
You want a pantry that looks curated and high-end without spending a fortune. These 24 small pantry ideas on a budget are exactly what you need—simple DIYs, thrift-friendly hacks, and easy styling tricks that make a tiny space feel organized, calm, and boutique. You’ll find projects that suit cottagecore, japandi, farmhouse, and boho looks, all using inexpensive supplies and basic tools.
I start most label work with my Cricut Explore cutting machine for crisp vinyl, but several projects only need a craft knife. Grab a budget hot glue gun as well—I link it throughout where a low-temp stick helps hold lighter materials without fuss. Each project includes a full materials list, exact quantities, drying times, and step-by-step instructions so you can finish quickly and confidently.
Scroll through 24 practical projects—from painted crates and pull-out shelf liners to magnetic spice jars and chic glass canister makeovers—each one designed for real small pantries on a budget. Pin the projects you love, and let’s turn that tight shelf into a tidy, high-end-looking pantry that feels expensive but cost a fraction of the price.
- Small Pantry Ideas on a Budget: Chalkboard Jar Labels
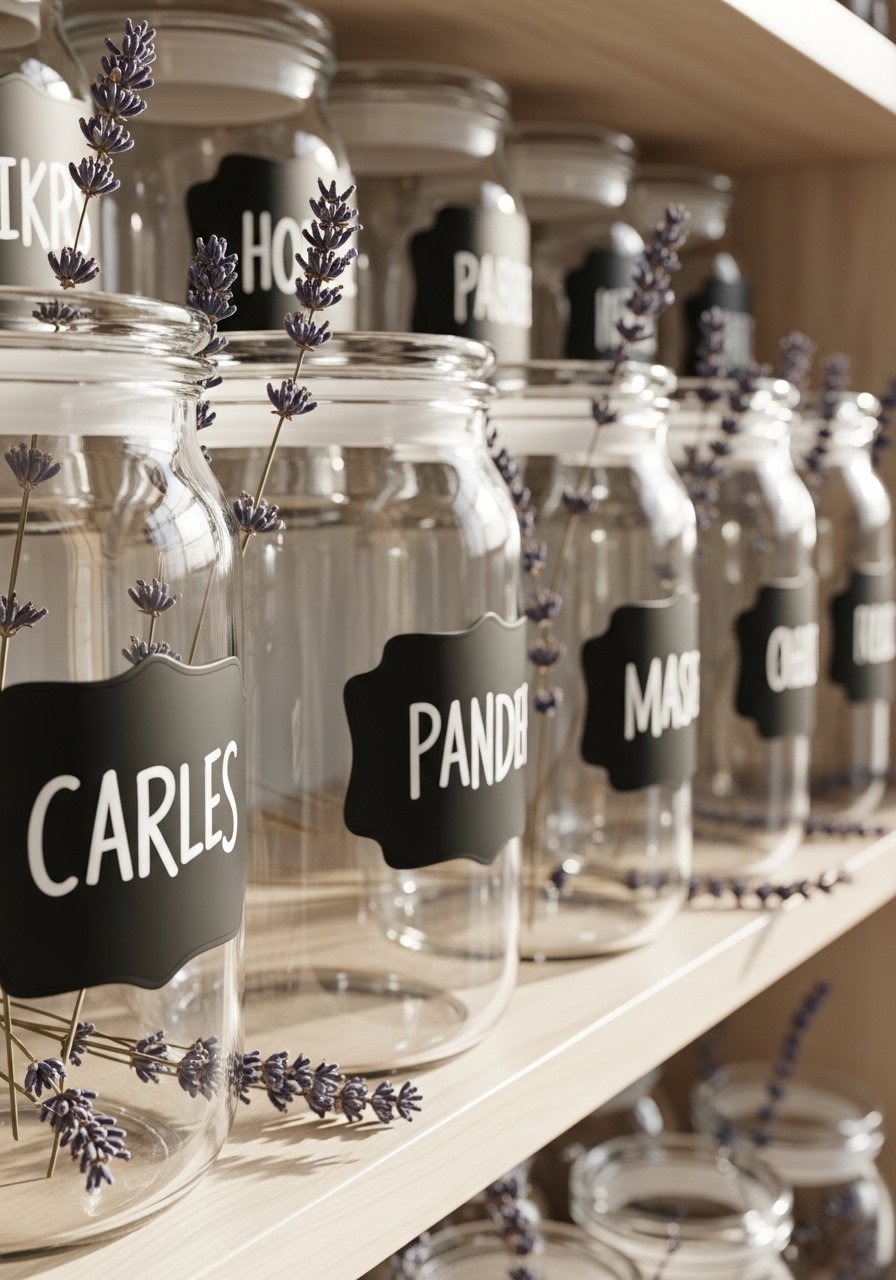
This classic look reads boutique without the price tag. Chalkboard-painted labels allow you to change contents easily and give jars a matte, tailored finish that feels curated. Beginners love this because it’s forgiving—sanding or repainting is quick. I use a small foam brush for smooth coats and my precision craft knife to trim stencil edges when needed.
Materials
- 6 clear glass jars (16–32 oz) with lids
- 1 4 oz bottle of chalkboard paint (matte)
- 1 foam brush, 1/2-inch
- 1 fine-grit sandpaper, 220
- 1 white chalk marker or chalk pencil
- 1 painter's tape, 1/2-inch
- Optional: small sanding block
Instructions
- Clean jars and lids with rubbing alcohol; let dry fully (10 minutes).
- Mask the area around the label shape with painter's tape to get straight edges.
- Apply first thin coat of chalkboard paint with the foam brush. Let dry 30 minutes.
- Sand lightly for smooth finish; wipe dust.
- Apply a second thin coat. Let cure 2 hours to touch, 24 hours for full adhesion.
- Remove tape carefully once paint is dry to the touch.
- Season the chalk paint by rubbing chalk sideways across the painted area, then wipe clean.
- Write labels with a chalk marker. Re-seal lids if needed.
How to Display or Gift It
- Line jars in a row on a shallow shelf and add a dried sprig tucked behind each lid for cottagecore charm.
- Wrap a set in kraft tissue and place in a small gift box for a hostess present.
- Store extra jars nested in a stackable craft organizer like a plastic bin set until ready to use.
- Small Pantry Ideas on a Budget: Printed Kraft Pantry Labels
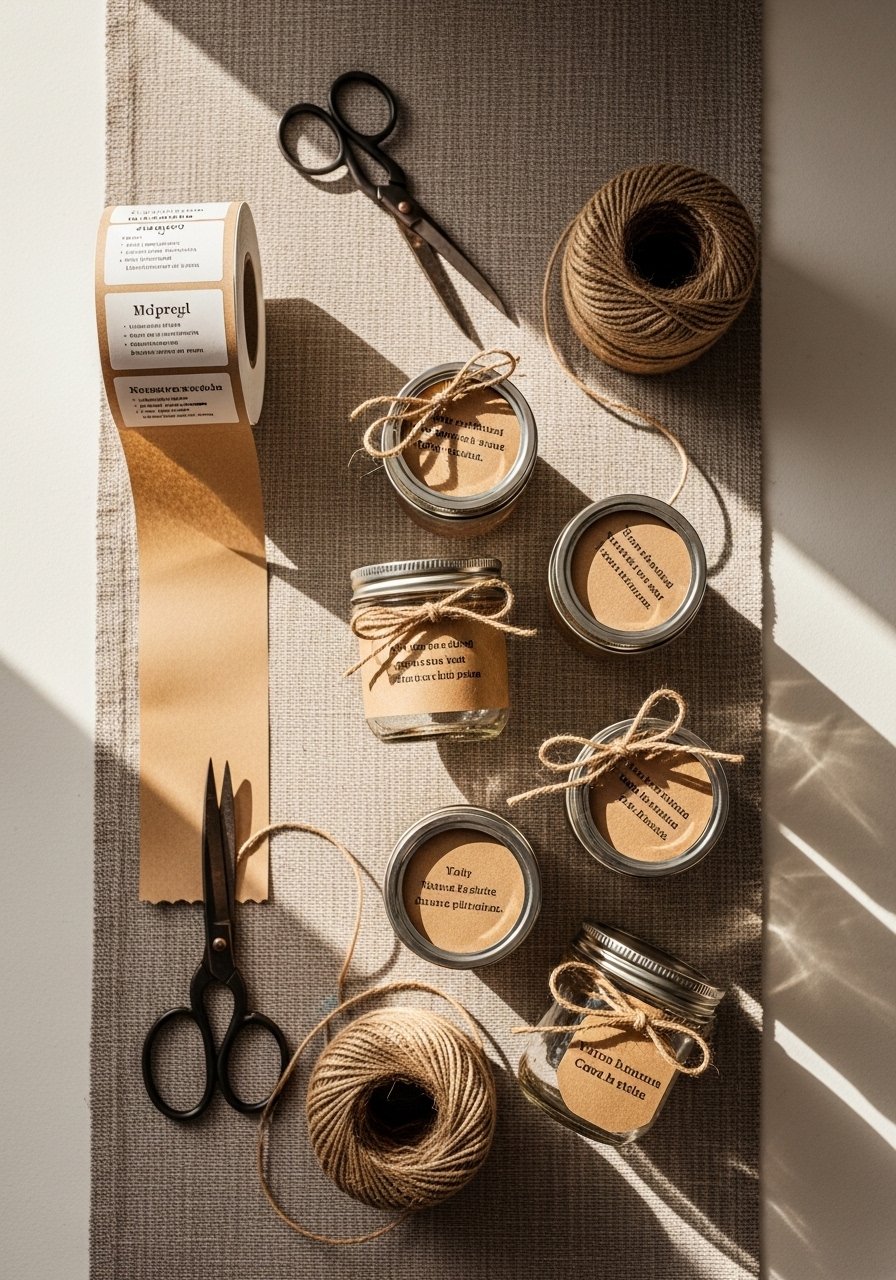
Paper labels are inexpensive and give a handmade vibe that reads high-end when printed consistently. Use your printer and a simple label template, or cut with a Fiskars paper trimmer for clean edges. This is quick to batch-make and very budget-friendly.
Materials
- 24 kraft label tags (2.5" x 1.5")
- 1 spool natural jute twine, 10 yards
- 1 hole punch (1/8 inch)
- 1 laser or inkjet printer
- 1 set black ink cartridge (if printing)
- Optional: clear matte spray sealer, 6 oz
Instructions
- Download or create a 2.5"x1.5" label template; fill with pantry item names.
- Print on kraft cardstock. Cut with paper trimmer for straight edges.
- Punch holes and thread twine; tie around jar necks.
- Optional: mist labels lightly with a clear matte spray from 8–10 inches away; let dry 15 minutes.
- Attach labels to jars and arrange on shelf.
How to Display or Gift It
- Group labeled jars by use: baking, snacks, grains. Use a shallow wooden crate as a display tray.
- For gifting, stack jars in a kraft box with shredded paper and tie with jute.
- Store extra tags in a small craft organizer drawer like this storage drawer set.
- Painted Crate Floating Shelf — small pantry ideas on a budget
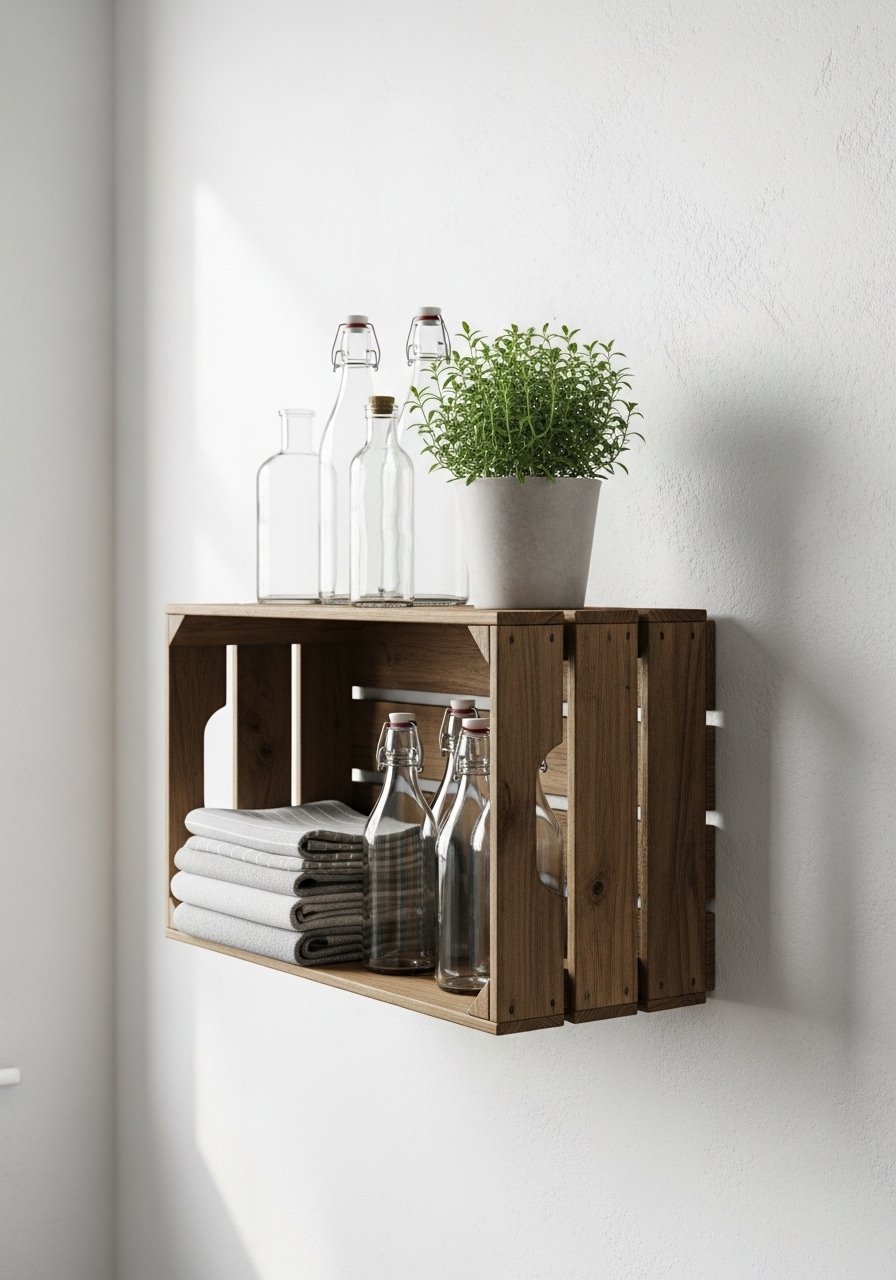
Recycled wooden crates make inexpensive floating shelves that look custom when painted and installed flush. Choose a muted tone (sage, warm gray) for a japandi or farmhouse look. Use a compact cordless drill to mount securely.
Materials
- 1 wooden crate, 12" x 8" x 6"
- 1 8 oz acrylic chalk-style paint (chosen color)
- 1 foam roller, 2-inch
- 4 1.5" wood screws and anchors (for drywall)
- 1 cordless drill with screwdriver bit
- 1 sandpaper, 120 grit
- 1 clear matte sealer, 4 oz
Instructions
- Sand crate lightly; wipe dust.
- Paint first thin coat with foam roller; dry 30 minutes.
- Apply second coat; dry 1 hour.
- Seal with one coat of clear matte sealer; dry 2 hours.
- Mark wall location. Use drill to install anchors and screws so crate sits flush.
- Slide crate over screws; level and tighten.
How to Display or Gift It
- Use two crates staggered vertically for an artful pantry nook.
- Add folded linens and a small wooden sign for a coordinated look.
- Store extra crates flat in a garage shelf or a stackable bin until ready.
- Budget Shelf Liner with Contact Paper
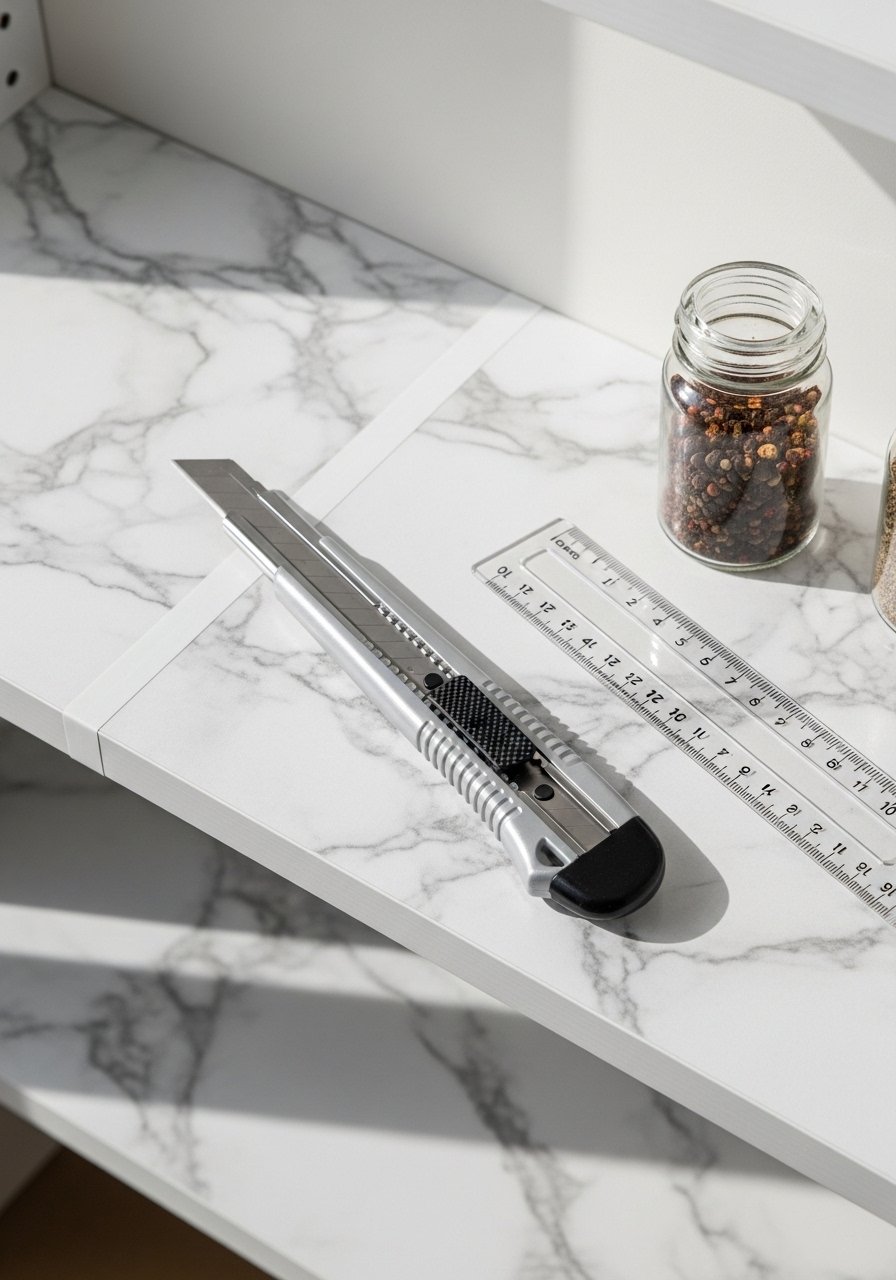
Marble or textured contact paper looks luxe instantly and costs a few dollars per roll. It’s a dream for renters who want a high-end surface without permanence. A self-healing mat and a straight-edge ruler make cutting precise.
Materials
- 1 roll contact paper, 18" x 6 ft (marble or wood pattern)
- 1 self-healing cutting mat, 12" x 18"
- 1 metal ruler, 18"
- 1 precision craft knife
- 1 cloth for smoothing air bubbles (microfiber)
- 1 measuring tape
Instructions
- Measure shelf length and depth; add +1/4" per edge for tuck.
- Cut contact paper on self-healing mat with ruler and craft knife.
- Peel backing partially; align edge and press down.
- Smooth across with microfiber cloth to remove bubbles.
- Trim excess with craft knife; tuck edges under shelf lip.
How to Display or Gift It
- Use contact-papered shelves in a monochrome pantry for a luxe look.
- For gifting, line a small pantry crate with coordinating contact paper.
- Store leftover rolls upright in a craft organizer tube.
- Tension Rod Snack Bag Clips
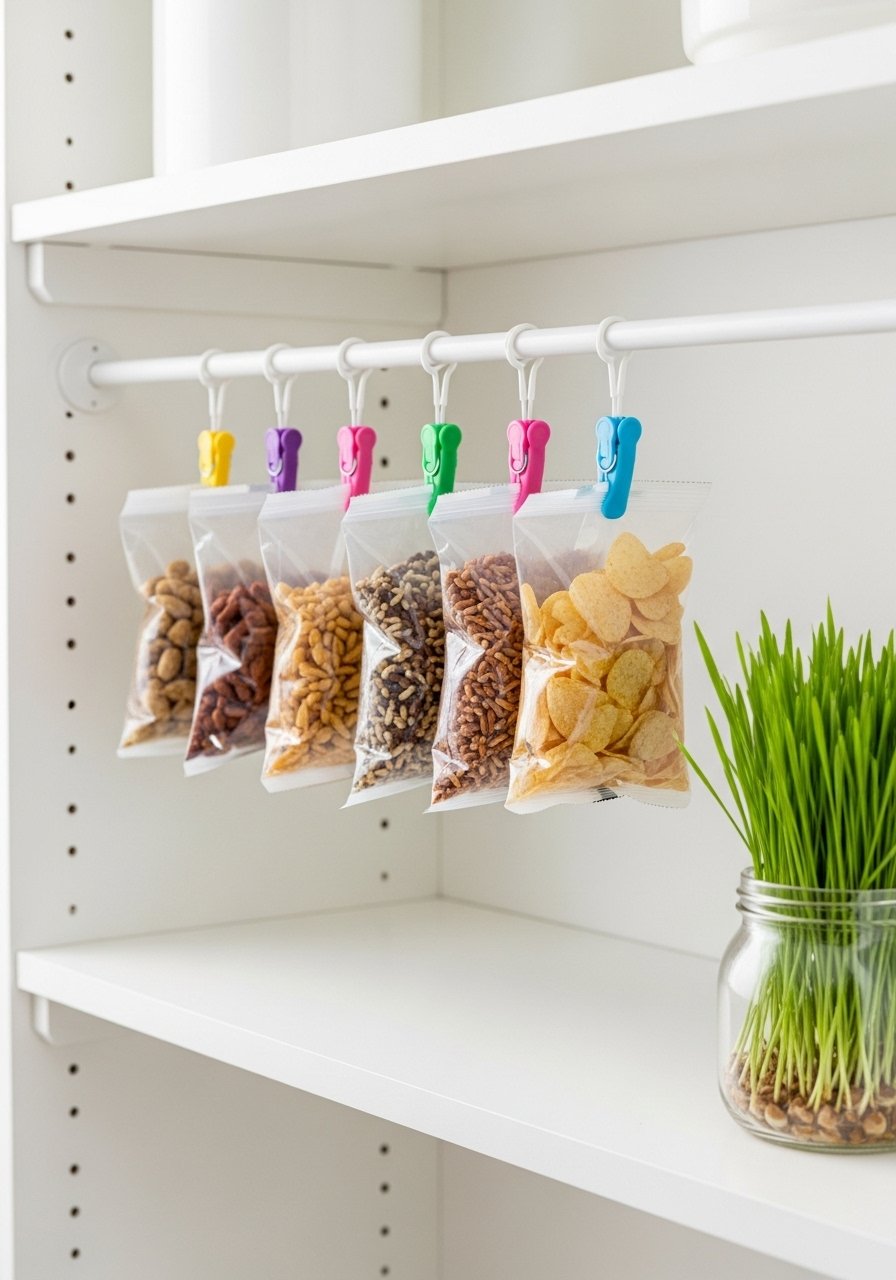
Tiny tension rods are cheap and make an instant space-saving rail for chip bags, spice pouches, or plastic wrap. Clip with budget metal clips for a tidy, boutique look.
Materials
- 1 tension rod, 12–24" adjustable
- 12 small metal chip clips
- 1 small step ladder (if needed for install)
- 1 measuring tape
- 1 microfiber cloth for cleaning shelf edge
Instructions
- Wipe shelf side walls where rod will rest.
- Measure inside width and choose rod length -1/8" for snug fit.
- Twist rod to extend and fit between sides.
- Clip snack bags and hang from rod. Space clips evenly.
How to Display or Gift It
- Use natural wood clips for a boho feel.
- Place beneath a shelf to create a “hanging pantry.”
- For gifting, include a small pack of clips and a tension rod in a kitchen gadget box.
- DIY Tiered Can Risers
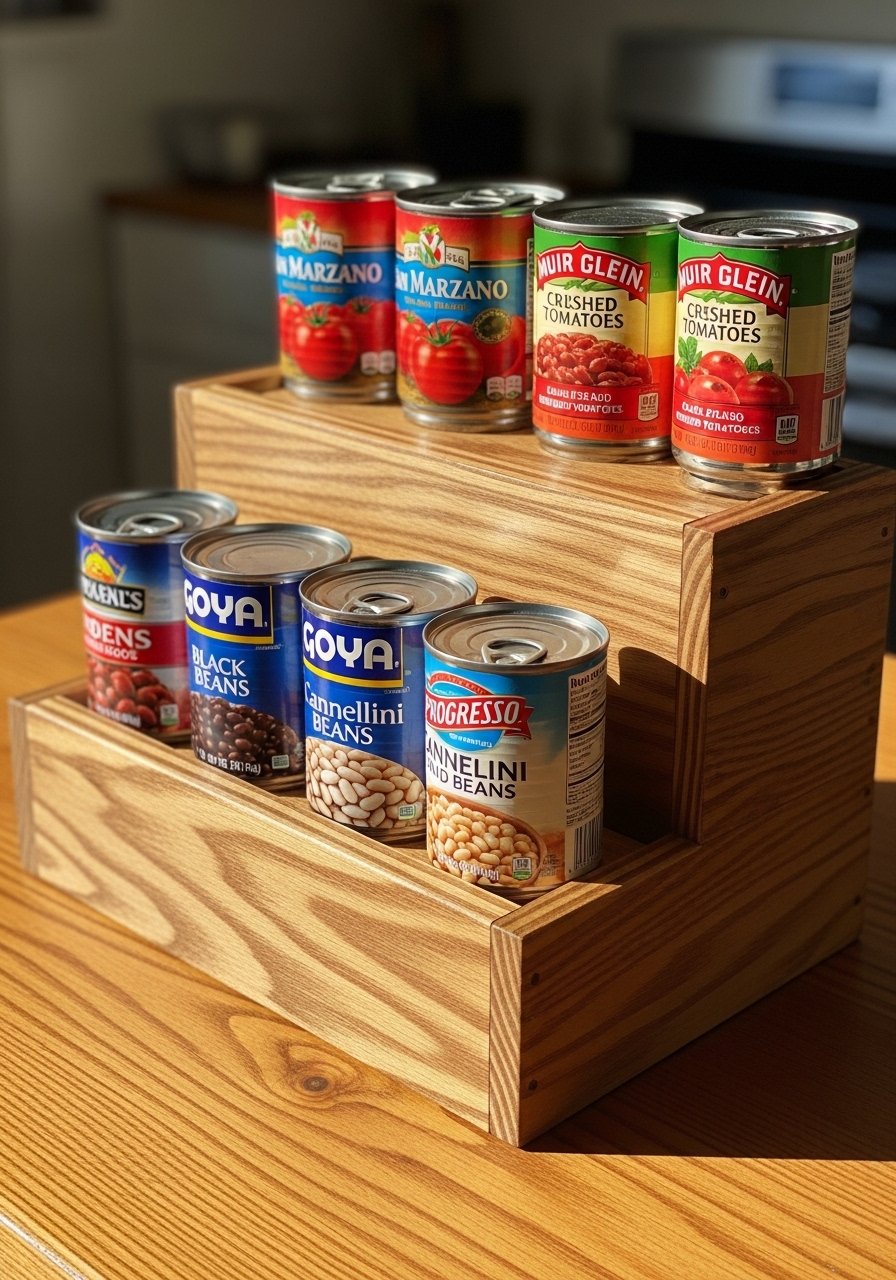
Tiered risers let smaller items sit in front so labels show, making shelves look organized. Build risers from inexpensive plywood or repurpose a picture frame backer.
Materials
- 1 12" x 6" plywood sheet, 1/4"
- 2 small wooden blocks, 12" x 2" x 1"
- 1 wood glue, 4 oz
- 1 sandpaper, 120 grit
- 1 wood stain or paint, 4 oz
- 1 small paintbrush or foam brush
- 1 clamp (optional)
Instructions
- Cut plywood into a 12"x6" top and 12"x2" riser front (or use pre-cut).
- Sand edges smooth.
- Stain or paint; let dry 1 hour per coat. Two coats recommended.
- Glue the front block to the underside to create the riser. Clamp 30 minutes.
- Let glue cure 2 hours before use.
How to Display or Gift It
- Make a set of three risers for long pantry shelves.
- Use in a gift basket filled with specialty canned goods.
- Store nested in the pantry when not in use.
- Magnetic Spice Jars on a Cheap Sheet Metal Strip
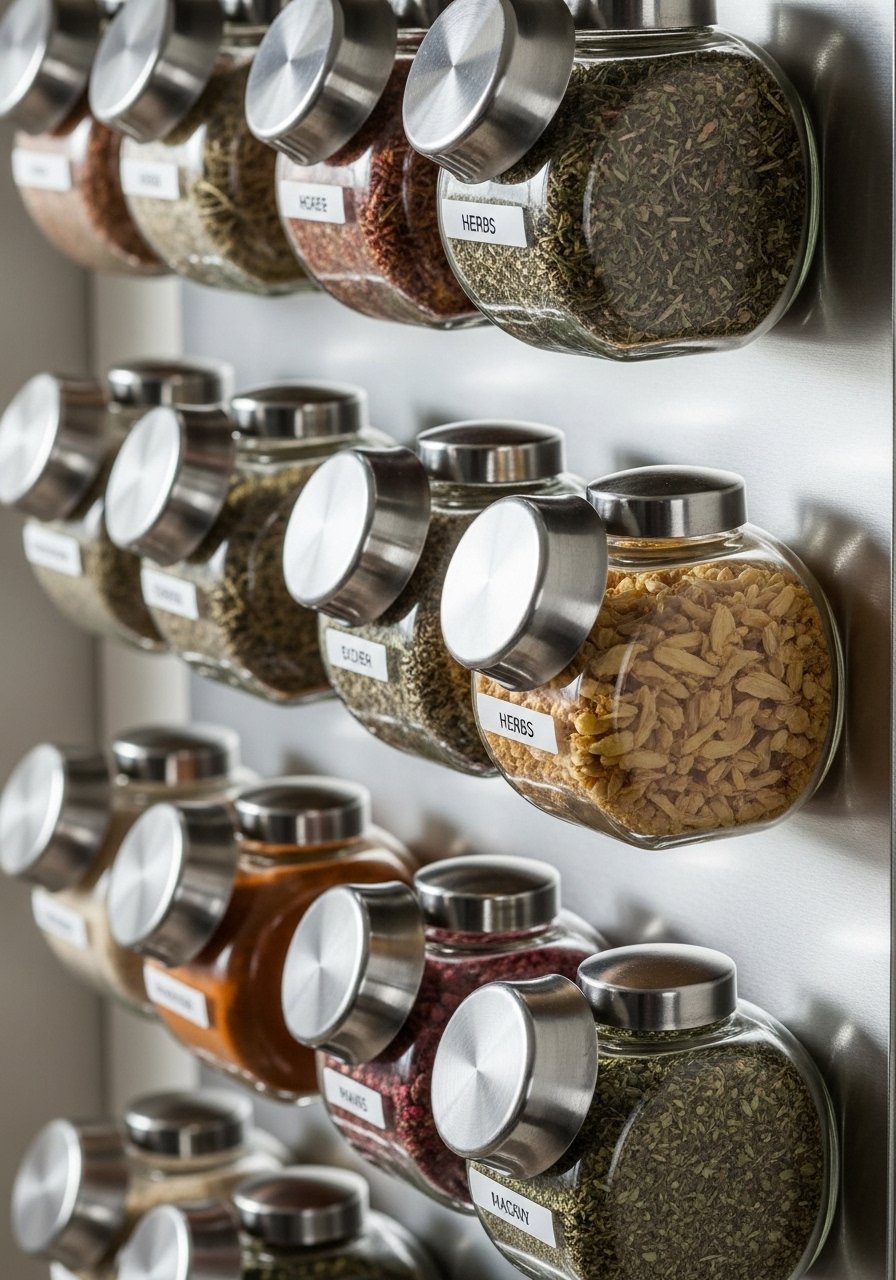
Magnetic jars free up shelf space and look clean. Use a thin sheet metal strip mounted to the wall—an inexpensive and modern solution. A roll of magnetic spice labels looks professional.
Materials
- 12 2 oz round glass spice jars with metal lids
- 1 12" sheet metal strip (lightweight)
- 4 small screws & anchors
- 1 adhesive vinyl label sheet, printable
- 1 drill
- 1 pencil
- 1 small level
Instructions
- Fill jars with spices; close lids.
- Mark sheet metal strip placement on wall; level.
- Drill pilot holes and fix strip with screws and anchors.
- Attach jars magnetically; arrange in name order.
- Print and stick labels on lids for easy reading.
How to Display or Gift It
- Use in a vertical column to save horizontal shelf space.
- Gift as a starter spice set packed in kraft paper with twine.
- Keep spare jars in a small storage drawer.
- Pegboard Pantry Wall
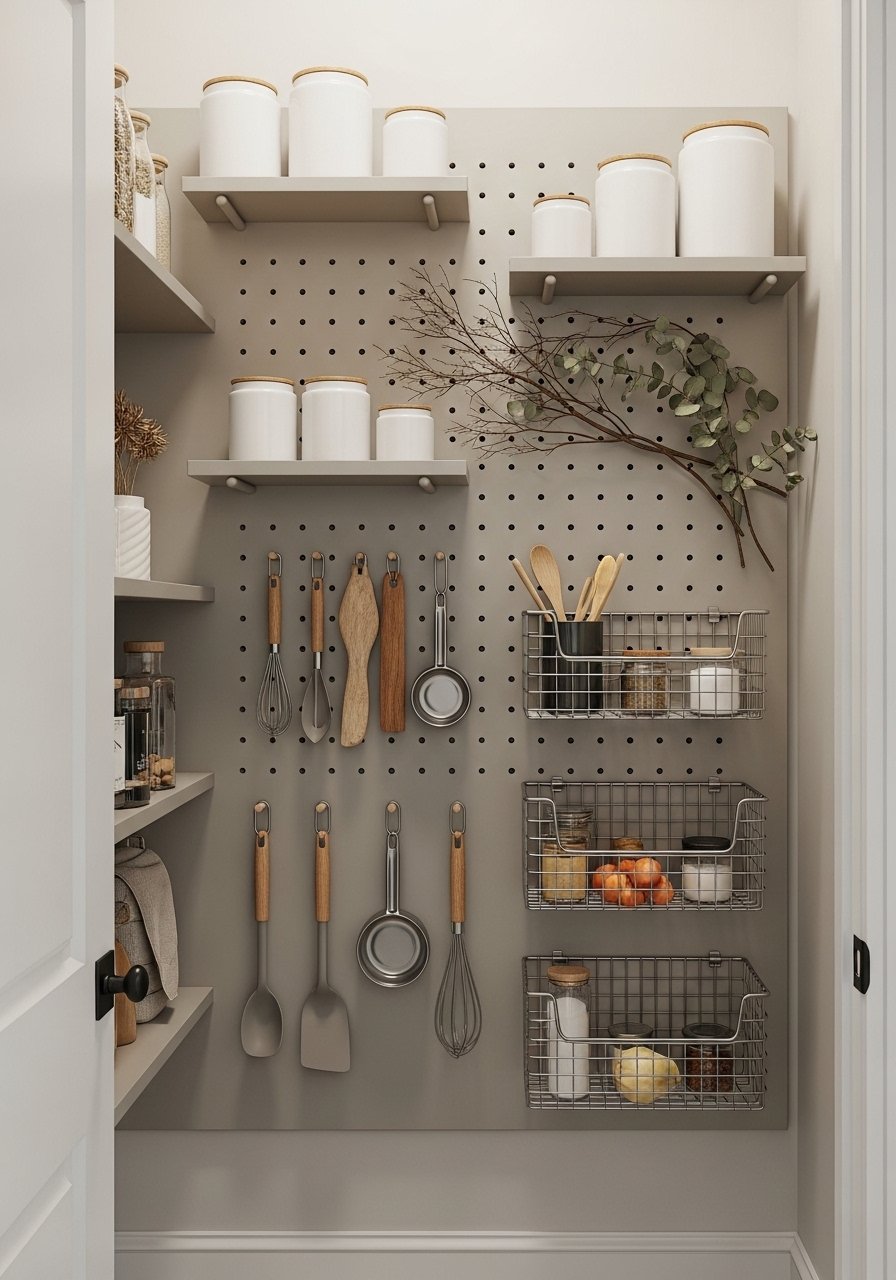
Pegboard turns any wall into flexible storage and looks custom if painted. It’s great for small pantry ideas on a budget because it’s inexpensive and modular. Use a small paint roller for a smooth finish.
Materials
- 1 pegboard panel, 24" x 16"
- 4 pegboard hooks and accessories set
- 1 8 oz latex paint (matching pantry color)
- 1 foam roller, 4-inch
- 4 screws and wall anchors
- 1 drill and screwdriver bit
Instructions
- Paint pegboard with two thin coats; dry 1 hour between coats.
- Mark wall studs or use anchors for secure install.
- Mount pegboard flush using screws and anchors.
- Arrange hooks, baskets, and shelves on board.
- Adjust layout as items change.
How to Display or Gift It
- Style with wooden utensils and a hanging herb pot for a japandi look.
- Give as a pantry starter kit with pegboard hooks and a small set of baskets.
- Store extra hooks in a labeled jar for easy swaps.
- DIY Pantry Door Shelves (Over-the-Door Slim Shelves)
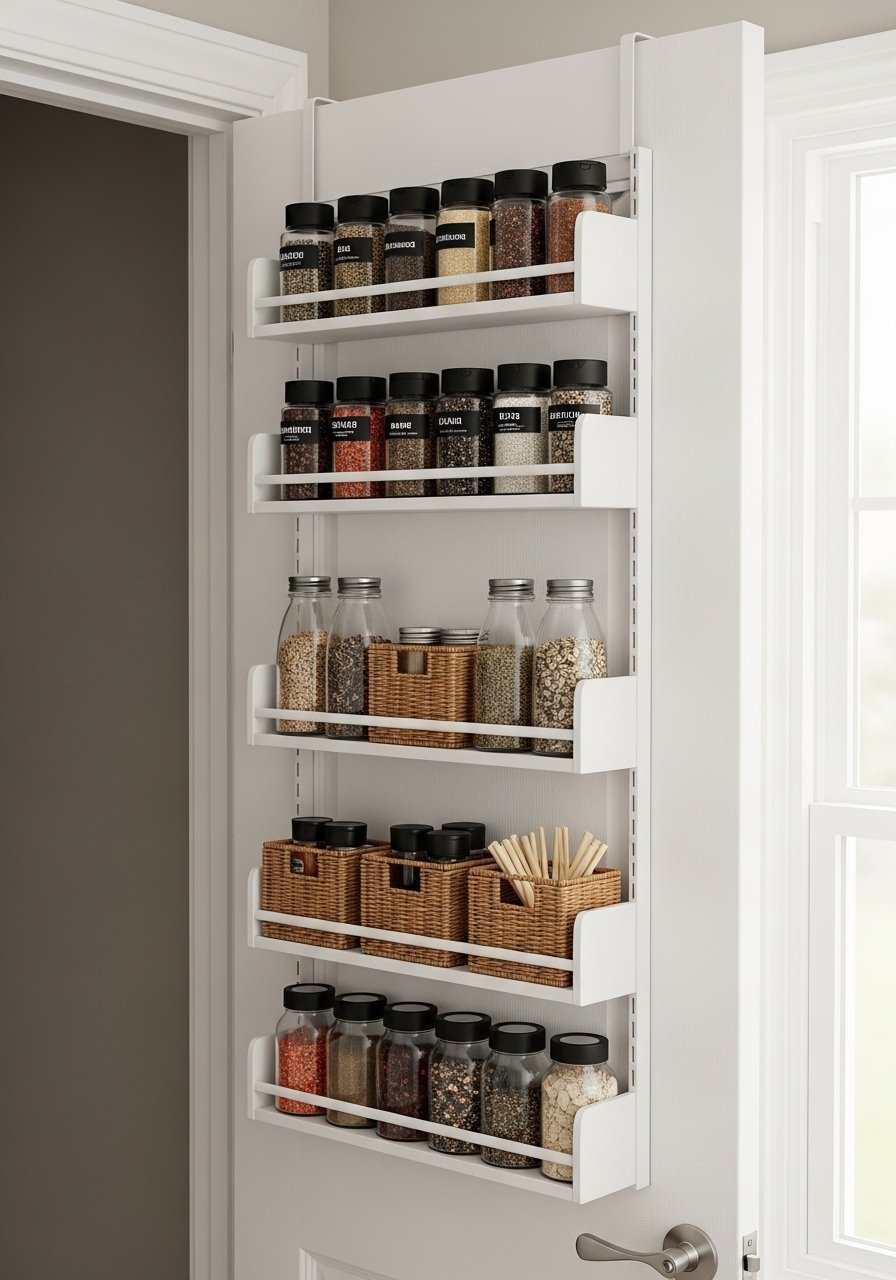
Convert the pantry door into storage with slim over-the-door shelves—cheap to buy and quick to hang. They instantly expand storage and keep frequently used items at arm’s reach.
Materials
- 1 over-the-door organizer with 3 shelves (11" wide)
- 6 small baskets to fit shelves
- 1 adhesive felt pads pack (to protect door)
- 1 measuring tape
Instructions
- Measure door thickness and organizer fit.
- Hang organizer over door top. Add felt pads to prevent marks.
- Place baskets on shelves and fill with dry goods.
- Check door swing for clearance.
How to Display or Gift It
- Use labeled baskets for tea, single-serve snacks, and wraps.
- Wrap a new organizer as a moving-in gift for friends.
- Store extra baskets flat until needed.
- Hanging Wire Baskets from Undershelf
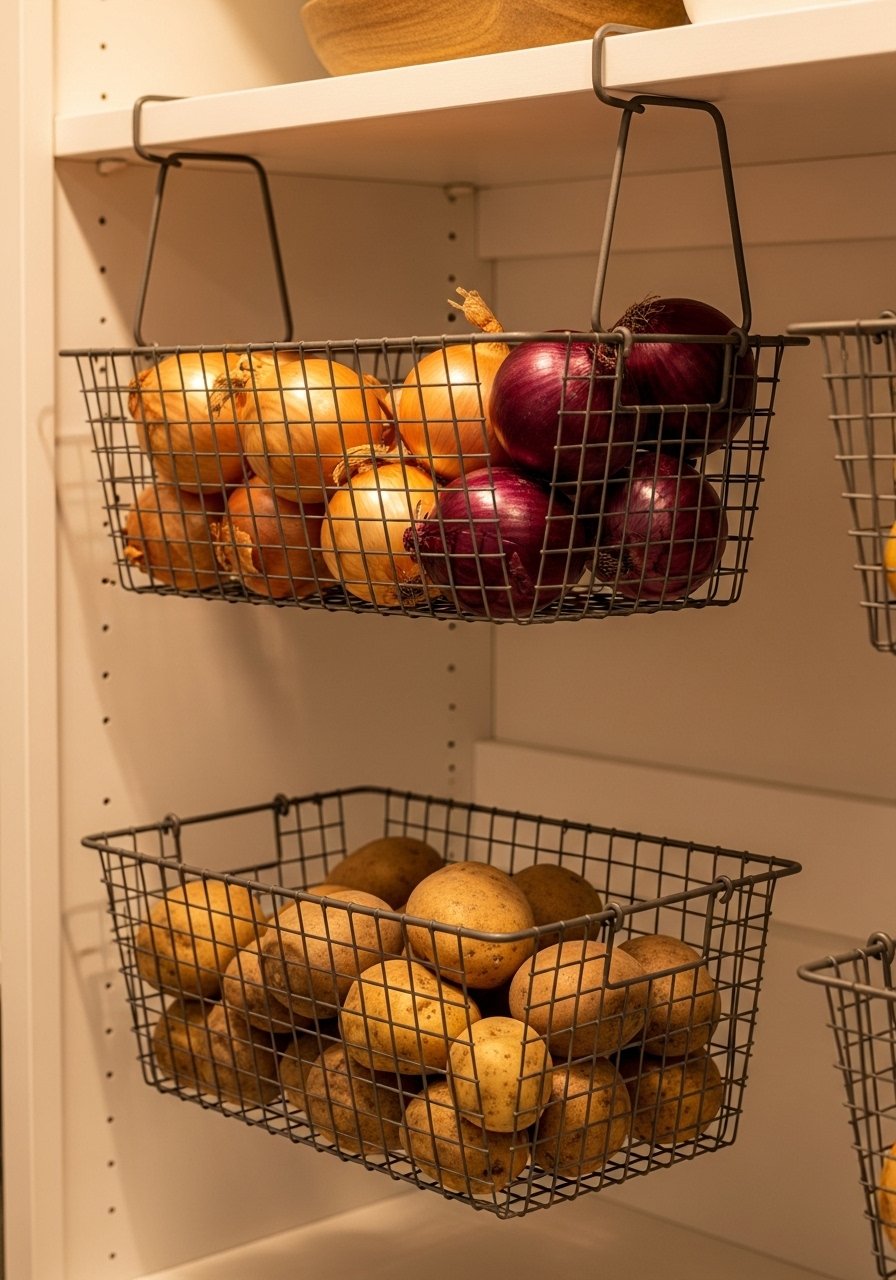
Under-shelf baskets add quick, hidden storage for produce or bulky items. They’re cheap, slide in and out, and look tidy when paired with woven liners.
Materials
- 2 under-shelf wire baskets (11" x 8")
- 2 woven liners, 12" x 10"
- 1 microfiber cloth
- 1 measuring tape
Instructions
- Clean underside of shelf with microfiber cloth.
- Slide baskets into place until they hook securely.
- Place liners inside baskets for a softer look.
- Fill with onions, potatoes, or snack packs.
How to Display or Gift It
- Use matching liners for a cohesive look across baskets.
- Combine with a crate on the floor for a storage vignette.
- Gift liners and baskets together in a housewarming bundle.
- Thrifted Rolling Cart Makeover
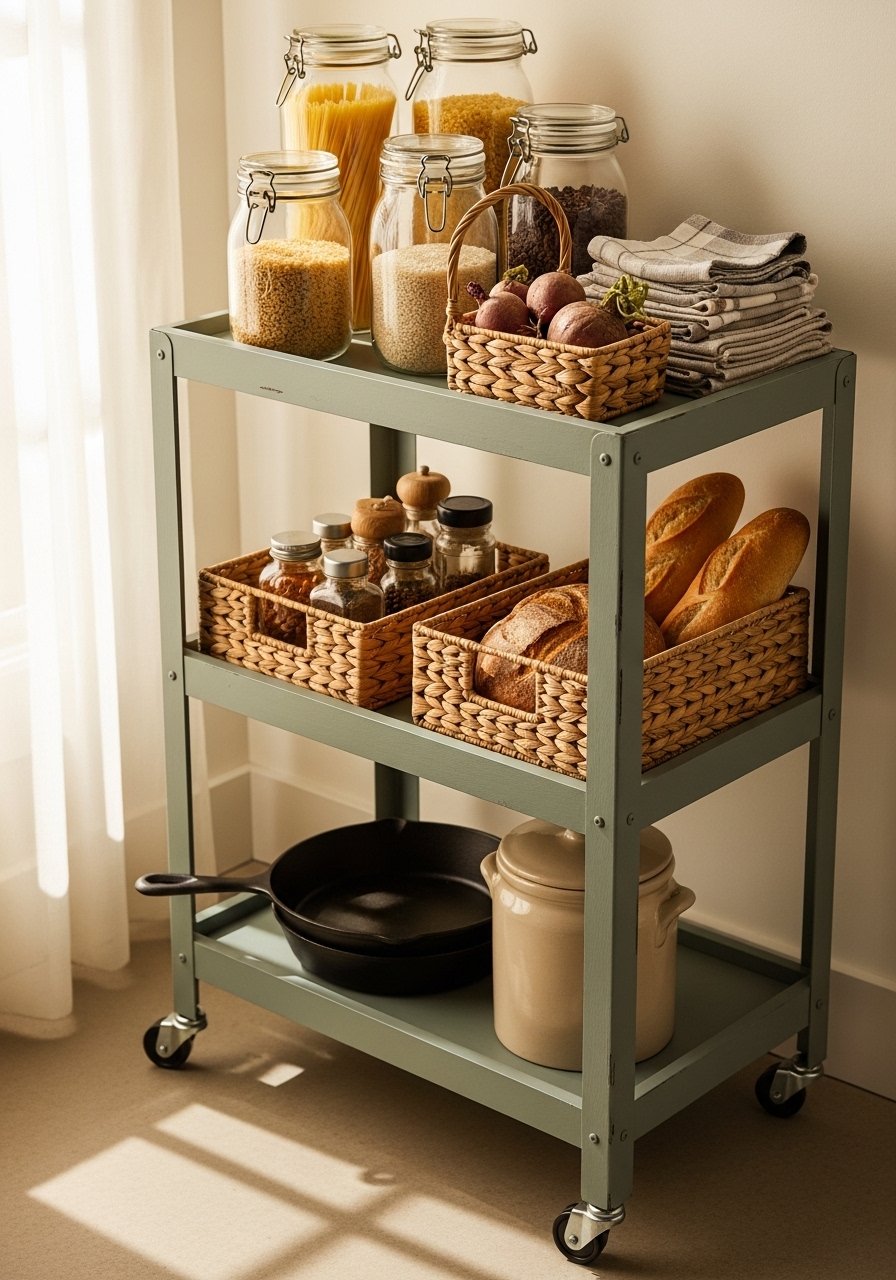
A thrift-store rolling cart can be painted and styled to match your pantry. Wheels make it easy to pull out for restocking. A can of spray paint and new liners make a big visual change for little cost.
Materials
- 1 second-hand 3-tier rolling cart
- 1 spray paint, metal primer included
- 1 roll patterned contact paper for liners
- 3 foam brushes
- 1 sandpaper, 120 grit
- 1 drop cloth
Instructions
- Clean and sand cart lightly.
- Apply primer coat if bare metal; let dry 1 hour.
- Spray paint in thin, even coats; let dry 30 minutes between coats.
- Line shelves with cut contact paper.
- Arrange pantry items and roll in place.
How to Display or Gift It
- Use cart for breakfast station with tea, coffee, and mugs.
- Gift a painted cart with curated pantry essentials.
- Store spare paint and liners in a small organizer.
- Wicker Basket Pull-Outs with DIY Labels
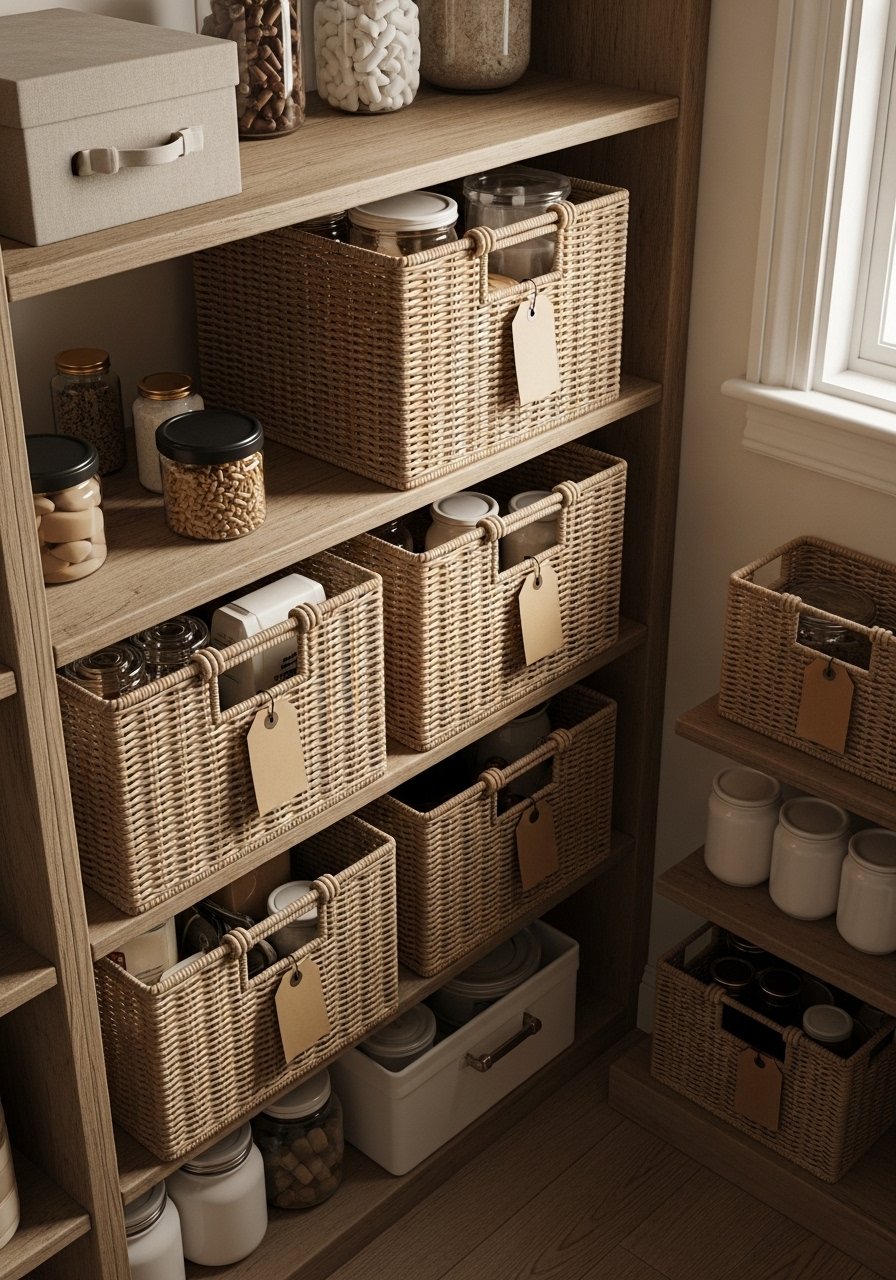
Wicker baskets hide clutter and look expensive when labeled uniformly. Add loop handles and simple printed tags for a boutique feel.
Materials
- 3 wicker baskets, 12" x 8" x 6"
- 3 leather loop handles or rope handles
- 1 pack kraft tags, 50 ct
- 1 hot glue gun with low-temp glue sticks
- 1 scissors
Instructions
- Glue handles to basket fronts; let set 10 minutes.
- Attach kraft tags with jute and label.
- Line baskets with thin cotton liners if desired.
- Pull out as needed to access contents.
How to Display or Gift It
- Use matching baskets across all shelves for continuity.
- Gifts: basket filled with baking supplies tied with twine.
- Store spare tags and glue sticks in a small craft box.
- DIY Pull-Out Shelf Sliders (Budget)
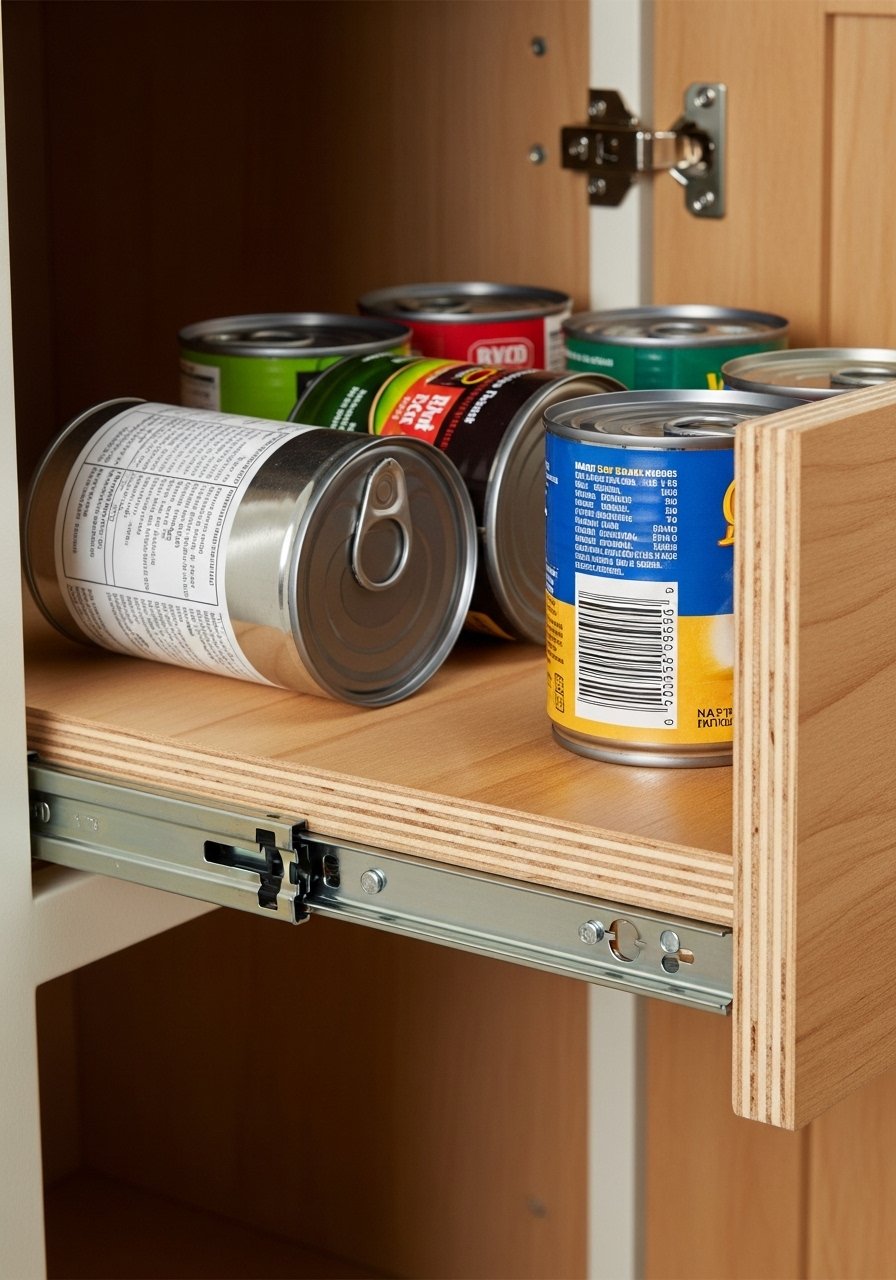
Pull-out shelves make deep pantry shelves usable. Full-extension slides are pricier, but basic 14" drawer slides do the job on a budget.
Materials
- 1 plywood shelf, cut to shelf depth (3/4" thick)
- 2 14" side-mount drawer slides
- 1 screws for slides (pack)
- 1 cordless drill and screwdriver bit
- 1 measuring tape
- 1 pencil
Instructions
- Cut plywood to fit inside pantry with +1/8" clearance each side.
- Attach drawer slides to plywood per manufacturer.
- Mount mating parts to pantry interior.
- Slide shelf in and test movement; adjust screws as needed.
- Load shelf and enjoy easy access.
How to Display or Gift It
- Use for heavy items like flour bags and sugar.
- Pack as a practical gift for friends renovating a pantry.
- Keep spare slides in a labeled hardware box.
- Vertical Utensil Rail (Dowels and Hooks)
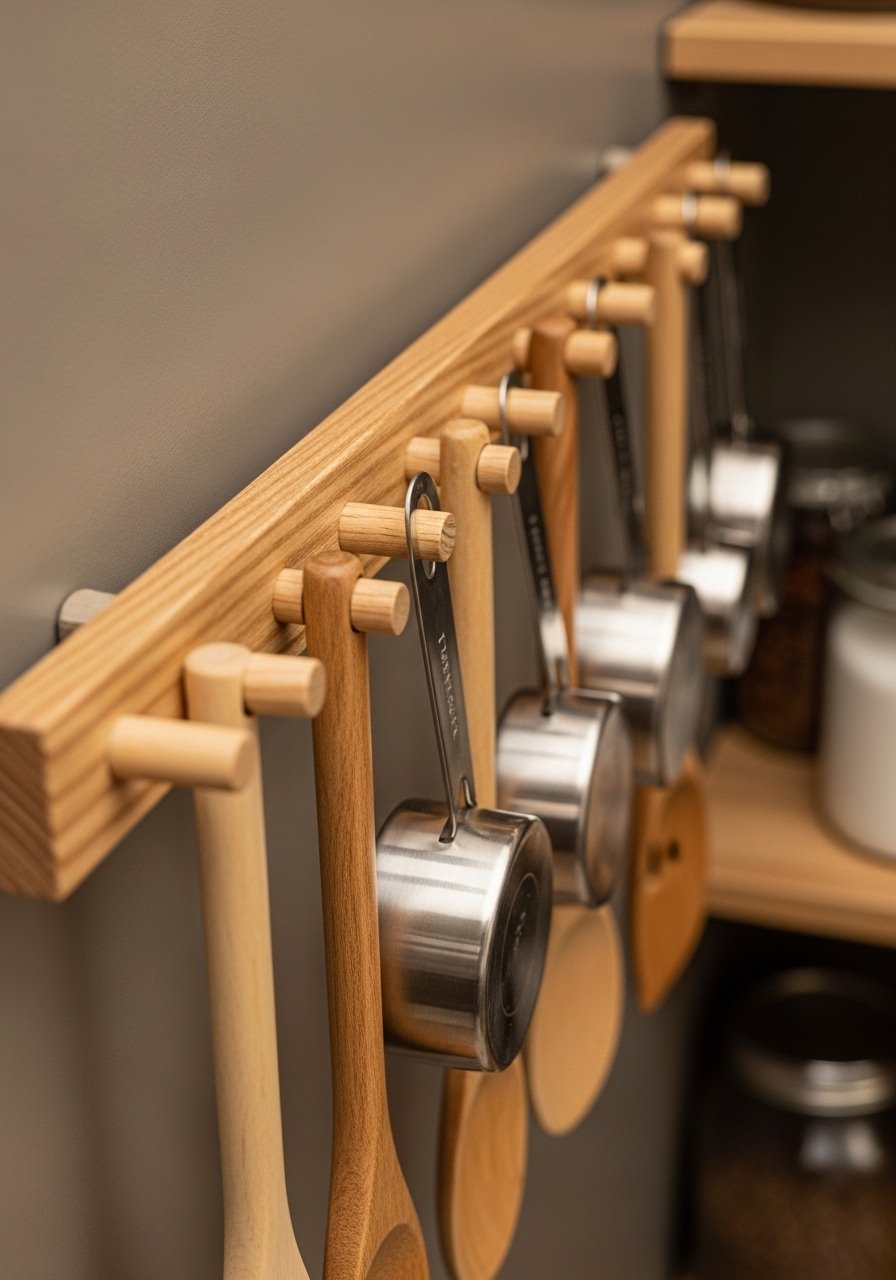
A simple dowel rail keeps utensils visible and accessible. It’s inexpensive and fits narrow gaps or the inside of the pantry door.
Materials
- 1 wooden rail, 18" x 2" x 3/4"
- 6 wooden dowels, 1/2" diameter, cut to 2"
- 1 wood glue, 4 oz
- 4 screws and anchors
- 1 small drill bit sized for dowels
- 1 sandpaper, 120 grit
Instructions
- Mark dowel placement evenly across rail.
- Drill holes slightly deeper than dowel length.
- Insert dowels with wood glue; wipe excess.
- Mount rail to pantry wall with screws and anchors.
How to Display or Gift It
- Hang measuring spoons, small whisks, and tea towels.
- Gift a utensil rail with a set of wooden spoons.
- Store extra dowels in a small hardware tub.
- Mini Display Shelf with Wooden Easel

A mini display shelf with a little wooden easel makes pantry vignettes feel like a boutique. Use for seasonal displays or to hold recipe cards.
Materials
- 1 small wooden shelf, 8" x 4"
- 1 small wooden easel, 4"
- 1 sandpaper, 120 grit
- 1 wood stain or paint, 2 oz
- 1 foam brush
Instructions
- Sand and finish shelf and easel.
- Mount shelf or place on counter.
- Prop easel with a card or small framed label.
How to Display or Gift It
- Rotate a recipe or menu card seasonally.
- Gift as a small pantry styling set with an easel and card.
- Store extra easels flat in a kitchen drawer.
- Jar-Lid Magnetic Spice Labels
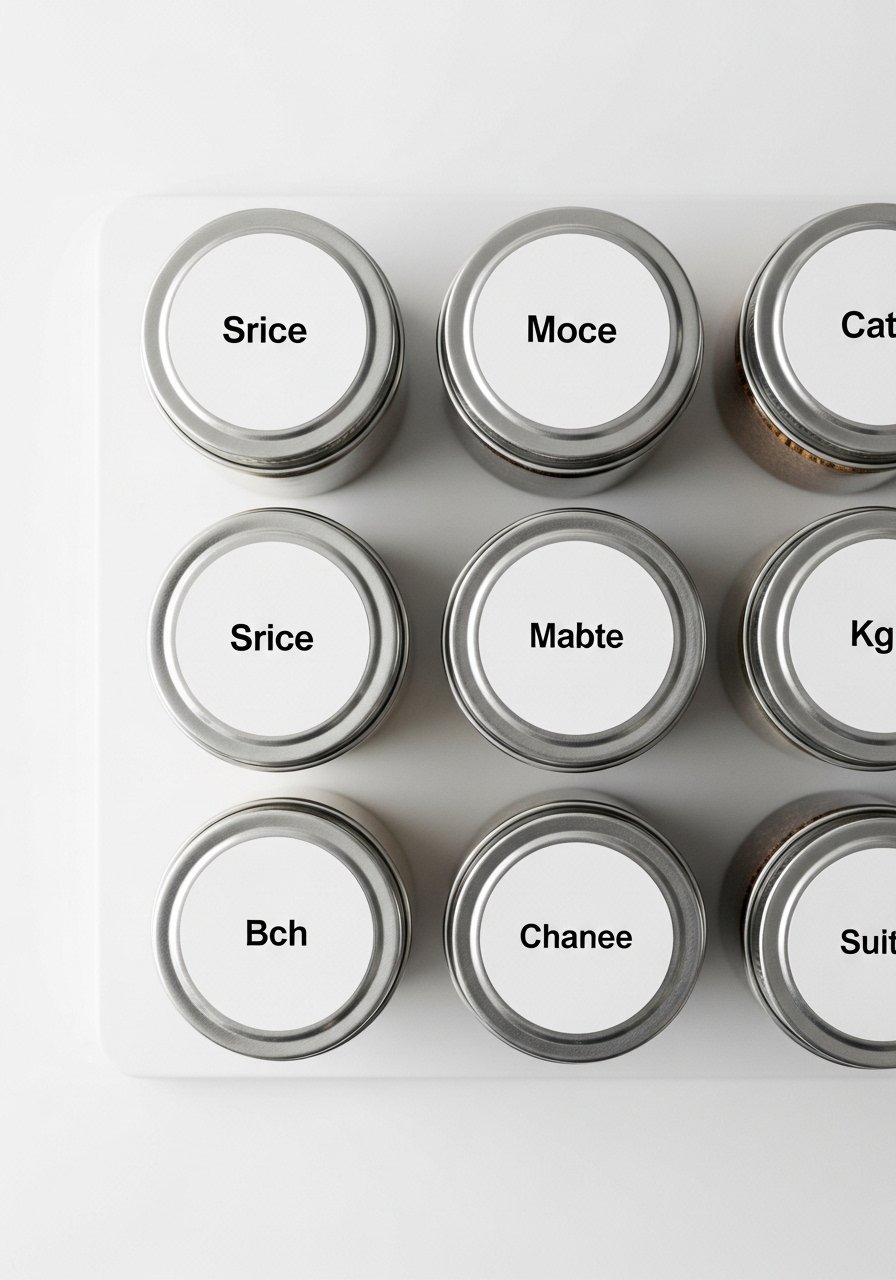
Use printable magnetic sheets to label jar lids and stick them to a metal board or tray. It looks polished and keeps spices visible.
Materials
- 1 printable magnetic sheet pack (8.5" x 11")
- 12 matching spice jar lids (metal)
- 1 laser printer or inkjet compatible
- 1 scissors or paper trimmer
Instructions
- Design circular labels sized to jar lids.
- Print on magnetic sheets and cut.
- Stick to lids and place on metal tray or board.
How to Display or Gift It
- Mount a small magnetic sheet inside pantry for rotating spices.
- Package a set of labeled lids as a kitchen gift.
- Store spare sheets flat.
- Fabric Shelf Bins (Boho Chic)
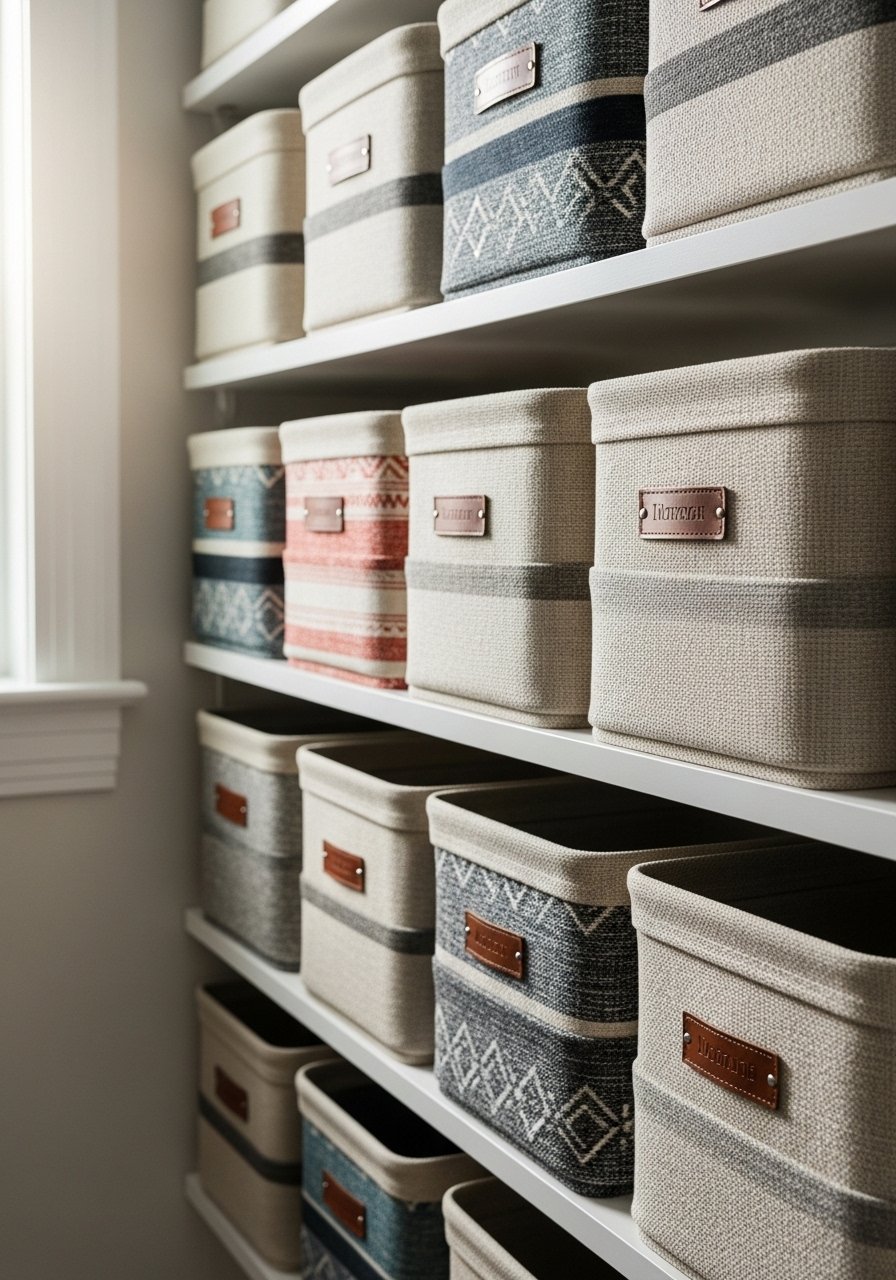
Soft fabric bins give shelves a softer, high-end look and hide mess. Make them from canvas or buy affordable collapsible bins and add leather labels for polish.
Materials
- 3 canvas collapsible bins, 12" x 8" x 6"
- 3 leather label tags
- 1 hot glue gun and low-temp glue sticks
- 1 fabric marker for labeling
Instructions
- Attach leather labels with hot glue; let cool 5 minutes.
- Fill bins by category: snacks, baking, kid-friendly.
- Label with fabric marker if desired.
How to Display or Gift It
- Use matching bins across shelves for cohesion.
- Gift as a pantry starter set with a few bins and labels.
- Store folded bins flat when not used.
- Command Hook Rope Rail for Lightweight Items
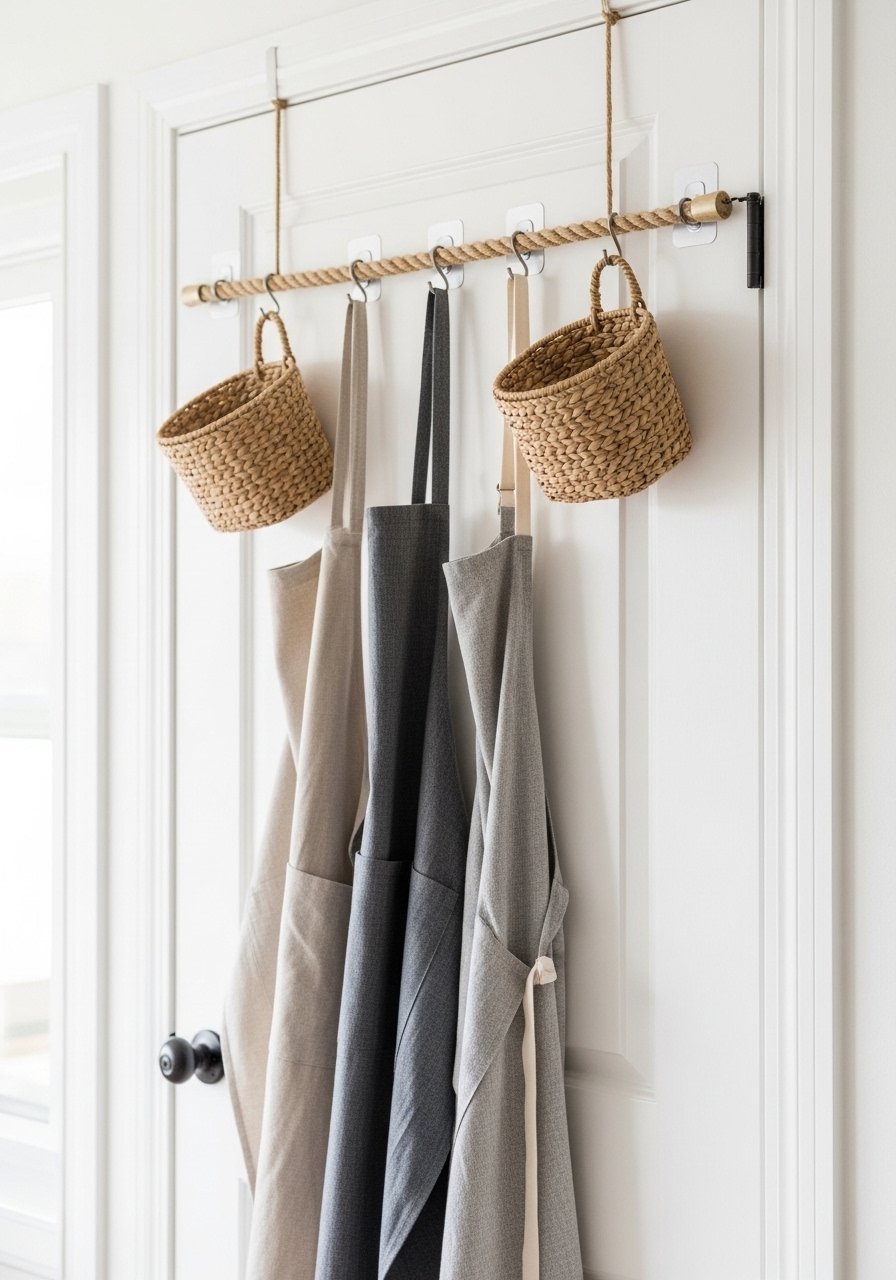
Adhesive command hooks create a removable rope rail that holds lightweight baskets, aprons, or oven mitts—great for renters. Use thick cotton rope for a clean look.
Materials
- 4 large adhesive command hooks
- 1 cotton rope, 4 ft
- 2 small hanging baskets
- 1 scissors
Instructions
- Clean door surface and attach command hooks per package instructions.
- Tie rope ends to hooks and loop to desired tension.
- Hang baskets and items.
How to Display or Gift It
- Use to store reusable bags or grocery lists.
- Gift with a set of command hooks and a rope.
- Remove hooks cleanly when moving.
- Upcycled Wine Rack for Wraps & Foils
Rotate an inexpensive wine rack to store paper towel rolls and wrap boxes upright. It keeps rolls contained and looks chic when painted.
Materials
- 1 small wooden wine rack (holds 3 bottles)
- 1 paint or stain, 4 oz
- 1 foam brush
- 1 sandpaper, 120 grit
Instructions
- Sand and paint or stain wine rack; dry 1 hour.
- Place rotated on shelf and insert rolls vertically.
- Use a small clip to secure loose ends of wrap.
How to Display or Gift It
- Use in a kitchen supply shelf with labeled baskets.
- Gift as an organization hack with a fresh paint finish.
- Store extra racks flat.
- Woven Placemat Shelf Liners (Budget Chic)
Cut inexpensive woven placemats to fit shelves for texture and a luxury feel. They’re washable, durable, and inexpensive.
Materials
- 2 woven placemats, 18" x 12"
- 1 sharp scissors or rotary cutter
- 1 measuring tape
Instructions
- Measure shelf depth and mark placemat to size.
- Cut with sharp scissors or rotary cutter.
- Place on shelf and arrange jars.
How to Display or Gift It
- Pair with wooden crates or baskets for layered texture.
- Gift a set of placemats bundled with a ribbon.
- Store extra placemats flat to avoid creasing.
- Vinyl Shelf Labels with Cricut — small pantry ideas on a budget
Custom vinyl labels made with a Cricut Explore cutting machine look professional and last longer than paper. Vinyl gives a sleek, high-end feel without splurging on printed labels.
Materials
- 1 roll matte permanent vinyl, 4" x 12 ft
- 1 transfer tape roll, 12" wide
- 1 weeding tool set
- 1 scissors
- 1 clean cloth for surfaces
Instructions
- Design labels in Cricut Design Space; size to container.
- Cut vinyl and weed excess using weeding tool.
- Apply transfer tape and affix label to container.
- Press firmly with a scraper; remove tape slowly.
How to Display or Gift It
- Use consistent font and label placement for a boutique look.
- Give a labeled set of pantry jars as a housewarming gift.
- Store spare vinyl rolls in a craft storage box.
- Rope-Wrapped Shelf Edge Trim
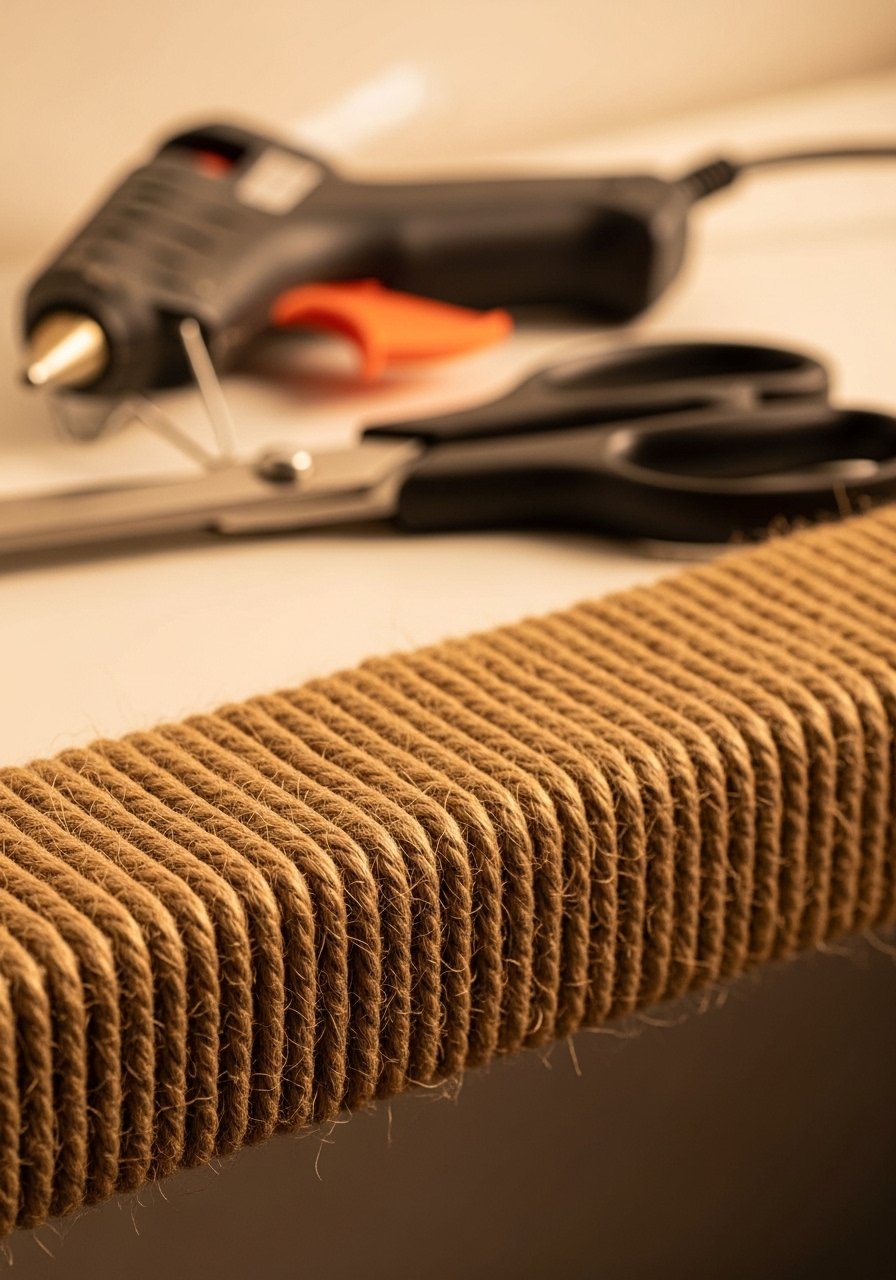
Wrap shelf edges with jute rope to add a tactile trim and hide rough particleboard edges. It’s inexpensive and adds a handmade finish that feels designer.
Materials
- 1 spool jute rope, 50 ft
- 1 hot glue gun and glue sticks
- 1 scissors
- 1 ruler
Instructions
- Clean shelf edge.
- Start at one end and glue rope along the edge, pressing tightly.
- Continue wrapping with minimal gaps; cut when finished and glue down the end.
- Let glue fully cool 10 minutes before use.
How to Display or Gift It
- Pair with woven placemat liners for texture contrast.
- Gift as a DIY kit with rope and glue gun.
- Keep extra rope neatly coiled in a storage bin.
- Paint-Dipped Canisters
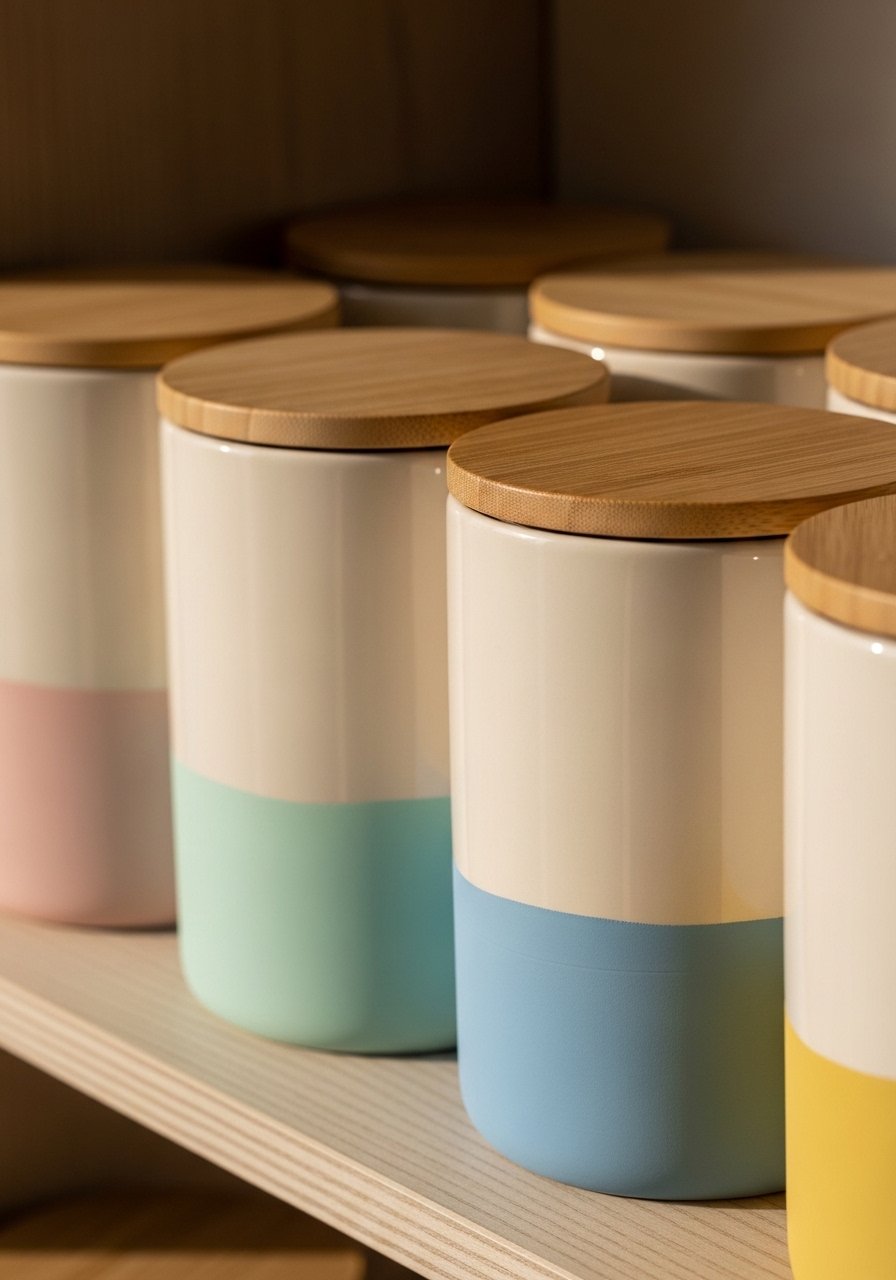
Paint-dipping canisters creates a clean, modern look with a backsplash of color. Choose a soft palette for a boutique feel.
Materials
- 3 plain ceramic canisters with lids
- 1 4 oz acrylic craft paint per color
- 1 foam brush
- 1 painter's tape
- 1 drop cloth
Instructions
- Tape off the dip line on each canister.
- Stir paint and apply two thin coats to the base; 30 minutes drying between coats.
- Remove tape when paint is tacky.
- Let cure 24 hours before handling lids.
How to Display or Gift It
- Use color-blocking to coordinate with kitchen textiles.
- Gift a set in a kraft box with tissue paper.
- Store extra canisters stacked carefully.
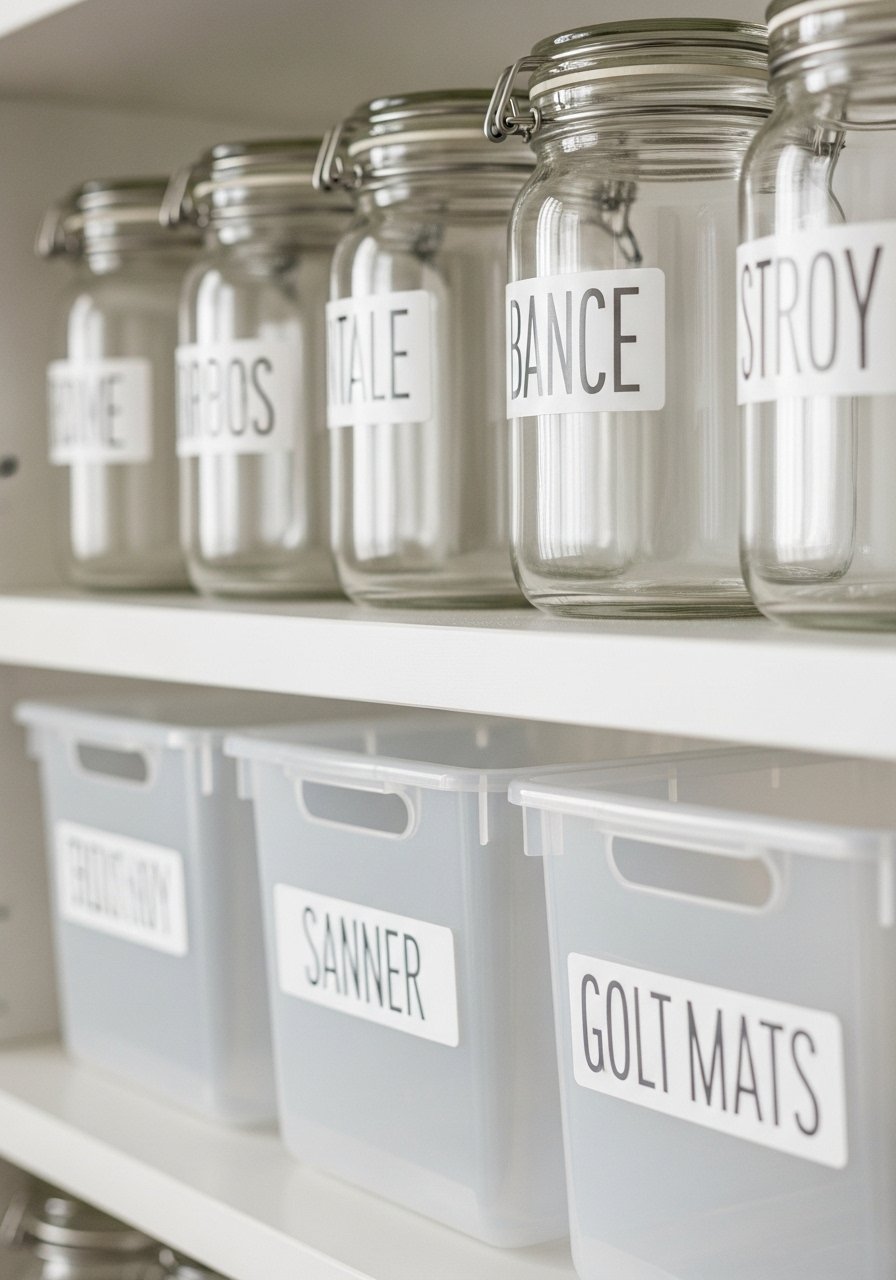
- Uniform Glass Jar Swap (Match-Made Look)
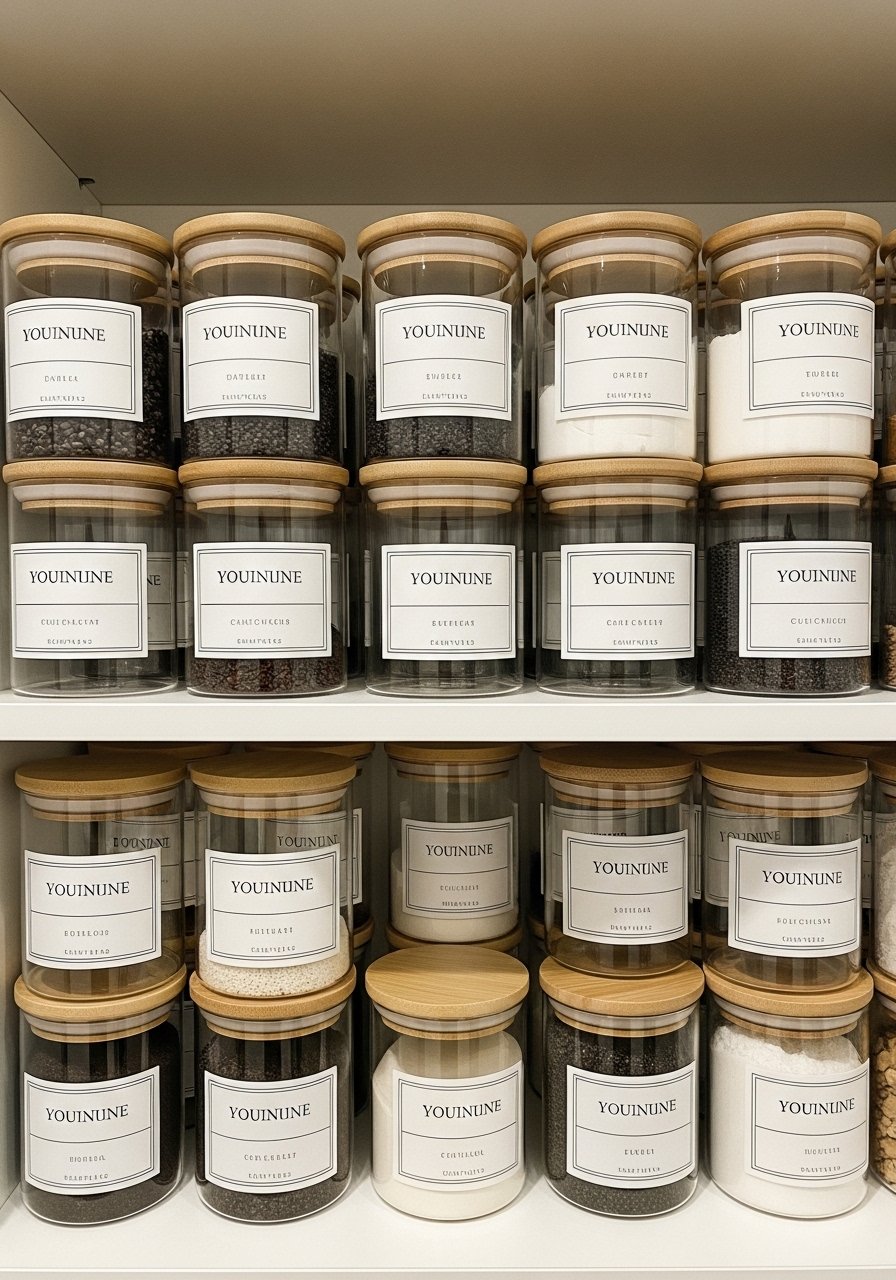
Nothing looks higher end than uniform containers. Swap mismatched packaging for matching jars (Mason or euro-style) and matching lids. Buying in bulk often costs less than buying individual branded items.
Materials
- 12 clear glass jars, 16 oz with wooden lids
- 12 kraft or vinyl labels
- 1 chalk marker or permanent marker
- 1 dish soap and sponge for cleaning original packaging
Instructions
- Transfer contents from original packaging into jars.
- Wipe jar rims and lid threads.
- Apply labels consistently.
- Arrange jars by size and category for visual flow.
How to Display or Gift It
- Create a pantry display by stacking jars on risers and in crates.
- For gifting, fill a jar with cookie mix and attach recipe card on top.
- Keep extra lids and jars boxed in a dry place.
That’s 24 small pantry ideas on a budget that make even tiny storage feel intentional and elevated. Try a couple of small swaps—matching jars, a contact paper liner, or a pegboard—and you’ll notice the space reads calm and curated. Save this pin to come back when you’re ready to tackle a shelf or give a pantry refresh as a thoughtful gift.
Which idea are you most excited to try? Share a photo, and I’ll give tips for styling it on a budget. Trust me, picking up a quality hot glue gun with temperature control changed how every single one of these projects turned out — no more stringy mess, no more burns. If you want one, this temperature-control hot glue gun is my go-to.


