I always start a pantry refresh with a quick inventory and a stack of clear jars. When space is tight, small pantry ideas that use vertical space and smart containers make a world of difference. This list of 25 projects is full of clever storage builds, decanting hacks, and easy DIY organizers you can finish in an afternoon.
You’ll find projects for every skill level: from simple jar labels to a sliding drawer for small appliances. I run adhesive vinyl through my Cricut Joy cutting machine when I want neat labels fast, and I keep a low-temp hot glue gun on the bench for quick fixes. Each project below includes an exact materials list and step-by-step instructions, with helpful product suggestions woven in so you can shop in one click.
Ready to reclaim every inch? These small pantry ideas focus on function, texture, and pretty finishes so your pantry feels tidy and peaceful. Pin the ones you love and save the whole list for your next weekend project.
- Tiered Can Rack for Narrow Shelves
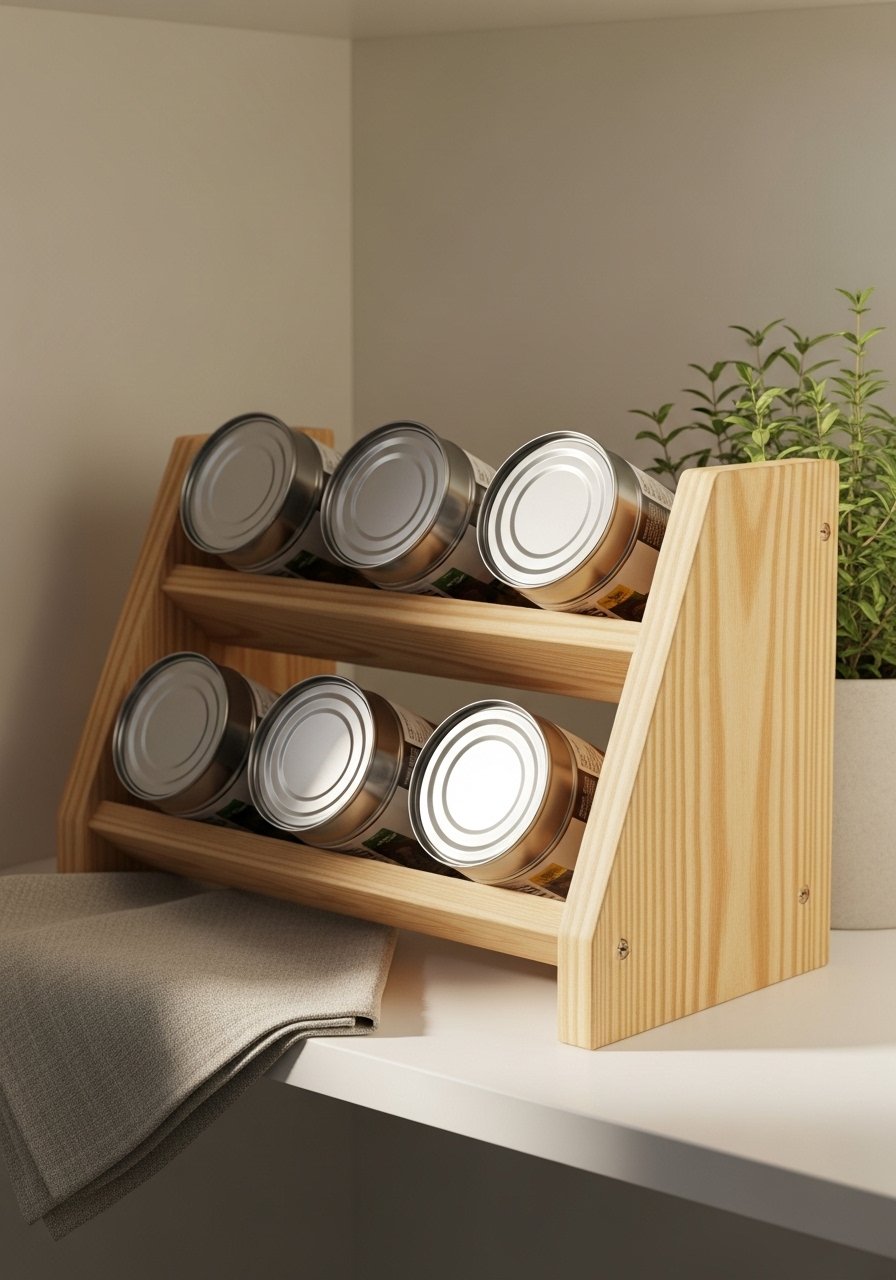
This compact tiered can rack stacks cans so labels face forward. It’s perfect when shelves are shallow. The finished piece is smooth wood with a slightly distressed paint finish that adds texture and farmhouse charm. Beginners love this one for its simple cuts and fast assembly—each tier feels sturdy under hand.
Materials
- 1 pine board, 1 x 8 in x 24 in
- 1 pine strip, 3/4 in x 3/4 in x 24 in
- 3 wood dowels, 1/2 in x 10 in
- 6 1 1/4" wood screws
- 1 small jar of chalk paint, 4 oz
- Sandpaper 120 and 220 grit
- Wood glue, 30 mL
- Felt pads (optional)
- Painter’s tape (for straight paint lines)
Instructions
- Cut the pine board into three tiers: 6 in x 8 in, 6 in x 8 in, 6 in x 8 in (you’ll stagger heights).
- Cut the pine strip into three supports, each 6 in long. Sand all pieces smooth with 120, then finish with 220 grit.
- Mark dowel locations on each support at 2 in and 6 in in from edges. Drill a 1/2 in hole 1/2" deep.
- Glue dowels into holes with wood glue. Let set 30 minutes. Clamp if needed.
- Attach supports to the underside of each tier with wood screws, countersinking slightly.
- Paint with one coat of chalk paint. Dry 1 hour, apply second coat if needed. Finish cues: paint is fully opaque and matte.
- Once dry, lightly sand edges for a distressed look. Add felt pads to the base.
How to Display or Gift It
Place the rack on a pantry shelf to keep tomato paste and beans facing front. Pair with labeled clear jars for a cohesive look. If gifting, wrap in kraft paper and tuck a small wooden spoon inside. For storage between uses, stack tiers flat in a shallow craft organizer.
- Door-Mounted Spice Rack (Over-the-Door)
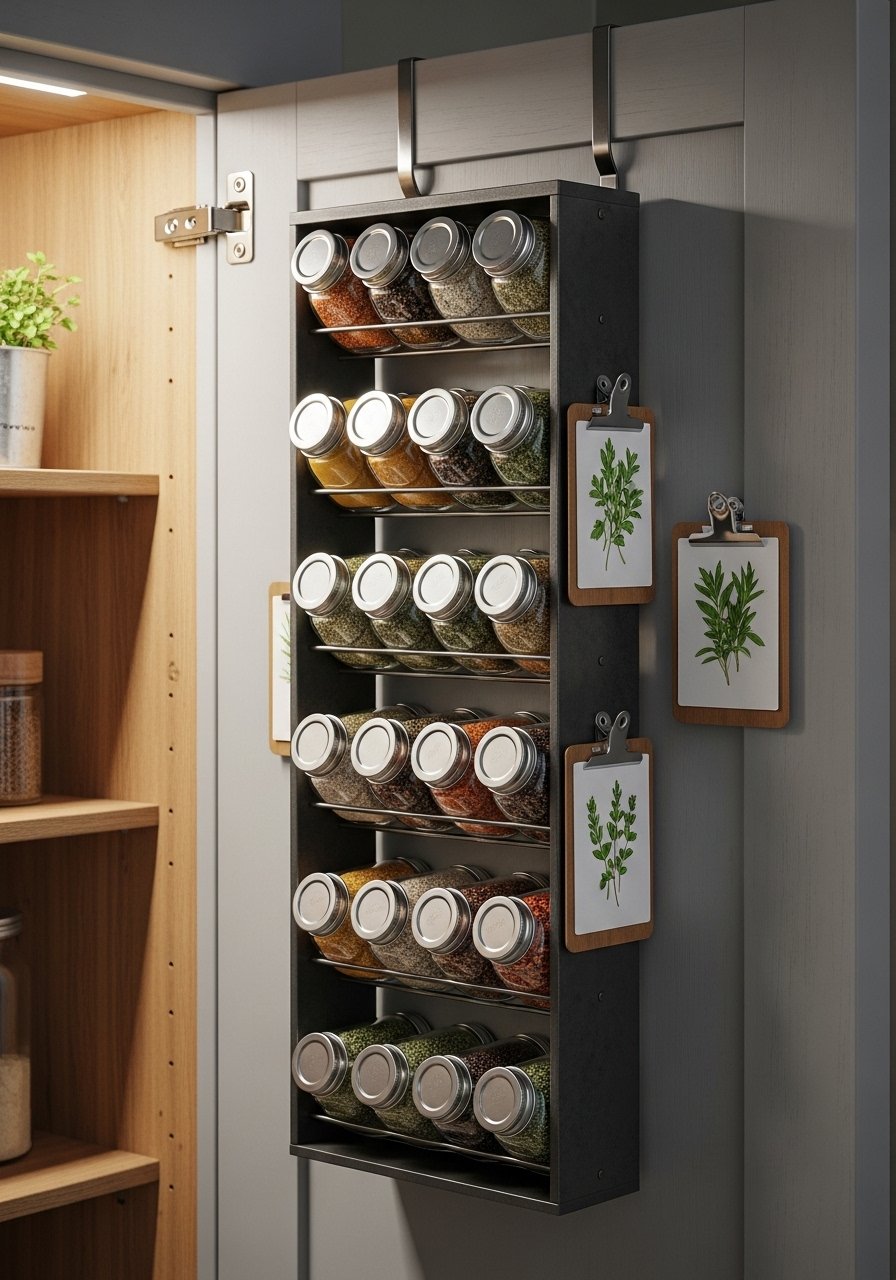
This over-the-door spice rack uses thin plywood and shallow shelves to free up shelf space. The row of small bottles looks tidy and adds texture. It’s a great fit if you want small pantry ideas that move storage onto unused surfaces. A quick bit of sanding and plywood varnish keeps the look clean.
Materials
- 1 plywood sheet, 1/4 in x 12 in x 24 in
- 4 small shelf cleats, 3/4 in x 3/4 in x 12 in
- 10–12 2 oz spice jars with lids
- 12 3/4 in wood screws
- Wood glue, 20 mL
- Clear wipe-on polyurethane, 2 oz
- Sandpaper 120 grit
- Hanging hardware (adjustable over-the-door hooks)
Instructions
- Measure the inside face of the pantry door. Cut plywood to 11 in x 22 in.
- Cut cleats into four shelf supports (two per shelf). Sand all pieces.
- Attach cleats to plywood at 3 in, 7 in, and 11 in from top using wood glue and screws.
- Stain or varnish the plywood: one coat, dry 2–4 hours, light sand, one more coat.
- Attach over-the-door hooks to top edge, then hang.
- Fill small spice jars and label them. Completion cue: shelf holds jars without bowing.
How to Display or Gift It
Mount on the inside of the pantry door for instant reach. Add small clip-on herb scissors nearby. If gifting, include a set of refillable spice jars tucked into kraft packaging.
- Mason Jar Lids Under-Shelf Storage (Small Pantry Ideas: Jar Station)
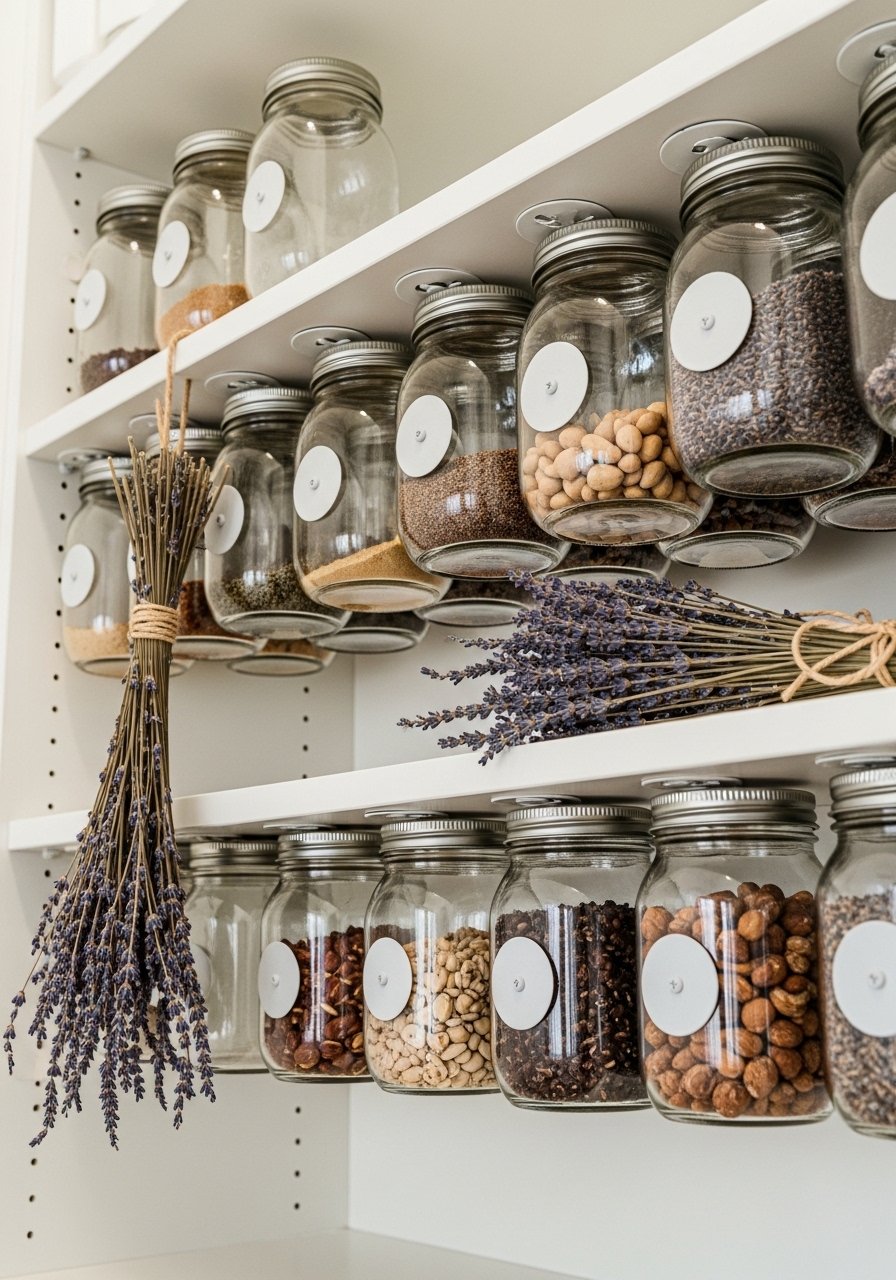
Using the underside of a shelf to hang mason jars is one of the most economical small pantry ideas. The jars slide on and off for quick refills and give you visibility for small items. The texture of glass against painted metal looks clean and a little vintage.
Materials
- 6 16 oz mason jars with bands
- 6 jar lid rings with drilled metal discs (or make from 1/8 in steel sheet)
- 6 #6 x 1/2" wood screws
- 1 small pack of liners for lids (optional)
- Measuring tape
- Drill with 1/8 in bit
- Sanding cloth
Instructions
- Decide spacing on underside of shelf—3 in between jar centers works well.
- Mark screw points and pre-drill 1/8 in pilot holes.
- Secure the drilled lid rings or metal discs to the underside with screws.
- Screw lids (without seals) into rings; screw jars on to test fit.
- Fill jars and twist to ensure smooth on/off action. Completion cue: jars hang level and don’t wobble.
How to Display or Gift It
Arrange jars by frequency of use—everyday spices closest to the opening. For gifting, fill one jar with a baking mix and tie with twine. For storage, remove lids and store flat in a shallow container.
- Pull-Out Baskets on Drawer Slides
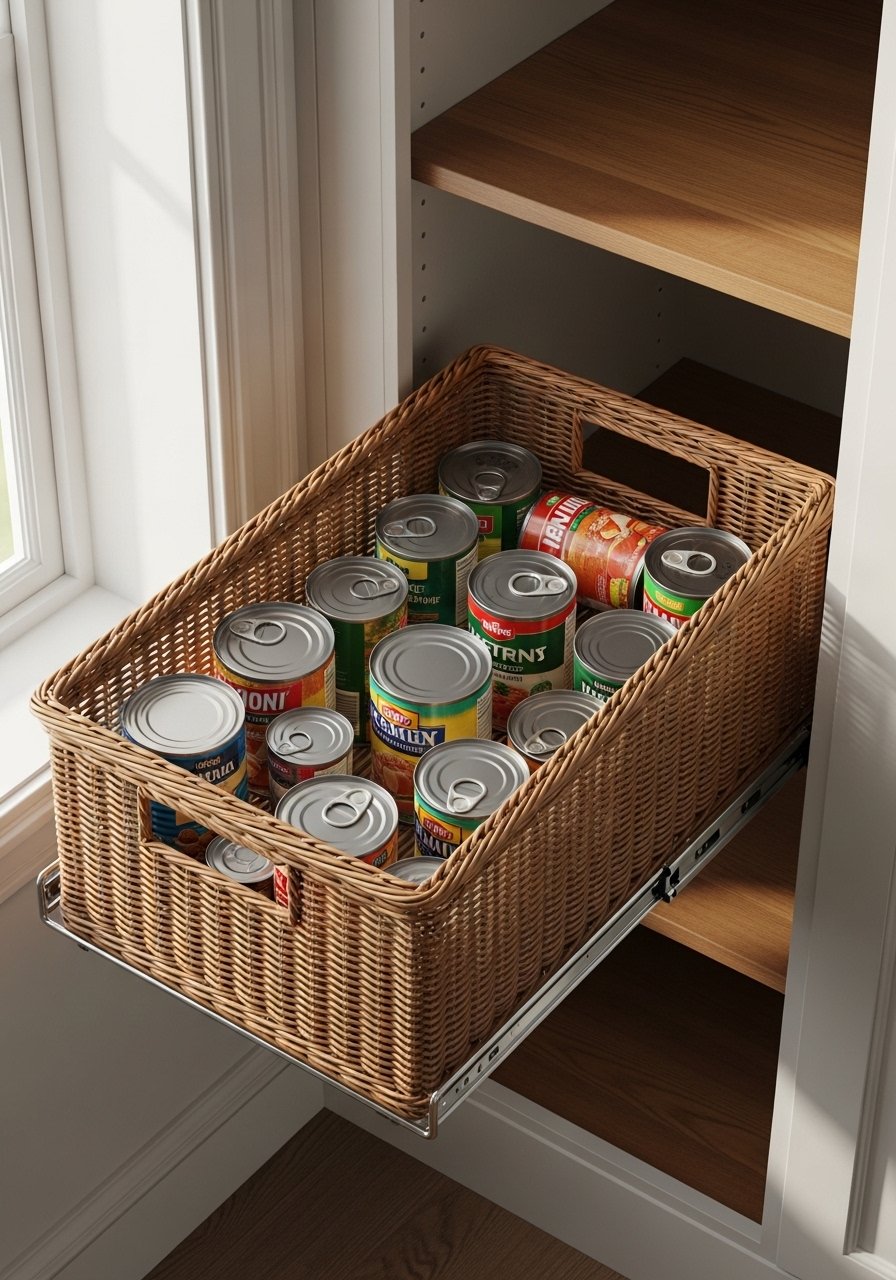
Pull-out baskets turn hard-to-reach back corners into accessible storage. Use undermount or side-mount drawer slides rated for at least 50 lb for smooth motion. The airflow of rattan baskets is ideal for produce and snacks.
Materials
- 2 14 in soft-close drawer slides (rated 50 lb)
- 1 rattan basket with metal frame, 12 in x 14 in x 6 in
- 1 plywood base, 1/4 in x 12 in x 14 in
- 4 wood screws 3/4"
- Wood glue, 20 mL
- Drill and screwdriver
Instructions
- Measure shelf depth; cut plywood base to fit inside basket with 1/4" clearance.
- Attach bottom of the basket to plywood using wood glue and screws.
- Install drawer slides on side walls inside pantry according to manufacturer directions.
- Attach mating slide members to the plywood base. Test extension and adjust.
- Place basket onto slides and slide in/out to confirm smooth action. Completion cue: basket glides fully and locks or stops cleanly.
How to Display or Gift It
Store heavier items at the back so the basket glides evenly. Label the front with a chalkboard tag for contents. If gifting, combine the basket with a few pantry-sized treats.
- Copper Lazy Susan Turntable Station
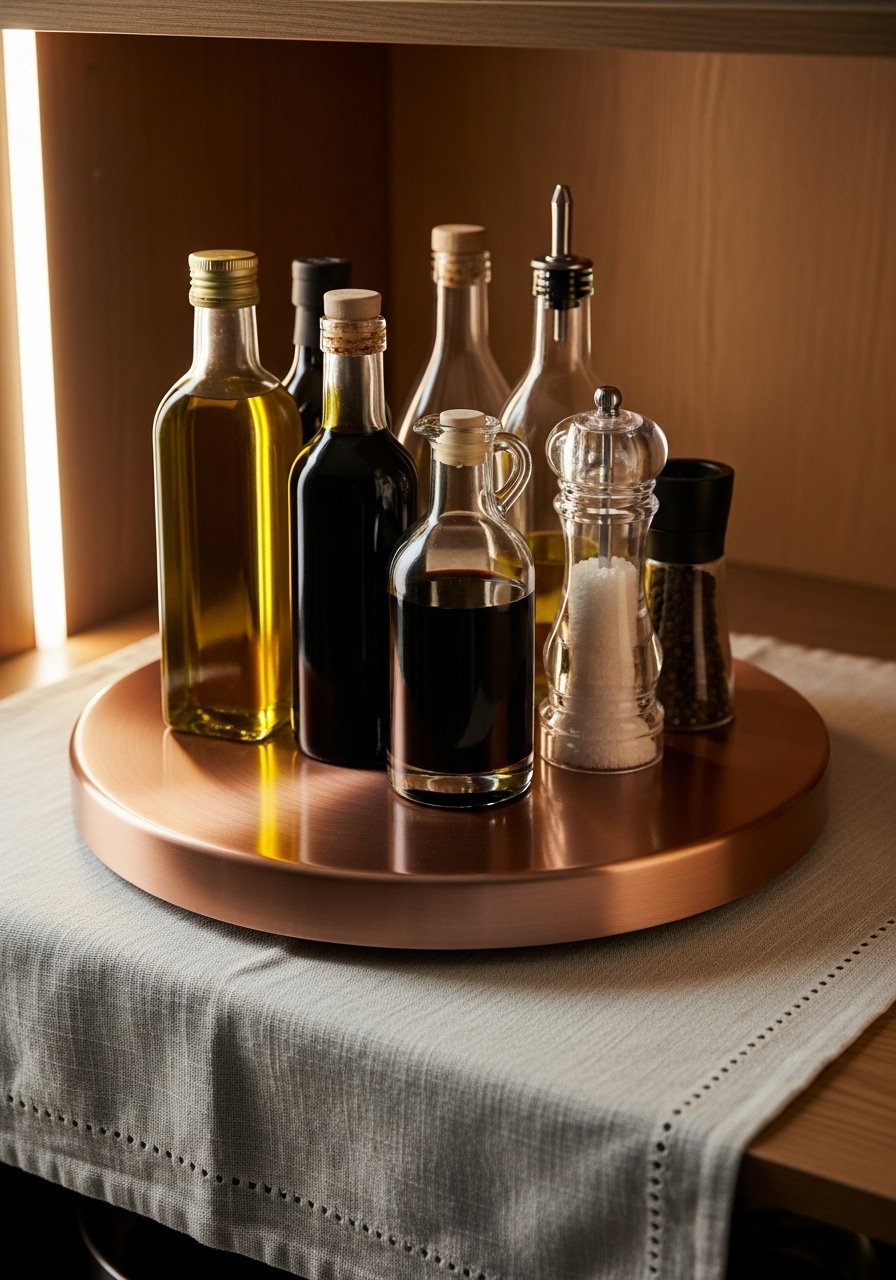
A turntable makes grabbing condiments simple. Choose a heavy-duty lazy susan with a non-slip base so jars don’t slide. It’s one of the easiest small pantry ideas and looks polished in copper or wood.
Materials
- 1 12 in heavy-duty lazy susan turntable
- 6–8 glass condiment bottles (8 oz)
- 1 non-slip shelf liner, 12 in x 12 in
- Cleaning cloth
- Mild dish soap
Instructions
- Clean shelf surface and place non-slip liner down.
- Center the turntable on the liner and rotate to make sure it spins freely.
- Arrange bottles by use frequency with heavier bottles near the center.
- Wipe bottles to remove any dust. Rotation should be smooth with no wobble.
How to Display or Gift It
Place under a shelf or on a pantry island. Pair with labeled oil bottles for a cohesive look. For gifting, include a bottle of small-batch vinegar tucked in kraft paper.
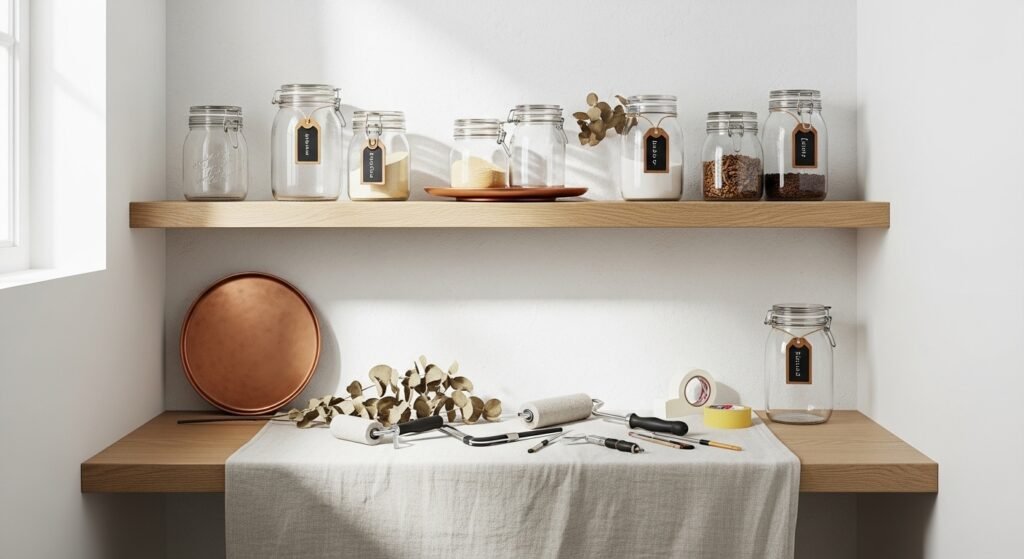
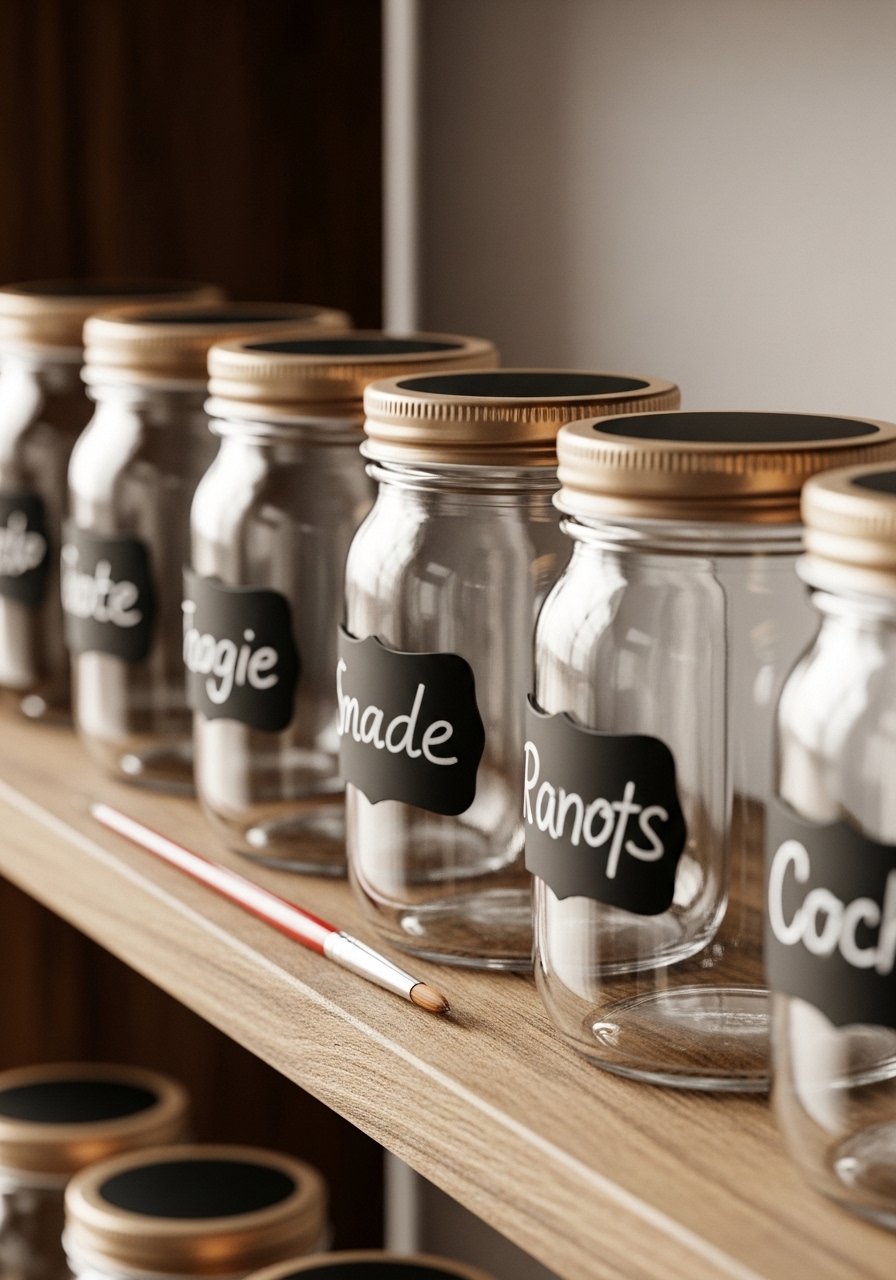
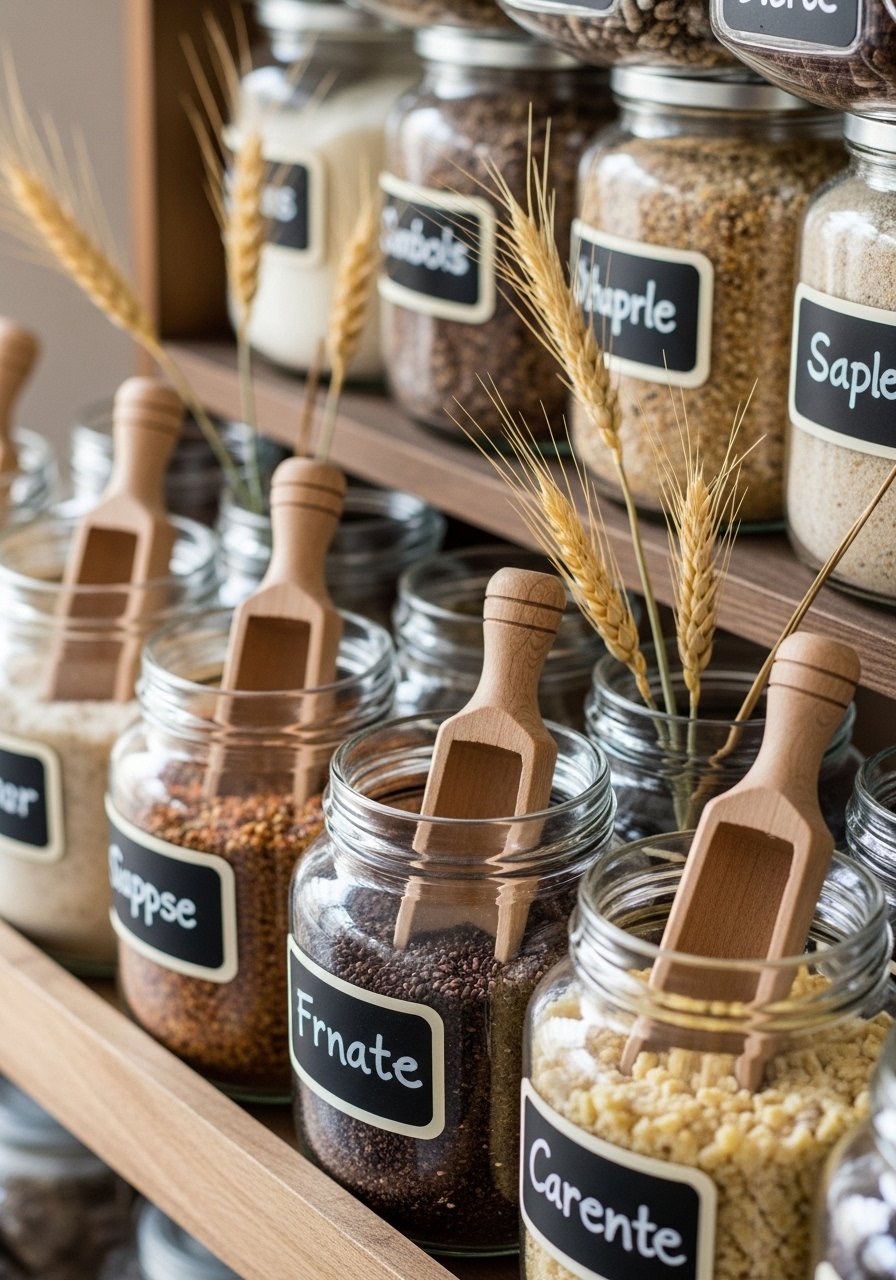
- Labeled Clear Pantry Jars (Decant & Display)
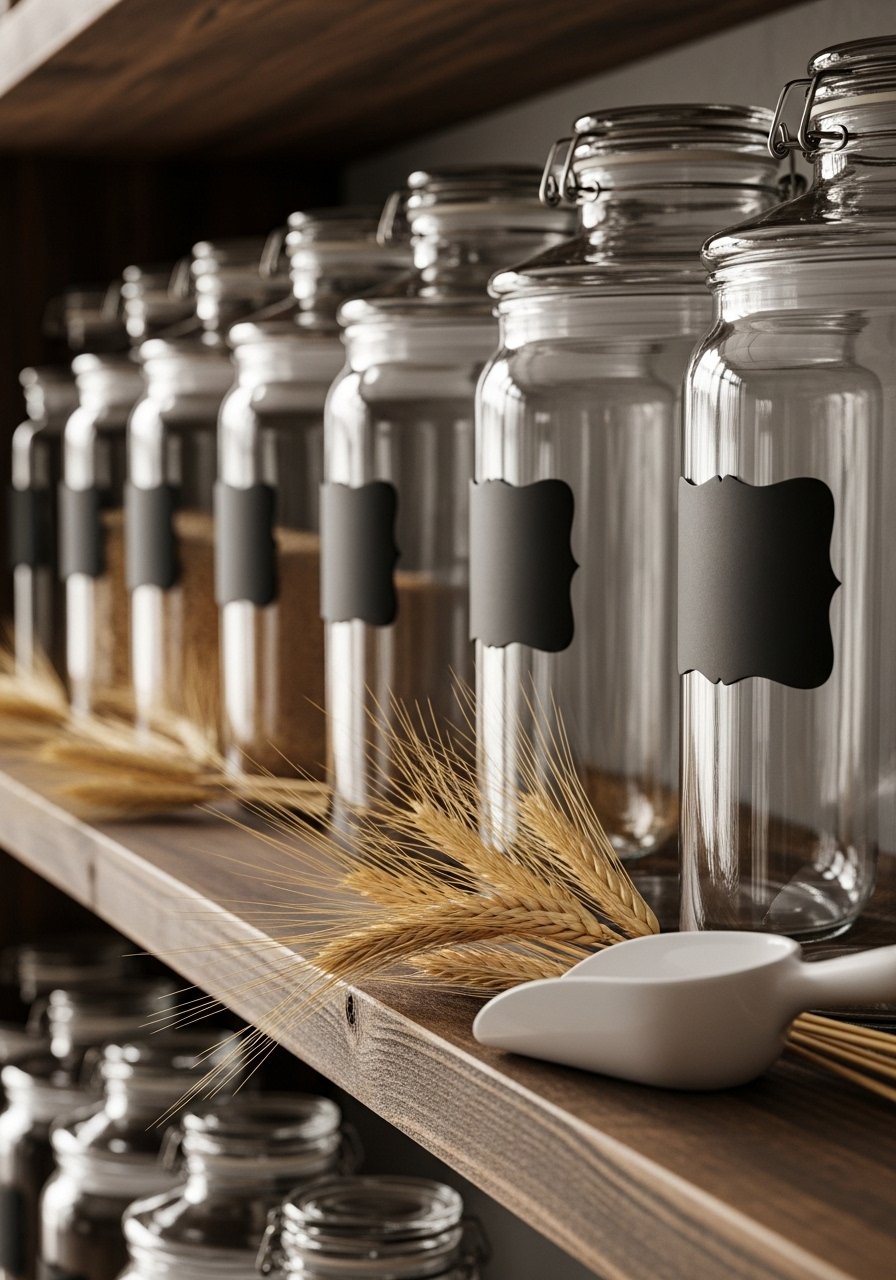
Decanting dry goods into clear jars saves space and looks calm. Choose uniform jars in 32 oz and 64 oz sizes for stacking and visual rhythm. Use vinyl or chalkboard labels for quick changes.
Materials
- 6 32 oz clear glass jars with airtight lids
- 3 64 oz clear glass jars with airtight lids
- Removable black vinyl label sheets
- Cricut Joy cutting machine or scissors
- Rubbing alcohol and cloth
- Funnel (plastic), 2 in diameter
- Measuring cups for decanting
Instructions
- Clean jars and lids with warm soapy water; dry completely.
- Wipe label areas with rubbing alcohol and let evaporate 5 minutes.
- Cut labels on your cutting machine or by hand. Apply from one side to avoid bubbles.
- Use a funnel to decant ingredients into jars. Fill leaving 1 in headspace for expansion.
- Label jars with contents and date. Completion cue: lids seal firmly, no tacky residue on label.
How to Display or Gift It
Group like items together—baking, grains, pulses. Store on a single row per shelf for clear sightlines. For gifting, fill a jar with cookie mix and include baking instructions tied to the jar.
- Magnetic Spice Jars on Metal Strip
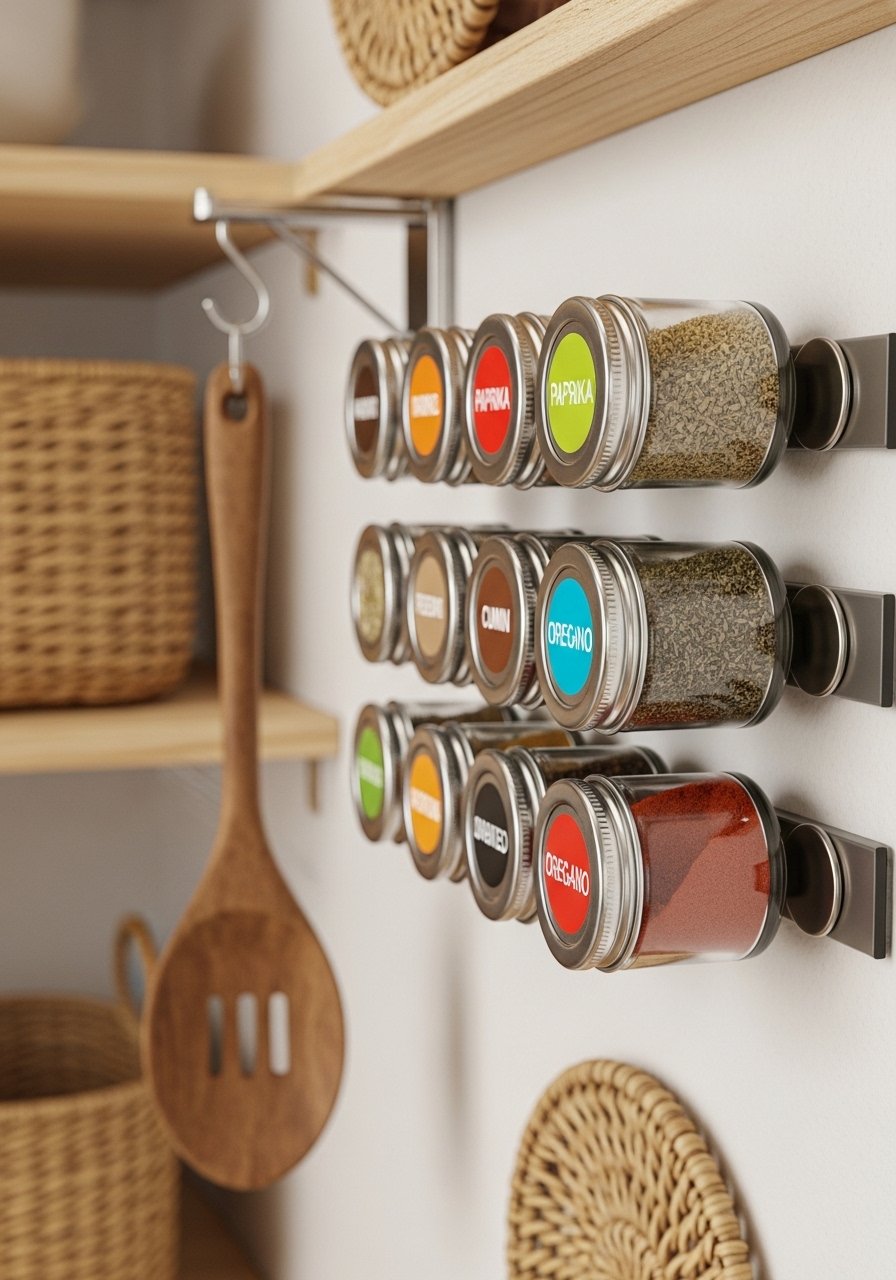
Magnetic jars free up shelf space and add a playful display. Attach a metal strip to the inside of your pantry or to a door. Use the tops of jars for vinyl labels and the sides for quick reads.
Materials
- 12 round magnetic spice jars, 2 oz with metal lids and magnetic bottoms
- 1 24 in magnetic metal strip
- 4 screws for mounting
- Drill with countersink bit
- Small label sheet
- Rubbing alcohol
Instructions
- Mark metal strip placement—centered horizontally on door/side wall.
- Pre-drill screws in strip and countersink holes.
- Mount strip level using screws. Test magnet strength with an empty jar.
- Fill jars, clean tops with alcohol, apply labels. Completion cue: jars hold firmly even when nudged.
How to Display or Gift It
Organize by flavor profile—savory to sweet. Stick a small magnetic measuring spoon on the strip too. For gifting, include a set of pre-filled spices in a kraft box.
- Vertical Cereal Dispenser Build
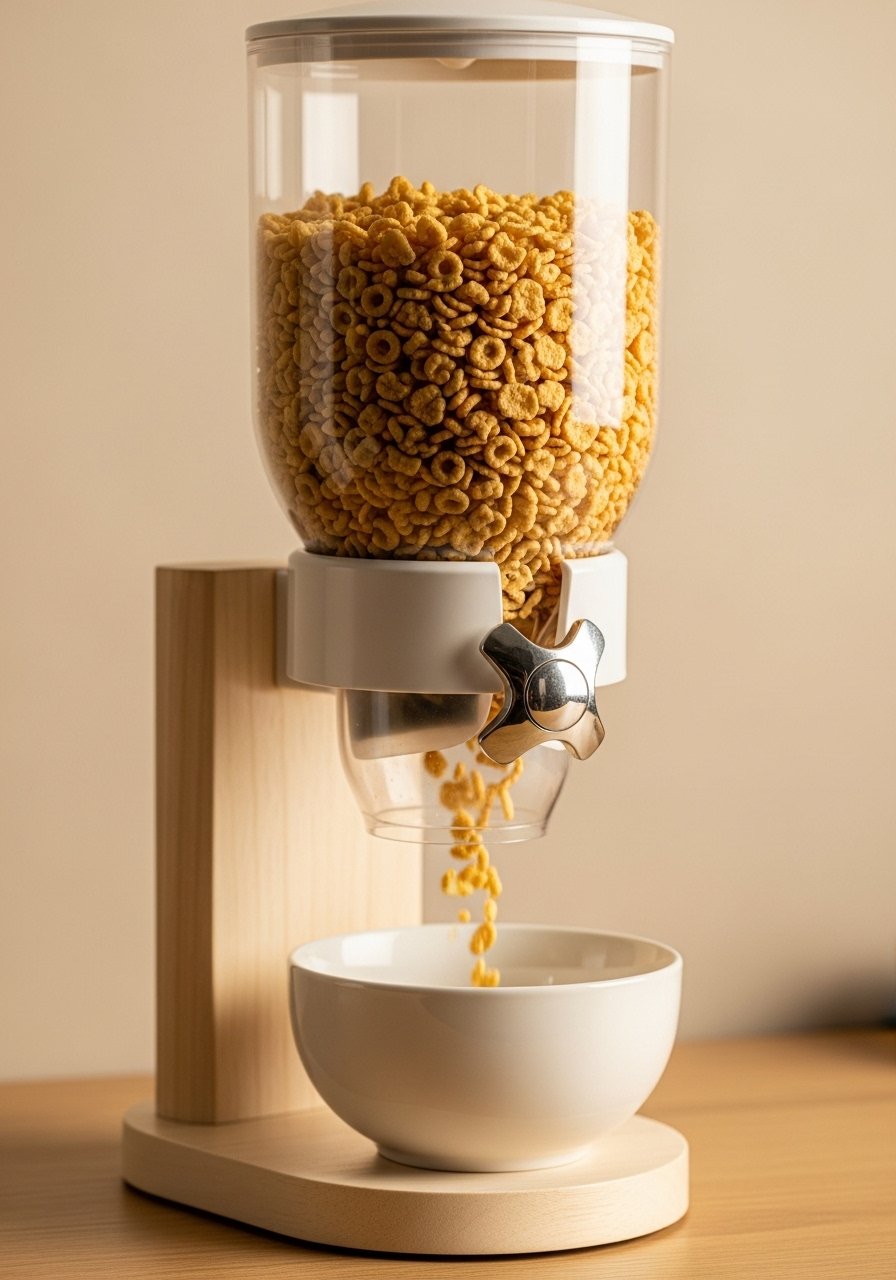
A vertical dispenser keeps cereal fresh and saves space compared to bulky boxes. Use an acrylic tube and a simple wooden base with a gravity-fed spout. This project is great for families.
Materials
- 1 acrylic tube, 4 in diameter x 18 in
- 1 wooden base, 6 in x 6 in x 3/4 in
- 1 cereal dispenser spout kit (food-safe)
- Wood screws x4
- Sandpaper 220 grit
- Food-safe silicone sealant, 10 mL
- Drill with hole saw bit for spout opening
Instructions
- Cut hole in base to match spout diameter using a hole saw.
- Fit spout into base with silicone sealant. Let cure 24 hours.
- Secure acrylic tube to base with screws or collar. Seal edges with a thin bead of silicone and smooth.
- Fill with cereal and test flow. Completion cue: cereal dispenses cleanly with no clogging or leakage.
How to Display or Gift It
Place on the lowest pantry shelf or counter with a cereal bowl under the spout. For gifting, add a bag of specialty granola and a wooden scoop.
- Over-the-Door Shoe Organizer for Snacks

A clear shoe organizer turns a pantry door into a snack station. Pockets keep small items upright and visible. This is a low-cost solution with instant impact.
Materials
- 1 clear PVC over-the-door shoe organizer (24 pockets)
- 1 set over-the-door hooks
- Scissors
- Labels for pocket rows (optional)
Instructions
- Hang the organizer using the over-the-door hooks.
- Group snacks by type and place in pockets—kids’ favorites at child height.
- Add labels to rows for quick access. Completion cue: pockets hold items without sagging.
How to Display or Gift It
Use for single-serve containers, sauce packets, and snack bars. For gifting, fill pockets with travel-sized treats and tie a bow to the top hook.
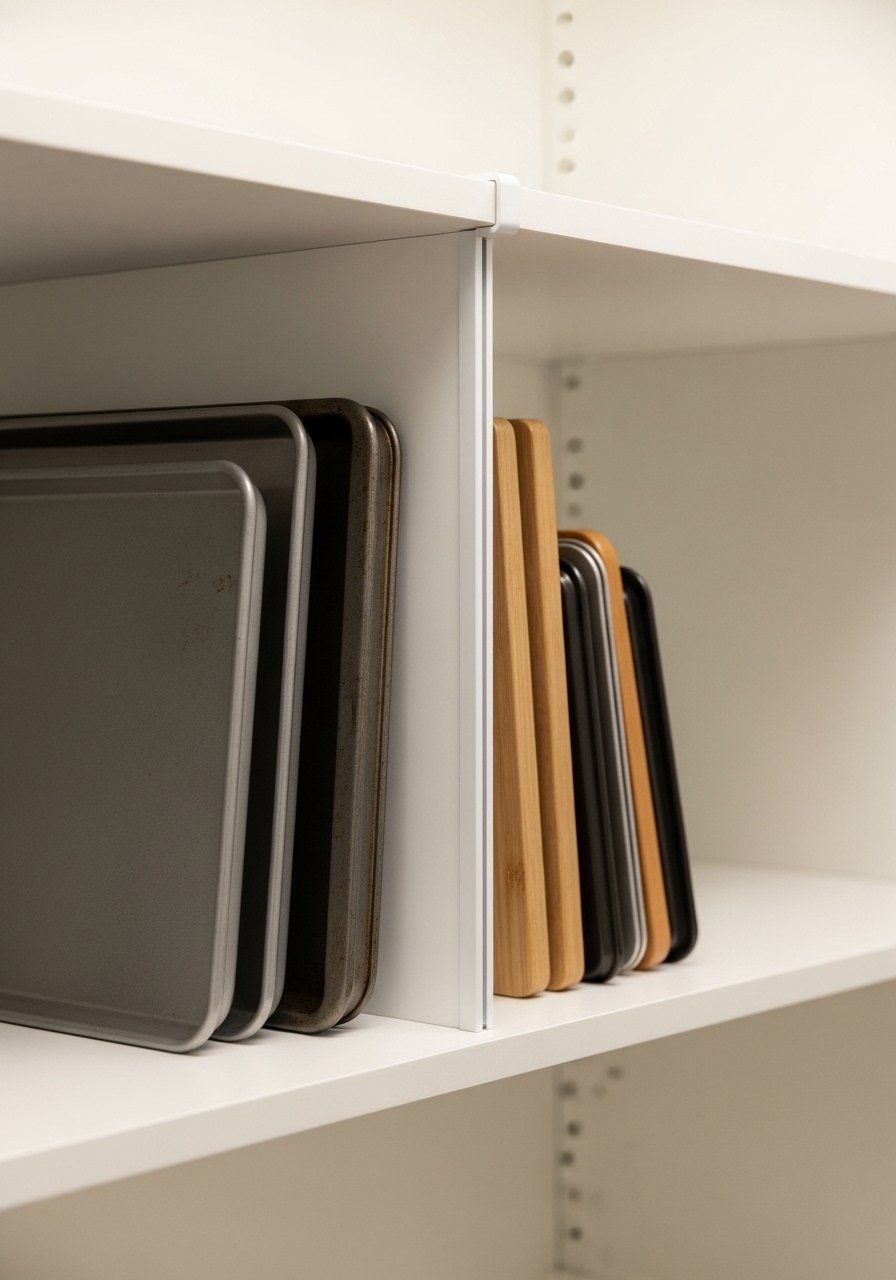
- Stackable Baking Tray Organizer (small pantry ideas)
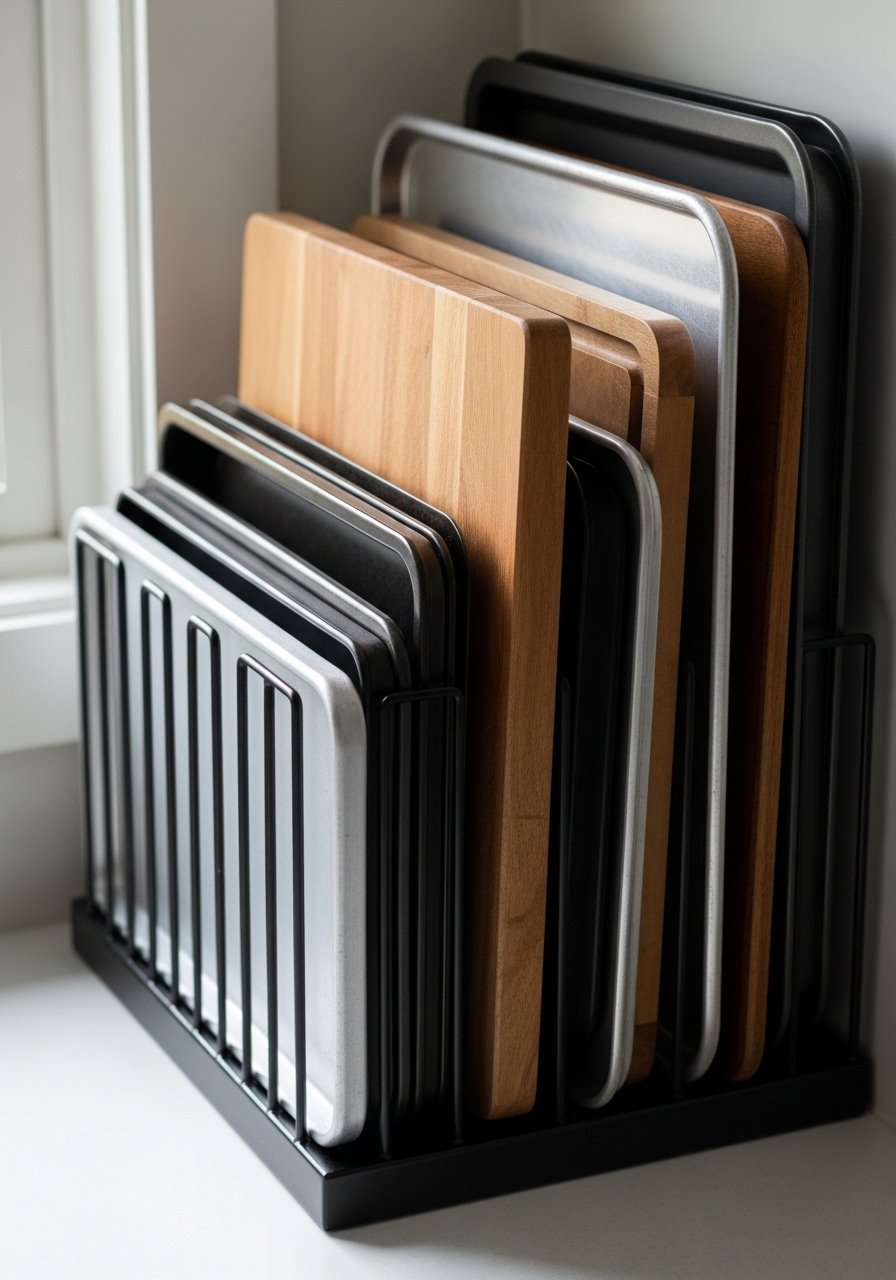
A vertical organizer for baking sheets keeps thin items accessible and upright. Metal dividers prevent warping and allow easy removal. This bench-style rack is a compact small pantry idea for baking lovers.
Materials
- 6 metal dividers, 1/8 in thick x 1 in wide x 8 in tall
- 1 plywood base, 1/2 in x 12 in x 14 in
- 4 wood screws 1"
- Felt strips to line dividers
- Pencil and ruler
Instructions
- Mark divider spacing on the plywood base—1 in apart.
- Attach felt strips to the base where dividers will sit.
- Insert and screw dividers vertically into the base. Space should fit both cookie sheets and cutting boards.
- Test with trays; ensure no rubbing or scratching. Completion cue: trays slide in/out easily without scraping.
How to Display or Gift It
Set at the back of a deep pantry shelf or inside a cupboard. For gifting, pair with a silicone baking mat and recipe card.
- Pegboard Pantry Wall
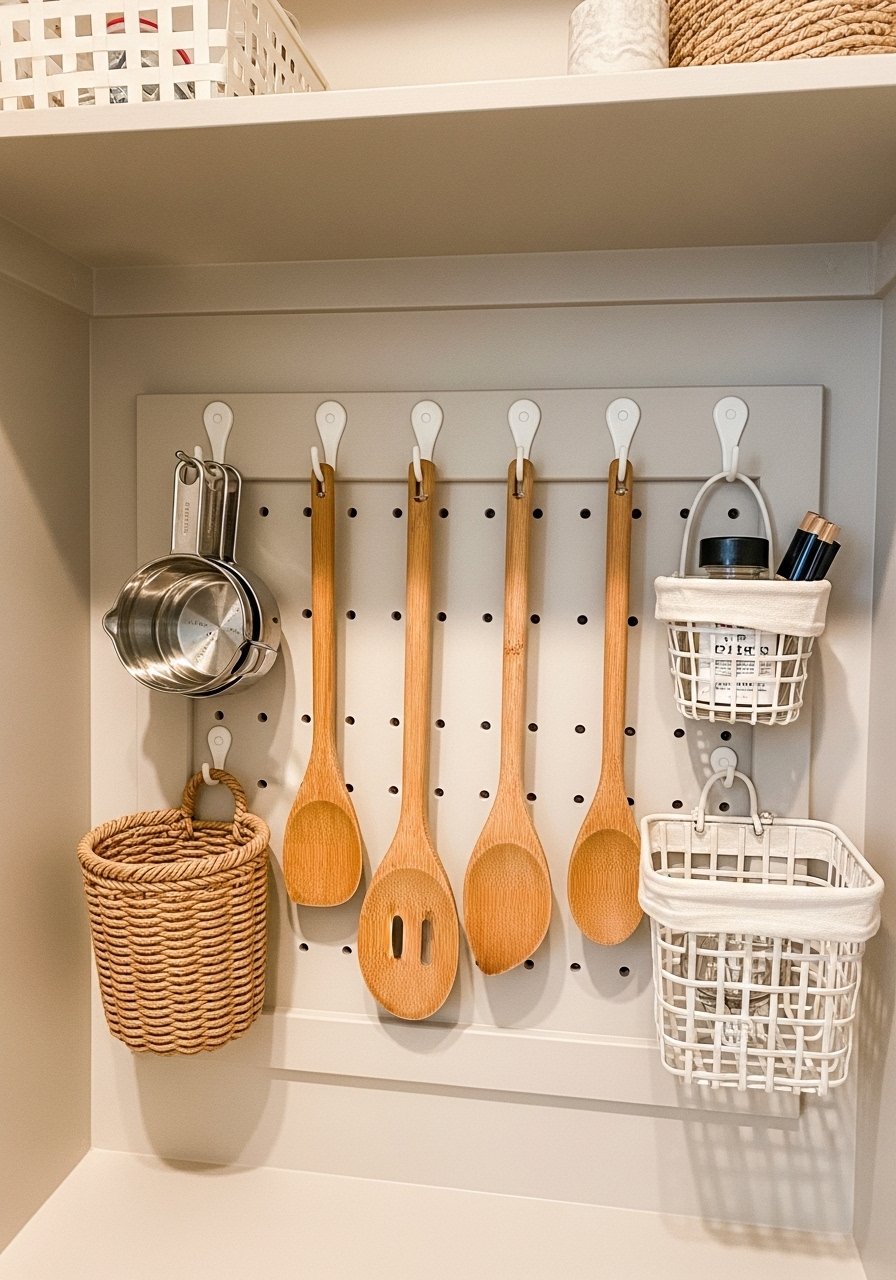
A pegboard creates a flexible command center. Move hooks and baskets to fit tools, small appliances, or pantry staples. Use hardwood pegboard for a durable finish.
Materials
- 1 pegboard panel, 24 in x 32 in
- 8–12 assorted pegboard hooks and baskets
- 4 wall anchors and screws
- Paint (latex), 8 oz
- Drill and level
Instructions
- Paint pegboard if desired; dry 2–4 hours between coats.
- Mount to a flat wall surface using anchors and screws, ensuring it’s level.
- Arrange hooks and baskets to hold measuring cups, small jars, and utensils.
- Adjust spacing as your needs change. Completion cue: heavy items sit securely without sagging.
How to Display or Gift It
Style with wooden spoons and small hanging herb scissors. For gifting, include a set of pegboard tool hooks and a small basket.
- Chalkboard Labels & Painted Lids
Painted lids give jars a coordinated look and allow quick label changes. Use food-safe paint on lids and chalkboard paint for writing. This craft is tactile—the matte black lid feels smooth under the palm.
Materials
- 10 jar lids (flat metal), cleaned
- 1 small jar chalkboard paint, 2 oz
- 1 small foam brush
- Chalk markers or chalk pencil
- Painter’s tape
- Sanding cloth
Instructions
- Remove seals and clean lids thoroughly. Sand lightly.
- Tape off any areas you want unpainted.
- Paint one thin coat of chalkboard paint with a foam brush. Dry 30 minutes. Apply second coat if needed.
- Cure painted lids 24 hours before writing. Write labels with chalk marker. Completion cue: paint is matte and not tacky after 24 hours.
How to Display or Gift It
Use on your clear glass jars for a cohesive shelf. Wrap a set of painted lids as a hostess gift with a small chalk marker.
- Under-Shelf Wire Baskets
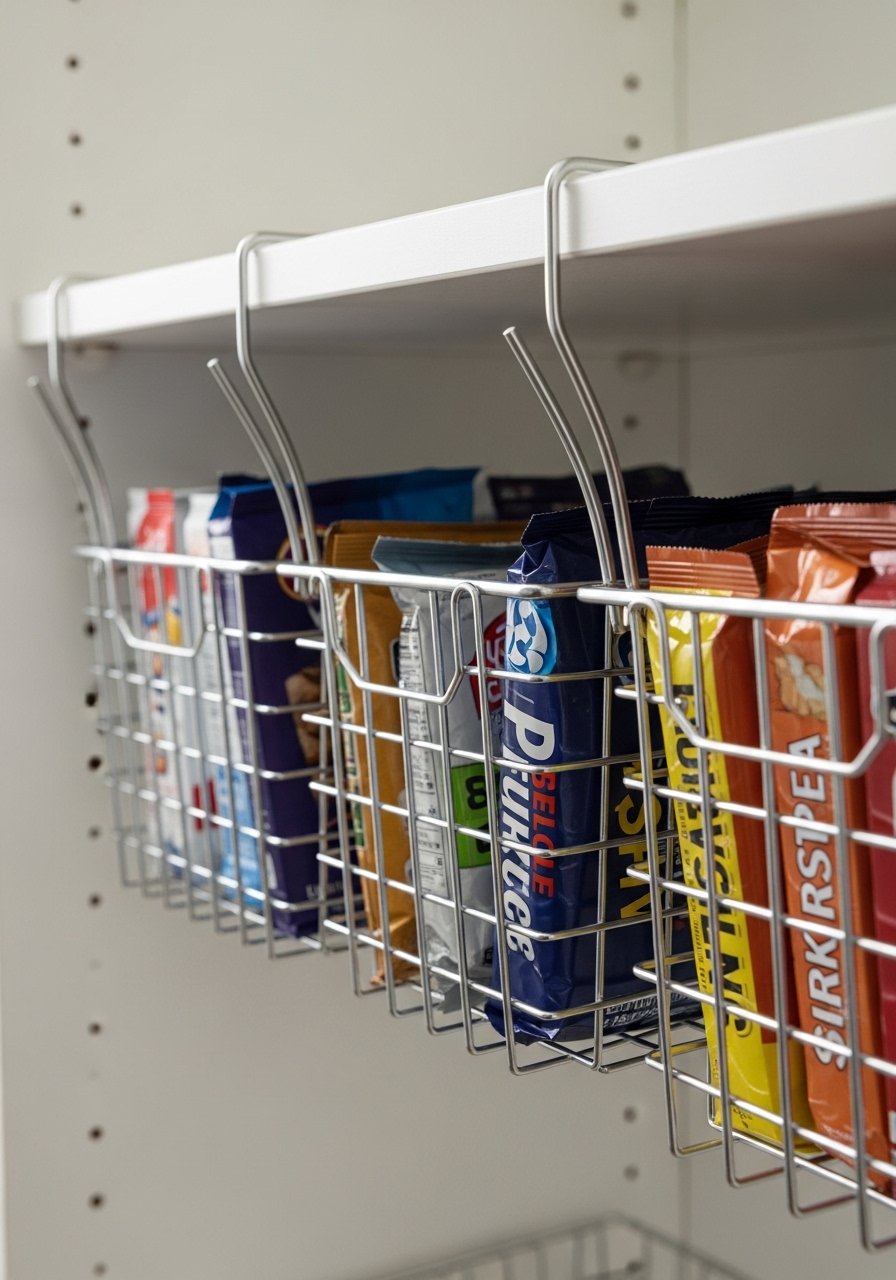
Under-shelf baskets add hanging storage without installation. They slide onto existing shelves and give more usable space below.
Materials
- 2 under-shelf wire baskets, 12 in x 6 in x 6 in
- Measuring tape
- Small screwdriver (if adjustable)
Instructions
- Measure shelf thickness to ensure the basket hooks fit.
- Slide baskets onto the shelf lip until secure.
- Fill with snack pouches or small packages. Completion cue: baskets sit flush and don’t tilt.
How to Display or Gift It
Use for snack pouches or kitchen linens. For gifting, fill with travel-size treats and tuck in a small recipe card.
- Tension Rod Baking Sheet Divider
Tension rods are a tool-free way to create dividers. Placing them vertically creates slots for trays and boards. They’re adjustable and remove cleanly.
Materials
- 2 tension rods, 18–28 in adjustable
- 4 thin felt pads (to protect surfaces)
- Measuring tape
Instructions
- Measure the shelf height and choose a rod length that fits snugly.
- Stick felt pads where the rod will contact to protect shelf finish.
- Install rods vertically, spacing them 1 in–1.5 in apart for narrow board storage.
- Slide in baking sheets and cutting boards. Completion cue: items stand upright and rod doesn’t slip.
How to Display or Gift It
Use multiple rods across the pantry for a modular system. For gifting, include a set of felt pads and a mini instruction card.
- Sliding Drawer for Small Appliances
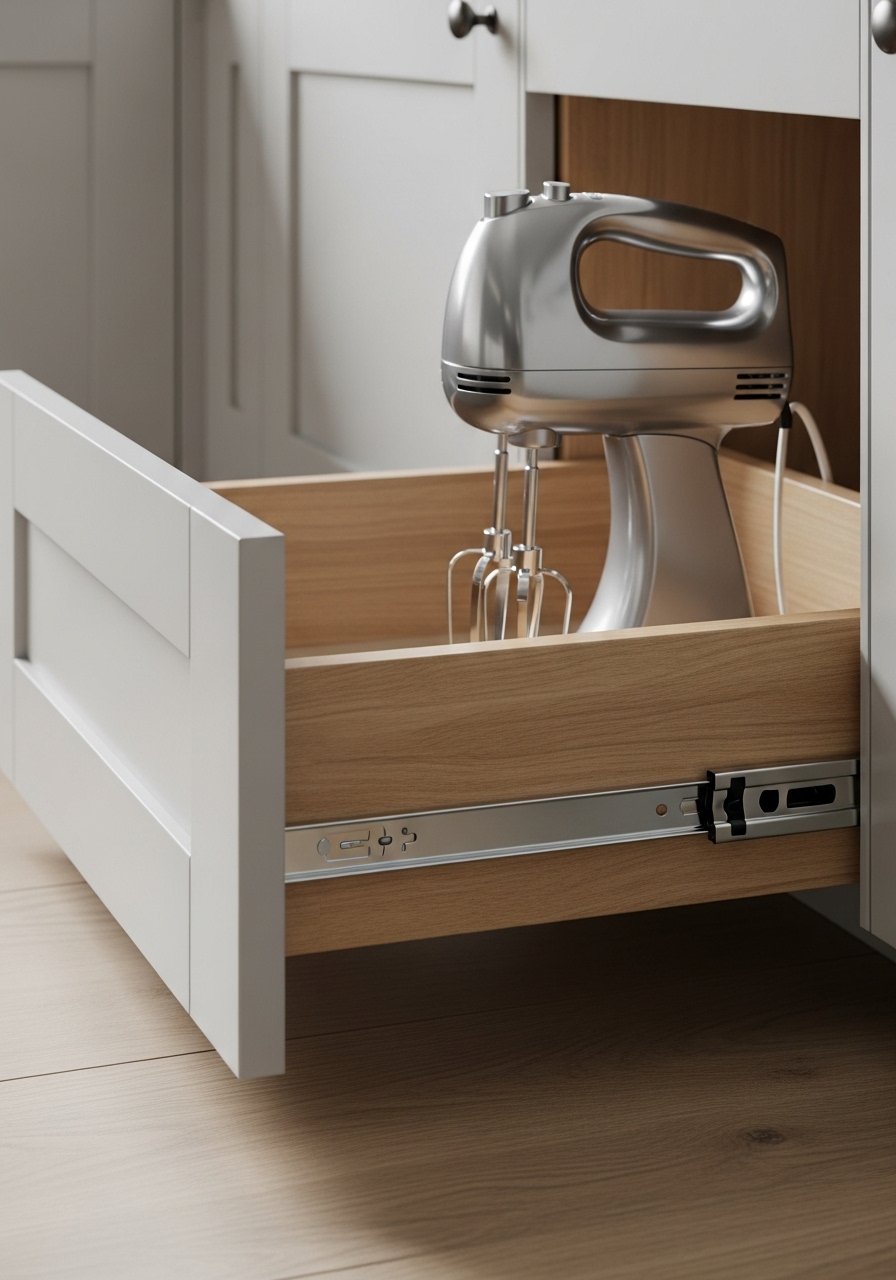
A sliding shelf keeps small appliances accessible yet tucked away. Use full-extension slides rated for the appliance weight. This build makes appliances feel part of the pantry, not clutter.
Materials
- 2 full-extension drawer slides, 18 in, 100 lb rated
- 1 plywood drawer base, 3/4 in x 16 in x 20 in
- 1 front face panel, 1/2 in x 16 in x 6 in
- Wood screws and glue
- Drill and level
Instructions
- Build a shallow drawer box using plywood and glue; allow glue to set 1 hour.
- Install slides per manufacturer instructions, ensuring level placement.
- Attach drawer face and test full extension with the appliance in place.
- Completion cue: drawer glides smoothly and closes flush.
How to Display or Gift It
Store mixers, blenders, or small air fryers on this drawer. For gifting, include a silicone mat to protect the drawer floor.
- Hanging Wire Basket Tier
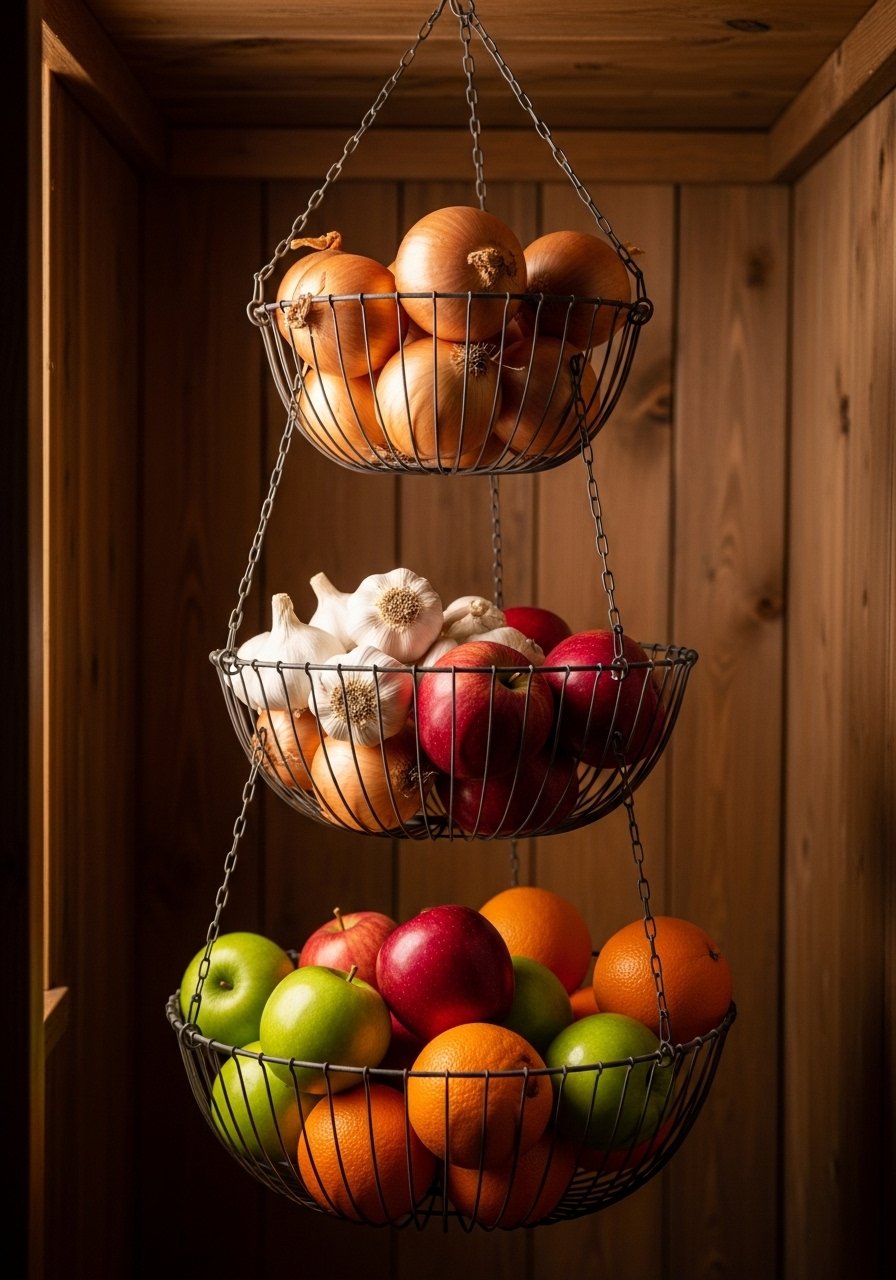
A tiered hanging basket frees up shelf space and makes produce easy to access. Use a secure hook and chain system rated for at least 30 lb.
Materials
- 1 three-tier hanging basket, 12 in / 10 in / 8 in
- 1 ceiling hook rated 50 lb
- 1 chain length 24 in
- Stud finder
- Drill
Instructions
- Find a ceiling joist and mark hole for the hook; pre-drill.
- Screw in the hook, attach chain, and hang basket.
- Test with a light load then add produce. Completion cue: basket hangs level and don’t sway excessively.
How to Display or Gift It
Hang near a pantry window or above an island. For gifting, include a small set of mesh produce bags.
- Refillable Bulk Food Station with Scoops
Set up a refill station for rice, oats, and beans with scoops and labeled jars. A tray keeps spills contained and lifts the station for cleaning.
Materials
- 4 64 oz wide-mouth glass jars with airtight lids
- 4 bamboo scoops, 1/4 cup
- 1 wooden tray, 12 in x 18 in
- Chalk labels or vinyl
- Funnel (3 in)
Instructions
- Place jars on the tray and label contents.
- Use the funnel and scoops to transfer goods into jars.
- Keep scoops in small clip-on jars or tied with twine. Completion cue: lids seal and scoops sit neatly beside jars.
How to Display or Gift It
Perfect for baking enthusiasts; pair with a printed conversion chart. For gifting, include a sample bag of heritage grains.
- Airtight Jar Lid Sealer (small pantry ideas)
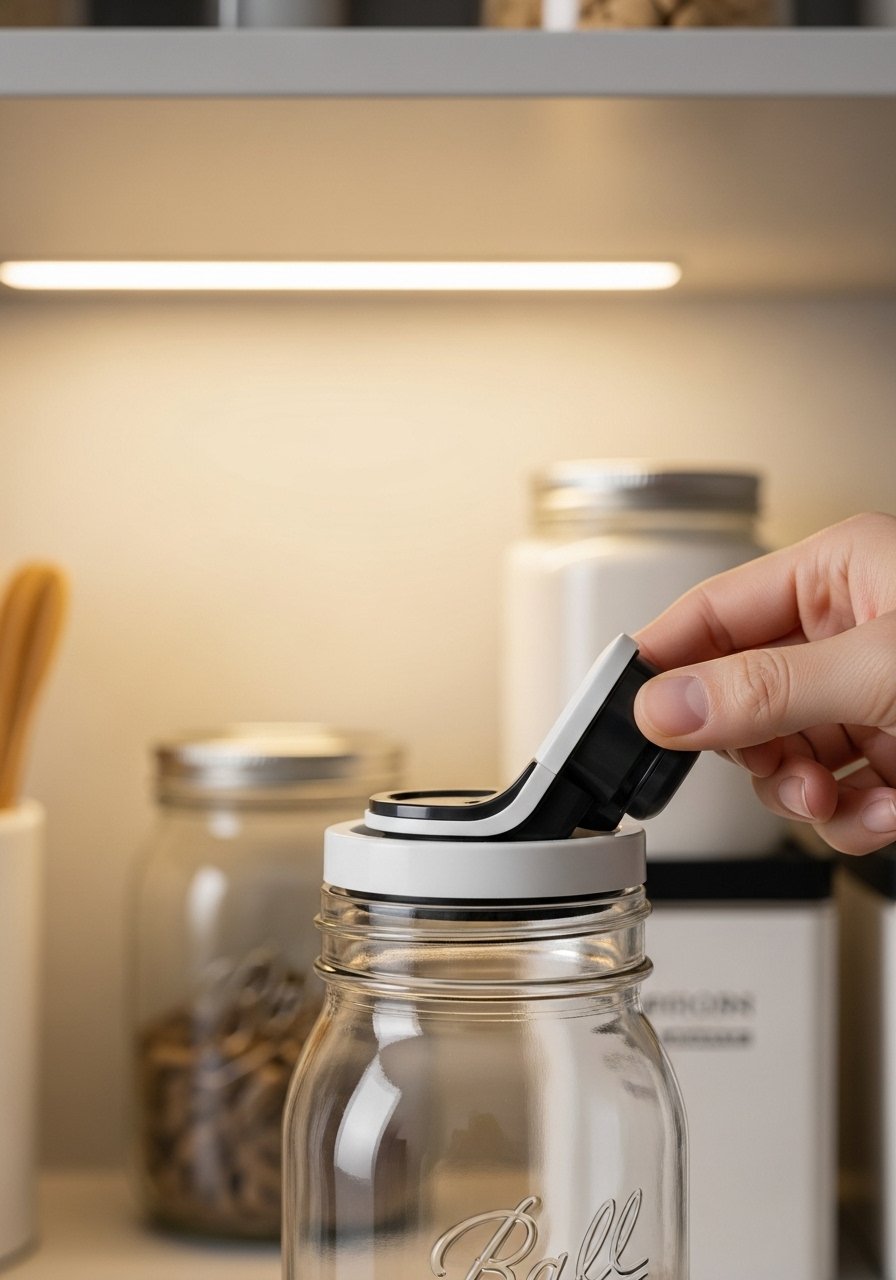
Using a jar lid sealer or vacuum pump extends shelf life for dry goods and is a tech-forward pantry upgrade. It’s one of those small pantry ideas that keeps bulk purchases fresher longer.
Materials
- 1 vacuum jar sealer attachment (fits mason jars)
- 6 mason jar lids compatible with vacuum seals
- 1 set replacement gaskets
- Instructions from manufacturer
Instructions
- Follow the sealer manufacturer’s instructions for initial setup.
- Place lid and pump to remove air as directed—usually 2–3 pumps.
- Test by leaving sealed jar for 24 hours to check lid depression. Completion cue: lid stays depressed and resists pressing back up.
How to Display or Gift It
Use for flours and pulses. For gifting, include a starter set of lids and a printed note about storage times.
- Clip-On LED Shelf Lights
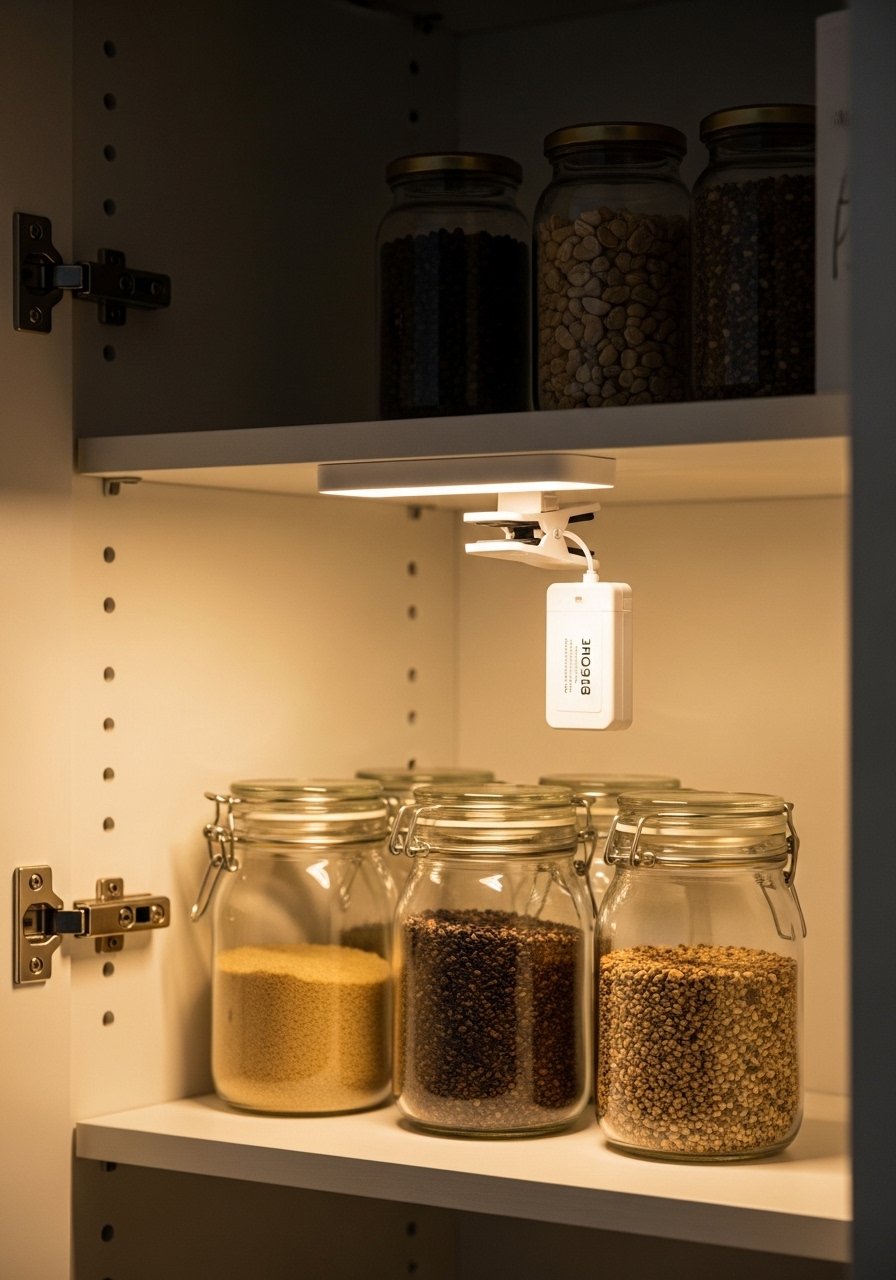
LED clips brighten deep shelves so you can read labels. Rechargeable clip-on lights are quick to install and don’t require wiring. The light makes textures pop and reduces accidents reaching in.
Materials
- 2–4 rechargeable clip-on LED lights
- Micro USB charging cable
- Small cable clips (for tidy wires)
Instructions
- Clip lights to shelf edges where shadows fall.
- Charge fully (usually 2–3 hours) before first use.
- Set brightness and test runtime. Completion cue: shelves evenly lit with no flicker.
How to Display or Gift It
Place lights near darker corners and inside deep cabinets. Gift as a pantry add-on paired with a set of clear jars.
- Spice Drawer with Custom Inserts
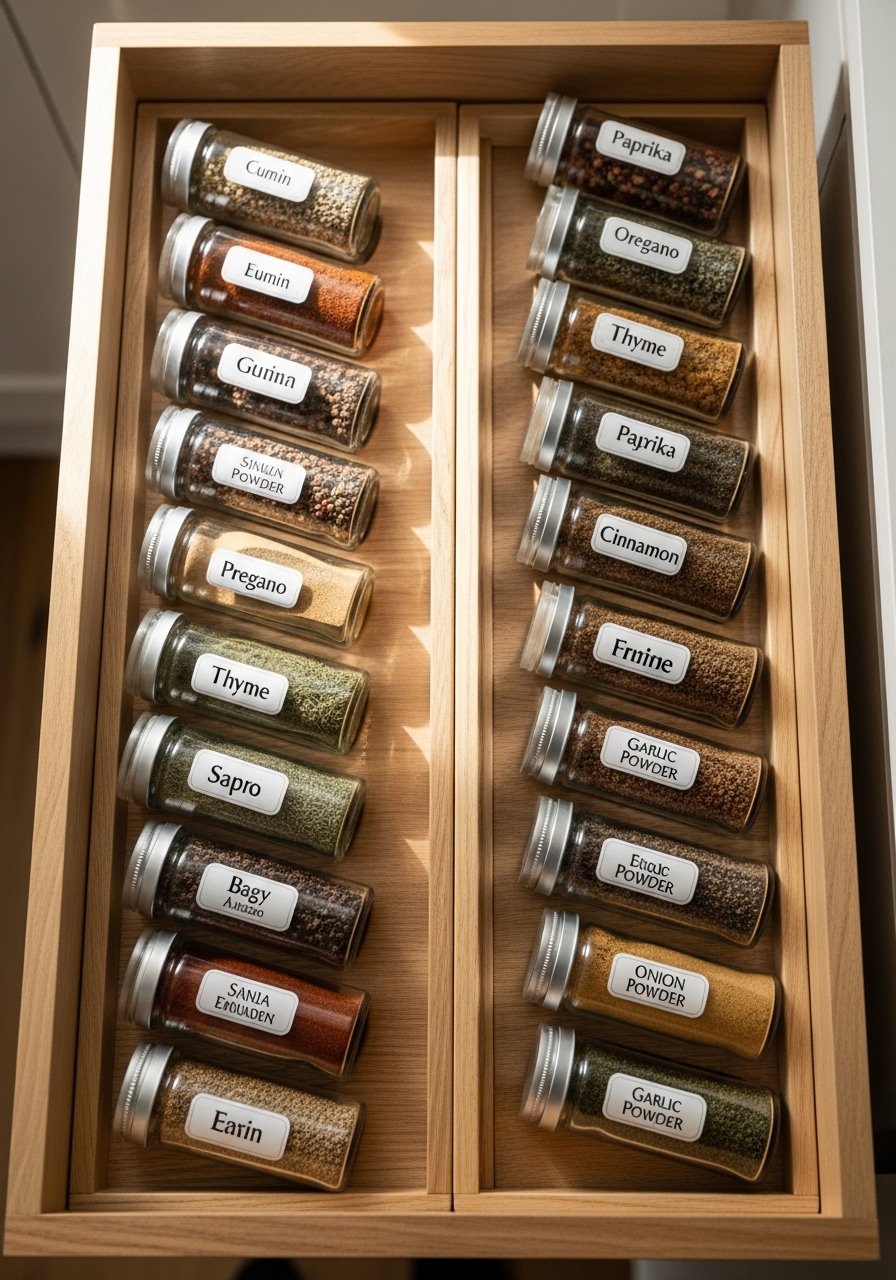
A shallow drawer with angled inserts keeps spice jars readable and prevents rolling. Make inserts from thin plywood and sand for a smooth finish.
Materials
- 1 shallow drawer or slide-out shelf, 3.5 in deep
- 1 plywood sheet, 1/4 in x 12 in x 12 in
- 6–8 jar stopper inserts cut at 10-degree angle
- Wood glue and small clamps
- Sandpaper 220 grit
Instructions
- Measure inside drawer and cut plywood to fit the base.
- Cut insert ramps to 10-degree slope and glue in rows with 1/2 in spacing.
- Sand edges and test with spice jars. Completion cue: jars rest at a readable angle and don’t move when drawer opens.
How to Display or Gift It
Keep the spice drawer directly below the stove for easy reach. For gifting, include a small set of pre-labeled spice jars.
- Wooden Crate Stack Shelving
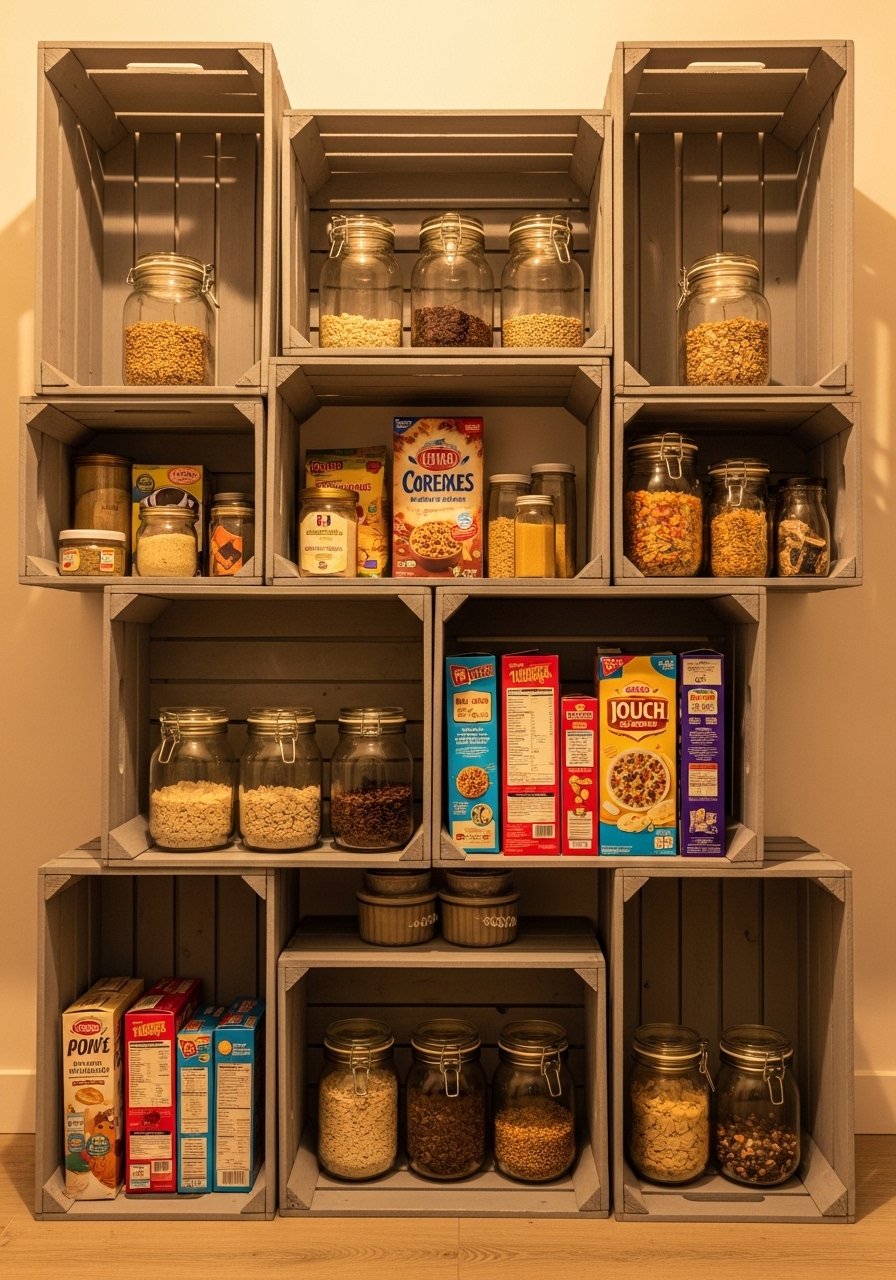
Stackable wooden crates make modular shelving you can reconfigure. Paint crates in a single color for a cohesive look, or mix stains for a rustic vibe.
Materials
- 3 wooden crates, 12 in x 16 in x 8 in
- 6 small L-brackets
- 6 wood screws 3/4"
- Paint or stain, 8 oz
- Sandpaper 120 grit
Instructions
- Sand crates and paint or stain; dry 2–4 hours between coats.
- Stack crates and secure with L-brackets for stability.
- Fill with baskets or jars. Completion cue: stacked crates do not shift and support weight evenly.
How to Display or Gift It
Use for bulk cereal or paper goods. For gifting, include a small label stamp set.
- Vertical Wine & Oil Rack (Narrow Bottles)
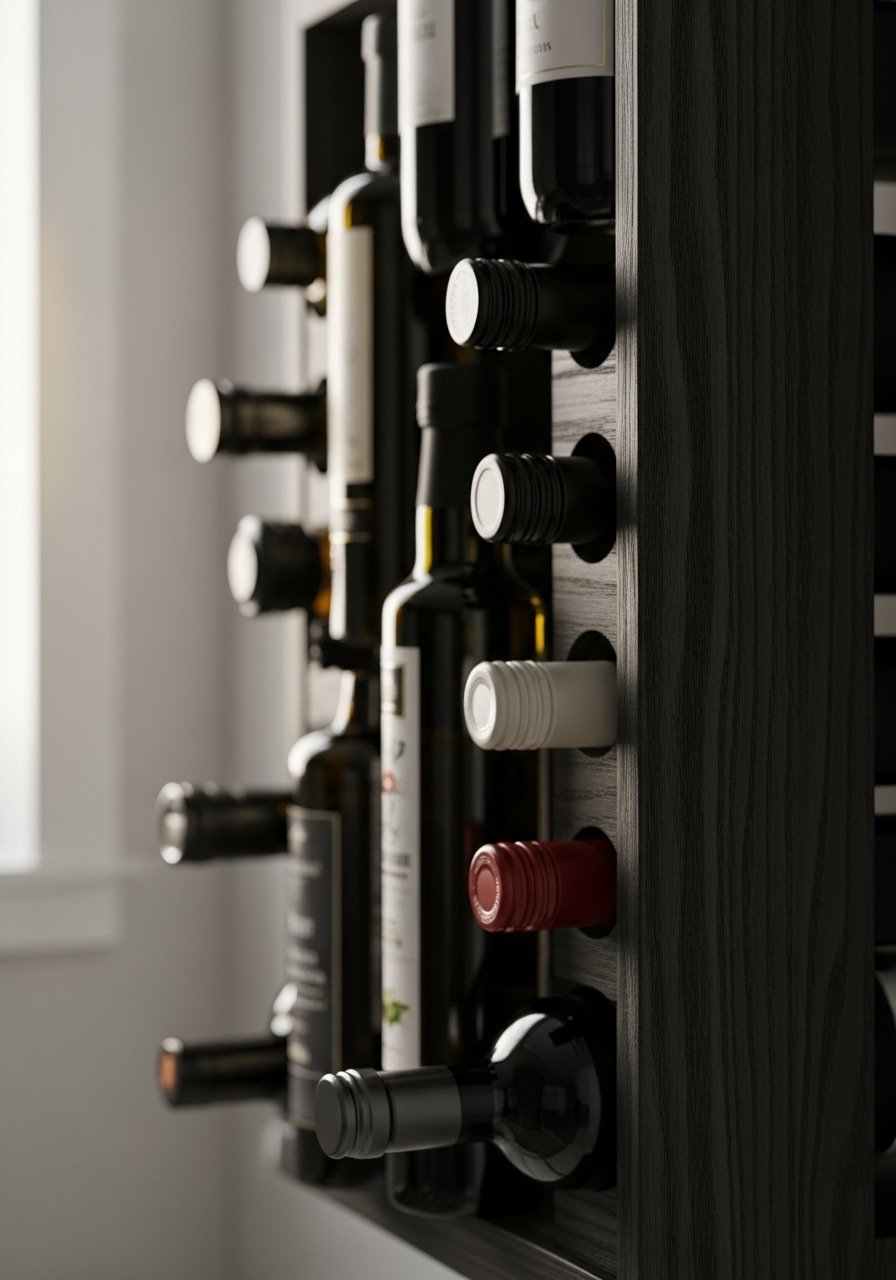
Store bottles vertically in a narrow rack to keep oils and vinegars handy. Slotted wood supports bottle necks and prevents rolling.
Materials
- 1 wooden slotted rack, 4 in x 24 in
- 8 rubber bottle stoppers (for added grip)
- Sandpaper 220 grit
- Wood glue, 20 mL
Instructions
- Make or buy a slotted rack sized for bottle neck diameters (1.2 in–1.5 in).
- Install rubber stoppers in slots for anti-slip.
- Place bottles and ensure stable fit. Completion cue: bottles rest without wobble.
How to Display or Gift It
Place near your seasoning station. For gifting, add a bottle of infused olive oil.
- Slim Rolling Cart Pantry
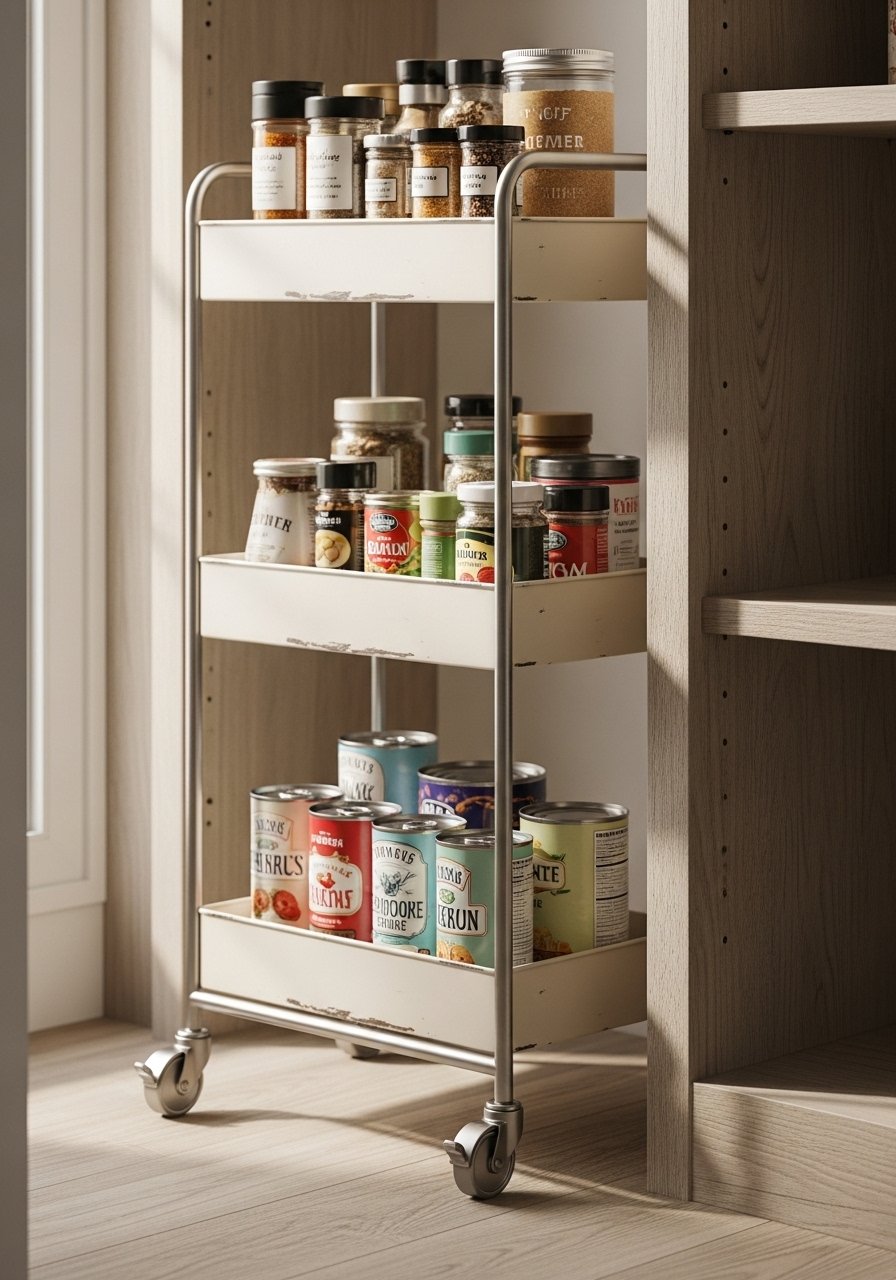
A slim rolling cart slides into tight gaps for grab-and-go storage. Look for carts 4–6 in narrower than the gap you intend to fill.
Materials
- 1 slim rolling cart, 10 in x 24 in x 30 in (approx.)
- Non-slip shelf liner
- Small baskets for grouping
- Wheels rated 25 lb each
Instructions
- Assemble cart per manufacturer instructions.
- Line shelves with non-slip liner and load with items by frequency.
- Test rolling in and out of the gap. Completion cue: cart rolls smoothly without scraping.
How to Display or Gift It
Use for canned goods or baking accessories. For gifting, include a set of stackable pantry bins.
- Fold-Down Snack Station Shelf
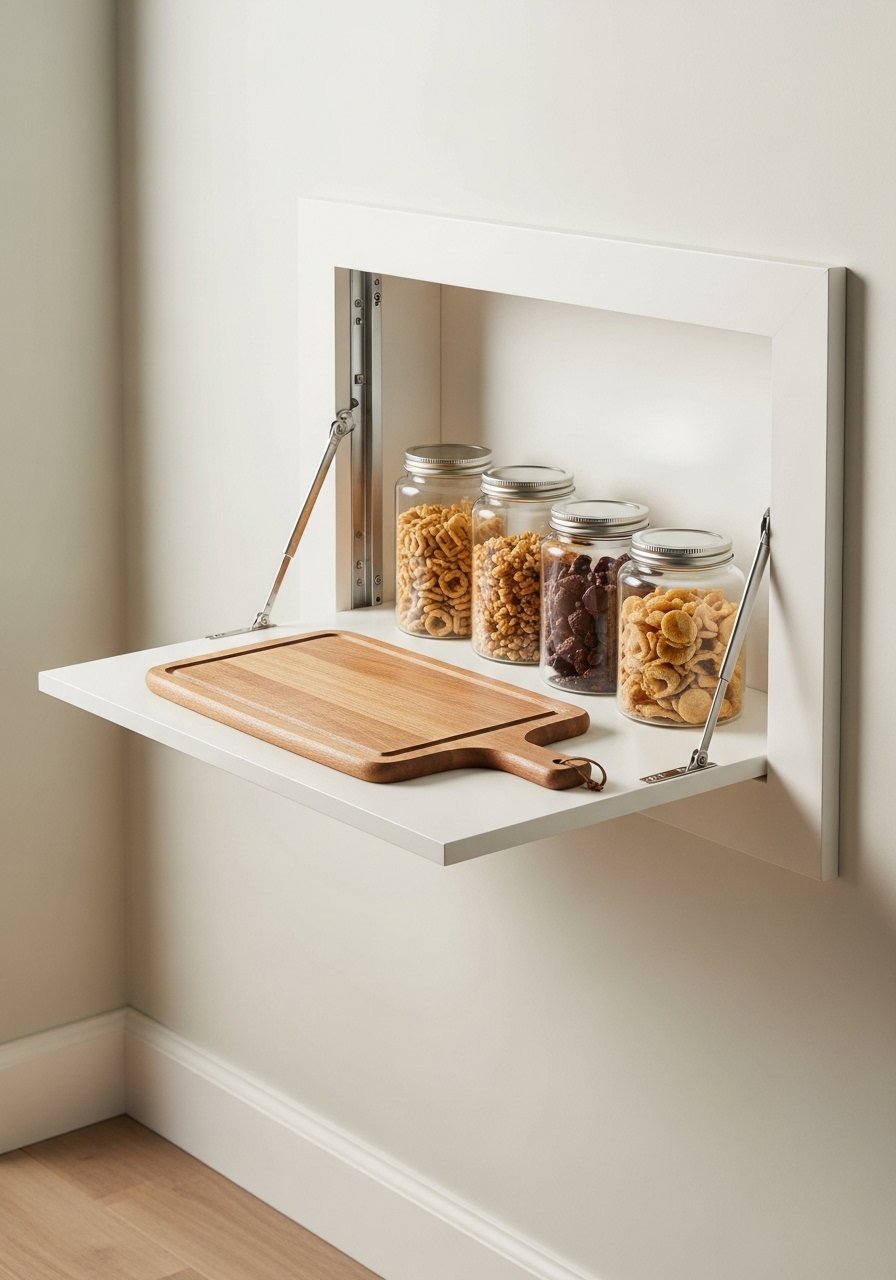
A fold-down shelf gives you a temporary work surface or snack station. Use a piano hinge and chain support for sturdiness.
Materials
- 1 plywood shelf top, 3/4 in x 18 in x 12 in
- 1 piano hinge, 18 in
- 2 chain supports, 6 in
- Screws and wall anchors
- Sandpaper 220 grit
Instructions
- Cut shelf to size and sand.
- Attach piano hinge to the back edge and secure to pantry wall studs.
- Attach chain supports to hold shelf level when open.
- Test with weight up to 20 lb. Completion cue: shelf holds weight and folds flush.
How to Display or Gift It
Use as a kids’ snack or lunch prep surface. For gifting, include a set of small snack jars.
- Mason Jar Herb Garden on Pantry Door

An herb garden on the pantry door keeps fresh herbs at hand and adds life. Choose shallow-rooted herbs and position for indirect light or supplement with a clip-on grow light.
Materials
- 4 16 oz mason jars
- 1 wooden plank, 4 in x 18 in x 3/4 in
- 4 hose clamps or jar holder brackets
- 4 small potting soil pucks
- Herb seedlings (basil, parsley, thyme, chives)
- Drill and screwdriver
Instructions
- Attach hose clamps to the plank spaced evenly; secure clamps with screws.
- Insert mason jars and fill with potting soil.
- Plant herb seedlings and water lightly. Completion cue: soil feels moist but not waterlogged after planting.
- Check daily for light and water needs.
How to Display or Gift It
Mount on the pantry door interior for easy harvesting. For gifting, include a packet of herb seeds and care card.
I can’t wait to see which of these small pantry ideas you try first. There’s something here for every space and skill level—from easy mason jar hacks to built-in sliding drawers. Pin this post so you can come back when you’re ready to DIY a tidy pantry. Which project will you make this weekend? Share a photo with a friend and start a mini pantry challenge.
Trust me, picking up a quality hot glue gun with temperature control changed how every single one of these projects turned out — less stringy glue, quicker bonds, and fewer burns.


