You know that little corner of the kitchen that always feels tight but could look absolutely charming? These 26 bold farmhouse small pantry ideas are built for that exact space—cozy, functional, and full of rustic personality. Whether you’re working with a skinny closet, an under-stair cubby, or a recessed wall niche, you’ll find projects that add vintage warmth, smart storage, and farmhouse texture.
You’ll see projects that use reclaimed wood, mason jars, chalk paint, and simple hardware. I often reach for my hot glue gun with temperature control for quick assemblies and my Cricut Explore cutting machine when I need crisp labels. Each idea includes materials (with exact quantities), step-by-step instructions (with real drying and set times), display tips, and troubleshooting notes so you won’t waste time or supplies.
Ready to make your pantry feel like a tiny farmhouse shop? Pin the ones you love and let’s get crafting.
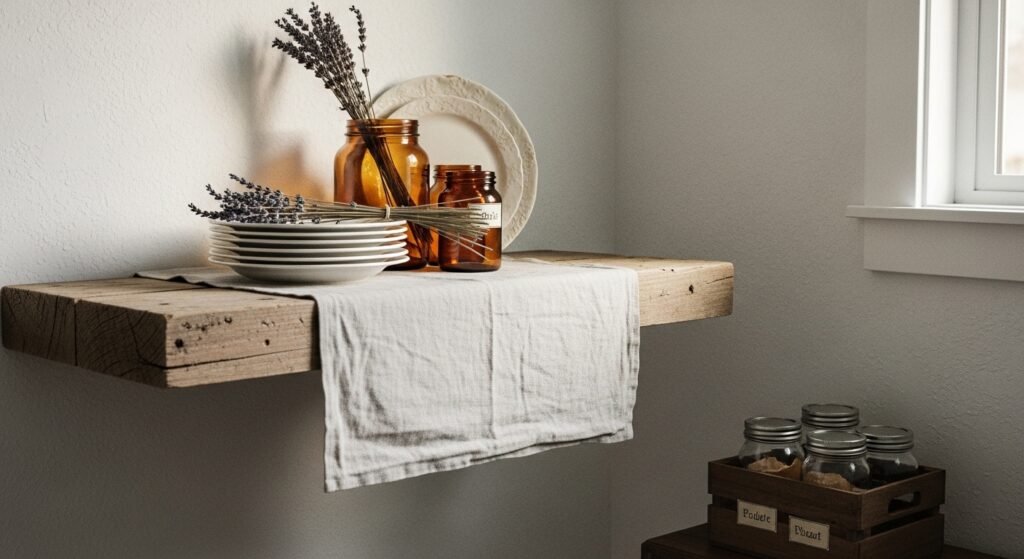
- Reclaimed Wood Floating Shelf with Basket Hooks
This floating shelf brings rustic texture and extra hanging storage to a narrow pantry wall. The warm grain and black hardware feel farmhouse, while baskets give you flexible bins for snacks and linens. Beginners will like how forgiving the cut-and-sand steps are.
Materials
- 1 24" x 6" reclaimed wood board, planed and sanded
- 2 3" x 18" steel floating shelf brackets
- 4 black metal S-hooks
- 2 woven seagrass baskets, 10" x 8"
- 8 1-1/4" wood screws (bracket mount)
- 1 120-grit sandpaper sheet
- 1 8-oz bottle matte clear sealer
- pencil, level, drill with 3/16" bit
Instructions
- Measure and mark shelf height; use a level and pencil to mark bracket placement 24" apart.
- Pre-drill bracket holes with 3/16" bit and secure brackets with wood screws.
- Sand board edges and face with 120-grit until smooth to the touch; wipe dust.
- Apply one thin coat of matte clear sealer with a foam brush; let dry 1 hour. Apply second coat; dry 2 hours.
- Slide board onto brackets, centered and flush.
- Hang baskets from S-hooks spaced evenly beneath the shelf.
- Load jars and linens; adjust baskets so they hang straight.
How to Display or Gift It
- Style with labeled spice jars and a ceramic vase with dried lavender.
- Tie a small twine bow around each basket handle for a unified look.
- Store seasonal items like holiday cookie cutters in the baskets.
- Wrap the shelf in kraft paper for gifting and include hanging hardware in a small bag.
- Farmhouse Small Pantry Idea: Mason Jar Spice Rack
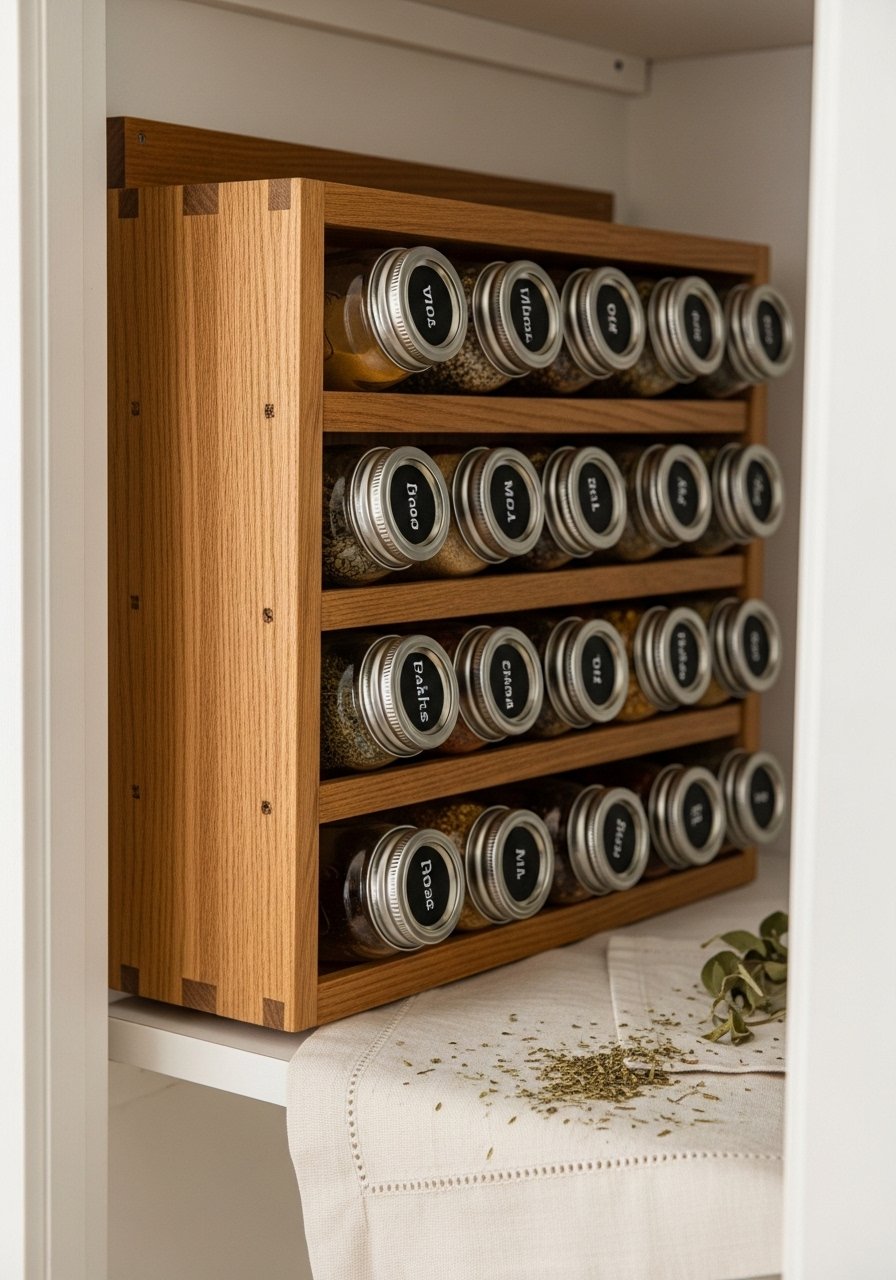
Turn a skinny pantry door into a spice dream. This vertical mason jar rack saves shelf space and gives that apothecary vibe farmhouse lovers crave. The project is fast and uses basic woodworking skills.
Materials
- 1 4' x 6" pine board, cut to door height
- 12 8 oz mason jars with metal lids
- 12 chalkboard round labels
- 2 1-1/2" metal L-brackets and screws
- 1 1/8" hinge set (if mounting to inner door)
- 1 jar lid punch or 1" drill bit to make lid holes
- 1 jar opener (optional)
- pencil, ruler, power drill
Instructions
- Measure door interior and cut pine board to fit height minus 1/4".
- Mark jar lid positions in two columns spaced 2.5" apart vertically.
- Punch a 1" hole in each jar lid for mounting or use full lids and screw into a pre-drilled pilot hole.
- Attach lids to board with screws through pilot holes. Space jars on their mounted lids.
- Mount board to the door with L-brackets or hinges; ensure clearance for jars.
- Fill jars with spices; label with chalkboard labels.
- Test door close—adjust bracket positions if rubbing occurs.
How to Display or Gift It
- Label jars with a white paint pen for crisp text.
- Store a small magnetic spice spoon set on the inside of the door.
- This makes a great housewarming gift; pack with three sample spice jars in a kraft box.
- Keep an extra jar empty for blending fresh spice mixes.
- Woven Basket Tiered Corner Shelf

Corner space? Use stacked wooden crates with woven baskets to create a tiered pantry display. The texture of wicker plus wood makes this feel cozy and farmhouse-chic. It works great if you want movable storage.
Materials
- 3 small wooden crates (12" x 8" x 6")
- 3 woven baskets to fit each crate
- 6 1-1/2" wood screws (to stack crates)
- 1 80-grit sandpaper sheet
- 1 4-oz bottle clear wax finish
- 4 cork furniture pads
Instructions
- Sand crate edges lightly with 80-grit to remove splinters.
- Stack crates in a staggered corner configuration and pre-drill holes.
- Screw crates together with wood screws for stability.
- Apply a thin coat of clear wax finish with a lint-free rag; cure 4 hours.
- Insert baskets into each crate. Add cork pads under bottom crate to protect floors.
- Arrange pantry staples by frequency of use—everyday at waist height.
How to Display or Gift It
- Add handwritten kraft tags tied with twine to baskets.
- Slide a small herb pot into the top crate for a live touch.
- Fold extra liners for the baskets and store in a flat craft organizer between uses.
- Chalk-Painted Pantry Door with Peg Rail
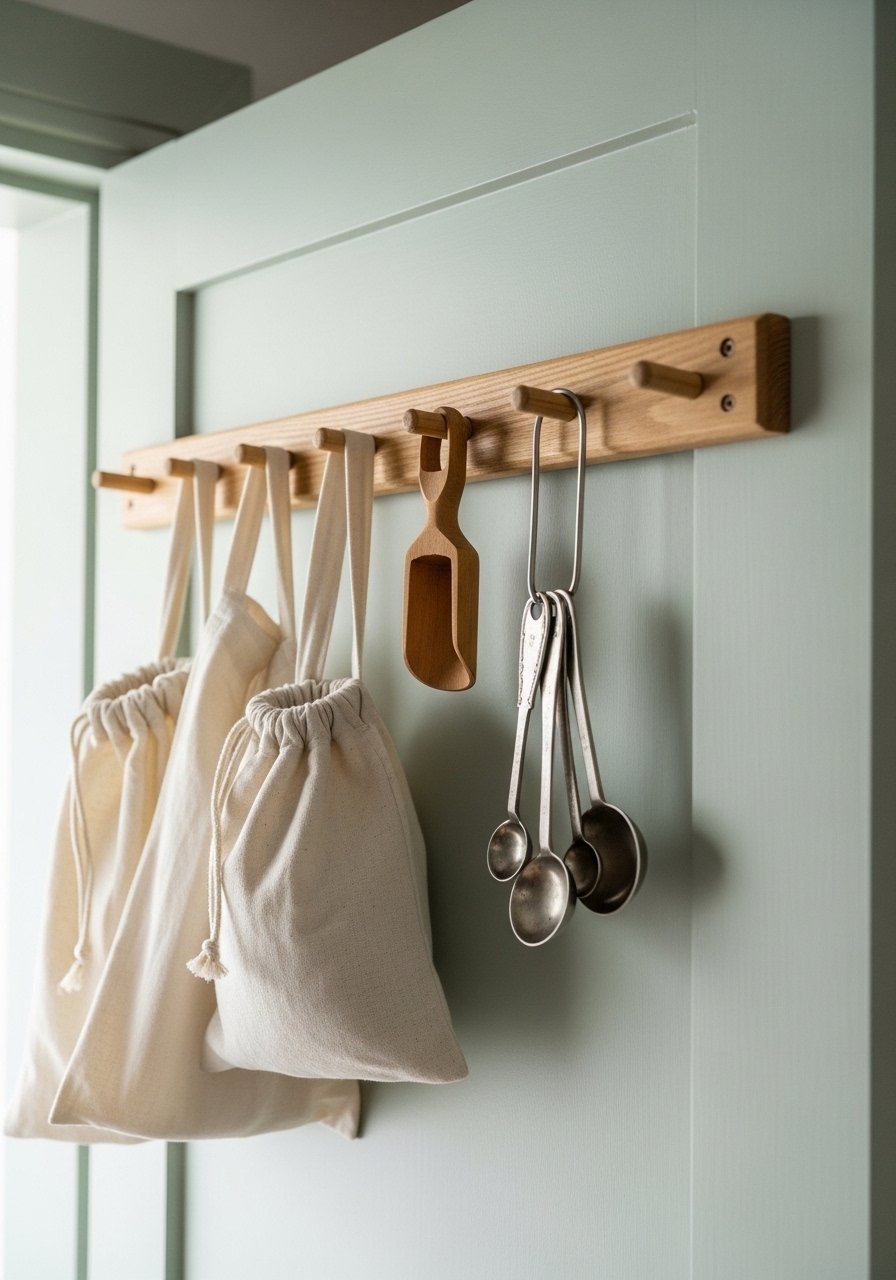
A coat of chalk paint can completely change the mood of a small pantry. This inside-door makeover adds a peg rail for hanging bags and tools—practical and pretty.
Materials
- 1 quart chalk paint in pale sage
- 1 foam roller (4" nap)
- 1 12" wooden peg rail (unfinished)
- 3 1-1/2" wood screws and anchors
- 1 120-grit sanding block
- 1 can wax finish, 8 oz
- painter’s tape, drop cloth
Instructions
- Remove door hardware; sand high-sheen areas with 120-grit until just dull.
- Tape edges and place a drop cloth.
- Apply first coat chalk paint with foam roller; thin coats prevent drips. Dry 30 minutes.
- Apply a second coat for full coverage. Dry 1 hour.
- Lightly sand edges for a distressed look; wipe clean.
- Mount peg rail with screws and anchors. Reattach hardware.
- Apply wax finish with a soft cloth; cure 24 hours.
How to Display or Gift It
- Hang linen produce bags and wooden scoops on pegs.
- For gifting, include a small jar of wax and a soft cloth for upkeep.
- Chalk labels on hanging bags let you swap contents seasonally.
- Slim Rolling Pantry Cart from a Utility Trolley
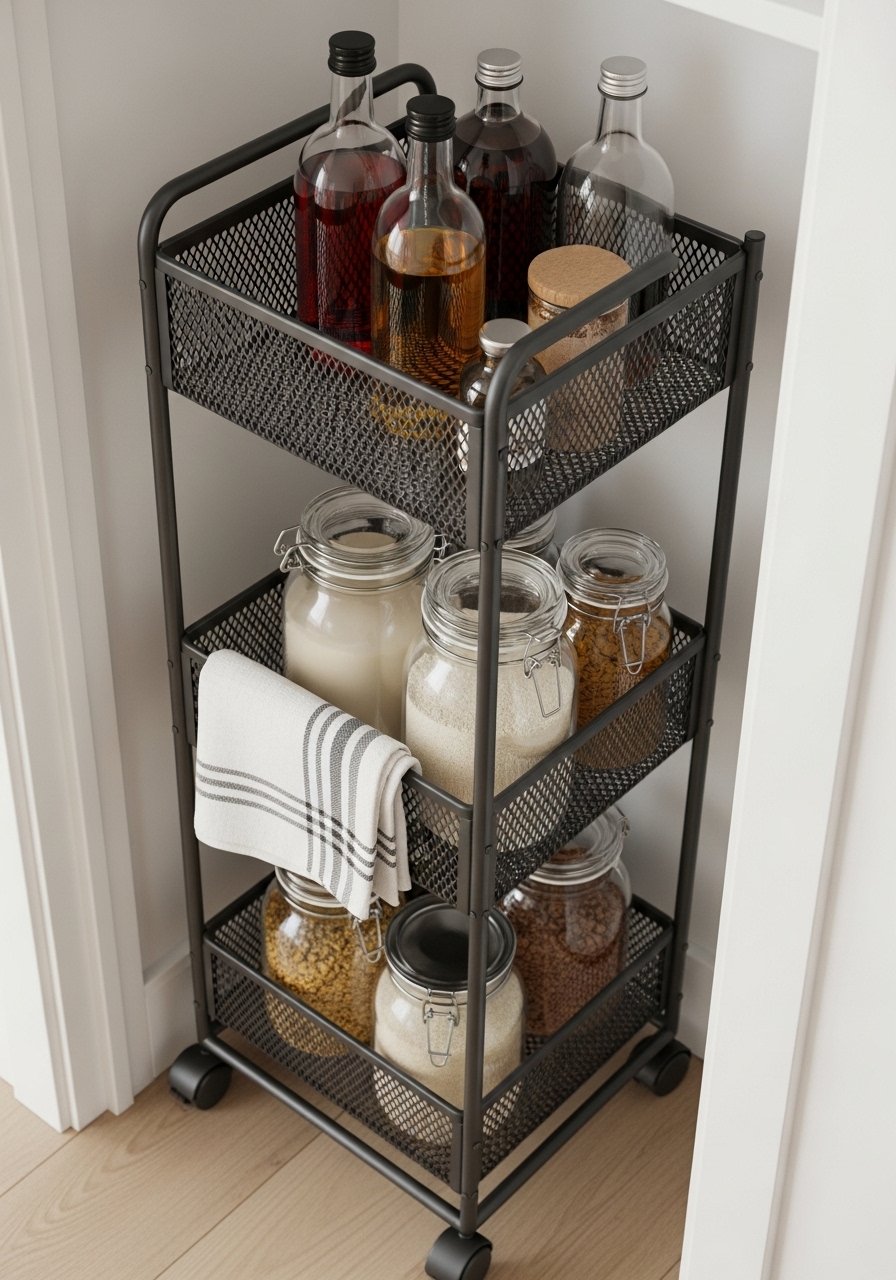
A narrow rolling cart is perfect for deep pantry gaps. Convert a basic utility trolley into an organized mobile pantry with baskets and labeled jars.
Materials
- 1 slim utility cart (12" x 24" x 32")
- 3 stackable woven baskets to fit shelves
- 6 round chalk labels
- 1 set caster wheels (if cart lacks smooth-rolling ones)
- 1 bottle multipurpose spray paint (matte black) — optional
- soft cloth
Instructions
- Clean the cart surface. If painting, lightly sand and spray two thin coats; dry 1 hour between coats.
- Install caster wheels if needed and test roll.
- Arrange baskets on each shelf to keep glass jars from sliding.
- Place heavy items on bottom shelf, frequently used on middle.
- Label baskets or jars with chalk labels.
- Roll cart into place and tuck the handle behind a pantry wall.
How to Display or Gift It
- Style the top shelf with a decorative tray for oils and vinegars.
- A cart makes a great pantry gift—tie a baker’s towel to handle with twine.
- Store flat baking sheets upright along the back with a simple divider.
- Farmhouse Small Pantry Idea: Pegboard Command Center
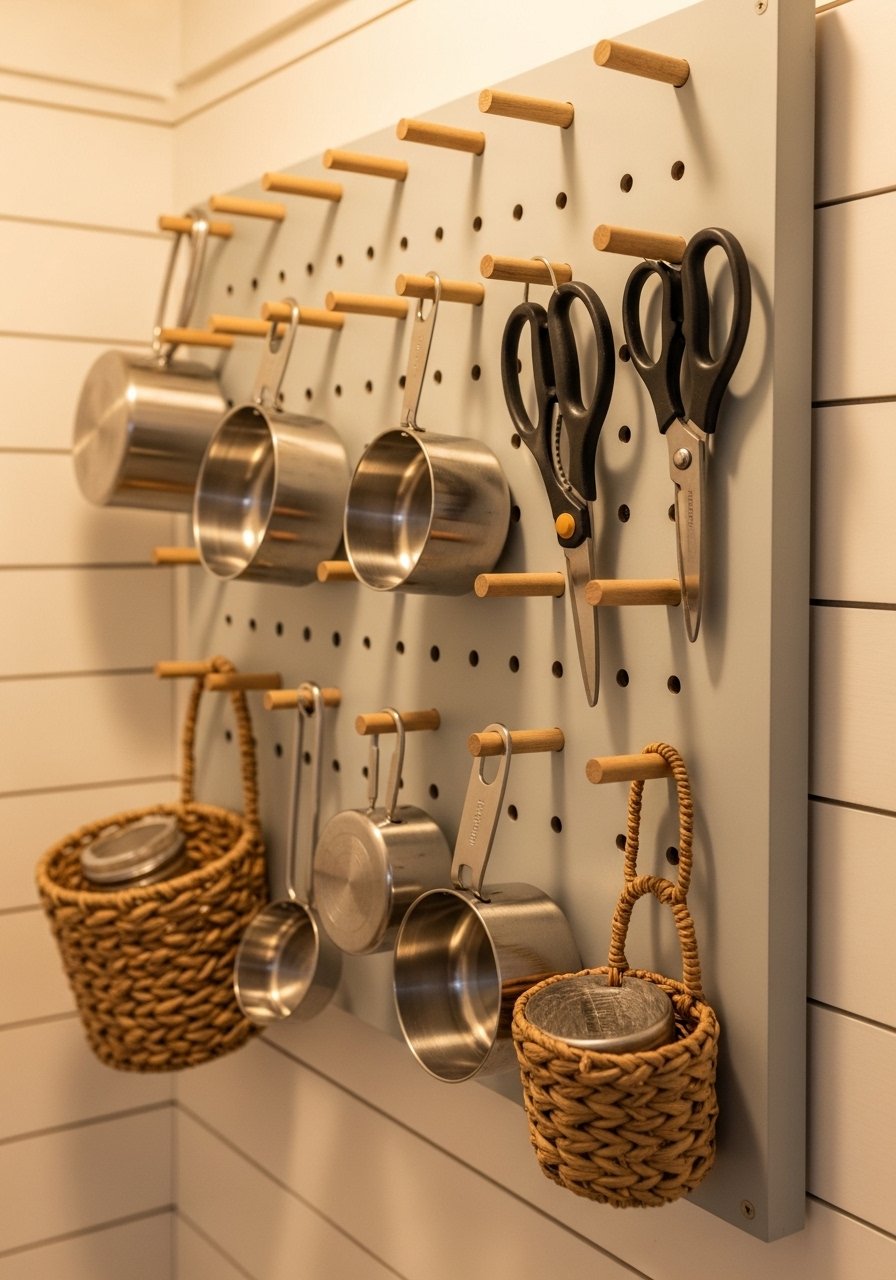
Pegboard gives flexible storage and a tidy look. Use it inside the pantry for utensils, small baskets, or a hanging herb basket. It’s adjustable and adapts as your needs change.
Materials
- 1 2' x 3' pegboard panel
- 10 wooden pegs and hooks set
- 3 small wire baskets for pegboard
- 1 quart chalk paint (same color as pantry wall)
- 1 foam brush
- 6 1-1/4" screws and anchors
- measuring tape
Instructions
- Paint pegboard and allow to dry 1 hour.
- Mount panel centered on your wall area using screws and anchors.
- Arrange pegs for hanging measuring cups, scissors, and small baskets.
- Hang frequently used tools at eye level.
- Adjust peg placement as needs evolve—no tool required.
How to Display or Gift It
- Add a small mounted chalkboard for weekly menu notes.
- Use small baskets to hold loose items like clothespins or tea bags.
- This panel also works as a mini herb wall with small pots.
- Farmhouse Small Pantry Idea: Labeled Milk Crate Stack
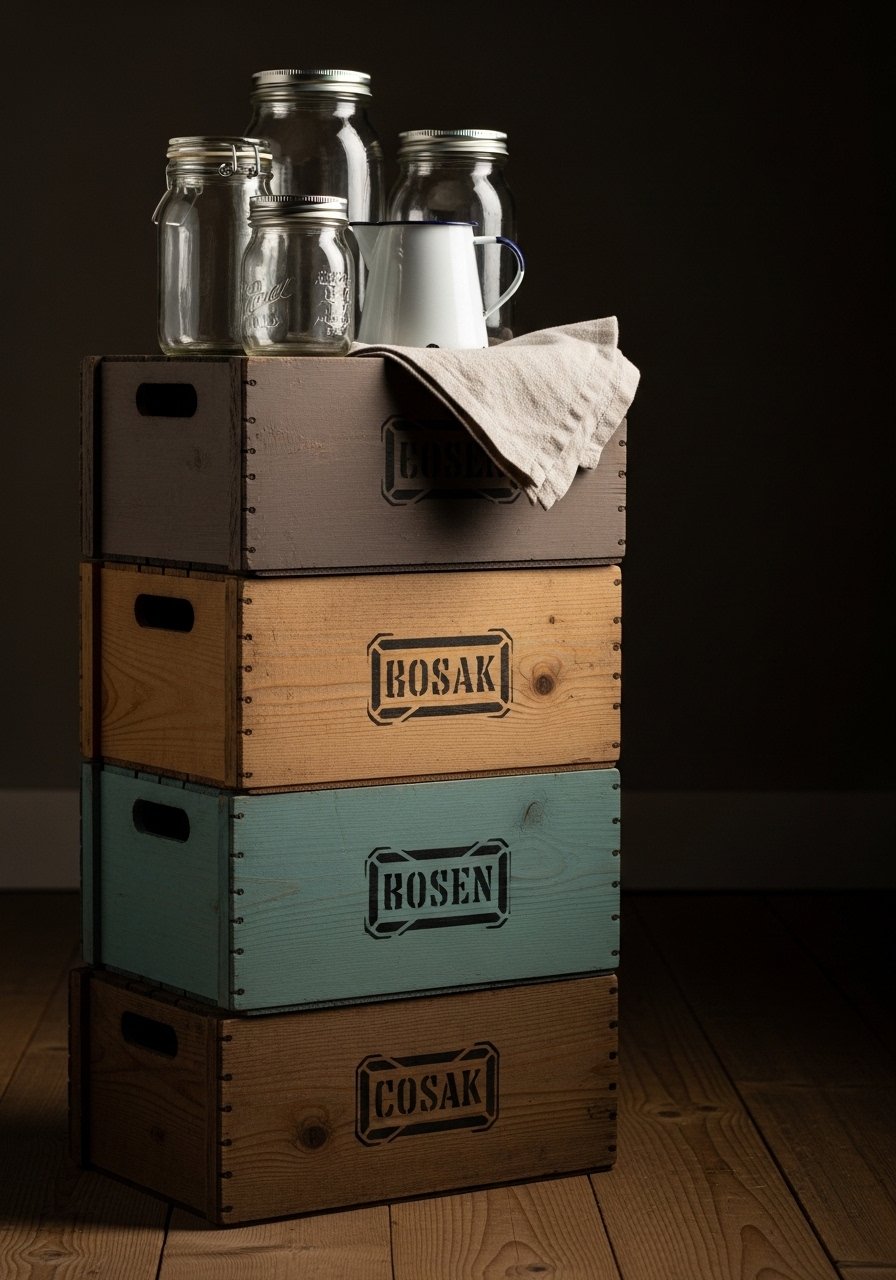
Stackable milk crates give instant farmhouse charm and modular storage. Stenciled labels help you find staples fast and make the whole wall feel curated.
Materials
- 4 wooden milk crates (13" x 10" x 6")
- 1 stencil set for words (4" letters)
- 1 2-oz bottle matte craft paint (black)
- 1 foam stencil brush
- 8 small corner brackets and screws
- sandpaper 120-grit
- twine for ties
Instructions
- Sand crate faces gently with 120-grit.
- Center stencil and dab paint with foam brush in thin layers; dry 20 minutes between coats.
- Once letters are opaque, remove stencil and allow paint to cure 2 hours.
- Stack crates and secure with corner brackets for stability.
- Insert lined baskets or jars and label further with twine tags.
- Move crates as needed; secure to wall if stacking high.
How to Display or Gift It
- Place a small wooden easel with a handwritten list on top.
- Gift a stack filled with baking essentials in a kraft box.
- Store seasonal linens in the top crate to rotate with decor.
- Painted Wire Shelving Makeover
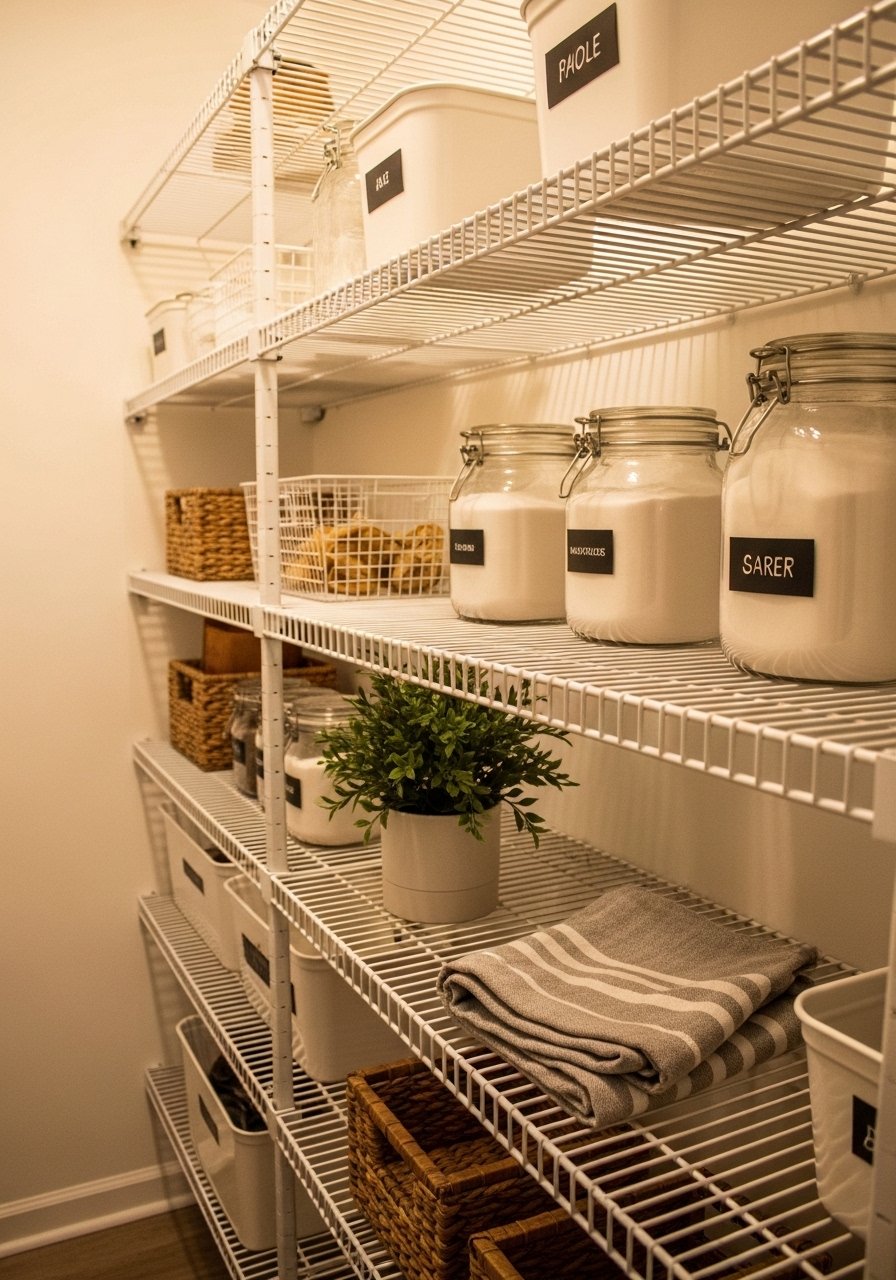
Wire shelves can look industrial. A quick paint job and woven baskets soften the look and give farmhouse appeal. It’s a high-impact refresh.
Materials
- 1 can spray paint for metal (matte white)
- 3 woven storage baskets sized for shelf depth
- 1 drop cloth
- painter’s tape
- 1 rust-inhibitor primer spray (if needed)
- soft cloth
Instructions
- Empty shelves and clean with warm soapy water; dry fully.
- Lay drop cloth. If rust exists, spray prime and let dry 1 hour.
- Spray two light coats of matte white paint, 10 minutes between coats.
- Let paint cure 24 hours before reloading.
- Fit baskets and arrange jars for a uniform look.
- Rotate contents seasonally to keep it tidy.
How to Display or Gift It
- Top the shelf with a metal tray and small herbal jars.
- Store extra labels and a marker in one basket for quick relabeling.
- Use a small crate as a tray for oils and vinegars.
- Repurposed Ladder Towel Rack for Pantry Linens
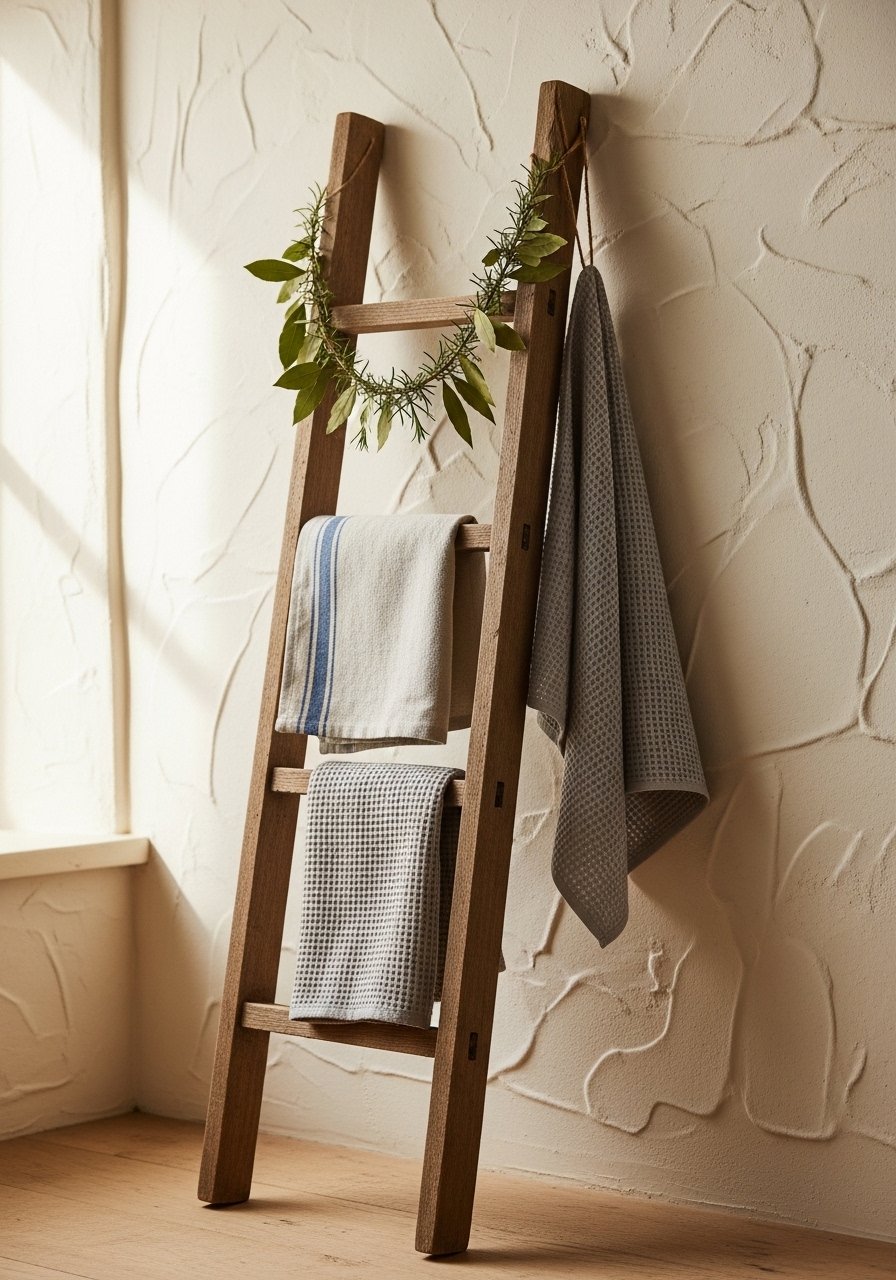
A short repurposed ladder is a charming way to store tea towels, aprons, and produce bags. It leans or mounts and adds vertical interest to a narrow pantry.
Materials
- 1 48" wooden ladder (short rung spacing)
- 1 bottle wood conditioner, 4 oz
- 4 linen tea towels
- 2 rubber feet to protect floor
- sandpaper 120-grit
- small hook set (if you prefer mounting)
Instructions
- Sand ladder lightly and wipe dust.
- Apply wood conditioner with cloth and let penetrate 30 minutes.
- Position ladder leaning in pantry or mount securely with hooks.
- Hang towels or cloth bags on rungs; fold for a tidy look.
- Add rubber feet to protect floor.
How to Display or Gift It
- Fold towels in thirds and hang evenly spaced.
- Tie a sprig of dried lavender to the ladder for scent.
- Ladder makes a sweet gift—pair with a stack of tea towels wrapped in twine.
- Chalkboard Labels + Vinyl Decals Pantry System

Uniform labels give small pantries an instantly styled look. Mix chalkboard labels with vinyl cut decals for long-term staples and changeable items.
Materials
- 1 roll chalkboard sticker sheet
- 1 vinyl decal pack (black matte)
- 1 white chalk pen
- 20 round and rectangular labels of various sizes
- ruler and small scissors
Instructions
- Clean jar surfaces with rubbing alcohol and let dry.
- Cut labels to fit; apply carefully to avoid bubbles.
- Use vinyl decals for permanent staples like flour and sugar.
- Write with chalk pen for changeable items and wipe with a damp cloth to update.
- Wait 24 hours for labels to adhere fully before washing jars.
How to Display or Gift It
- Wrap a set of labeled jars in kraft paper for gifting.
- Store unused labels in a flat craft organizer for easy access.
- Use a label layout grid on a clipboard for consistent placement.
- Mini Farmhouse Pantry Nook with Sliding Barn Track
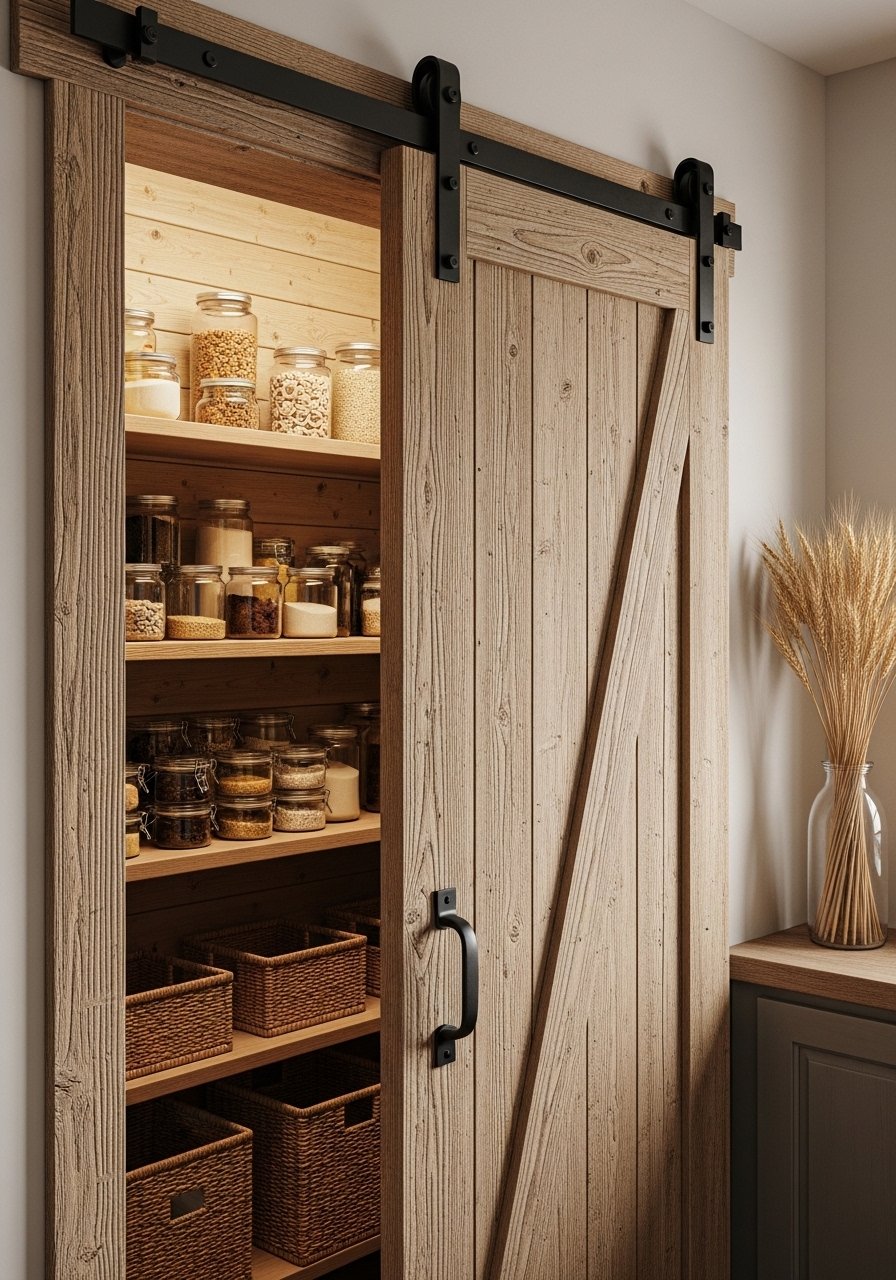
If your pantry door eats space, swap to a sliding barn door. It gives farmhouse character and keeps the doorway clear—great for tight kitchens.
Materials
- 1 sliding barn door kit (track length 6')
- 1 28" x 78" reclaimed style door (pre-finished)
- 4 heavy-duty screws and anchors
- 1 door guide kit
- stud finder, power drill
Instructions
- Find studs along header and mark for track mounting.
- Install the rail to studs using heavy screws per kit instructions.
- Hang door on track and install floor guide to prevent swinging.
- Test slide motion and adjust rollers for smoothness.
- Re-style pantry entrance with a doormat and basket nearby.
How to Display or Gift It
- Mount a small wreath or sign to the sliding door for seasonal flair.
- Use a wall hook near entrance for aprons.
- This makes a striking gift for someone renovating a small kitchen.
- Tiered Glass Jar Dispenser for Grains
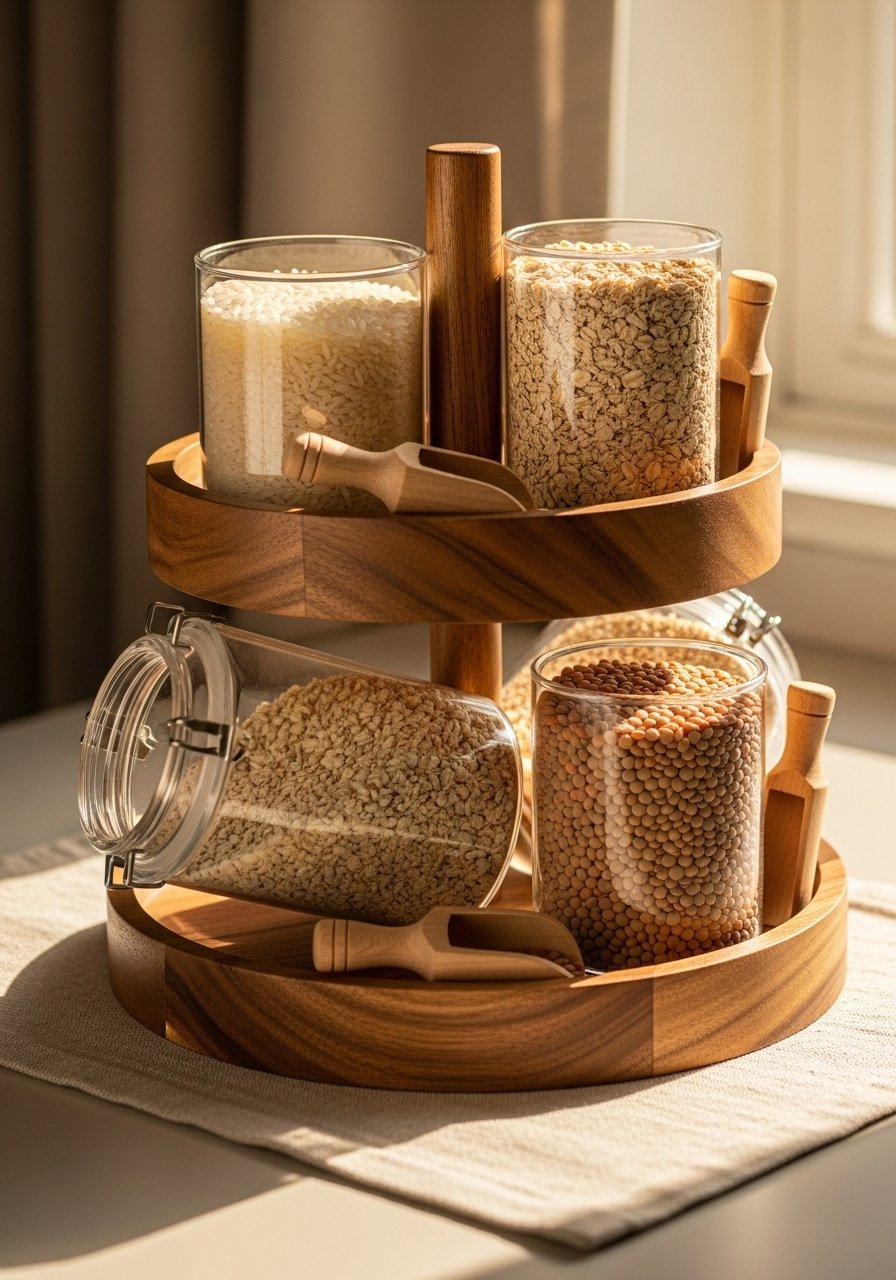
A tiered dispenser looks like a boutique shop and makes bulk grains easy to pour. The stand keeps the counter tidy and is very tactile when scooping.
Materials
- 3 2.5 L glass dispensers with spigot
- 1 24" x 10" hardwood plank for stand base
- 4 1" wooden dowels for risers
- 8 1" wood screws
- 1 fine wood finish, 2 oz
- small scoops (3)
Instructions
- Cut base and two riser platforms to size; sand smooth.
- Attach dowels as supports between platforms with wood glue and screws.
- Place dispensers on each level; secure with small L-clips if needed.
- Apply wood finish; cure 2 hours.
- Fill dispensers and test spigots for leaks.
How to Display or Gift It
- Add labels to dispensers with vinyl decals.
- Place a small tray beneath spigots to catch drips.
- For gifting, include three scoops tied with baker’s twine.
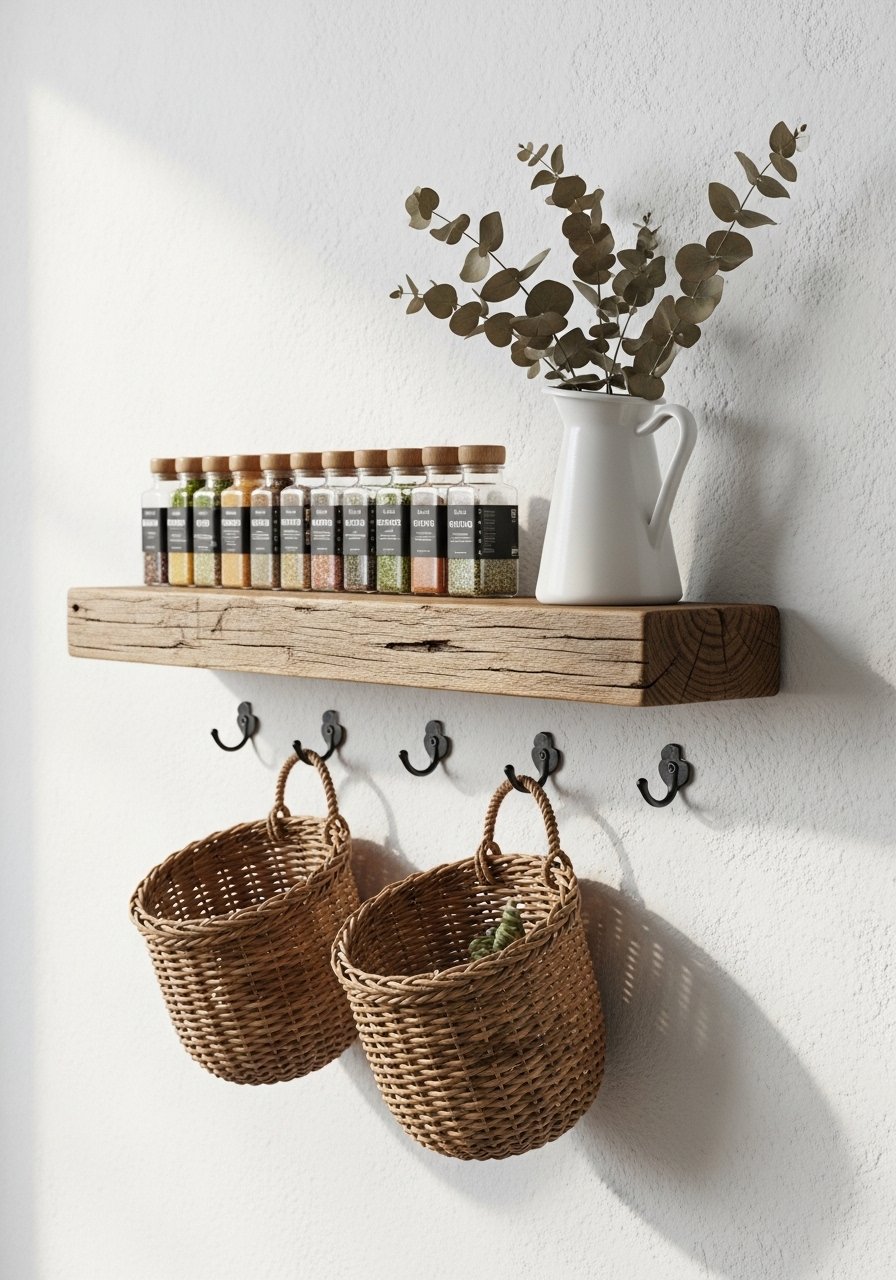
- Labeled Wire Baskets Mounted on Wall
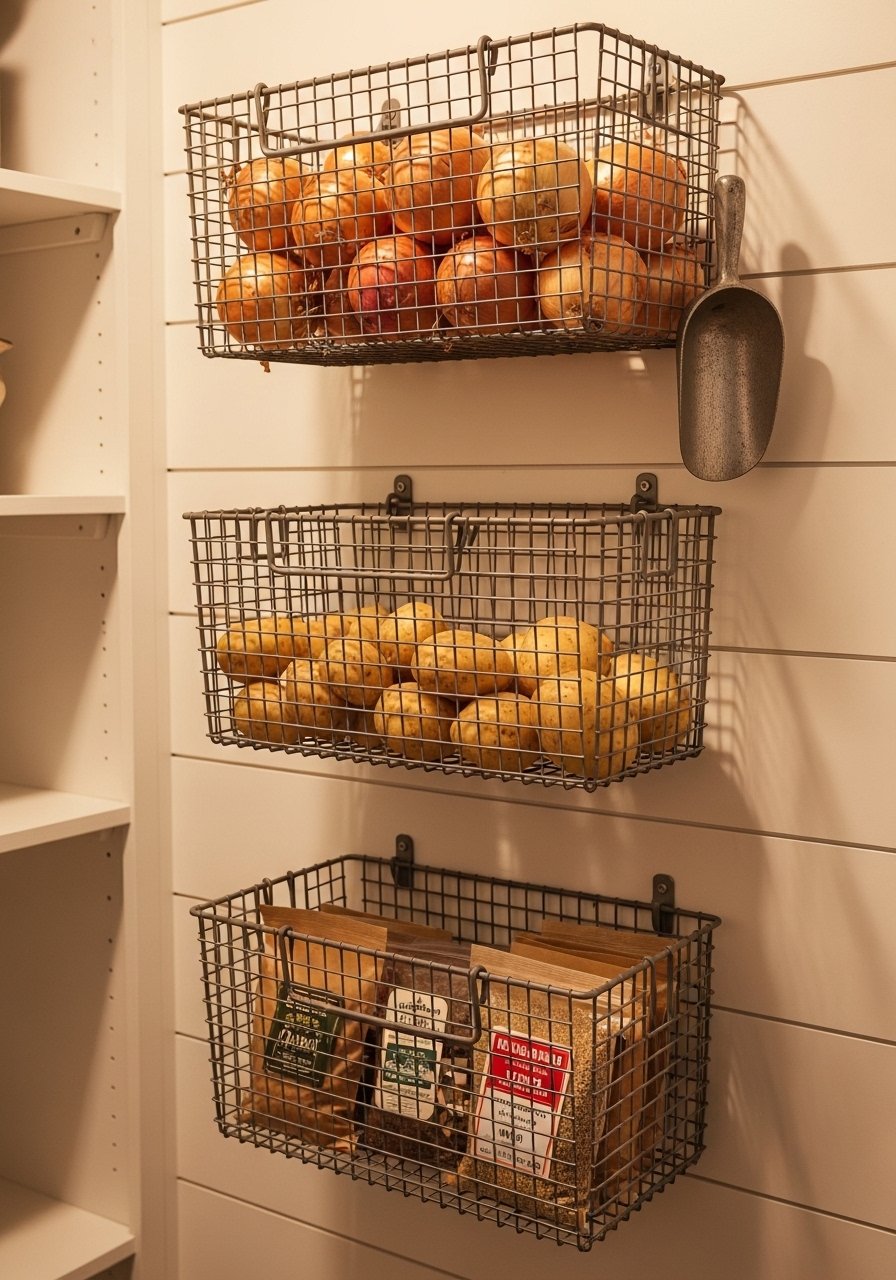
Wire baskets mounted on the wall free up shelf space and keep root vegetables perfectly ventilated. They’re simple to install and very farmhouse-friendly.
Materials
- 3 galvanized wire baskets (12" x 8")
- 6 medium screws and anchors
- 1 set of brass label holders for baskets
- drill, level
- small peel-and-stick rubber bumpers
Instructions
- Mark basket placement on wall with level.
- Drill pilot holes and install anchors.
- Mount baskets with screws and ensure level.
- Attach label holders to front of baskets and insert labels.
- Add rubber bumpers behind baskets to protect the wall.
How to Display or Gift It
- Use one basket for potatoes, one for onions, and one for miscellaneous pantry goods.
- Throw a small linen liner into baskets for delicate items.
- Label holders allow quick content swaps for seasonal storage.
- Wooden Crate Under-Shelf Drawers
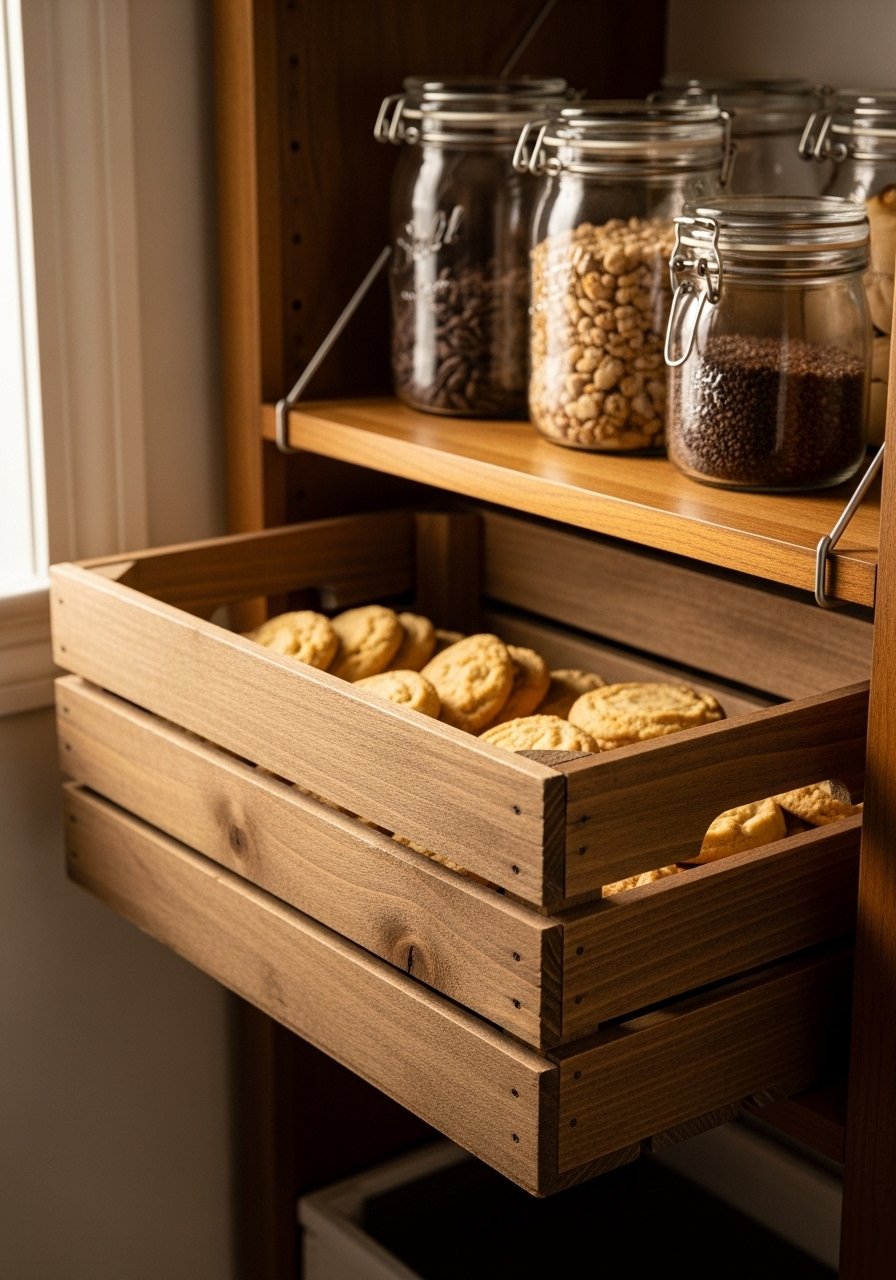
Under-shelf drawers give hidden storage for snacks or baking supplies. Turning a crate into a slide-out drawer is a satisfying build that keeps counters clear.
Materials
- 1 wooden crate (12" x 10" x 6")
- 2 12" under-shelf drawer slides
- 4 1" wood screws
- 1 small cup pull handle
- sandpaper 120-grit
- wood finish sample, 2 oz
Instructions
- Sand the crate edges and finish as desired; dry 1 hour.
- Mount drawer slides to underside of the shelf using measured placement.
- Attach matching slides to the crate sides.
- Secure handle to crate front.
- Slide crate into place and test smooth operation.
How to Display or Gift It
- Store snack pouches or baking mats in the drawer.
- Line the crate with a piece of kraft paper for easy cleaning.
- Pack a crate with pantry essentials as a quick housewarming gift.
- Farmhouse Small Pantry Idea: Mini Herb Drying Rack
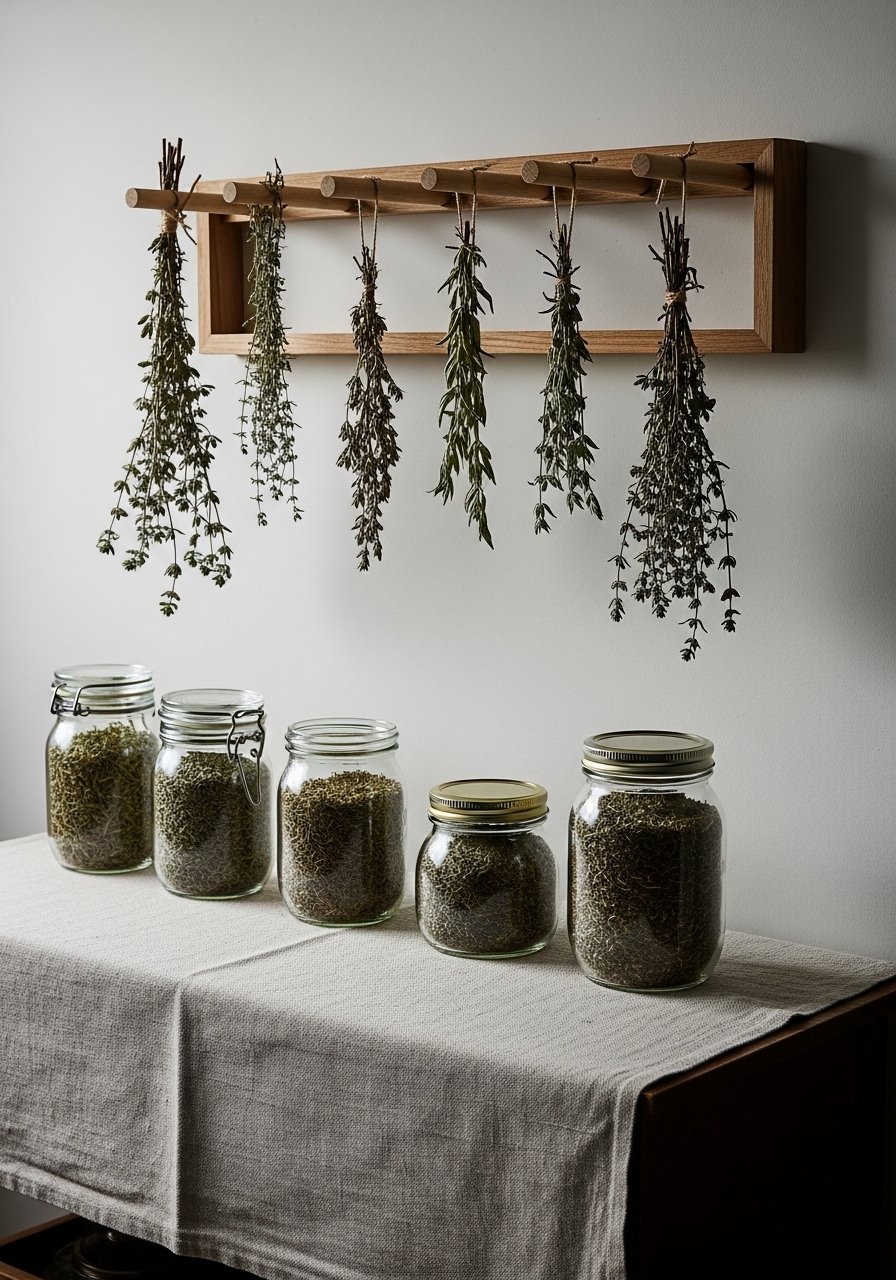
Dry herbs at home on a small rack and add an herbal scent and visual interest to a pantry. It’s practical and adds a farmhouse apothecary touch.
Materials
- 1 18" wooden dowel rack (3 dowels)
- 12 small clothespins
- 1 jar for clippings
- small saw and sandpaper
- 1 coat of clear matte finish, 2 oz
Instructions
- Cut and sand dowels to length; mount horizontally at different heights.
- Attach dowels with screws and pre-drilled pilot holes.
- Clip small herb bundles with clothespins and hang upside-down.
- Allow herbs to dry 7–14 days depending on humidity.
- Store dried herbs in labeled jars with airtight lids.
How to Display or Gift It
- Pair dried herbs with wooden spoons and a small recipe card set for gifting.
- Use chalk labels on jars and a small easel sign for display.
- Make-ahead dried bundles keep well for months if stored airtight.
- Fold-Down Pantry Table for Small Kitchens
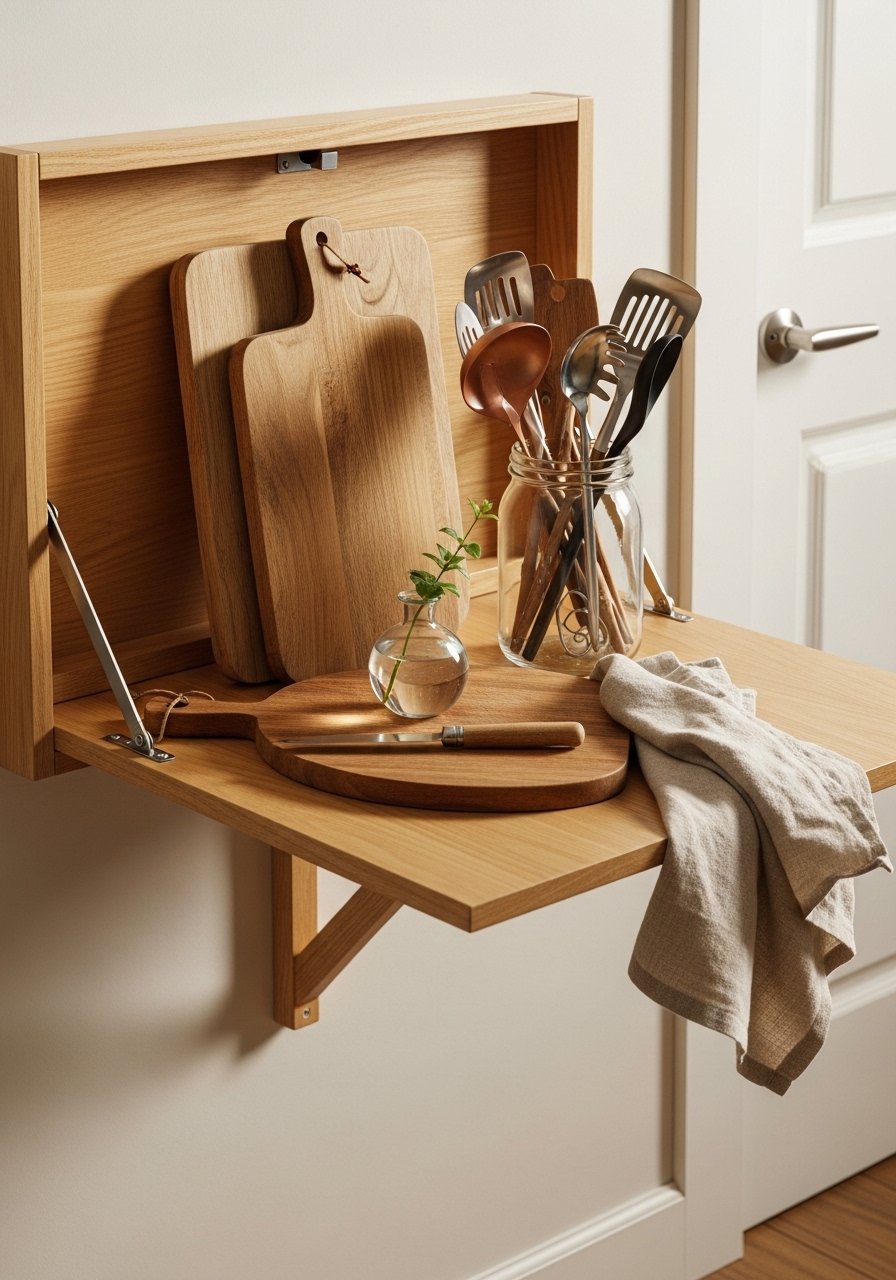
A fold-down table gives workspace in a tiny pantry for baking or coffee prep and folds away when not needed. It's a clever space-saver with farmhouse style.
Materials
- 1 24" x 18" hardwood tabletop
- 2 folding shelf brackets rated 100 lbs each
- 6 screws for bracket mounting
- sandpaper 120-grit
- 2 small decorative hinges
- 1 bottle clear finish, 4 oz
Instructions
- Sand and finish the tabletop; cure 2 hours.
- Mount one bracket to wall studs and attach table to bracket.
- Install second bracket and hinges for additional support.
- Test fold-down motion and adjust bracket tensions if necessary.
- Style with a small cutting board and utensil jar.
How to Display or Gift It
- Add a thin magnetic knife strip along the back edge.
- Fold down for meal prep and fold up for extra storage.
- Wrap a small set of utensils and a tea towel as a gift to accompany the table.
- Baker’s Rack Conversion with Hooks and Shelves
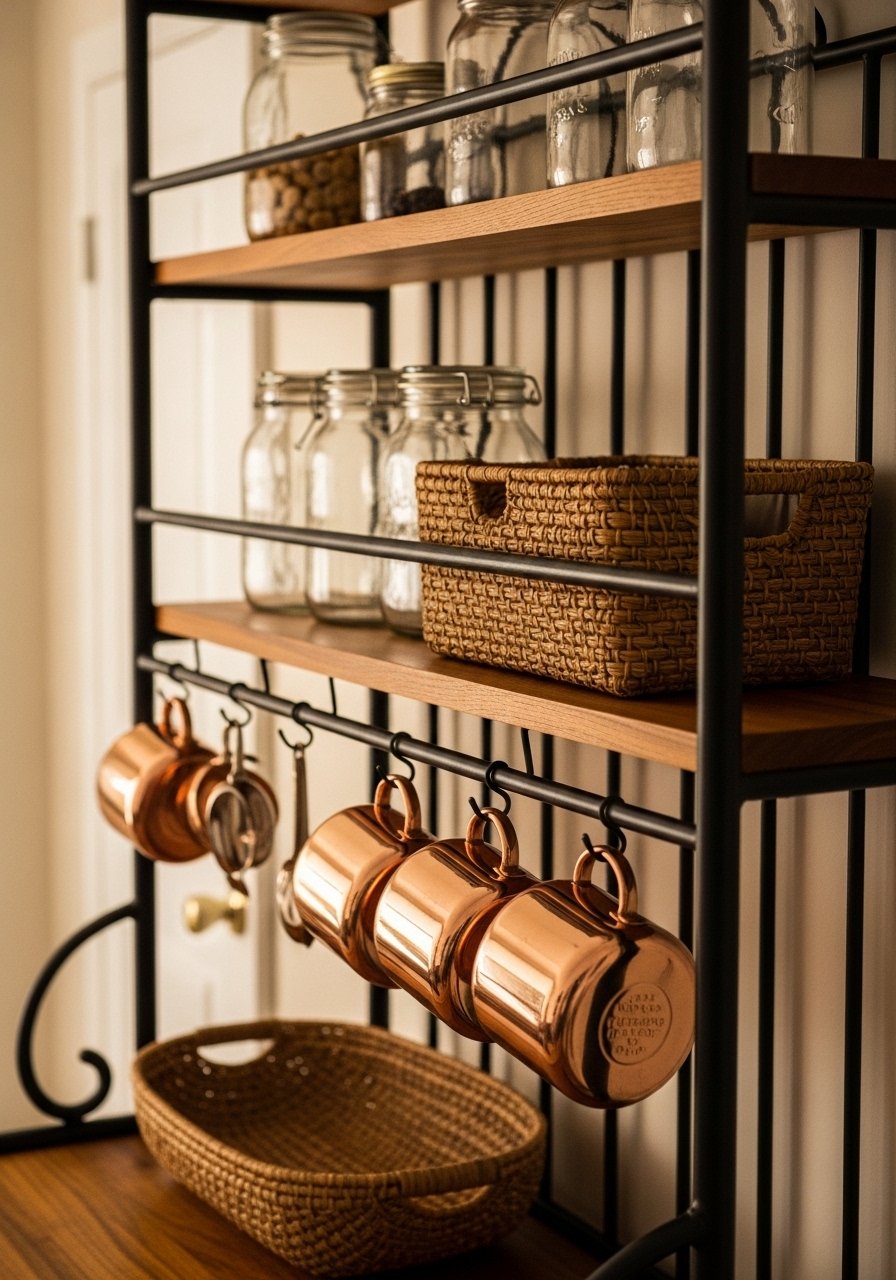
Baker’s racks are perfect for narrow pantries—convert one with wooden shelves and hooks for mugs and utensils. It’s sturdy yet airy.
Materials
- 1 four-tier baker’s rack (metal)
- 3 custom-cut plywood shelf inserts (to fill rack footprint)
- 12 S-hooks for hanging mugs
- 6 wood screws to secure inserts
- 1 stain or paint for shelves, 4 oz
- sandpaper 120-grit
Instructions
- Measure and cut plywood inserts to fit each shelf; sand edges.
- Stain or paint shelves; dry 1 hour.
- Place inserts and secure with screws into rack brackets.
- Hang S-hooks across front for mugs and tools.
- Arrange jars and baskets by frequency of use.
How to Display or Gift It
- Use top shelf for decorative items and bottom shelf for heavy staples.
- Gift the rack with a set of copper mugs tied to hooks.
- Add a small tray for oils and vinegars on eye-level shelf.
- Repurposed Drawer Dividers for Flatware Storage
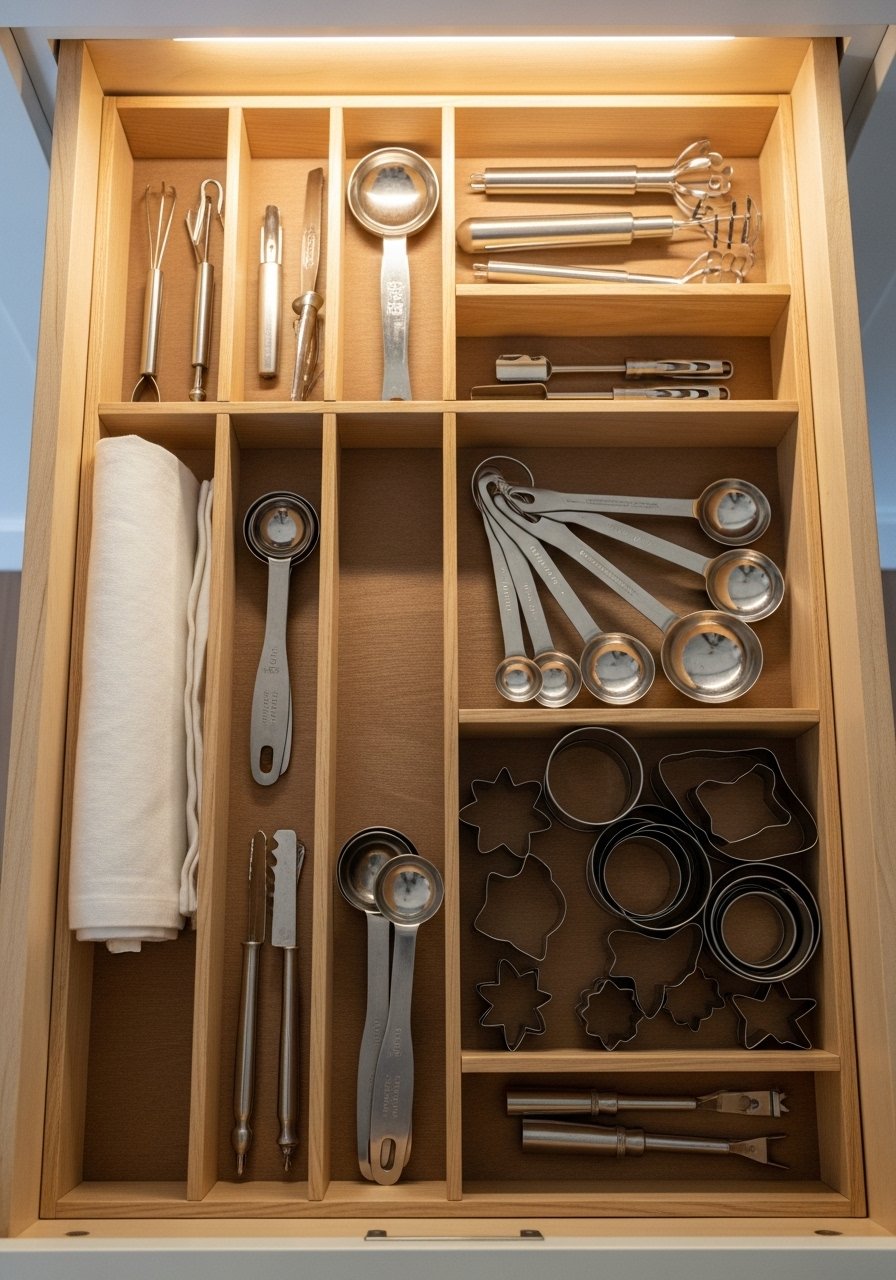
Turn any pantry drawer into an organized zone with simple wooden dividers. They keep small tools accessible and reduce clutter.
Materials
- 1 12" x 18" drawer to fit pantry shelf
- 6 thin wooden slats (1/8" x 1" x 12")
- wood glue
- measuring tape and pencil
- utility knife for trimming liners
Instructions
- Measure drawer interior and plan divider positions.
- Glue slats perpendicular to the drawer base at marked spots.
- Clamp and dry 1 hour.
- Trim a thin liner to fit and press into corners.
- Sort tools and adjust divider layout as use dictates.
How to Display or Gift It
- Use small drawer organizers for tea bags and clips.
- Label each slot with tiny vinyl decals for quick identification.
- This makes a great included upgrade when gifting kitchenware.
- Rolling Bread Box with Ventilated Slatted Lid
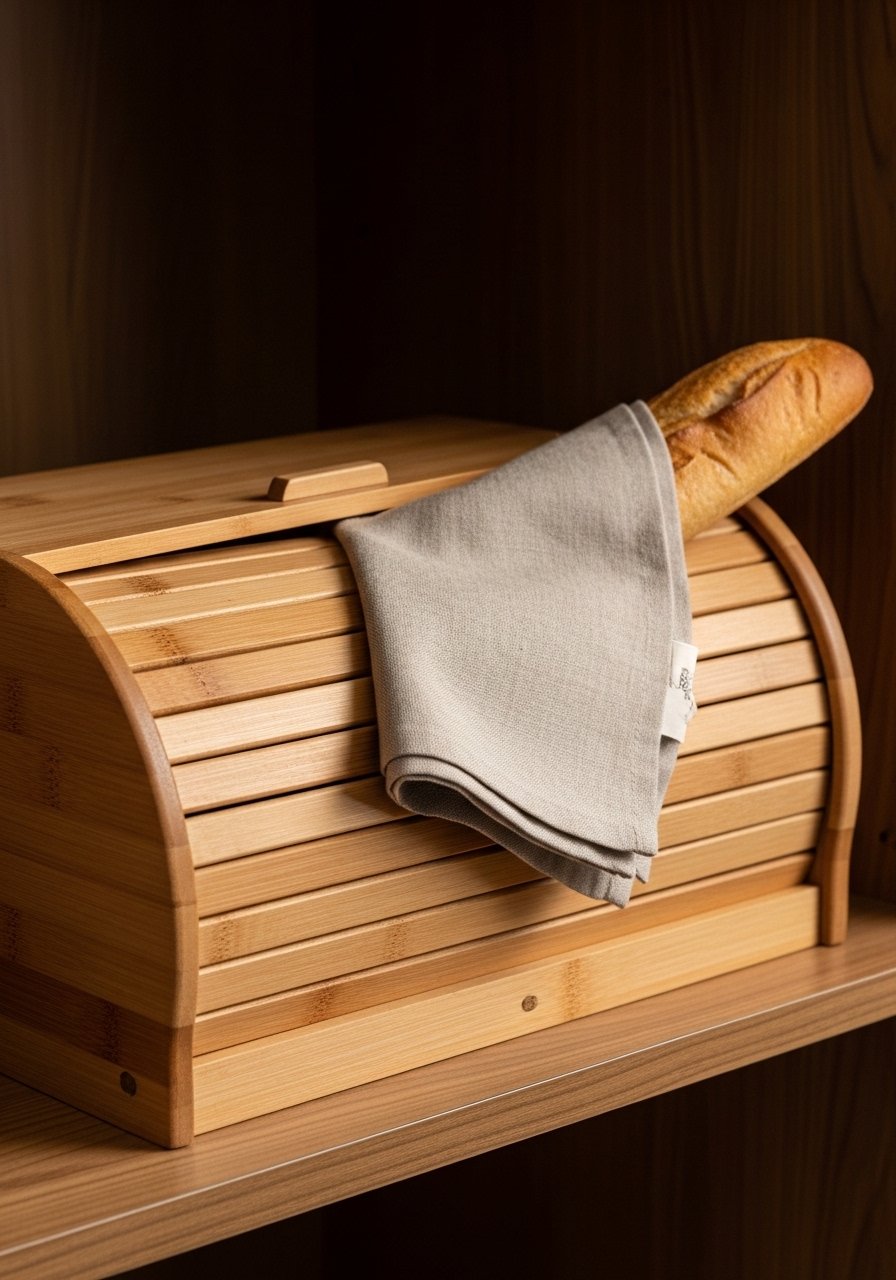
A ventilated bread box keeps loaves fresher and adds farmhouse bakery charm. The rolling lid is practical and tactile.
Materials
- 1 bread box kit or plans for a 16" x 10" box
- 1 1/8" slatted wood panel for lid
- 2 small drawer slides for rolling action
- wood glue and clamps
- clear food-safe finish, 2 oz
Instructions
- Assemble box per plan, gluing and clamping sides.
- Fit slatted lid onto drawer slides and test roll.
- Sand all edges smooth and apply food-safe finish; cure 24 hours.
- Place on a lower shelf and store bread wrapped in linen inside.
How to Display or Gift It
- Add a linen bread bag and wooden bread knife tied together for a gift.
- Clean crumbs with a small handheld broom and store inside when not in use.
- Rotate baked goods and dry items to keep airflow optimal.
- Pegboard Basket System for Produce
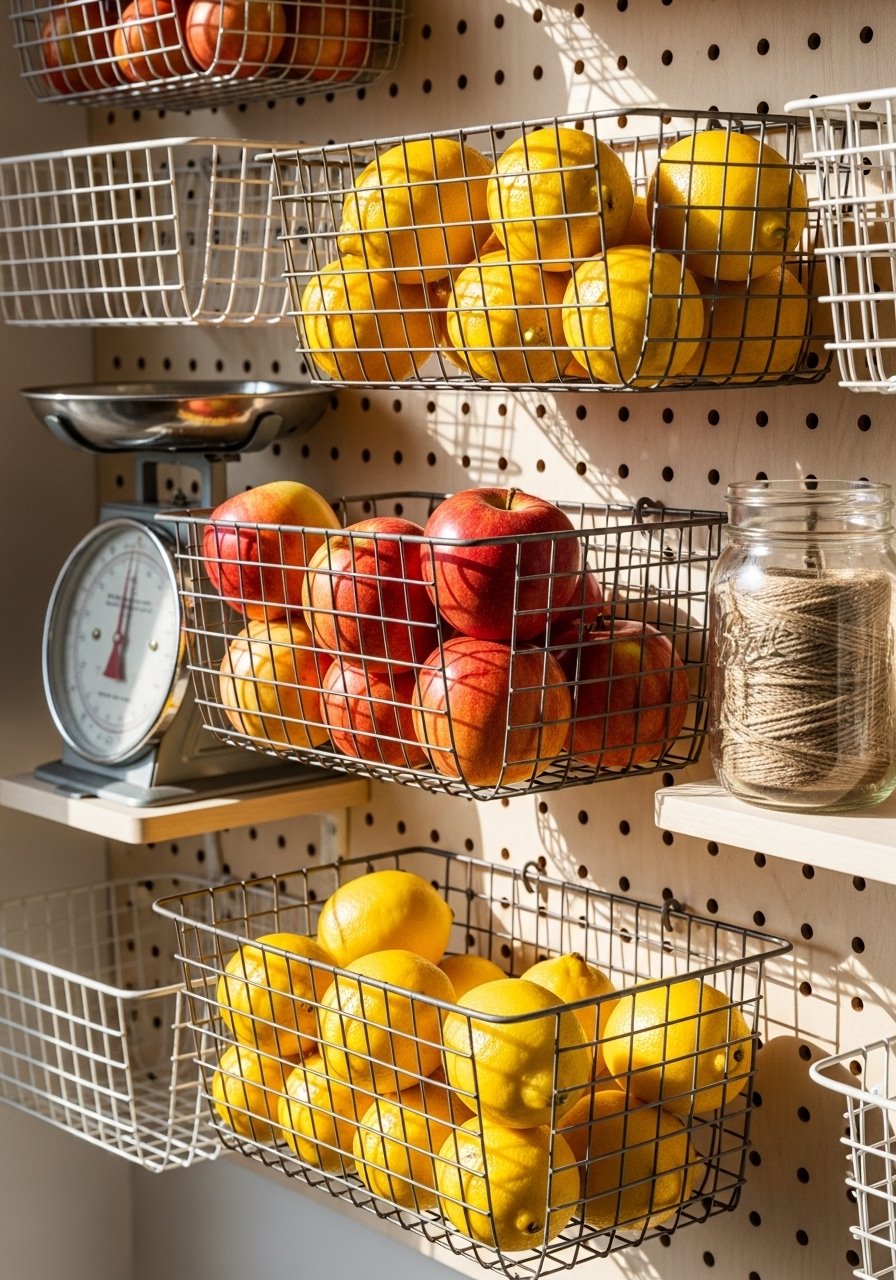
Use pegboard hooks and baskets to create a breathable produce wall. It’s flexible, easy to rearrange, and looks like a little country market.
Materials
- 1 pegboard panel (2' x 3')
- 4 wire hanging baskets
- 10 peg hooks and accessories set
- 6 screws and anchors
- chalk pen and labels
Instructions
- Mount pegboard securely to wall studs.
- Hang wire baskets using peg hooks; position higher for light items.
- Fill with produce and rotate for freshness.
- Use chalk pen to label baskets for quick identification.
How to Display or Gift It
- Add a small scale on a shelf nearby for measuring produce.
- For gifting, fill baskets with seasonal fruit and wrap with cellophane.
- Narrow Pull-Out Pantry Shelves
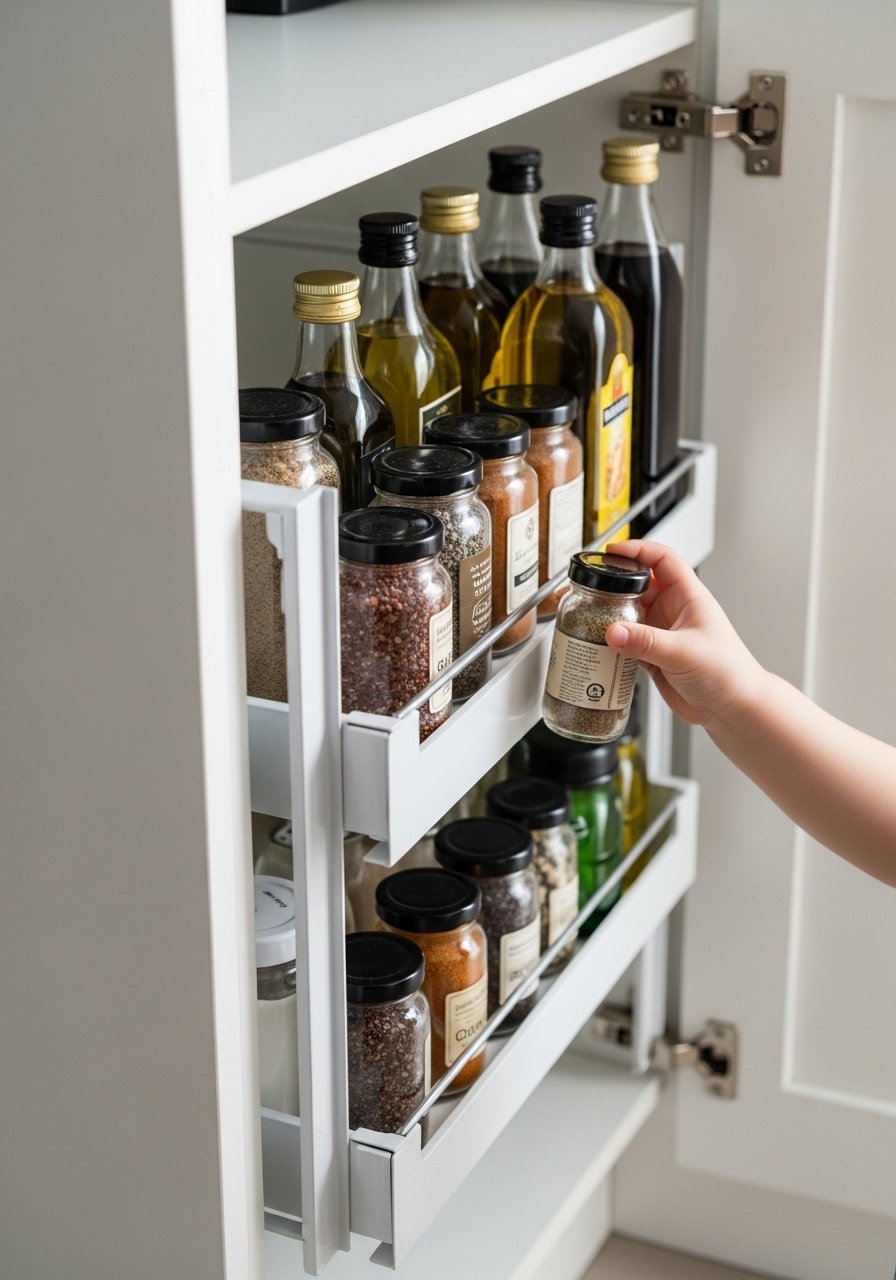
Pull-out shelves are brilliant in narrow pantry gaps—everything slides forward for easy access. Build them with sturdy slides and measured spacing.
Materials
- 2 full-extension 14" drawer slides
- 1 plywood shelf cut to 10" x 24"
- 4 1" wood screws
- 1 handle for front
- wood finish, 2 oz
Instructions
- Cut shelf to size and finish edges.
- Attach drawer slides to shelf and cabinet interior per manufacturer instructions.
- Install handle and test sliding action.
- Load heavier items on lower pull-outs for stability.
How to Display or Gift It
- Use these for oils, vinegars, and tall bottles.
- For gifting, include a small bottle of artisan oil mounted to the shelf.
- Rustic Wire Lid Organizer for Pots
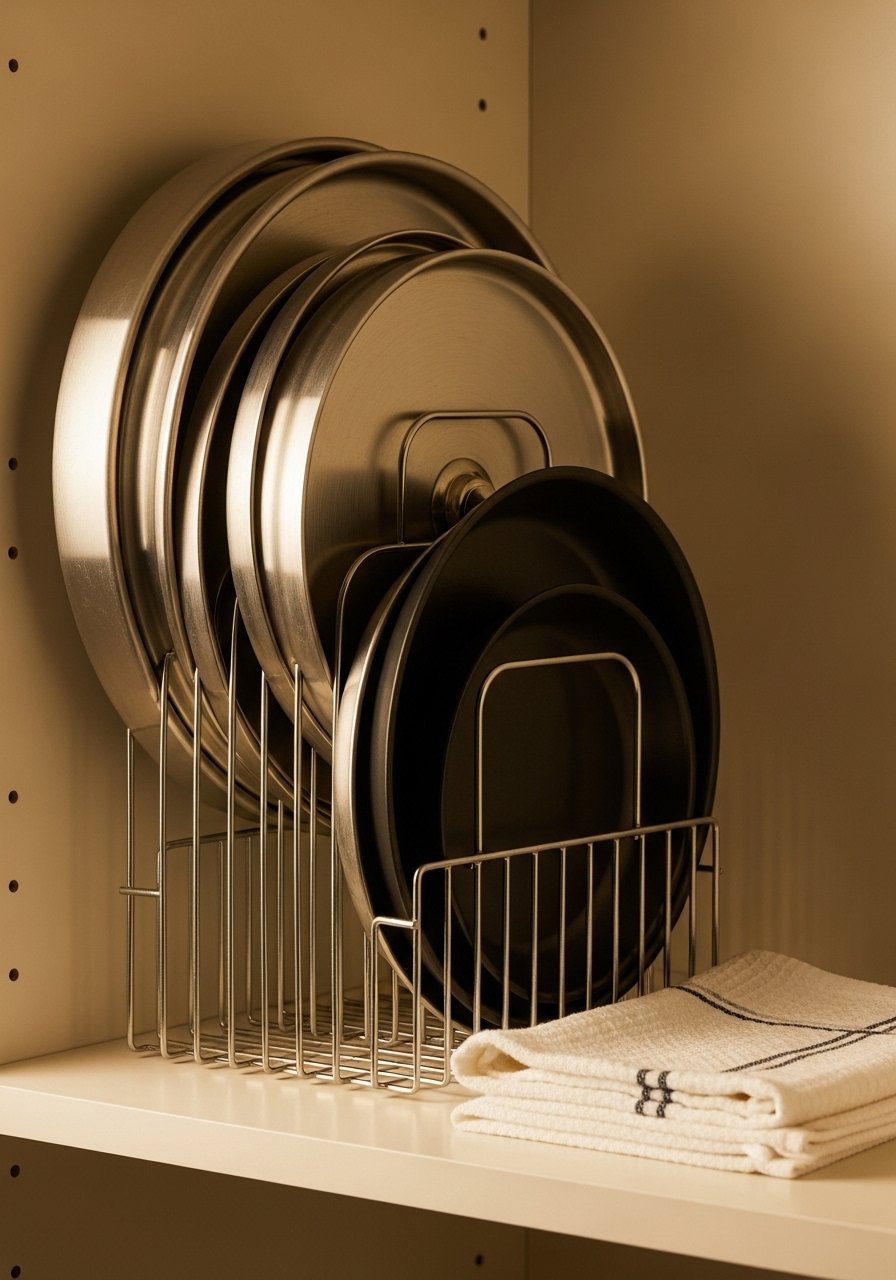
Keep pot lids upright and accessible with a wire organizer. It frees horizontal shelf space and reduces clatter.
Materials
- 1 vertical lid organizer (10" x 12")
- 4 rubber bumpers
- 1 small non-slip mat for shelf
- cleaning cloth
Instructions
- Place organizer on shelf and line with non-slip mat.
- Insert lids upright with largest in back.
- Add rubber bumpers to protect lids and organizer from shifting.
How to Display or Gift It
- Use one organizer per shelf for different-sized lids.
- Wrap organizer with a small dish towel and tie for gifting with cookware.
- DIY Mason Jar Tiered Wall Mount
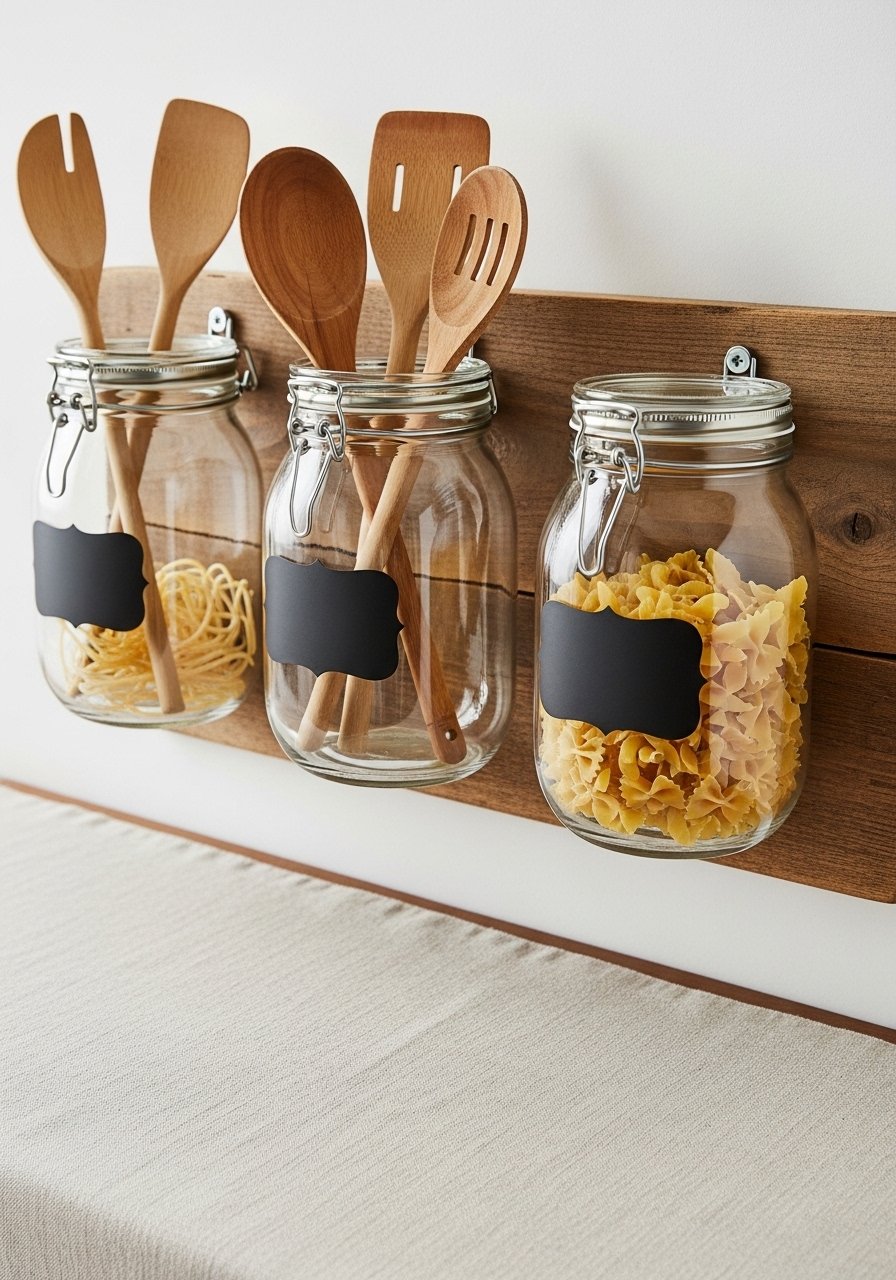
Mount mason jars on a small wood board to hold utensils, pasta, or snacks. It’s tactile, farmhouse-sweet, and keeps counters clear.
Materials
- 3 16 oz mason jars with lids
- 1 12" x 6" wooden plank
- 3 jar lid rings and screws for mounting
- 2 wall anchors and screws
- 1 small bottle finish, 1 oz
Instructions
- Stain or finish plank; dry 2 hours.
- Mark and pre-drill three lid ring positions.
- Attach lid rings with screws and invert lids to hold jars.
- Mount plank to wall and screw jars into ring bases.
- Fill jars and replace lids snugly.
How to Display or Gift It
- Add wooden spoons and a small herb jar.
- Tie a ribbon around the plank for gifting and include a recipe card tucked into one jar.
- Chalk-Painted Crate Label Wall

Mount an array of small crates as cubbies. Paint the fronts with chalkboard paint for changeable labels and a homey grid look.
Materials
- 6 small wooden crates (9" x 6" x 6")
- 1 can chalkboard paint
- 1 foam roller
- 12 screws and anchors
- chalk pen
Instructions
- Paint the front face of each crate with chalkboard paint; dry 30 minutes between coats.
- Mount crates in a grid with screws and anchors.
- Write contents on each chalk front and fill crates.
How to Display or Gift It
- Change labels for holidays—use "Cookies" or "Hot Cocoa."
- This makes a playful pantry wall and a fun gift when filled with treats.
- Farmhouse Tiered Cake Stand for Pantry Display
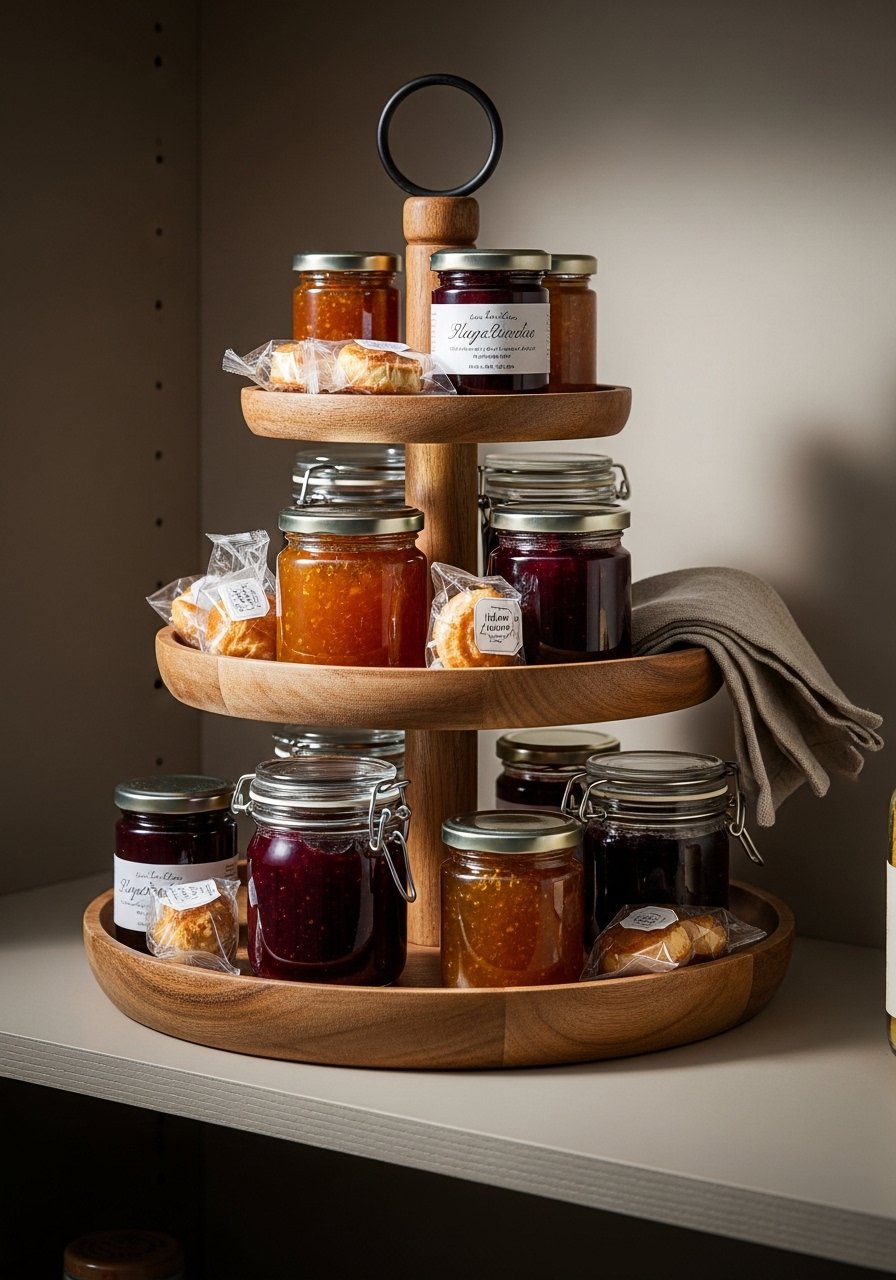
A tiered cake stand turns small items into a display. Use it on pantry shelves for jams, tiny jars, or snack mixes.
Materials
- 1 two-tier wooden cake stand kit (10" and 6")
- 1 sanding block
- 2 coats food-safe finish, 30-minute intervals
- kitchen twine for accent
Instructions
- Assemble stand per kit instructions and sand smooth.
- Apply two coats of food-safe finish; cure 12 hours.
- Arrange small jars and label with tiny round labels.
How to Display or Gift It
- Fill tiers with tea sachets, jam, or mini cookies for a gift.
- Use a small clear dome on top for protection.
- Pantry Lighting Upgrade with LED Strip and Motion Sensor
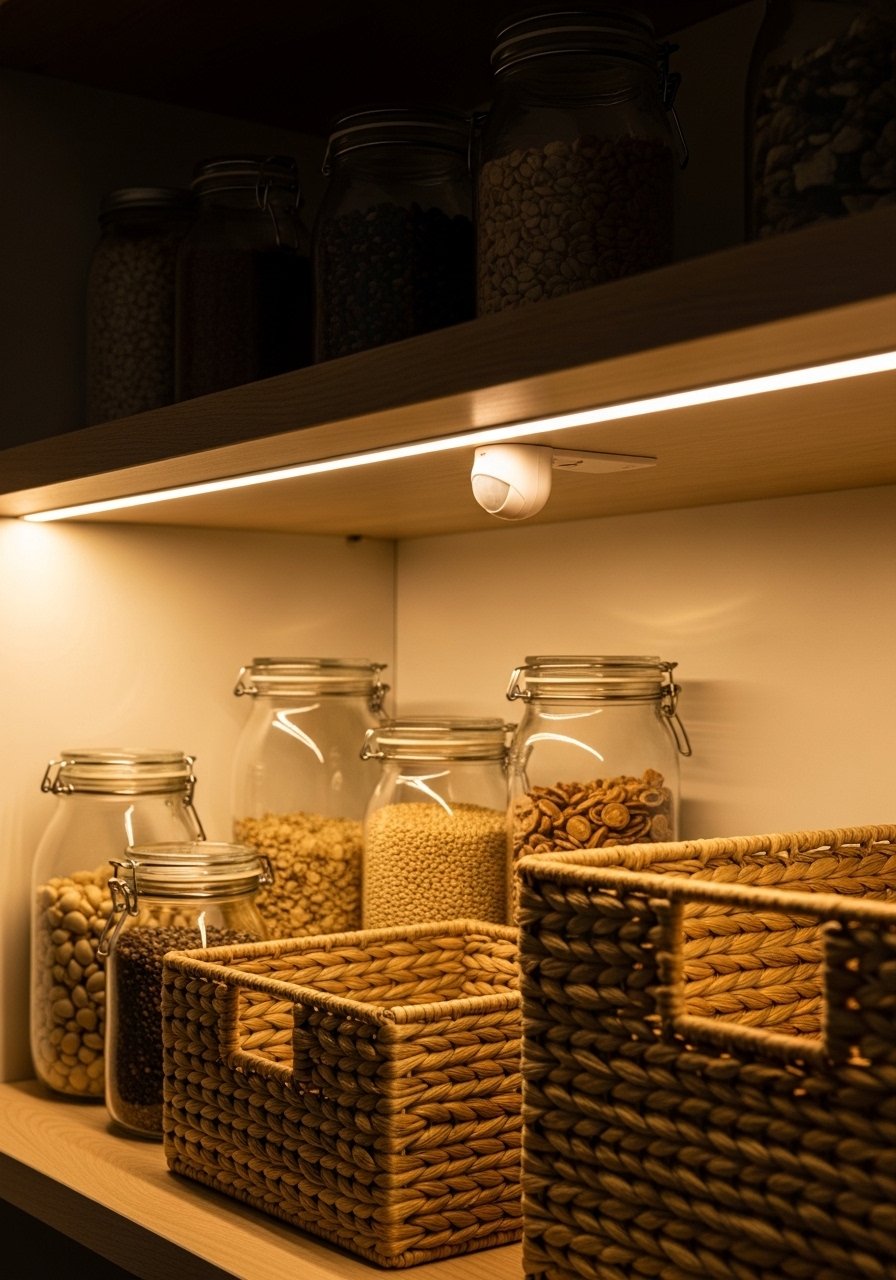
Good lighting makes a tiny pantry feel larger. LED strips with a motion sensor add convenience and showcase your curated pantry.
Materials
- 1 6' warm white LED strip light (battery or plug-in)
- 1 motion sensor switch compatible with strip
- 4 adhesive mounting clips
- 1 wire concealer kit (optional)
- double-sided mounting tape
Instructions
- Clean shelf undersides with alcohol and let dry.
- Attach LED strip with adhesive and secure with mounting clips.
- Install motion sensor between strip and power source; test activation.
- Hide wires with a concealer kit for a tidy finish.
- Replace batteries yearly or as indicated by the strip manufacturer.
How to Display or Gift It
- Light highlights labels and jars for a warm look.
- Gift a plug-in LED kit with a small instruction card for easy installation.
- Use wireless battery strips if you prefer no cords.
Trust your eye and your tools—these small changes make a big difference in function and style. Save or pin the ideas you’ll try, and share your favorites with a friend who loves rustic kitchens as much as you do. Which idea are you trying first—mason jar racks, a sliding barn door, or the pull-out shelves? I’d love to see a photo when you’re done.
Trust me, picking up a quality hot glue gun with temperature control changed how many small projects finished out—less stringing and faster holds—and it helps across several of the builds above.


