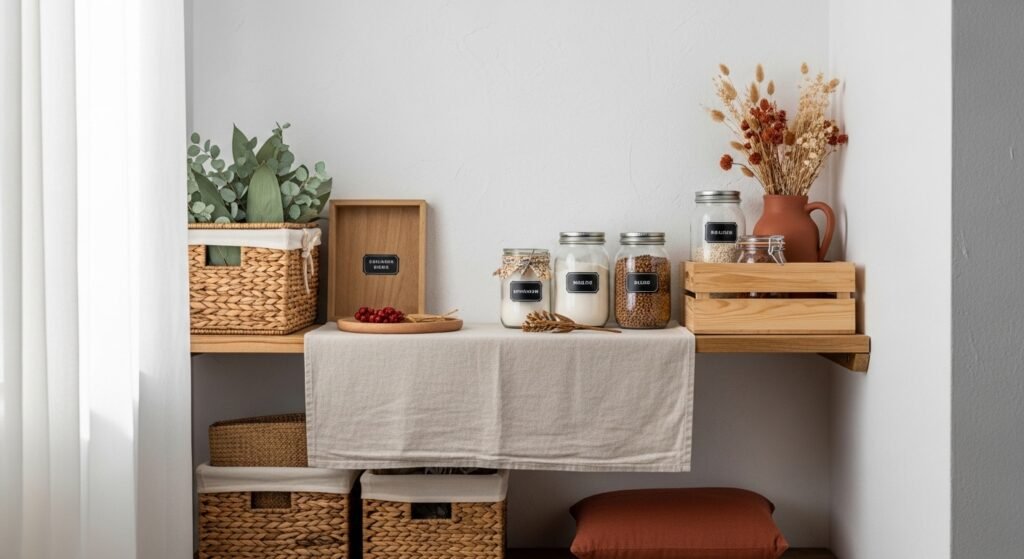
Tight on space but craving a pantry that’s organized, renter friendly, and actually pretty? You’re in the right place. These small pantry ideas for apartments focus on non-permanent solutions, clever vertical storage, and easy DIY finishes so you get a polished look without drilling holes or breaking a lease.
You’ll find 23 real projects — from tension-rod spice rails to macramé hanging shelves — each with exact materials, step-by-step instructions, drying times, and styling tips. I use my Cricut Joy cutting machine for custom labels and a temperature-controlled hot glue gun for quick assemblies. Read the project intros to pick the ones that match your aesthetic — cottagecore, japandi, boho, or farmhouse — and pin the whole list for later.
- Tension-Rod Tiered Spice Rail
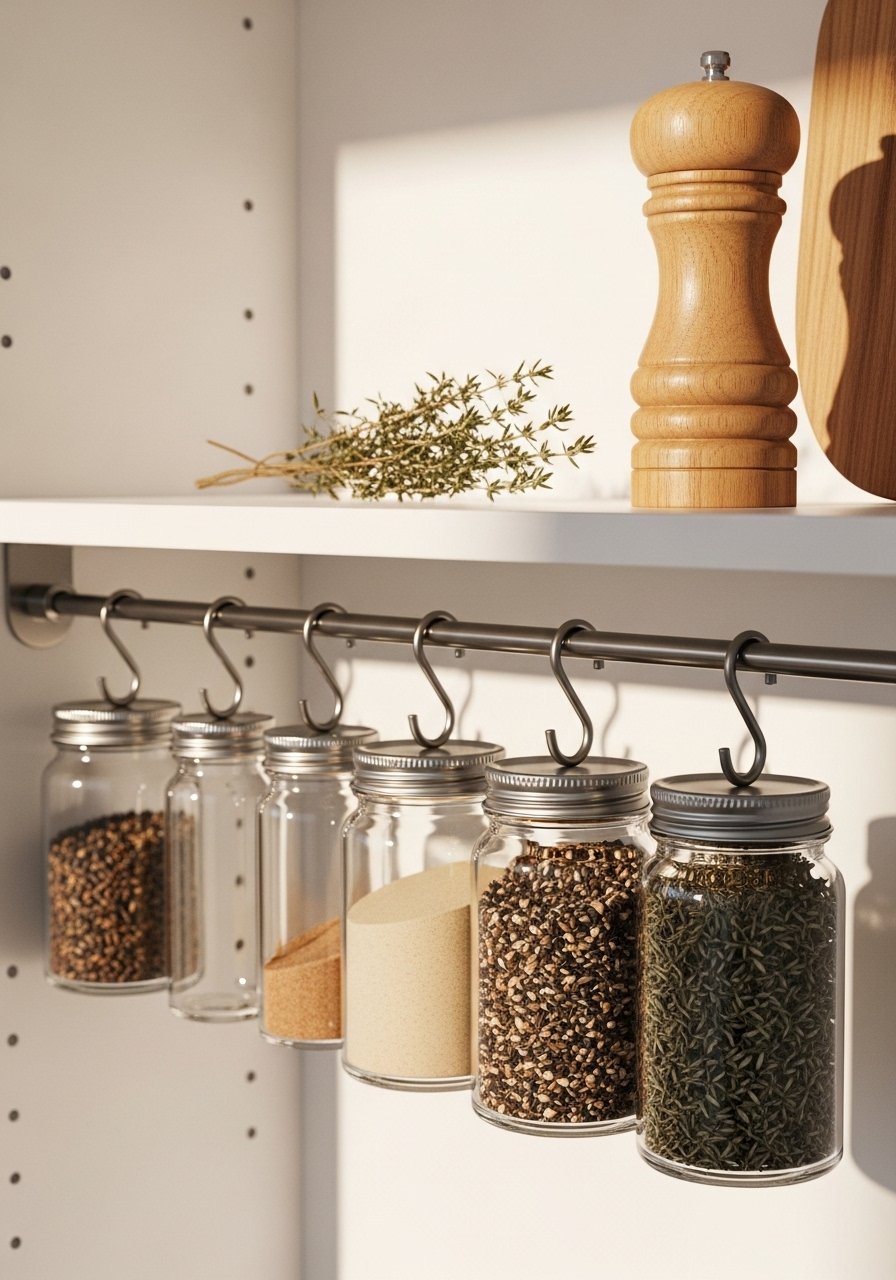
This tension-rod spice rail uses a non-drilling rod to add a tier of hanging spice jars under or above a shelf. It’s ideal if you want quick access and a clean line of glass jars that catch the light. I use a 24–36” tension rod for small pantries — it’s forgiving and stays put when adjusted.
Materials
- 1 tension rod (24–36" adjustable)
- 10 small glass spice jars (2 oz) with metal lids
- 10 S-hooks (small, stainless)
- 1 roll of clear painter’s tape (for placement)
- 1 permanent marker or printable labels
- 1 small level (9" bubble level)
- Soft cloth for cleaning
Instructions
- Empty the shelf area and wipe clean. Measure the inside width with your level.
- Extend the tension rod to just under the full width. Wrap two strips of painter’s tape on the rod ends where they’ll touch the shelf to protect finish.
- Place the rod into position and torque it gently until it’s snug. It should hold without flexing.
- Hang S-hooks spaced 2–3 inches apart along the rod. Adjust spacing based on jar width.
- Fill jars with spices and screw lids on tight. Slide jars onto S-hooks by looping the jar lid hole or use jar-top hangers if lids lack holes.
- Check stability by pulling each jar slightly; the rod should not slip. Re-tighten if needed.
How to Display or Gift It
- Align jars by color or label type for a tidy visual.
- Print small Kraft paper labels using your Cricut Joy for a uniform look.
- These rails pack flat: remove jars and loosen the rod when you move.
- Gift idea: fill a set of labeled jars and tie them together in a kraft bag for a housewarming present.
- Mason Jar Lid Hanging Spice Rack
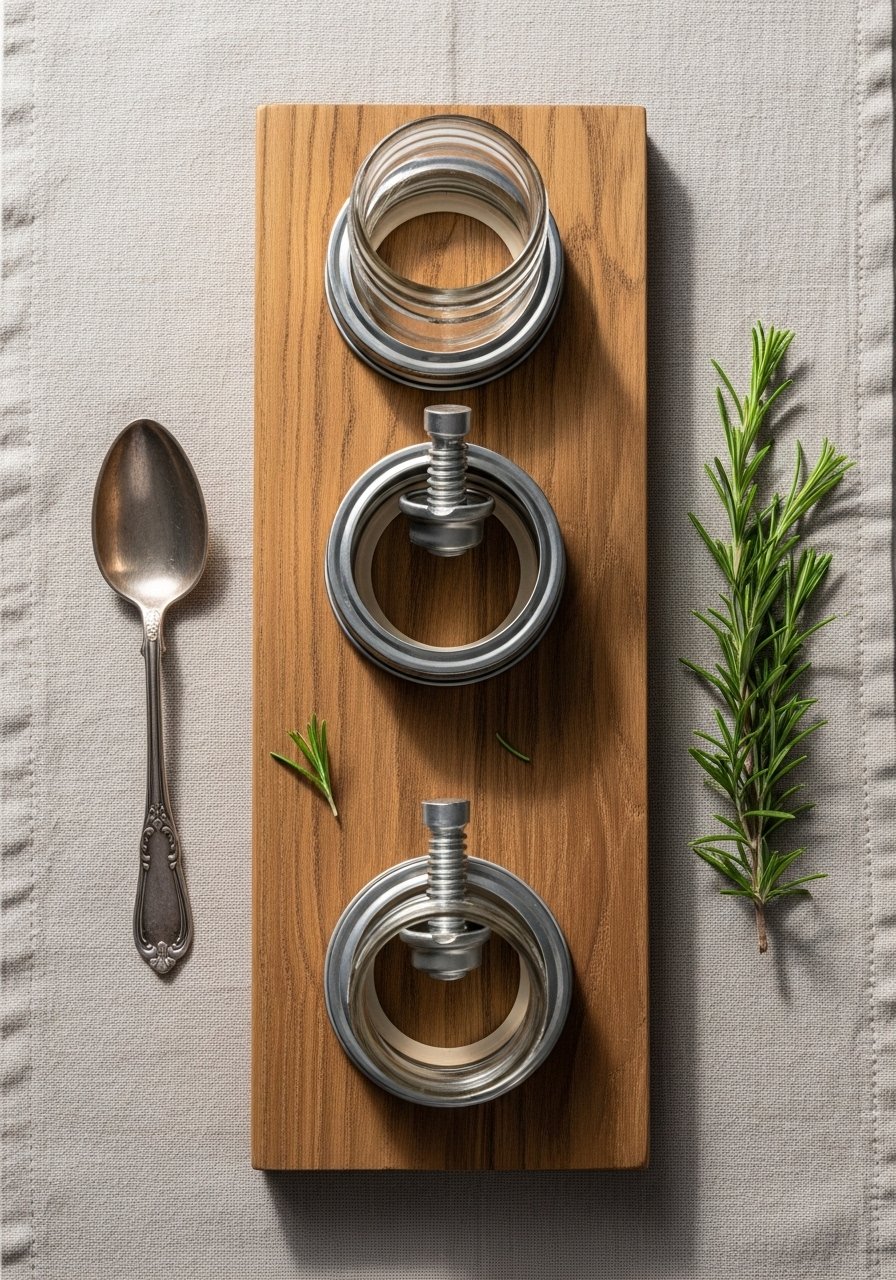
This mason jar lid hanging rack gives you a compact row of visible spices and pantry staples. It’s renter friendly — mount it with removable adhesive strips — and has a cozy farmhouse vibe when paired with Ball jars.
Materials
- 1 wooden board, 24" x 4" x 3/4" (pine, sanded)
- 10 wide-mouth mason jars (16 oz) with lids and rings
- 10 metal lid rings turned into hangers (reuse existing rings)
- 6–8 high-strength removable adhesive strips (Command Medium)
- Wood stain or acrylic paint, 1/4 cup
- Foam brush for stain
- 1 screwdriver
Instructions
- Stain or paint the board; allow 2 hours between coats. Wipe excess and dry overnight.
- Arrange ring spacing on board (every 2.25–2.5") and mark with pencil.
- Attach each ring to the board using two small screws through the ring into the wood. Tighten until ring sits snugly.
- Fill mason jars with contents and screw lids and rings back on. Thread jars into the mounted rings so they hang beneath the board.
- Clean the wall with rubbing alcohol, let dry, and stick the adhesive strips to the back of the board per the strip instructions. Press firmly for 30 seconds.
- Apply tension test carefully by removing one jar and ensuring the board holds.
How to Display or Gift It
- Pair with dried herbs or tea blends in jars for a rustic look.
- Place above a narrow pantry niche for easy access.
- For gifting, label each jar and secure the board in a shallow kraft box.
(Product mention: Ball mason jars 16 oz)
- Over-the-Door Clear Pocket Organizer Pantry Makeover
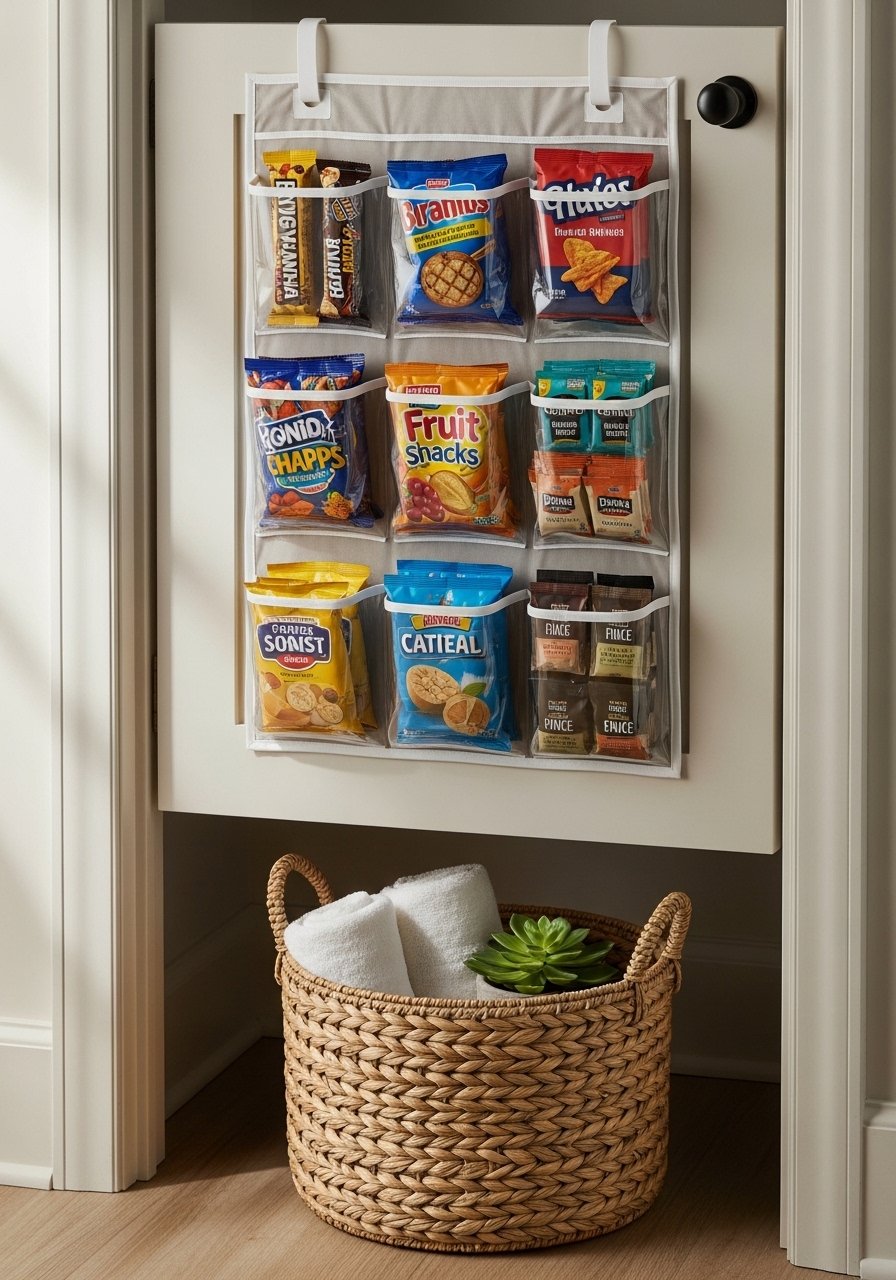
A clear over-the-door pocket organizer turns that wasted door into instant storage for snacks, packets, and small tools. It’s perfect for renters — no modifications — and you can label pockets for quick sorting.
Materials
- 1 clear over-the-door pocket organizer (18–24 pockets)
- 10 small kraft labels or printable sticker labels
- 1 bundle of tea towels (folded for shelf)
- 3 small basket bins for bottom shelf
- 1 lint-free cloth for cleaning
Instructions
- Hang the pocket organizer over the pantry door per manufacturer directions.
- Sort items by category: snacks, sauces, packets, single-use items. Use labels on each pocket.
- Store heavier items lower and delicate items higher. Leave top pockets for flat, lightweight goods.
- Every two weeks, remove all items and wipe pockets to prevent crumbs.
- Rotate contents seasonally — reserve pockets for holiday baking spices when needed.
How to Display or Gift It
- Use clear pockets to showcase patterned snack bags for a playful look.
- For gifting, fill a pocket with specialty tea bags and attach a small recipe card.
- Store unsightly items in small bins on the pantry floor and tuck the door organizer above.
(Product mention: over the door pocket organizer)
- Removable Adhesive Pegboard Command Center

A removable adhesive pegboard brings flexible hanging storage without drilling. Pick pegboard sheets with strong adhesive backing and customize with baskets, hooks, and jars. It suits modern and Japandi looks when paired with wooden hooks and matte black baskets.
Materials
- 1 removable adhesive pegboard panel (12"x24")
- 6 pegboard hooks and small baskets
- 3 small wooden utensil holders
- 2 adhesive cable clips
- 1 set of small mason jars with screw-on lids (for loose items)
- Rubbing alcohol wipes to prep wall
Instructions
- Wipe wall with rubbing alcohol and let dry. Mark where panel will sit.
- Peel backing and press the panel onto the wall for 30 seconds, starting at the center and smoothing outward.
- Hang hooks and baskets in preferred layout. Place frequently used items at eye level.
- If you need to move the panel, release per manufacturer instructions; wait 24 hours before reapplying elsewhere.
- Clean any marks left behind with a damp cloth.
How to Display or Gift It
- Use small labels on hooks for categories.
- Hang a small framed recipe card or printed shopping list from a peg.
- For gifting, set up a mini prep station with small utensils and herb scissors in the pegboard baskets.
(Product mention: removable adhesive pegboard)
- Stackable Pull-Out Bins (Small Pantry Ideas for Apartments)

These stackable pull-out bins maximize vertical space on a narrow shelf and keep contents visible. They slide forward so you can reach deep pantry corners without rummaging. I like clear poly bins so you can see what's inside at a glance.
Materials
- 3 clear plastic stackable pull-out bins, 12"x6"x5"
- 3 printable label sheets or chalkboard labels
- 1 small notepad for inventory
- Foam grip pads (optional, 4)
- Measuring tape
Instructions
- Measure shelf depth and ensure bins have room to stack.
- Place a foam grip pad under each bin’s corners to prevent slipping when pulled.
- Group items by function: snacks, single-serve, baking packets. Place similar-size items in each bin.
- Label fronts with contents and restock top-to-bottom to keep a rotation system.
- To clean, lift each bin and wipe with warm, soapy water; dry thoroughly.
How to Display or Gift It
- Line bins with patterned shelf liner for a pop of style.
- Stack bins in pantry corners to create a stepped display for visibility.
- For gifting, fill one bin with a themed kit — cookie supplies, tea sampler — and wrap in cellophane.
(Product mention: mdesign plastic storage bins)
- Under-Shelf Hanging Wire Baskets
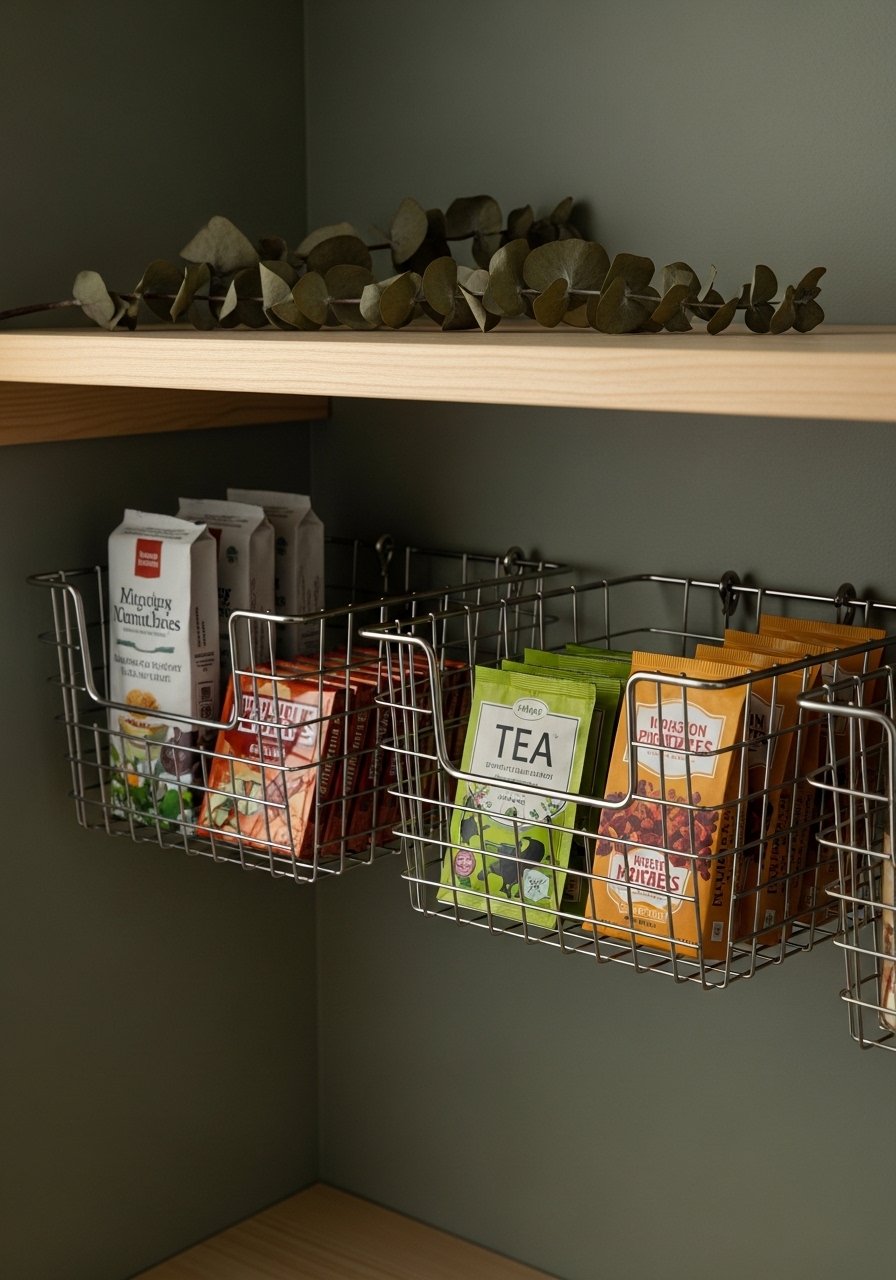
Under-shelf baskets clip onto existing shelves to create more tiers without altering shelving. They’re great for small pantry ideas for apartments because they reclaim lost vertical space and are easy to remove.
Materials
- 2 under-shelf hanging wire baskets, 12"x8"
- 6 small resealable bags for grouping
- 1 pair of kitchen shears
- 1 small label maker or printable labels
- Soft brush to clean shelf edge before hanging
Instructions
- Clear items from shelf and wipe underside clean.
- Slide each basket onto the shelf lip until flush. Ensure weight is centered.
- Fill baskets with lightweight items: granola bars, packets, spice sachets.
- Avoid overloading — limit to 5–7 lbs per basket to protect the shelf.
- Every month, unclip and clean the baskets with warm, soapy water.
How to Display or Gift It
- Add a small chalkboard label on the front of each basket.
- Use baskets at eye level for snack visibility.
- For gifting, fill an under-shelf basket with an assortment of tea bags and tie a ribbon around the basket.
(Product mention: under shelf basket)
- Tiered Lazy Susan Turntable (Two-Tier)

A two-tier lazy Susan makes tiny pantry corners functional. Spinning access means you can store more in the same footprint and keep oils, vinegars, and condiments organized.
Materials
- 1 two-tier lazy Susan turntable (12" base)
- 5 small glass bottles for oils and sauces
- Non-slip shelf liner, 12"x12"
- 1 small pour spout set
- 1 cleaning cloth
Instructions
- Place non-slip liner on shelf where the turntable will sit. This keeps it steady.
- Load heavier bottles on the bottom tier and lighter items on top.
- Spin to test balance; redistribute until it turns smoothly without hopping.
- Wipe bottles after each use to prevent sticky residue.
- Clean the turntable monthly with a damp cloth and mild soap.
How to Display or Gift It
- Group bottles by use and label lids with your Cricut Joy.
- Place the lazy Susan in a corner shelf to maximize space.
- For gifting, assemble a mini oil tasting set on the lazy Susan and wrap with cellophane.
(Product mention: lazy susan turntable)
- Magnetic Spice Jars on Fridge Side
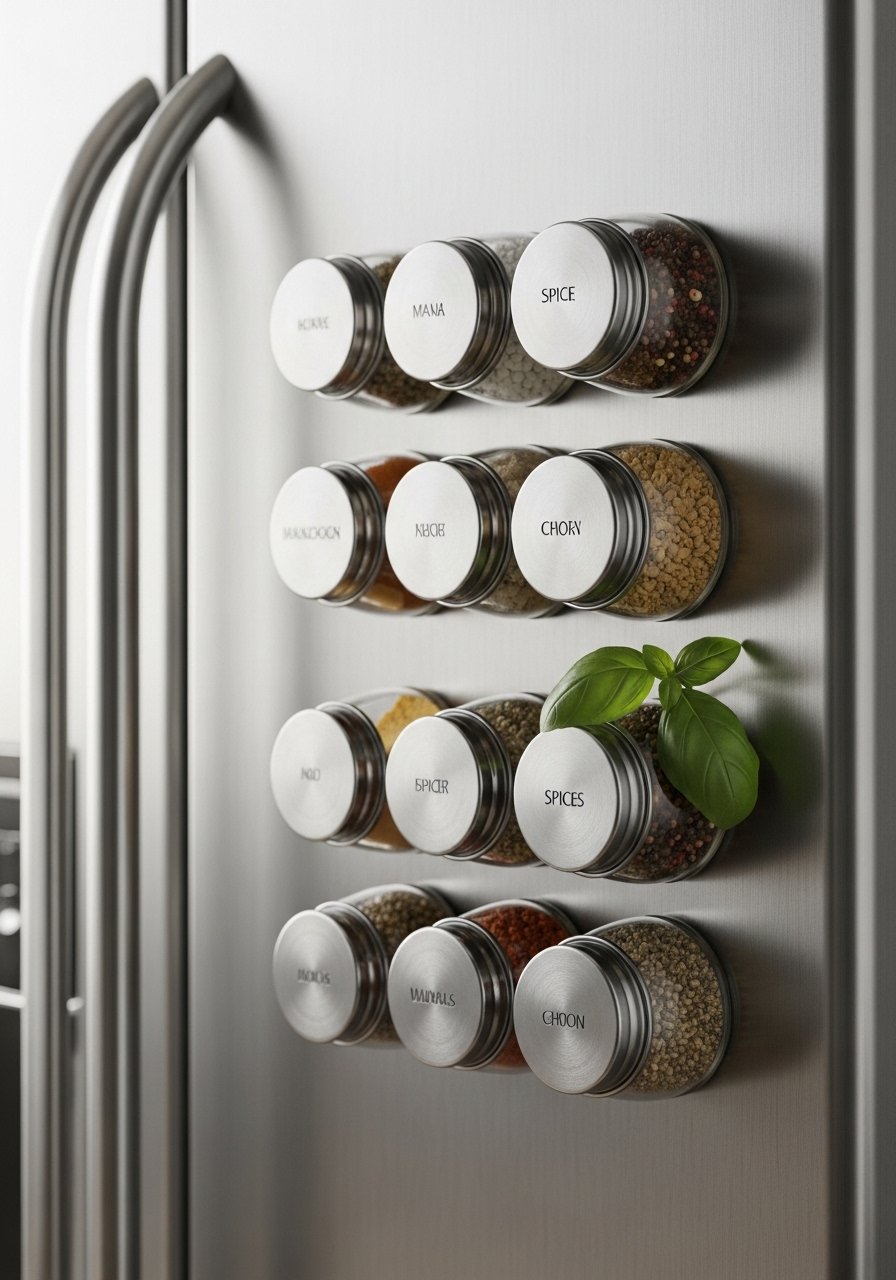
Turn the side of your fridge into a magnetic spice wall with round magnetic jars. It clears shelf space and creates an attractive, apothecary-style display.
Materials
- 12 magnetic spice jars (round, 2 oz)
- 1 sheet of printable adhesive labels
- 1 permanent marker
- Small magnet strip (if fridge side isn't magnetic)
- 1 soft cloth to prep surface
Instructions
- Clean fridge side thoroughly and dry.
- Fill jars with spices and tighten lids. Apply labels to top or side.
- Attach jars directly to the fridge or to a magnetic strip stuck to the fridge side.
- Place frequently used spices at comfortable height.
- Check magnets monthly to ensure strong hold; replace magnets if weakened.
How to Display or Gift It
- Arrange jars in a grid for a neat look or in a gradient based on color.
- For gifting, include a printed recipe card tied to one jar with twine.
- Keep a small spice chart nearby to remember flavor pairings.
(Product mention: magnetic spice jars)
- Fold-Down Pantry Prep Shelf (Clamp-On)
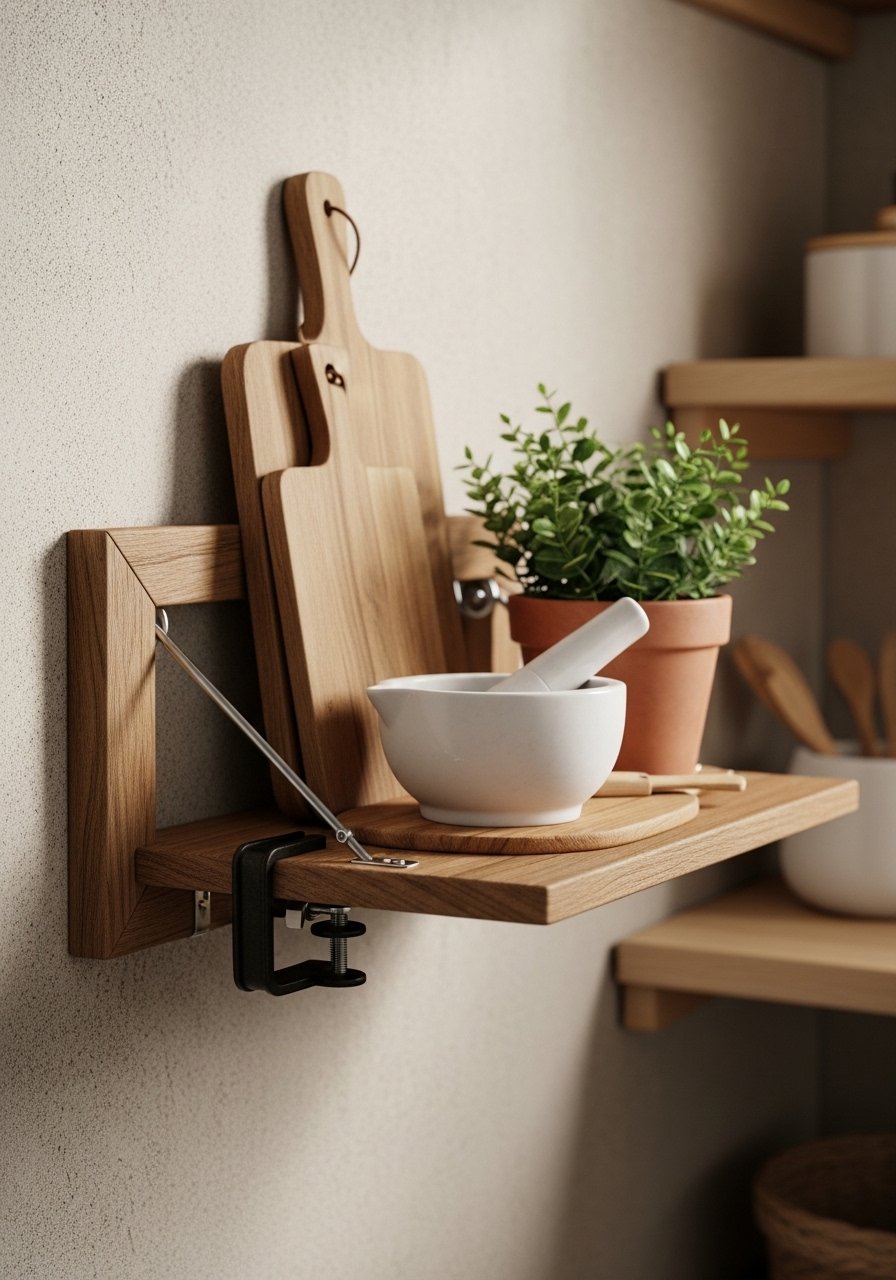
A clamp-on fold-down shelf adds counter-style prep space inside a pantry and can be removed when you move. Use clamp brackets so there’s no drilling, and choose a smooth, sealed wood top for easy wiping.
Materials
- 1 pre-cut wood shelf, 18"x10", sealed with polyurethane
- 2 clamp-on folding shelf brackets (fold-flat, 10" reach)
- 4 rubber pads for clamp protection
- 1 bottle of wipe-on polyurethane (3 oz) for touch-ups
- Soft cloth for finishing
Instructions
- Seal the wood shelf with two thin coats of wipe-on polyurethane; allow 2 hours between coats. Fully cure 24 hours.
- Attach clamps to the pantry sidewall per bracket instructions, using rubber pads to protect the finish. Tighten clamps until secure.
- Place shelf into folded bracket supports and test load up to 25 lbs.
- Fold shelf up when not in use.
- For moving, loosen clamps and remove shelf; re-tighten on new surface.
How to Display or Gift It
- Use as a staging spot for meal prep or coffee station.
- Add a small hook beneath to hang measuring spoons.
- Wrap a fold-down shelf in kraft for a practical housewarming gift.
(Product mention: folding shelf brackets clamp-on)
- Peel-and-Stick Liner + Labeling Grid

A pretty peel-and-stick shelf liner plus a consistent labeling grid keeps items in their place and hides shelf wear. It’s forgiving and renter friendly — remove cleanly when you move.
Materials
- 1 roll peel-and-stick shelf liner (12" wide, pre-cut length)
- 1 pack of chalkboard labels (36)
- 1 measuring tape and pencil
- Scissors or craft knife
- Small brayer roller
Instructions
- Measure shelf length and cut the liner allowing 1/4" overhang at the back.
- Peel 6–8" of backing and align the front edge; smooth with a brayer roller. Continue peeling and smoothing outward.
- Trim edges with a craft knife for a clean fit.
- Apply labels to canisters or baskets and write contents with chalk marker.
- Reapply liner by warming adhesive lightly with a hairdryer for stubborn spots.
How to Display or Gift It
- Match liner pattern to pantry theme (cottagecore florals, japandi neutrals).
- Keep extra liner stored flat in a craft organizer for future touch-ups.
- Gift set idea: include a roll of liner with a set of labels in a kraft box.
(Product mention: peel and stick shelf liner)
- Vertical Tray Organizer for Baking Sheets
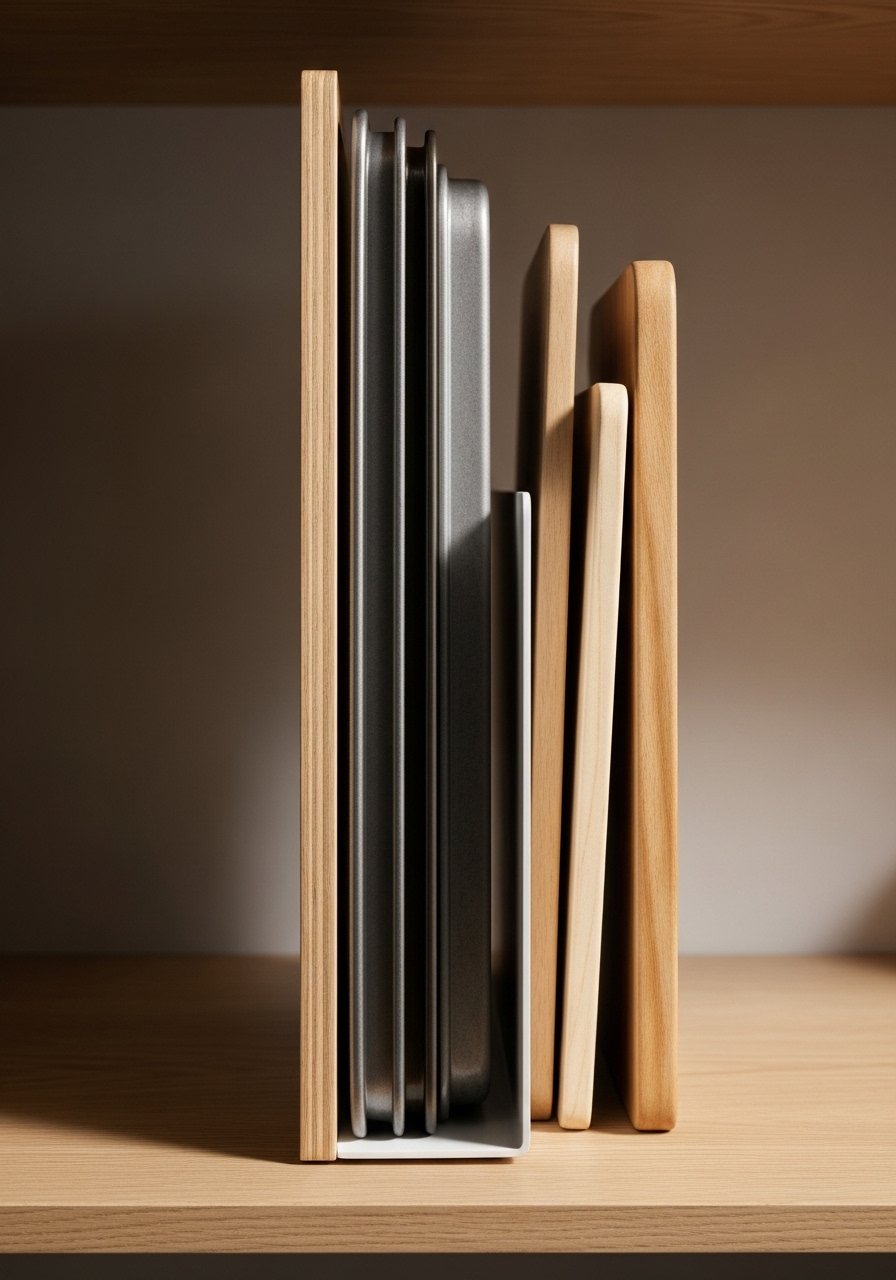
Store baking sheets, trays, and cutting boards upright with a vertical tray organizer to reclaim shelf depth. This keeps things accessible without stacking heavy items.
Materials
- 1 vertical tray organizer rack (12” tall)
- 2 thin cutting boards
- 1 silicone mat for base
- 1 small label for each slot
Instructions
- Place the organizer on the shelf near the back or side to use vertical space.
- Slide baking sheets and boards upright into slots with even spacing.
- Use silicone mat beneath to prevent sliding and protect shelf finish.
- For heavy sheet pans, double-check rack stability and distribute weight.
How to Display or Gift It
- Keep the organizer near the oven for quick access.
- Add a label to each slot for “baking” or “cutting” to maintain order.
- For gifting, include a set of silicone spatulas tucked into the bottom slot.
(Product mention: vertical tray organizer)
- Hanging Fruit Crates with Twine (Small Pantry Ideas for Apartments)
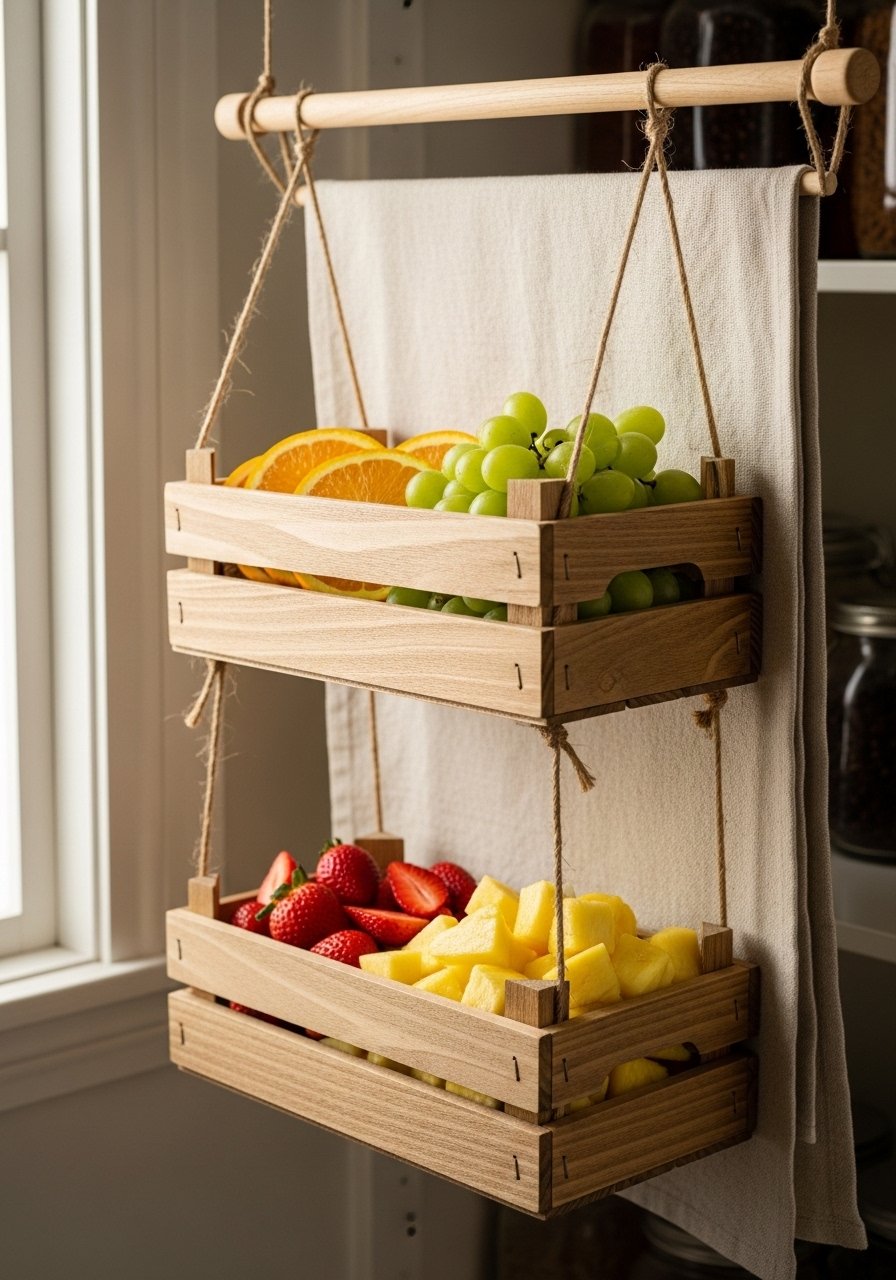
Suspend small wooden crates with jute twine from a tension rod to create a boho fruit-and-veg station. It keeps produce off shelves and looks warm and handmade.
Materials
- 2 small wooden crates (10" x 6")
- 24 feet natural jute twine (3mm)
- 1 tension rod (24–36")
- 4 S-hooks
- 1 pair of scissors
- 1 small sandpaper (120 grit)
Instructions
- Sand crate edges lightly and wipe dust off.
- Tie twine securely around each crate’s corners, creating 4 equal-length hangers. Knot with a double knot and trim ends.
- Hang S-hooks on the tension rod, attach twine loops to hooks, and adjust crate height.
- Test with lightweight fruit first; do not exceed 10–12 lbs per crate.
- Replace twine annually if fraying appears.
How to Display or Gift It
- Line crates with a small cotton liner for citrus.
- For seasonal flair, add dried lavender sprigs.
- Gift idea: a crate filled with seasonal fruits makes a thoughtful welcome present.
(Product mention: wooden crate)
- Clear Acrylic Can Dispenser DIY
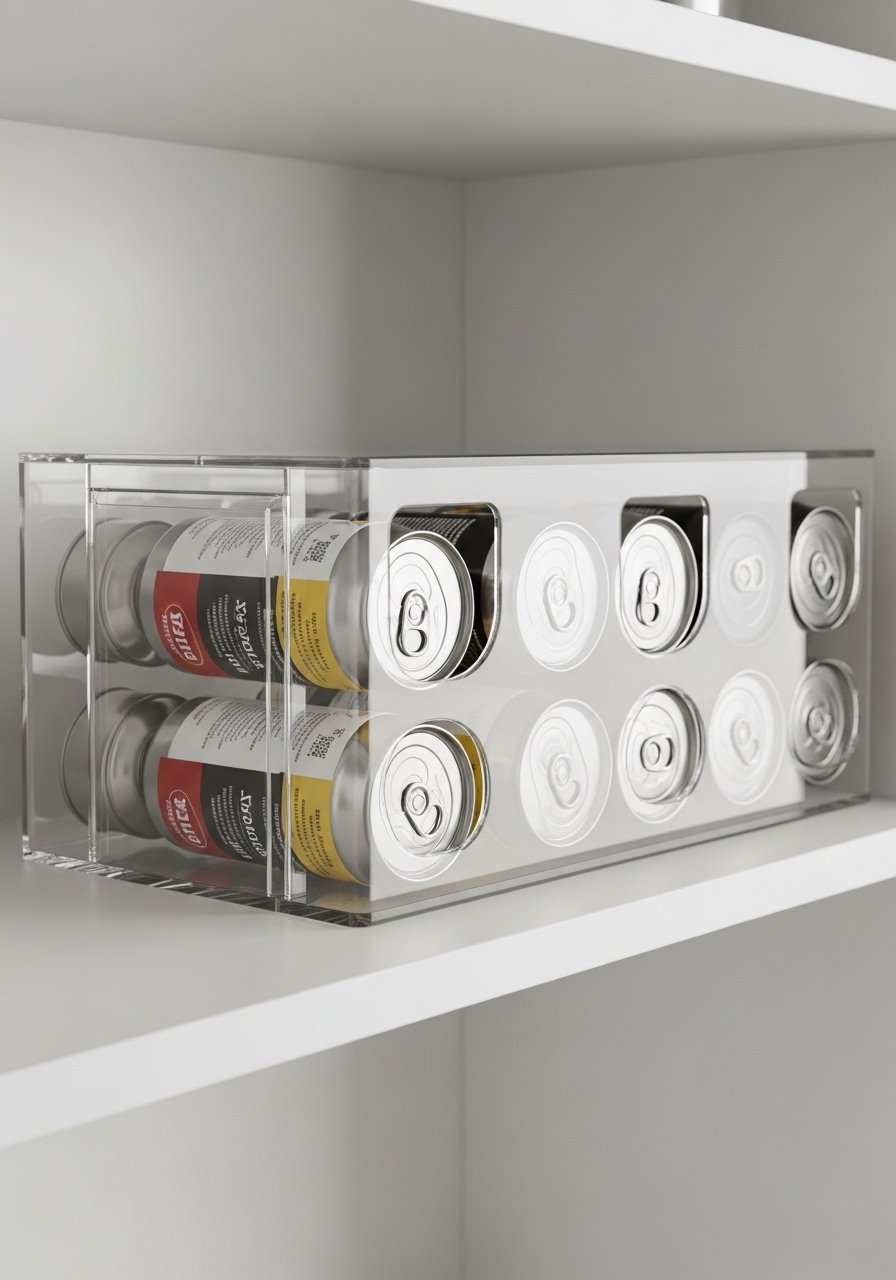
A clear acrylic can dispenser keeps cans aligned and pushes them forward as you remove one, so you always use the oldest first. It’s a tidy, modern solution for slim pantries.
Materials
- 1 clear acrylic can dispenser (fits standard 12 oz cans)
- 1 bottle of mild glass cleaner
- 1 soft microfiber cloth
- 1 small label for the front
Instructions
- Wipe the dispenser and shelf surface clean.
- Slide cans into the dispenser and test the push-through action.
- If dispenser sticks, add a small strip of non-slip tape to the bottom to control speed.
- Label the front with contents or rotation date if desired.
- Wash with mild soap and water monthly; air dry.
How to Display or Gift It
- Place the dispenser near the center of the shelf for easy reach.
- Pair with a can opener stored in a nearby pull-out bin.
- Gift idea: fill a dispenser with specialty canned goods for a curated pantry starter.
(Product mention: acrylic can dispenser)
- Corkboard Meal Plan & Grocery List Board
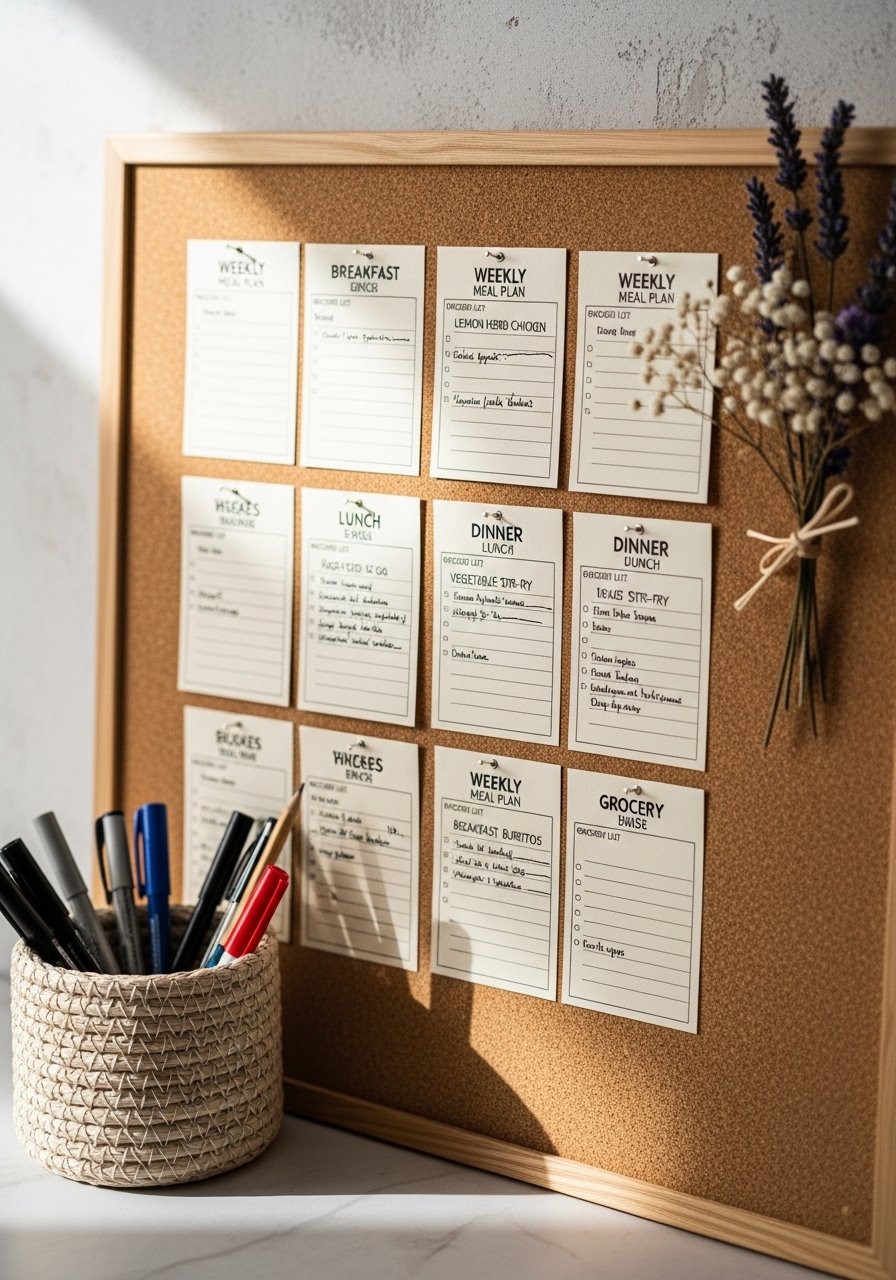
A slim corkboard or framed memo board inside the pantry keeps meal plans, grocery lists, and coupons in one place. It’s especially handy for small pantries where the fridge space is limited.
Materials
- 1 slim corkboard, 12"x18"
- 10 printed meal cards (3"x5")
- 6 push pins
- 1 small pen holder with pens
- 1 adhesive strip for mounting
Instructions
- Mount the corkboard on the inside pantry wall using removable adhesive strips.
- Pin weekly meal cards and a hanging notepad for grocery items.
- Replace cards weekly and keep completed items in a small folder.
- Clean pins and board surface monthly.
How to Display or Gift It
- Frame the board with washi tape for color.
- Gift with a coordinating set of meal cards and magnetic pen for the fridge or pantry door.
- Store extra cards in a labeled envelope attached to the board back.
(Product mention: cork board)
- PVC Rotating Snack Rack

A lightweight DIY rotating snack rack made from PVC pipe and a small lazy susan base turns a tall narrow space into stacked snack storage. It’s inexpensive and renter friendly.
Materials
- 1 lazy susan base (6–8" diameter)
- 1 PVC pipe section, 1.5" diameter, 12" long
- 2 flange connectors for PVC
- 4 wood screws
- 1 small wooden disc (optional, 6" diameter)
- Spray paint (optional color)
Instructions
- Attach flange to PVC ends; screw flange to the wooden base or lazy susan per instructions.
- If painting, spray the PVC with two light coats, dry 30 minutes between coats.
- Place the rack in the pantry and stack boxes and bagged snacks around the pipe.
- Rotate to access different shelves.
- Keep heavier items on the bottom and lighter items on top.
How to Display or Gift It
- Paint to match your pantry color scheme.
- Use as a grab-and-go station for kids’ snacks.
- For gifting, assemble prepaid snack packs on the rack in a decorative wrap.
(Product mention: lazy susan turntable)
- Pull-Out Bag Dispenser for Drawer

Make plastic and reusable bag storage tidy by creating a pull-out bag dispenser in a shallow drawer. It keeps bags compact and easy to grab when heading out.
Materials
- 1 pull-out bag dispenser insert (fits a 12" drawer)
- 1 stack of folded reusable bags (10)
- 1 small label
- Soft cloth
Instructions
- Place the dispenser insert into a shallow drawer.
- Fold reusable bags neatly and insert them into the dispenser.
- Pull bags through the slot as needed.
- Periodically empty and launder reusable bags.
How to Display or Gift It
- Install near the pantry door for easy access.
- For gifting, fold and tie a set of reusable bags with twine and include a small card.
(Product mention: bag dispenser insert)
- Foldable Step Stool with Hidden Storage

A foldable step stool with hidden storage gives you reach and extra space for baking supplies or seasonal items tucked inside.
Materials
- 1 foldable wooden step stool with storage, 12" high
- 1 small cushion (optional)
- 1 set of drawer dividers (for inside storage)
- Soft cloth for dusting
Instructions
- Unfold the stool and check hinges; tighten any loose screws.
- Add drawer dividers to organize inside storage.
- Place near pantry shelf for easy access; open storage holds rarely used items.
- Fold and store behind the pantry door when not in use.
How to Display or Gift It
- Paint the stool in a subtle color to match your pantry palette.
- Include a small packet of baking spices inside if giving as a gift.
(Product mention: folding step stool with storage)
- Minimalist Wire Rack for Cans

A minimalist wire can rack stacks canned goods on a small footprint. Choose powder-coated metal for a modern look that resists rust.
Materials
- 1 wire can rack (holds up to 12 cans)
- 1 small level
- 1 soft cloth for dusting
Instructions
- Place rack on shelf and test with a stack of cans.
- Arrange cans older-to-newer so you pull from the front first.
- Clean rack monthly and wipe shelf beneath to remove any residue.
How to Display or Gift It
- Paint the rack matte black for a Japandi look.
- Add a small printed “pantry rotation” tag to remind household members.
(Product mention: wire can rack)
- Japandi Wooden Crate Stack with Fabric Liner
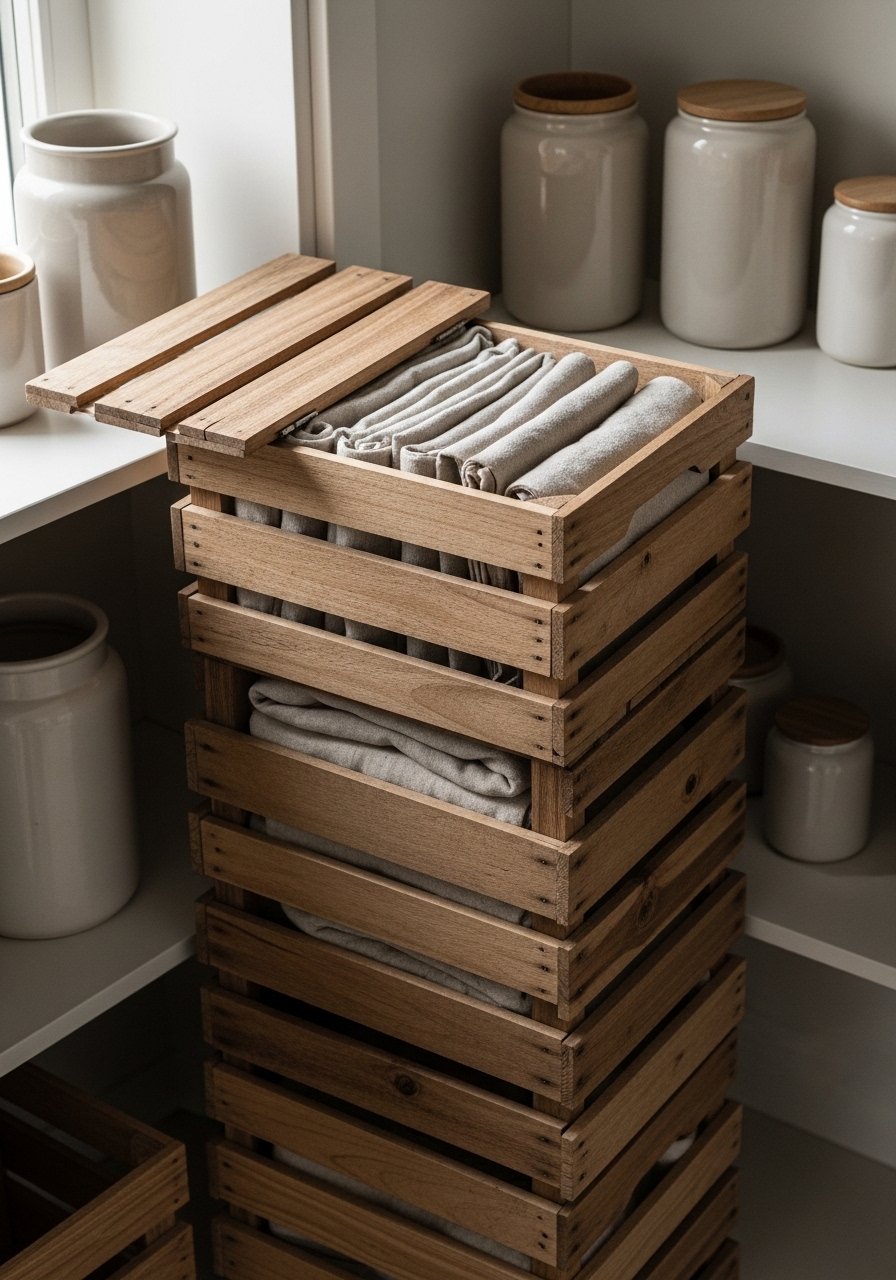
Stack lightweight wooden crates with neutral linen liners to achieve a warm Japandi look. The liners protect contents and create a calm, tactile finish.
Materials
- 3 small wooden crates (12"x8")
- Linen fabric for liners, 1/2 yard
- Small stapler or fabric glue
- Measuring tape
- Sanding block (120 grit)
Instructions
- Sand crate interiors lightly and wipe away dust.
- Measure and cut linen to fit crate interiors with a 1" overlap.
- Staple or glue liner in place and fold edges for a clean look.
- Stack crates securely, largest on bottom, narrowest on top.
- Use crates for dry goods, tea tins, or additional kitchen linens.
How to Display or Gift It
- Keep the stack against a pantry wall for a curated look.
- For gifting, line a crate with tea towels and a small mortar and pestle.
(Product mention: linen fabric 1/2 yard)
- Boho Macramé Hanging Shelf for Lightweight Items

A small macramé hanging shelf adds boho texture and holds light pantry items like tea tins, recipe cards, or decorative jars. Use lightweight macramé cord and a wooden shelf plank.
Materials
- 3mm macramé cord, 30 yards
- 1 wooden plank, 10"x6"
- 1 small drill for center hole
- 1 set of wood beads (optional, 10)
- Scissors and tape measure
Instructions
- Drill four evenly spaced holes in the wooden plank for cord. Sand smooth.
- Cut eight lengths of cord at 4 ft each. Thread through holes and knot underneath for secure hanging.
- Tie macramé knots (square knots or lark’s head) to create decorative supports. Add beads as desired.
- Attach to a removable hook inside the pantry. Test with light items only (limit 5 lbs).
- Trim and melt cord ends slightly to prevent fraying if using synthetic cord.
How to Display or Gift It
- Style with ceramic mugs, small jars, or a trailing dried herb.
- Wrap finished macramé shelf with tissue and include care instructions as a gift.
- Store extra cord in a craft organizer for repairs.
(Product mention: macrame cord 3mm)
- Magnetic Tool Strip for Metal Utensils & Lids

A magnetic strip stores metal utensils and small lids vertically and clears drawer space. Use removable adhesive mounting or Command small strips for renters.
Materials
- 1 magnetic tool strip, 12"
- 4 small adhesive strips (Command)
- Metal utensils, lids to test
- Rubbing alcohol wipe to clean surface
Instructions
- Wipe surface clean and dry thoroughly.
- Apply adhesive following the strip’s package directions. Press for 30 seconds.
- Attach metal utensils and lids; arrange by size.
- Check monthly that adhesive remains secure.
How to Display or Gift It
- Install near a spice station for quick access to measuring spoons.
- Gift with a set of stainless-steel tongs or spoons mounted on the strip.
(Product mention: magnetic tool strip)
- Slim Rolling Pantry Cart (No-Assembly Option)
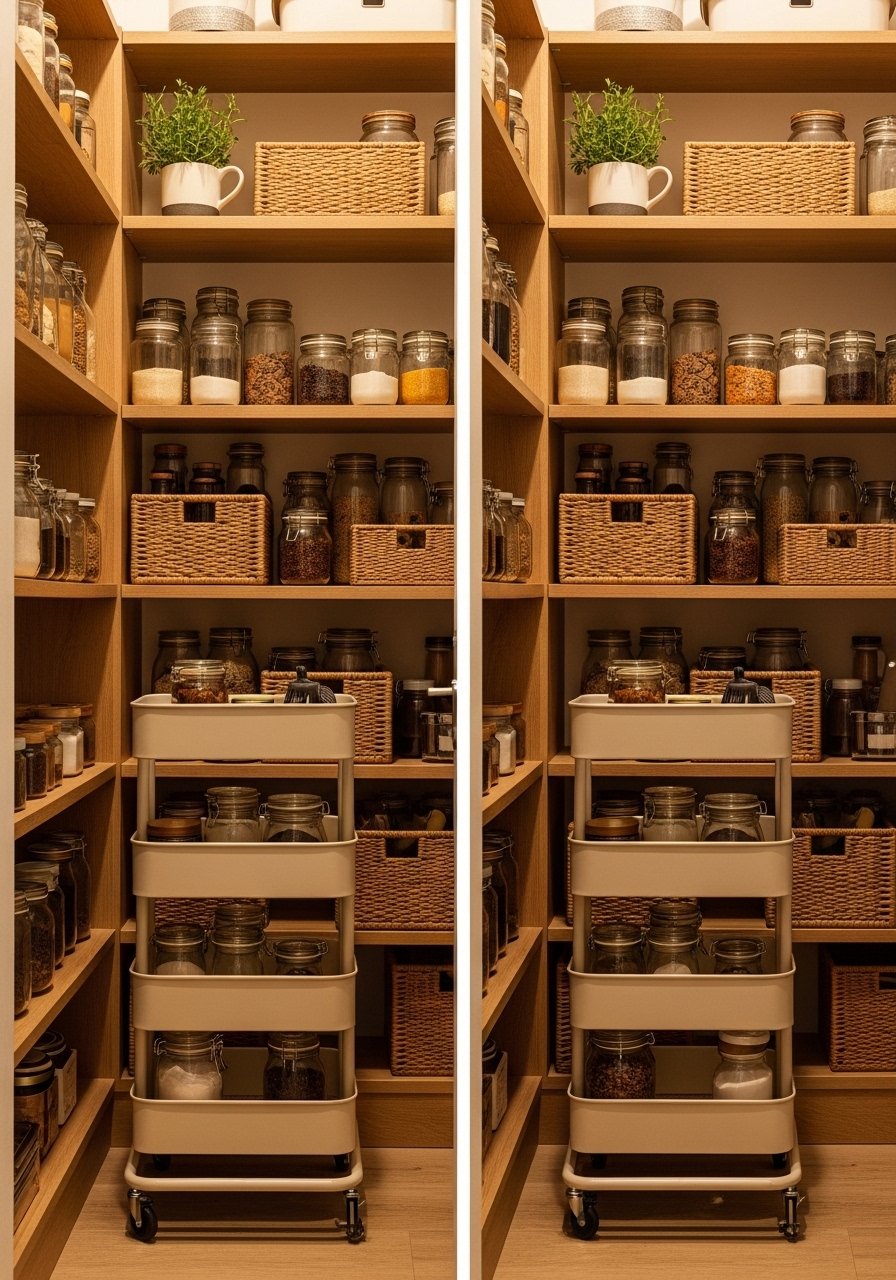
A slim rolling pantry cart fits narrow gaps and moves wherever you need it. Pick one with no-tool assembly or wheels that clip on for renter convenience.
Materials
- 1 slim rolling pantry cart (5–7" wide)
- 2 small woven baskets for shelves
- 1 non-slip liner for each shelf
- Small set of labels
Instructions
- Slide the cart into a gap between appliances or shelves.
- Organize by vertical zones: top for tea, middle for snacks, bottom for heavy items.
- Use non-slip liners to prevent jars from shifting while rolling.
- Clean wheels monthly and check for debris.
How to Display or Gift It
- Pull the cart out as a mini prep station when cooking.
- For gifting, fill top shelf with coffee supplies and wrap in clear cellophane.
(Product mention: slim rolling cart)
- Chalkboard Labels & Reusable Bags Organizer
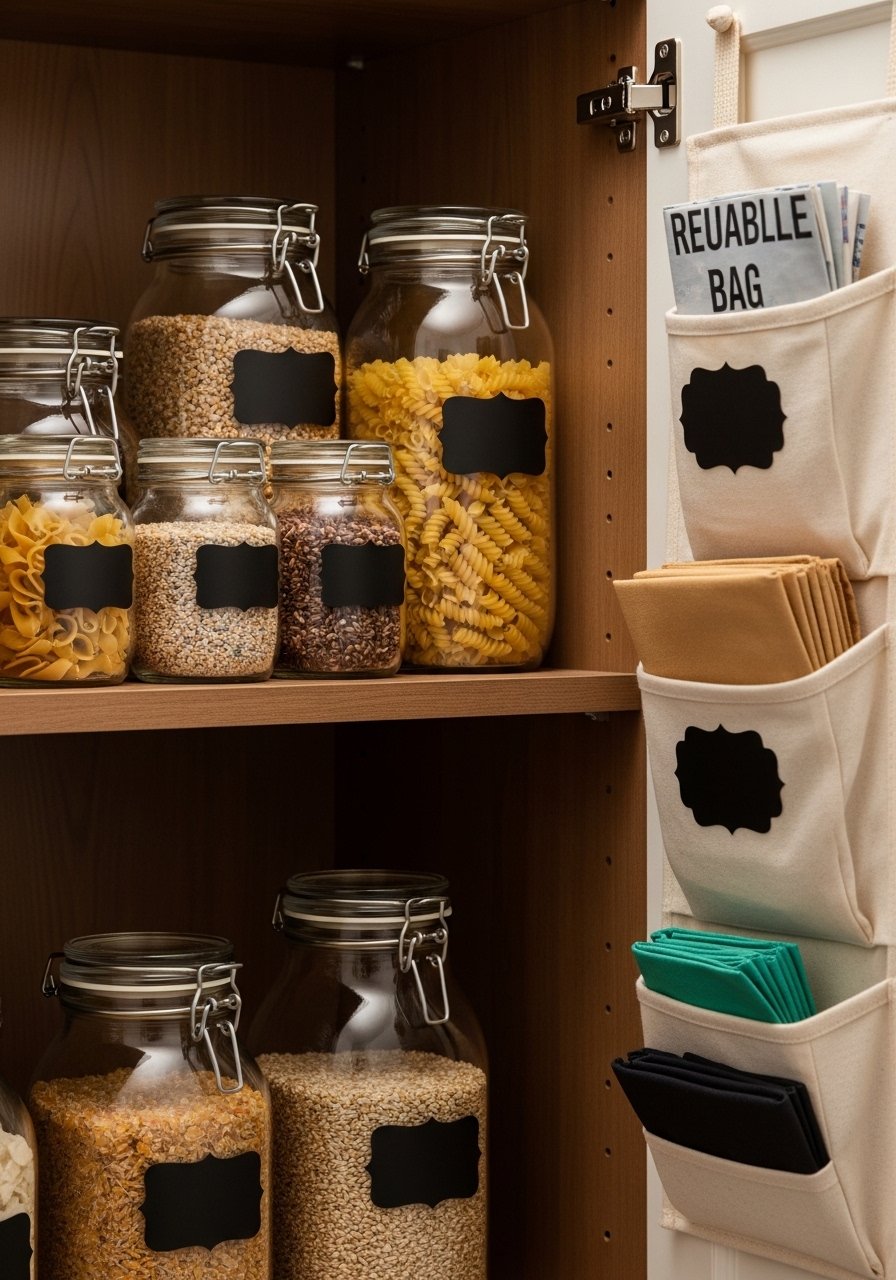
Create consistent chalkboard labels and a small pocket organizer for reusable bags to keep your pantry visually calm. Use a label kit or your Cricut for precise shapes.
Materials
- 36 chalkboard labels (assorted shapes)
- White chalk marker
- Small hanging reusable bag organizer
- 1 set of reusable grocery bags (5)
- Soft cloth
Instructions
- Clean container lids and apply chalkboard labels. Let them sit 24 hours before writing.
- Use a white chalk marker and write contents neatly; allow 2 minutes to dry.
- Hang the bag organizer on the pantry door and fold reusable bags into slots.
- Wash reusable bags monthly and refresh labels as ingredients change.
How to Display or Gift It
- Group labeled jars by category for an instant calm look.
- Include a matching chalk marker and spare labels if gifting the set.
- Store extra labels and markers in a shallow craft organizer inside the pantry.
(Product mention: chalkboard labels)
Thanks for sticking with me through 23 renter-friendly, stylish small pantry ideas for apartments. You’ve got options for tension rods, hanging crates, magnetic systems, and simple cart solutions that don’t require drilling or a landlord’s approval. Try one build at a time, pin the projects you love, and share your photos — I’d love to see how you make them yours.
Trust me, picking up a quality temperature-controlled hot glue gun changed how neat my quick assemblies turned out — less string, better control, and faster fixes. Which pantry hack are you trying first? Tell a friend who’s moving into an apartment and make their unpacking a little smoother.


