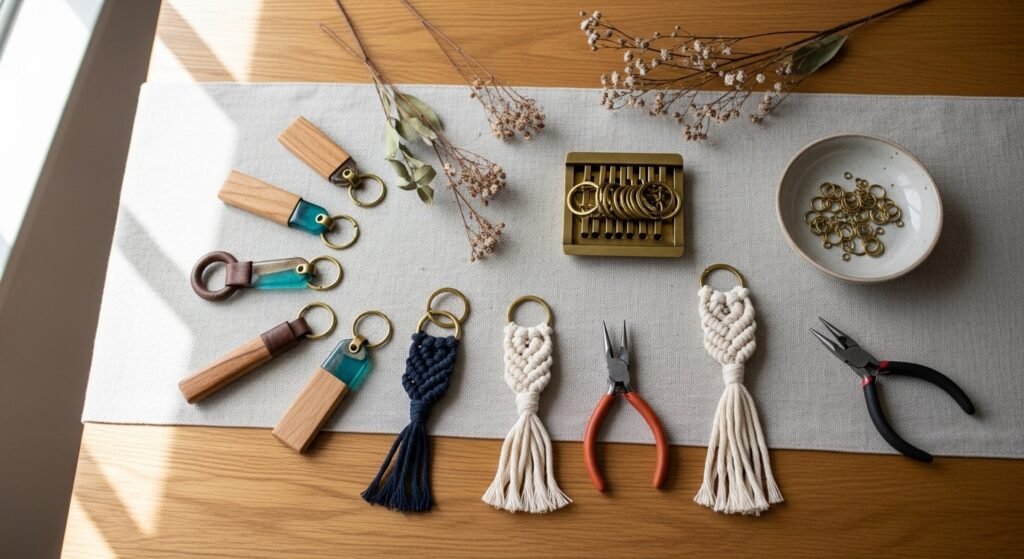
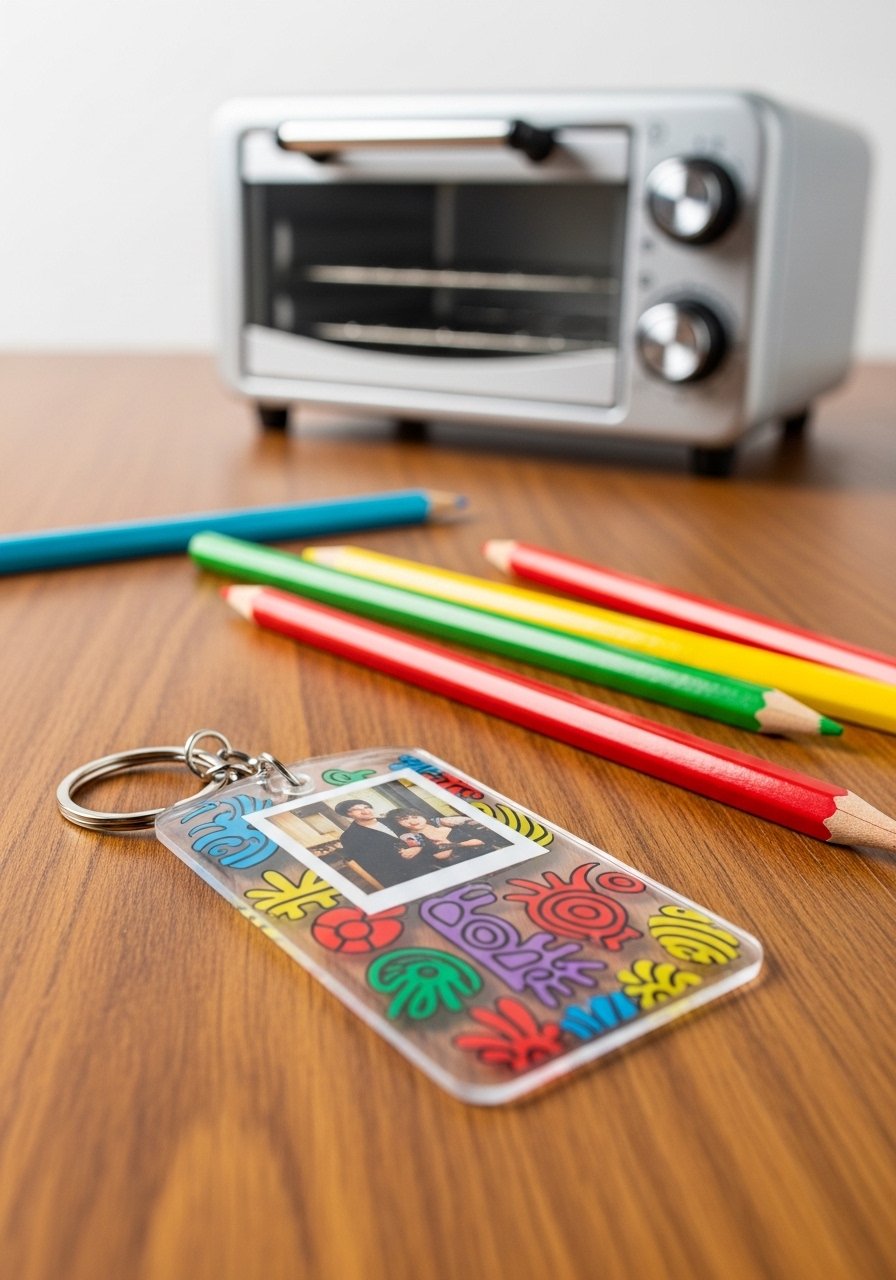
You know that tiny gift that ends up on the kitchen hook and sparks a smile every time? These 24 DIY keychain ideas for gifts are tiny, thoughtful keepsakes you can make in an afternoon and personalize for anyone on your list. Whether you love farmhouse wood, boho macramé, sleek resin, or cozy felt, you’ll find projects here that match trending styles like cottagecore, japandi, and modern boho.
I reach for my Cricut Joy cutting machine when I need quick, precise shapes, but plenty of these crafts only need a simple craft knife. Each project below includes a realistic materials list with exact quantities, step-by-step instructions with drying times, and tips for fuss-free gifting. You’ll also find crafty tool suggestions sprinkled naturally—like a precision craft knife set for crisp edges—so you can shop only what helps the project. Pin your favorites and get ready to make keepsakes people will treasure.
- Rustic Stamped Wooden Tag Keychain

This rustic wooden tag feels handmade and warm in your hand. The sanded edges and visible grain give it a cozy farmhouse vibe that suits birthdays and housewarming gifts. It’s beginner-friendly and uses a simple metal stamping kit to personalize initials or short words. I use a wood burning and stamp-friendly mallet set to get clean impressions.
Materials
- 1 unfinished wood oval tag, 25 x 40 mm
- 1 16mm split key ring
- 1 18–20 gauge eye screw
- 1 pack metal letter stamps (A–Z)
- 1 small rubber mallet
- 1 120 and 220 grit sandpaper
- 1 matte sealer spray, 2–3 light coats
Instructions
- Sand the wood tag with 120 grit, then finish with 220 grit for a smooth edge.
- Lightly mark the center with a pencil for your stamp placement.
- Position the letter stamp, hold it straight, and strike with the mallet once or twice. Check impression depth; aim for legible, not crushed.
- Insert the eye screw and twist until snug.
- Apply 2 thin coats of matte sealer, 15 minutes between coats. Let fully cure 24 hours (firm to the touch, no tackiness).
- Attach split ring and test the jump ring for smooth rotation.
How to Display or Gift It
- Tie a sprig of dried lavender through the keyring and place it in a small kraft box lined with tissue.
- Add a note explaining the stamped letter meaning.
- Store extra blank tags flat in a labeled craft drawer so they don’t warp.
- Mini Macramé Tassel Keychain (Boho)
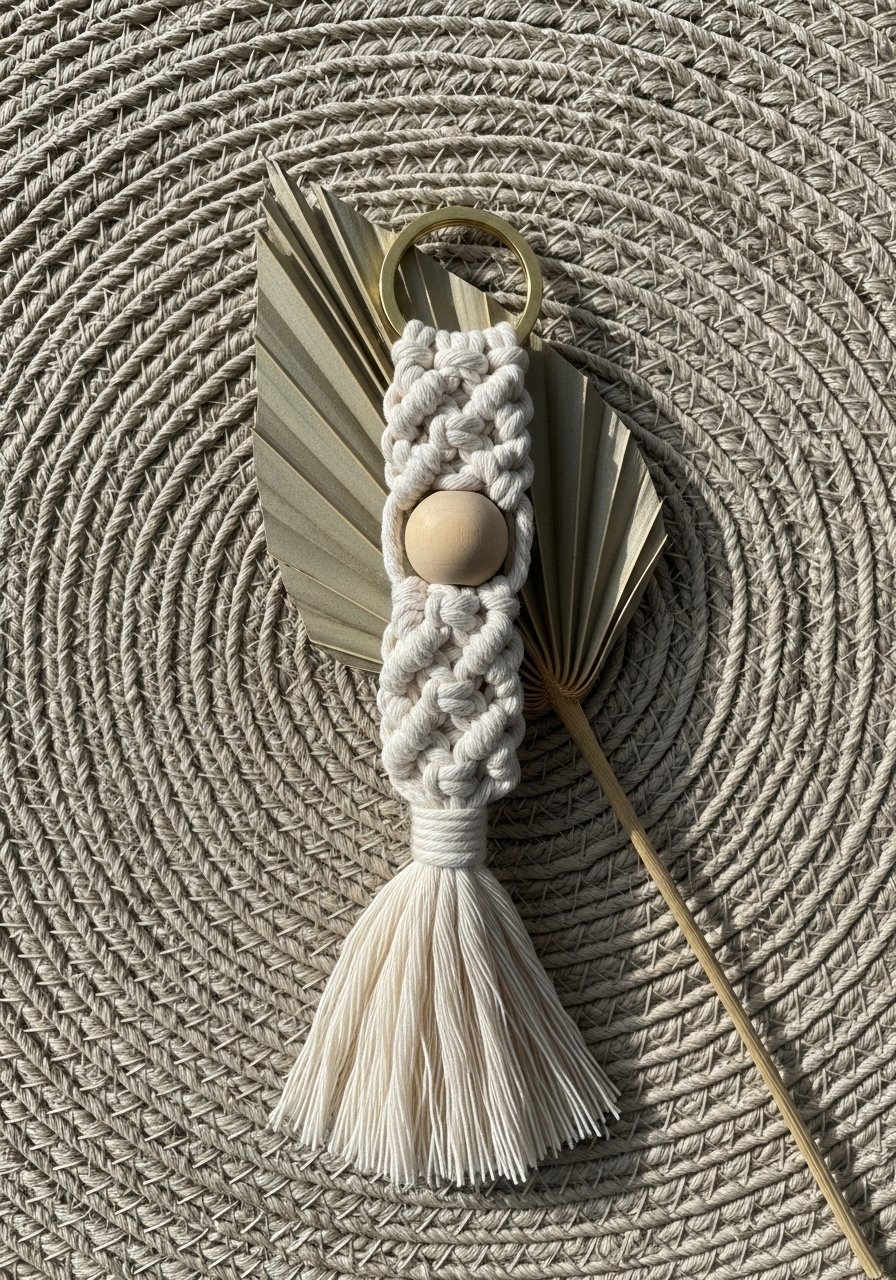
This mini macramé tassel is lightweight and tactile. The 3mm cord makes neat knots and a bouncy tassel perfect for boho-loving friends. If you’re new to macramé, a 5mm macramé cord sampler is great to practice with.
Materials
- 3mm single-strand macramé cord, 3 yards
- 1 12mm wooden bead
- 1 25mm brass split key ring
- 1 small pair of scissors
- 1 needle-nose pliers (for rings)
- Optional: fabric stiffener, 1 small brush
Instructions
- Cut a length of cord 36 inches. Fold in half and loop through the key ring to secure with a lark’s head knot.
- Use square knots for the body: make 6 square knots (3 full repeats).
- Slide on the wooden bead and secure with a half knot beneath it.
- Trim the tail to 2 inches and comb the ends with a small brush for a fringe look. Apply a dab of fabric stiffener if you want firmer tassels; let dry 30 minutes.
- Tidy stray fibers and shape gently with scissors.
How to Display or Gift It
- Tie to a kraft tag with a handwritten note.
- Store tassel keychains flat in a shallow box to protect the fringe.
- Pair with a matching tote or mug for a coordinated gift set.
- DIY keychain ideas for gifts: Personalized Leather Tab
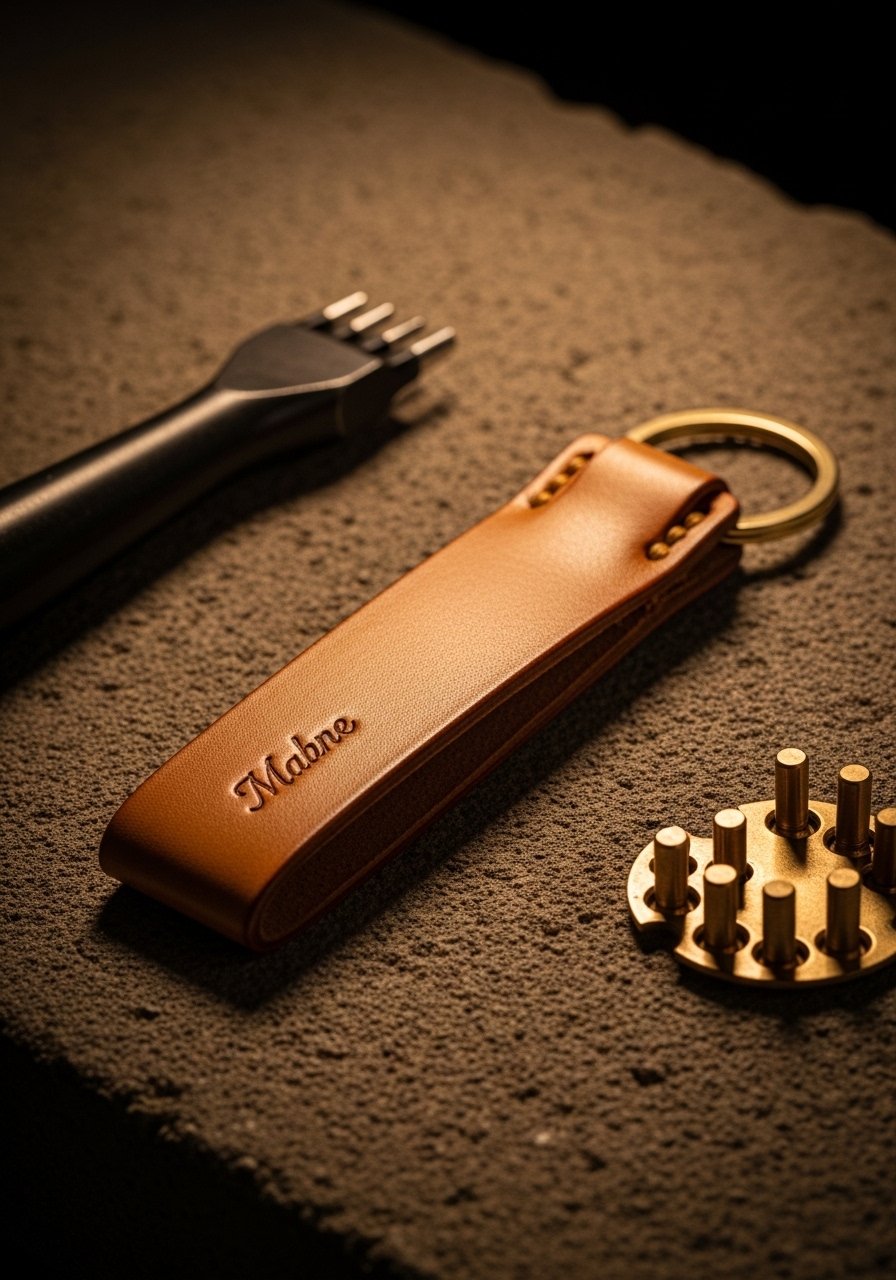
A leather tab keychain is classy and lasts for years. Burnished edges and a stamped name make it feel bespoke. Use a leather hole punch and rivet kit to attach hardware cleanly.
Materials
- 1 strip vegetable-tanned leather, 10 cm x 2.5 cm, 2mm thick
- 1 20mm brass split key ring
- 1 brass rivet set
- 1 leather dye (optional), 1 small applicator
- 1 edge burnisher or beeswax
- 1 metal letter/number stamp set for leather
- 1 cutting mat and ruler
Instructions
- Cut leather to 10 x 2.5 cm. Round the corners with scissors.
- Dye if desired; apply thin coat, let dry 30–45 minutes, and buff.
- Stamp name centered, using a hard surface underneath. Tap stamps with a mallet until consistent depth.
- Fold the leather into a loop over the ring, mark rivet hole 6 mm from edge.
- Punch the hole, insert rivet, and set with the rivet setter.
- Burnish edges with beeswax for a smooth finish.
How to Display or Gift It
- Wrap in kraft paper and tie with twine.
- Include a small care note about leather conditioning.
- Keep extras flat in a drawer to prevent warping.
- Polymer Clay Initial Charm
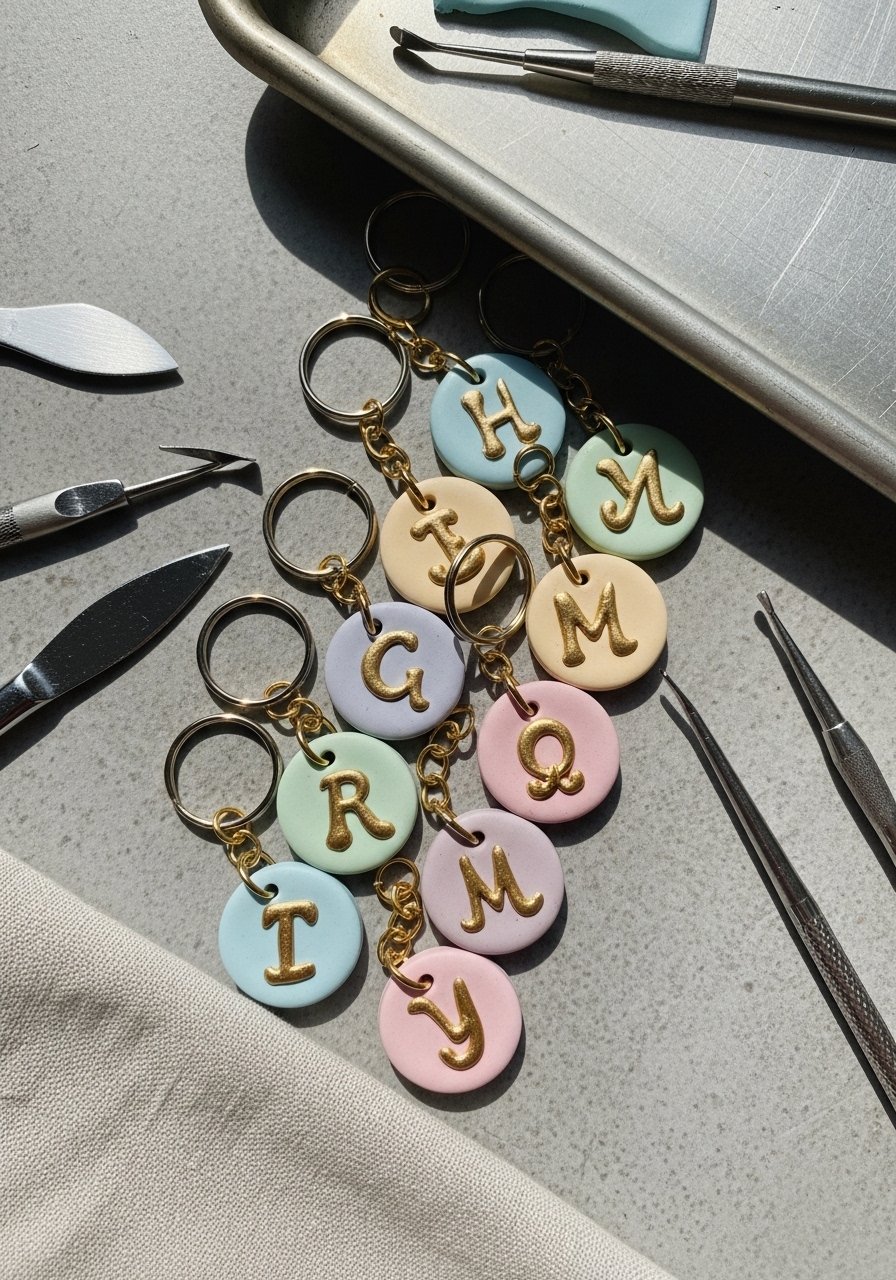
Polymer clay molds into bright, lightweight charms you can bake at home. These initial tags are colorful and ideal for teen or kid gifts. I prefer the convenience of a polymer clay starter kit for consistent colors.
Materials
- Conditioned polymer clay, about 10 g per charm (use colors as desired)
- 1 small alphabet rubber stamp or blade for initials
- 1 metal straw or 2mm hole punch
- 1 18mm split key ring
- 1 non-stick baking mat, oven (bake at 265°F / 130°C)
- 1 gloss varnish (optional), 1 thin foam brush
Instructions
- Condition clay until soft and even.
- Roll to 3–4 mm thickness and cut 25 mm circles with a cutter.
- Press initial gently with an alphabet stamp. Punch a hole 2–3 mm from edge.
- Bake on the non-stick mat at 265°F (130°C) for 15–20 minutes (follow clay package times). Cool completely 30 minutes.
- Apply 1 thin coat of gloss varnish; dry 24 hours to be fully cured (no tack).
How to Display or Gift It
- Nest charms in mini organza bags.
- Bundle sets by color or initial in a small kraft box.
- Store unused clay sealed in plastic to prevent drying.
- Shrink Plastic Photo Keychain (Retro)
Shrink plastic lets you turn small drawings or photos into durable, shrunken charms with a glossy finish. Kids love making these for grandparents. You’ll want a pack of clear shrink plastic sheets that take ink well.
Materials
- 1 clear shrink plastic sheet, cut to 7 x 10 cm
- Permanent inkjet or laser-print photo reduced to 3 cm diameter
- 1 hole punch for shrink plastic (preholes important)
- 1 small toaster oven or conventional oven
- 1 gloss sealer spray, 2 thin coats
- 1 12–15mm split key ring
Instructions
- Print image smaller than final size (shrink factor ~50–60%). Trim and place on shrink sheet.
- Pre-punch hole before baking—if you try later, it may crack.
- Bake at 300°F / 150°C for 2–3 minutes following package instructions. Watch it shrink and flatten; it should stop moving and lie flat.
- Cool 2 minutes; apply 2 light coats of gloss sealer, 10 minutes apart. Let cure 24 hours.
How to Display or Gift It
- Slip into a clear acetate sleeve with a handwritten date.
- Add a ribbon loop and tuck into a greeting card.
- Keep finished charms flat during curing; store in a shallow box.
- Epoxy Resin Photo Keychain (Keepsake)
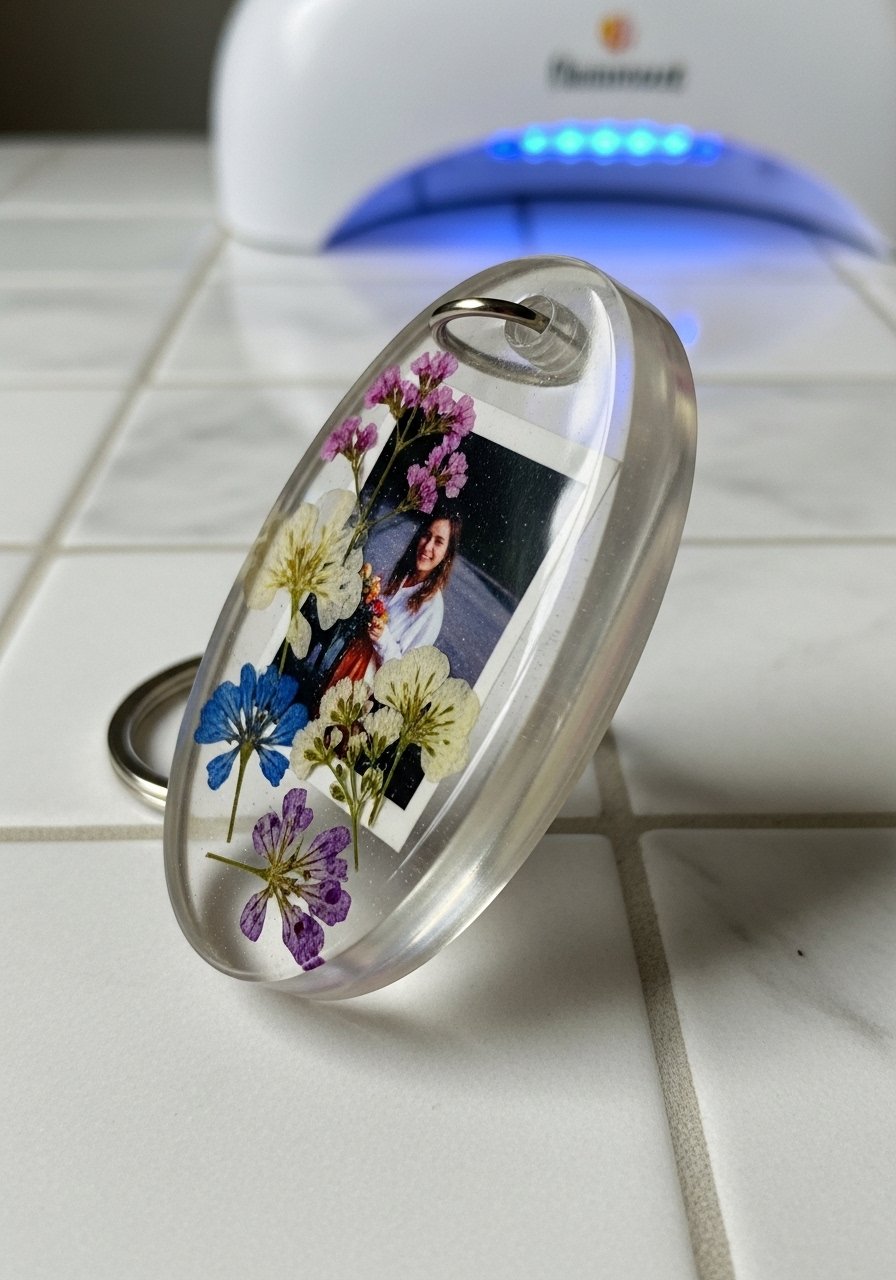
Encapsulated photos in resin feel like miniature, everlasting snapshots. Use a clear epoxy resin with a two-part system and a small silicone mold. My go-to is the clear epoxy resin kit for jewelry.
Materials
- 1 two-part clear epoxy resin kit (enough for 10 keychains)
- 1 small silicone oval mold, 40 x 20 mm
- 1 small printed photo trimmed to fit
- Tweezers, mixing cups, stir sticks
- 1 UV lamp or curing space (for faster set)
- 1 12mm split key ring and eye screw
Instructions
- Mix resin and hardener 1:1 (or kit ratio) for 2–3 minutes, scraping sides.
- Pour a thin base layer (~0.5 mm) into mold and let sit 10–15 minutes for bubbles to rise.
- Place photo centered, gently press with tweezers. Add a bit more resin to fill; work slowly to avoid trapped air.
- Pop bubbles with a heat gun for 5–10 seconds at low setting.
- Let cure 24 hours (fully hard, no tack). For extra hardness, wait 72 hours before heavy use.
How to Display or Gift It
- Present in a small clear box with a ribbon.
- Add tiny dried florals for a romantic touch.
- Store in a dust-free container while resin cures to avoid bits.
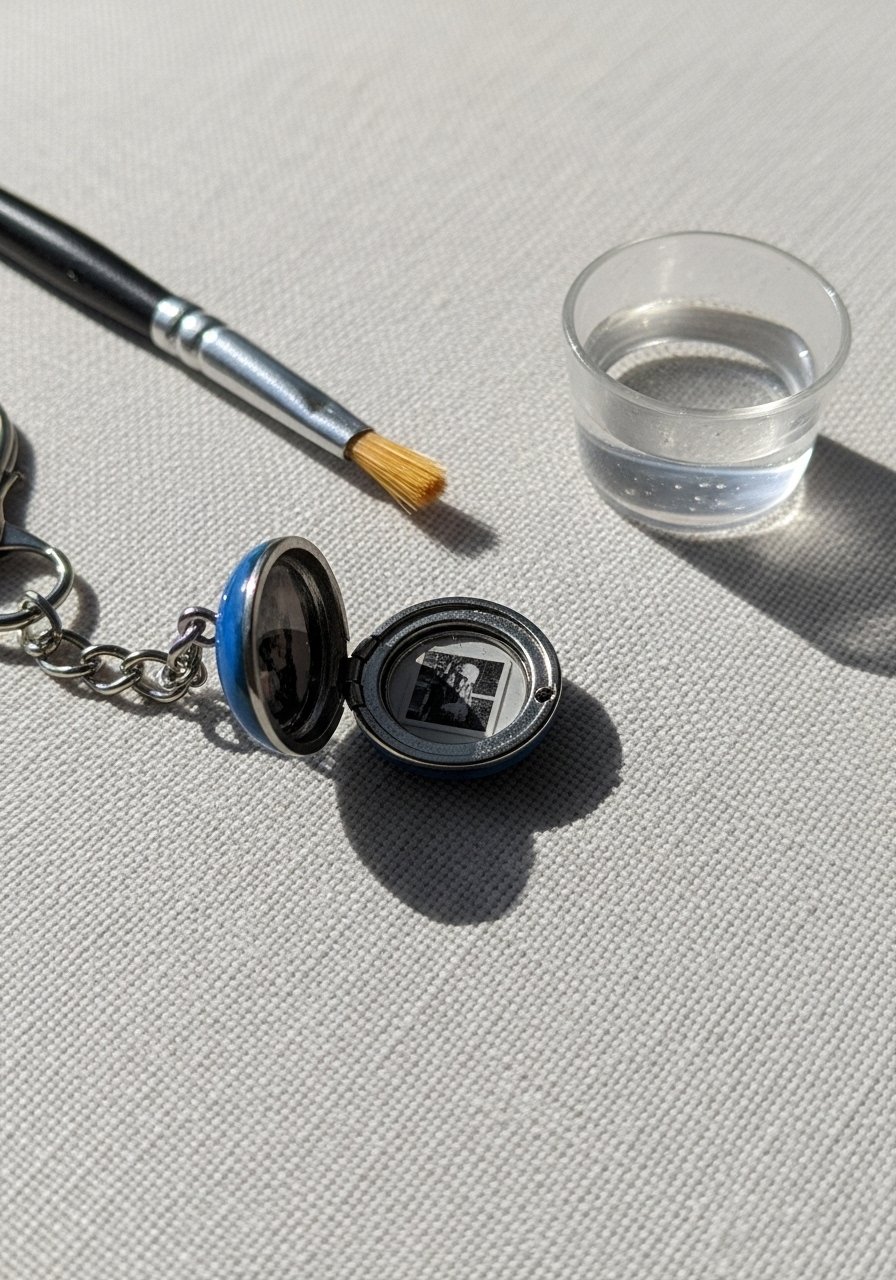
- Clay Air-Dry Photo Locket Keychain
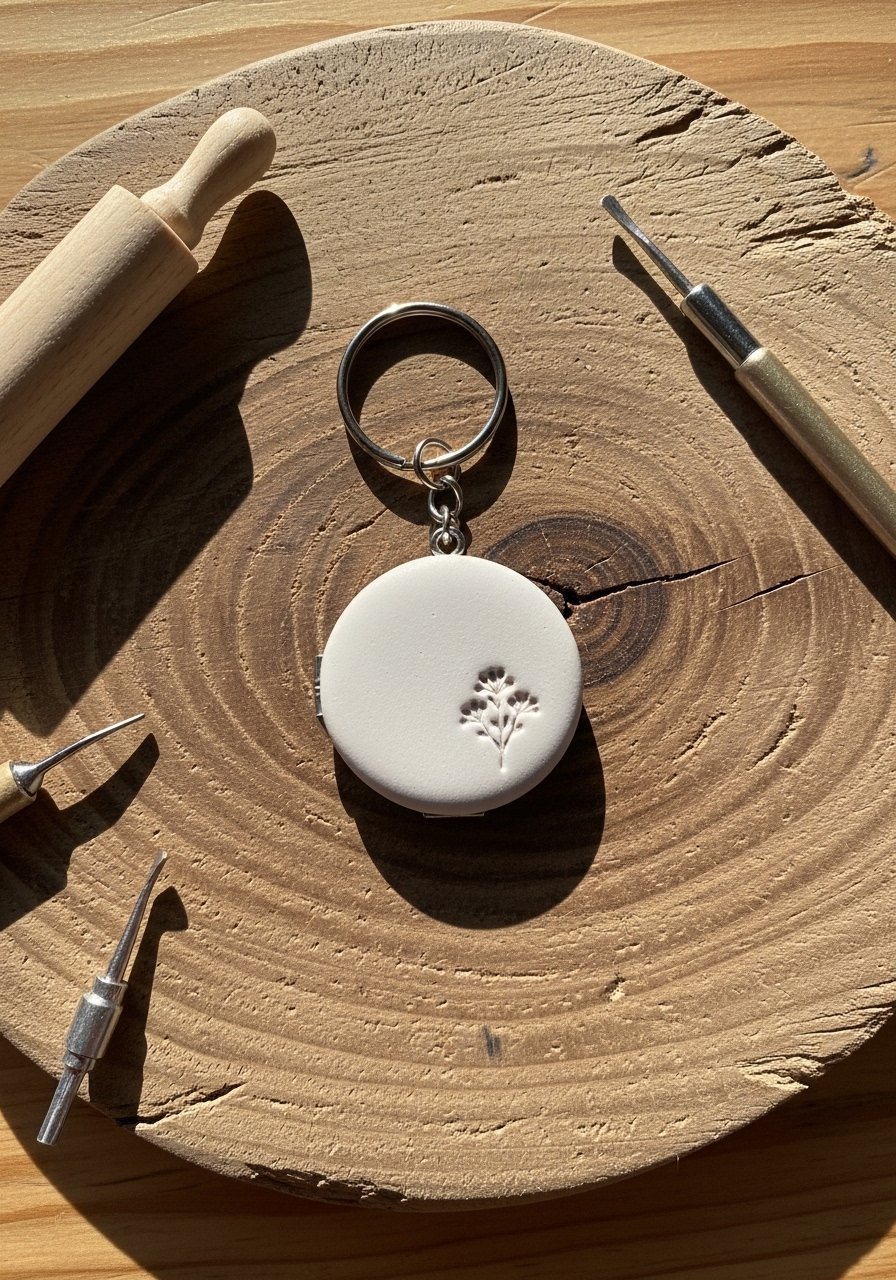
Air-dry clay lets you make soft, tactile lockets without an oven. These open-faced pendants showcase photos or notes. I keep a set of air-dry clay tools on hand.
Materials
- Air-dry clay, about 15 g per locket
- 1 small round cutter, 30 mm
- 1 thin magnet set (optional) or small hinge
- 1 gloss or satin sealer, 1 foam brush
- 1 metal key ring
- 1 fine sandpaper (220 grit)
Instructions
- Roll clay to 3–4 mm thickness. Cut two matching circles 30 mm.
- On one circle, create a 25 mm recessed area for a photo using a round cutter pressed lightly.
- Attach the two halves with a thin coil hinge or set small magnets in recesses.
- Smooth seam and let dry 24–48 hours depending on thickness (fully firm, not soft).
- Sand lightly and seal inside and out with 2 thin coats of sealer, 15 minutes between coats.
How to Display or Gift It
- Insert a tiny printed photo or folded note.
- Package in a mini kraft box with a ribbon.
- Keep finished pieces flat while drying to avoid warping.
- Beaded Name Bead Keychain (Retro/90s)
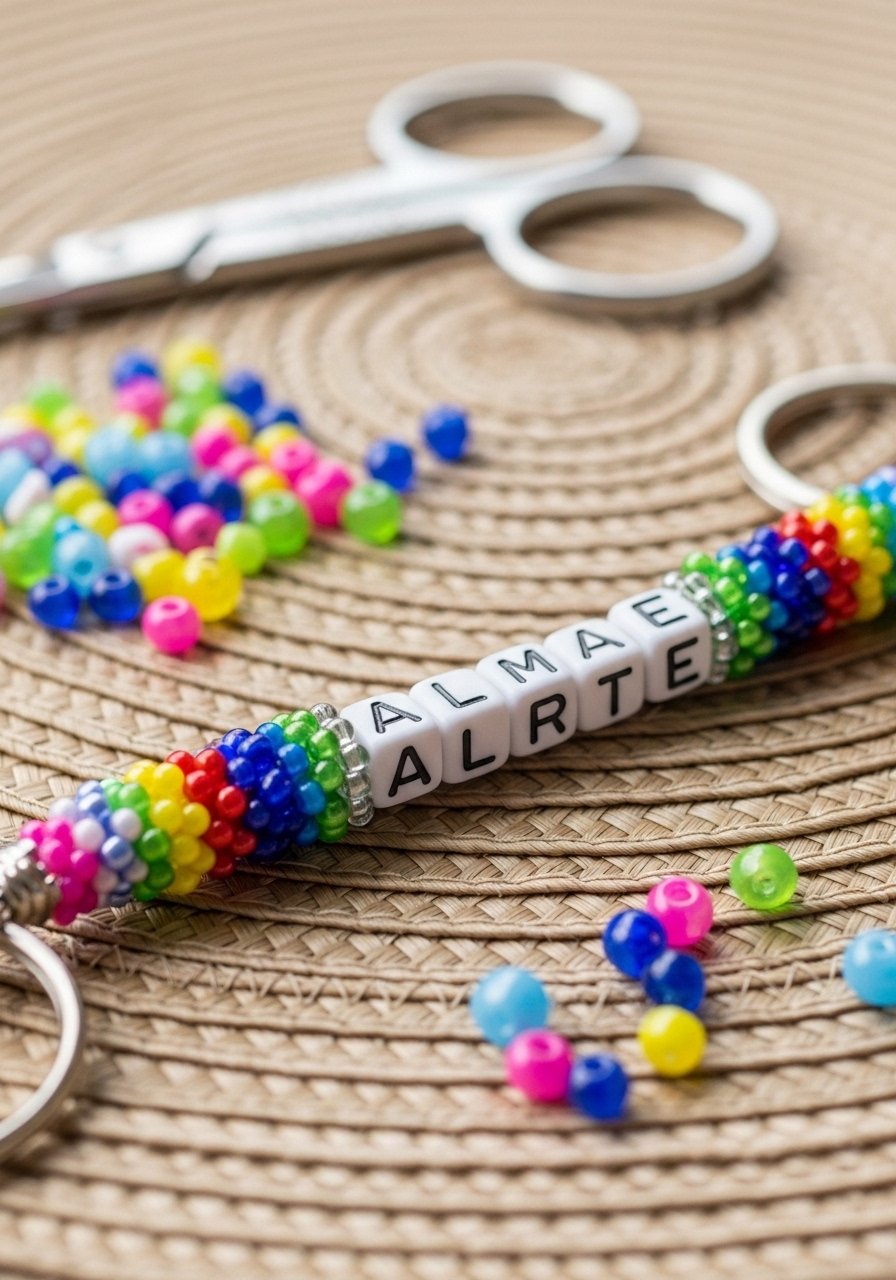
Letter beads paired with colorful accent beads make nostalgic name keychains. They’re fast, kid-friendly, and great for group gift-making. I use a pack of alphabet and seed beads for variety.
Materials
- Mixed alphabet beads, each 7 mm
- Seed beads about 3–4 mm, 10 g
- 1 0.7 mm elastic cord, 30 cm
- 1 12mm split key ring
- 1 clear nail glue or fabric glue
- Scissors and a tape to secure cord while stringing
Instructions
- Cut elastic 30 cm and tape one end to work surface.
- String seed beads in pattern, adding alphabet beads for the name—leave 1 cm on each end for knotting.
- Tie a surgeon’s knot and secure with a dab of clear glue. Let glue set 15 minutes.
- Trim ends and slide knot into a large bead if you want a tidy finish.
- Attach to split ring and pull gently to test knot security.
How to Display or Gift It
- Slide into a small organza bag for a cute presentation.
- Bundle with matching beaded bracelet.
- Store beads in a compartment organizer to keep colors sorted.
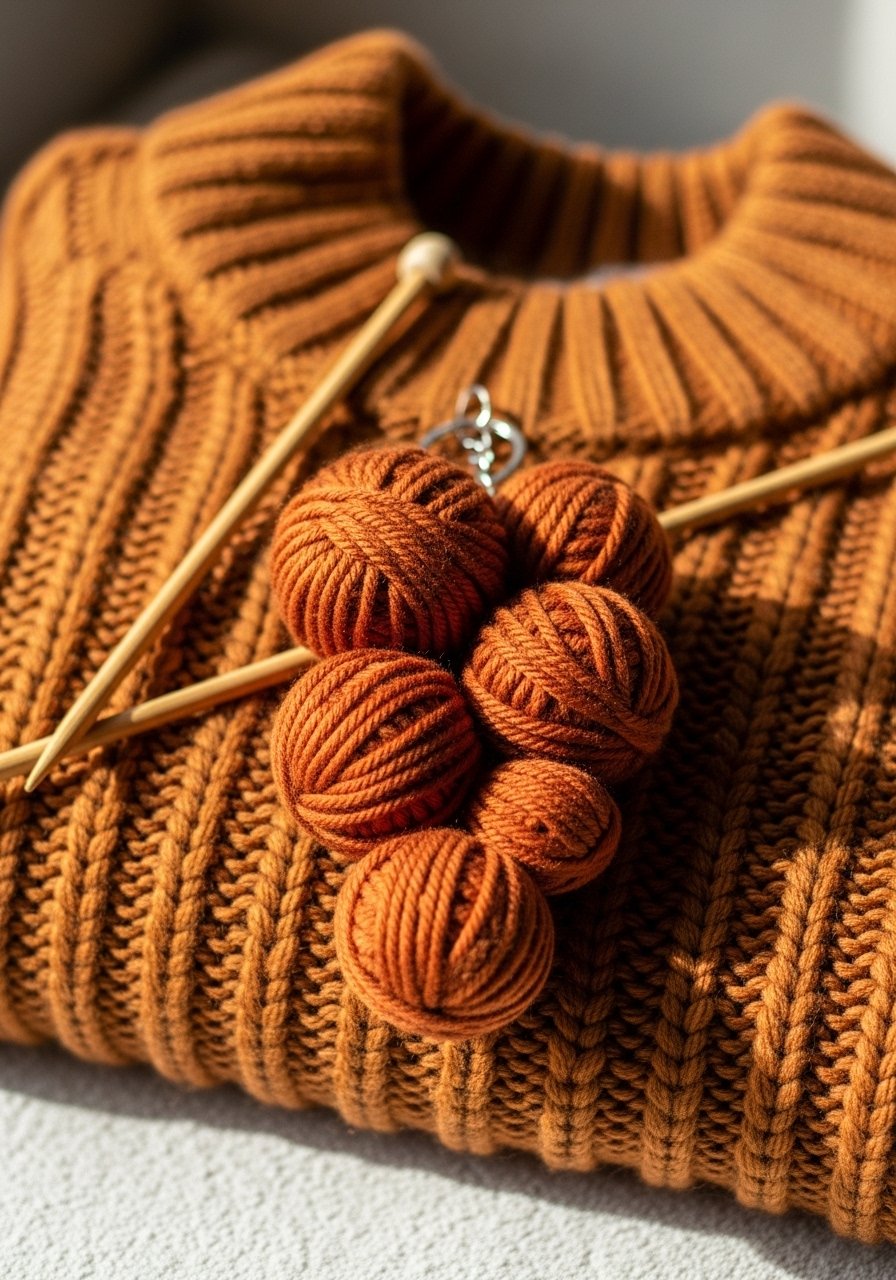
- Tiny Tassel Pom-Pom Keychain (Cozy)
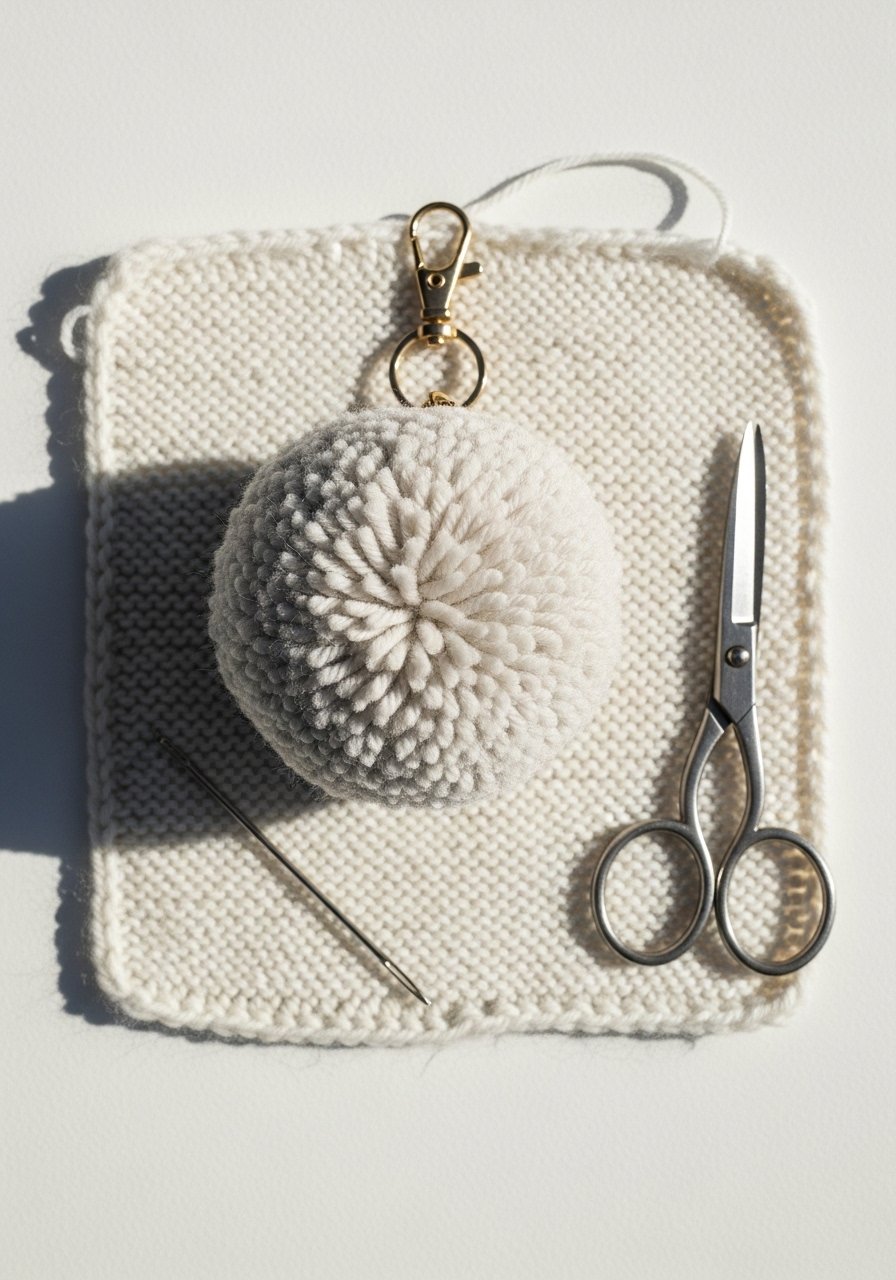
Yarn pom-pom keychains feel wonderfully tactile and cozy—great paired with winter gifts. A small pom-pom maker kit speeds the process.
Materials
- Soft acrylic yarn, approx 20 g
- 1 pom-pom maker (small size)
- 1 20mm split key ring
- 1 tapestry needle
- Scissors and a small comb
Instructions
- Wrap yarn around the pom-pom maker per tool instructions until full.
- Trim and secure tightly with yarn through the center. Remove maker.
- Fluff and trim evenly into a neat sphere about 35–40 mm diameter.
- Attach a short loop of yarn to the key ring and stitch securely with tapestry needle.
- Optionally spray with fabric protector and let dry 30 minutes.
How to Display or Gift It
- Attach to a holiday gift tag or mitten set.
- Store pom-poms in a breathable box to avoid flattening.
- Sea Glass Wire-Wrap Keychain

Wire-wrapping a polished sea glass shard makes an oceanic keepsake. The smooth glass and delicate wire look refined but are surprisingly simple to assemble. A wire-wrapping pliers set helps.
Materials
- 1 sea glass piece, 20–30 mm
- 26–28 gauge craft wire, 30 cm
- 1 12mm split key ring
- Round-nose pliers and wire cutters
- Fine sandpaper (optional, for smoothing rough edges)
Instructions
- Cut 30 cm of wire. Position sea glass and wrap with a tight base loop.
- Twist and create a decorative bail at the top using round-nose pliers. Make sure wire ends are tucked.
- Attach to split ring and test for secure wrap.
- If wire feels sharp, file ends lightly and tuck under wraps.
How to Display or Gift It
- Present in a small bag with a note about where the glass was found.
- Pair with a coastal-scented candle for a themed gift.
- DIY keychain ideas for gifts: Miniature Embroidery Hoop Charm
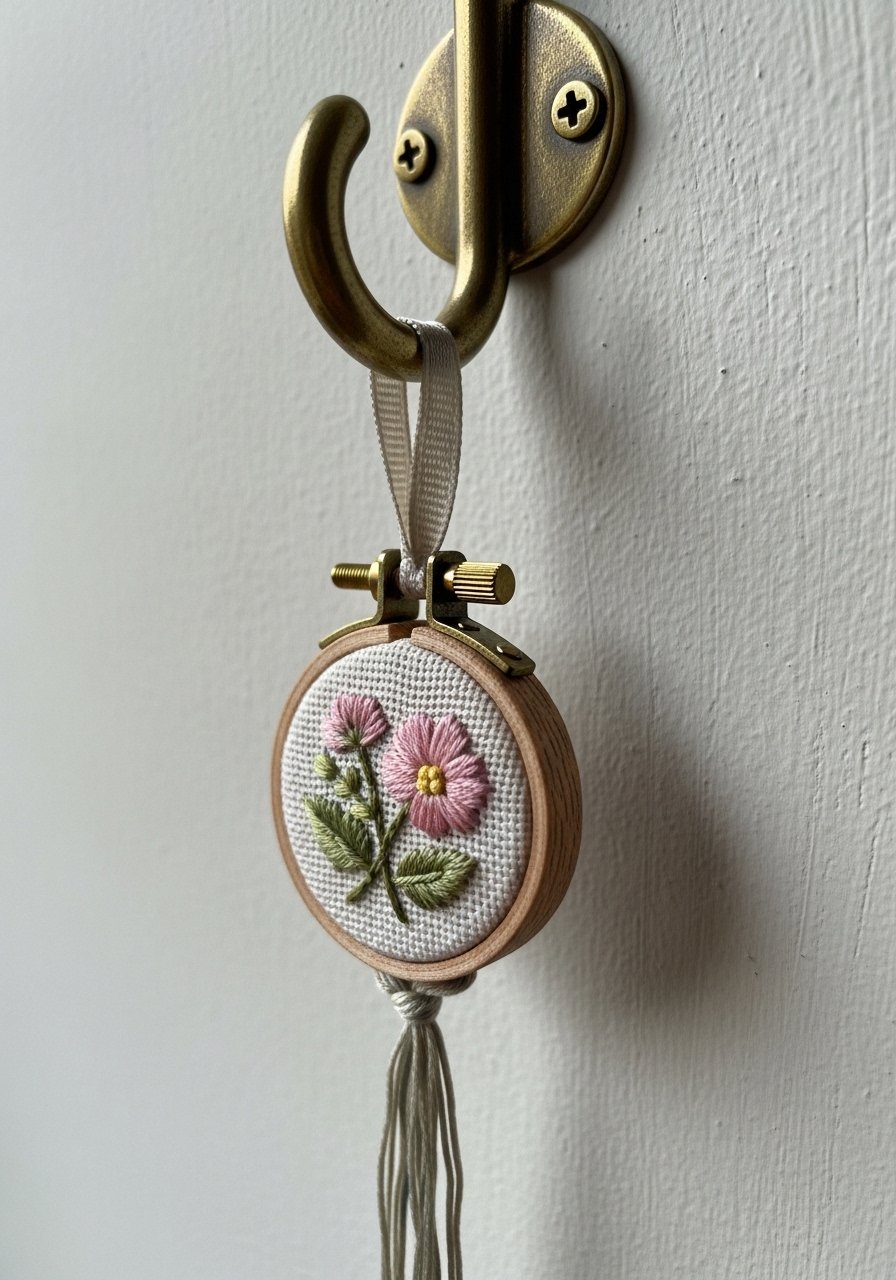
Tiny embroidery hoops with simple stitches feel handmade and intricate. The texture is tactile and suits anyone who likes cottagecore or wistful gifts. I use a compact mini embroidery hoop set to keep sizes consistent.
Materials
- 1 mini embroidery hoop, 25 mm diameter
- Small scrap of linen or cotton fabric, 4 x 4 cm
- Embroidery floss, about 1–2 m of each color
- Embroidery needle, scissors
- 1 12mm split key ring
- Small amount of fabric glue
Instructions
- Hoop fabric taut in the mini hoop and trim excess to 5 mm.
- Stitch a tiny motif (e.g., French knots, backstitch leaves). Keep stitches shallow so hoop closes flat.
- Apply a thin ring of fabric glue in the groove and press closed. Let dry 30–60 minutes.
- Attach key ring through top of hoop and trim threads.
How to Display or Gift It
- Tie a length of floss as a bow and tuck into a small gift box.
- Keep unstitched fabric squares sandwiched flat to use later.
- Photo Transfer Wood Keychain
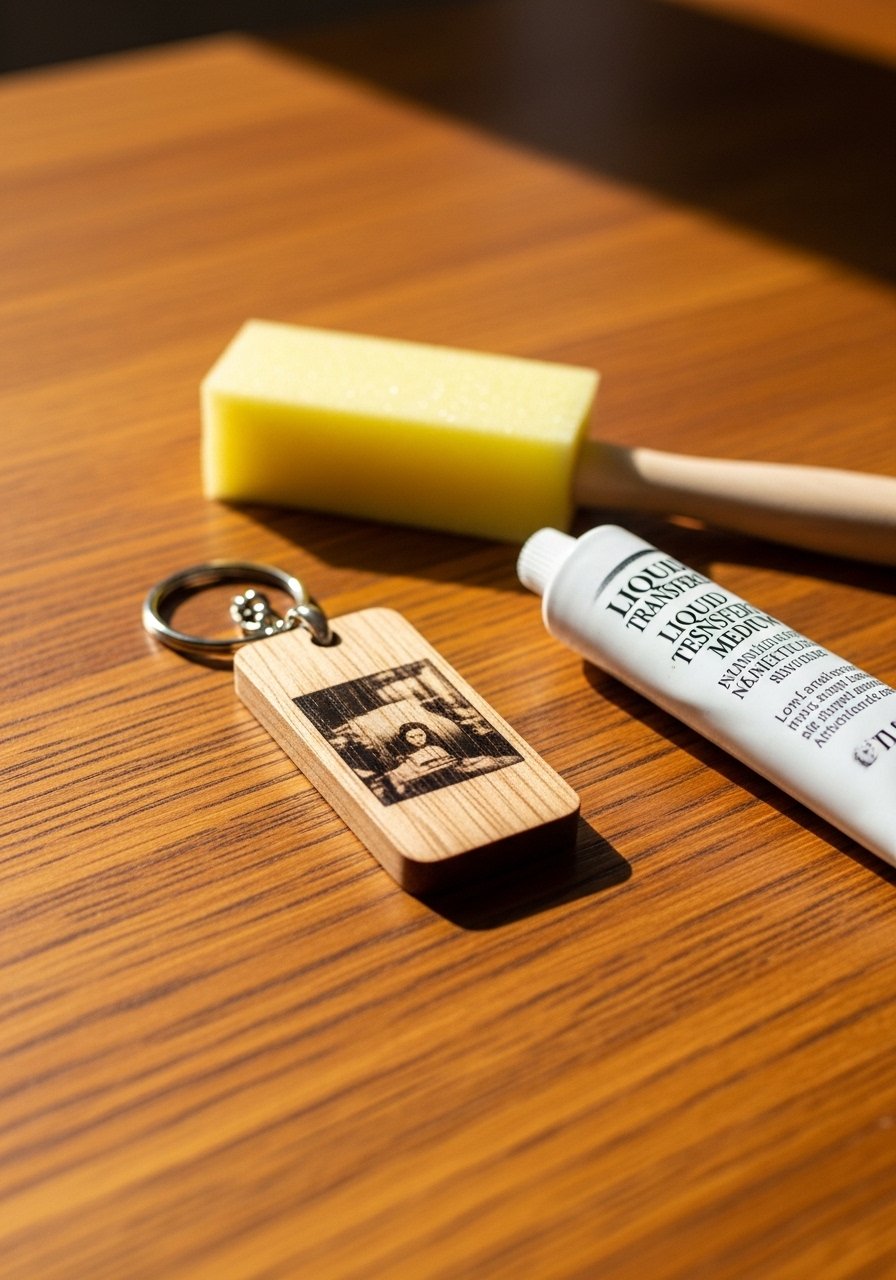
Photo transfer onto wood gives a vintage, tactile feel. The image sinks into grain for a soft, heirloom look. Use a photo transfer medium for predictable results.
Materials
- 1 wood rectangle, 35 x 18 mm, sanded
- Photo laser print mirrored, sized 30 x 15 mm
- 1 bottle photo transfer medium
- Foam brush, damp cloth
- Matte sealer, 2 coats
- 1 small hole and split ring
Instructions
- Sand the wood smooth; stain or leave natural.
- Brush transfer medium on the wood and on the print. Press face-down and smooth out air bubbles.
- Let dry 4–6 hours (or overnight for best adhesion).
- Dampen paper with a sponge and gently rub to remove backing until image reveals. Stop when image is clear.
- Seal with 2 coats matte sealer, drying 15 minutes between coats.
How to Display or Gift It
- Pair with a printed photo in a small frame.
- Wrap in tissue and tuck into a postcard.
- Braided Paracord Mini Tassel (Outdoor-Friendly)
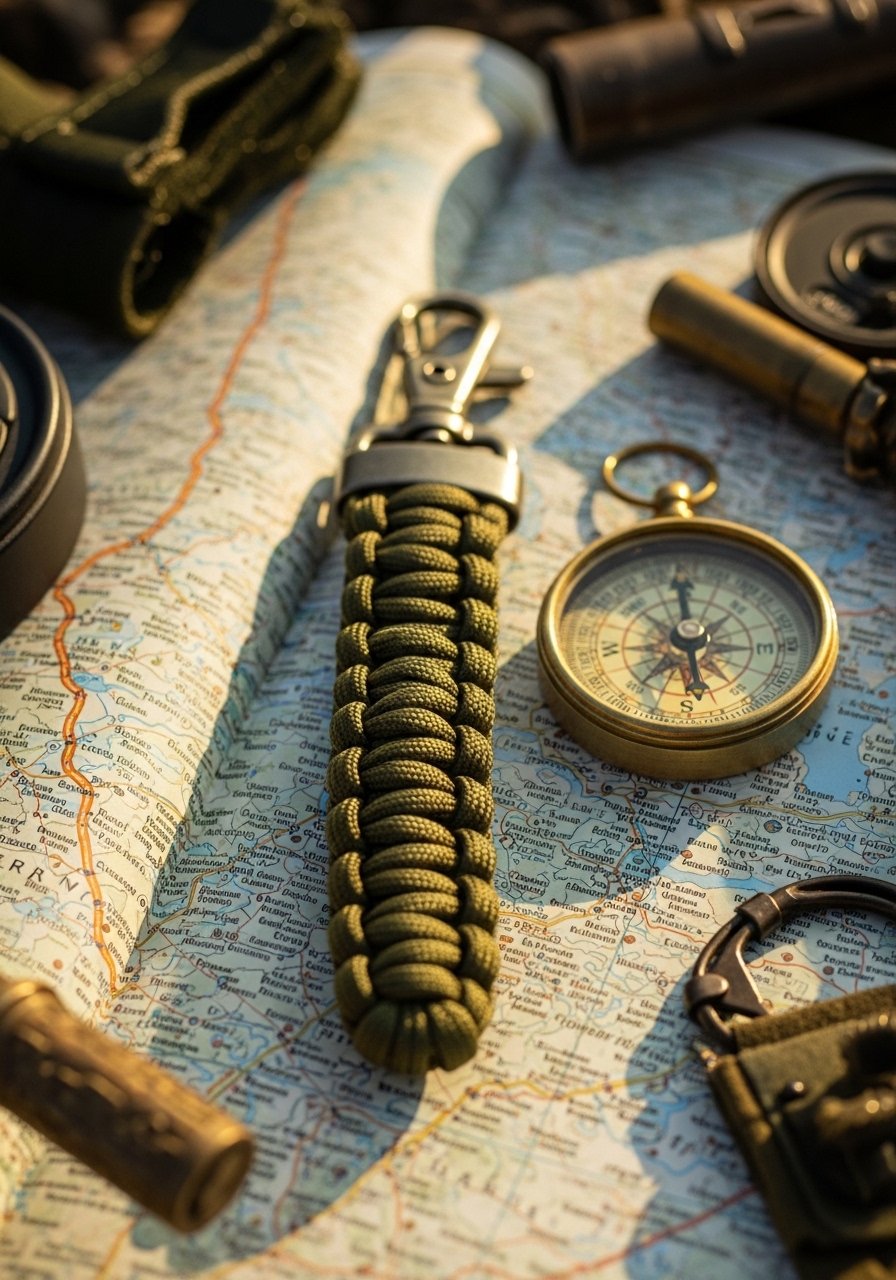
Paracord is durable and practical—great for campers and parents of teens. This tiny braided adapter is stylish and useful. I recommend a paracord bundle.
Materials
- 1 length paracord 550, 1 m
- 1 20mm split key ring or carabiner clip
- Lighter to melt ends
- Scissors, ruler
- Optional: bead or knot stopper
Instructions
- Measure and fold cord to make a loop for the ring; secure with a series of cobra knots about 4 cm long.
- Finish ends by trimming and carefully melting with a lighter, pressing to seal.
- Add bead or decorative knot at the base to finish.
How to Display or Gift It
- Clip to an outdoor-themed gift like a water bottle.
- Store paracord in a small drawer to keep it untangled.
- Felt Mini Animal Keychain (Kid-Friendly)
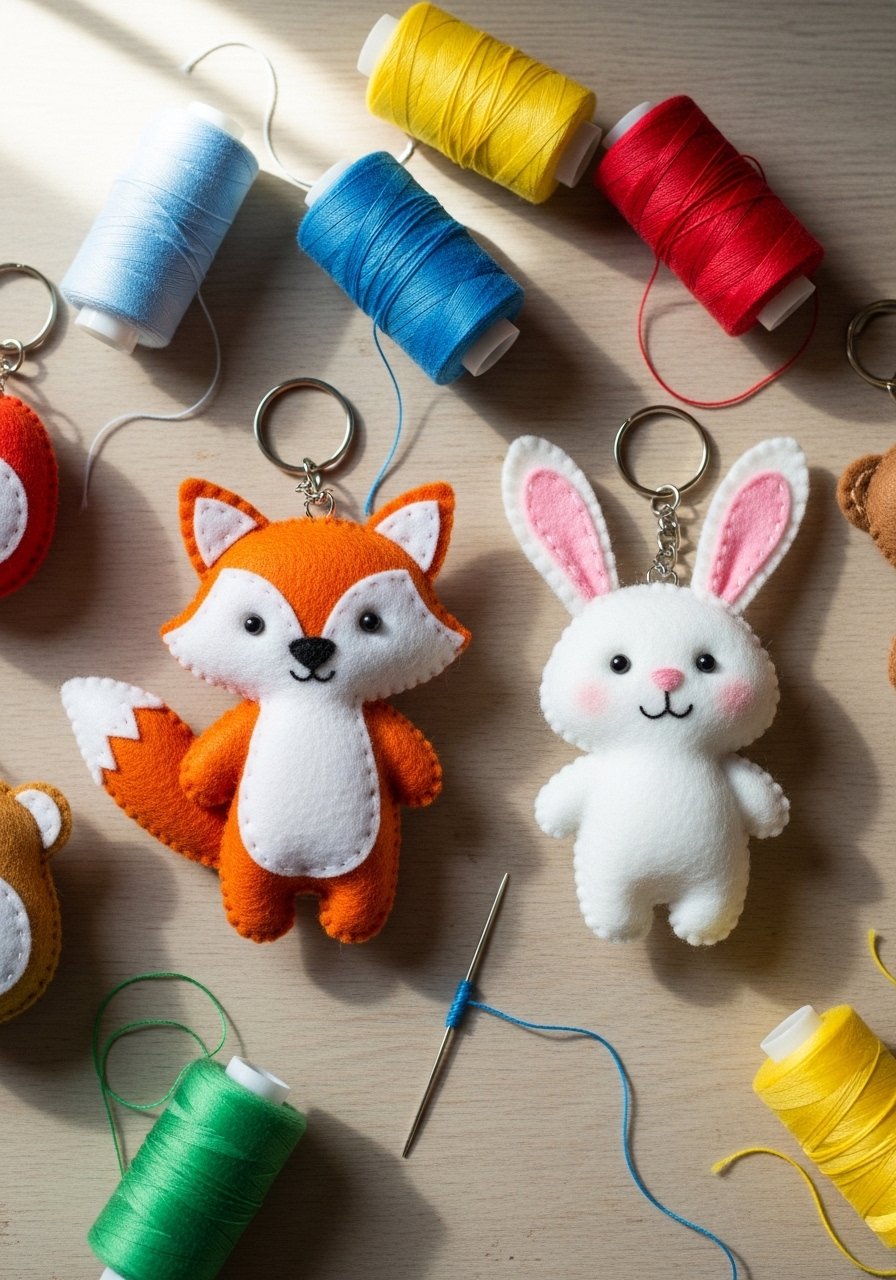
Soft felt animal keychains are perfect for kids and make fun classroom gifts. Hand-stitching gives a homespun charm. A multi-color felt sheet pack supplies plenty of options.
Materials
- Felt sheets, 5 x 5 cm per charm
- Embroidery thread, about 30 cm per charm
- Small amount of polyester stuffing, pinch each
- 1 split key ring
- Sewing needle and scissors
- Fabric glue (optional for small pieces)
Instructions
- Cut two matching felt shapes (body and backing).
- Place small stuffing in center and whipstitch edges closed with blanket stitch.
- Add facial features with small stitched details or tiny glue-on felt pieces.
- Attach key ring before fully closing if necessary.
- Trim threads and press lightly.
How to Display or Gift It
- Group several in a small drawstring bag for a child's party favor.
- Store completed felt charms in a shallow box to preserve shape.
- Brass Tag with Metal Stamping (Industrial)
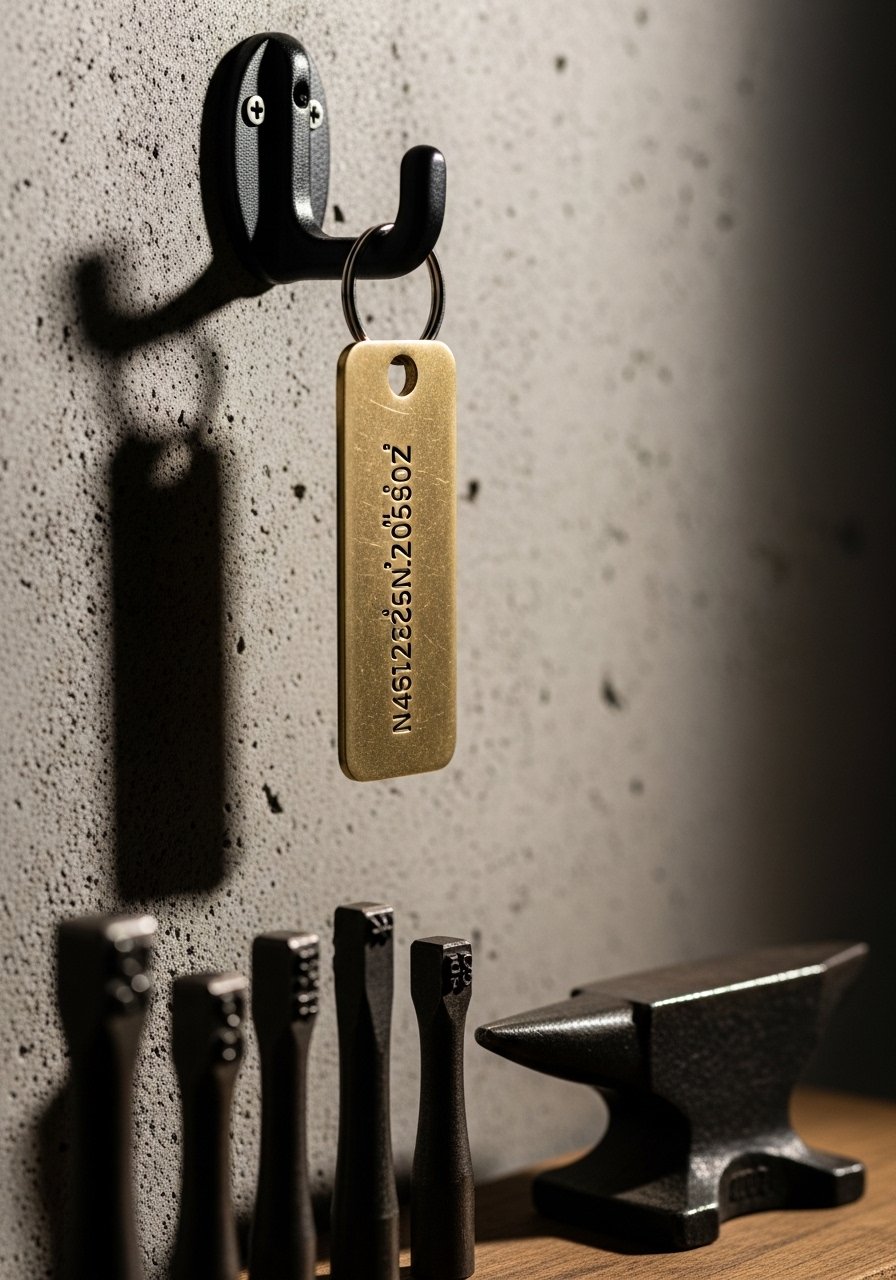
Brass tags with stamped coordinates or dates have a modern-industrial feel. The metal takes stamping beautifully. Use a metal stamping starter kit for crisp letters.
Materials
- 1 brass tag, 40 x 15 mm
- Letter stamps, mallet
- Sandpaper 220 grit
- Black permanent marker (for antiquing)
- 1 split key ring
- Optional lacquer to seal
Instructions
- Sand tag to remove burrs. Mark stamping center lightly.
- Stamp letters with steady, even strikes. Clean any burrs off with fine sandpaper.
- Rub black marker into impressions, wipe surface clean to highlight letters.
- Seal with thin lacquer if desired; dry 24 hours.
How to Display or Gift It
- Slip into a minimalist kraft box.
- Pair with a leather key fob for mixed-material contrast.
- Mini Acrylic Keychain with Painted Edge
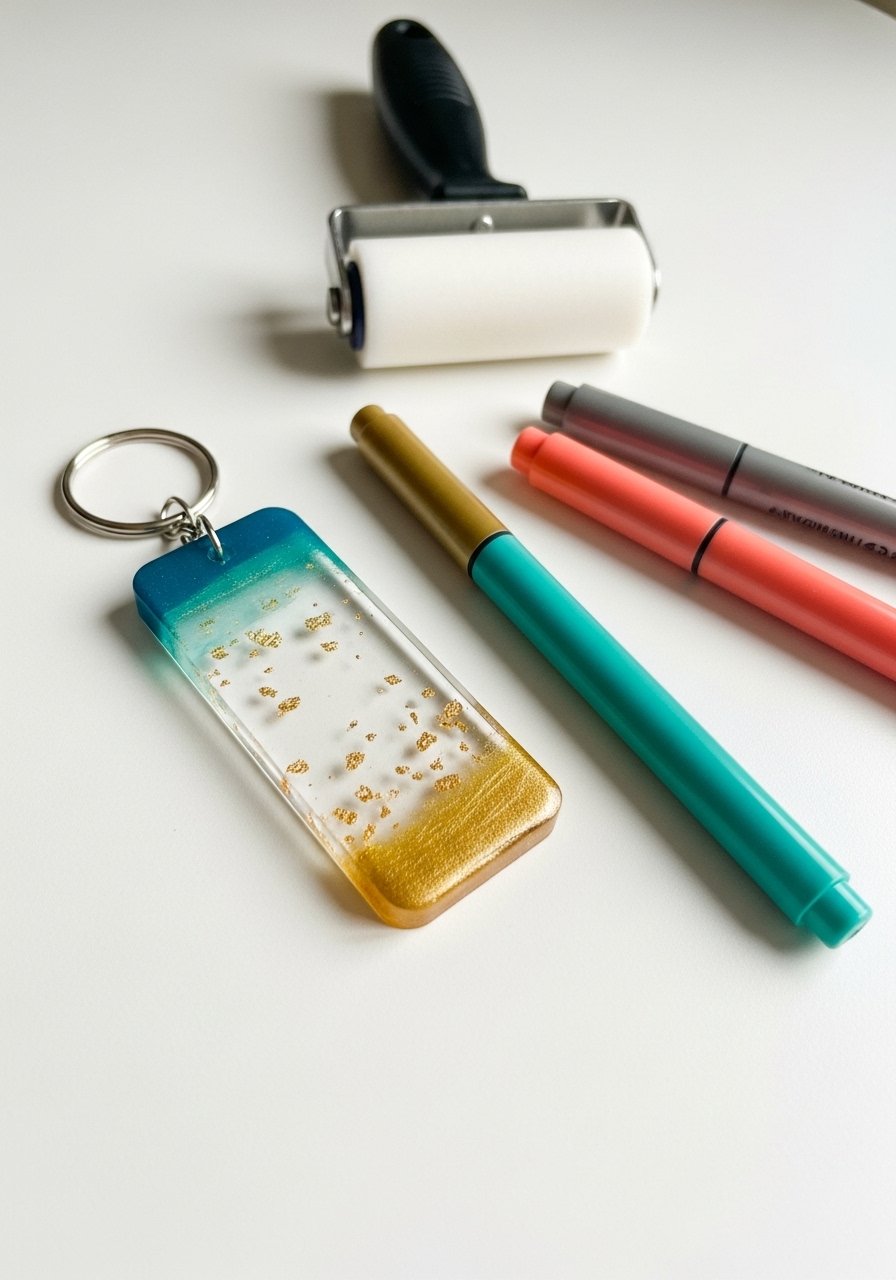
Clear acrylic cut and painted on the edge gives a modern, sleek look. Paint pens make crisp accents. I keep a set of paint pens for quick detailing.
Materials
- 1 clear acrylic blank, 40 x 20 mm
- Alcohol ink or acrylic paint pen
- Sanding pad 400–600 grit
- 1 drill or pre-drilled holes for split ring
- Matte sealer spray, 2 coats
- 1 split key ring
Instructions
- Sand the edge lightly to accept paint, wipe with alcohol.
- Paint the edge with ink or paint pen; apply 2 coats for opacity, 10 minutes between coats.
- Seal lightly with matte spray, 2 thin coats, 10 minutes between.
- Add split ring and test for finish hardness after 4 hours.
How to Display or Gift It
- Pair with a coordinating acrylic pen.
- Store blanks flat and covered to prevent dust during painting.
- Bottle Cap Deco Keychain (Vintage)

Repurposed bottle caps with a decorative resin insert feel charmingly retro. Use a small jewelry resin and a tiny silicone mold. A small epoxy jewelry resin kit works well here.
Materials
- 1 cleaned bottle cap, flattened slightly
- Tiny paper or photo insert cut to fit
- Jewelry epoxy resin, small enough for thin fills
- Tweezers and mixing stick
- 1 split key ring
- Optional tiny flower or glitter for insert
Instructions
- Prepare insert sized to bottle cap interior.
- Mix small resin batch and add a thin base layer; let set 10–15 minutes.
- Place insert, then top with another tiny resin layer to fill. Pop bubbles with a gentle heat pass.
- Cure 24 hours until hard and non-tacky.
- Drill small hole in cap edge and attach split ring.
How to Display or Gift It
- Tuck in a retro matchbox-style gift box.
- Pair with a small bottle opener for a coordinated, thematic gift.
- DIY keychain ideas for gifts: Mini Photo Locket with Resin
This miniature photo locket uses resin to seal the image inside a compact charm. It has an intimate feel perfect for anniversary or friendship gifts. Use a small round silicone mold for consistent shapes.
Materials
- Two-part clear resin (small batch)
- Mini round silicone mold, 20 mm
- Tiny photo printed to 16 mm
- Fine-tip stir sticks and micro brush
- 1 split key ring
- Tweezers and gloves
Instructions
- Mix resin per kit ratio for 2 minutes, ensuring no streaks.
- Pour a thin base layer and let sit 5–10 minutes to self-level.
- Position the photo and press gently, add a top layer of resin to encapsulate.
- Remove bubbles with a gentle heat pass and allow 24 hours cure.
How to Display or Gift It
- Attach to a necklace chain for a two-part gift.
- Present in a tiny velvet pouch for a luxe feel.
- Hand-Painted Mini Portrait Keychain (Watercolor on Paper)
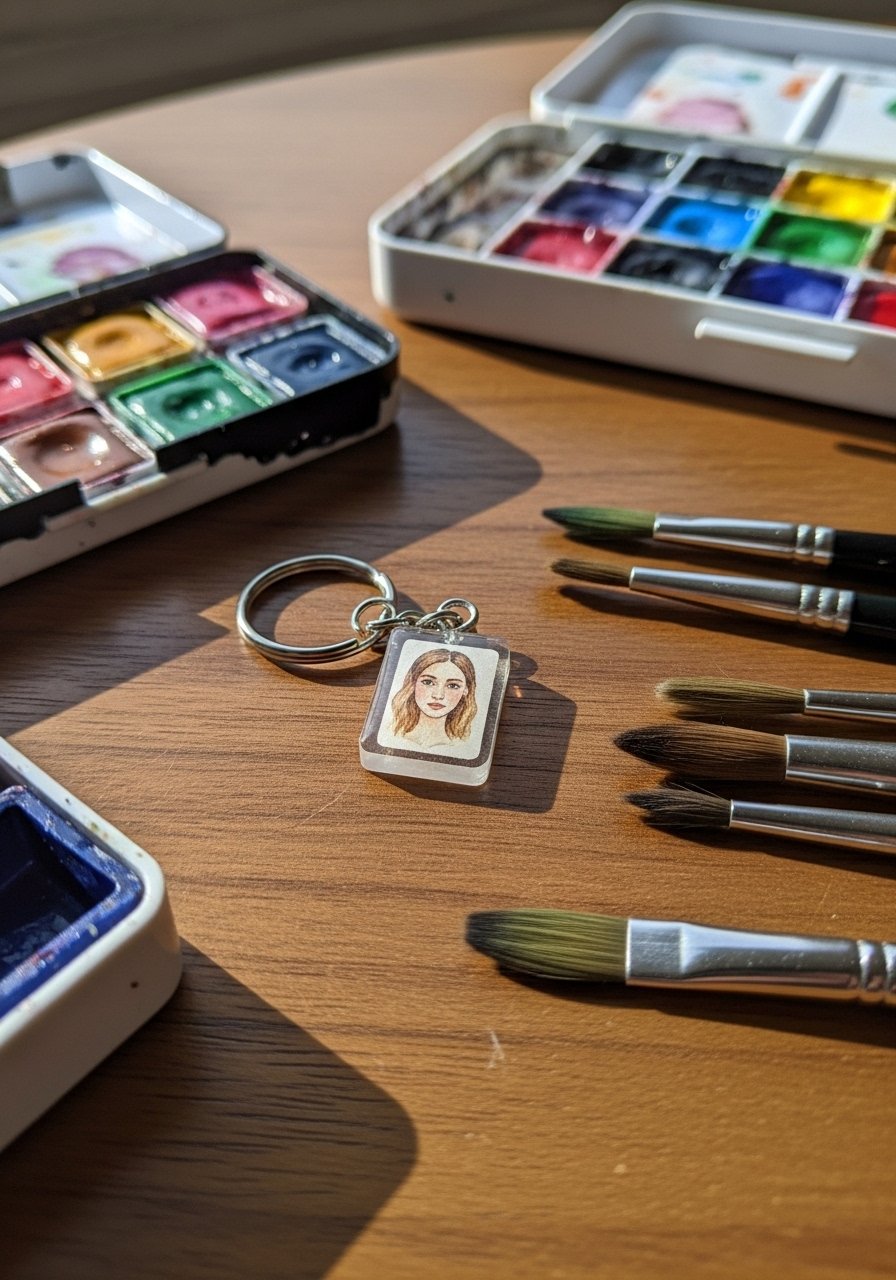
Tiny watercolor portraits sealed in resin are highly personal and delicate. Paint on heavyweight watercolor paper and seal in tiny molds. A compact watercolor pan set works well.
Materials
- Watercolor paper, cut to 18 x 18 mm
- Watercolor pan set and fine brush
- Resin and silicone mold 20 mm
- Small amount of clear varnish to protect paper before resin
- Tweezers and mixing supplies
- 1 split key ring
Instructions
- Paint tiny portrait on paper. Let dry completely 30 minutes.
- Seal painted surface lightly with clear varnish and let dry 15 minutes.
- Embed in resin mold per resin instructions and cure 24 hours.
- Add split ring and finish edge if needed.
How to Display or Gift It
- Slip into a small frame card and include the story of the portrait.
- Keep painted papers flat under weights until sealed.
- Mini Leather Tassel with Bead (Japandi)

A leather tassel with a single wooden bead is sleek and suits japandi and minimalist tastes. Use fine vegetable leather and a leather craft tool set for clean cuts.
Materials
- Vegetable-tanned leather strip, 30 x 4 cm, 1 mm thickness
- 1 10mm wooden bead
- 1 split key ring
- Ruler and rotary cutter or sharp craft knife
- Beeswax and edge burnisher
Instructions
- Fold leather in half, slice fringe lines at 3–4 mm spacing to within 1 cm of fold.
- Roll tightly and slide bead onto the core before tying off with thin leather strip.
- Trim tassel end evenly and burnish.
- Attach split ring and press for firm hold.
How to Display or Gift It
- Pair with neutral-toned stationery for a tasteful gift.
- Store leather pieces flat to avoid curling before use.
- Stamped Metal Coordinates Keychain
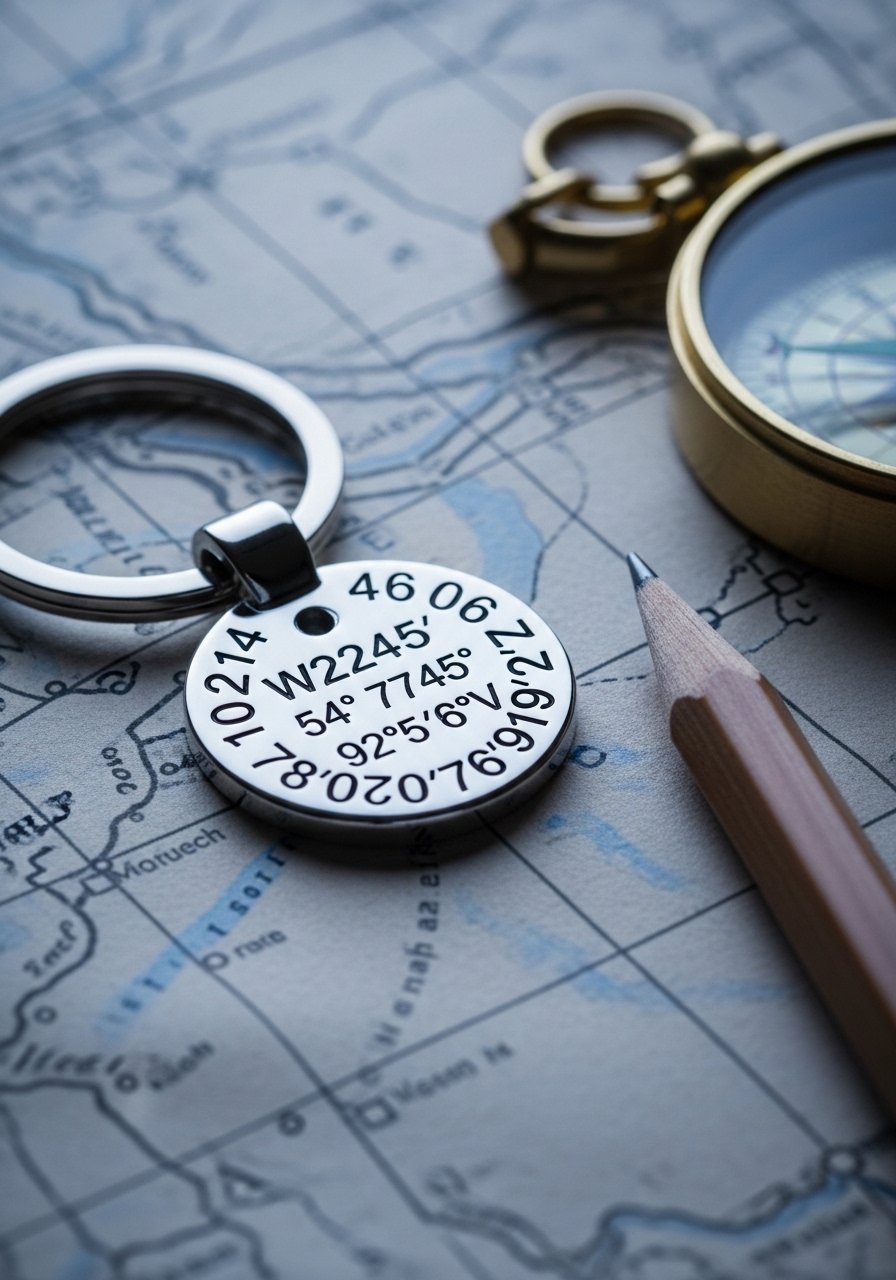
Stamped stainless pieces withstand daily wear while holding sentimental coordinates or dates. Use stainless blanks and a metal stamping kit rated for stainless. A stainless stamping blank set simplifies matching sizes.
Materials
- 1 stainless steel blank, 30 mm
- Metal alphabet/numeric stamps
- Mallet and steel block
- Blacking marker for antiquing
- 1 split key ring
- Fine sandpaper for smoothing
Instructions
- Mark stamping guide lines on blank with pencil.
- Stamp each character firmly, keeping stamps vertical.
- Fill impressions with marker and wipe surface clean to highlight.
- Seal with thin clear lacquer if desired; dry 24 hours.
How to Display or Gift It
- Present on a small map showing the coordinates.
- Include a note explaining the location significance.
- Upcycled Sweater Pom Keychain (Cozy Retro)
Transform old sweaters into plush pom keychains. It’s sustainable and cozy. A small pom-pom maker or pom tool speeds this up.
Materials
- Old wool sweater scrap, about 10 x 10 cm
- Scissors, needle and thread
- 1 split key ring
- Small stuffing if needed
- Pom-pom maker (optional)
Instructions
- Cut sweater fabric into strips and wrap around tool or form a pom by hand.
- Secure center with strong thread and trim to shape.
- Attach to split ring via threaded loop.
- Fluff and trim evenly.
How to Display or Gift It
- Bundle with a pair of warm socks for a winter gift.
- Store poms in a box with silica packets to prevent mildew.
- Tiny Cross-Stitch Charm (Heirloom)
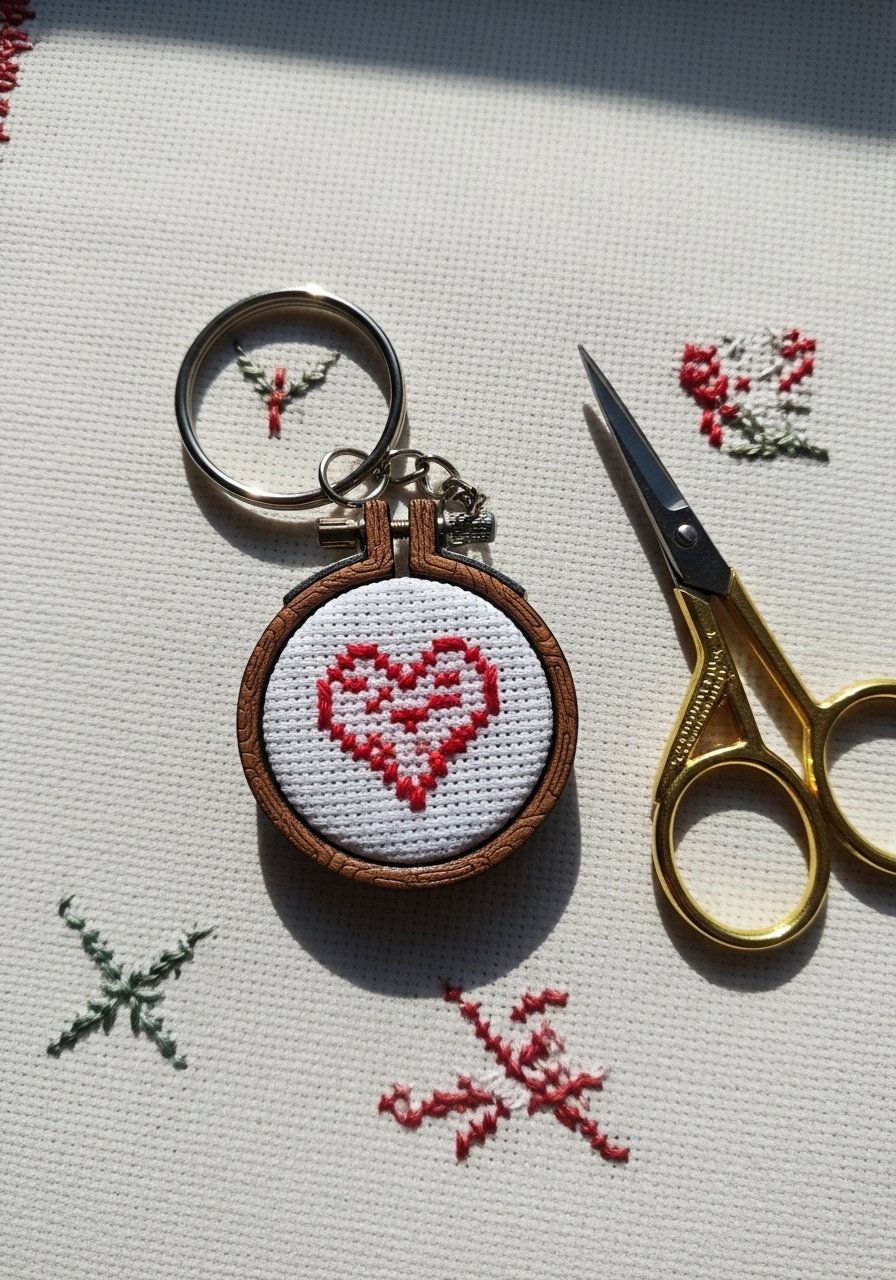
Micro cross-stitch in a tiny hoop reads like an heirloom. Simple motifs stitch quickly and look delicate. I keep an aida cloth sampler in my kit.
Materials
- Tiny aida cloth square, 25 x 25 mm
- Embroidery floss, small lengths
- Mini hoop 25 mm
- Needle and small scissors
- 1 split key ring
- Fabric glue to secure backing
Instructions
- Stitch a small motif (heart, star) centered on the square.
- Hoop fabric tightly and trim excess leaving 3–4 mm.
- Apply fabric glue in groove and press backing closed. Let dry 30 minutes.
- Attach ring and tidy threads.
How to Display or Gift It
- Tie onto a handwritten note for a birthday.
- Keep small cross-stitch pieces stacked flat when stitching multiple.
- Cork and Resin Message Keychain (Eco-Friendly Gift)
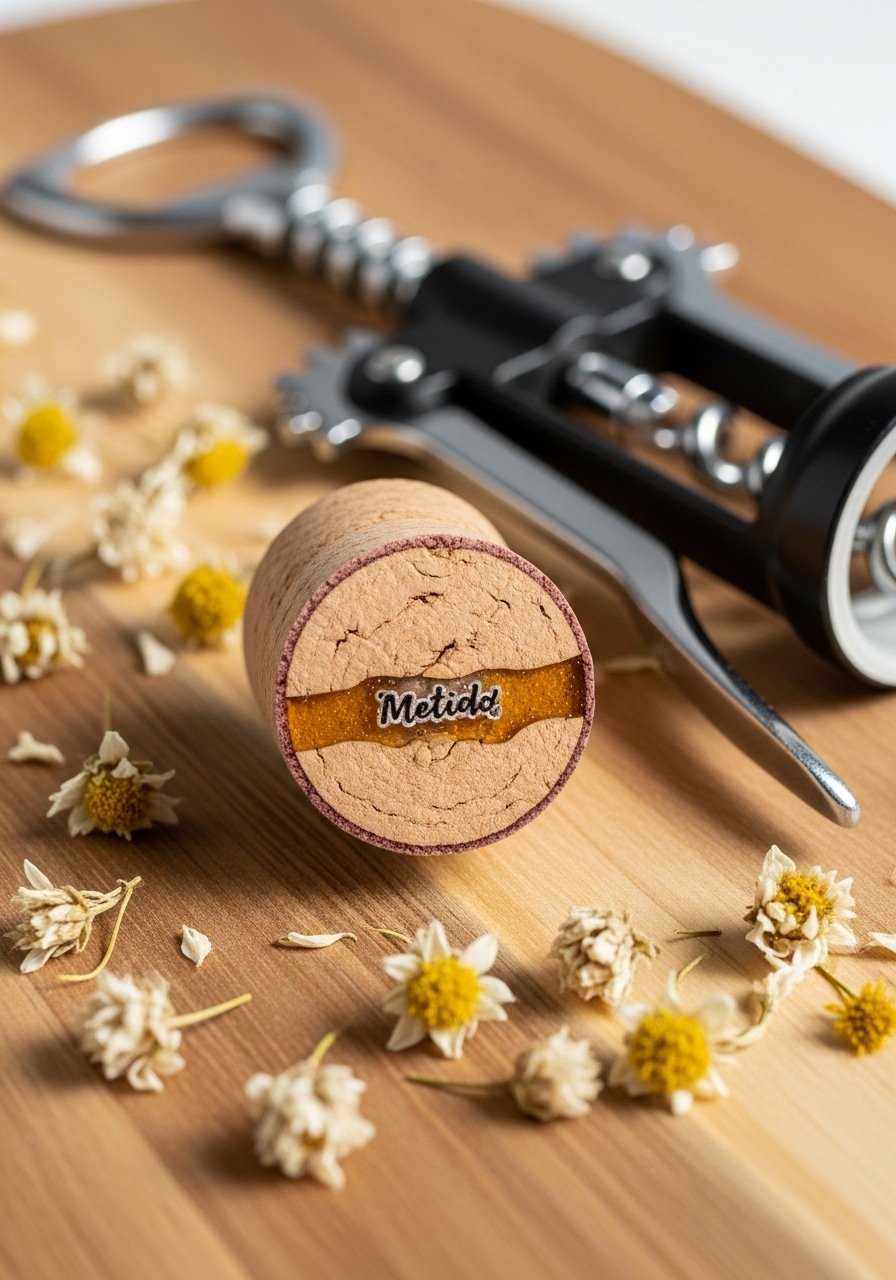
Slices of wine cork sealed with a tiny resin message make earthy, eco-friendly keepsakes. Use a small jewelry resin and a thin cork slice. I use a jewelry resin kit for small pours.
Materials
- Wine cork, sliced thin (3–4 mm thick)
- Tiny printed message or image
- Jewelry resin (small batch)
- Silicone mold or shallow tray for pouring
- 1 split key ring and eye screw
- Fine sandpaper and sealer
Instructions
- Slice cork into 3–4 mm rounds. Sand lightly.
- Place message on cork and pour a thin resin layer to encapsulate.
- Remove bubbles and cure 24 hours until hard.
- Twist a tiny eye screw into cork and attach ring.
How to Display or Gift It
- Pair with a bottle of wine for a hostess gift.
- Store cured corks flat until packaging.
Thank you for making it this far—what a joyful collection of projects! These 24 DIY keychain ideas for gifts cover styles from boho macramé to sleek acrylic and tiny heirloom lockets, so you can pick projects that match the recipient’s taste and your available tools. Try one or make a handful for a themed gift set. Pin this roundup to save ideas and share with friends who love crafty presents.
If you’re wondering what tool will make many of these easier, a temperature-controlled hot glue gun has helped me finish tassels and assemblies cleaner and faster—no more stringy glue lines. Which of these keychain projects are you most excited to make?


