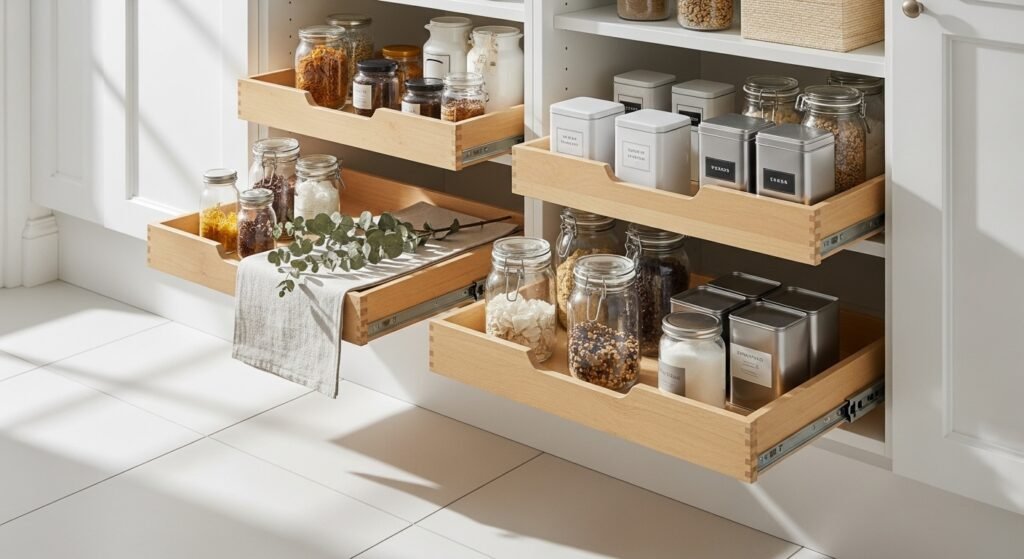
You know that tiny moment when you slide a tray out and everything is exactly where you expected? That’s the feeling these small pantry ideas with pull out shelves deliver. Whether your pantry is a slim closet or a shallow cabinet between appliances, pull-out shelving turns hidden corners into usable, visible storage. You’ll find 30 unique projects here — from simple sliding basket retrofits to full DIY pull-out pantry builds — each with real materials, clear steps, and styling tips.
I often use a Cricut Explore cutting machine for labels and a low-temp hot glue gun for quick fixtures. Every project below mentions a helpful tool or product when it genuinely speeds things up. Scan for ideas that match your skill level — beginners can add rolling baskets, while woodworkers can build full extension pull-outs. Ready to make every jar and snack effortless to reach? Let’s build smarter pantry shelves.
- Slim Slide-Out Spice Ladder
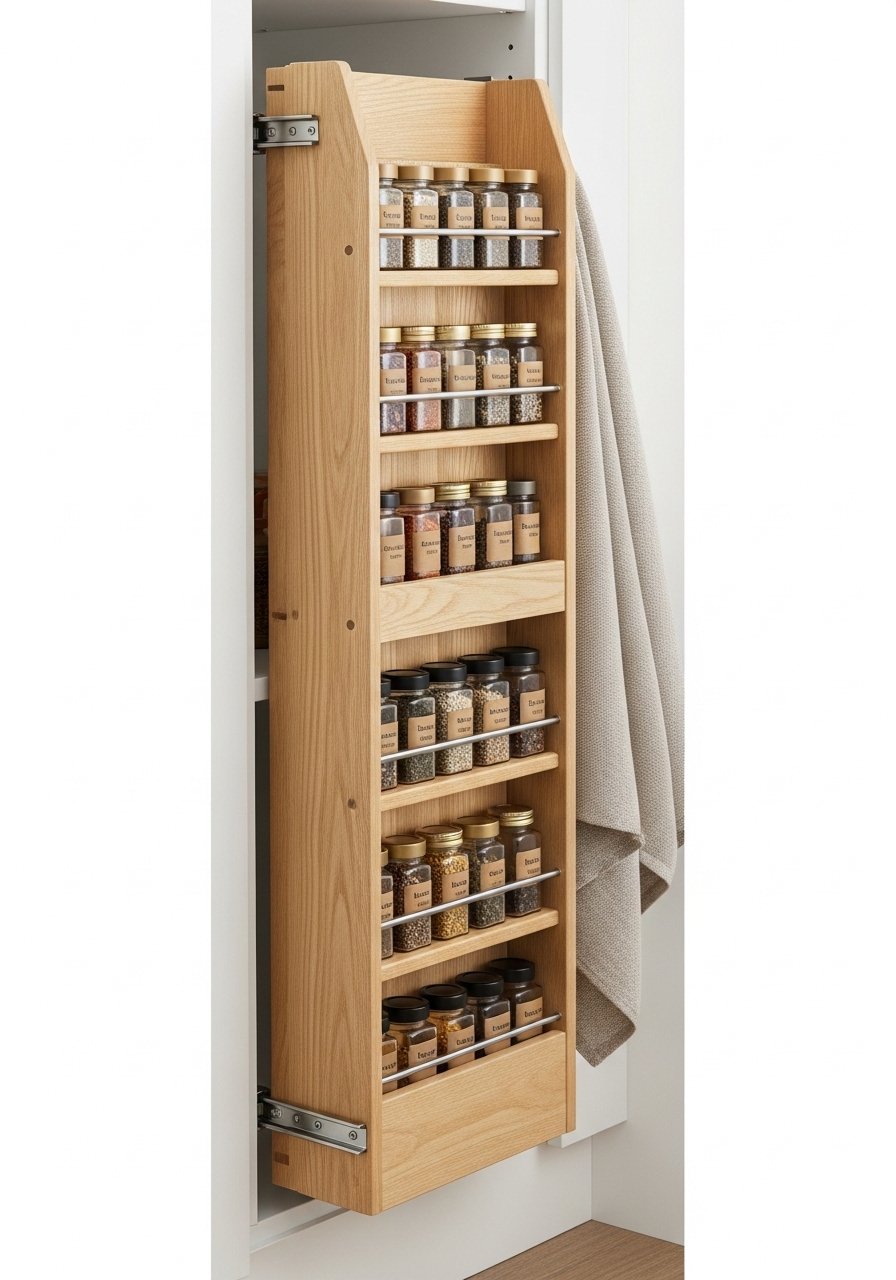
This slim spice ladder slides out like a cassette player and puts all your seasonings at eye level. It’s narrow, vertical, and ideal where depth is limited. The finished piece looks warm with a matte white finish and light wood steps. Beginners will love the straightforward cuts and simple hardware. The ladder feels solid in your hands — smooth rails and snug jar slots. A precision craft knife helps trim label sheets perfectly.
Materials
- 1 piece of birch plywood 12" x 48" x 1/2"
- 2 full-extension 12" drawer slides
- 4 dowels 3/4" x 8"
- 6–8 small spice jar inserts (or measure jars)
- 1 can of matte white acrylic paint 8 oz
- Sandpaper 120 and 220 grit
- Wood glue 4 oz
- 2 small brass handles
- Label sheets, 8.5"x11"
- Painter’s tape
Instructions
- Cut plywood into two side panels 3" x 48" and four shelf pieces 3" x 10". Sand edges smooth.
- Mark dowel positions on shelves at 2" from front, 1.25" spacing to hold jars.
- Drill 3/4" holes for dowels using a drill press for accuracy.
- Glue dowels into shelves, clamp, let set 30 minutes.
- Attach shelves to one side panel with wood glue and 3/4" brad nails. Let glue cure 1 hour.
- Attach second side panel. Sand all surfaces; apply two coats of matte acrylic paint, 30 minutes between coats. Full cure 24 hours.
- Install the 12" drawer slides into pantry opening and secure ladder to slides following slide instructions.
- Label jars and slide ladder in. Adjust stops for smooth action.
How to Display or Gift It
- Style with amber glass jars and matching kraft labels for a cottagecore look.
- Mount a small metal hook on the end to hang a tiny measuring spoon set.
- Package as a housewarming gift in tissue-lined kraft boxes.
- Store spare labels in a clear craft organizer tray for refills: craft organizer trays.
- Pull-Out Can Carousel
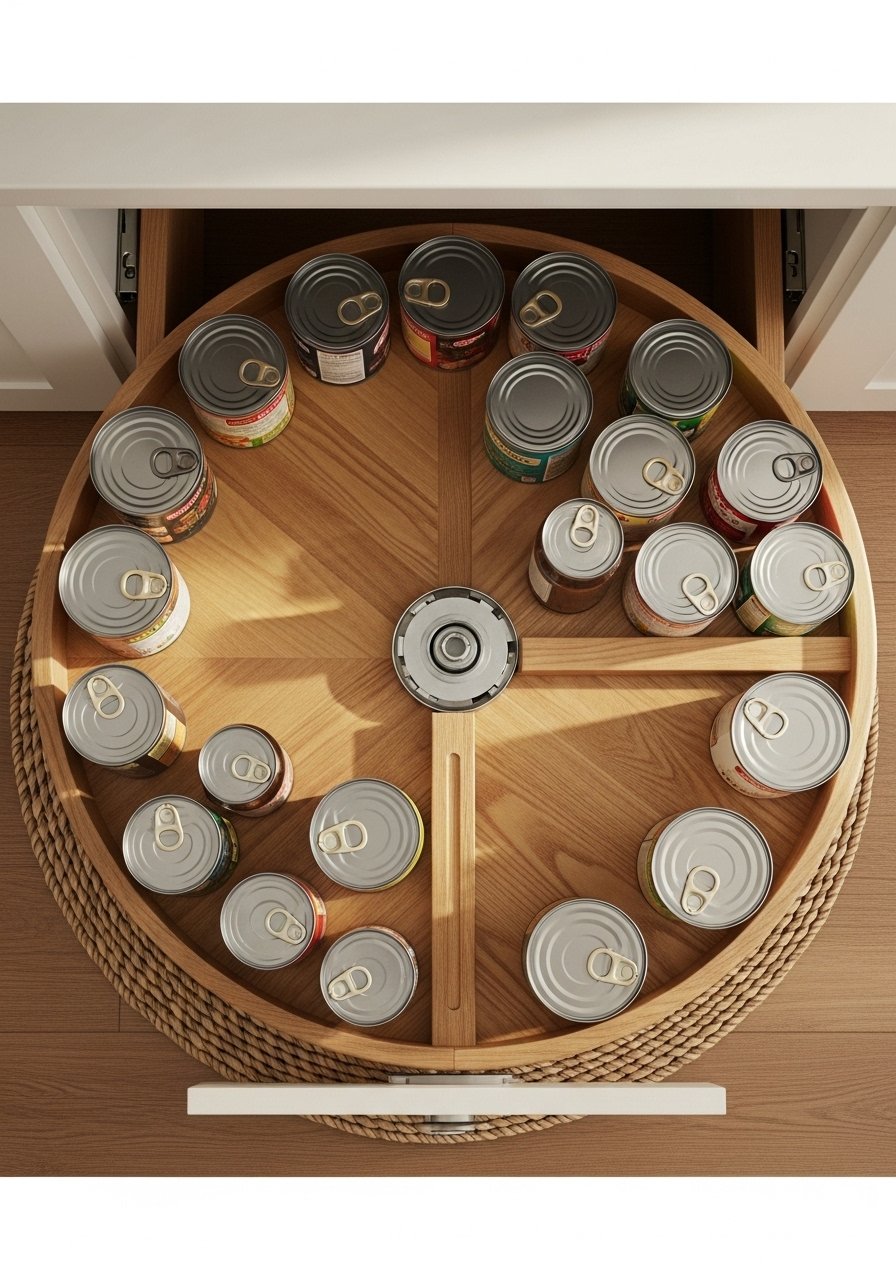
This low-turn carousel mounts on a pull-out tray so cans glide to the front when you slide the shelf. It’s handy for deep but narrow pantries. The finished carousel has smooth rotation and gentle wooden edges — perfect for boho or farmhouse styles. Use a brad nailer or a cordless drill when attaching the bearing; a self-healing cutting mat is handy for any trimming.
Materials
- 1 12" round birch wood disk
- 1 12" lazy susan bearing
- 1 18" x 14" plywood pull-out tray
- 2 14" full-extension drawer slides
- Wood stain (walnut) 4 oz
- Polyurethane clear coat 8 oz
- Screws and wood glue
- Sandpaper 120/220 grit
- Rubber bumpers (4)
- Painter’s tape
Instructions
- Sand the 12" wood disk smooth. Stain with one coat, wipe excess, dry 2–4 hours.
- Apply two coats polyurethane, sanding with 220 between coats. Cure 24 hours.
- Attach lazy susan bearing to disk center with short screws.
- Cut plywood tray to fit pantry interior; sand and seal with one coat of stain or paint.
- Screw the bearing-mounted disk to the center of the tray, ensuring free rotation.
- Install the 14" drawer slides into pantry and mount the tray per slide instructions.
- Place rubber bumpers under disk edge to reduce rattle.
- Load cans and rotate as needed.
How to Display or Gift It
- Pair the carousel with labeled can fronts for a neat, grocery-store look.
- Add a small chalkboard tag to the tray edge for rotation dates.
- Keep extra cans in a stackable storage bin nearby: stackable storage bins.
- Narrow Vertical Pull-Out — small pantry ideas with pull out shelves
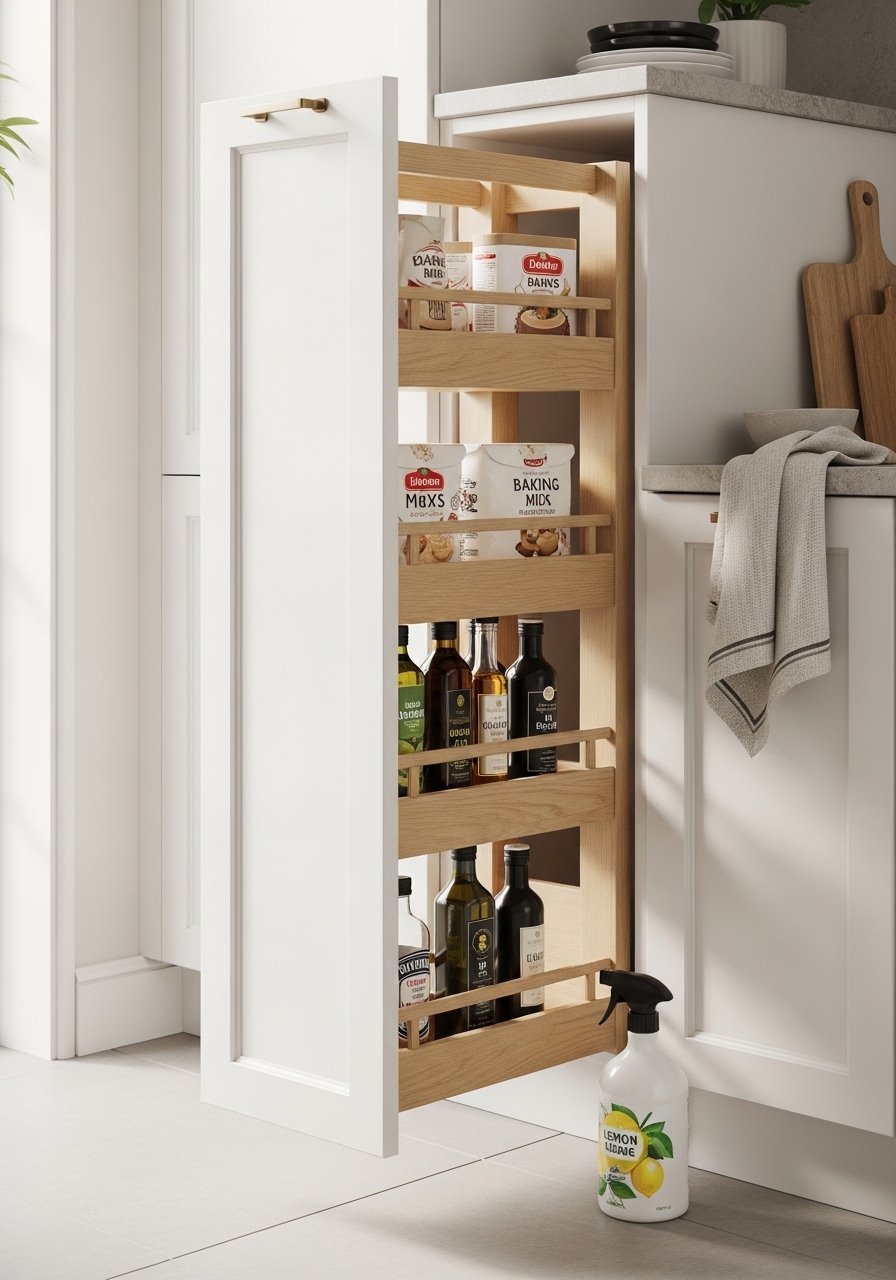
This narrow vertical pull-out fits between the oven and wall, perfect for oils, bottles, and baking mixes. It’s thin but deep enough for tall items and uses a full-extension slide. The slim unit has a shaker-inspired front and a soft hand-painted finish. A precision utility blade makes label trimming crisp.
Materials
- 2 side panels 2.5" x 72" x 1/2" birch plywood
- 6 shelves 2.5" x 10"
- 1 full-extension 18" drawer slide set
- 1 72" cabinet face frame or ready-made 2.5" board
- Matte chalk paint 8 oz
- Wood glue and 1" brad nails
- Sandpaper 120/220
- Magnetic catch (optional)
- Small front knob
Instructions
- Cut and sand side panels and shelves.
- Mark shelf spacing every 8–10" depending on bottle sizes.
- Glue and nail shelves to one side panel; clamp and let set 30–45 minutes.
- Attach second side; sand edges smooth.
- Paint two coats of chalk paint; dry 30 minutes between coats. Cure 24 hours.
- Attach the cabinet face or trim; install knob.
- Mount drawer slides into pantry opening and attach unit to slides.
- Use a magnetic catch if your slide lacks an integrated stop.
How to Display or Gift It
- Store olive oils, syrups, and vinegars grouped by use.
- Use clear pour spouts on bottles for controlled dispensing.
- Wrap as a hostess gift with artisan oil bottle in kraft paper and twine.
- Tiered Pull-Out Snack Baskets
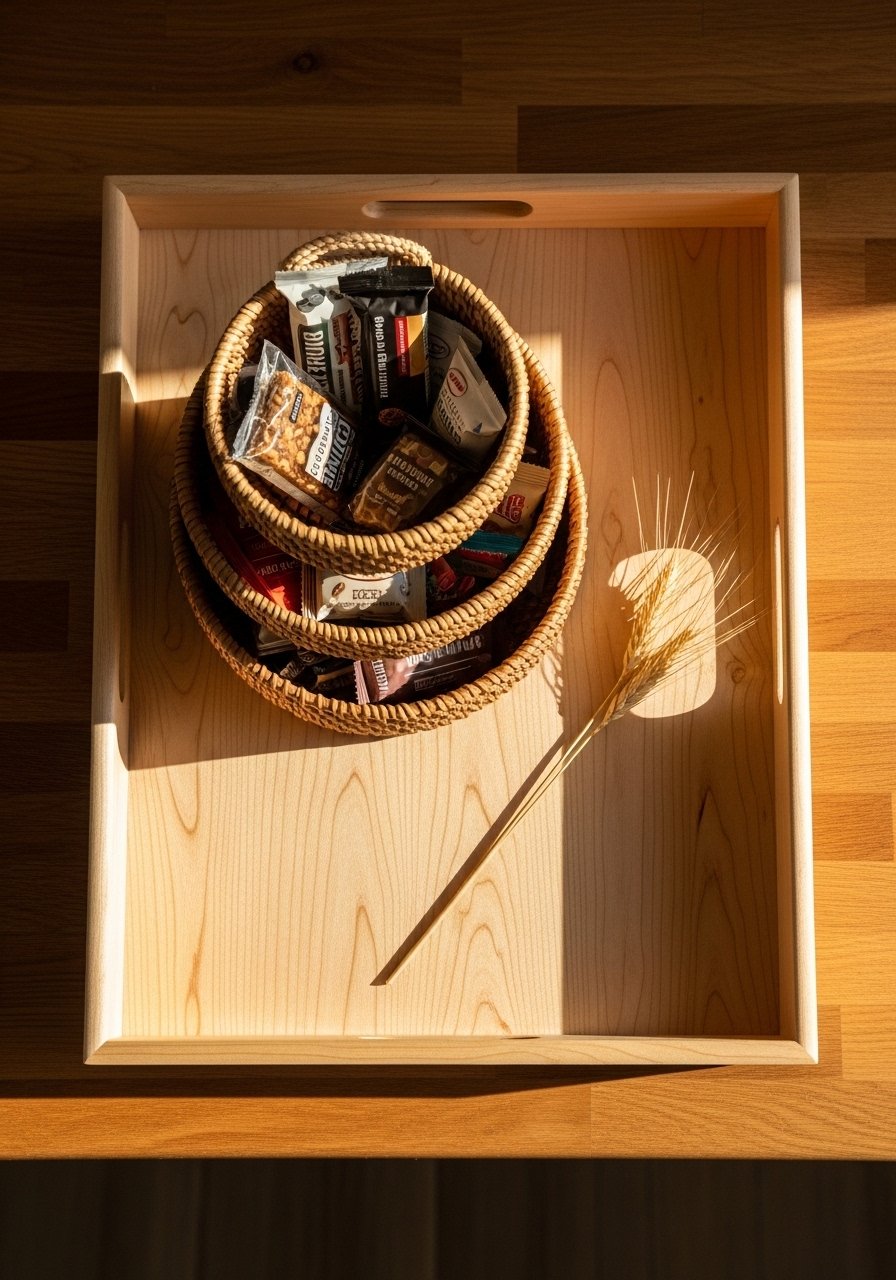
Two tiered baskets on a single pull-out give you vertical snack storage without building tall shelving. The mix of woven texture with a wood tray looks warm and cozy. This design is great for families — kids can slide it out and choose snacks independently. Use a hot glue gun to secure liner fabric quickly.
Materials
- 1 plywood tray 18" x 12" x 1/2"
- 2 shallow woven baskets (12" x 8" and 12" x 6")
- 2 12" cabinet slides
- 1 roll cotton liner fabric 0.5 yd
- Staple gun and staples
- Heat-resistant glue sticks
- Wood stain and sealer 4 oz each
- Velcro strips (for removable liners)
Instructions
- Cut tray to size, sand, and stain. Dry 2–4 hours.
- Attach slides and test motion in pantry opening.
- Line baskets with cotton fabric; secure with hot glue and staple underside.
- Place larger basket on tray base; use small wood risers (1" x 2") glued at corners to stack the upper basket.
- Secure upper basket to risers using glue for stability.
- Slide tray into slides and load snacks. Test weight capacity and adjust risers if tilting occurs.
How to Display or Gift It
- Add a small chalkboard label to the front of each basket for snack categories.
- Store liners flat in a compartmentalized craft organizer: craft organizer trays.
- Make multiple sets for holiday baking supplies as gifts.
- Pull-Out Baking Sheet Divider
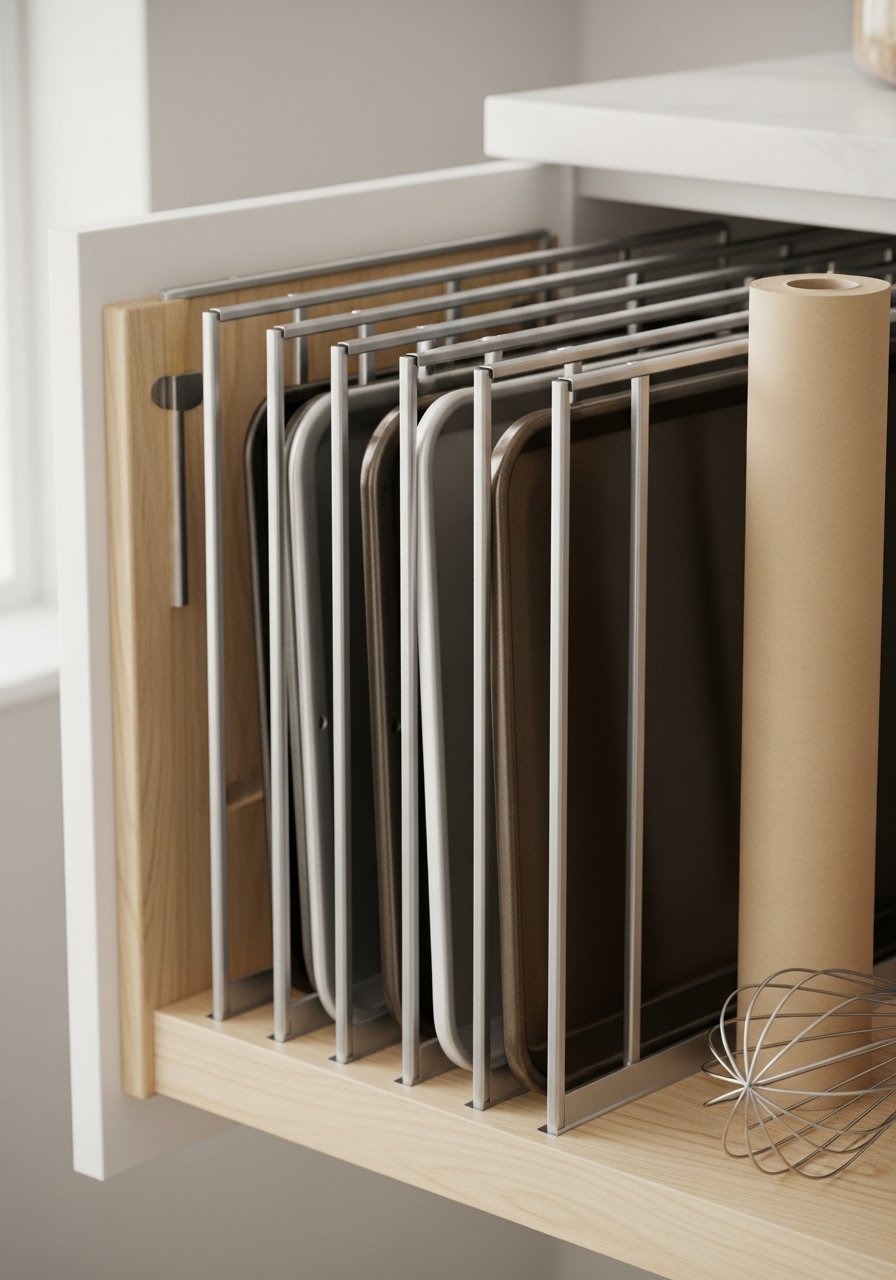
This project makes baking sheets accessible and upright instead of stacked. The finished look is tidy and industrial-chic when using metal dividers. It’s simple woodwork and great for bakers. A small brad nailer speeds assembly.
Materials
- 1 pull-out tray 20" x 14" x 1/2"
- 6 metal sheet dividers 8" tall (or 1/8" plywood partitions)
- 2 16" full-extension slides
- Wood glue and small screws
- Sandpaper 120/220
- Spray paint (matte black) 8 oz
- Felt pads (for sheet bottoms)
- Handle
Instructions
- Cut tray and sand smooth.
- Mark and install dividers spaced 1.25"–1.5" apart, glue and screw from underneath.
- Paint or finish dividers for protection; dry 1–2 hours.
- Install felt pads at bottom of each slot to reduce noise.
- Mount drawer slides and insert tray.
- Store sheet pans upright; test that they slide in without catching.
How to Display or Gift It
- Pair with a small metal label holder on the front for easy sorting.
- Gift it with a set of silicone baking mats wrapped in kraft paper.
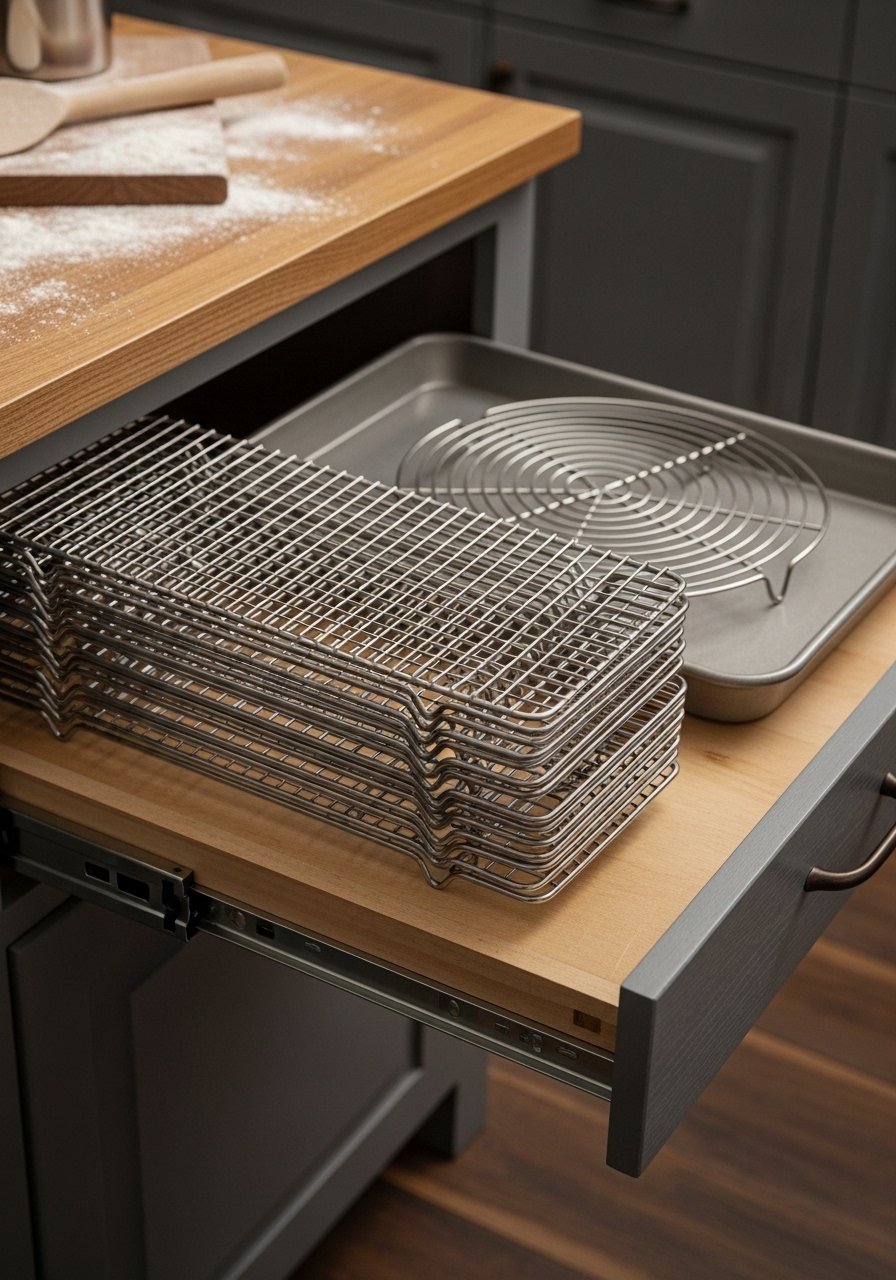
- Sliding Wire Basket Retrofit
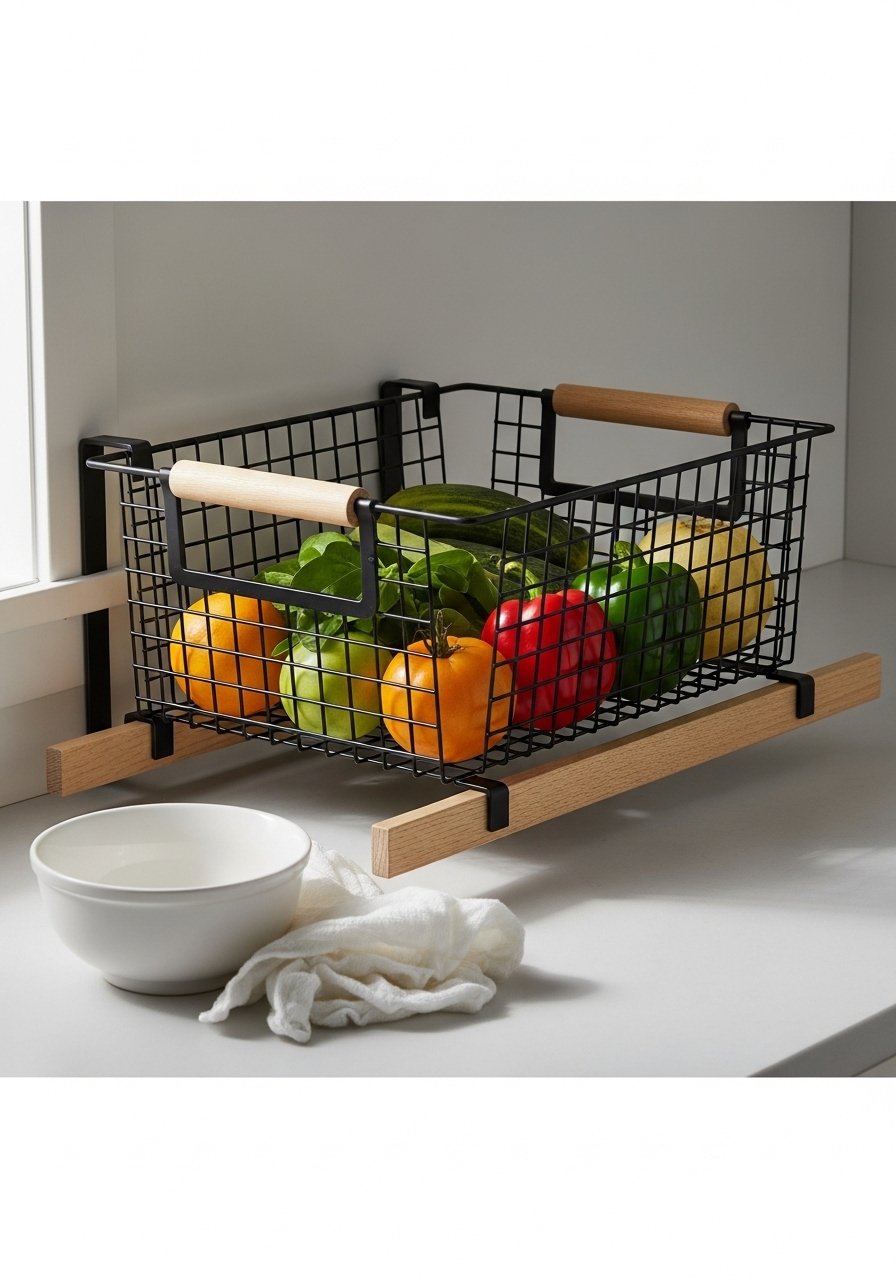
Convert an open shelf into pull-out wire baskets for produce or root vegetables. Wire keeps airflow and looks modern farmhouse. This retrofit is fast and beginner-friendly. A cordless drill driver simplifies mounting.
Materials
- 2 wire baskets 16" x 12" x 6"
- 2 16" full-extension drawer slides
- 1 plywood base 16" x 12" x 1/2"
- Screws and mounting plates
- Sandpaper
- Handles (optional)
- Spray paint (black for baskets) 8 oz
- Rubber feet to prevent rattle
Instructions
- Spray baskets with two light coats of paint; dry 1 hour.
- Cut a plywood base to basket size; sand and seal.
- Mount drawer slides to pantry as directed.
- Attach baskets to base using mounting plates and screws.
- Test load with produce and adjust stops.
- Add handles or labels to basket fronts.
How to Display or Gift It
- Stack them in a pantry for a rustic market feel.
- Use fabric liners tied with jute for a softer look.
- Store spare liners in a clear mason jar set.
- Sliding Spice Drawer with Labels
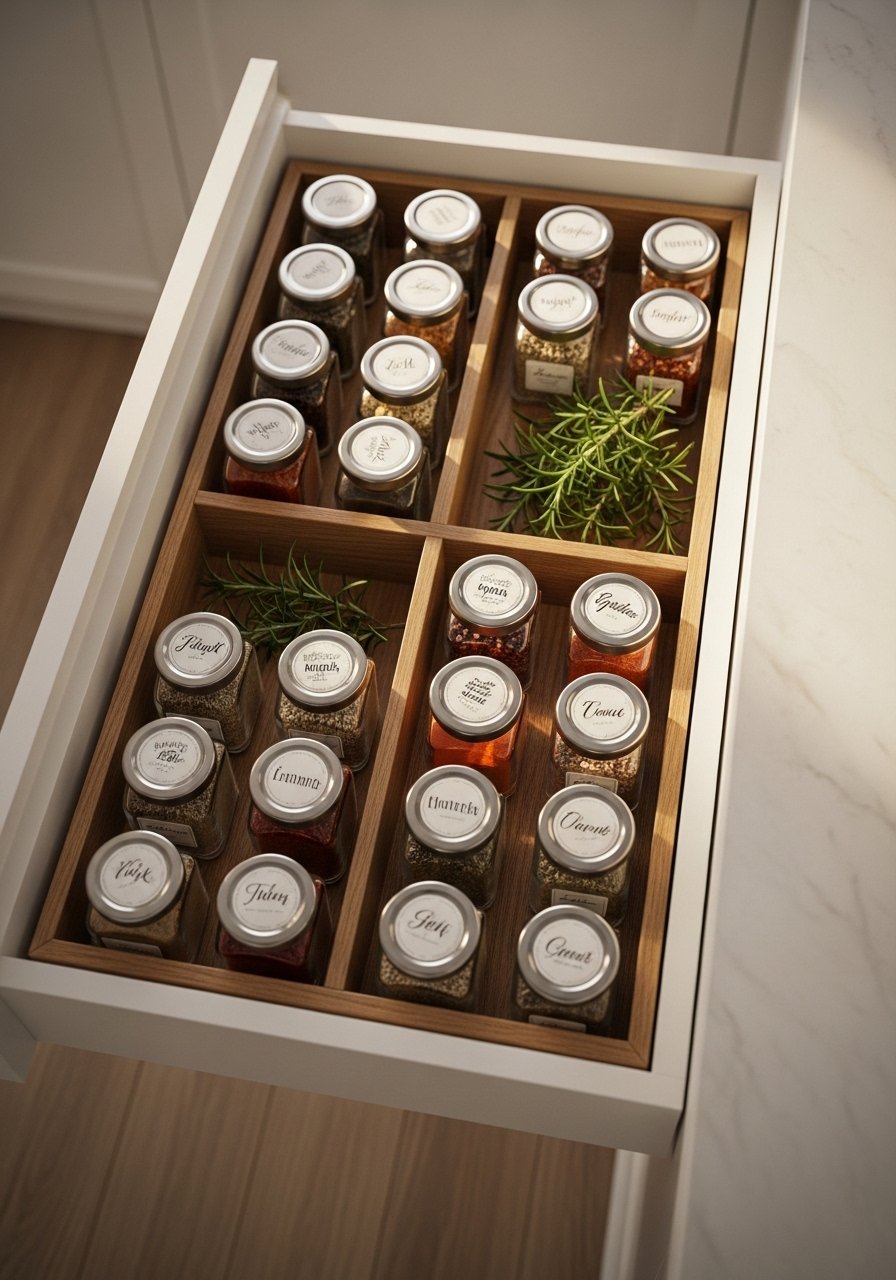
A shallow spice drawer lets you see jar tops at a glance. Labeled tops and a shallow depth keep it tidy. This is an ideal first woodworking project. Use a brayer roller when applying adhesive label sheets for smooth results.
Materials
- 1 shallow drawer box 18" x 6" x 2.5"
- 1 set of 18 small spice jars (1.5 oz)
- 1 sheet of printable label paper
- Divider strips (1/4" oak)
- Full-extension 14" slide
- Wood glue, sandpaper
- Matte sealant spray 8 oz
- Drawer knob
Instructions
- Build or adapt a shallow drawer box; sand all edges.
- Cut divider strips to create rows matching jar diameter.
- Glue dividers in place and let set 30 minutes.
- Apply matte sealant to drawer interior; dry 1 hour.
- Print and apply labels to jar lids using brayer roller for bubble-free adhesion.
- Install slides and mount drawer in pantry.
- Arrange jars by alphabet or cuisine.
How to Display or Gift It
- Use a small wooden easel to display a printed master spice list.
- Wrap the drawer in kraft tissue for gifting with a set of spices.
- Store extra jars in a stackable organizer: stackable storage bins.
- Pull-Out Appliance Garage Shelf
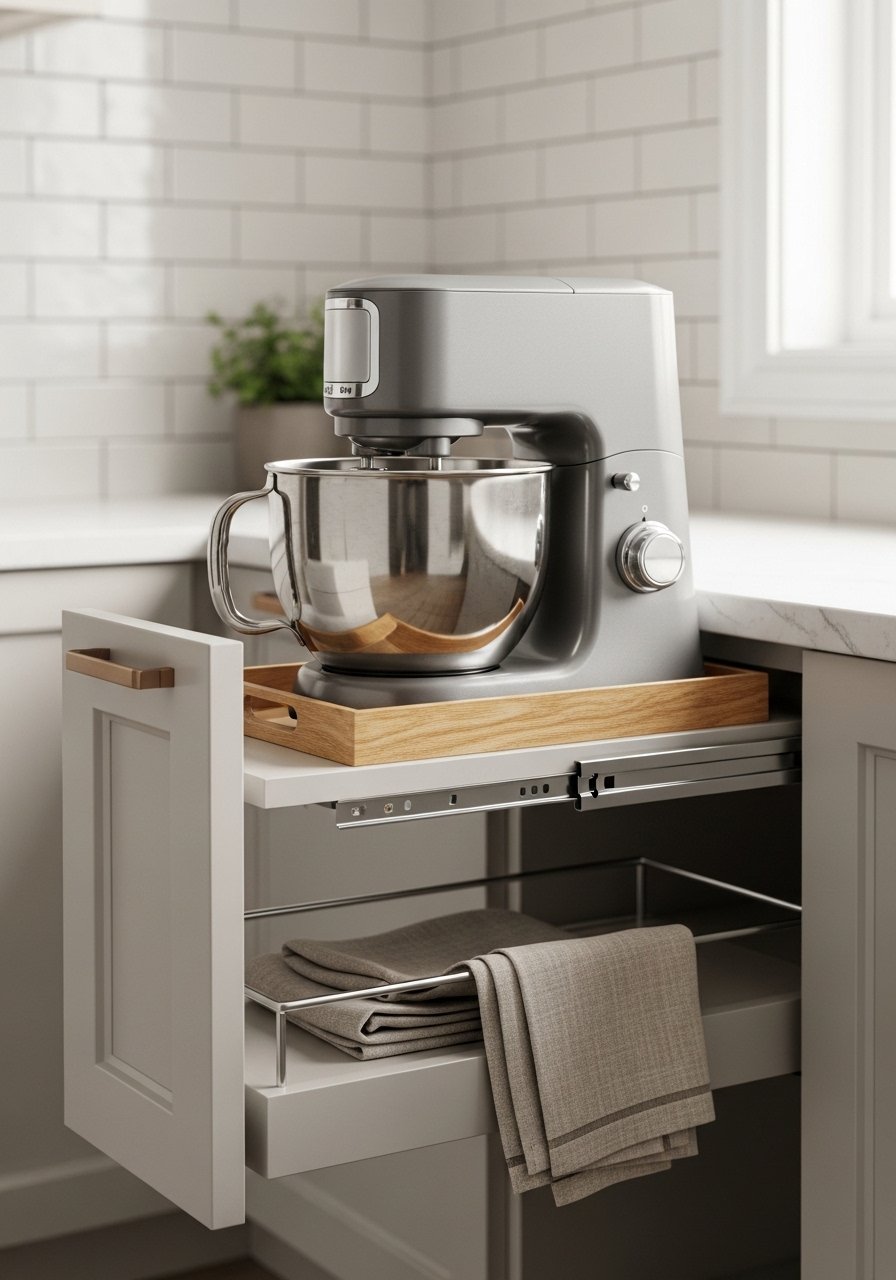
Slide your small appliances out when needed and hide them when not. This appliance garage on slides saves counter space and looks neat. It’s a heavier build, so choose quality slides. A heat gun can help dry any applied finish faster.
Materials
- 1 plywood shelf 24" x 18" x 3/4"
- 2 heavy-duty full-extension slides (rated 100+ lb)
- 1 small chain or slide stop
- Trim pieces for face
- Paint or stain 8 oz
- Screws and wood glue
- Felt pads to protect appliance base
- Handle
Instructions
- Cut and sand shelf to size; attach trim to front for a finished face.
- Paint or stain; allow 2–4 hours drying between coats. Full cure 48 hours.
- Attach heavy-duty slides to pantry and shelf, following slide instructions.
- Add felt pads where appliance contacts shelf.
- Test load with appliance; add chain or stop to prevent full extension beyond safe load.
- Tidy cord management with Velcro ties.
How to Display or Gift It
- Pair with a small appliance cover for dust-free storage.
- Add a magnetic recipe holder to the face for quick reference.
- Gift with a silicone spatula set tucked into the shelf.
- Pull-Out Tea & Coffee Bar Tray

Create a dedicated beverage station that slides out for morning routines. The tray holds mugs, canisters, and a small kettle or French press. It adds cafe charm and keeps counters clear. Use a foam brush to apply thin coats of sealer for a durable surface.
Materials
- 1 tray 18" x 12" x 1/2"
- 2 14" full-extension slides
- 3 small canisters for tea/coffee/sugar
- 1 silicone mat 12" x 8"
- Small electric kettle (optional)
- Sealant (food-safe polyurethane) 8 oz
- Foam brush
- Velcro strips for secure canisters
Instructions
- Sand and seal tray with two thin coats of food-safe polyurethane; dry 2–4 hours.
- Attach slides to tray and pantry interior per instructions.
- Add silicone mat and arrange canisters and mugs.
- Use Velcro on canisters to prevent movement when sliding.
- Test the tray under load and adjust slide tension if needed.
How to Display or Gift It
- Style with matching ceramic mugs and a wooden spoon.
- Wrap as a housewarming gift with a bag of specialty coffee and a wooden stirrer.
- Store spare tea bags in a decorative mason jar.
- Sliding Pull-Out Wine Rack
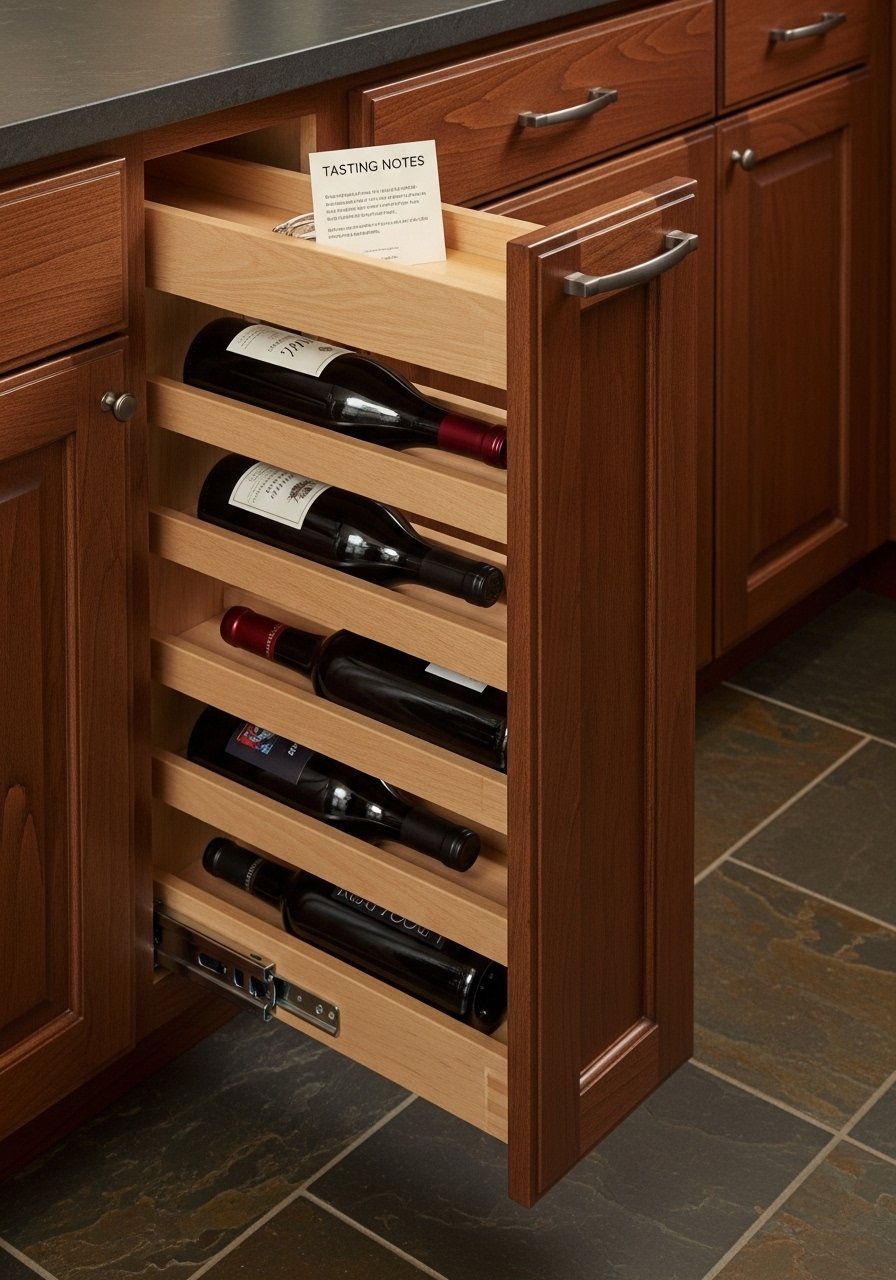
Make a slim wine rack that slides out for tastings. Horizontal slots cradle bottles safely and the pull-out action gives quick access. Great for small pantries in urban apartments. A dowel jig helps cut perfect bottle slots.
Materials
- 1 pull-out box 18" x 8" x 12"
- 6 dowels 1" diameter cut to bottle-width spacers
- 2 14" full-extension slides
- Stain (dark walnut) 4 oz
- Polyurethane 8 oz
- Wood glue, sandpaper
- Front trim and small knob
Instructions
- Build box and sand all edges.
- Cut dowel notches into side panels at 2" increments for bottle cradles.
- Stain and seal box; dry between coats 2–4 hours.
- Glue dowels into notches and clamp until set 30 minutes.
- Install drawer slides and insert rack.
- Test with bottles and adjust spacing if bottles rock.
How to Display or Gift It
- Add a small tasting notes booklet and a corkscrew in a drawer nearby.
- Keep a set of wine charms in a craft organizer for gifting with the rack.
- Pull-Out Snack Drawer for Kids
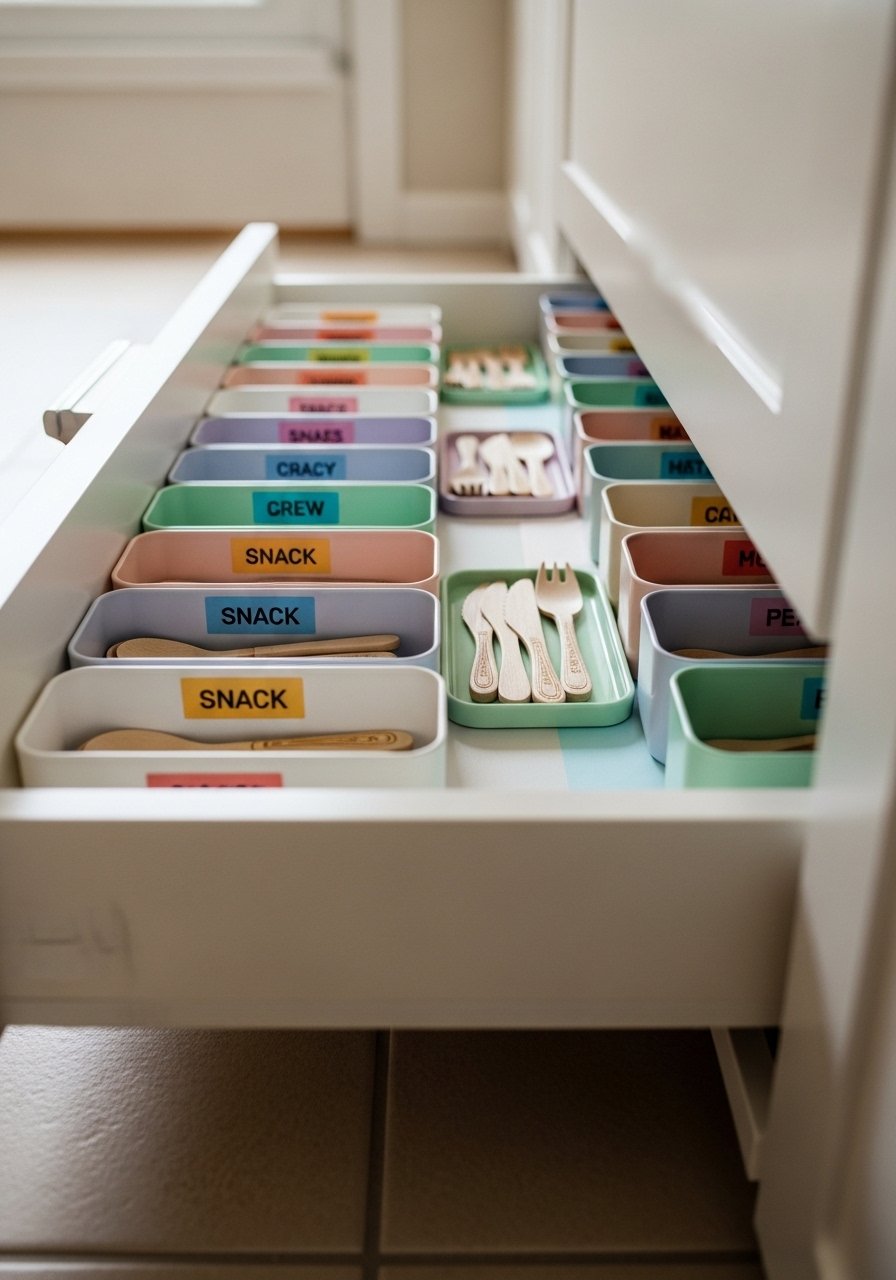
A kid-level pull-out drawer keeps snacks accessible and controlled. Divide the space into bins for fruit, crackers, and treats. Add easy-pull knobs kids can use independently. A label maker speeds up naming compartments.
Materials
- 1 shallow drawer 18" x 12" x 3"
- 4 plastic snack bins 4" x 6"
- 14" full-extension slides
- Child-friendly knob
- Printable label sheets
- Matte sealant 8 oz
- Velcro for bin attachment
- Sandpaper
Instructions
- Build the box and sand smooth.
- Apply sealant to make it easy to clean; dry 1 hour.
- Place bins and measure spacing; attach Velcro for stability.
- Print and apply labels to bin fronts.
- Install slides and mount drawer at a low, reachable height.
- Demonstrate to kids how to slide and choose snacks safely.
How to Display or Gift It
- Use pastel liners for a playful touch.
- Gift with a snack-sorting activity for toddlers.
- Store extra bins in a stackable storage bin.
- Pull-Out Pantry Organizer — small pantry ideas with pull out shelves
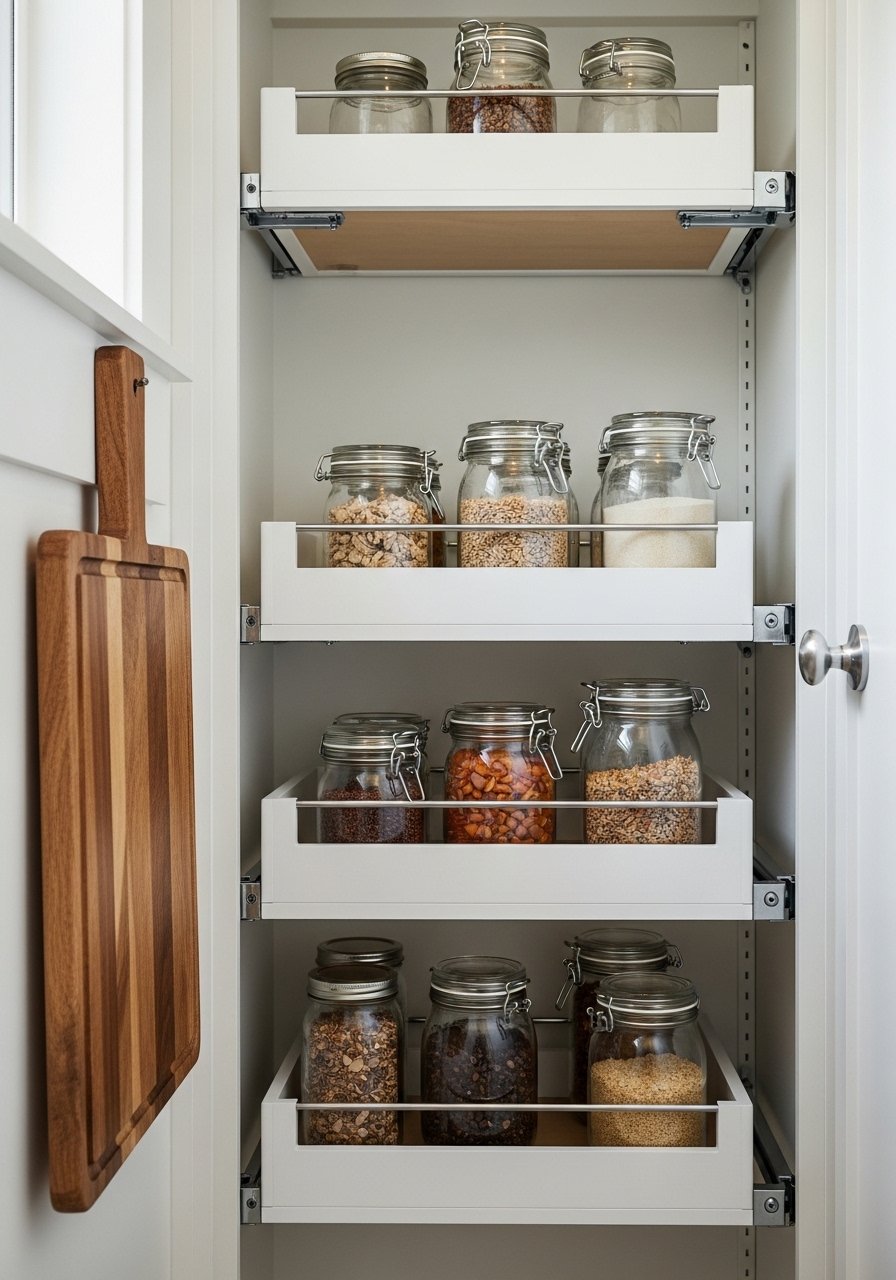
This multi-shelf pull-out packs tiered shallow trays into a slim footprint. Each thin shelf holds jars or packets and slides individually for targeted access. The system looks modern with crisp white paint and wooden trim. A foam brush works great for thin, even coats of paint.
Materials
- 4 shallow trays 20" x 8" x 1/2"
- 2 sets of 16" full-extension slides (one per shelf pair)
- 1 face trim board
- Paint (semi-gloss) 8 oz
- Wood glue, screws, sandpaper
- Stop blocks to prevent full extraction
Instructions
- Build trays and sand all surfaces.
- Paint trays with two thin coats, dry 30 minutes between coats, cure 24 hours.
- Install slides for each tray pair, ensuring proper height spacing.
- Attach face trim for a finished look.
- Add stop blocks or slide stops to keep trays from falling out.
- Load jars and arrange by frequency of use.
How to Display or Gift It
- Label each shelf edge with a small sticker for contents.
- Create a matching spice tray for a neighbor as a practical gift.
- Pull-Out Baking Center with Flour & Sugar Bins
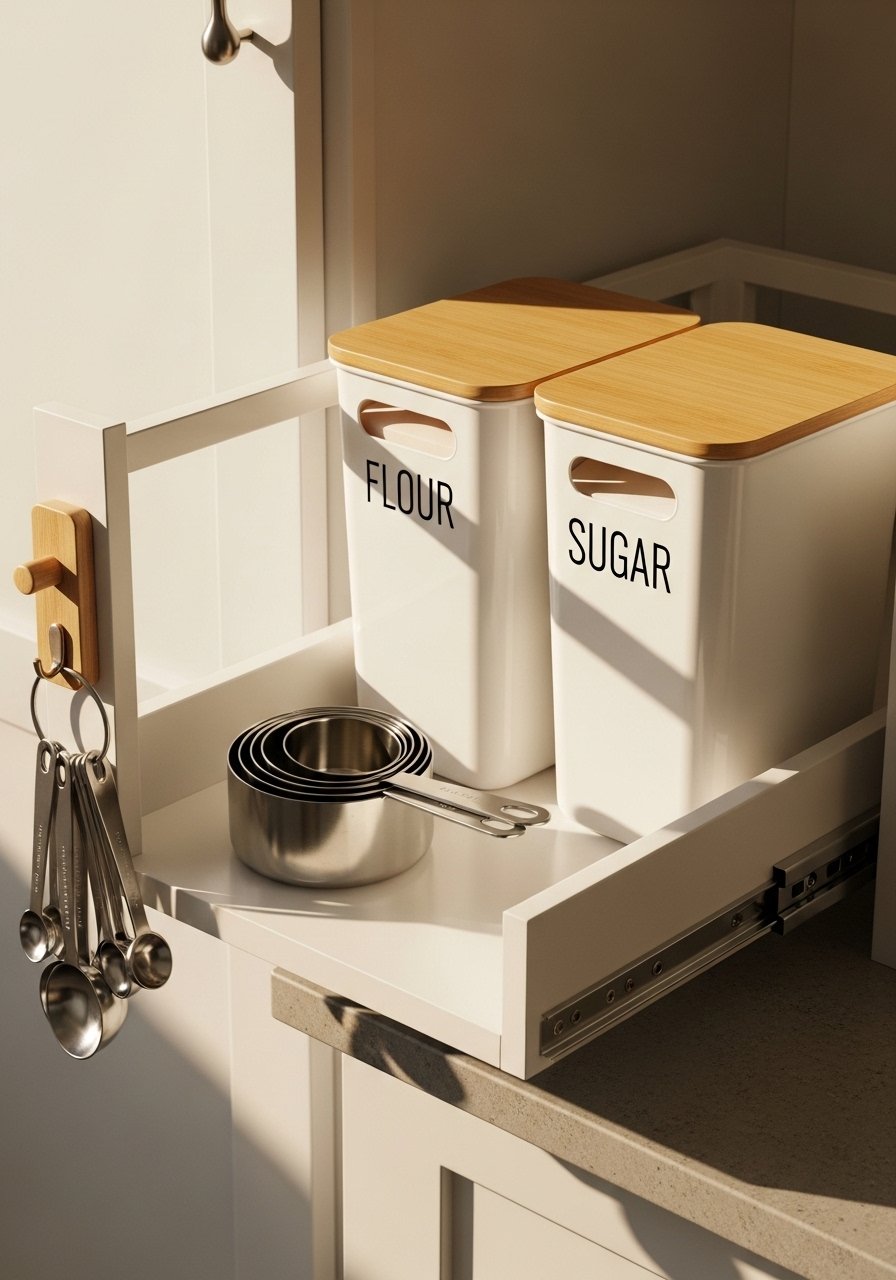
Keep baking basics together on a sturdy pull-out shelf. Large airtight bins stay hidden but slide forward when you’re ready to bake. This build needs a dust-tight finish on lids; use a silicone sealant for airtightness. A silicone spatula set pairs well here.
Materials
- 1 heavy-duty pull-out shelf 22" x 16" x 3/4"
- 2 airtight bins (5–10 lb capacity each)
- 2 heavy-duty drawer slides (100 lb rating)
- Silicone sealant 3 oz
- Wood stain and polyurethane 8 oz each
- Velcro strips for lids
- Label stickers
Instructions
- Cut and finish the shelf with stain and polyurethane; let cure 48 hours.
- Attach slides and test for smoothness under load.
- Position bins and apply silicone sealant to lids for extra seal; cure 24 hours.
- Secure lids to bins with Velcro for kid-proofing.
- Mount shelf in pantry and load bins with measured scoops nearby.
- Keep a spare scoop in a labeled jar on the shelf.
How to Display or Gift It
- Add a wooden scoop tied with twine as a finishing touch.
- Package similar bins and a scoop as a bridal or housewarming present.
- Sliding Cutting Board and Peel Station
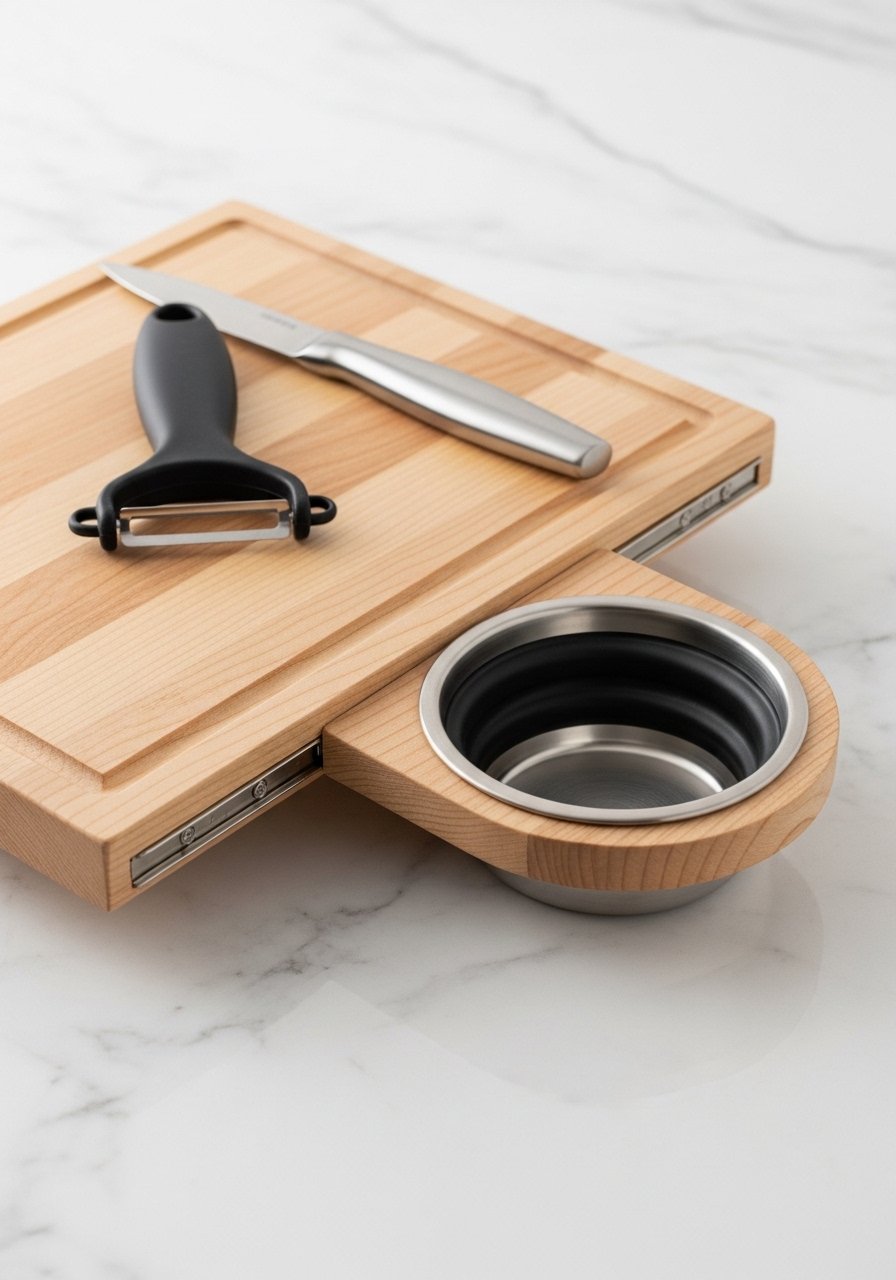
Add a thin pull-out that holds a cutting board and collapsible peel bowl for quick prep. The board stores flush and slides out when you need extra prep space. Use a food-safe finish and a self-healing cutting mat if you prefer non-wood surfaces.
Materials
- 1 pull-out drawer 20" x 14" x 1" (board integrated)
- 1 maple cutting board thin profile 18" x 12"
- 1 collapsible silicone bowl
- 14" full-extension slides
- Food-safe mineral oil 4 oz
- Velcro strips to keep bowl in place
- Small edge handle
Instructions
- Sand and oil the cutting board with mineral oil; two coats, 1 hour apart. Cure 24 hours.
- Build drawer with a recess to seat the board flush.
- Attach slides and test board extraction.
- Affix collapsible bowl with Velcro into a side recess.
- Store small prep tools on an attached mini magnetic strip.
- Maintain board by re-oiling monthly or when dry.
How to Display or Gift It
- Pair with a small herb scissors set and wrap as a kitchen gift.
- Store spare mineral oil in a labeled bottle in a craft organizer.
- Pull-Out Pet Food Station
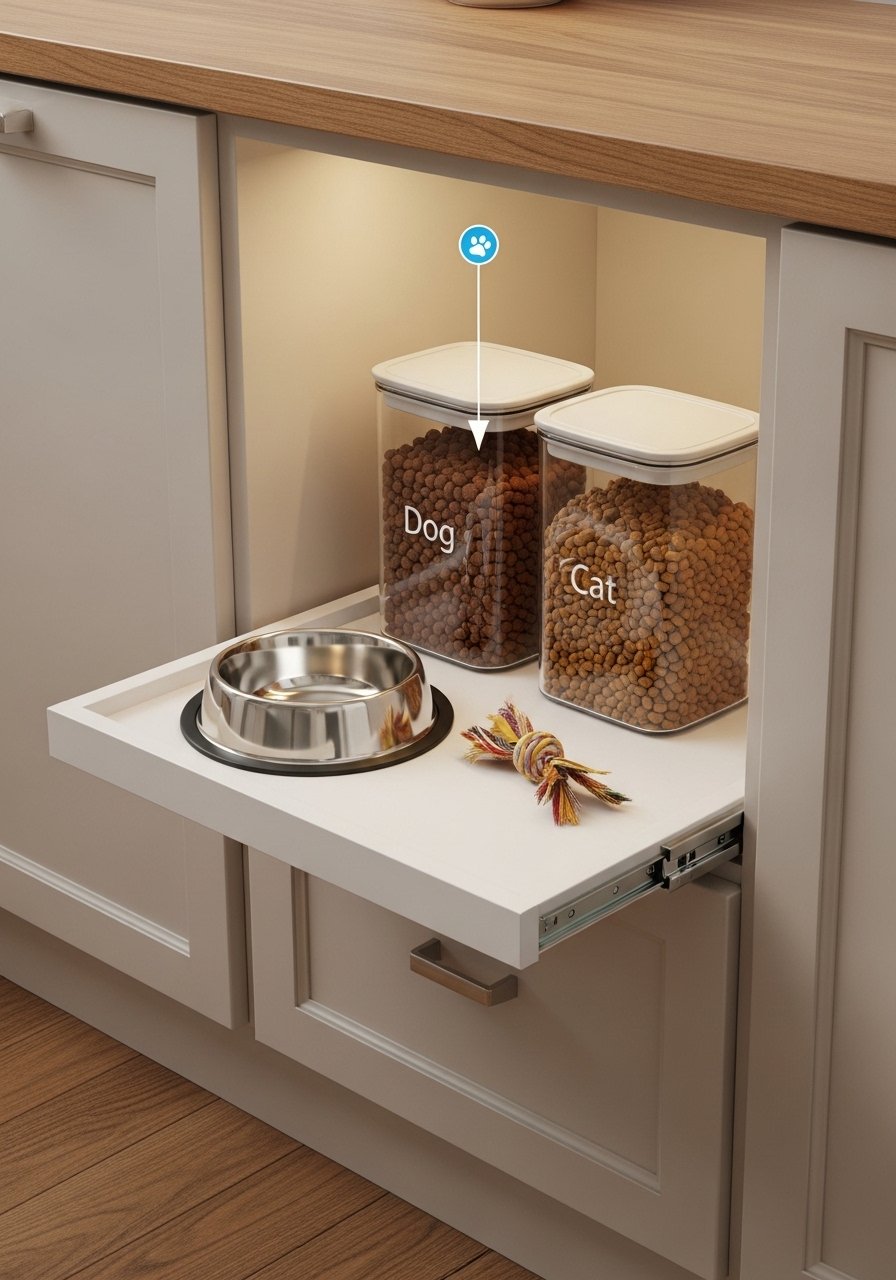
Create a slide-out station for pet food and bowls that hides mess and keeps mealtimes tidy. Airtight canisters and a non-slip bowl make feeding simple. A small silicone mat helps contain spills.
Materials
- 1 heavy pull-out shelf 24" x 18" x 3/4"
- 2 airtight pet food canisters (3–5 qt)
- 1 non-slip stainless feeding bowl
- 2 heavy-duty slides (100 lb)
- Silicone mat 18" x 12"
- Cord clips for any automatic feeder
- Paint or stain, sandpaper
Instructions
- Finish shelf and allow 24–48 hours cure for sealant.
- Attach slides rated for heavy load.
- Place silicone mat and situate canisters and bowl.
- Use cord clips to secure any automatic feeder cords.
- Slide in and out to refill and clean.
- For automatic feeders, secure the feeder mount to the shelf per manufacturer specs.
How to Display or Gift It
- Add a small treat jar on the shelf and a leash hook on the inside pantry door.
- Gift with a set of pet-safe bowls in a kraft box.
- Sliding Bulk Bin for Rice & Grains

Bulk bins on a sturdy pull-out keep grains visible and manageable. Use food-safe bins and secure scoops for quick portioning. A small food storage funnel helps transfer grains cleanly.
Materials
- 1 heavy pull-out shelf 24" x 16"
- 2 clear airtight bulk bins (5–10 qt)
- 2 scoops
- 2 heavy-duty slides (100 lb)
- Velcro or adhesive to hold bins
- Label stickers
- Silicone mat
Instructions
- Finish the shelf and allow sealant cure 24 hours.
- Position bins and affix with Velcro to prevent shifting.
- Install slides and test for smooth movement.
- Label each bin and store scoops on side hooks.
- Clean mats and bins monthly to prevent residue.
How to Display or Gift It
- Keep a small hand vacuum in a nearby drawer for quick clean-ups.
- Package a set of scoops and funnel as a practical gift.
- Pull-Out Cleaning Caddy Shelf
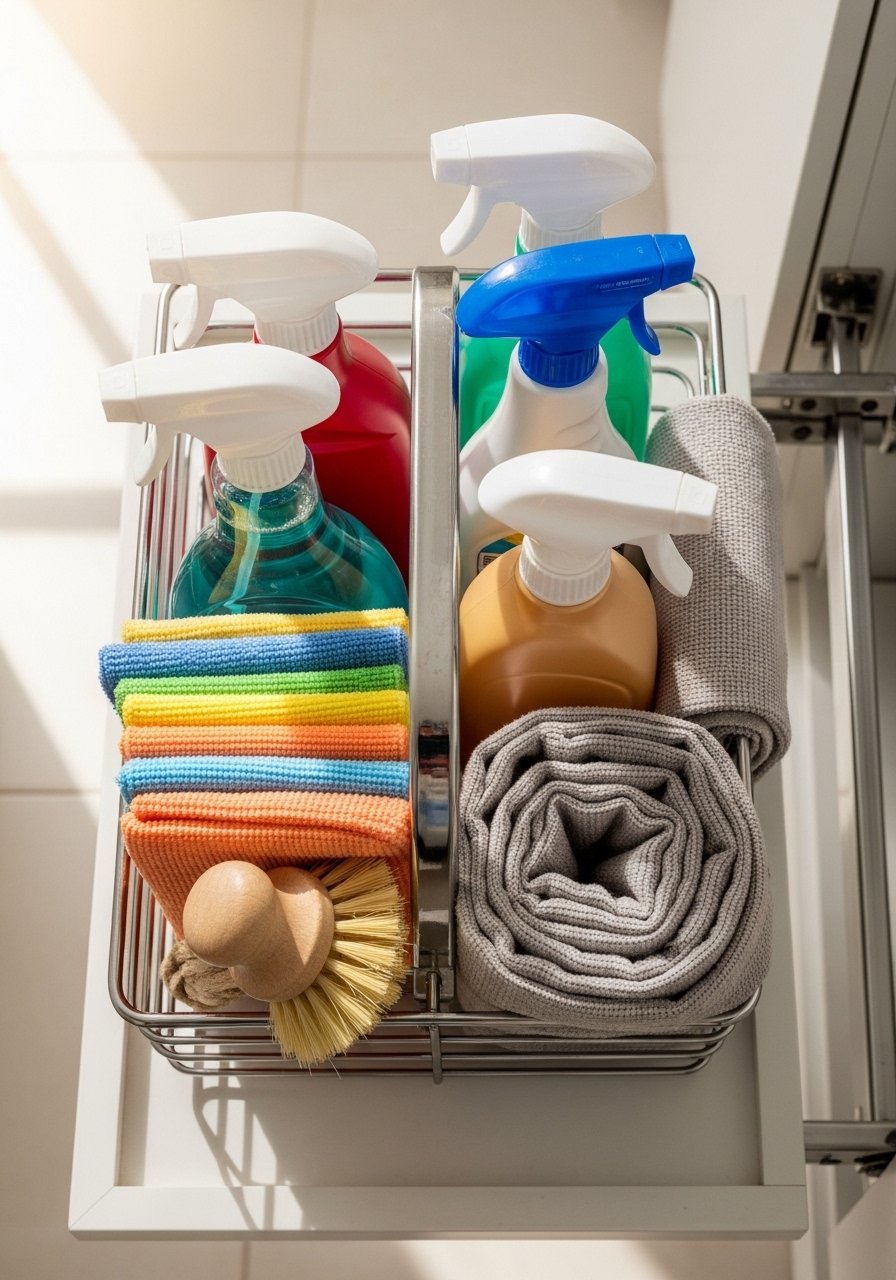
A cleaning caddy on slides lowers heavy bottles and sprays for easy grab-and-go cleaning. Grouping supplies makes routine chores faster. Use a rust-resistant caddy and a microfiber cloth set.
Materials
- 1 pull-out shelf 20" x 14" x 3/4"
- 1 metal caddy or plastic tote
- 2 heavy-duty slides
- Hooks for brushes
- Waterproof sealant for shelf
- Velcro to anchor caddy
- Rubber feet
Instructions
- Finish shelf with waterproof sealant; cure 24 hours.
- Attach slides and anchor caddy with Velcro.
- Add hooks for brushes and store cloths folded.
- Slide caddy out when cleaning and slide back when done.
- Periodically empty and wash caddy to prevent mildew.
How to Display or Gift It
- Tie a small set of cleaning cloths with twine and gift with the caddy.
- Store spare cleaning supplies in labeled mason jars.
- Slim Pull-Out for Cutting Boards & Lids
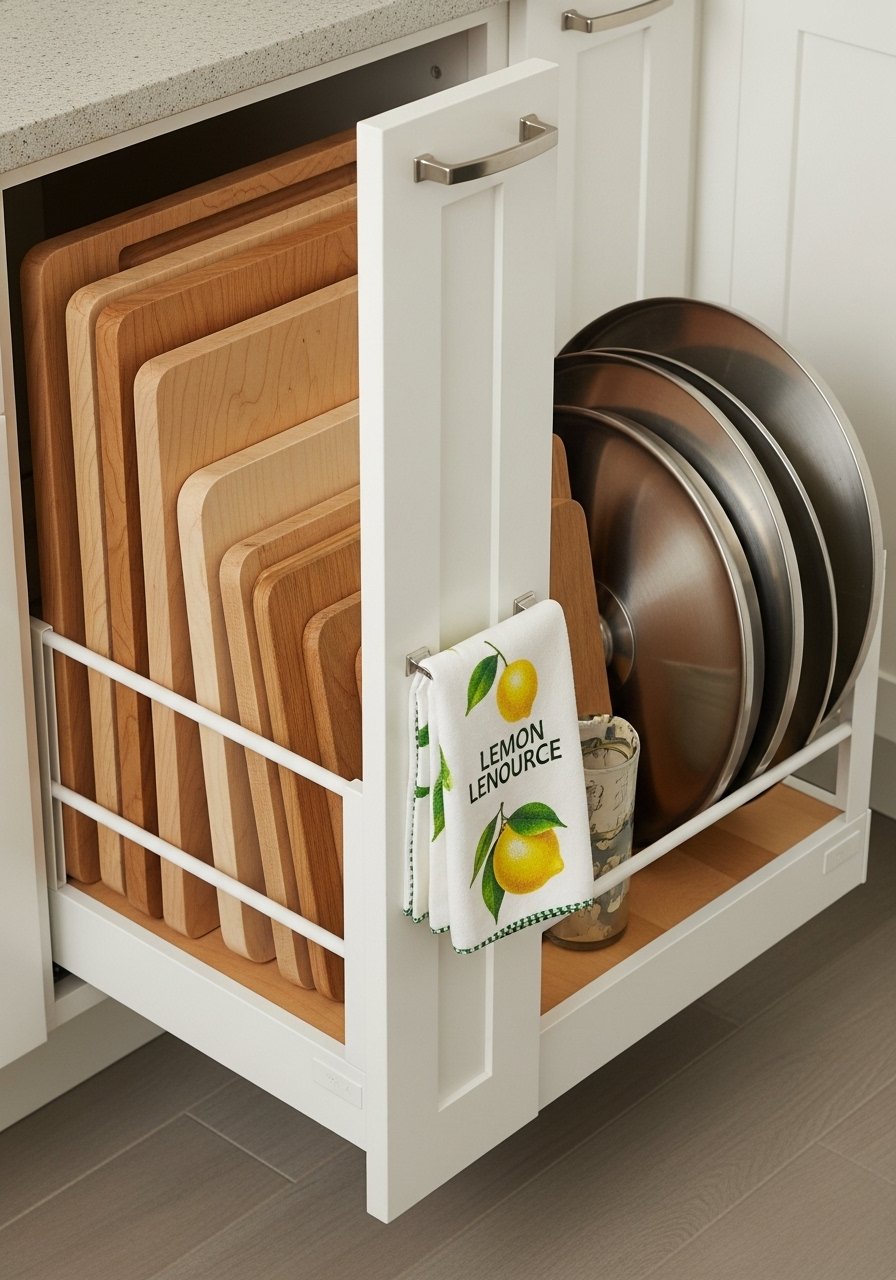
This vertical organizer holds cutting boards and pot lids upright and easy to reach. It’s perfect for narrow cupboard spaces. Use a precision craft knife to trim foam dividers neatly.
Materials
- 1 slim pull-out box 20" x 6" x 16"
- 6–8 dividers (1/4" plywood) 16" tall
- 2 14" full-extension slides
- Felt pads to protect boards
- Paint or stain
- Wood glue, sandpaper
Instructions
- Cut box and dividers, and sand smooth.
- Paint or stain and let dry 2–4 hours.
- Glue dividers into base, spaced to match board width.
- Install slides and insert organizer.
- Add felt pads to divider edges to prevent scratches.
How to Display or Gift It
- Gift with a small oil bottle and board care instructions.
- Store spare dividers flat in a craft organizer.
- Pull-Out Tray for Bread & Bagels
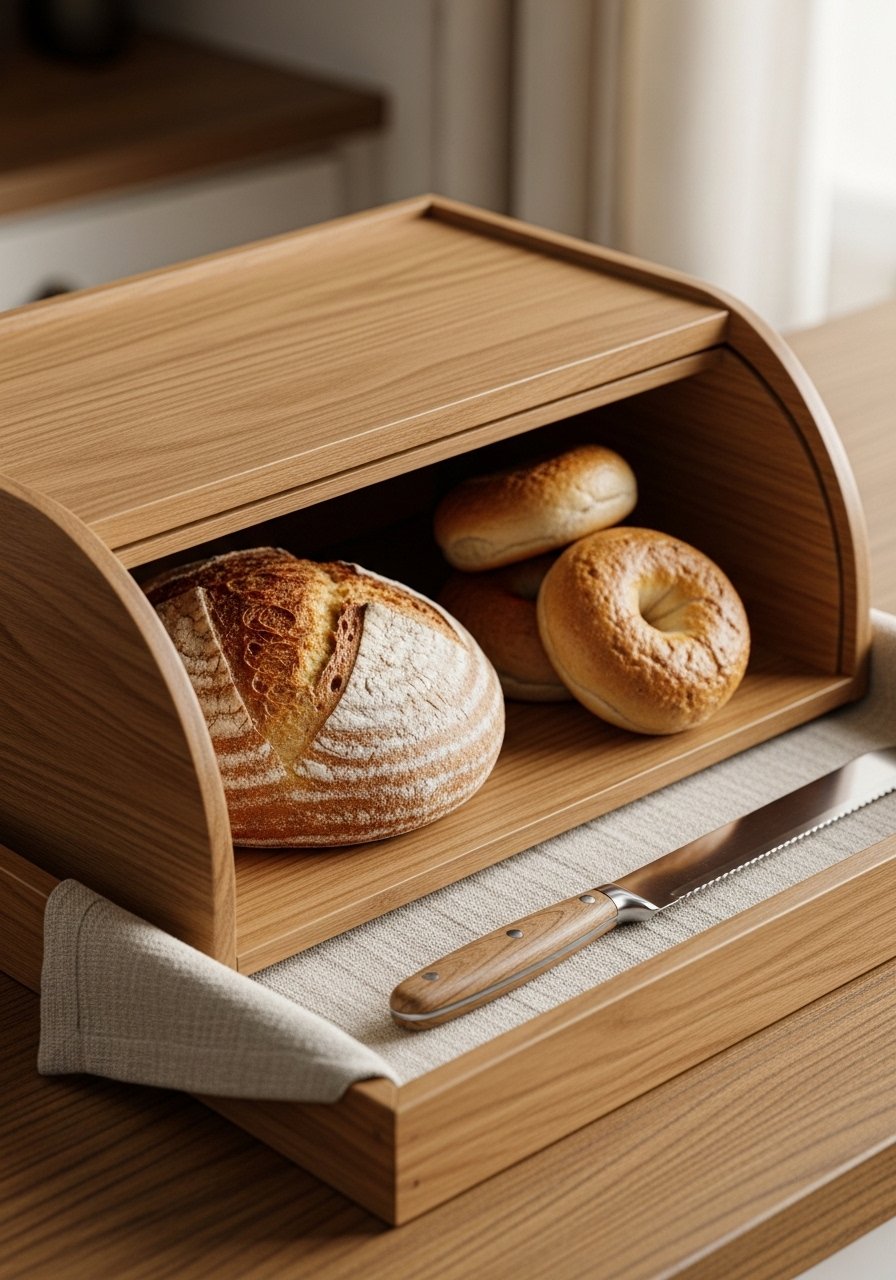
A pull-out bread tray keeps loaves fresh and accessible. For a bakery feel use linen liners and a wooden crumb catcher. A bread knife stored nearby completes the setup.
Materials
- 1 shallow tray 18" x 12"
- 1 linen liner 0.5 yd
- 2 14" full-extension slides
- Wood stain and sealant
- Crumb catcher (thin metal tray)
- Velcro for liner attachment
- Handle
Instructions
- Finish tray with stain and sealant; dry 2–4 hours.
- Sew or hot-glue linen liner to fit tray and attach with Velcro for washing.
- Insert crumb catcher beneath liner.
- Mount slides and test with a loaf and bagels.
- Wash liners weekly and replace as needed.
How to Display or Gift It
- Pair with a jar of artisan jam and gift in a kraft box.
- Store spare liners in a craft organizer tray.
- Pull-Out Vertical Herb Garden Shelf
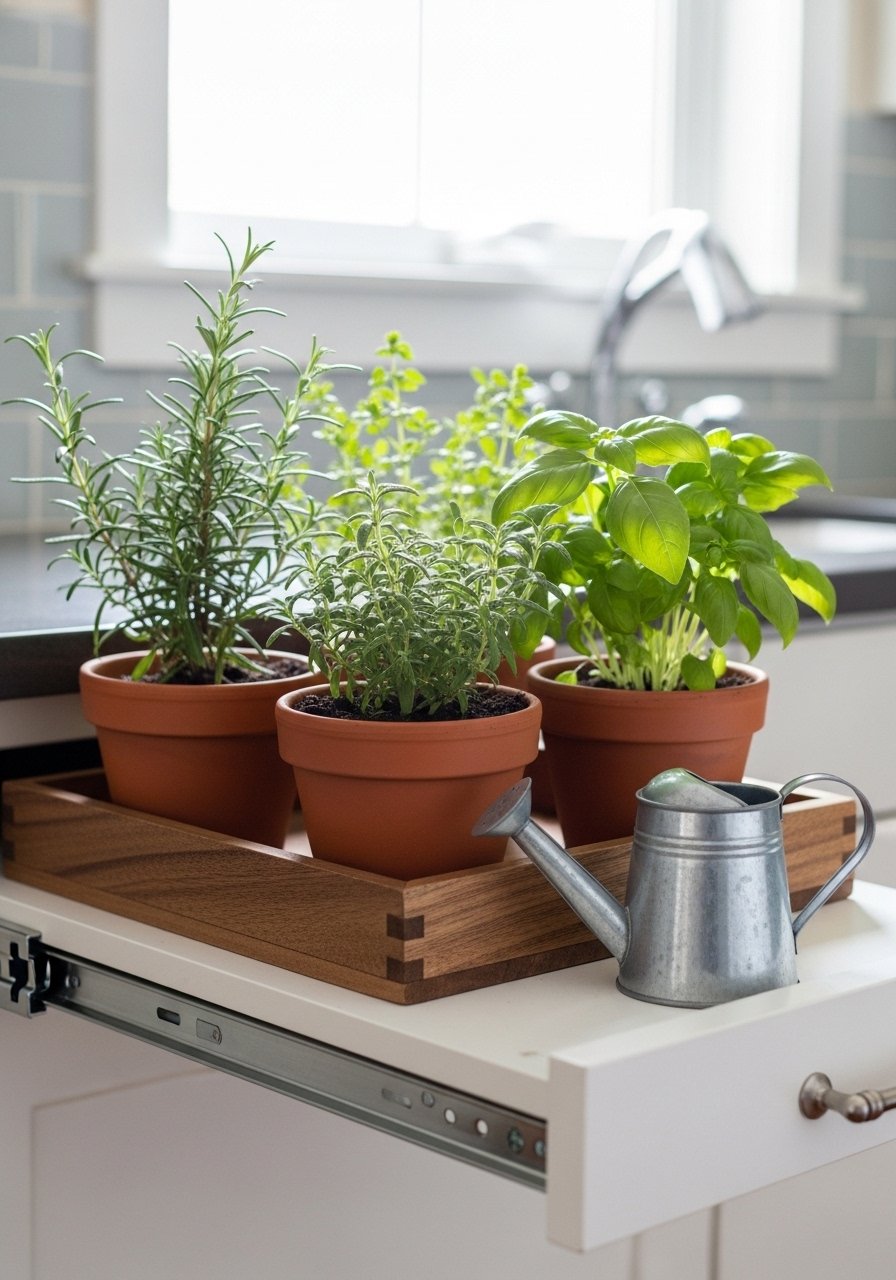
Bring fresh herbs into a pantry-friendly pull-out with drainage trays and small pots. It's perfect for limited counter space and adds a fresh scent every time you open the door. A compact watering can helps keep pots tidy.
Materials
- 1 pull-out tray 20" x 12"
- 6 small terracotta pots (3"–4")
- 1 plastic drip tray cut to size
- 2 14" slides
- Potting mix 1 qt per pot
- Labels for herbs
- Small watering can
Instructions
- Cut and fit plastic drip tray into the pull-out base.
- Place pots with potting mix and plant herbs; water lightly.
- Install slides and test weight capacity.
- Rotate plants occasionally for even light exposure.
- Water with small watering can and check drip tray weekly.
How to Display or Gift It
- Add mini plant labels and gift with seed packets.
- Store spare potting mix in a sealed mason jar.
- Sliding Towel & Linens Shelf
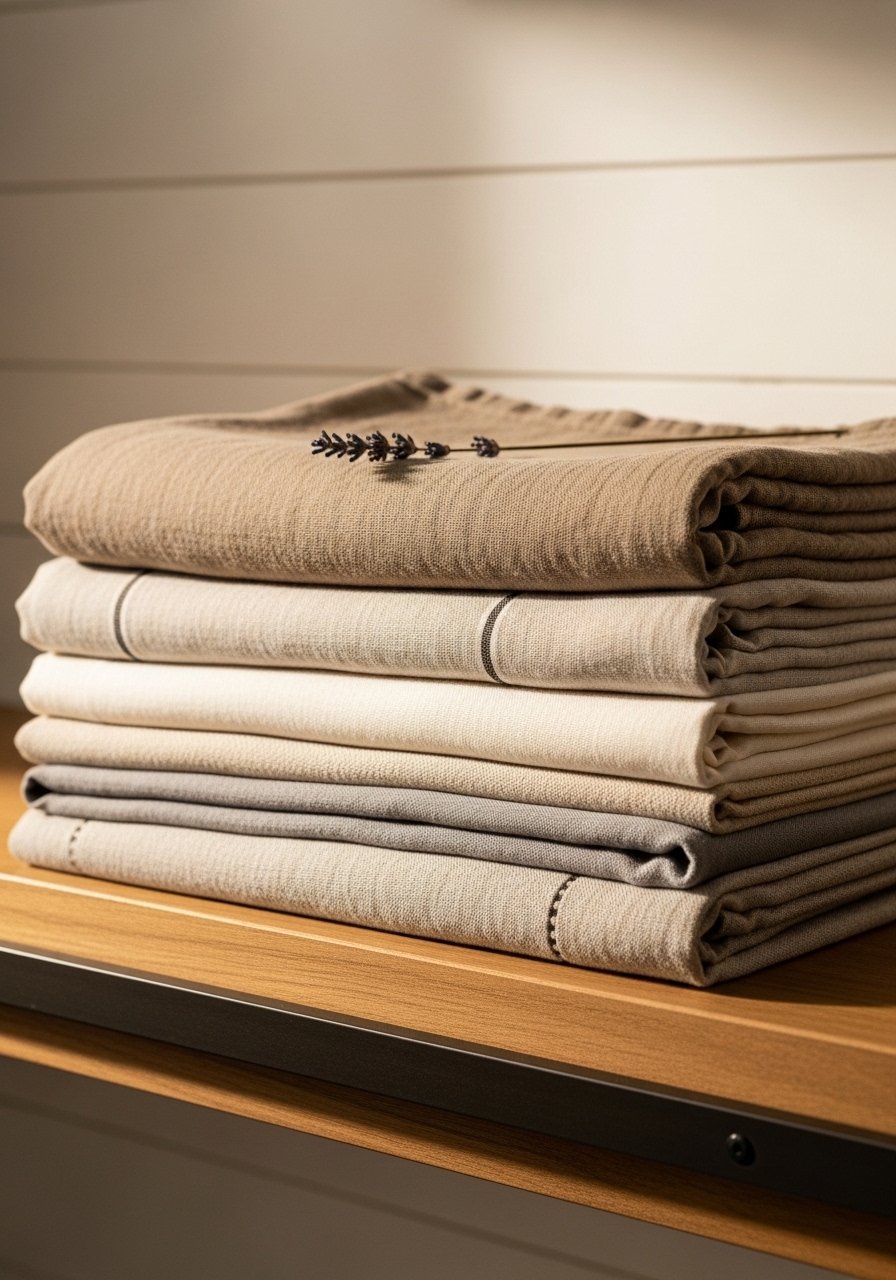
Keep extra kitchen towels and napkins on a sliding shelf for easy reach. Folded linens look spa-like and stay dust-free. Use a foam brush for neat sealer application on the shelf.
Materials
- 1 tray 18" x 12"
- 2 14" slides
- Cloth napkins and towels set (6–10 pieces)
- Wood stain or paint
- Velcro or small bungee to keep stack from shifting
- Small label holder
Instructions
- Finish tray and allow paint/stain to cure 24 hours.
- Fold linens uniformly and stack.
- Attach Velcro or bungee across the front to prevent shifting when sliding.
- Install slides and test access at different pantry heights.
- Replace towels seasonally for a fresh look.
How to Display or Gift It
- Fold towels with a ribbon and gift for hostess presents.
- Store spare linens in a labeled craft organizer tray.
- Rolling Cutlery & Utensil Drawer
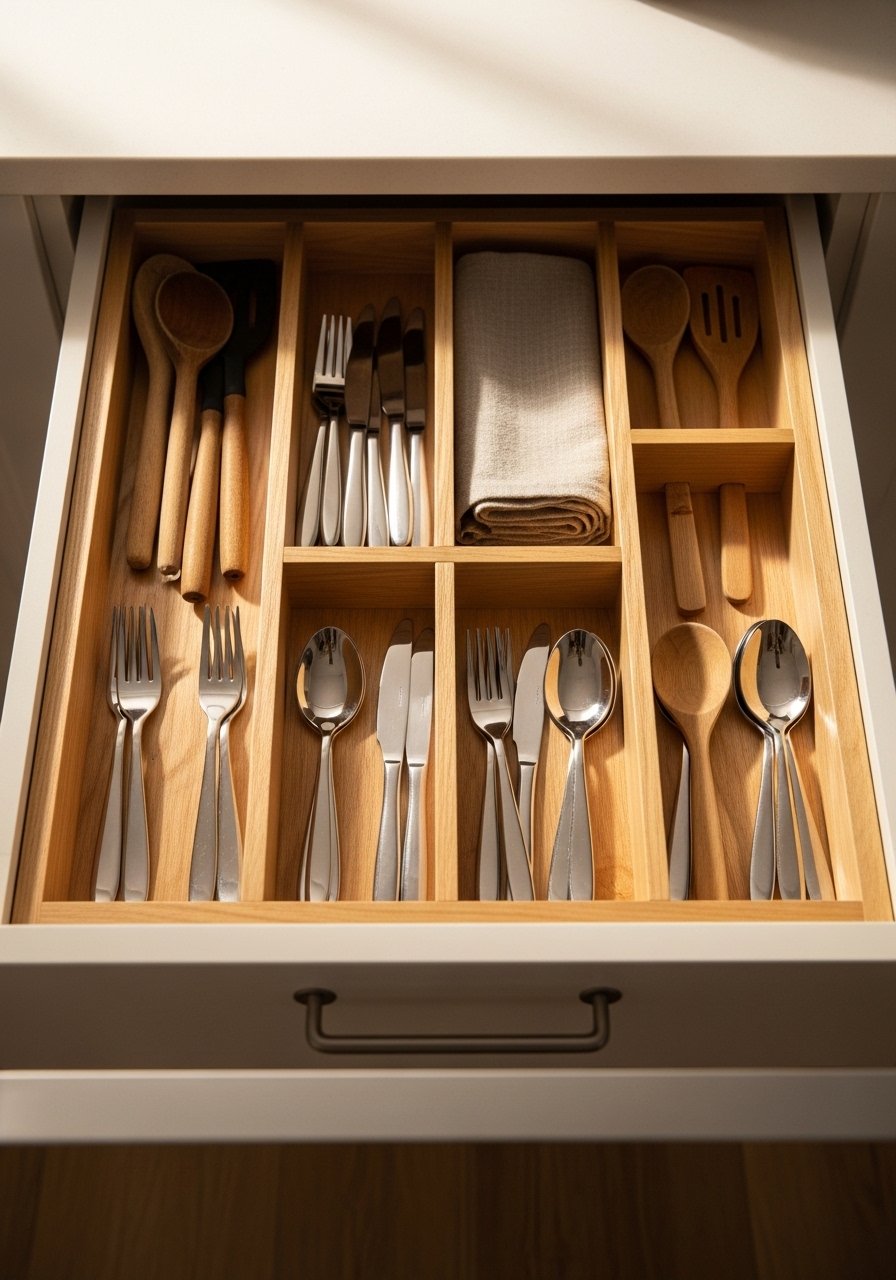
Create a rolling drawer with dividers for spatulas, whisks, and spoons. This keeps utensils neat and prevents clattering. A small magnetic strip can hold metal tools in place.
Materials
- 1 drawer 18" x 14" x 3"
- Divider strips 1/4" oak
- 14" full-extension slides
- Small magnetic strip
- Wood glue, sandpaper
- Matte sealant
Instructions
- Build drawer and sand.
- Measure and glue divider strips to create compartments.
- Seal interior with matte finish; dry 1 hour.
- Attach magnetic strip to one side for metal tools.
- Install slides and organize utensils by function.
- Clean false bottom quarterly to remove crumbs.
How to Display or Gift It
- Gift with a wooden spoon set tied in twine.
- Store spare dividers flat in a craft organizer.
- Pull-Out Baking Tool Caddy
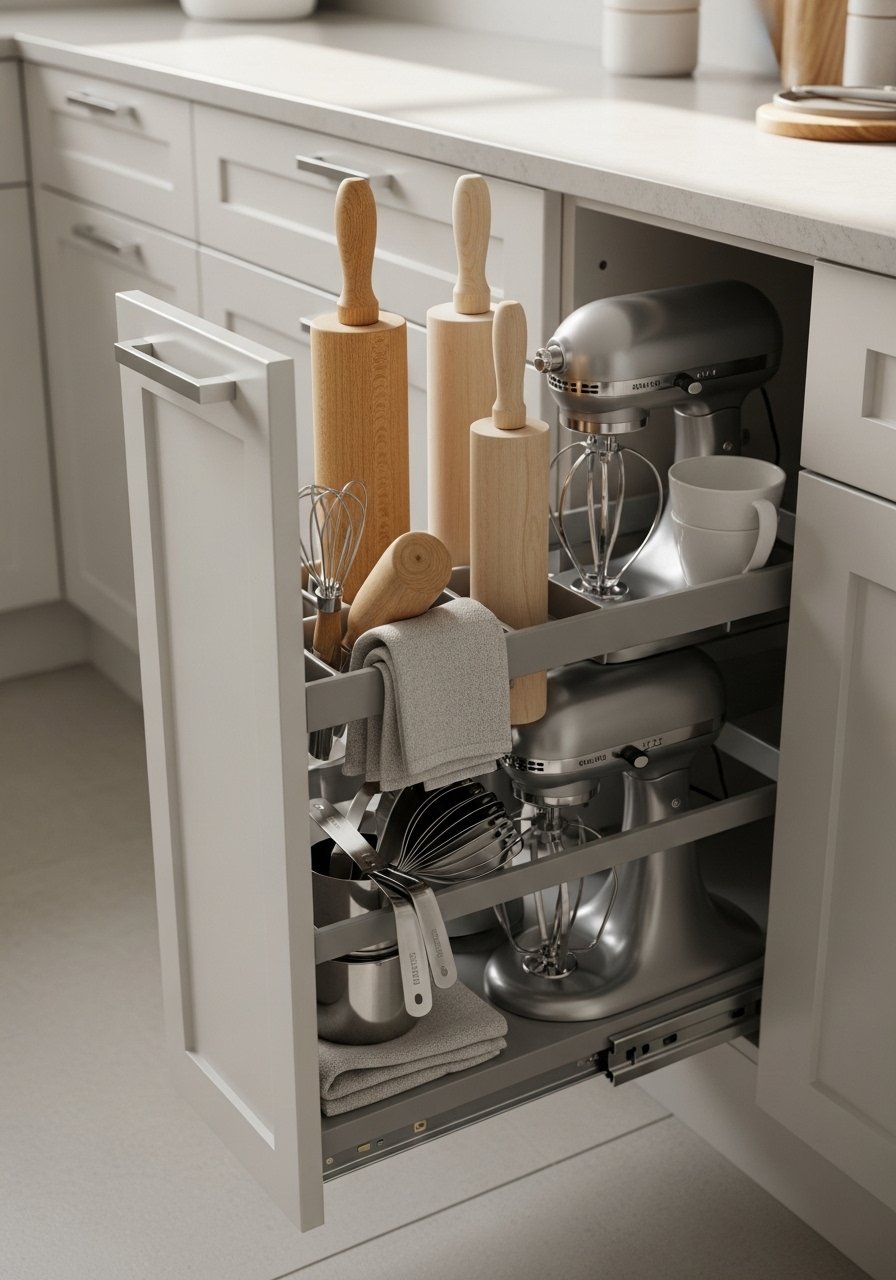
A dedicated caddy for rolling pins, measuring cups, and whisks keeps baking tools in one spot. Add vertical dowels to cradle rolling pins. A rolling pin rack can be repurposed for this shelf.
Materials
- 1 pull-out shelf 20" x 12"
- 2–3 vertical dowels 3/4" diameter
- Hooks for measuring cups
- 14" slides
- Small towel hook
- Paint or stain
Instructions
- Finish shelf and let cure 24 hours.
- Install dowels vertically to support rolling pins and long tools.
- Attach hooks for measuring cups and lightweight tools.
- Mount slides and test ergonomics for tool reach.
- Keep frequently used items front-most.
How to Display or Gift It
- Wrap a set of wooden spoons and a rolling pin as a bakery gift.
- Store extras in a stackable bin.
- Pull-Out Breakfast Nook Organizer

This tray organizes breakfast essentials — bowls, spoons, and cereal canisters — for quick mornings. Stack items sensibly and anchor canisters to avoid spills. A small milk frother makes mornings feel special.
Materials
- 1 tray 20" x 16"
- 2 cereal canisters (2–3 qt)
- Stackable bowls (4)
- 14" slides
- Rubber anchors for canisters
- Small spoon jar
Instructions
- Seal tray surface and allow to cure 24 hours.
- Position canisters and anchor them with rubber anchors to prevent shifting.
- Place bowls and spoons for easy reach.
- Install slides and test weight and motion.
- Keep spoons in a jar affixed to the tray.
How to Display or Gift It
- Gift with a curated breakfast kit: granola, syrup, and a wooden spoon.
- Store spare canisters in a labeled storage bin.
- Canning & Preserving Pull-Out Shelf — small pantry ideas with pull out shelves
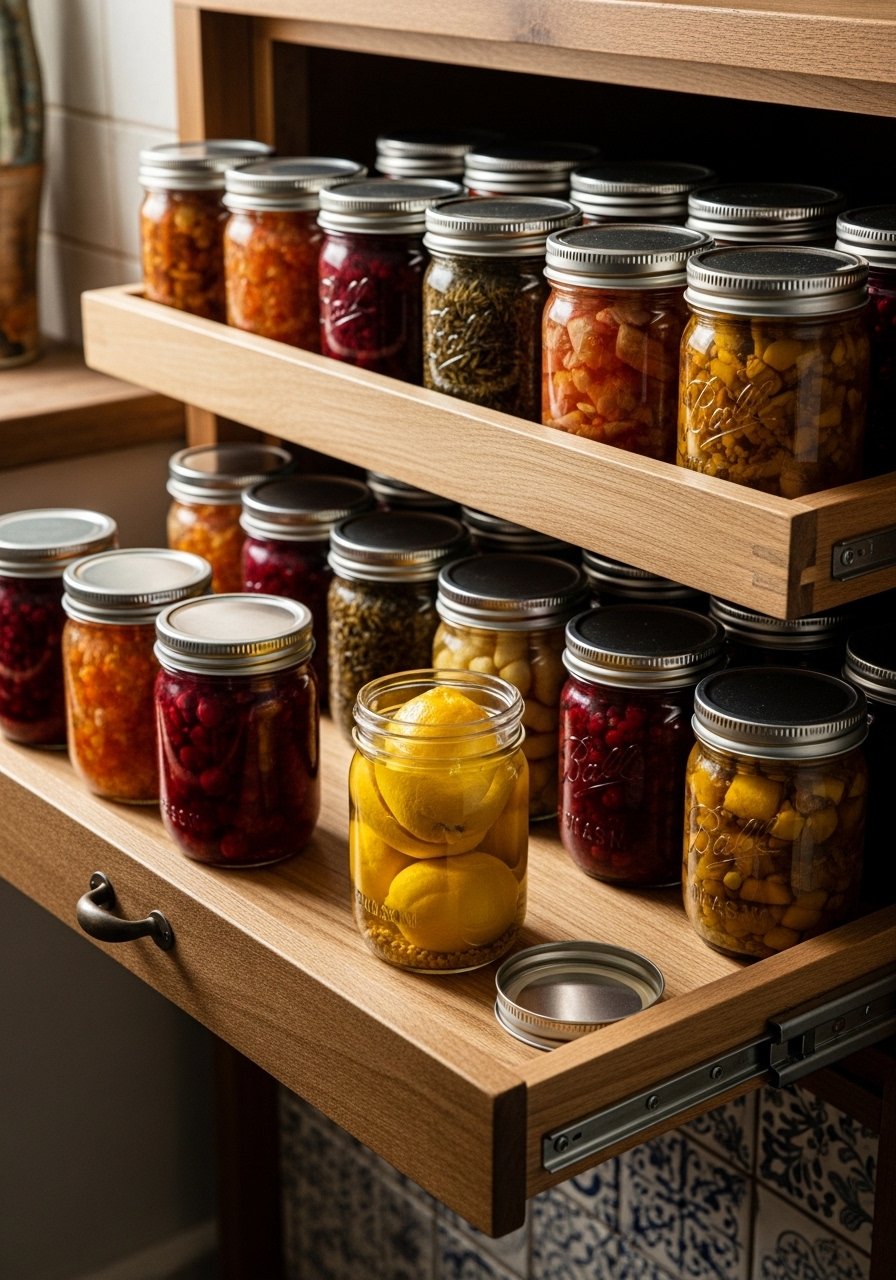
Store jars for canning on a sturdy pull-out shelf to reduce lifting heavy boxes. Use a sealed wooden tray and evenly spaced rows so jars don’t clink. A jar lifter makes loading safer. I keep a set of mason jars handy for canning.
Materials
- 1 heavy-duty pull-out shelf 24" x 18"
- 12–24 mason jars (pint or quart)
- 2 heavy-duty slides (100 lb)
- Non-slip liner
- Jar lifter for safe handling
- Label stickers
Instructions
- Finish shelf and allow sealant to cure 48 hours.
- Lay a non-slip liner and arrange jars in rows.
- Install slides and test for smooth movement under full load.
- Use a jar lifter to place jars to avoid drops.
- Keep lids and spare rings in a nearby organizer.
How to Display or Gift It
- Build a canning starter kit with a jar lifter and labels as a gift.
- Store spare lids and rings in a compartmentalized organizer.
- Pull-Out Refrigerator Tray for Lunch Prep
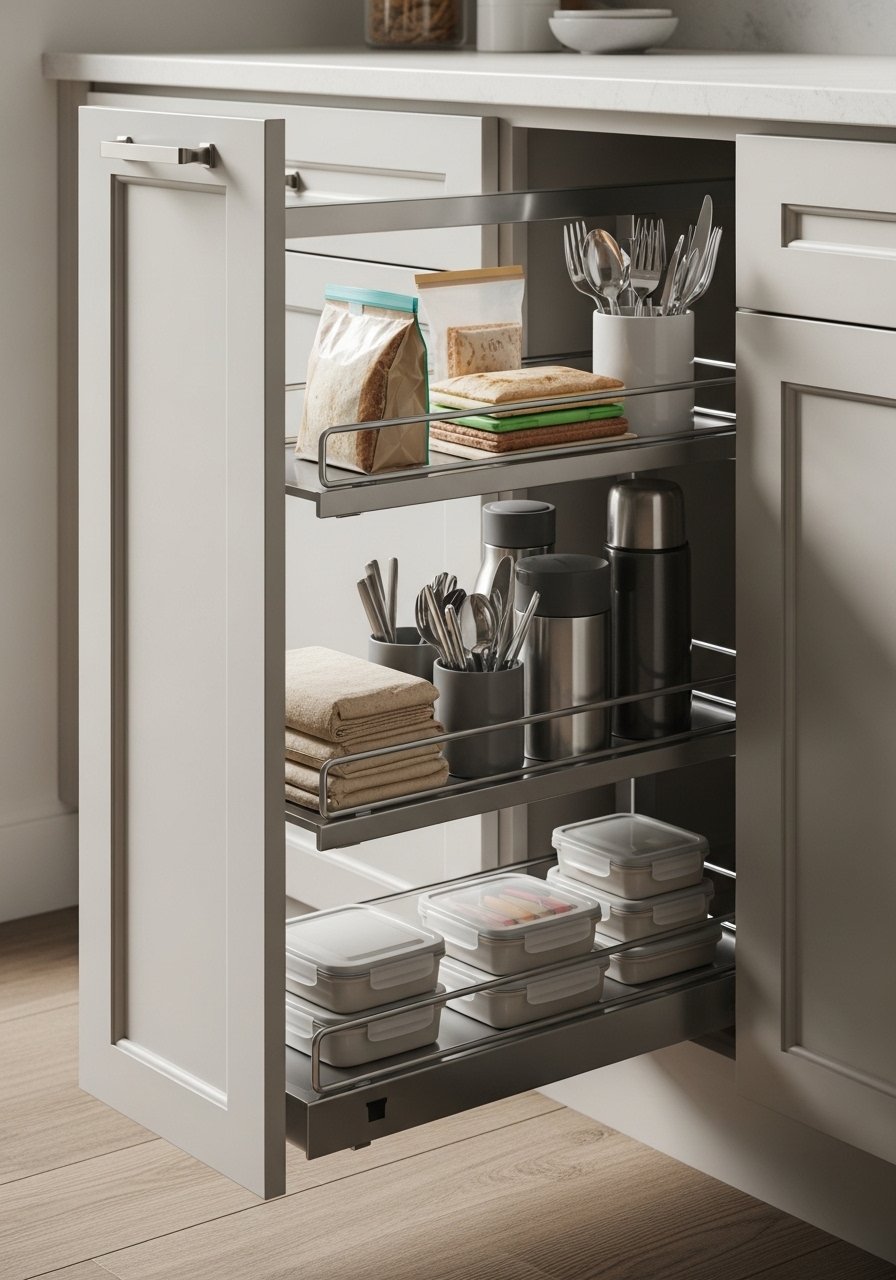
Make a lunch prep tray that slides out with baggies, reusable containers, and labels. It’s a ready station for weekday routines. Use a label maker for reusable container names.
Materials
- 1 tray 20" x 14"
- Reusable containers (set of 4)
- Sandwich bags and clip seals
- 14" slides
- Label stickers
- Small caddy for utensils
Instructions
- Organize containers and tools on the tray.
- Install slides and confirm weight limits.
- Label containers for quick packing.
- Stock the tray weekly for smooth mornings.
- Replace single-use items with reusable alternatives for sustainability.
How to Display or Gift It
- Gift with a set of reusable sandwich bags and a thermos.
- Store extra containers in a stackable bin.
- Pull-Out Baking Tray for Cooling & Proofing
Use a pull-out shelf for cooling baked goods or proofing dough—close enough to a prep area but out of the way. Wire racks stack neatly and the shelf can double as staging for multiple batches. Use a silicone baking mat to keep surfaces clean.
Materials
- 1 deep tray 24" x 18" x 3/4"
- 2–3 wire cooling racks
- 14" heavy slides
- Silicone baking mat
- Handle
- Paint or stain
Instructions
- Finish and seal the tray; cure 24–48 hours.
- Place silicone mat on surface for easy cleanup.
- Store wire racks and use the shelf for hot trays when cooling.
- Install slides and test full use with hot items.
- Clean mats after each baking session.
How to Display or Gift It
- Gift with a set of baking mats and a wooden spoon.
- Store spare cooling racks in a craft organizer.
- Pull-Out Drawer for Crafting & Label Station
Turn a pantry pull-out into a centralized label and packaging station with a cutter, label maker, and tapes. This keeps gift-wrapping close to food storage. A label maker is my go-to for tidy labels.
Materials
- 1 shallow drawer 18" x 12"
- Label maker
- Washi tape rolls (4)
- Scissors and small cutting mat
- Small bins for tapes and pens
- 14" slides
- Matte sealer
Instructions
- Organize tools and supplies into bins sized for the drawer.
- Apply a non-slip liner and seal drawer interior.
- Install slides and test ergonomics.
- Keep printed label rolls and spare batteries in a small jar.
- Replace tape rolls and restock as needed.
How to Display or Gift It
- Wrap with a ribbon set and gift to a friend who loves crafts.
- Store spare tapes in a craft organizer tray.
- Pull-Out Cold-Box for Root Vegetables
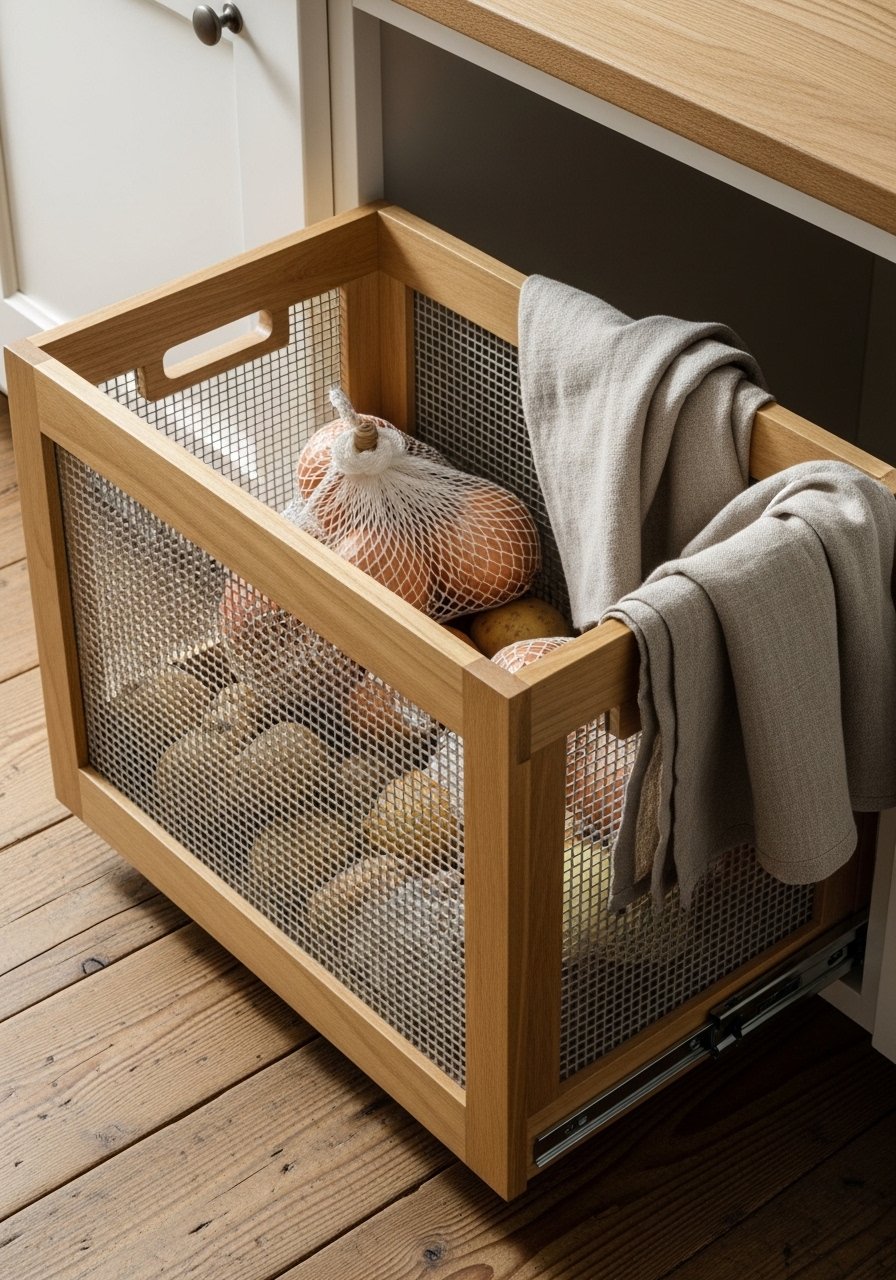
Create a ventilated pull-out cold-box for potatoes, onions, and citrus. Mesh sides keep air flowing and roots stay fresher longer. Use galvanized hardware for durability. A handheld moisture meter is helpful if you store produce regularly.
Materials
- 1 ventilated box 20" x 16" x 10" (slatted plywood)
- 2 heavy slides
- Mesh side panels
- Galvanized screws
- Lid or removable top (optional)
- Linens to line shelves
Instructions
- Build the slatted box with gaps for airflow.
- Attach slides and test motion.
- Line with a breathable linen for extra cushioning.
- Store produce in mesh bags and rotate stock monthly.
- Check for soft spots and remove any bad items promptly.
How to Display or Gift It
- Add a small label and a wooden scoop for scooping potatoes.
- Gift with a root-vegetable roasting spice blend.
- Shoe Box-Style Pull-Out for Pantry Extras
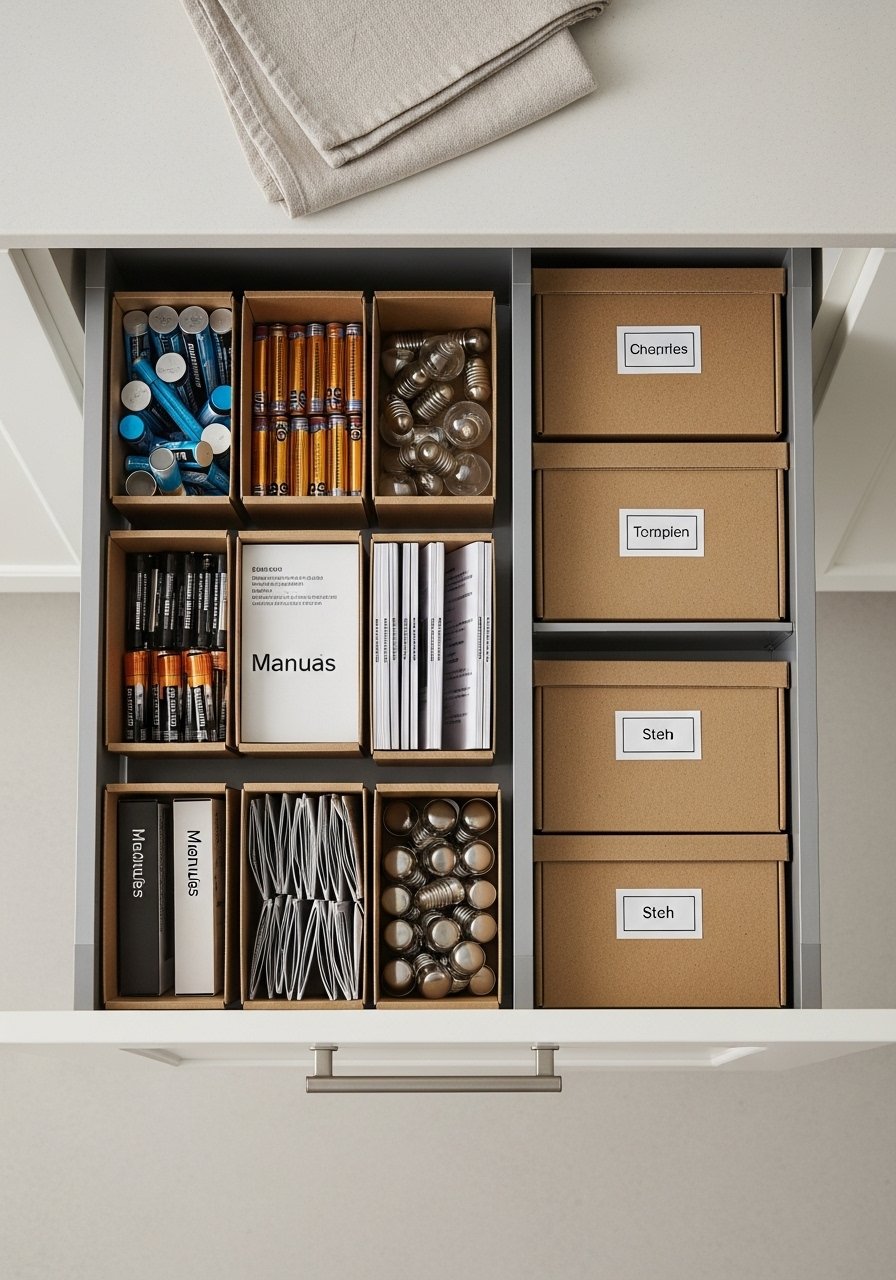
A final small tray divided into shoebox-style bins holds pantry extras: batteries, bulbs, and manuals. It’s an easy way to keep odds-and-ends accessible when you need them. A craft organizer tray is perfect for storing smaller parts.
Materials
- 1 shallow tray 18" x 12"
- 4–6 small cardboard or plastic shoebox bins
- Label stickers
- 14" slides
- Small adhesive hooks
- Non-slip liner
Instructions
- Cut and finish tray; add non-slip liner.
- Place bins and label each for its content.
- Install slides and test with weight of stored items.
- Keep it near the pantry entrance for quick access to extras.
- Replenish consumables monthly.
How to Display or Gift It
- Gift a set of labeled storage boxes for moving day.
- Keep a spare box under the sink for overflow supplies.
Thanks for staying with me through 30 small pantry ideas with pull out shelves — each one designed to make reaching everything effortless. Try a simple retrofit first (wire baskets or a spice drawer) if you’re unsure, or pick a heavier build if you want a permanent upgrade. Pin your favorites for later, and share this with a friend who’s reorganizing their kitchen. Which project will you try first?
One final tip: grabbing a quality hot glue gun with temperature control changed the way I finish small details — fewer strings and cleaner bonds.


