You love the cozy, lived-in feel of farmhouse style, but you also want a DIY project that fits your actual living room and budget. These 22 farmhouse DIY coffee table ideas cover everything from pallet-and-wheels weekend builds to small resin river tables you can finish in an afternoon. You’ll find simple plans for beginners and stepped-up builds for weekend woodworkers, all tuned to current trends like cottagecore, boho-farmhouse, and Japandi-meets-rustic.
I reference tools I actually use so you won’t guess which to buy. I start small projects with my Cricut Joy cutting machine when I need vinyl stencils, and I reach for a temperature-controlled hot glue gun for quick assembly. Each project below includes a full materials list, step-by-step instructions with drying times, and display tips so your new farmhouse piece looks like it belongs in a magazine (but without the cost).
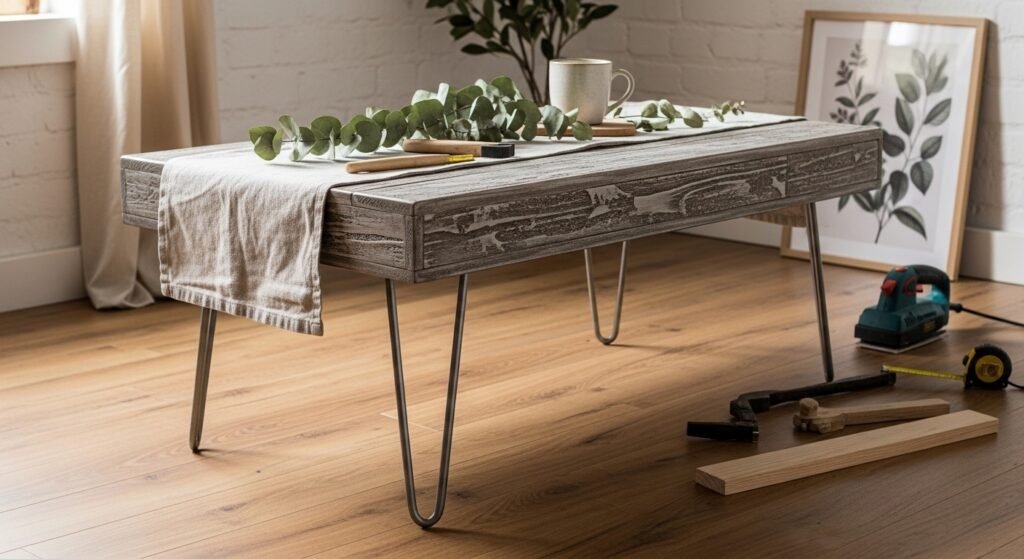
- Reclaimed Pallet Farmhouse Coffee Table
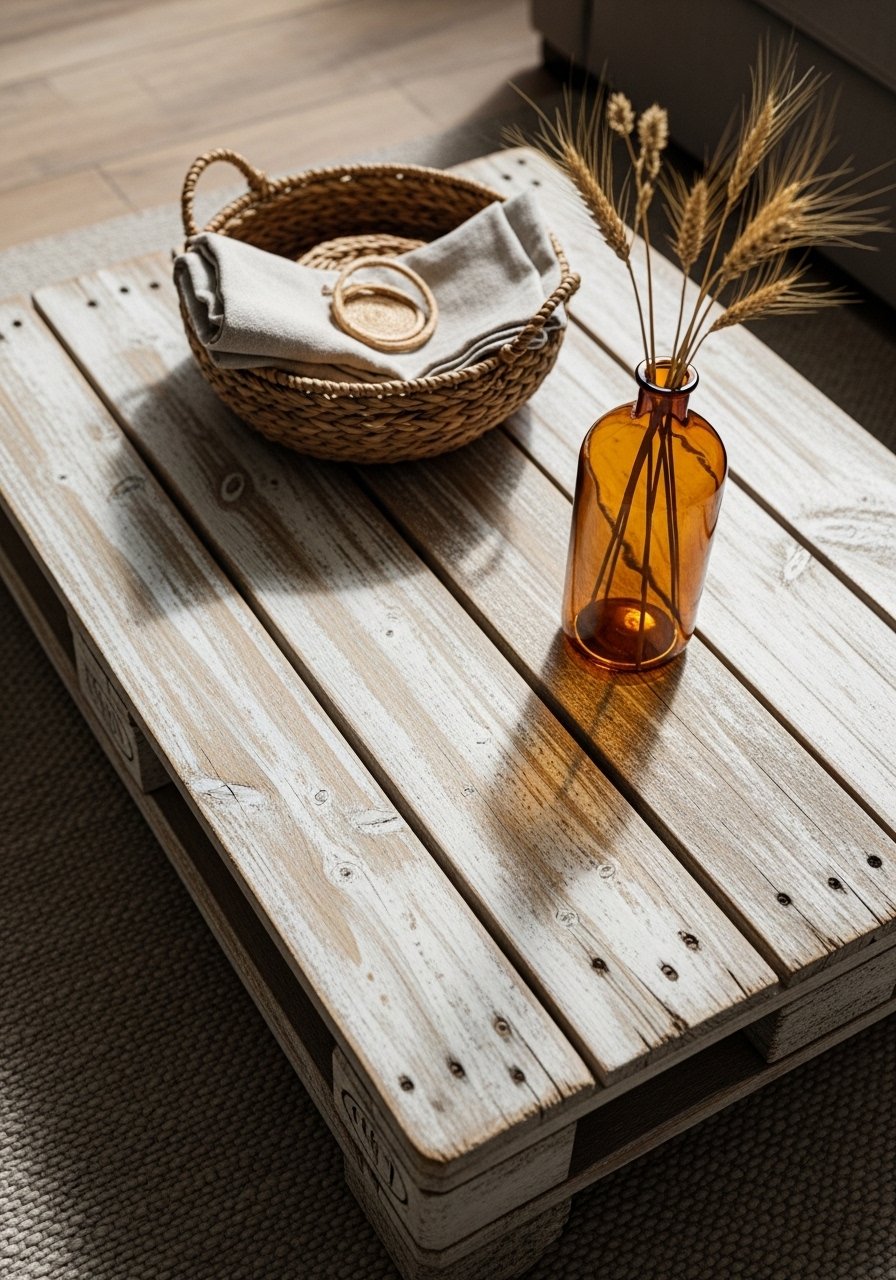
This pallet table is rustic, budget-friendly, and perfect if you love raw texture. The slatted top and slightly raised legs give that classic farmhouse silhouette. Beginners will like how forgiving the wood is—small gaps and dents add character. Use a random-orbit sander to get a soft, worn finish.
Materials
- 1 reclaimed pallet, sturdy, approx 40" x 20"
- 4 2×3 pine boards, 18" long (for leg blocks)
- 1 1×3 pine board, 40" long (center support)
- 8 1-1/4" wood screws
- 1 12-oz can white chalk paint
- 1 8-oz jar clear wax (paste)
- Sandpaper: 80, 120, 220 grit
- Wood glue (Gorilla wood glue)
- Felt pads for feet
- Optional: casters (2" locking)
Instructions
- Inspect pallet for loose boards and nails; remove nails and pull loose boards with pliers.
- Cut pallet to desired size (recommended 36–40" long) with circular saw.
- Attach center support 1×3 underneath with wood glue and 2-1/4" screws, countersink screws.
- Cut 2×3 leg blocks to 15" for a standard coffee table height (top thickness included). Sand all raw edges with 80 then 120 grit.
- Paint the pallet top with 1–2 thin coats of white chalk paint, letting each coat dry 30–45 minutes. Sand corners lightly with 220 grit for a worn look.
- Apply paste wax with a soft cloth; buff after 10 minutes until matte sheen.
- Attach legs to underside with screws through center support; add felt pads or casters.
- Cure time: let wax set 24 hours before heavy use.
How to Display or Gift It
- Pair with a woven tray and amber glass vase for a cottagecore vignette.
- Wrap in kraft paper and tie with jute twine if gifting. Use a small label tucked under twine.
- Store pallet pieces flat in a dry spot if building multiple tables at once.
- For mobility, use locking casters—search for "2 inch locking casters" if you want wheels.
- A rustic farmhouse vignette looks great on a sisal rug and next to linen-upholstered seating.
- Hairpin Legs + Butcher Block Top (Modern Farmhouse)
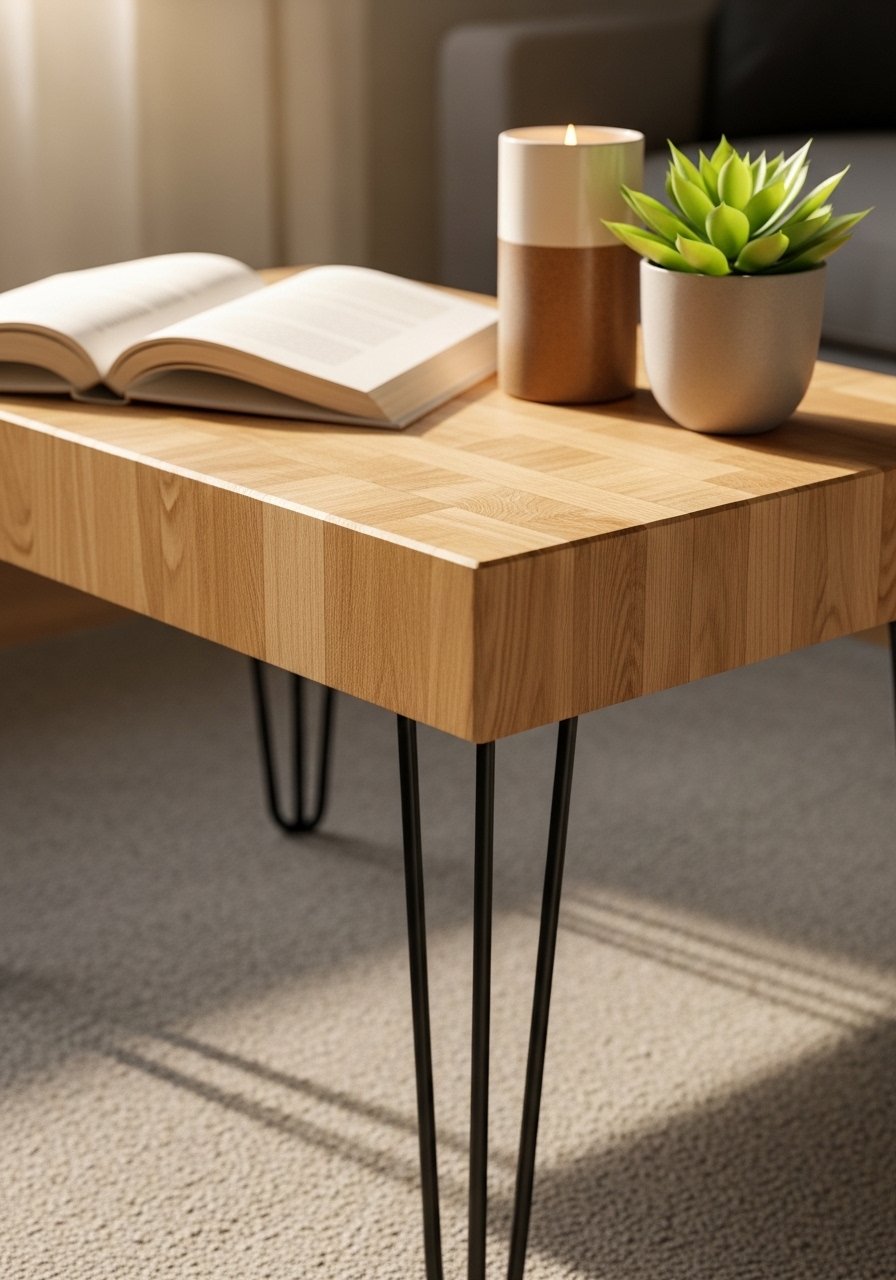
Clean lines meet farmhouse warmth with a butcher block top and hairpin legs. The smooth top balances rustic chairs and textured throws. I use a foam brush for even polyurethane coats so the grain stays visible.
Materials
- Butcher block top 36" x 20" x 1" (pre-sanded)
- 4 black steel hairpin legs, 16" height
- 8 1" wood screws (for legs)
- 1 500 mL satin polyurethane (water-based)
- Foam brush (2")
- Sandpaper 220 grit
- Painter’s tape
Instructions
- Lightly sand butcher block with 220 grit to remove dust.
- Wipe clean with tack cloth.
- Apply first coat of water-based polyurethane with foam brush; thin, even strokes following grain.
- Dry 2–3 hours; sand gently with 220 grit between coats.
- Apply 2 more coats (total 3) for full protection. Final cure 48 hours.
- Mark leg locations 2" in from corners; pre-drill holes then attach legs with screws.
- Flip table and press firmly on a flat surface to check wobble; adjust screw tightness.
How to Display or Gift It
- Style with a linen runner and ceramic tray.
- For gifting, place in a flat box with foam corner protectors.
- Use felt pads under legs to protect floors.
- Pair with a small set of minimalist coasters.
- A foam brush helps smooth polyurethane application.
- Crate-Stack Storage Coffee Table (Farmhouse with Function)
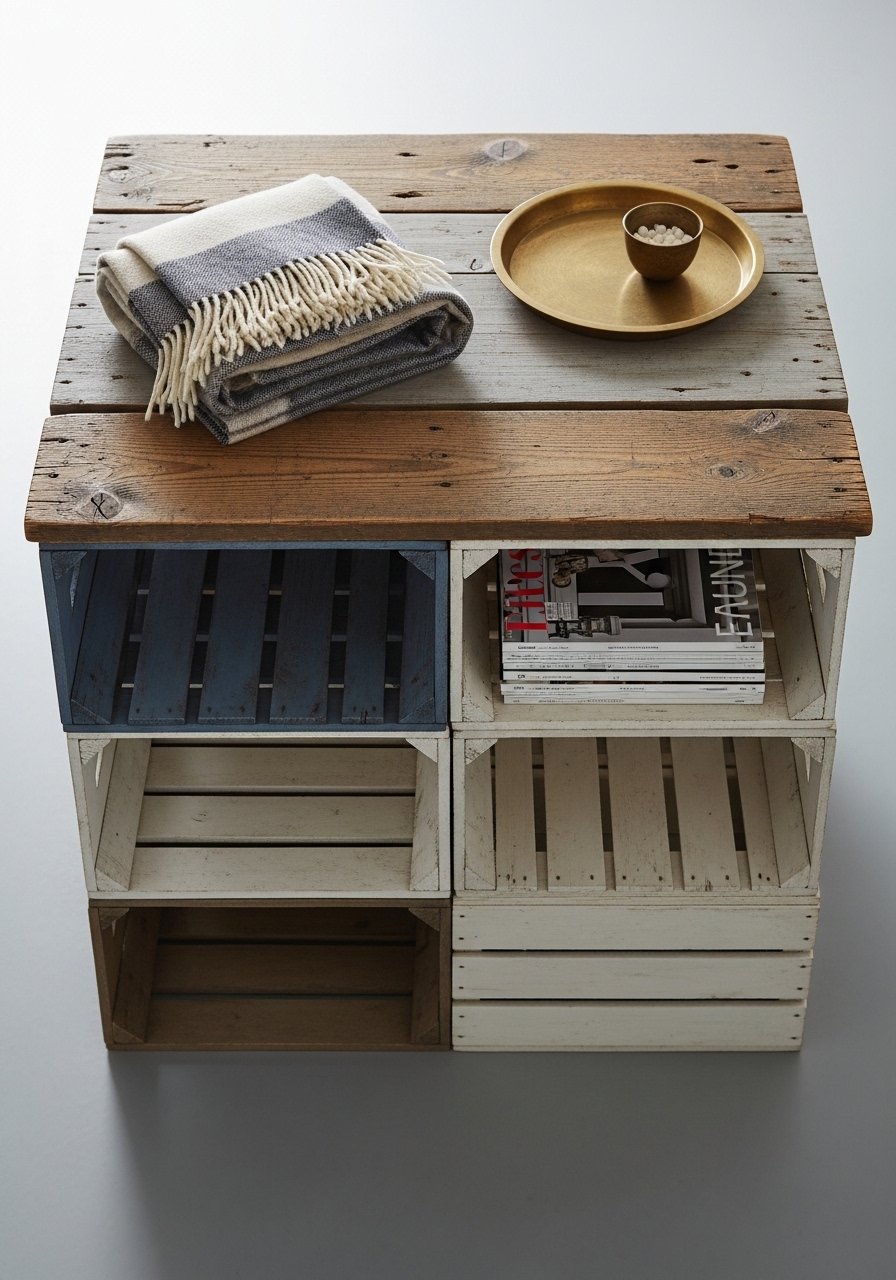
Stacked crates add storage and a casual farmhouse vibe. This is perfect if you like to hide remotes and throw blankets. The open cubbies make styling easy—think baskets and vintage books.
Materials
- 3 wooden storage crates, 18" x 12" x 8"
- Top plank 36" x 16" x 1"
- Chalk paint (antique white), 8 oz
- Wood screws 1-1/4"
- Wood glue
- Sandpaper 120, 220
- 4 small casters (optional)
Instructions
- Paint crates and top with 1–2 coats of chalk paint; dry 30–45 minutes between coats.
- Sand edges for a distressed look.
- Stack crates in desired layout (two on bottom, one on top centered), glue and screw through inner bottom of top crate into lower crates for stability.
- Attach top plank with screws from underside into crate lip.
- Attach casters to bottom for mobility, if desired.
- Let glue set 24 hours before heavy loading.
How to Display or Gift It
- Use woven baskets inside cubbies for tidy storage.
- Gift as a dorm or first-apartment table—wrap in kraft with a twine bow.
- Store extra paint and brushes in a small craft organizer for touch-ups.
- A set of small casters keeps the table easy to move for cleaning.
- Shiplap Top Coffee Table (Coastal Farmhouse)
Shiplap gives that clean, horizontal farmhouse look with a coastal twist. The faux shiplap is made from 1x4s joined side-by-side—painted slightly weathered for charm. A brayer roller helps press down any seams when using veneer or thin laminate strips.
Materials
- 4 1×4 pine boards, 40" long
- 2 1×2 pine battens, 36"
- Wood screws 1-1/4"
- Chalk paint (soft blue-gray), 8 oz
- Sandpaper 120, 220
- Wood filler
- Clear satin sealer 8 oz
Instructions
- Butt 1×4 boards edge-to-edge to form top. Clamp and attach battens underneath across width with wood glue and screws.
- Fill gaps with wood filler; sand flush after 30 minutes.
- Paint with 1–2 coats of chalk paint; dry 30–45 minutes between coats.
- Lightly sand edges for worn look.
- Seal with satin sealer, 2 coats, dry 2 hours between coats. Full cure 24–48 hours.
- Attach legs or base as desired.
How to Display or Gift It
- Pair with driftwood accents for coastal farmhouse styling.
- Wrap small hardware in tissue and tuck under table if gifting disassembled.
- Use a small crate for remote control storage.
- A brayer roller smooths any adhesive or veneer seams during assembly: brayer roller.
- Farmhouse DIY Coffee Table: X-Leg Rustic Top

X-legs pair perfectly with a chunky tabletop for a farmhouse statement piece. The angled legs create sturdy support and a farmhouse workshop look. A Kreg pocket-hole jig speeds up assembly and hides fasteners.
Materials
- Top plank 42" x 18" x 1.25" (pine or reclaimed)
- 2 X-leg assemblies cut from 2x6s (see measurements)
- Kreg screws 1-1/4"
- Wood stain (early American), 8 oz
- Polyurethane satin, 8 oz
- Kreg pocket-hole jig
- Sandpaper 120, 220
Instructions
- Cut top plank and X-leg pieces: each X is two 18" boards joined in center at 90°.
- Drill pocket holes with Kreg jig in leg pieces; join with Kreg screws.
- Sand and stain tabletop; wipe off excess stain after 5 minutes. Dry 2–4 hours.
- Apply 2 coats satin polyurethane; dry 2 hours between coats. Full cure 48 hours.
- Attach X-leg assemblies to underside centered 2" in from ends with screws.
- Check level; add felt pads.
How to Display or Gift It
- Style with a woven runner and stack of vintage books.
- For gifting, disassemble legs and include assembly screws in a labeled bag.
- Store extra stain in a well-sealed metal can in a cool place.
- If you don’t have a pocket-hole jig, try a Kreg pocket-hole jig for cleaner joins.
- Trunk-to-Coffee-Table (Vintage Farmhouse)
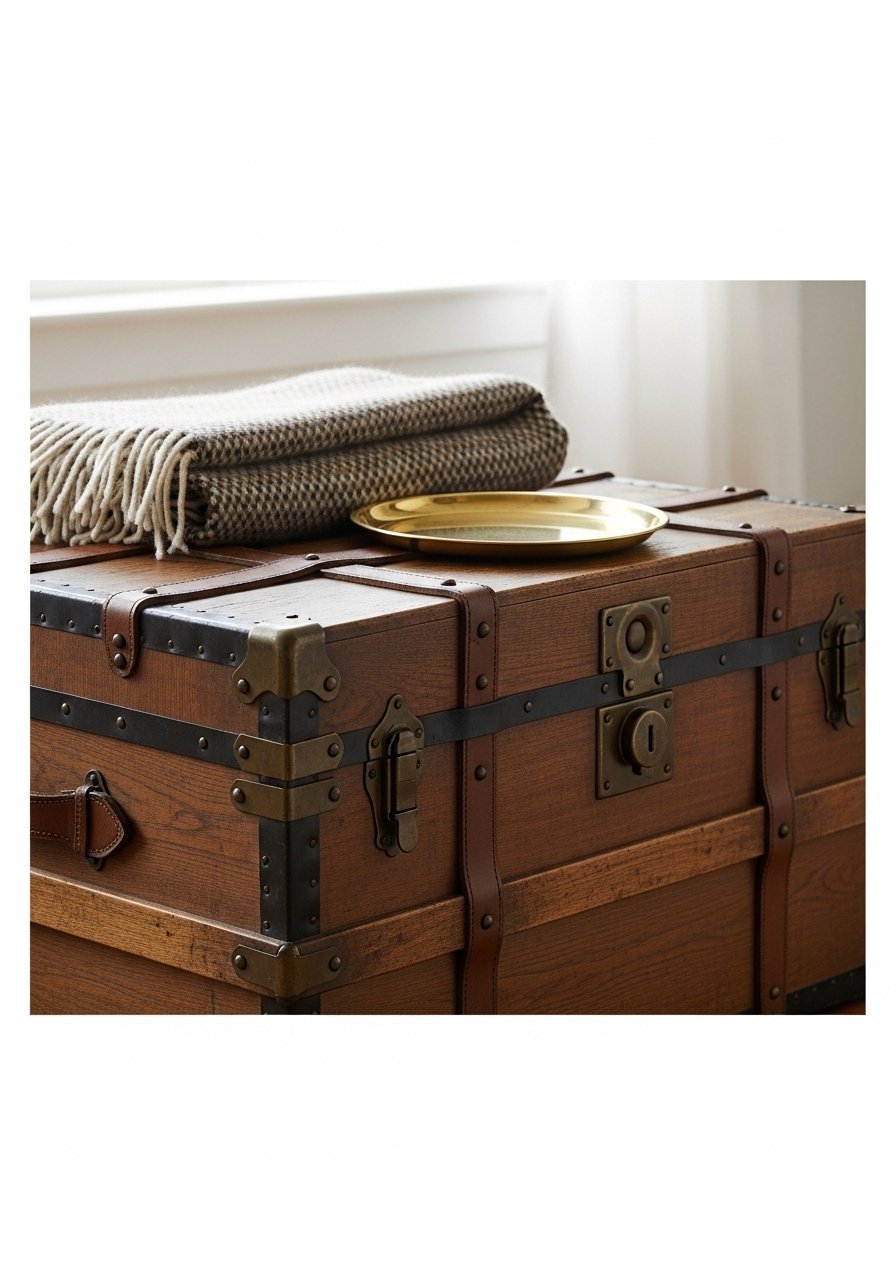
An old trunk becomes a coffee table with storage and character. Add wooden feet for height and a sealed top for drinks. The leather straps and metal corners give that farmhouse+vintage mix.
Materials
- Vintage wooden trunk (approx 36" x 18" x 16")
- 4 wooden feet, 2" height (optional)
- Wood glue and small screws
- Clear epoxy or polyurethane for top (see below)
- Sandpaper 120, 220
- Metal corner protectors (optional)
Instructions
- Clean trunk interior; repair hinges if needed with screwdriver.
- If top is uneven, sand lightly and fill gaps with wood filler; sand smooth after 30 minutes.
- Apply epoxy or 3 coats polyurethane to top for drink protection. If using epoxy, mix per kit instructions and pour; allow 24–72 hours cure.
- Attach feet with screws if you want extra height.
- Reattach straps and polish metal corners.
How to Display or Gift It
- Use as coffee table and storage for blankets.
- Gift by tucking a handwritten note under the lid.
- Use a small brass tray on top to corral remotes and candles.
- For epoxy work, a reliable epoxy resin kit avoids sticky surfaces and levels nicely.
- Sliding Top Storage Farmhouse DIY Coffee Table
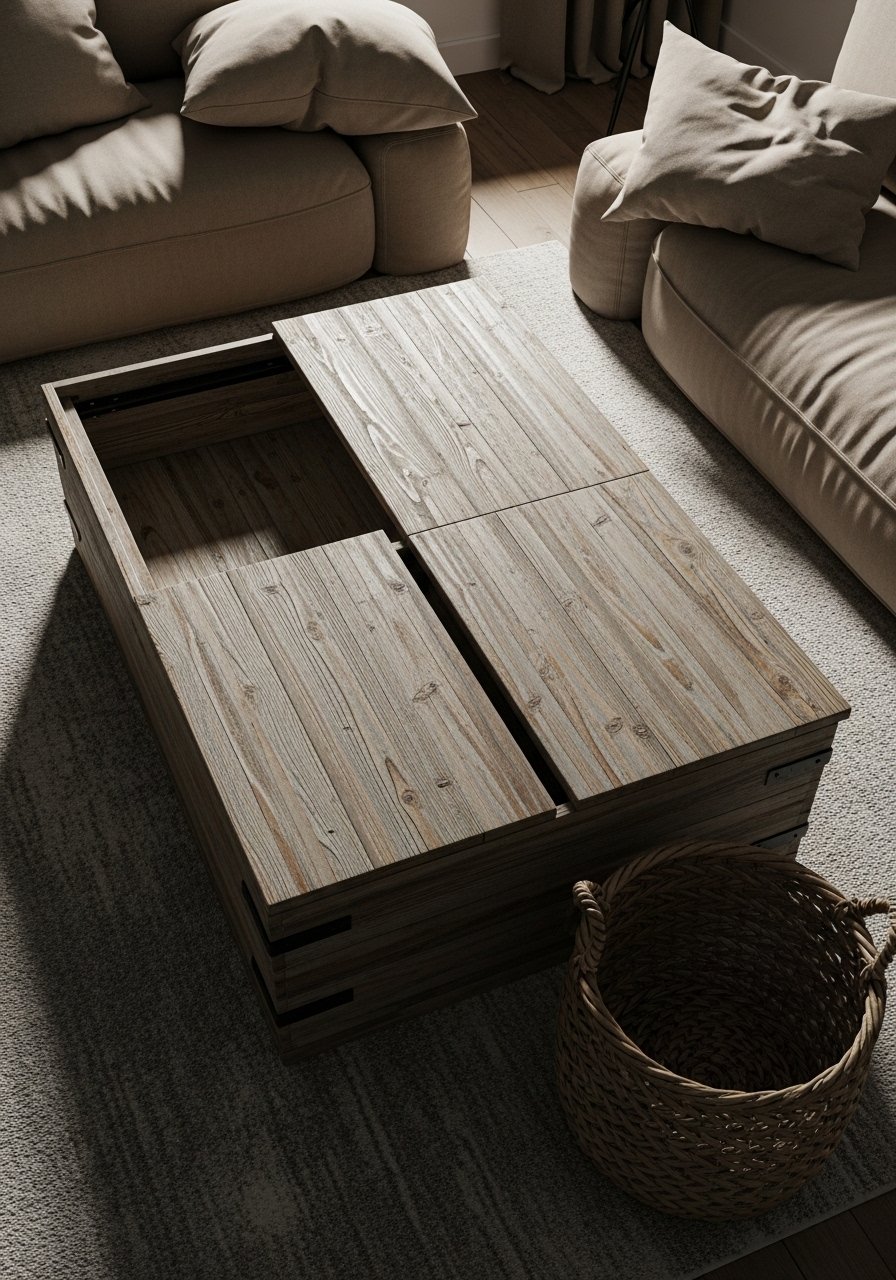
A sliding top coffee table keeps clutter out of sight and offers a playful design element. This build uses a plywood base and a grooved top that slides on wooden runners. It’s ideal for living rooms where you need easy, hidden storage.
Materials
- Plywood box base 36" x 20" x 10"
- Top planks 36" x 20" x 3/4"
- Wooden runners 36"
- Wood glue and 1-1/4" screws
- Chalk paint or stain
- Sandpaper 120, 220
- Magnetic catches (for top alignment)
Instructions
- Build plywood box base: assemble sides and bottom with glue and screws; square it with clamps.
- Attach runners inside top edges; ensure they’re parallel.
- Make top so it fits slightly over edges (~1/8" clearance) to slide smoothly.
- Paint or stain top; allow 30–45 minutes between coats; final cure 24 hours.
- Add magnetic catches underneath to hold top in place when closed.
- Test sliding action and sand runners if sticky.
How to Display or Gift It
- Keep board games or coasters inside for ready access.
- For gifting, include a small set of felt pads and assembly instructions.
- Store disassembled runners flat until assembly in a craft organizer.
- Magnetic catches help keep the lid secure—search for "magnetic catches for cabinets" if you want replacements.
- Concrete-Top Farmhouse Coffee Table
Concrete adds a modern contrast to farmhouse wood. This small concrete slab top uses a silicone mold and a wooden base. It’s heavier, so keep size modest. Use a quality concrete mix and a respirator while mixing.
Materials
- Plywood base 36" x 20" x 1"
- Concrete mix for countertops (3–5 lb)
- Silicone mold or custom form
- Rebar mesh or fiberglass reinforcement
- Concrete sealer (penetrating)
- Mixing bucket and trowel
- Safety: gloves, respirator, goggles
Instructions
- Build a mold slightly larger than desired top; line with release agent.
- Mix concrete per manufacturer directions; add reinforcement layers.
- Pour into mold, tap to release bubbles; smooth surface with trowel.
- Let cure 48–72 hours depending on mix; demold carefully.
- Sand edges with diamond pad if needed and seal with penetrating sealer; dry 24 hours.
- Attach concrete top to wooden base using construction adhesive and screws from underside through wood.
How to Display or Gift It
- Pair with warm wood and textiles to soften concrete’s cool look.
- Concrete tables are heavy—don’t ship as a gift unless crated.
- Store extra sealer for future touch-ups.
- A quality concrete mix for countertops yields the best finish: concrete countertop mix.
- Farmhouse DIY Coffee Table with Built-In Planter
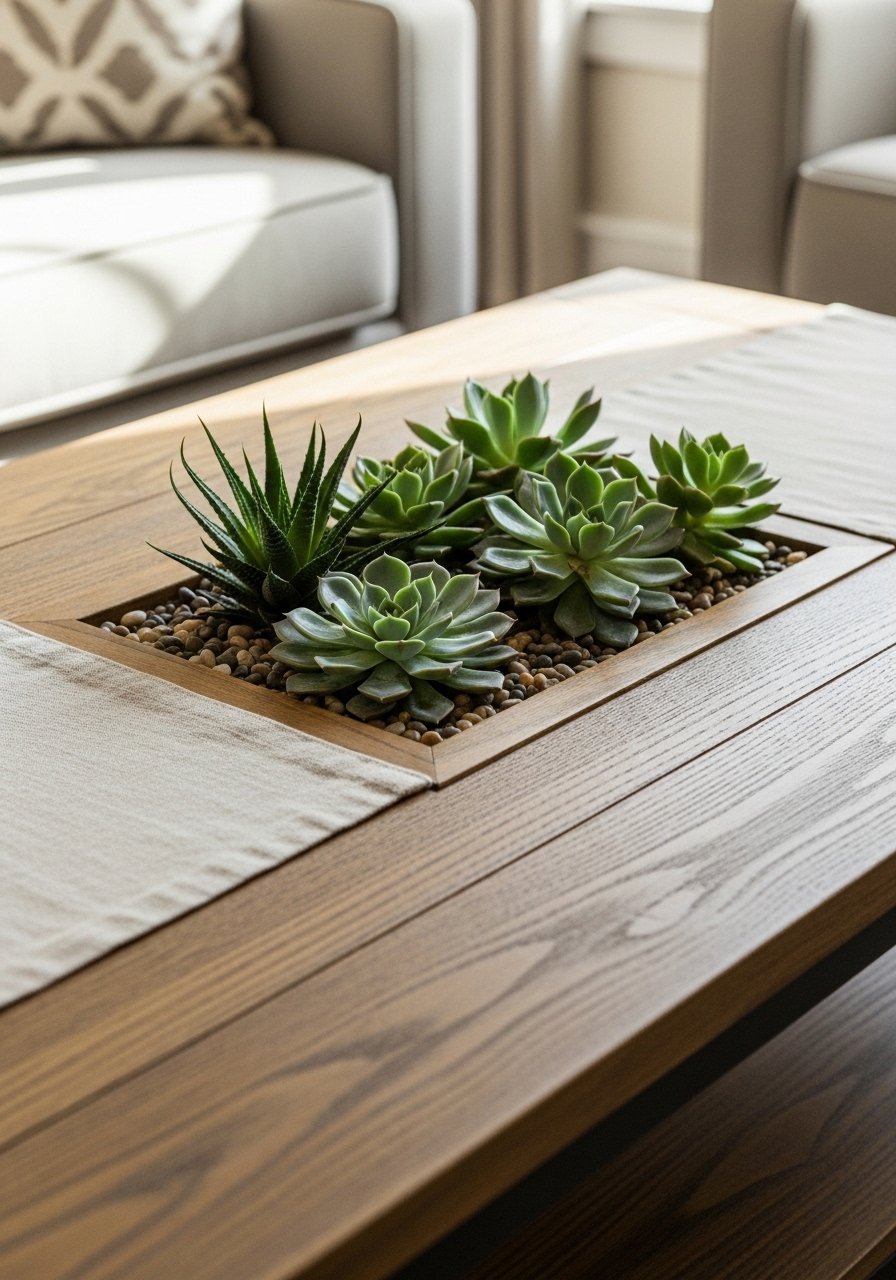
This built-in planter brings a touch of cottagecore greenery right to your coffee table. Keep the planter shallow (3–4") and use a removable liner for easy watering. Succulents and air plants work best.
Materials
- Top plank 42" x 20" x 1.5"
- Plywood box for planter 18" x 8" x 4"
- Plastic planter liner 18" x 8"
- Landscape fabric
- Potting mix for succulents, small pebbles
- Wood screws and glue
- Clear sealer for wood top
Instructions
- Cut center of plank to recess the planter box (leave 2" border).
- Build planter box from plywood and line it with plastic liner; drill a small drainage hole and cover with pebble layer to catch overflow.
- Fit planter into top; seal edges with silicone and clamp while setting 24 hours.
- Finish wood with stain and 2 coats of sealer; dry 2 hours between coats.
- Plant succulents in liner with landscape fabric; top with small pebbles to retain moisture.
- For watering, lift liner out carefully and water over a sink.
How to Display or Gift It
- Use small pebbles and a tiny driftwood accent for styling.
- If gifting, include succulent care instructions and a moisture meter.
- Store extra pebbles and liners in a craft organizer for future swaps.
- A small moisture meter can help beginners maintain succulents: moisture meter.
- Painted Stenciled Top Coffee Table (Farmhouse Chic)
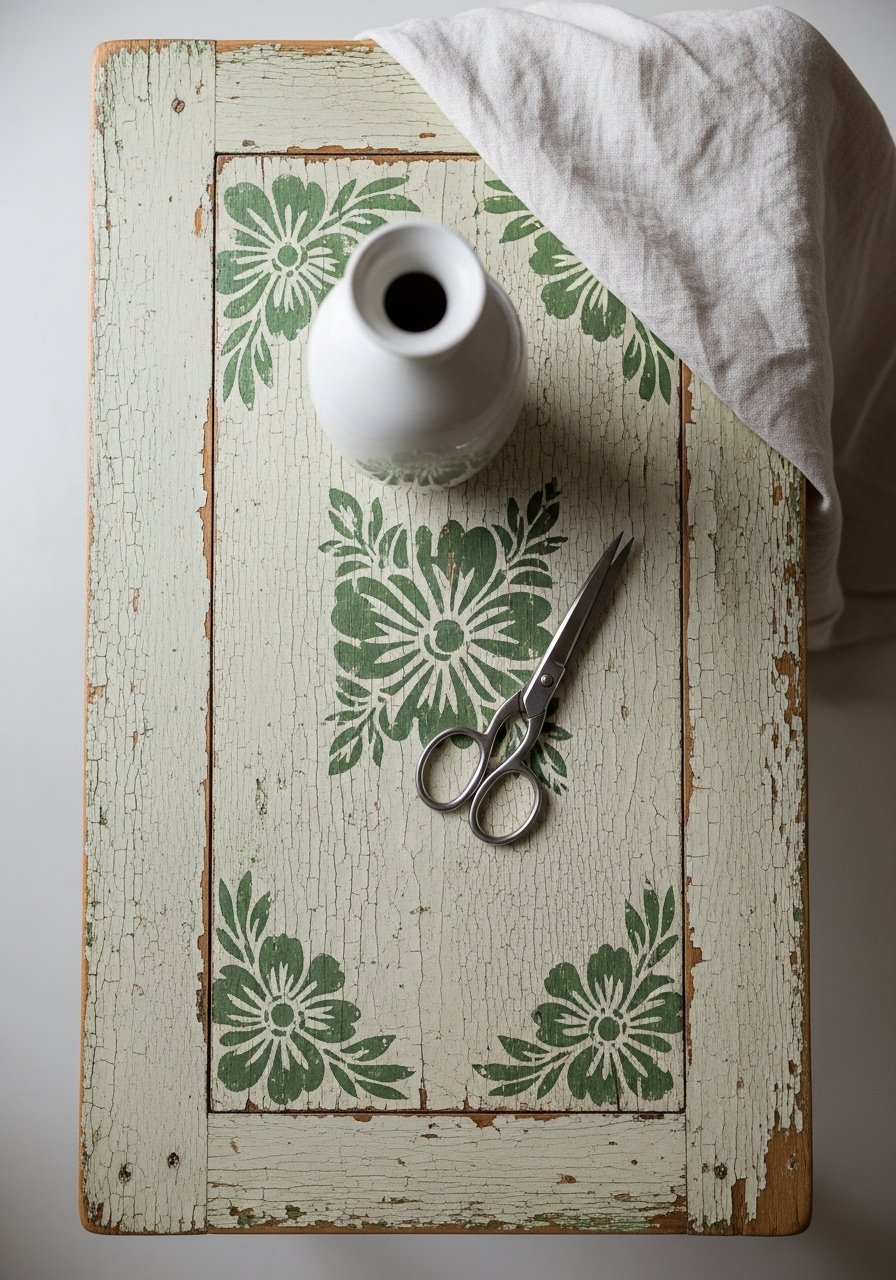
Stencil a floral or geometric pattern for a cottage-farmhouse focal point. Use repositionable stencil adhesive and a small foam roller for crisp edges without bleed.
Materials
- Table top 36" x 20"
- Repositionable stencil (floral or geometric)
- Chalk paint base (off-white), 8 oz
- Accent paint (sage green), 2 oz
- Stencil brush or foam roller
- Stencil adhesive spray
- Clear matte sealer
Instructions
- Paint base coat; let dry 30–45 minutes.
- Position stencil and tack with repositionable spray adhesive.
- Load foam roller sparingly with accent paint; roll off excess on paper towel.
- Apply paint over stencil with light dabbing motion to avoid bleeding.
- Remove stencil carefully; repeat until pattern covers top.
- Allow 2 hours dry then seal with matte sealer; final cure 24 hours.
How to Display or Gift It
- Pair with soft textiles and ceramic pitchers.
- Wrap stencil and leftover paints in a small box for gifting.
- Store stencils flat in a craft organizer.
- Stencil adhesive spray keeps the pattern crisp: stencil adhesive spray.
- Rustic Pipe-Base Coffee Table
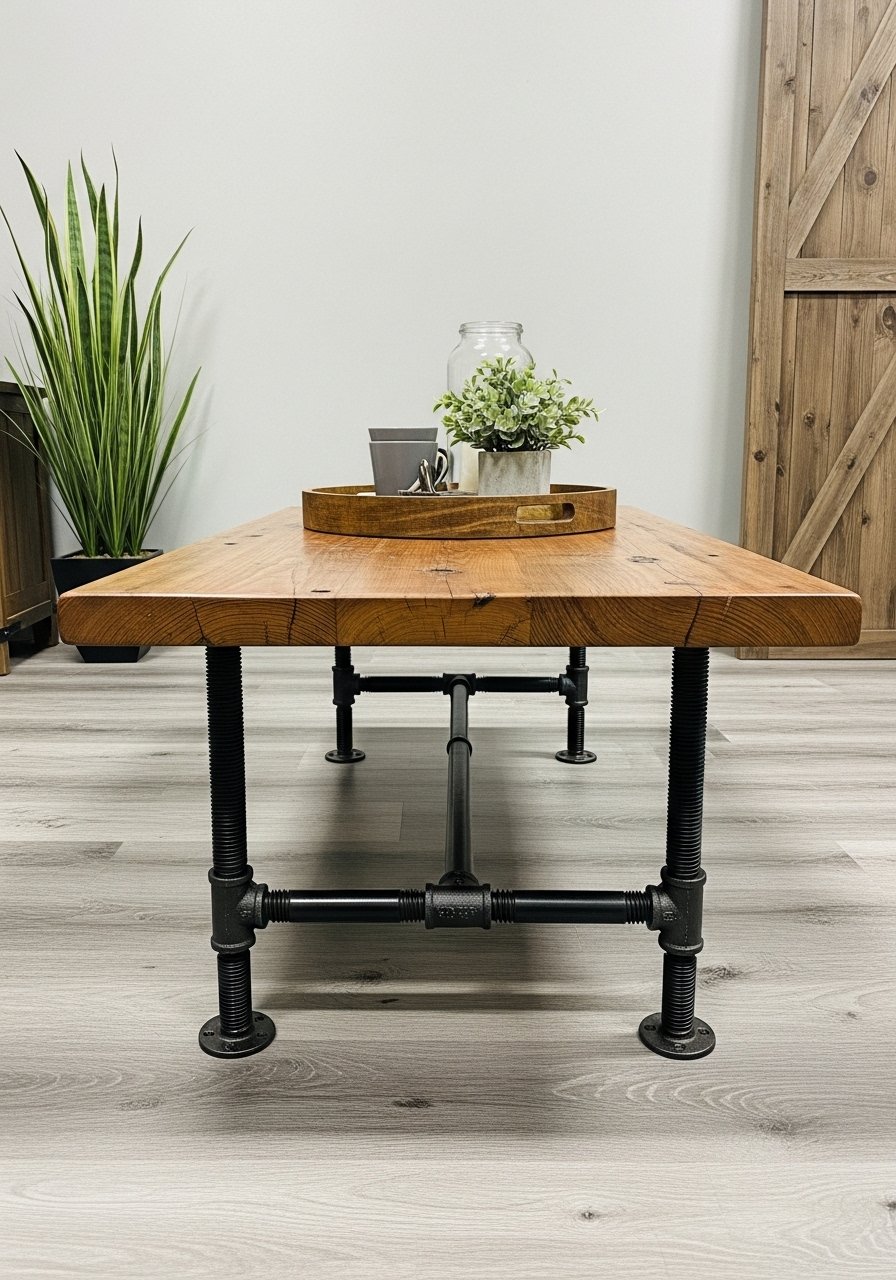
Industrial pipes add a dark, textured contrast to warm wood. The pipe hardware is strong and lends a modern-rustic edge. Threads tighten easily for a sturdy result.
Materials
- Top plank 40" x 20" x 1.25"
- Pipe legs set (flange, pipe, elbow) for 16" height
- Wood screws for flanges
- Dark walnut stain
- Polyurethane satin, 8 oz
- Sandpaper 120, 220
Instructions
- Stain tabletop and wipe excess after 2–3 minutes; dry 2–4 hours.
- Apply 2 coats polyurethane; dry 2 hours between coats.
- Attach pipe flanges to underside at corners with screws.
- Assemble pipe legs and thread into flanges.
- Check level on floor; tighten connections if wobbly.
How to Display or Gift It
- Pair with leather or neutral linen furniture for an industrial farmhouse mix.
- If gifting, include extra flange screws and a small hex wrench in a labeled bag.
- Store extra pipe fittings for future projects.
- Use a reliable pipe hardware set: industrial pipe legs set.
- Farmhouse DIY Coffee Table: Turned Leg Classic
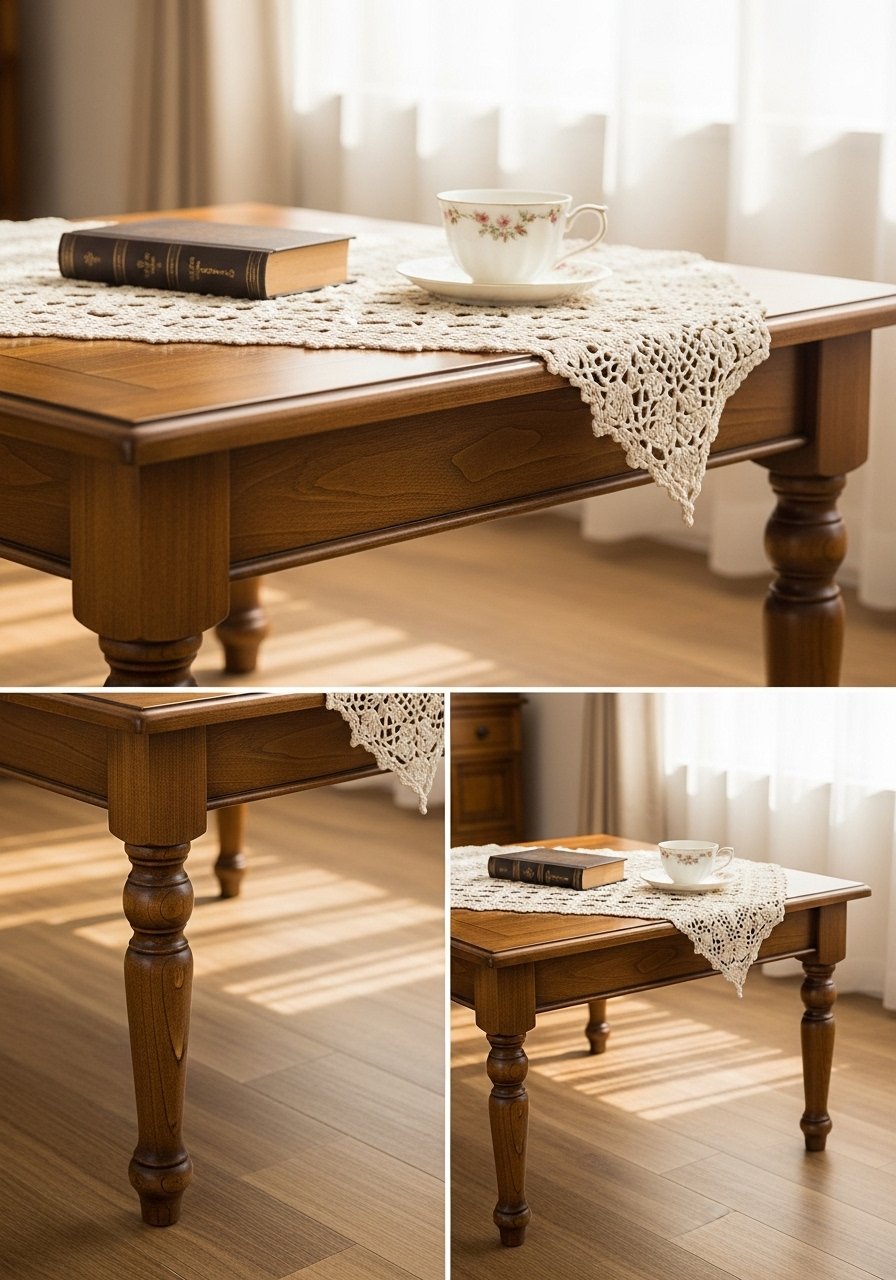
Turned legs create a timeless farmhouse silhouette that fits both traditional and modern rooms. You can buy pre-turned legs or make them if you have a lathe. This classic table is versatile and refined.
Materials
- Top plank 42" x 20" x 1"
- 4 turned legs, 16" height (pre-made)
- Apron boards 1×4 for frame
- Pocket-hole screws or wood screws
- Wood glue
- Stain and satin sealer
- Sandpaper 120, 220
Instructions
- Build apron frame from 1x4s to support table top; use pocket-hole screws for hidden joints.
- Attach legs to apron with wood glue and screws; clamp for 30 minutes.
- Stain top and apron; dry 2–4 hours.
- Seal with 2 coats satin sealer; dry 2 hours between coats, full cure 48 hours.
- Attach top to apron with screws from inside the apron so screws aren’t visible.
How to Display or Gift It
- Add a small vase with wildflowers for a cottagecore touch.
- For gifting, include felt pads and assembly instructions.
- Store extra turned legs in a dry place for repairs.
- If you need turned legs, check "pre turned table legs" for options: turned legs.
- Folding Picnic-Style Coffee Table (Outdoor Farmhouse Vibes)
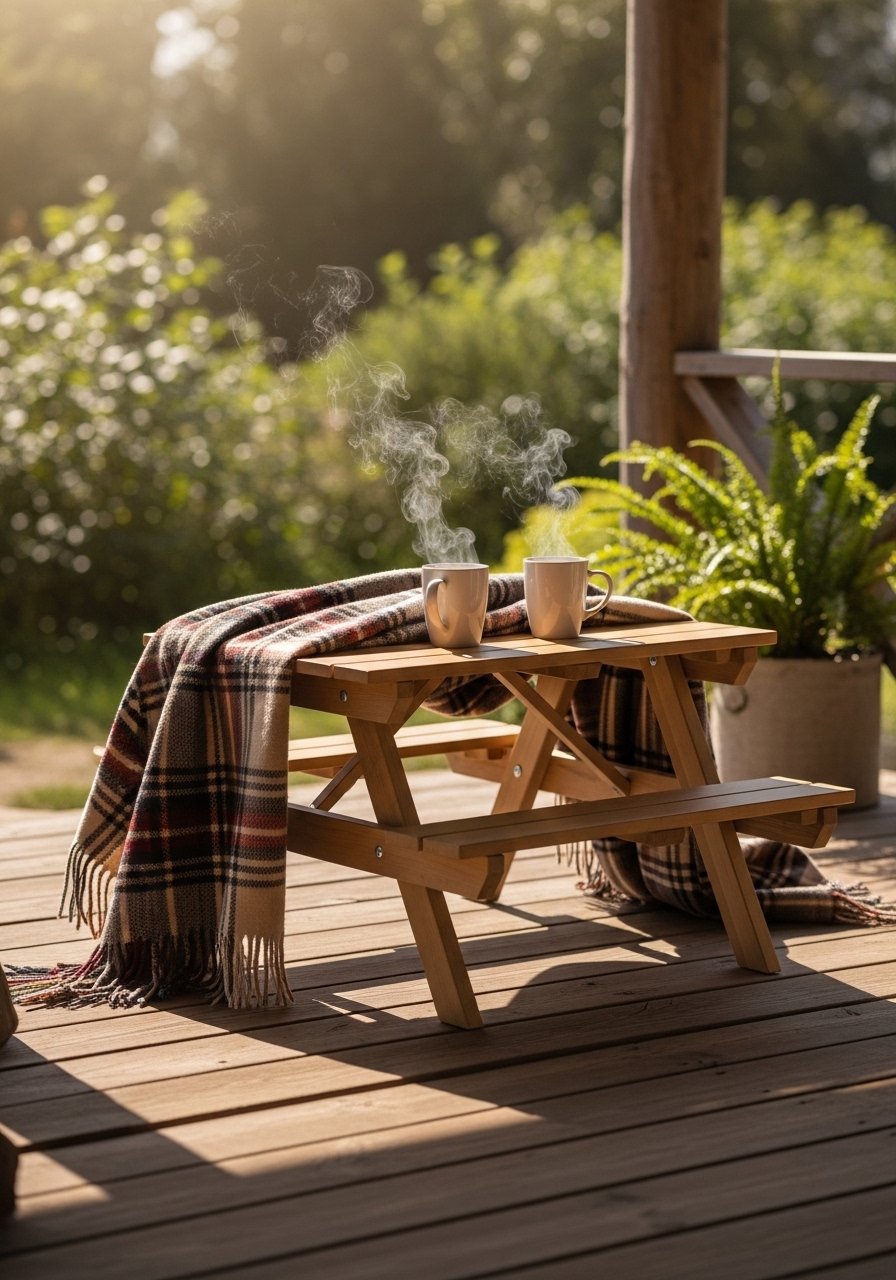
This folding picnic table brings farmhouse charm to porches and patios. It’s easy to fold away for storage and durable when sealed properly. Use outdoor-grade polyurethane or exterior paint.
Materials
- Slatted top planks 36" x 20"
- Hinges for folding mechanism (2)
- 2×2 supports for legs (cut to folding length)
- Exterior paint or spar urethane
- Stainless steel screws
- Sandpaper 120
Instructions
- Assemble slatted top and attach cross supports underneath.
- Build folding legs and attach to top with hinges.
- Paint or seal with exterior-grade finish; dry 2–4 hours between coats. Full cure 72 hours for outdoor durability.
- Test folding action and tighten hinges as needed.
How to Display or Gift It
- Use on porches or take to picnics—easy to store folded.
- Wrap in breathable fabric for gifting to avoid trapped moisture.
- Keep spare hinge screws in a small hardware tin.
- Exterior spar urethane protects wood from weather: spar urethane.
- Rustic Ladder Shelf Coffee Table (Two-Tier)
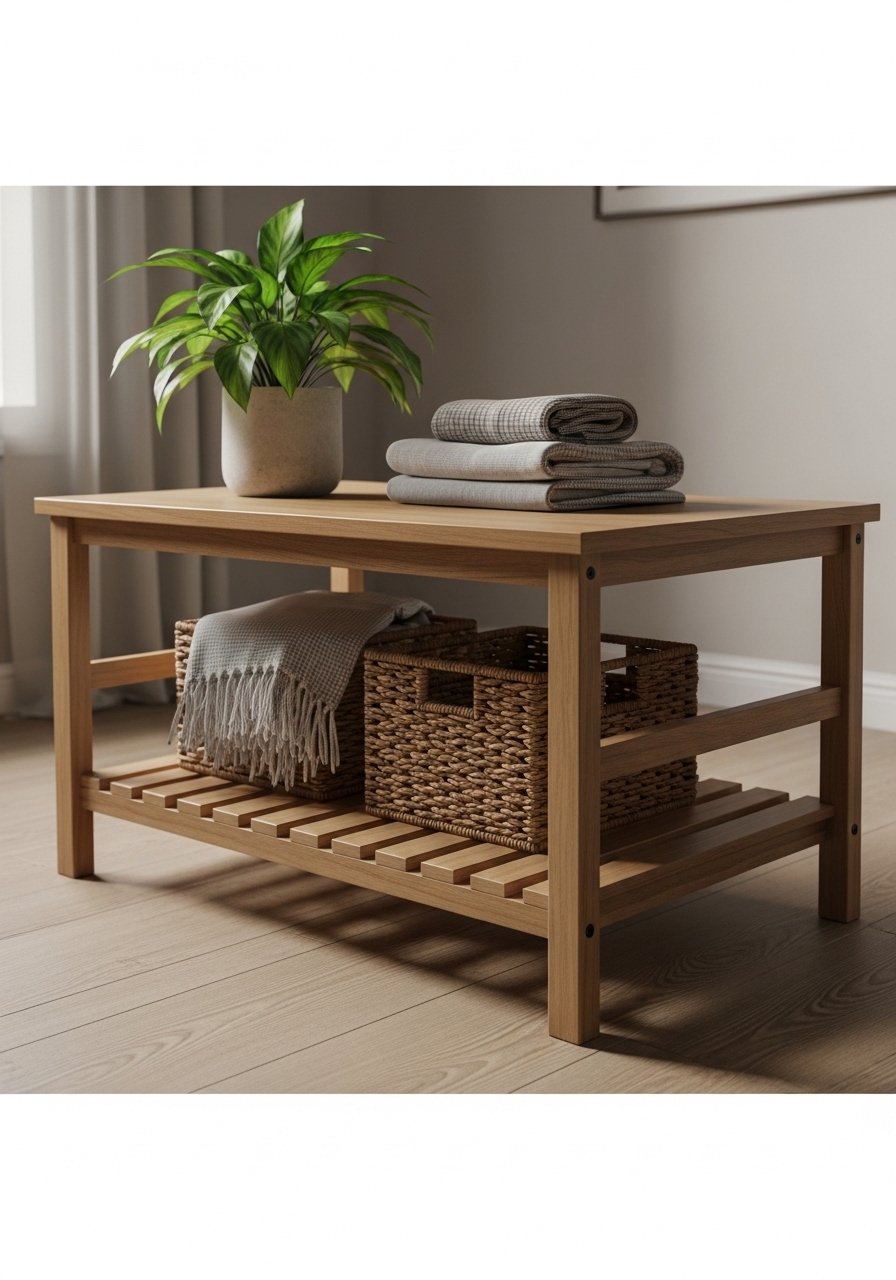
A ladder shelf coffee table adds open storage and farmhouse texture. The lower shelf is great for baskets and blankets. This build is sturdy and straightforward.
Materials
- Top plank 40" x 20"
- Lower shelf slats (3) 36" x 4"
- Side stringers (2) 40" x 6"
- Wood screws 1-1/4"
- Wood glue
- Chalk paint or stain
- Sandpaper 120, 220
Instructions
- Assemble side frames with stringers and lower shelf supports.
- Attach lower slats spaced 1" apart.
- Attach top plank to side frames.
- Paint or stain; allow 30–45 minutes between coats. Full cure 24 hours.
- Add baskets to lower shelf for neat storage.
How to Display or Gift It
- Use woven baskets to hide remote controls and small blankets.
- For gifting, include care instructions and a small basket set.
- Store spare slats and screws for later repairs.
- A simple craft organizer keeps your small screws and hardware tidy: craft organizer tray.
- Mosaic Tile Top Farmhouse Coffee Table
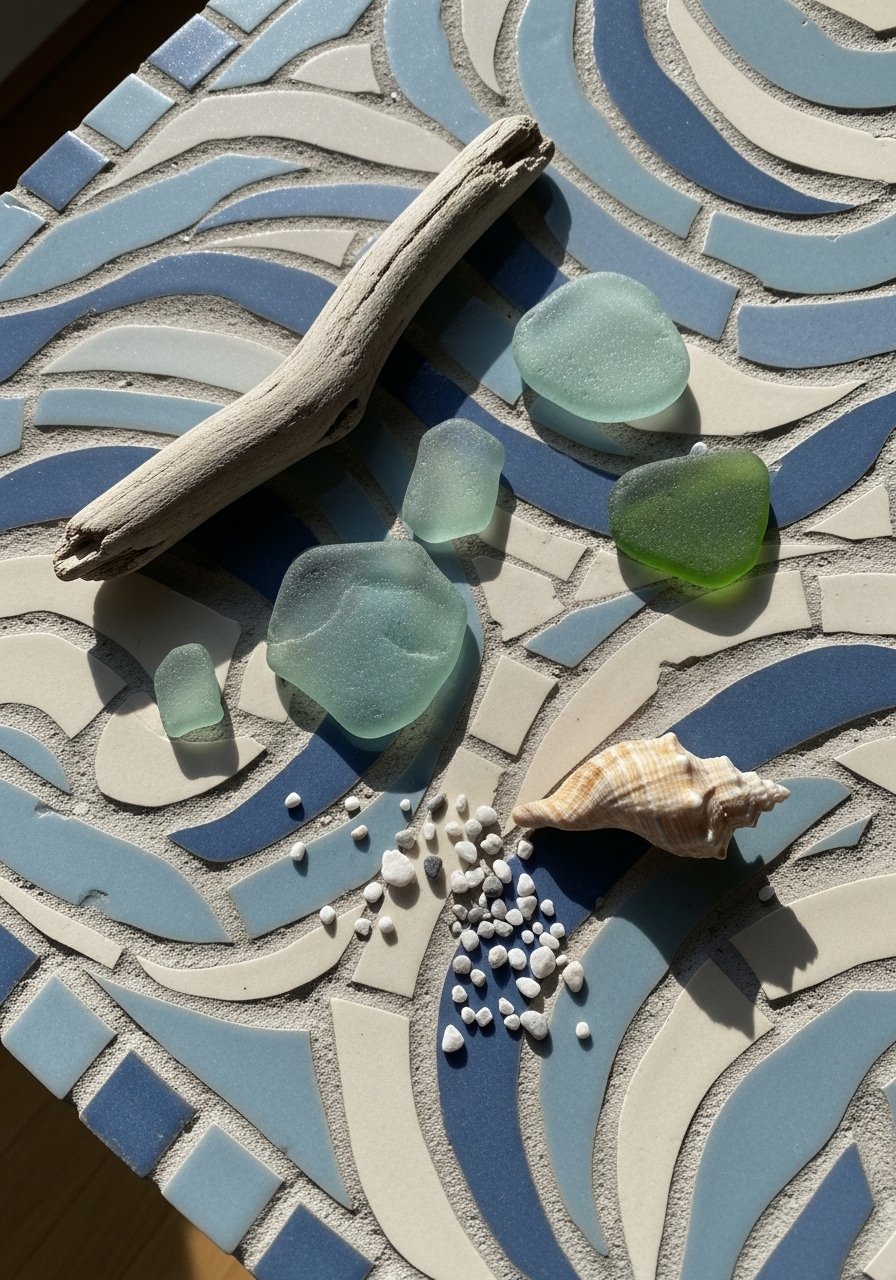
Mosaic tile tops give an artisanal farmhouse look with a hint of Mediterranean charm. Small tiles create intricate patterns, and grout seals the work for easy cleaning.
Materials
- Plywood top base 36" x 20"
- Ceramic mosaic tiles (approx 1 sq ft per 4 sq ft — adjust)
- Thin-set mortar (1–2 lb)
- Sanded grout, 1 lb
- Tile spacers
- Tile nippers, float, and sponge
- Clear sealer for grout
Instructions
- Cut plywood to size and seal with a primer coat.
- Lay tiles dry to plan pattern; use spacers for even gaps.
- Apply thin-set mortar in 1 sq ft sections and press tiles in, tapping gently.
- Let mortar set 24 hours.
- Grout with sanded grout; clean excess with sponge; cure 24 hours.
- Seal grout with clear sealer; dry 2 hours.
How to Display or Gift It
- Pair with woven coasters and a neutral rug to let the tile shine.
- If gifting, include grout sealer and care instructions.
- Store extra tiles flat in a box to prevent chips.
- A basic tile nipper set helps cut shapes: tile nipper tool.
- Mirrored Tile Accent Coffee Table
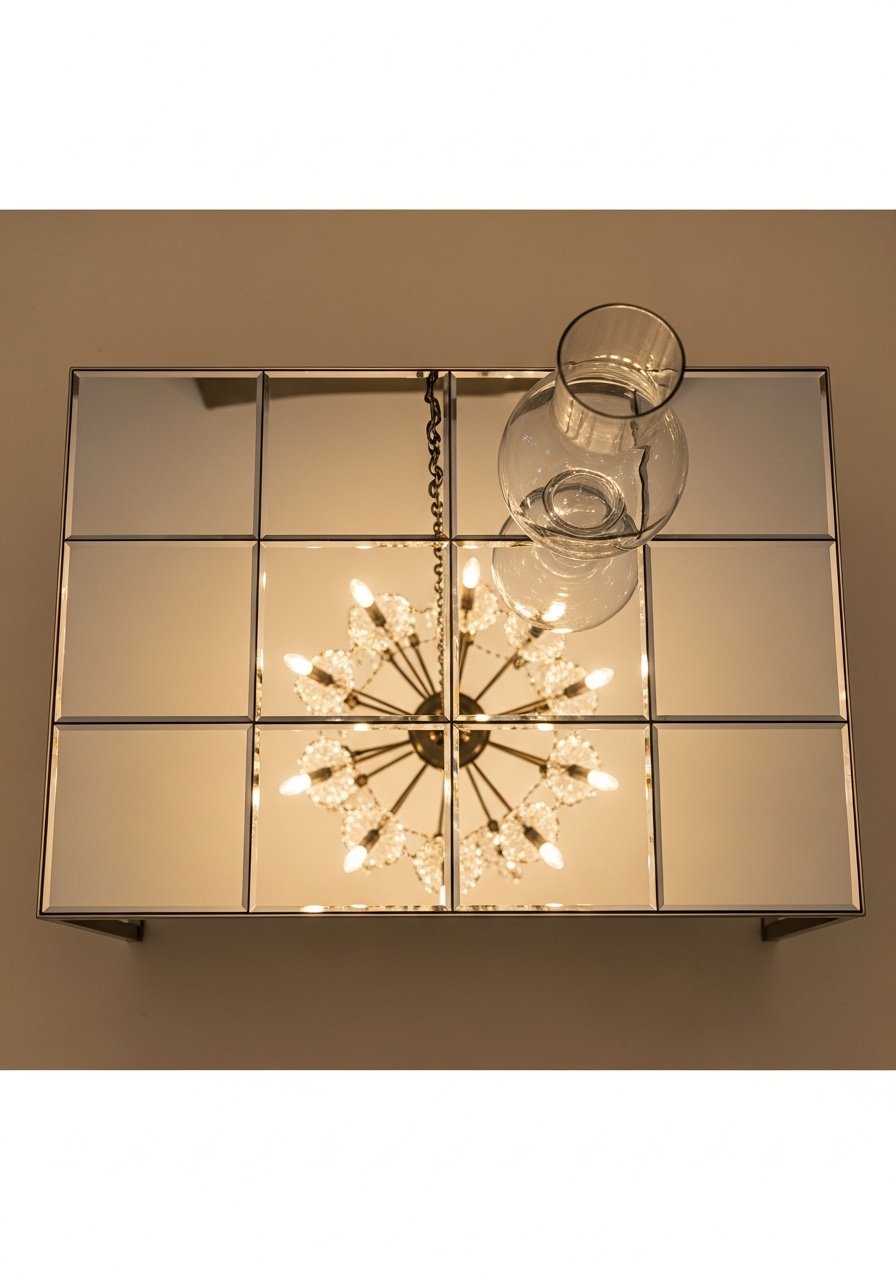
Mirrored tiles make a small table sparkle and reflect light for a brighter room. Use safety-backed tiles and a silicone adhesive. This is a glamorous farmhouse twist.
Materials
- Plywood top 36" x 20"
- Small mirror tiles (1" or 2" squares)
- Mirror adhesive (silicone-based)
- Grout (non-sanded)
- Felt pads for feet
Instructions
- Plan mirror layout and adhere tiles with mirror adhesive; let set 24 hours.
- Grout between mirrors with non-sanded grout; clean with sponge.
- Seal edges with clear silicone for added safety.
- Attach base or legs and felt pads.
How to Display or Gift It
- Keep polishing cloth handy for fingerprints.
- For gifting, package with corner protectors and a cleaning cloth.
- Store spare mirror tiles in a padded box.
- Mirror-safe adhesive prevents clouding: mirror adhesive silicone.
- Tufted Pouf Coffee Table (Soft Farmhouse)
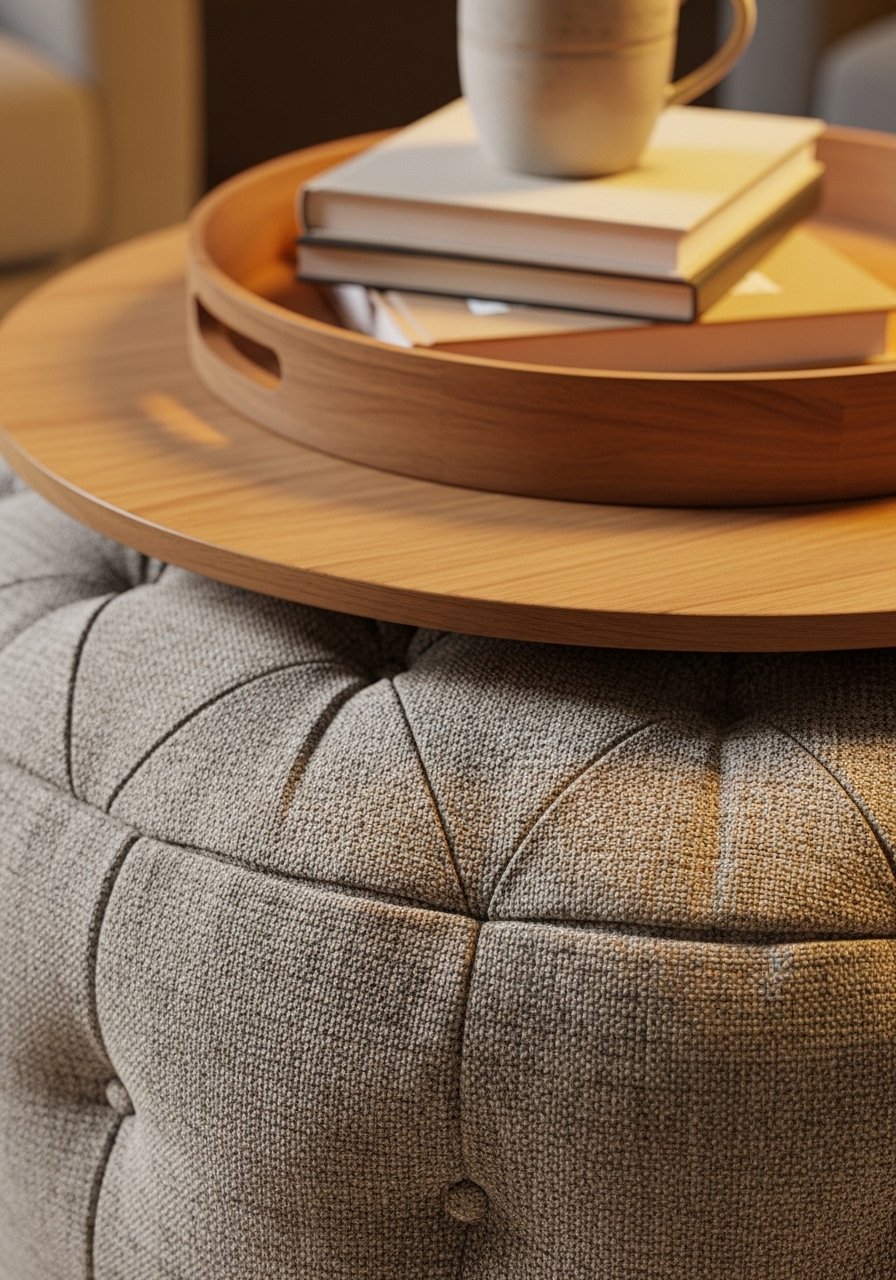
A tufted pouf with a sturdy removable tray gives a soft, casual farmhouse coffee table. It’s great for homes with kids and pets—soft edges reduce bumps. The tray can be plain wood or stained to match other furniture.
Materials
- Large round pouf (upholstered), 20–24" diameter
- Removable wooden tray 18" diameter
- Non-slip mat for tray
- Upholstery needle and thread (if tufting)
- Decorative buttons (optional)
Instructions
- Place non-slip mat on pouf top and set tray.
- If tufting, reinforce pouf top with additional batting and secure buttons with upholstery thread.
- If making tray, sand and stain; apply 2 coats of sealer; dry 2 hours between coats.
- Place tray on pouf for stability and easy serving.
How to Display or Gift It
- Swap trays seasonally—rattan for summer, wood for fall.
- For gifting, pair the pouf with a small tray and a care card.
- Store spare buttons and thread in a small sewing kit.
- A non-slip mat helps keep the tray in place: non slip mat.
- Small-Scale Resin River Farmhouse Coffee Table
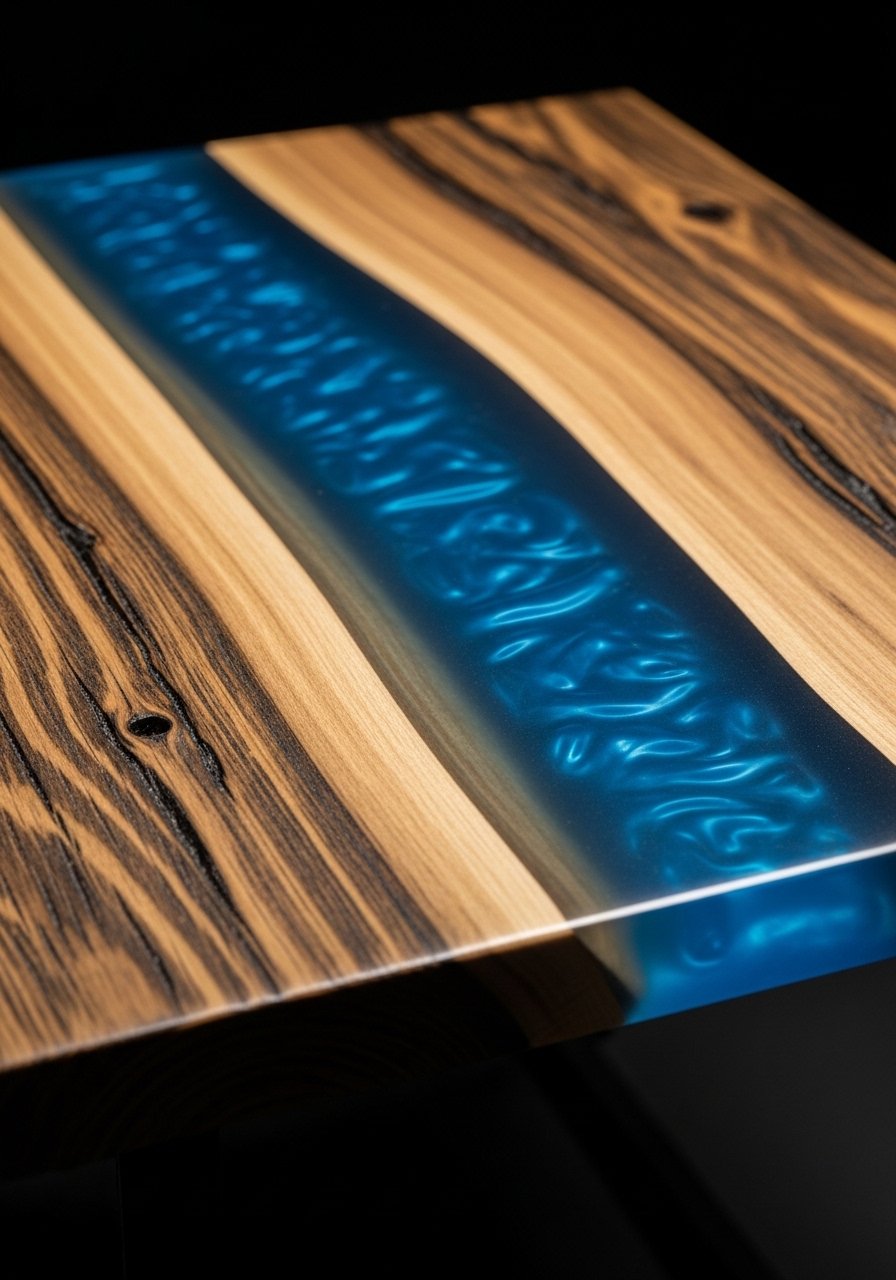
A resin river adds color and modern contrast to farmhouse wood. Keep the river narrow for a tabletop resin pour under 1/4" deep to reduce weight. Use a slow-curing epoxy for clarity.
Materials
- Wood slab top 36" x 16"
- Epoxy resin kit (clear, 16 oz minimum)
- Pigment dye (blue)
- Painter's tape and silicone caulk (to seal seams)
- Orbital sander and sandpaper 120–320
- Mixing cups and stir sticks
Instructions
- Create river channel in wood (router or saw); seal channel edges with tape and silicone.
- Mix epoxy per kit; add pigment and pour in thin layers (1/8" per pour).
- Let each layer cure 12–24 hours depending on resin; sand lightly between pours with 320 grit.
- Final pour filled and leveled, let cure 72 hours for hard set.
- Sand surface flush and polish with rubbing compound if needed.
- Attach base once resin fully cures.
How to Display or Gift It
- Keep small coasters on the table to protect resin from heat.
- For gifting, include care instructions and a small polish cloth.
- Store extra resin and pigment in a cool dark place.
- I use an epoxy resin kit for clean pours: epoxy resin kit.
- Reclaimed Barn Beam Top Coffee Table
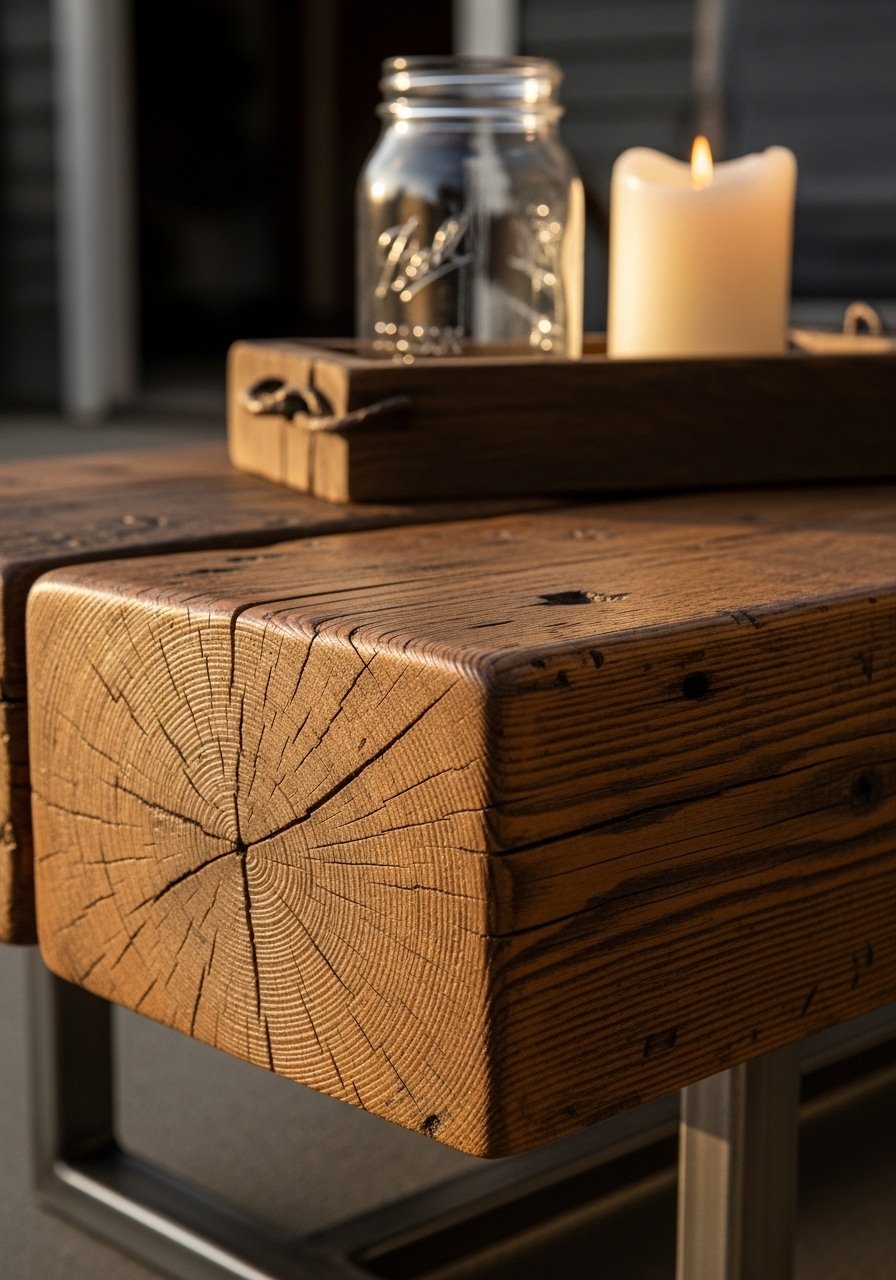
A solid barn beam top brings history and heft to your living room. Keep the table low and pair with minimalist legs to highlight the beam’s texture. Stabilize with epoxy or wood hardener if the beam is very old.
Materials
- Reclaimed barn beam slab 36" x 16" x 3"
- Metal base or hairpin legs
- Wood hardener (if needed)
- Tung oil or oil-based polyurethane
- Sandpaper 80–220
- Wood filler for cracks (if desired)
Instructions
- Clean beam and remove loose debris; apply wood hardener to flaky spots and let cure 24 hours.
- Sand surface carefully to remove sharp splinters with 80 then 120 grit.
- Apply tung oil 2–3 coats, allowing 24 hours between coats, for deep, hand-rubbed finish.
- Attach metal base with lag bolts into reinforced spots.
- Wait 48 hours before heavy use.
How to Display or Gift It
- Keep styling minimal to showcase grain and patina.
- If gifting, include a small bottle of tung oil for upkeep.
- Store spare bolts and leg hardware in a small craft organizer.
- Wood hardener helps stabilize older beams: wood hardener.
- Tray-Top Removable Coffee Table
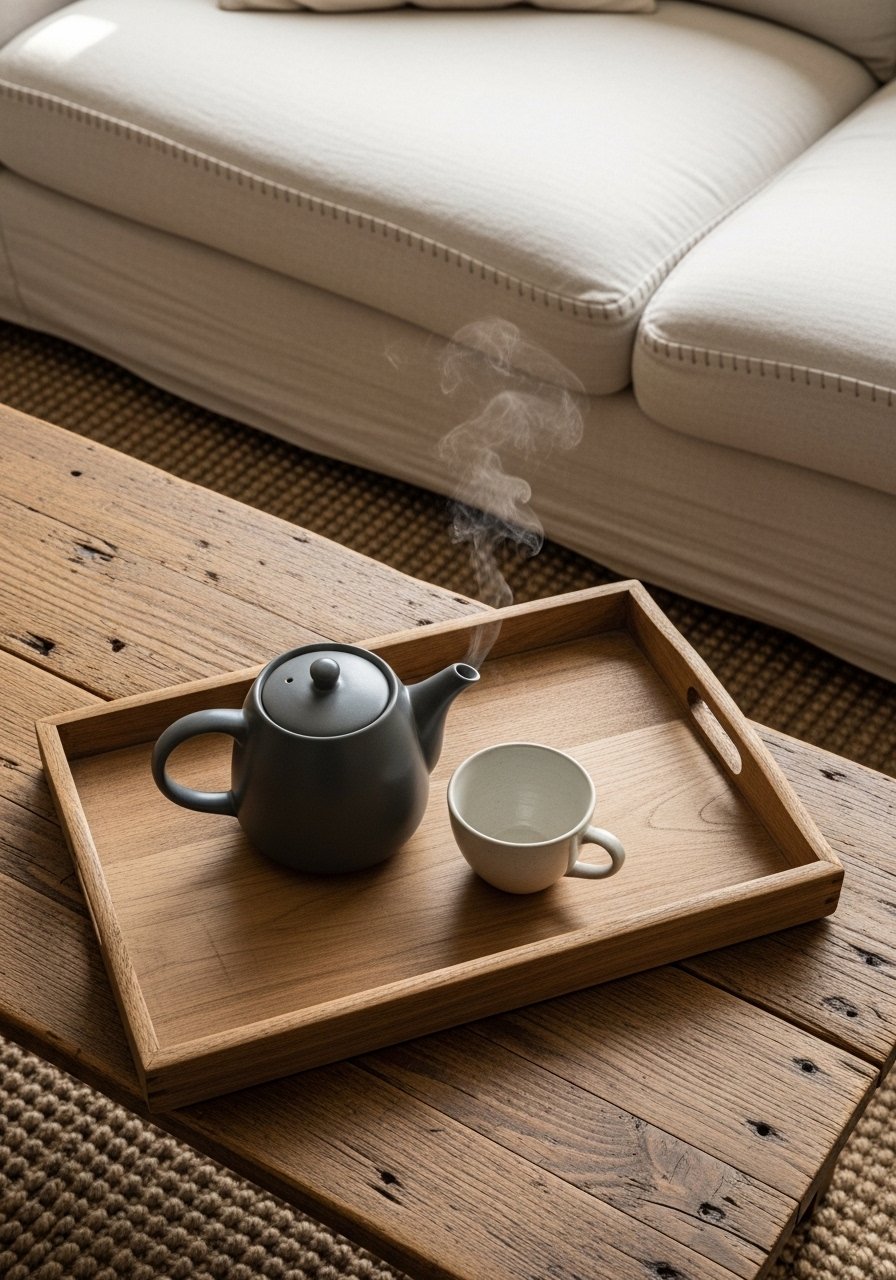
The removable tray creates a flexible surface you can take to the couch or use as a breakfast tray. It’s quick to build and swaps easily across rooms.
Materials
- Low table base 36" x 20"
- Removable tray 36" x 20" with handles
- Non-slip pads
- Stain and satin sealer
- Foam brush
Instructions
- Make tray with raised edges and cut handles.
- Sand and stain tray; apply 2 coats sealer with foam brush; dry 2 hours between coats.
- Place non-slip pads between tray and base so the tray stays put.
- For gifting, include a care label for the finish.
How to Display or Gift It
- Use as serving tray or as a tabletop surface for decorative items.
- For gifting, nest a set of coasters inside the tray and wrap in kraft paper.
- Store trays flat stacked to prevent warping.
- A foam brush makes sealing even: foam brush pack.
- Mid-Century Meets Farmhouse Tapered-Leg Table

Tapered legs lend a lighter silhouette to farmhouse tops, perfect in a Japandi-meets-farmhouse room. This build is simple but stylish.
Materials
- Table top 40" x 20"
- 4 tapered legs, 16" height (pre-made)
- Apron 1×3 for support
- Stain and satin sealer
- Pocket-hole screws
- Sandpaper 120, 220
Instructions
- Build apron frame and attach tapered legs with pocket holes or angle brackets.
- Stain and seal top; allow 2 hours between sealer coats. Full cure 48 hours.
- Attach top to apron with screws from underside.
- Check level and add felt pads.
How to Display or Gift It
- Pair with a neutral rug and ceramic accents for Japandi-farmhouse balance.
- For gifting, include assembly hardware in a labeled bag.
- Keep extra felt pads and screws in a small parts box.
- Need tapered legs? Search "tapered table legs wooden": tapered legs.
- Reclaimed Fence-Board Mosaic Coffee Table
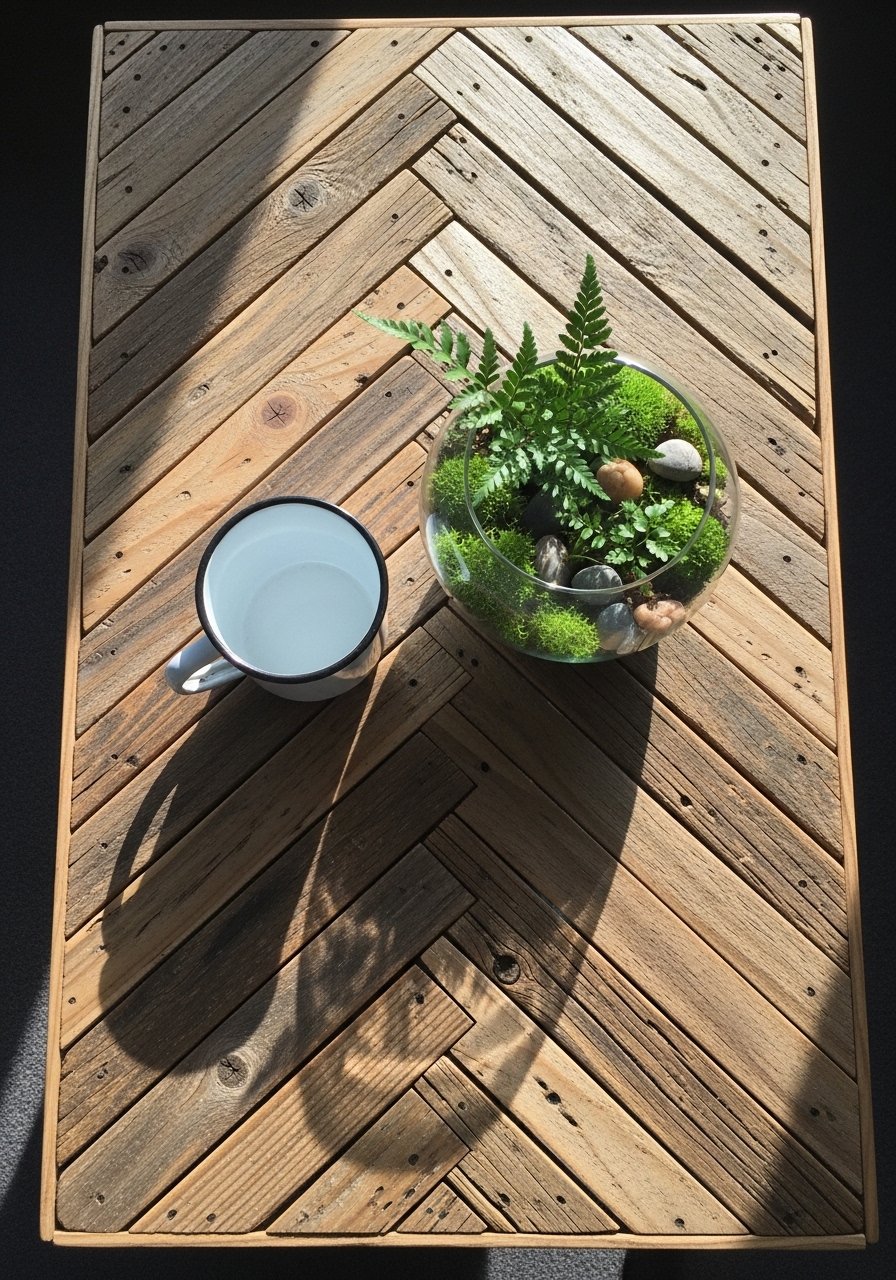
A fence-board mosaic turns weathered boards into a patterned tabletop with farmhouse patina. Vary board widths and finishes for an eclectic, cozy surface.
Materials
- Reclaimed fence boards cut into strips (total area 36" x 20")
- Plywood base 36" x 20" x 1/2"
- Wood glue and brad nails
- Sandpaper 120
- Clear matte sealer 8 oz
- Orbital sander (optional)
Instructions
- Sort boards by color and cut into strips; lay out pattern (chevron or random) on plywood base.
- Glue and nail strips to plywood, working in sections.
- Sand surface smooth with 120 grit or orbital sander.
- Seal with 2 coats matte sealer; dry 2 hours between coats. Full cure 24 hours.
- Attach legs and add felt pads.
How to Display or Gift It
- Style with simple ceramic pieces to highlight tabletop texture.
- For gifting, include care instructions and a small bottle of sealer for touch-ups.
- Store extra reclaimed strips flat and dry.
- An orbital sander speeds smoothing for a uniform finish: orbital sander.
You now have 22 approachable farmhouse DIY coffee table ideas to fit every skill level and aesthetic—from cottagecore planters and pallet builds to resin rivers and concrete tops. Try one that matches your time and tools, or mix ideas (hairpin legs + pallet top = quick weekend win). Save or pin this list so you can come back when the mood for a weekend build hits.
Which project are you most likely to try first? Tell me your space and I’ll help pick the perfect plan. Trust me, picking up a quality temperature-controlled hot glue gun changed how many of these projects went together—less stringy glue, cleaner joins, and fewer burns.


