
You squeeze every inch of counter and cupboard space in your tiny kitchen, and the pantry is where chaos either becomes calm or stays messy. These 21 small pantry ideas for small kitchens are made for exactly that tight-but-mighty space. You’ll find projects that add vertical storage, upgrade shelf utility, and create tidy zones for snacks, cans, and baking supplies—without knocking down a wall.
Each idea includes a realistic materials list, step-by-step instructions, and tips for display, gifting, or storage. Grab a hot glue gun and a roll of painter’s tape and you’ll be halfway there. If you like cutting vinyl labels fast, I run mine through my Cricut Joy cutting machine for uniform results. Ready to reclaim that pantry? Let’s make every single inch count with small pantry ideas for small kitchens that actually fit your life.
- Slim Over-the-Door Tiered Rack
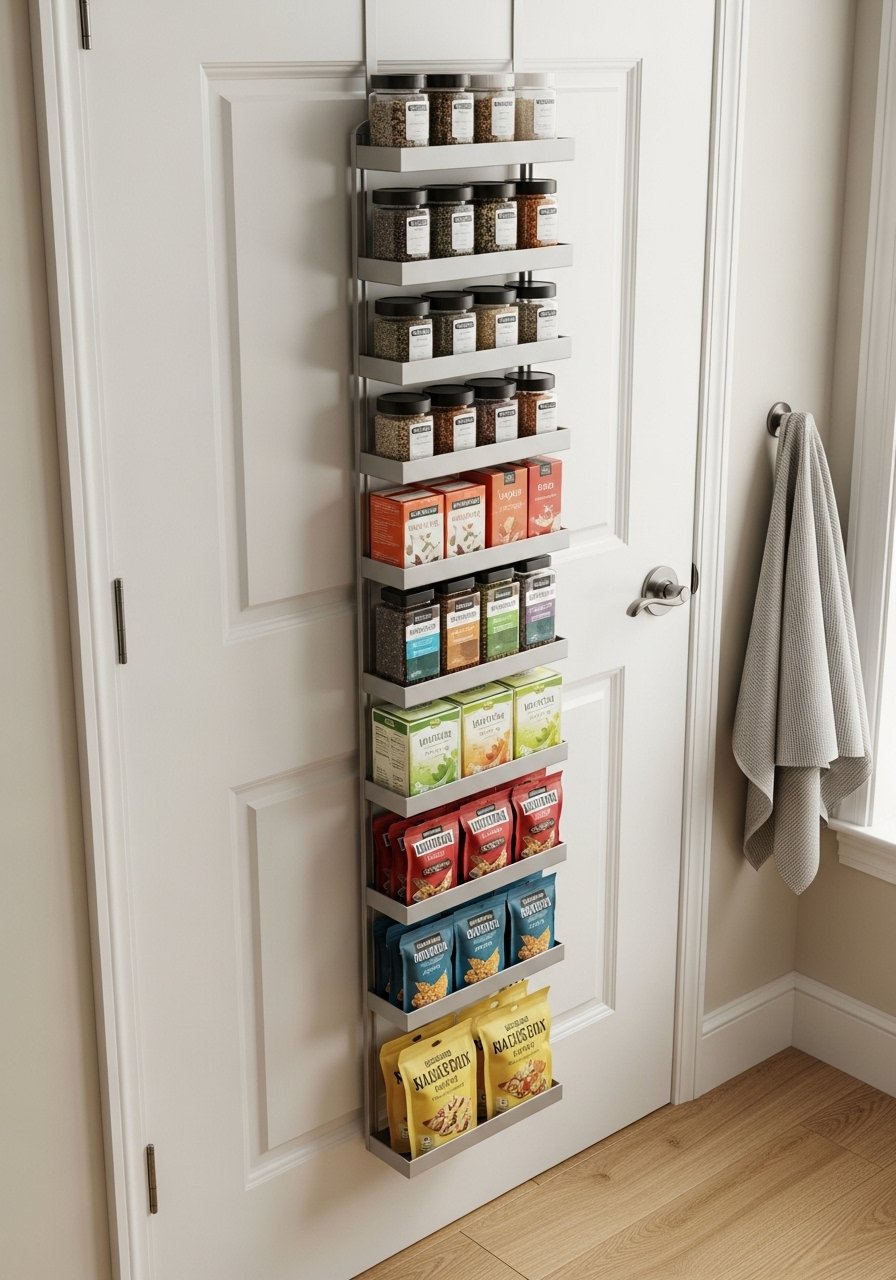
This slim over-the-door tiered rack gives instant vertical storage without drilling. It’s low-profile, lightweight, and perfect for dry goods and tea tins. Beginners will like the simple assembly and the neat, layered look it adds. The baskets feel smooth and slightly textured to the touch and make grabbing snacks easy.
Materials
- 1 over-the-door metal rack, 12–15" wide (fits standard doors)
- 4 small wire baskets (6–8" deep)
- 12 self-adhesive felt pads
- 8 zip ties (4" black)
- 1 small roll of painter’s tape
- 1 can of white spray paint (optional, satin finish)
- 1 set of small screw-in hooks (for added hanging)
- Instruction manual that comes with rack
Instructions
- Measure your pantry door width; choose a rack labeled 12–15" wide for snug fit.
- If painting, spray outdoors. Apply 2 light coats, 10 minutes between coats. Dry 30 minutes to touch; full cure 24 hours.
- Attach wire baskets to rack hooks per manufacturer directions.
- Use zip ties to secure baskets to rack for extra stability, trimming tails flush.
- Apply felt pads where rack meets door to prevent scuffing.
- Hang rack over the door; test with light items first, then load fully.
- Adjust basket placement for tallest items.
- If adding hooks, screw them into the rack frame for utensils or oven mitts.
How to Display or Gift It
- Style baskets with matching glass spice jars for a uniform look.
- Add labeled kraft tags tied with jute for gifting the rack assembled.
- Store disassembled racks flat in a narrow closet when not in use.
- For extra protection, use a painter’s tape roll before painting edges.
- Magnetic Spice Strip — Small Pantry Ideas for Small Kitchens

A magnetic spice strip turns an empty narrow wall into an instant spice command center. It keeps small jars visible and accessible, freeing shelf space. This is tactile—smooth metal, cool jars—and great for anyone who cooks frequently and needs spices within arm’s reach.
Materials
- 1 magnetic strip, 18–24" long
- 12–16 magnetic spice tins with clear lids
- Small vinyl labels or a roll of printable label paper
- 1 level
- 1 set of 3M Command strips (for damage-free mounting)
- 1 small label maker (optional)
- 1 microfiber cloth
Instructions
- Clean wall surface with rubbing alcohol; wipe dry.
- Lay out spice tins on a countertop to determine spacing.
- Use a level and mark mounting spots lightly with pencil.
- Attach Command strips to back of magnetic strip per package instructions.
- Press magnetic strip firmly to wall for 30 seconds; wait 1 hour before loading.
- Fill tins and add labels—printable label paper works well; let adhesive set 5 minutes.
- Arrange tins on the strip by frequency of use.
- Test magnet strength by tugging tins gently; add extra Command strips for heavier loads.
How to Display or Gift It
- Arrange tins by color or flavor gradient for a pretty pantry accent.
- Wrap a magnetic strip and sample tins as a housewarming gift in kraft paper.
- Store spare tins nested in a craft organizer drawer.
- For label consistency, try a portable label maker.
- Pull-Out Baskets with Dividers
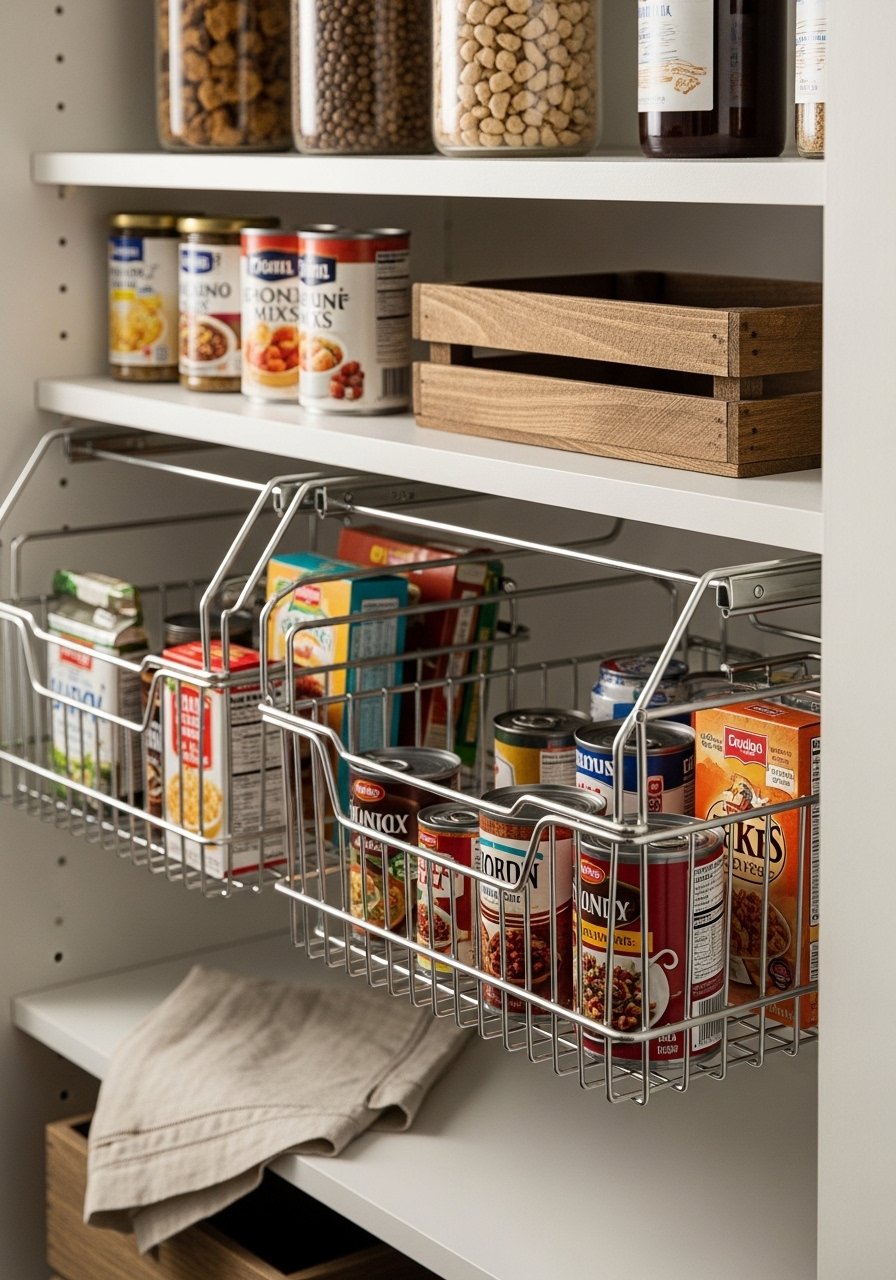
Pull-out baskets make the back of shallow shelves reachable. Adding dividers keeps cans upright and prevents tipping. The motion is smooth and satisfying—just pull and everything is front-and-center. Ideal for those with deep but narrow shelves.
Materials
- 2 shallow sliding basket drawers, 12" x 18"
- 4 bamboo dividers (adjustable)
- 8 small mounting screws (included)
- 1 cordless drill with Phillips bit
- 1 tape measure
- 8-10 zip ties (for securing baskets)
- 1 strip of non-slip shelf liner
Instructions
- Measure shelf depth and width; choose baskets that leave 1" clearance on sides.
- Install sliding rails on shelf following manufacturer instructions.
- Slide baskets in to test fit, then remove for divider installation.
- Place non-slip liner at basket base to stop jars from shifting.
- Insert bamboo dividers to create can-sized bays.
- Reinsert baskets; fasten rails with screws.
- Load cans vertically and label the front row for quick inventory checks.
- If basket shifts, add zip ties around rail and basket frame for added stability.
How to Display or Gift It
- Label each bay with small chalkboard tags.
- Stack multiple baskets on adjacent shelves to create zones—baking, breakfast, snacks.
- Keep spare dividers in a craft storage bin.
- For smooth sliding, use a cordless drill when installing rails.
- Tiered Lazy Susan for Canned Goods

A tiered Lazy Susan turns a corner into an organized rotating shelf. Two tiers increase capacity without crowding. The top turns smoothly; cans feel solid and easy to grab. Great for spices, condiments, or baking extracts.
Materials
- 1 two-tier wooden Lazy Susan kit, 12" diameter top, 9" bottom
- 1 can of clear water-based polyurethane (satin)
- 1 foam brush
- 12 non-slip shelf dots
- 1 roll of washi tape (for labeling)
- 1 small sanding sponge (220 grit)
- 1 damp cloth
Instructions
- Lightly sand the wooden surfaces with a 220-grit sponge; wipe clean.
- Apply 1 thin coat of polyurethane with foam brush; dry 2 hours. Apply second coat; dry 24 hours.
- Attach the rotating mechanism per kit instructions.
- Place non-slip dots where cans will sit.
- Arrange cans by type on tiers; balance heavier cans toward base.
- Use washi tape to write short-use dates and wrap around can tops.
- Rotate to access items; check stability monthly.
How to Display or Gift It
- Display on pantry shelf or as a countertop condiment caddy.
- Pair with small glass jars labeled via printable label paper for uniform looks.
- Wrap as a hostess gift with a small ribbon and recipe card.
- Mason Jar Hanging Rack
This mason jar hanging rack is rustic and practical. Jars are visible, which makes pantry inventory simple. The glass feels cool and clear in your hands—great for those who love cottagecore or farmhouse styles.
Materials
- 1 wooden plank, 18" x 4" x 1"
- 6 screw-top Mason jars (8 oz)
- 6 jar rings and bands
- 2 keyhole wall hangers
- 12 wood screws (1" length)
- 1 roll jute twine
- 1 small drill with 3/8" bit
- 1 can of clear spray sealer (optional)
Instructions
- Sand plank lightly; wipe dust with damp cloth.
- Drill six evenly spaced 3/8" holes for jar bands.
- Thread jar rings through holes; secure underneath with screws if needed.
- Attach keyhole wall hangers centered on back of plank.
- Seal plank with clear spray; dry 30 minutes to touch, full 24 hours.
- Screw lids onto Mason jars, fill with dry goods, screw bands on, then hang jars from bands.
- Mount plank on pantry wall using anchors for drywall support.
- Rotate jars to refill; hand-wash jars when needed.
How to Display or Gift It
- Tie a sprig of dried rosemary around a jar with jute twine for gifting.
- Use a small wooden easel to display a recipe card next to rack.
- Store extra jars in a stackable craft organizer.
- Tension Rod Snack Shelf
Tension rods are a no-drill pantry miracle. Add clip-on baskets and hooks to create a modular snack shelf. The system is lightweight, adjustable, and leaves no marks when removed—great for renters.
Materials
- 1 tension rod, extendable to 28–48"
- 4 clip-on baskets (metal)
- 10 S-hooks (small)
- 1 pack of binder clips (for chip bags)
- 1 small level
- 1 microfiber cloth
Instructions
- Measure the width between uprights and compress the tension rod to fit.
- Use a level to ensure rod is horizontal.
- Extend rod until snug; test hold by gently pulling down.
- Hang clip-on baskets and S-hooks at desired spacing.
- Use binder clips on chip bags and hang them by S-hooks.
- Reposition baskets as pantry contents change.
- Remove rod by compressing and rotating; wipe uprights clean after removal.
How to Display or Gift It
- Group snack types together and label baskets with small chalkboard tags.
- For gifting, pair a tension rod with reusable snack bags wrapped in cellophane.
- Store spare S-hooks in a small craft organizer tray.
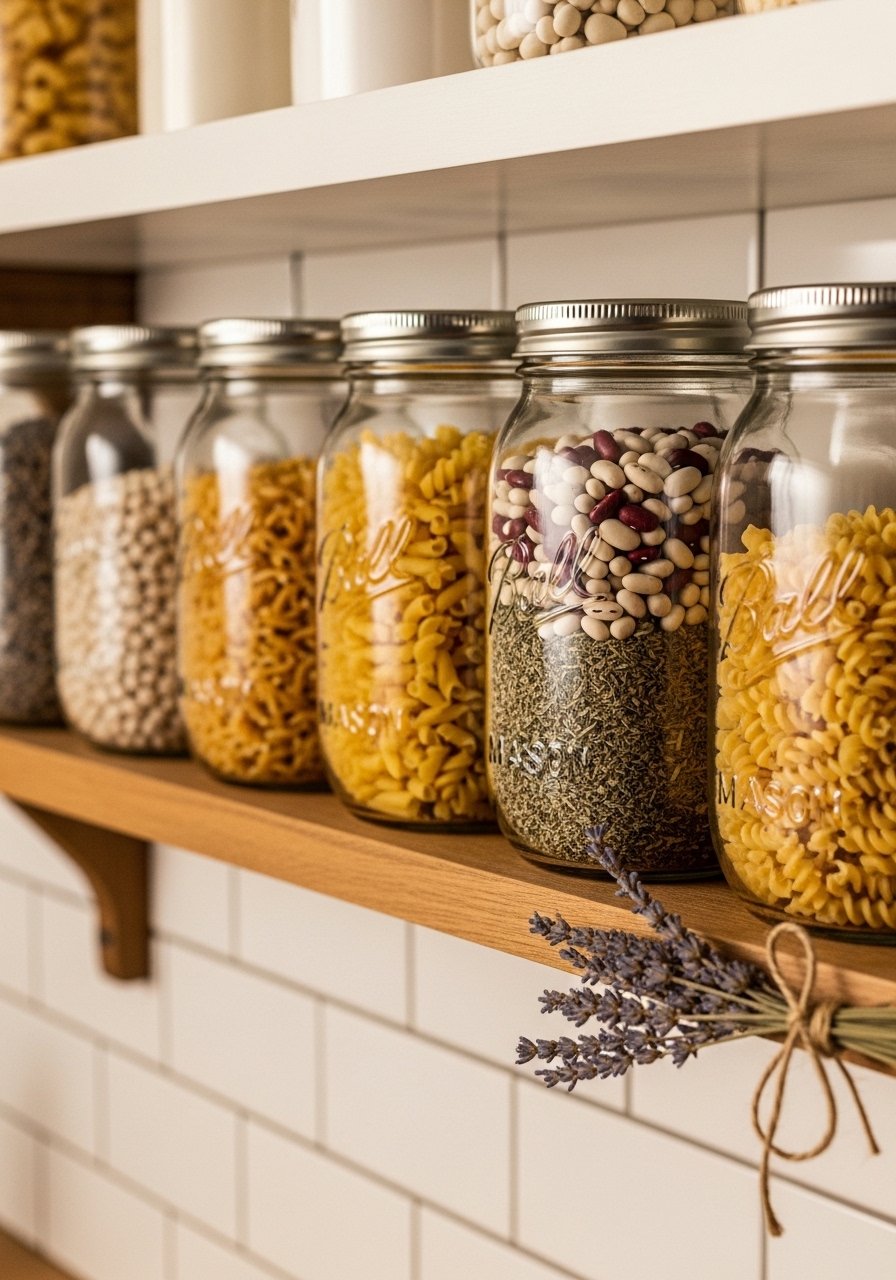
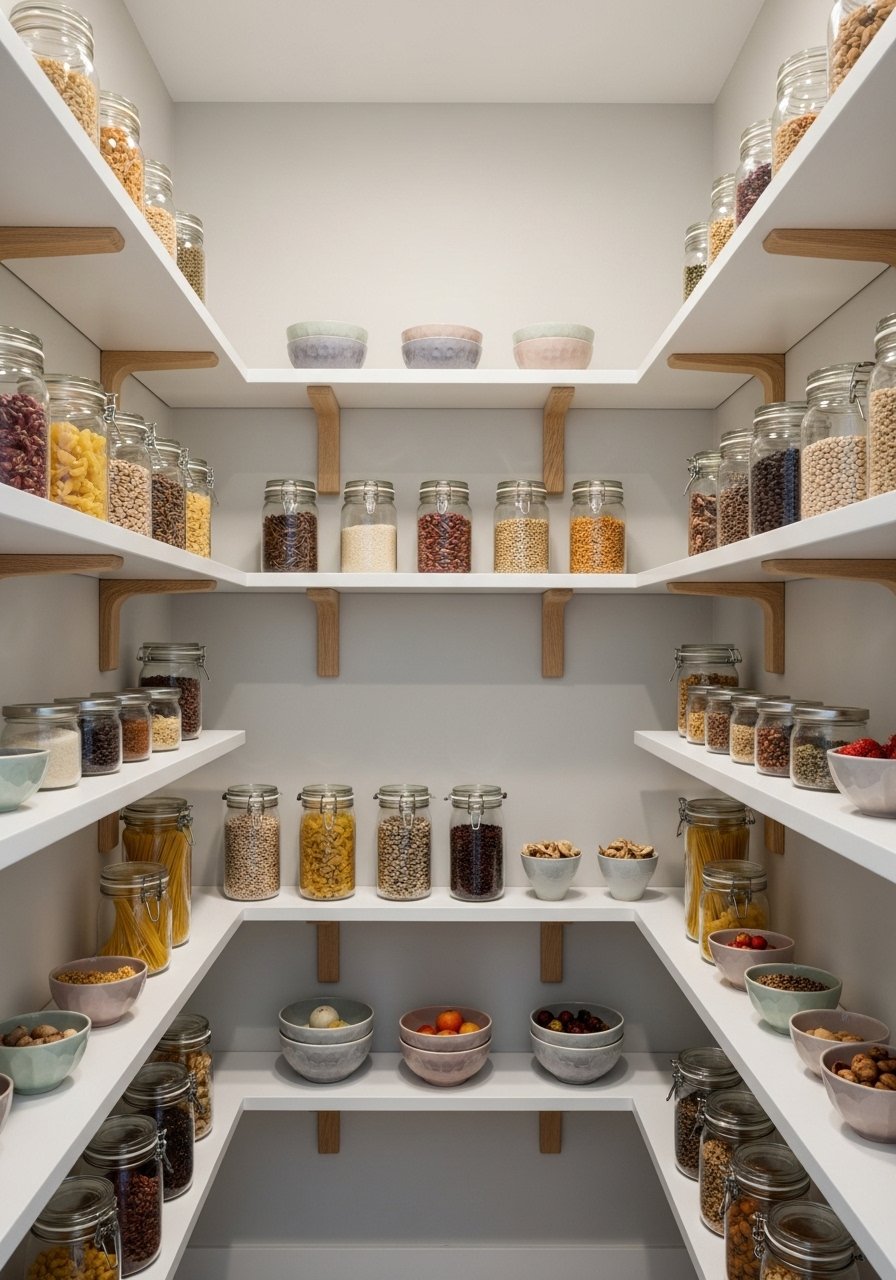
- Clear Glass Jar & Label System
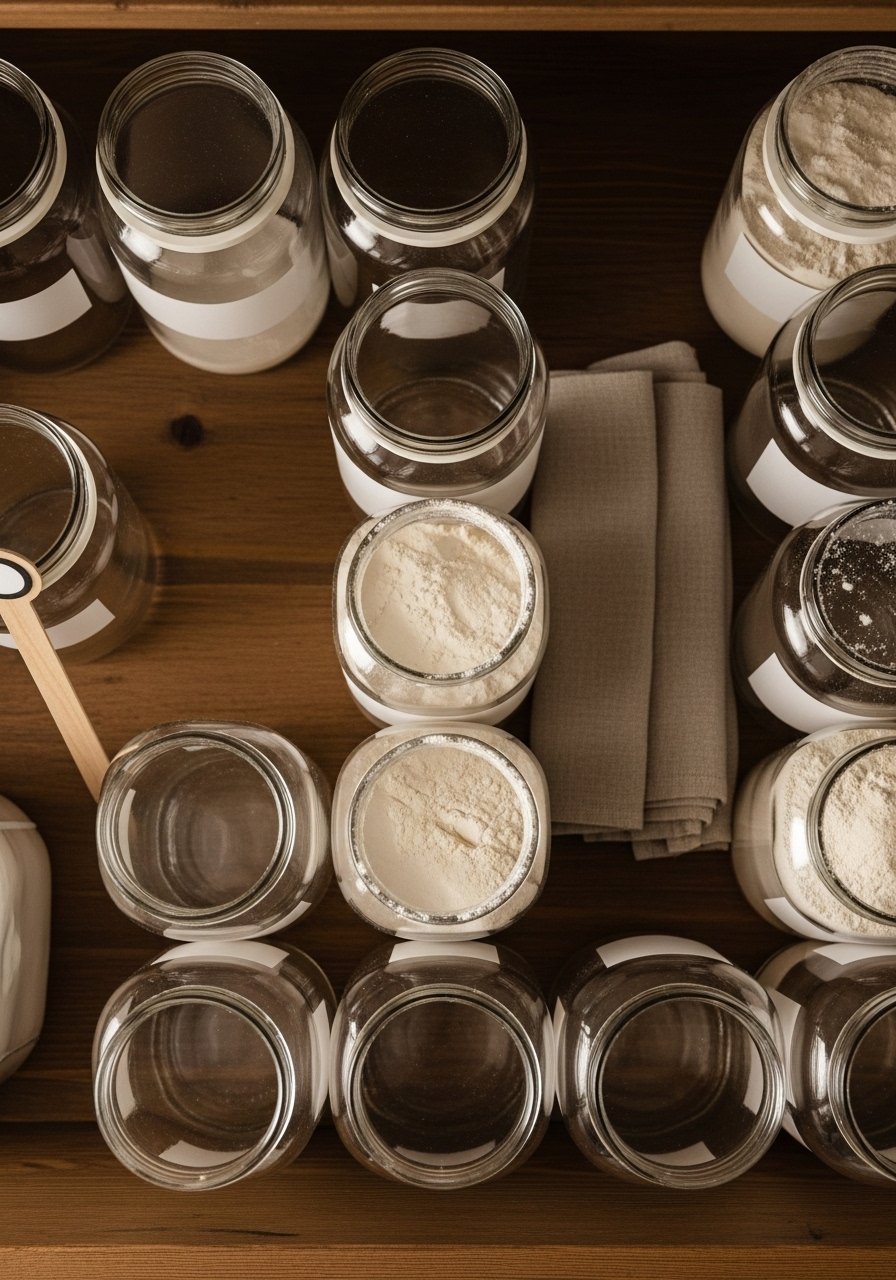
Uniform glass jars bring calm to busy shelves. Clear jars let you see amounts instantly and the labels keep things tidy. The weighty glass has a satisfying heft, and the uniform aesthetic fits many styles from modern to farmhouse.
Materials
- 12 clear glass storage jars with airtight lids, 16–32 oz
- 1 roll printable label paper
- 1 Cricut Joy cutting machine (optional) or precision scissors
- 1 microfiber cloth
- 1 funnel
- 1 set measuring cups
- 1 small brush for lid threads
Instructions
- Wash jars and lids in warm soapy water; dry completely.
- Arrange jars by type and size on a countertop.
- Fill jars using a funnel to avoid spills.
- Print labels using your label paper; cut with a precision craft knife or Cricut.
- Apply labels to jars centered on face.
- Wipe jar rims and threads with a small brush before sealing.
- Rotate stock by placing newest items at the back.
- Keep one jar empty for measuring or immediate use.
How to Display or Gift It
- Display jars on a single shelf for a pantry “uniform” look.
- For gifting, fill a jar with cookie mix layered attractively and attach a recipe card.
- Store extra labels and funnels in a stackable craft organizer.
- Slim Rolling Cart for Narrow Gaps
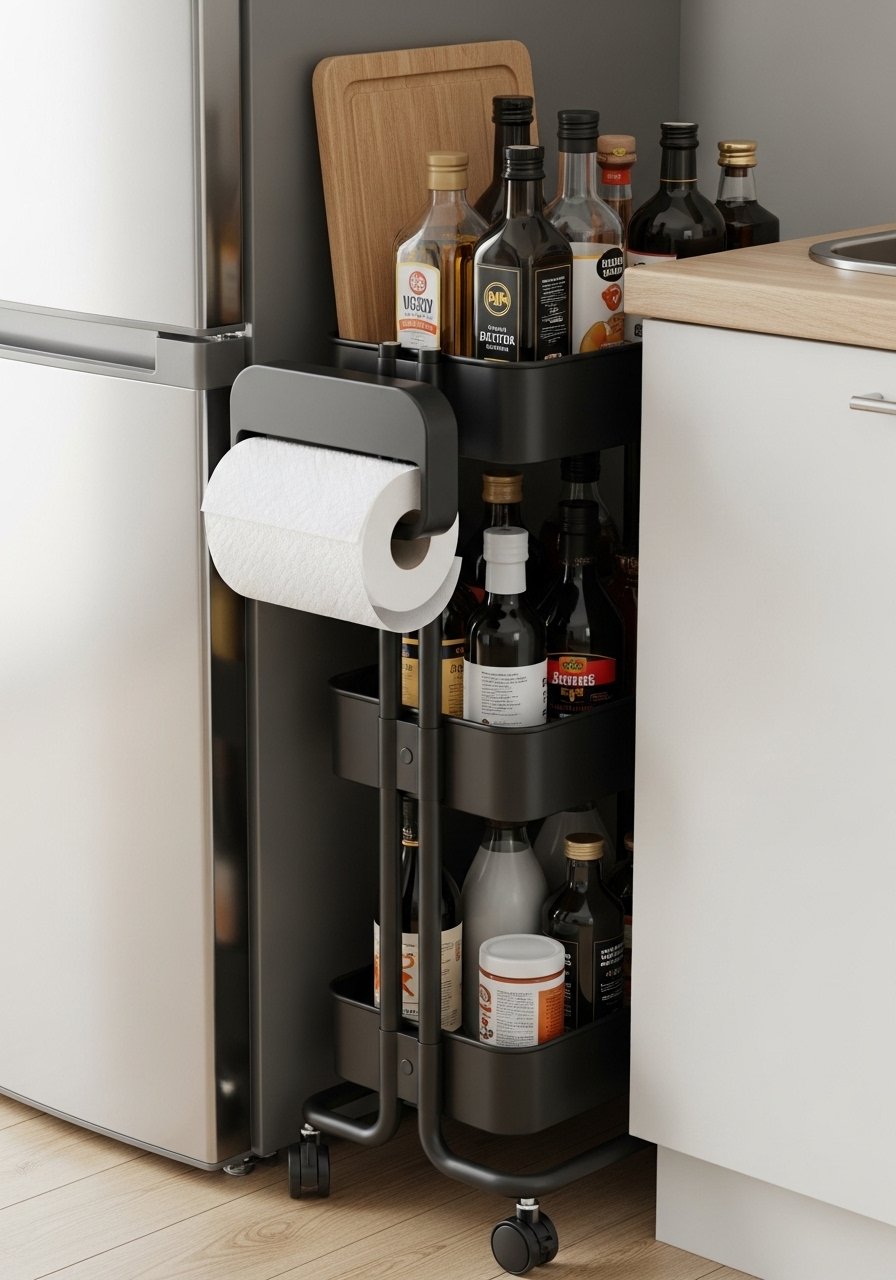
A slim rolling cart uses that narrow gap between appliances and counters. It slides out for access and rolls back neatly. The tiers have a slight lip, preventing spillover. Loved by home bakers and busy cooks.
Materials
- 1 slim rolling cart, 4–6" wide, 3 tiers
- 8 anti-tip bumper pads
- 1 bottle stopper set
- 2 small hooks for hanging utensils
- 1 can of rust-resistant spray (optional)
- 1 cleaning cloth
Instructions
- Measure gap width to ensure cart clearance.
- Place cart in gap and load bottom with heavy bottles for stability.
- Attach bumper pads to cart edges to protect appliances.
- Hang small hooks on cart sides for utensils.
- Check wheels monthly; apply rust-resistant spray to metal parts if needed and dry 30 minutes.
- Roll cart out to unload; return and center to avoid catching on flooring.
- Replace worn bumper pads when needed.
How to Display or Gift It
- Style top tier with matching glass cruets and a small herb plant.
- For gifting, assemble a “pantry starter” with olive oil, vinegars, and spices on the cart.
- Fold cart flat and store in a narrow closet when not used.
- Under-Shelf Wire Baskets
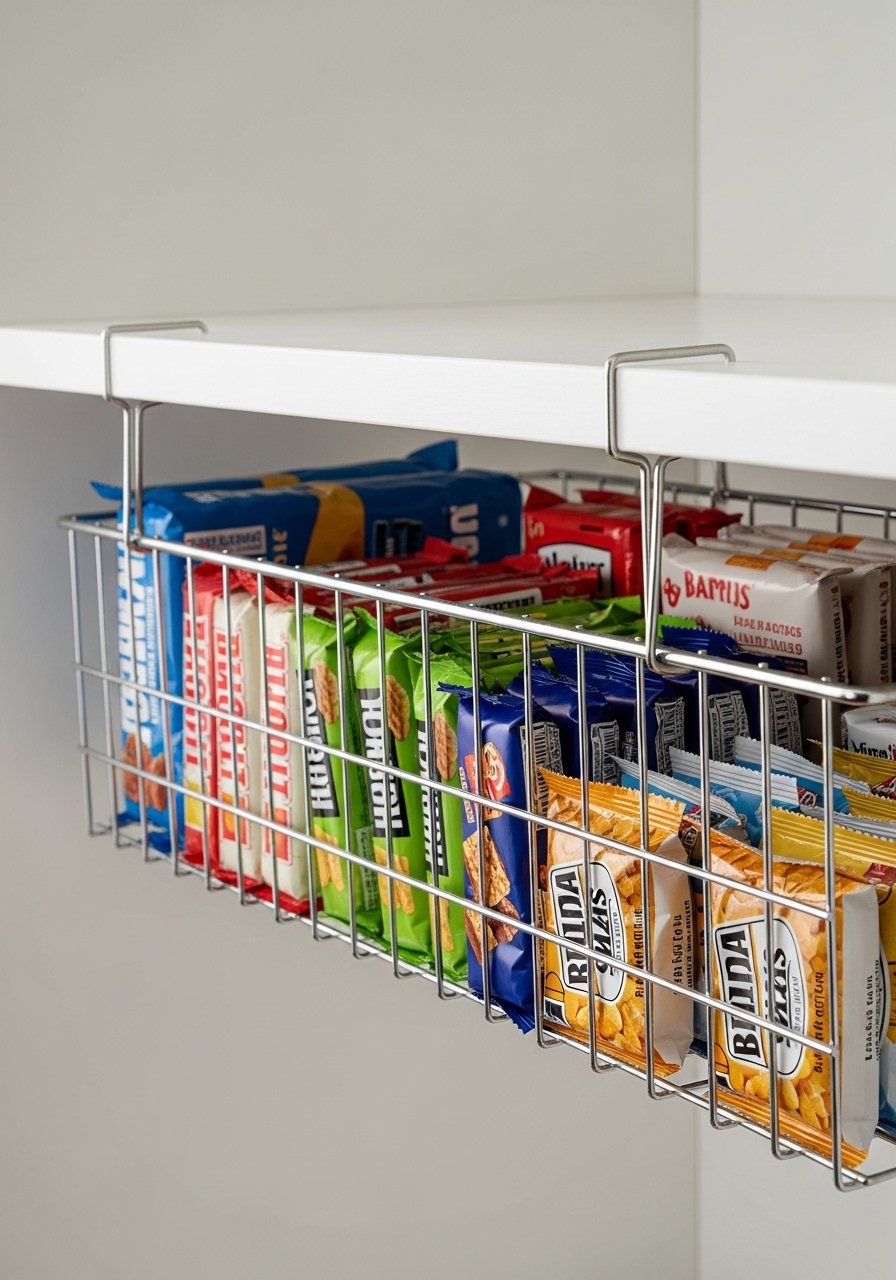
Under-shelf baskets add hidden storage without altering shelves. They slide on and tuck items beneath existing shelves for snacks and small packets. Baskets feel sturdy and the wire finish matches many metal pantry components.
Materials
- 2 under-shelf wire baskets (fits 3/4" shelf thickness)
- 1 roll of non-slip shelf liner (12" wide)
- 6 cable ties (for securing)
- 1 small flat-head screwdriver
- 1 pack of drawer labels
Instructions
- Measure shelf thickness; choose baskets that clip on snugly.
- Slide basket onto shelf edge. Adjust so it sits level.
- Line inside with non-slip liner trimmed to fit.
- Secure basket with cable ties underneath shelf if shelf load is heavy.
- Fill with snack bars or packets; don't exceed weight limit (usually 10–15 lbs).
- Check clip stability monthly and re-tighten cable ties as needed.
- Label basket front for content clarity.
How to Display or Gift It
- Group similar snack types together for grab-and-go mornings.
- Wrap a basket and snack sampler in cellophane for gifting.
- Keep extra liners and cable ties in a craft organizer tray.
- Pegboard Pantry Wall
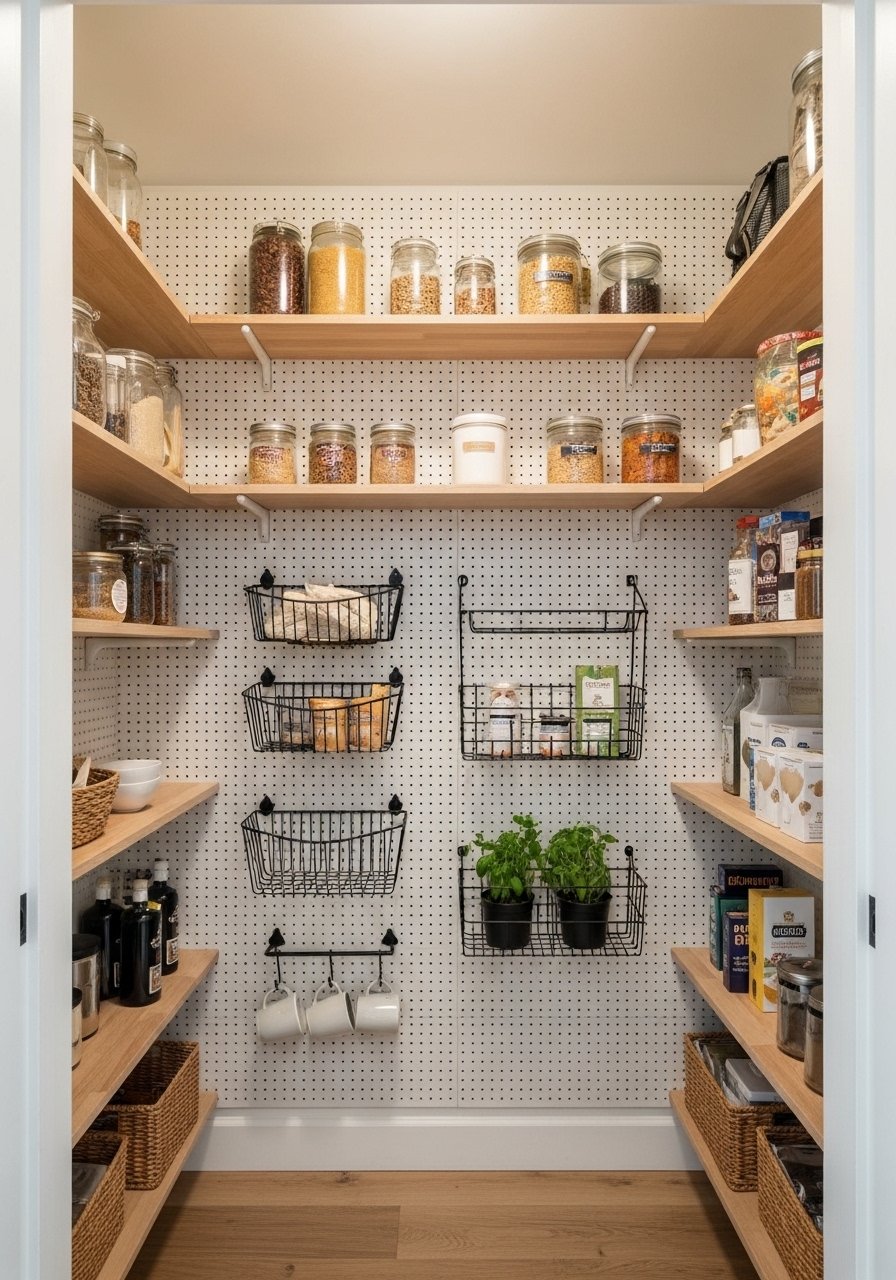
Pegboard adds fully customizable vertical storage. Hooks, baskets, and shelves move as needs change. The textured pegboard has a tactile quality and suits those who like modular solutions. It’s perfect for mixing open shelving with hanging storage.
Materials
- 1 pegboard sheet, 24" x 48"
- 1 set of pegboard hooks and baskets (20-piece)
- 4 small L-brackets for mounting
- 8 wall anchors (for drywall)
- 1 paintable caulk (optional)
- 1 paint roller and tray
- 1 stud finder
Instructions
- Decide pegboard placement and use stud finder to locate studs.
- Paint the pegboard with 2 coats of chalk or satin paint; dry 1 hour between coats, full cure 24 hours.
- Mount pegboard using L-brackets and anchors; leave 3/4" gap from wall so hooks can insert easily.
- Arrange hooks and baskets; hang items and adjust spacing.
- Use shelf brackets to add small wooden shelves to the pegboard.
- Add caulk to edges for a finished look.
- Reconfigure seasonally based on pantry needs.
How to Display or Gift It
- Hang measuring cups and utensils on hooks for visual interest.
- Include a small potted herb for freshness.
- Store extra hooks in a labeled mason jar on a shelf.
- For mounting ease, use a stud finder.
- Pull-Down Shelf for High Corners

A pull-down shelf makes high, hard-to-reach corners accessible. It folds down smoothly and locks in place at working height. The mechanism feels solid and kitchen-safe, ideal for tall households.
Materials
- 1 pull-down shelf hardware kit (with gas strut)
- 1 wooden shelf board, 18" x 12"
- 8 wood screws (1.25")
- 1 power drill
- 1 screwdriver set
- 1 safety strap (for heavy loads)
Instructions
- Cut shelf board to fit pantry depth.
- Pre-drill holes for hardware per kit template.
- Attach gas strut hardware to shelf and pantry side using screws.
- Test the lowering mechanism slowly to ensure smooth action.
- Add safety strap across front of shelf if storing heavier items.
- Load with light to medium-weight items only (max weight per kit typically 25–30 lbs).
- Check screws quarterly for tightness.
How to Display or Gift It
- Use for seldom-used bulk items and seasonal baking supplies.
- Add a decorative edge to the shelf and present as a smart gift for someone with high cabinets.
- Keep extra screws and instructions in a small tool box.
- Baking Station Drawer Organizer

Turn a pantry drawer into a baking station with trays and labeled jars. Drawers keep small tools contained and dust-free. The silicone muffin liners and wooden spoons feel cozy and ready-to-use.
Materials
- 1 set of bamboo drawer dividers (adjustable)
- 1 silicone baking mat set
- 6 small glass jars (4 oz)
- 1 roll of printable label paper
- 1 measuring spoon set
- 1 drawer liner mat (non-slip)
Instructions
- Measure interior drawer dimensions.
- Insert adjustable dividers to create compartments.
- Line drawer with non-slip liner.
- Place jars filled with baking staples in compartments and label.
- Add silicone mats and measuring spoons to remaining spaces.
- Keep frequently used items at front of drawer.
- Refresh liner and wipe drawer every 3 months.
How to Display or Gift It
- Wrap a drawer organizer filled with baking essentials as a sweet housewarming gift.
- Keep spare jars stacked in a stackable canister set.
- Corner Carousel (Lazy Corner)
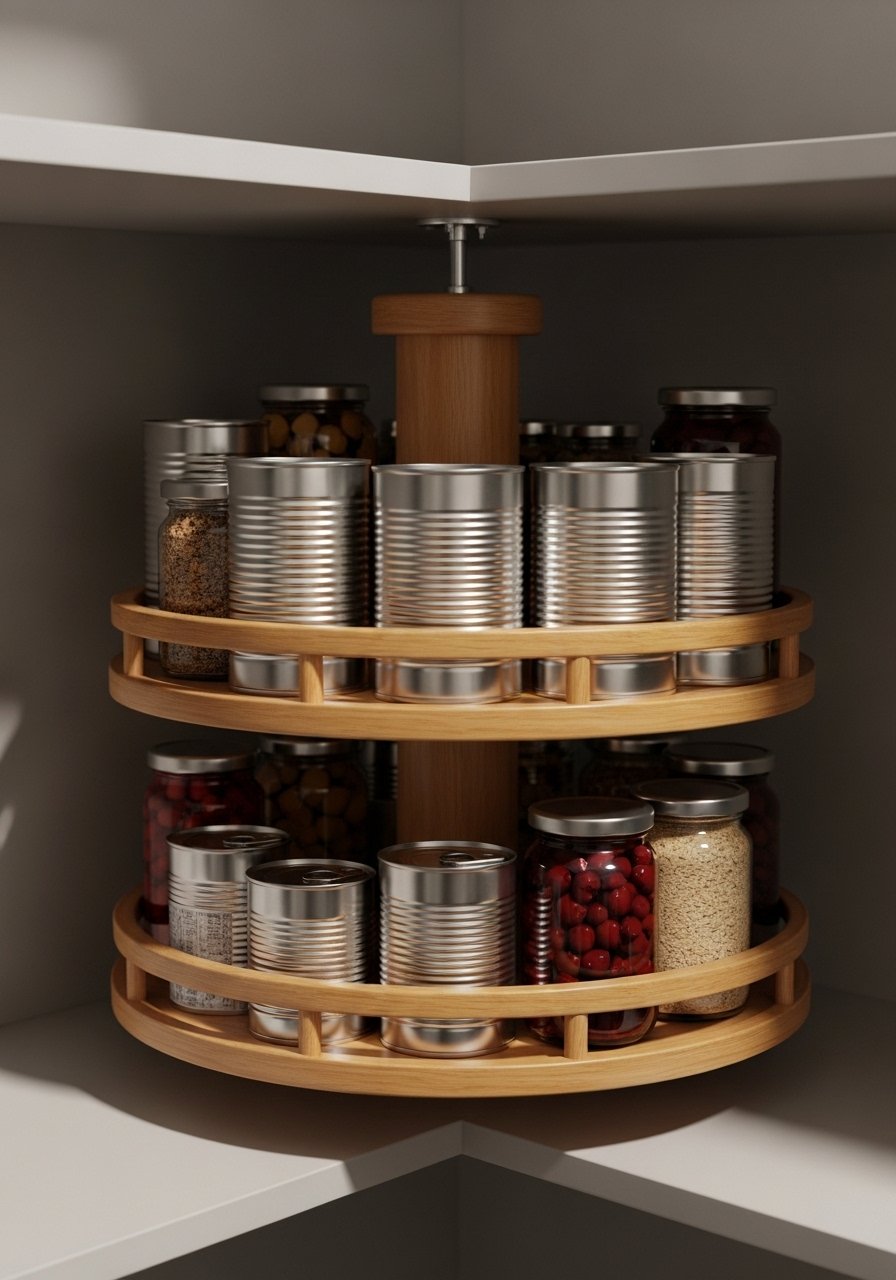
This corner carousel puts awkward corners to work. The rotating tiers glide, making items accessible from either side. It’s smooth and tactile—spin to reveal what’s hidden.
Materials
- 1 corner carousel unit, wood or coated metal
- 1 small silicone pad set for shelf protectors
- 1 screwdriver for assembly
- 1 bottle of food-safe wood oil (for wood finishes)
- 1 small cleaning brush
Instructions
- Assemble carousel according to manufacturer directions.
- Place silicone pads under feet to prevent slipping.
- Oil the wood parts with food-safe oil; wipe off excess, dry 1 hour.
- Place carousel in corner and load with jars and cans.
- Rotate to access; rebalance weight if it tips during rotation.
- Clean with damp cloth; avoid soaking wood parts.
How to Display or Gift It
- Use as a condiment center on a counter or inside pantry corners.
- Gift with a set of small spice blends and a recipe card.
- Store assembly instructions in a recipe box or craft organizer.
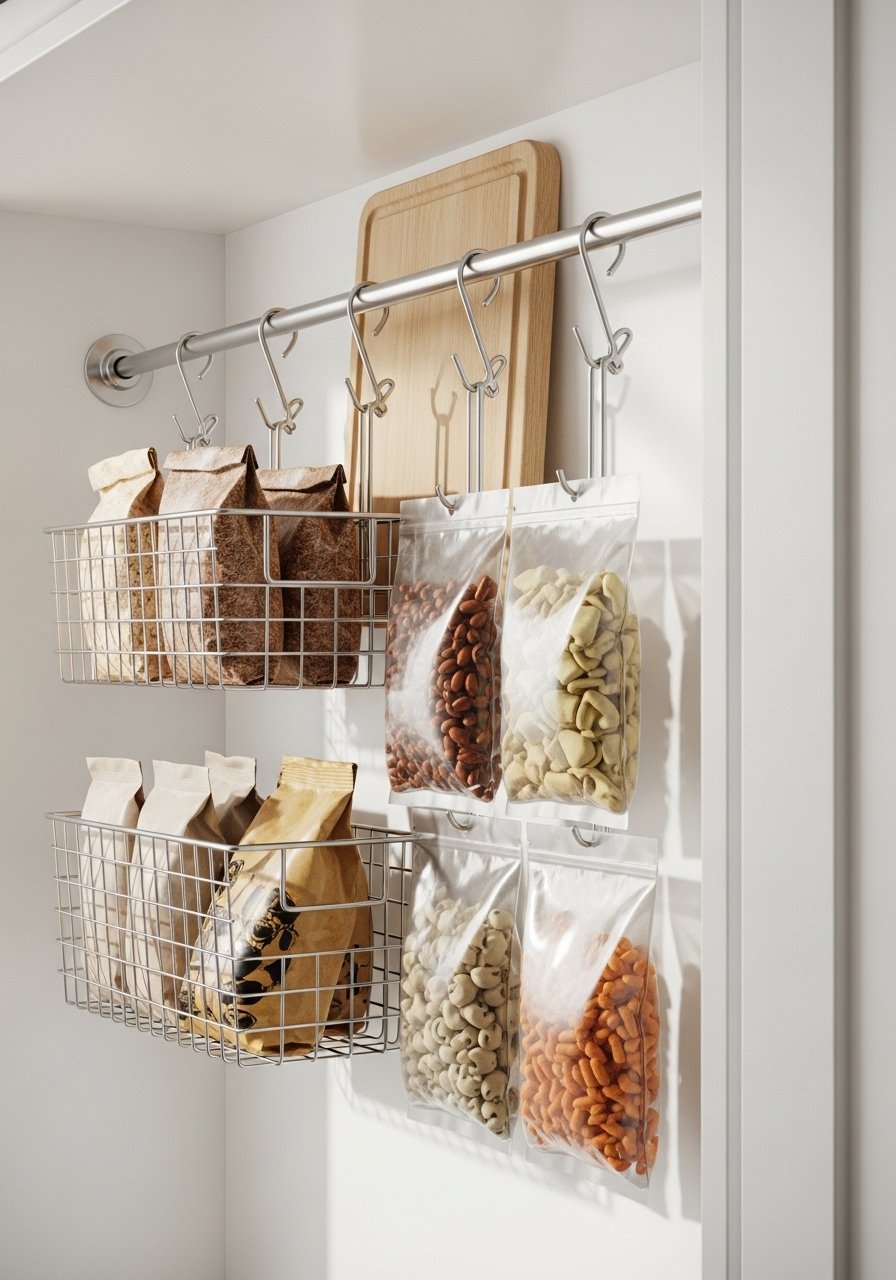
- Hanging Wire Baskets from Shelf
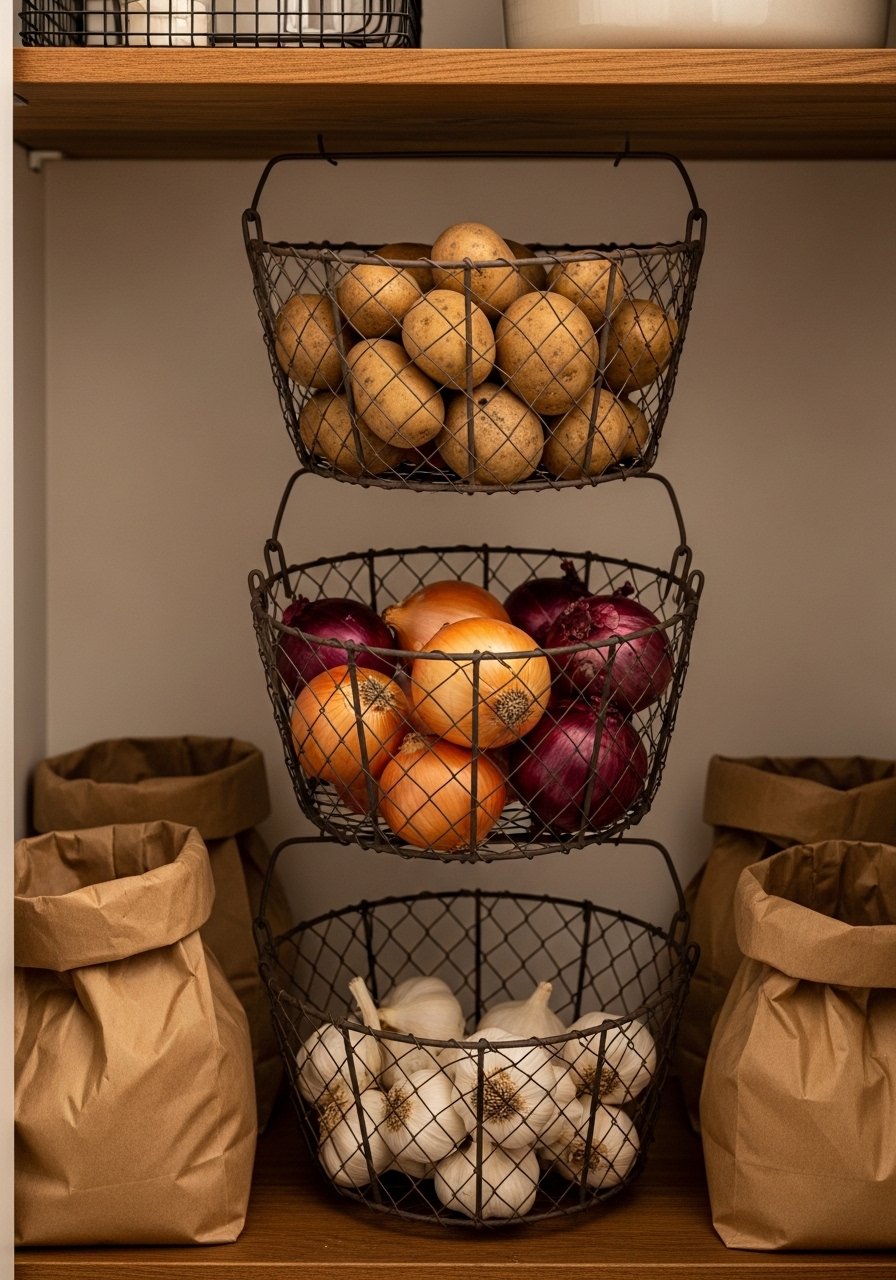
Hanging wire baskets slide under shelves to create root-vegetable storage while keeping surfaces clear. The open weave lets produce breathe. The baskets feel airy and practical.
Materials
- 3 under-shelf hanging wire baskets (8–10" deep)
- 6 S-hooks
- 1 roll of breathable produce bags (small)
- 1 small basket liner (optional)
- 1 cleaning cloth
Instructions
- Attach baskets under shelf by sliding rim over shelf edge or using S-hooks to hang.
- If baskets rest on brackets, ensure they’re balanced.
- Line with breathable produce bags for small items like garlic.
- Store heavier potatoes in bottom basket and lighter items above.
- Rotate produce weekly to avoid spoilage.
- Remove and wash baskets monthly.
How to Display or Gift It
- Add kraft paper bag liners for a rustic look.
- For gifting, group a basket with a wooden scoop and root vegetable seeds.
- Keep spare produce bags in a pantry drawer.
- Stackable Can Racks
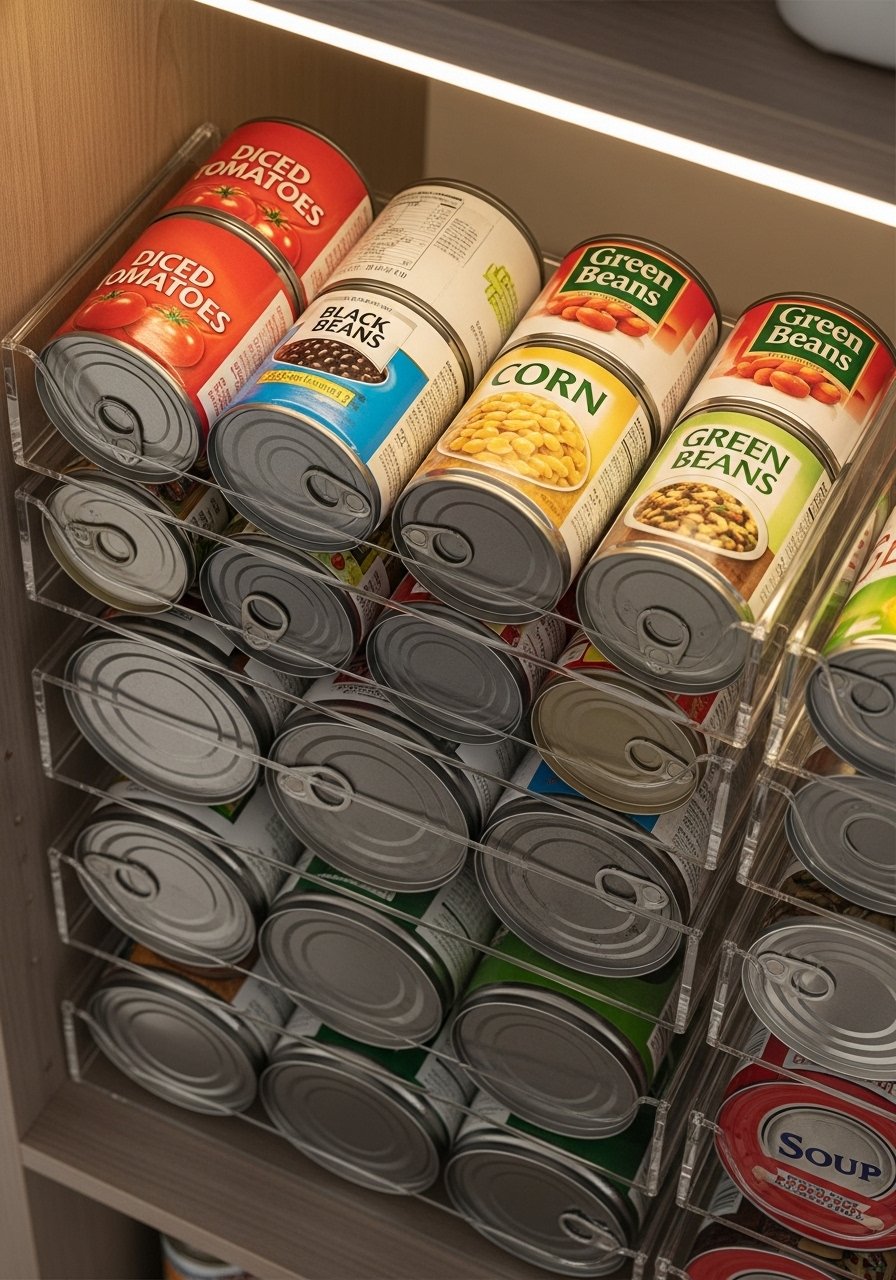
Stackable can racks convert vertical space into tidy rows so you see expiration dates at a glance. They’re sturdy and click together easily. You’ll love the orderly, staggered look.
Materials
- 4 stackable can racks (plastic or metal)
- 1 set of small chalkboard front labels
- 1 permanent marker
- 1 damp cloth
Instructions
- Place can racks in desired location; click together if stacking vertically.
- Load cans front-to-back or in staggered rows.
- Label racks with chalkboard tags for sections like “soups” or “tomato.”
- Keep heaviest cans on the lowest rack.
- Clean racks with damp cloth; avoid abrasive cleaners.
How to Display or Gift It
- Pair with a can opener wrapped in a ribbon for a practical gift.
- Store extra racks in a narrow pantry side column.
- For neat labeling, use a chalkboard label set.
- Adhesive Shelf Risers
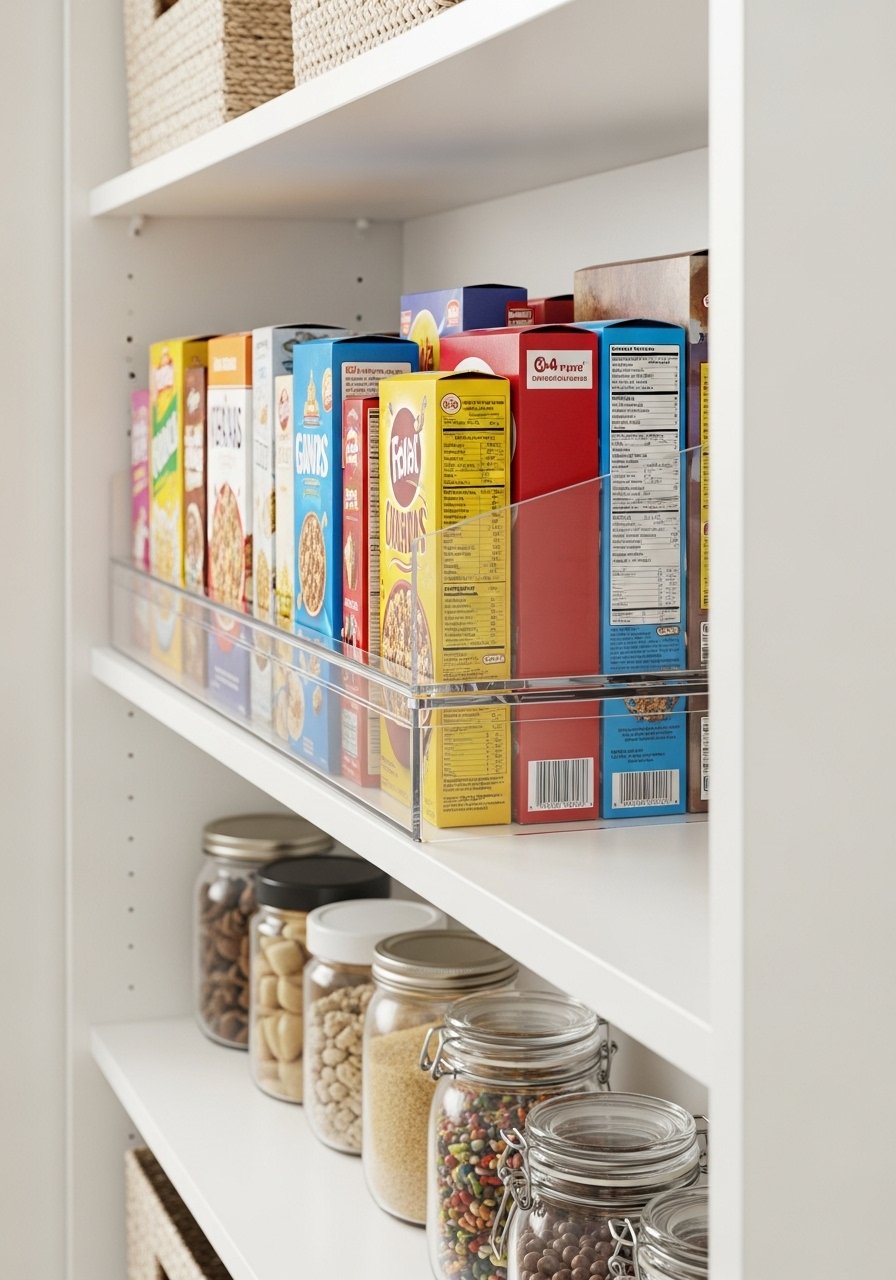
Shelf risers double shelf space by creating a second plane for shorter items. Clear acrylic keeps the view open. They’re a quick upgrade with a satisfying visual result.
Materials
- 2 clear acrylic shelf risers, 12" wide
- 1 bottle of rubbing alcohol for cleaning surfaces
- 1 microfiber cloth
- 1 set of removable shelf liners
Instructions
- Clean the shelf surface with rubbing alcohol; let dry.
- Place risers where you need added height.
- Put frequently used items on top for easy reach.
- Use shelf liners on risers to keep items from slipping.
- For shifting, apply small double-sided non-permanent pads.
- Remove periodically to clean both shelves.
How to Display or Gift It
- Use risers for open cereal boxes or coffee pods.
- Pack a set with gourmet coffee pods as a small gift.
- Store extra risers flat in a pantry corner.
- Hanging Shoe Organizer for Snacks
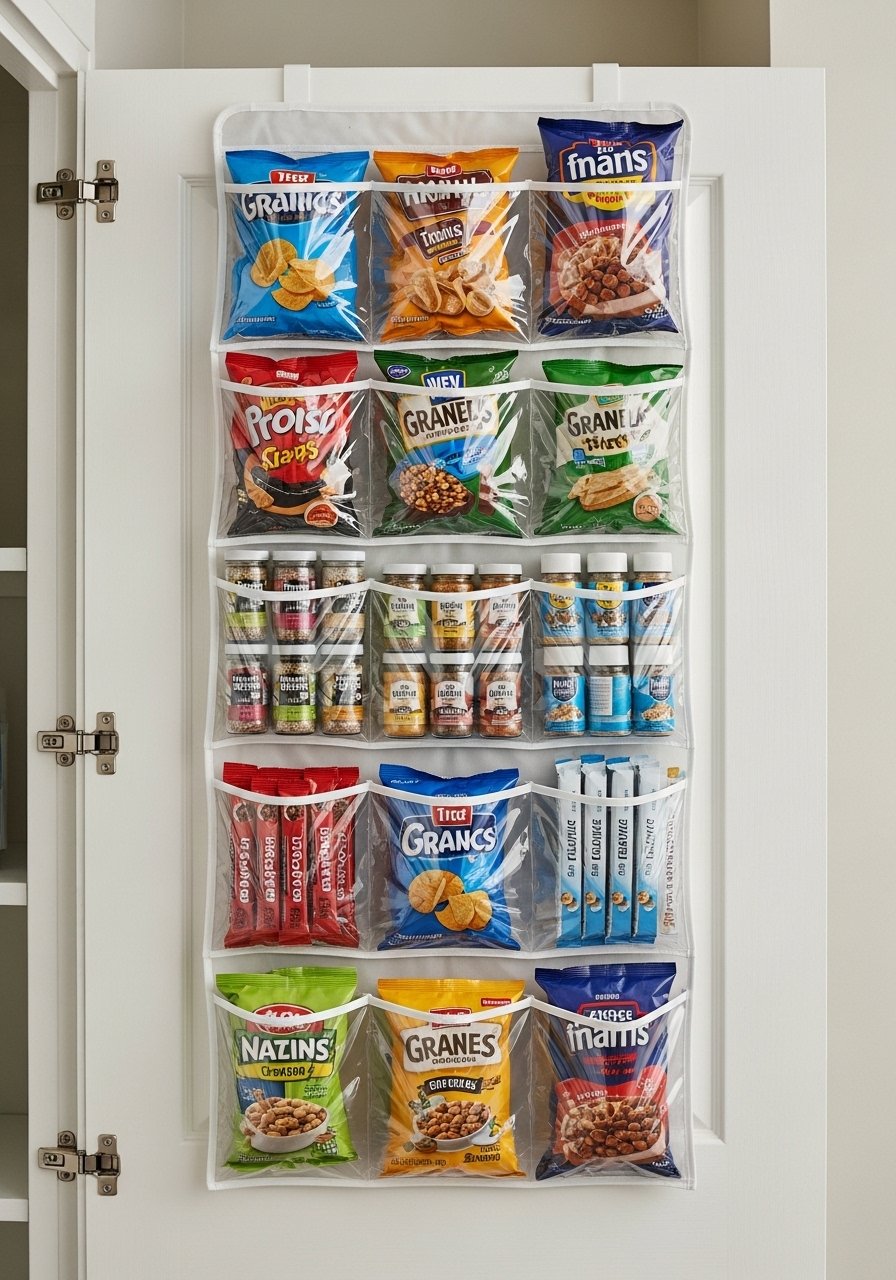
A hanging shoe organizer repurposed for snacks is an instant grab-and-go solution. Clear pockets make everything visible and reachable. It’s soft to the touch and surprisingly roomy.
Materials
- 1 over-door clear pocket organizer, 24 pockets
- 1 pack of small kraft bags
- 1 roll of masking labels
- 1 pair of scissors
- 1 package of Command hanging strips for doors (if no top rail)
Instructions
- Hang the organizer over the pantry door.
- Sort items into pockets by type.
- Label each pocket with masking labels.
- Use kraft bags in pockets to corral loose items.
- Check pockets weekly and rotate stock.
- Wash organizer per instructions if fabric; wipe plastic pockets with damp cloth.
How to Display or Gift It
- Fill pockets with themed snacks and tie with twine for a party favor.
- Fold organizer and store in a craft bin when not used.
- Add a pack of kraft bags to your gift bundle.
- Slim Vertical Wine or Bottle Rack
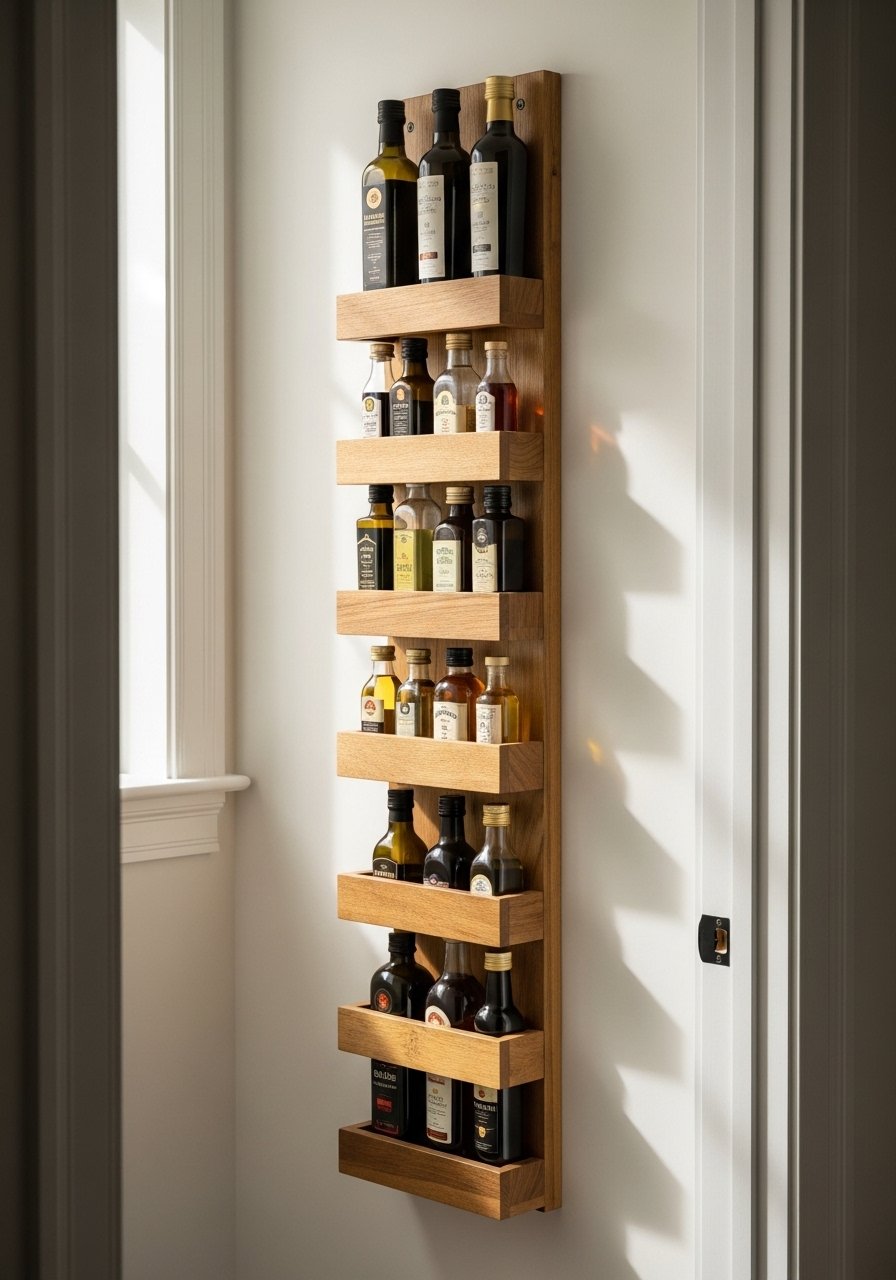
A slim vertical rack turns tall bottles into a neat column. It frees shelf depth and protects glass bottles from tipping. The rack’s wood feels warm and solid in your hands.
Materials
- 1 slim vertical bottle rack, fits 3–6 bottles
- 1 small level
- 2 wall anchors (if mounting)
- 1 furniture felt pad (to protect shelf)
- 1 bottle pourer set (optional)
Instructions
- Place the rack on a shelf or mount to the wall with anchors.
- Add felt pad under base to prevent sliding.
- Slot bottles neck-first into rack.
- Use pourers for frequently used oils to reduce spills.
- Check bottles for drip marks weekly and wipe clean.
How to Display or Gift It
- Style with matching oil dispensers and a small seasoning jar.
- Wrap as a hostess gift along with artisanal olive oil.
- Keep spare pourers in a small kitchen drawer.
- Label Template Station with Cricut
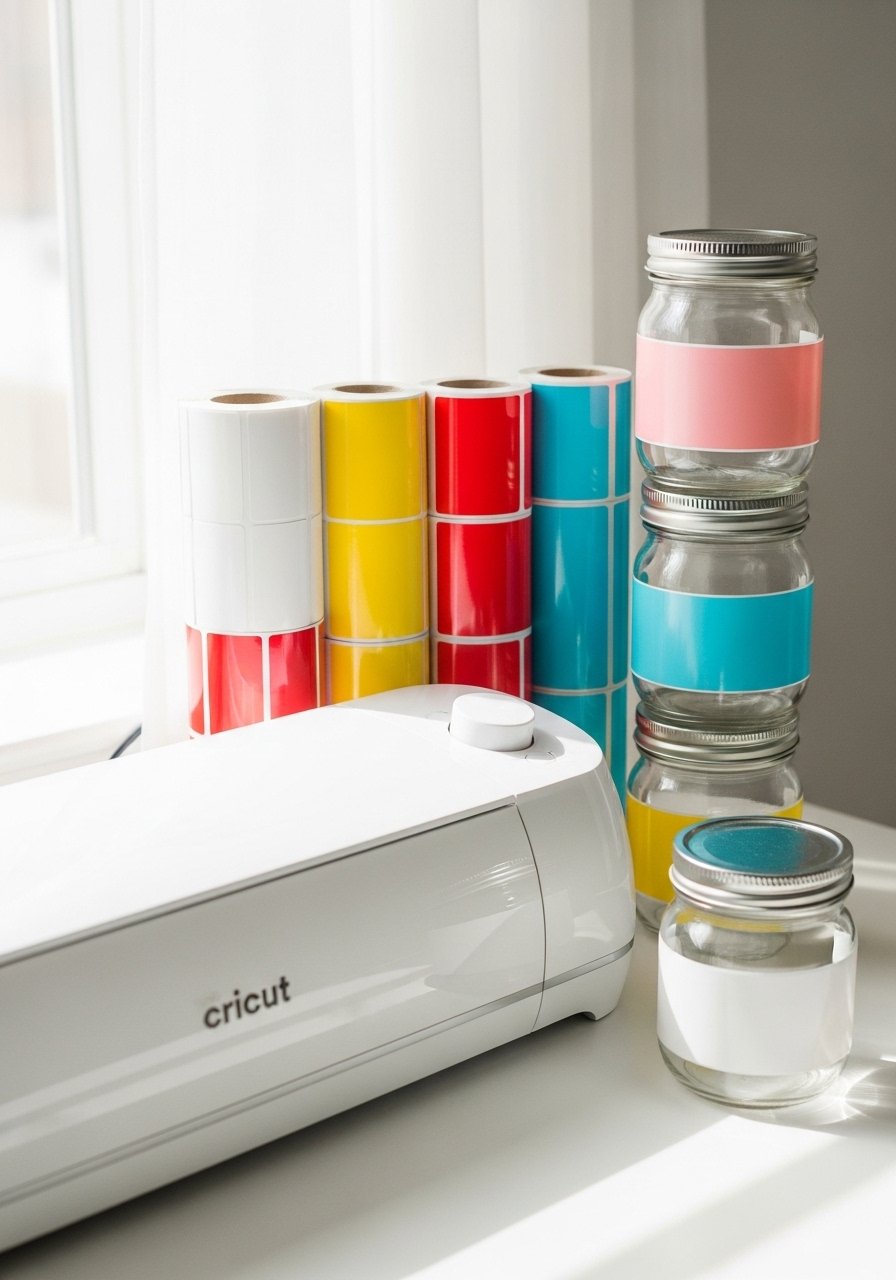
Custom labels unify mismatched containers and make inventory fast. A cutting machine speeds the process and gives polished edges. Labels feel smooth and look professional.
Materials
- 1 cutting machine like Cricut Explore or Joy
- 1 roll of permanent matte white vinyl
- 1 self-healing cutting mat
- 1 set of small scissors
- 1 pack printable label paper (for non-vinyl)
- 1 brayer roller for bubble-free application
Instructions
- Design labels in software and size to your jars.
- Load vinyl on cutting mat and cut using Cricut.
- Weed excess vinyl and use transfer tape to apply.
- Press with a brayer roller for firm adhesion.
- Apply labels to cleaned, dry surfaces.
- For paper labels, print and trim, then apply with firm pressure.
How to Display or Gift It
- Create matching label sets and tuck them into a gift box.
- Store leftover vinyl and mats in a craft storage drawer.
- For neat packaging, try a brayer roller.
- Slim Floating Shelves with Brackets
Floating shelves add display-ready storage in narrow pockets. Keep them slim so they don’t intrude. The wood feels smooth and provides a shelfy backdrop for jars and baskets.
Materials
- 2 slim floating shelves, 10" wide
- 4 floating shelf brackets
- 8 wall anchors
- 1 drill and bit set
- 1 small level
- 1 pack of decorative shelf baskets
Instructions
- Mark shelf locations with level and pencil.
- Install brackets into studs or use anchors for drywall.
- Slide shelves onto brackets and secure per instructions.
- Space items evenly; place heavier items near supports.
- Dust shelves weekly and check bracketing quarterly.
- Use baskets on shelves to corral small items.
How to Display or Gift It
- Arrange jars and baskets by color or use.
- Present a paired set of shelves as a gift with small pantry items staged on them.
- Store extra brackets and anchors in a tool pouch.
- Magnetic Knife or Utensil Strip for Pantry Wall
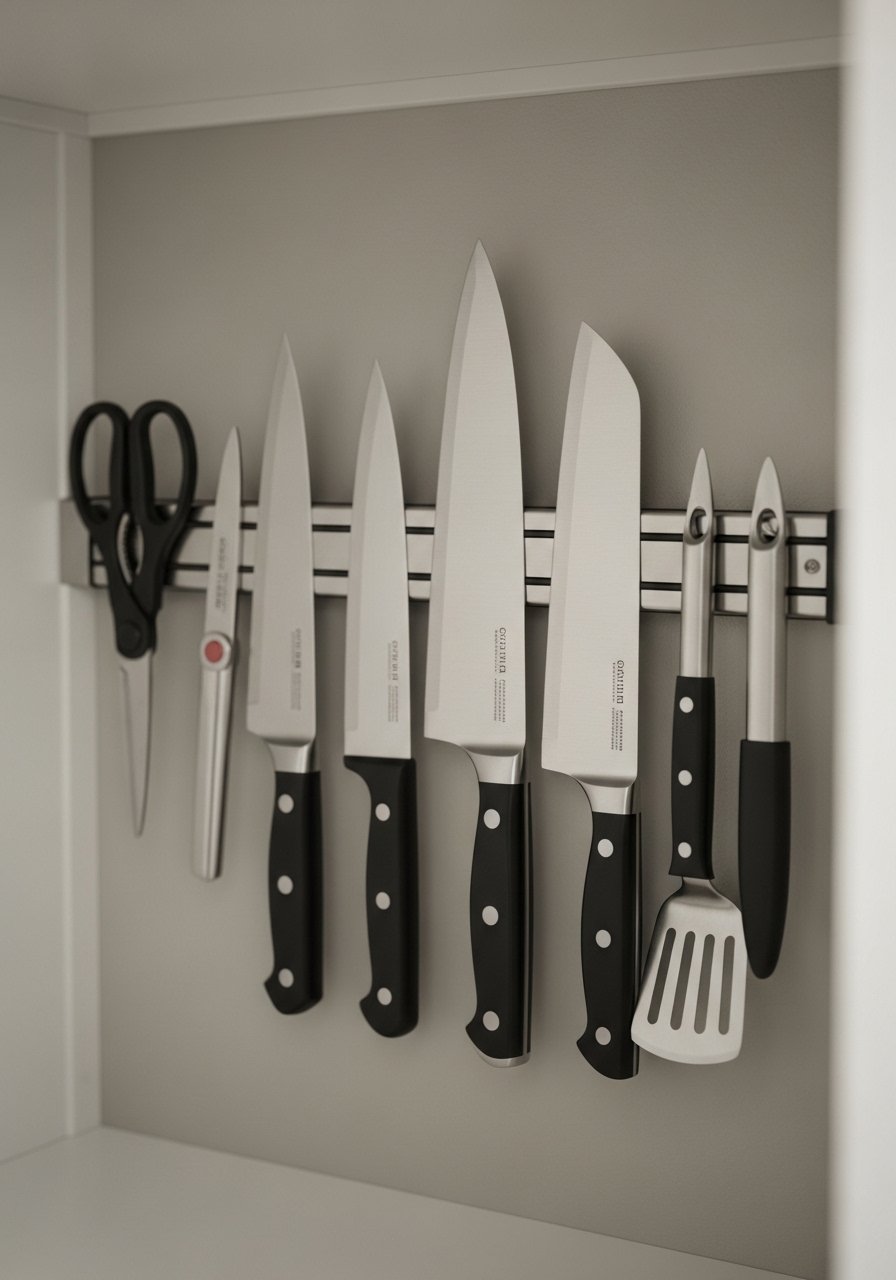
A magnetic strip keeps knives and metal utensils safe and accessible inside the pantry, freeing drawer space. The strip is cool to the touch and minimalist in look. It’s ideal for cooks who prefer easy reach.
Materials
- 1 stainless steel magnetic strip, 18–24"
- 8 wall anchors (if not mounting into stud)
- 1 small level
- 1 damp cloth for installation surface prep
- 1 set of protective knife guards (optional)
Instructions
- Pick a wall space away from moisture.
- Wipe wall with damp cloth and let dry.
- Use level to mark mounting points.
- Screw magnetic strip into wall anchors or studs.
- Test magnet strength by placing a knife gently on strip.
- Keep knives sheathed until placing on strip to avoid nicks.
- Wipe strip and knives monthly to prevent residue.
How to Display or Gift It
- Use as a dedicated utensil zone and pair with a small set of chef knives in a gift box.
- Store extra knife guards in a drawer or organizer.
- For easy installation, use a magnetic knife strip.
Every one of these projects is meant to be practical, doable, and friendly to small kitchens. You’ve got vertical builds, pull-outs, and smart repurposes that make pantry life simple and tidy. If you try a few, start with a single shelf or wall and see how quickly the rest falls into place—these small pantry ideas for small kitchens are designed to be mixed and matched.
If you want one tool to speed up many projects, a temperature-controlled hot glue gun changed how mine turned out—no strings, cleaner joints. Grab one for small fixes and quick assembly: hot glue gun with temperature control.
Which pantry problem do you want solved first: spice overload, snack clutter, or can chaos? Pin this guide for later and share with a friend who battles countertop overflow—good solutions are better when shared.


