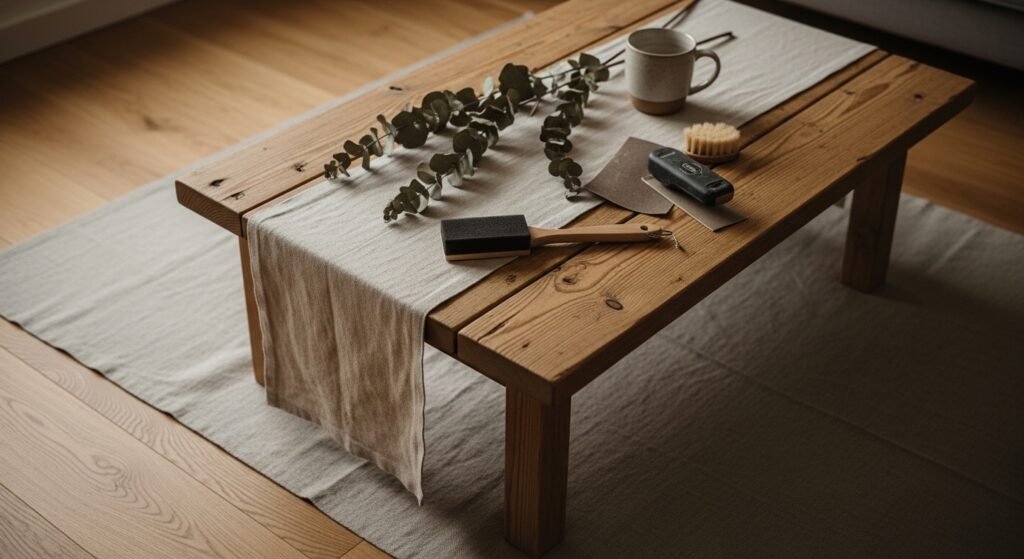
Cozy evenings with a blanket, a warm mug, and a table that feels like home—that's the vibe these rustic DIY coffee table ideas are all about. Whether you want a farmhouse focal point, a soft cottagecore piece, or a chunky boho ottoman table, these projects use simple tools and familiar finishes to bring that warm, lived-in look to your living room.
You’ll find everything from quick pallet builds to show-stopping live-edge resin tables. Each rustic DIY coffee table idea below includes exact materials, step-by-step instructions, drying and curing times, and styling tips so you can finish with confidence. Keep a foam brush and a heat gun nearby—foam brushes for smooth finish coats and a heat gun to pop bubbles in resin make several projects faster and neater.
Pin the projects you love, set aside an afternoon or two, and let’s build a cozy, rustic table that makes any living room feel like a hug.
- Rustic Pallet Coffee Table
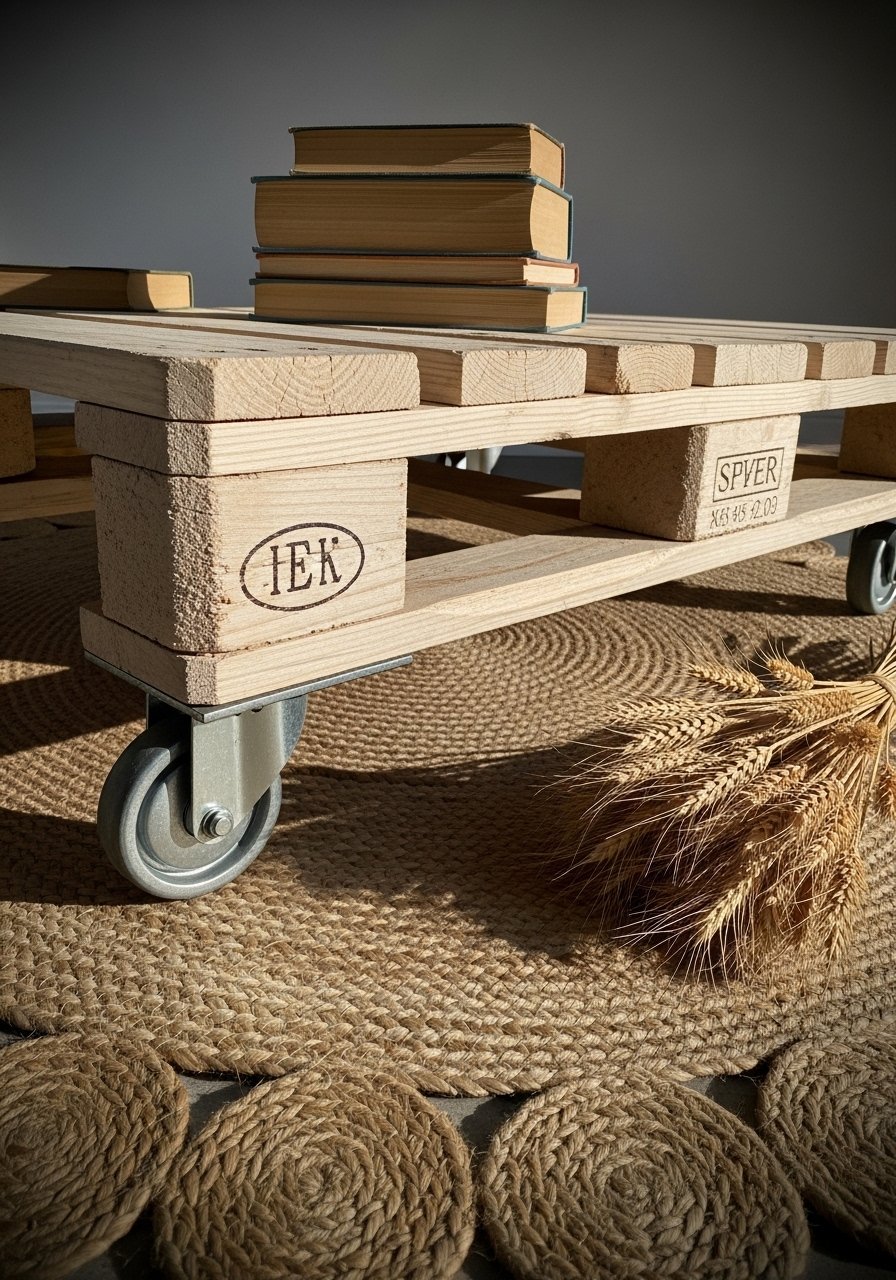
This pallet table is budget-friendly and quick. The gaps between slats add rustic texture, and a light whitewash gives it that lived-in, farmhouse look. Great for beginners and weekend projects; sanding is satisfying and tactile.
Materials
- 1 standard wooden shipping pallet (heat-treated, 40" x 48")
- 4 swivel caster wheels (2 locking)
- 3/4" exterior wood screws, 20
- Wood filler, 8 oz
- Sandpaper: 80, 120, 220 grit
- 1 pint chalk paint (off-white)
- 1 pint matte polycrylic topcoat (2 coats)
- Painter's tape
- Wood glue, 2 oz
Instructions
- Inspect pallet for damaged boards; remove any loose nails with pliers. Replace broken slats with 1×4 boards cut to size.
- Sand the top with 80 grit to remove rough spots, then 120 for smoothing, finishing with 220 for a soft touch.
- Fill holes with wood filler; let dry 30–60 minutes, then sand smooth.
- Apply a thin coat of chalk paint with a foam brush. Let dry 1 hour; apply a second thin coat for even opacity.
- Attach caster wheels to bottom corners with wood screws; pre-drill pilot holes first.
- Seal with 2 coats of matte polycrylic, sanding lightly between coats with 220 grit. Let cure 24 hours before use.
How to Display or Gift It
This table looks great with woven trays and a potted plant. For stability during transport, lock the casters and wrap corners in bubble wrap. Store spare paint and a small repair kit (wood filler, sandpaper) in a craft organizer for easy touch-ups. For easy moving, pair with a set of heavy-duty caster wheels.
- Reclaimed Barn Wood Slab Coffee Table
Reclaimed barn wood gives instant character—knots, nail holes, and color variation. Pairing it with hairpin legs keeps the look modern-rustic. If you love texture and history, this is for you.
Materials
- 3 reclaimed planks, 48" x 12" x 1"
- 4 hairpin legs, 12" height
- 8 wood screws, 1¼"
- 1 jar wood glue, 4 oz
- 1 can Minwax Wood Finish stain (choose color)
- 1 can satin polyurethane, 16 oz
- Sandpaper: 120, 220
- Tack cloth
Instructions
- Joint the planks: align edges and glue along seams with wood glue, clamp for 60 minutes.
- Sand tabletop starting 120 grit, finish with 220 grit, and wipe with a tack cloth.
- Apply 1 coat of wood stain with a lint-free cloth; wipe off excess. Dry 6–8 hours.
- Apply 2 coats of satin polyurethane with a foam brush. Sand lightly between coats with 220 grit. Dry 24 hours between coats.
- Attach hairpin legs with screws using a power driver and pre-drill holes to prevent splitting.
- Check stability and let cure 48 hours before heavy use.
How to Display or Gift It
Style with a woven runner for cottagecore charm. Small felt pads under legs protect floors. If gifting, add a sample jar of the same stain and sealing instructions in a kraft box. A compact electric sander speeds the prep.
- Live-Edge River Coffee Table (Epoxy)
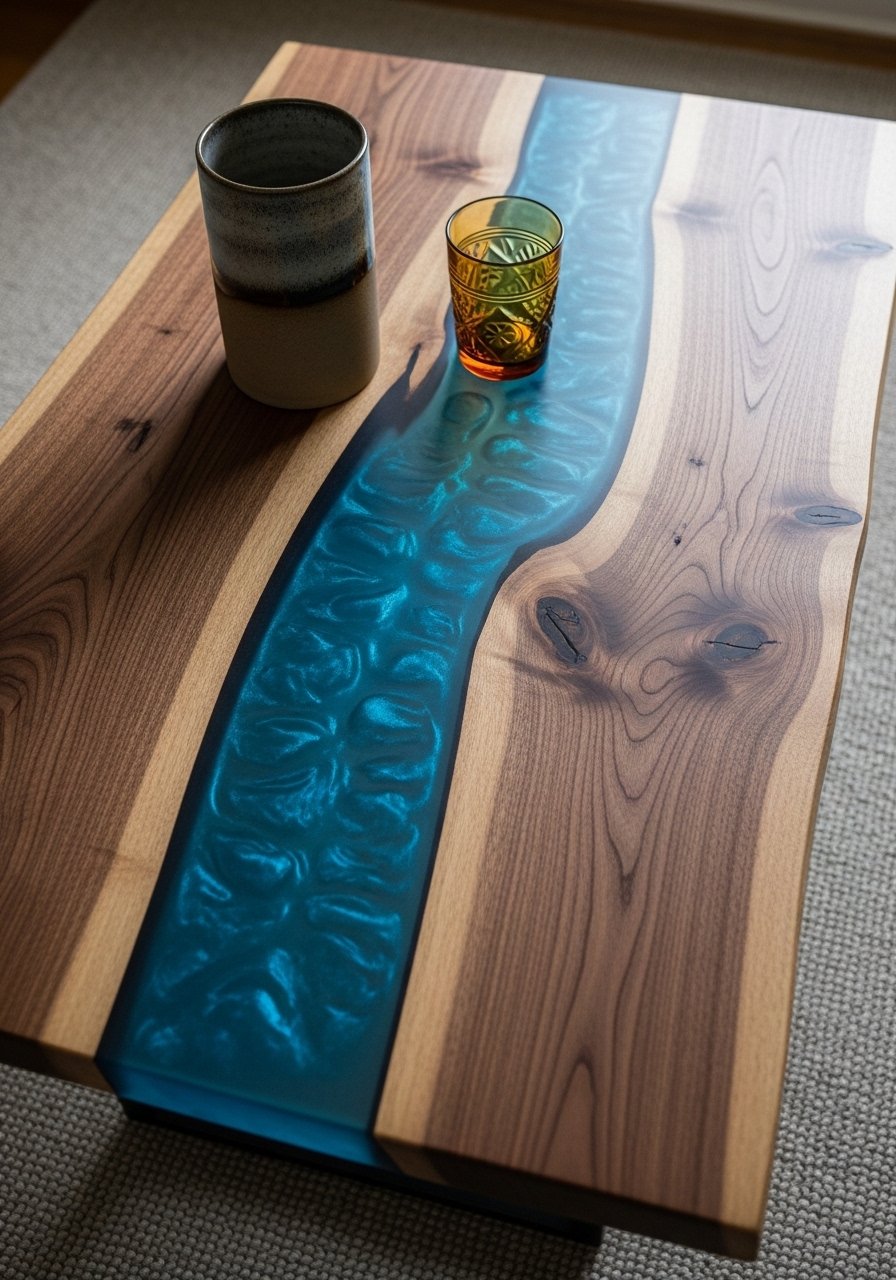
A live-edge river table is dramatic while still cozy. The glossy resin contrasts with rough bark edges for a high-end rustic look. This project uses epoxy resin—read instructions fully and work in a ventilated area.
Materials
- 1 walnut live-edge slab, 50" x 18" x 1.5"
- Epoxy resin kit (1.5–2 gallon) suitable for tabletops
- Blue alcohol inks or pigment powders, small amounts
- Painter's tape and silicone caulk (for billet mold)
- Orbital sander, 120–220 grit
- Hot air gun or torch (to remove bubbles)
- Disposable mixing buckets, sticks
- Nitrile gloves and respirator rated for organic vapors
Instructions
- Prepare slab: clean, sand edges 120–220 grit, and seal underside with thin epoxy coat to prevent air release.
- Build mold under the slab using melamine or tape and silicone caulk to contain resin.
- Mix epoxy per manufacturer instructions—usually 2:1 or 1:1 by volume. Stir slowly for 3–5 minutes to reduce bubbles.
- Tint part of the epoxy with pigment and carefully pour base clear layer. Let flash cure 6–8 hours.
- Pour colored epoxy into the channel in thin layers, using a heat gun to pop bubbles. Repeat until flush with slab top.
- Sand the cured surface starting with 220 grit up to 800–1200 grit, then buff with polishing compound. Full cure usually 72 hours.
How to Display or Gift It
This table is the room’s centerpiece—use neutral textiles so the resin stands out. For storage, keep dust covers over it until fully cured. A small epoxy resin kit designed for furniture makes mixing and curing easier.
- Rustic Hairpin-Leg Coffee Table with Sliding Shelf
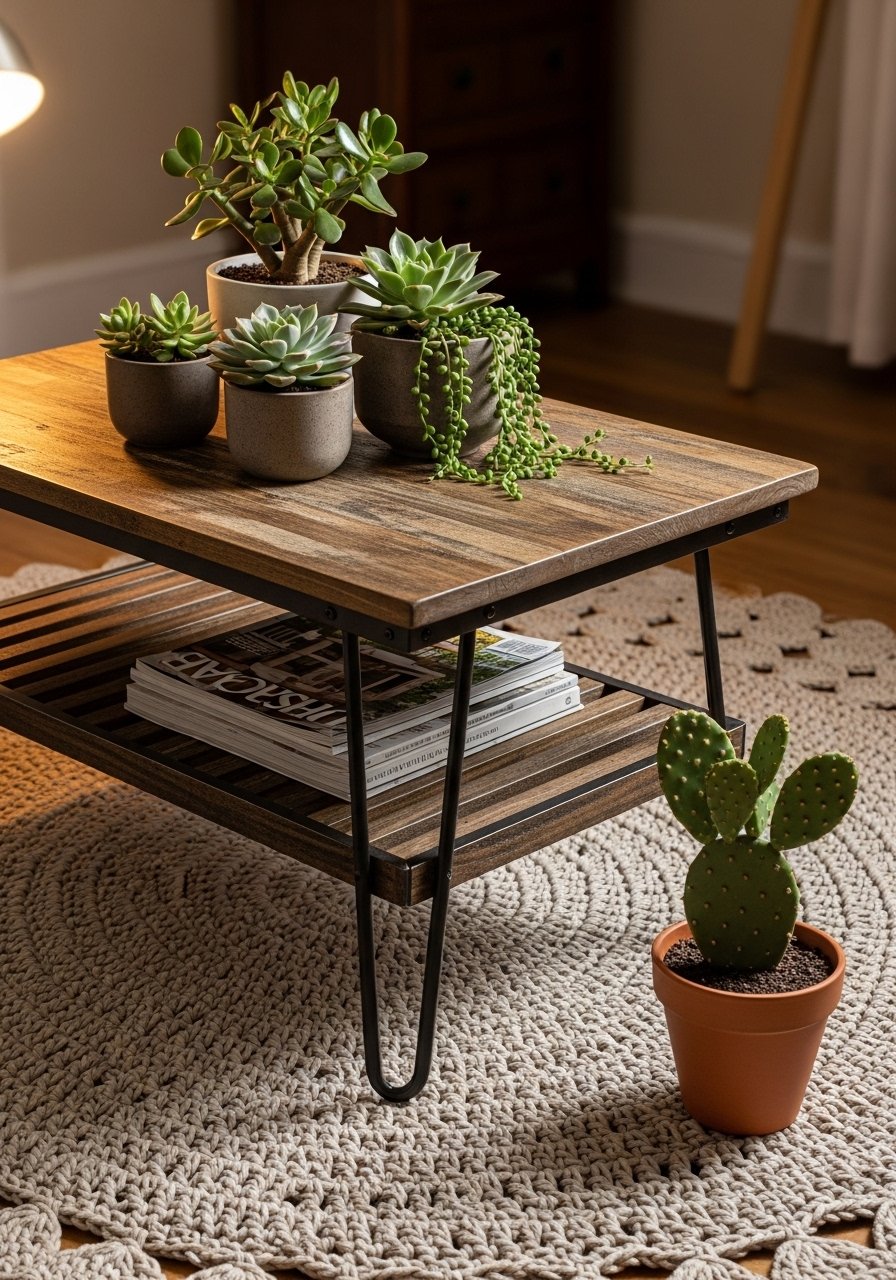
The sliding shelf adds hidden storage while keeping the airy hairpin-leg look. Great for small living rooms where function matters as much as style.
Materials
- 1 top plank, 36" x 20" x 1"
- 1 shelf plank, 34" x 10" x 3/4"
- 4 hairpin legs, 16"
- 2 drawer slides, 14"
- Wood screws and pocket hole screws
- Wood stain and satin topcoat
- Pocket hole jig (optional)
Instructions
- Cut top and shelf to size. Sand both to 220 grit.
- Stain both pieces; let dry 6–8 hours.
- Attach drawer slides under the tabletop and to the shelf per manufacturer directions.
- Mount hairpin legs at corners. Use pocket holes to secure shelf end grain and keep assembly tight.
- Apply 2 coats of topcoat; allow 24 hours cure before sliding shelf under load.
How to Display or Gift It
Slide the shelf out for easy access to remotes and books. Add a small tray and a candle on top for layering. For gifting, place in a reusable kraft box with assembly instructions and a soft furniture felt pad set.
- Cinder Block and Plank Industrial Coffee Table

This no-fuss table is affordable and easy to customize. Cinder blocks create a sturdy base and double as display nooks.
Materials
- 1 wood plank, 48" x 18" x 1"
- 2 cinder blocks (standard)
- Concrete adhesive (optional)
- Sandpaper 120, 220
- Stain and wipe-on polyurethane (1 coat)
- Felt pads for block bottoms
Instructions
- Sand the plank and wipe clean.
- Stain the plank with a cloth; dry 6–8 hours.
- Apply a wipe-on polyurethane coat; let cure 24 hours.
- Place cinder blocks at ends and set plank on top. Use concrete adhesive if a semi-permanent fix is desired and allow 24 hours cure.
- Add felt pads under blocks to protect flooring.
How to Display or Gift It
Use the block cavities for books or woven baskets. For quick seasonal swaps, drape a plaid throw across the top corner. Consider a set of decorative storage baskets to tuck inside blocks.
- Rustic Suitcase Coffee Table (Vintage-Look)
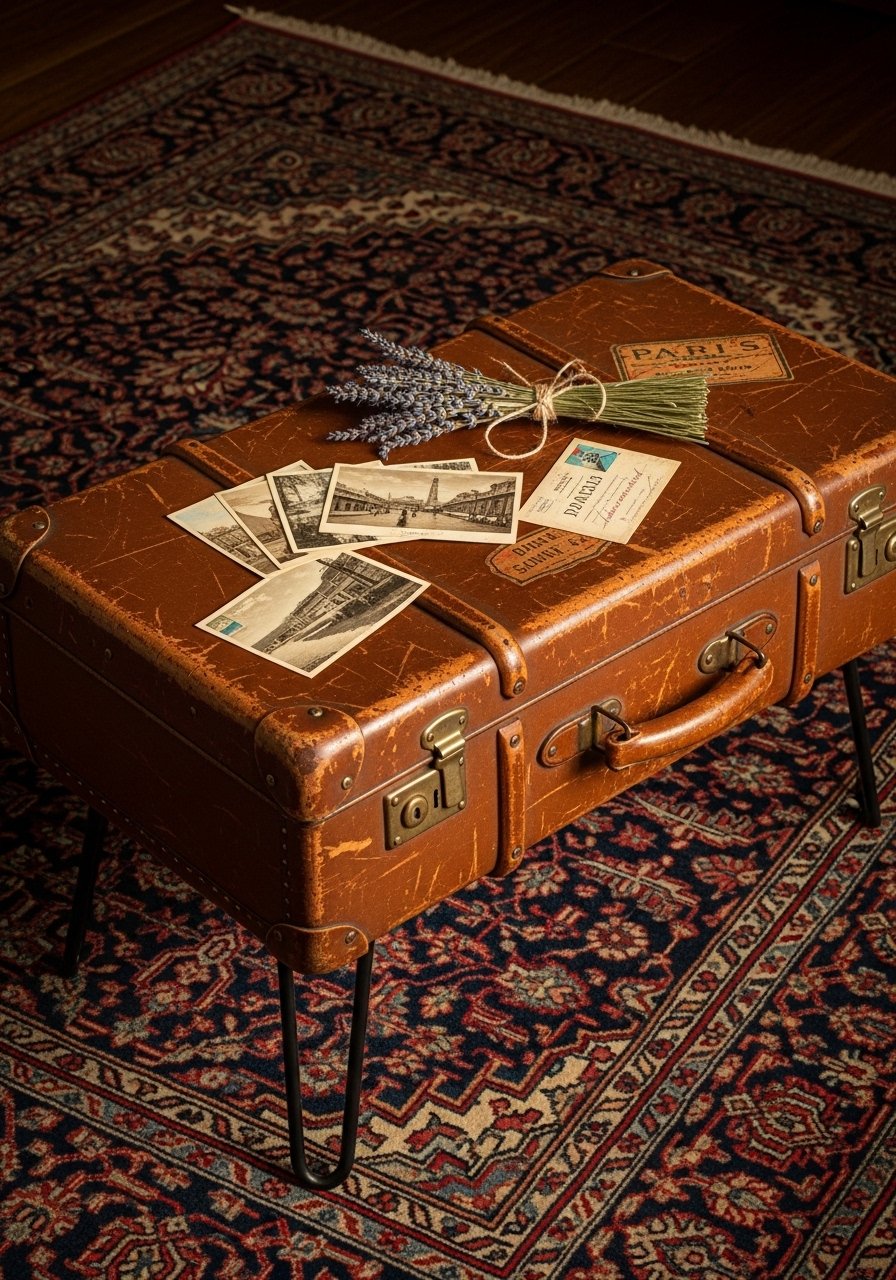
Repurposing an old suitcase adds instant story and charm. It’s also a built-in storage trunk for throws and blankets.
Materials
- Vintage or faux vintage suitcase (large)
- 4 hairpin legs, 12"
- L-brackets, 4
- Foam tape (for leveling)
- Optional decorative studs or corner protectors
- Fabric liner (if you want to reline interior)
Instructions
- Clean the suitcase interior and exterior; reline if needed.
- Attach hairpin legs using L-brackets and screws. Pre-drill through suitcase bottom carefully.
- Use foam tape around bracket edges to prevent rattling.
- Add decorative studs or corner protectors for reinforced rustic look.
How to Display or Gift It
This piece is perfect in a boho living room with layers of textiles. Fill with board games or extra cushions. If gifting, include a small furniture corner protector kit for shipping peace of mind.
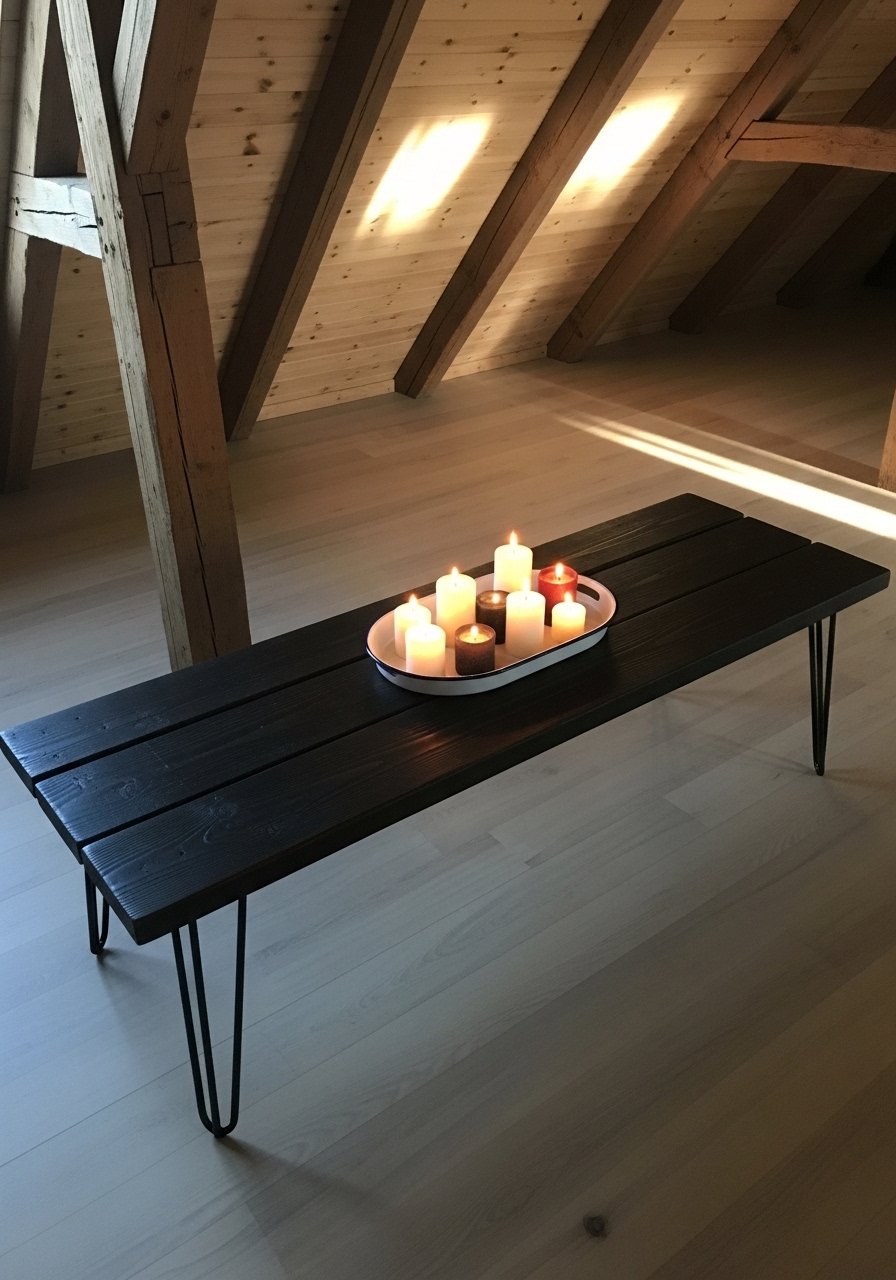
- Farmhouse X-Leg Coffee Table
The X-leg gives farmhouse flair while staying sturdy. Paint the base for contrast and sand edges for a softly worn finish.
Materials
- 1 tabletop, 44" x 22" x 1"
- 2 pre-cut X-leg templates (or build from 2x4s)
- Wood glue, pocket hole screws
- Chalk paint (white)
- Clear wax or poly for topcoat
- Sandpaper 120, 220
- Clamps
Instructions
- Build X-legs from 2x4s using miters or a router. Glue and clamp, then sand.
- Paint legs with chalk paint; whitewash the top or leave natural.
- Attach top to base with screws from underside; pre-drill pilot holes.
- Apply clear wax or poly on top. Let cure 24–48 hours before use.
How to Display or Gift It
Place on a braided rug for farmhouse coziness. Add a small tray and a mason jar of wildflowers. For transport, disassemble legs and pack in a cardboard furniture shipping kit.
- Mason Jar Inlay Coffee Table (Hidden Planter)
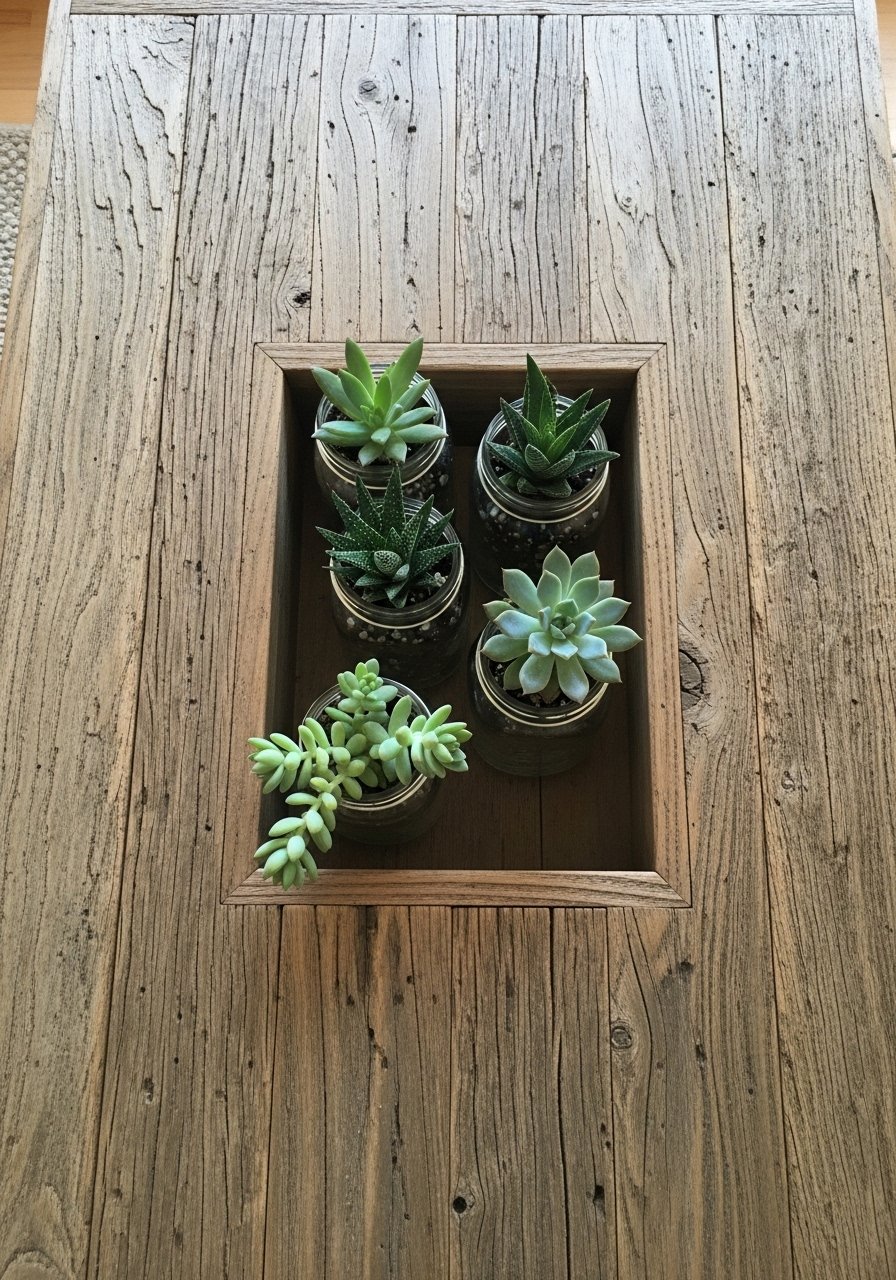
This table doubles as a tiny indoor garden. The jars are easy to swap out seasonally for fresh color.
Materials
- 1 tabletop, 36" x 24" x 1.25"
- 6 wide-mouth mason jars
- Router with straight bit (or jigsaw)
- Sandpaper 120, 220
- Wood stain and topcoat
- Potting soil and small succulents
- Silicone caulk
Instructions
- Mark jar positions on the tabletop and drill pilot holes.
- Use a router or jigsaw to cut recessed pockets 3/8" deep to seat jars snugly.
- Sand and stain the tabletop; allow stain to dry 6–8 hours.
- Seal the cut edges with silicone and insert jars. Silicone helps prevent scratching and slip.
- Fill jars with potting soil and plant succulents. Water sparingly to protect wood.
How to Display or Gift It
Swap jars for candles during gatherings. For gifting, include a small pack of succulents and a set of mason jars.
- Mid-Century Rustic Tapered-Leg Table
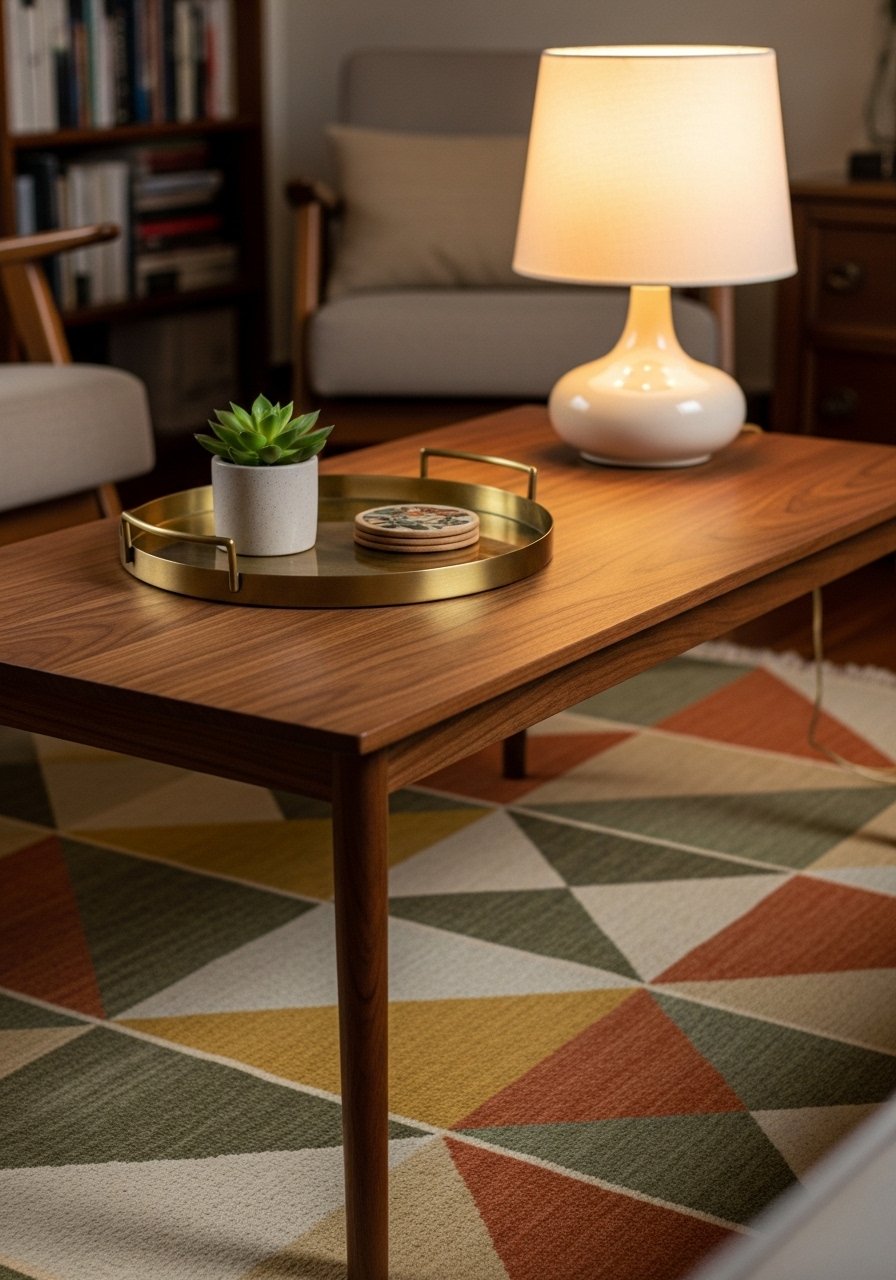
Blend mid-century shape with rustic finish. Tapered legs lift the piece and create a light footprint in the room.
Materials
- 1 top, 42" x 20" x 1"
- 4 tapered wooden legs, 14"
- Drill, dowels or metal leg brackets
- Walnut stain and satin varnish
- Wood filler and sandpaper 220
- Measuring square
Instructions
- Sand and stain the top; wipe off excess and let dry 6–8 hours.
- Attach tapered legs centered at corners using brackets or dowels, pre-drilling holes.
- Fill any screw holes with wood filler; sand when dry.
- Apply 2 coats satin varnish. Let cure 24 hours between coats.
How to Display or Gift It
Place a low bowl of seasonal fruit or pine cones on top. Use a small vintage-style brass tray for styling.
- Trunk-Top Coffee Table with Leather Straps
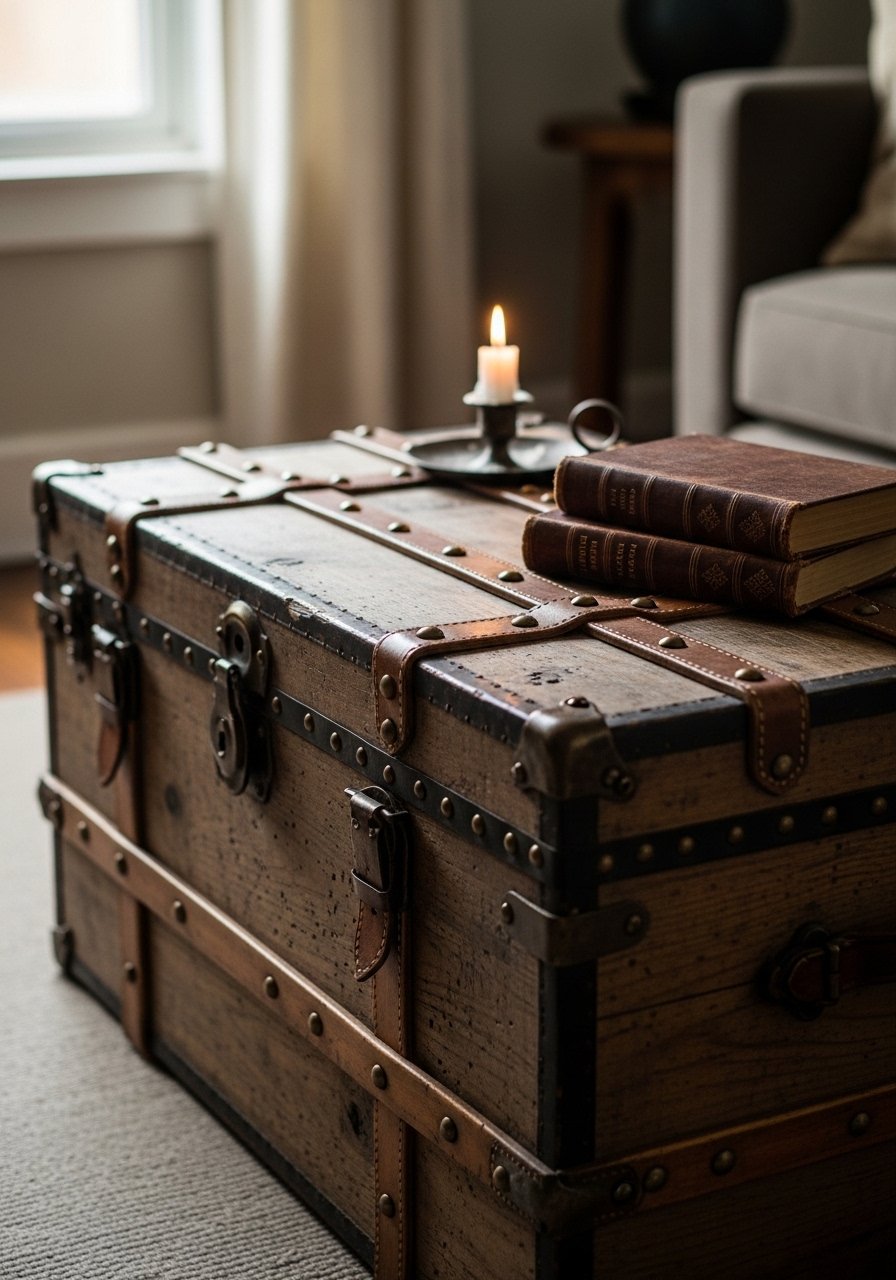
A trunk-top table adds vintage flair and storage. Leather straps and brass studs are small details that elevate the rustic look.
Materials
- Wooden trunk or deep crate, 36" x 20" x 14"
- Leather straps, 2, 40" each
- Brass studs, 20
- Upholstery tacks, optional
- Sandpaper 120
- Wood stain or rub-on antique finish
Instructions
- Clean and sand trunk surfaces lightly.
- Stain or rub on antique finish and let dry 4–6 hours.
- Attach leather straps across top with brass studs evenly spaced.
- Add felt pads to the bottom to protect floors.
How to Display or Gift It
Fill trunk with cozy blankets. Tie a twine bow and tuck in dried lavender if giving as a housewarming gift. A leather repair kit helps secure straps for longevity.
- Barrel Head Coffee Table (Round)
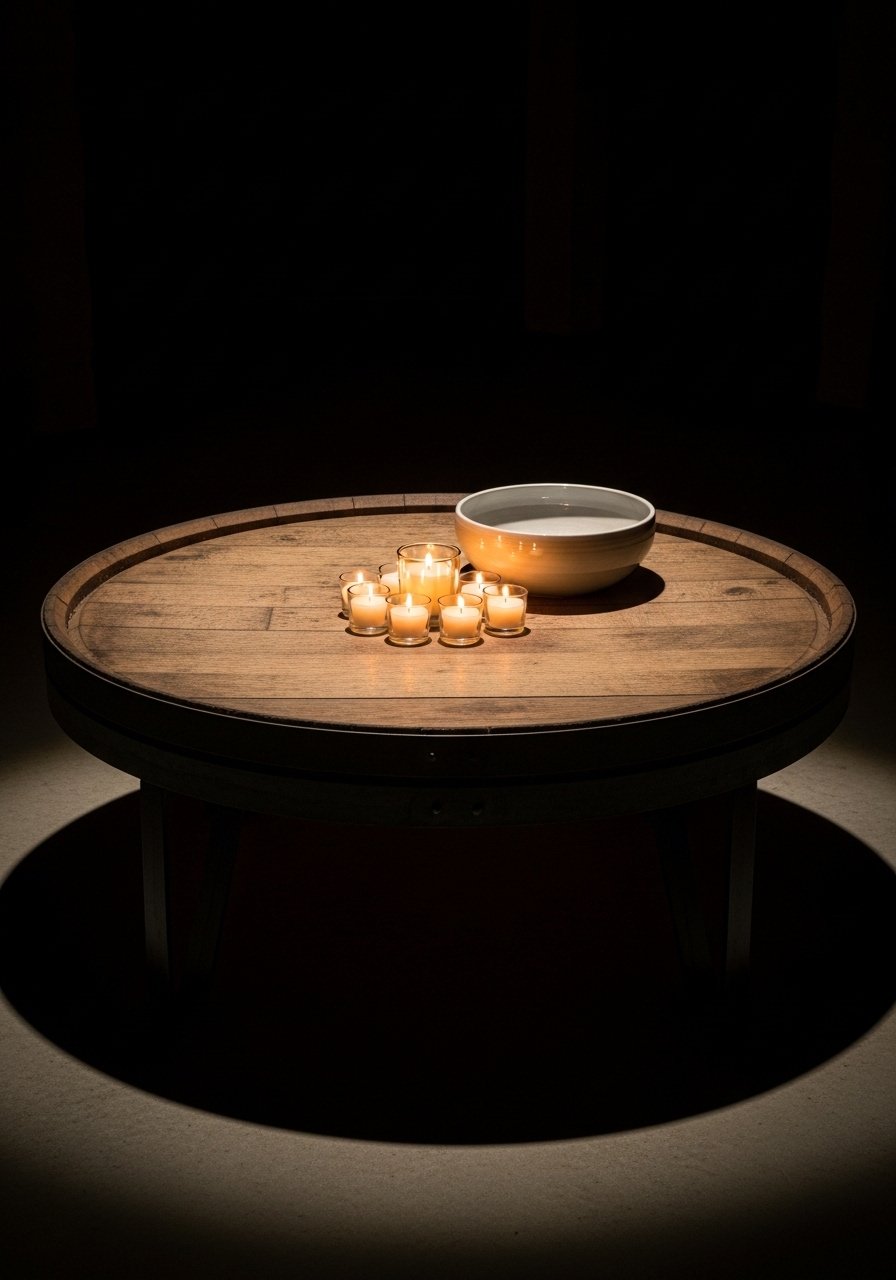
Using a barrel head gives you a ready-made round top with character. Keep edges slightly rough for authenticity.
Materials
- 1 wine barrel head, 36" diameter
- 3 iron or black metal legs, 14"
- Spray sealer or wipe-on polyurethane
- Sanding sponge 120, 220
- Iron cleaner (if using metal legs)
Instructions
- Sand the barrel head lightly to remove rough splinters.
- Clean metal legs and attach to barrel head with screws and brackets.
- Seal with 2 coats wipe-on polyurethane, 24 hours cure before use.
How to Display or Gift It
Pair with a rustic tray and pillar candles. For gifting, include coasters in a kraft box. A set of metal legs gives immediate industrial charm.
- Tree-Ring Slice Mosaic Coffee Table
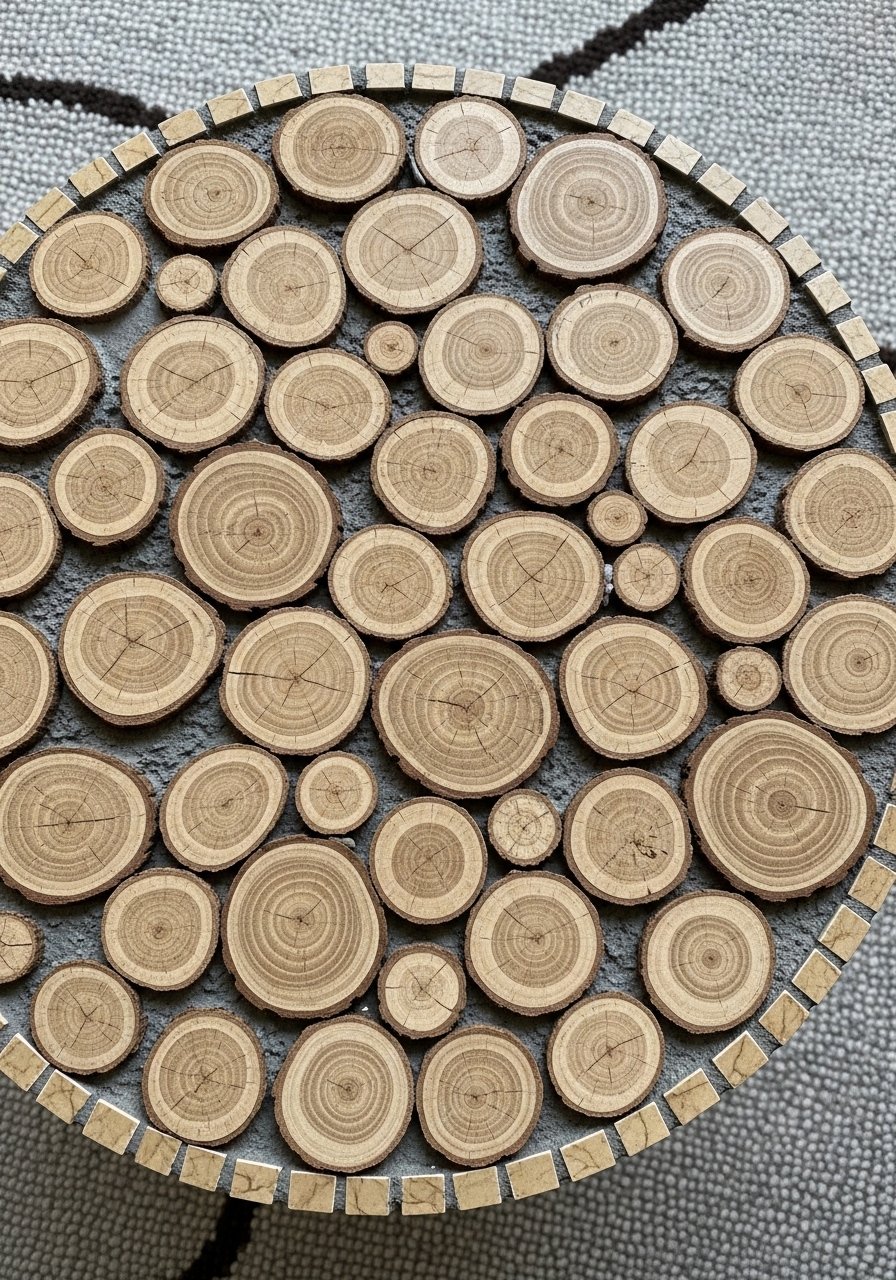
This tabletop uses many small slices for a natural mosaic. The rings provide tactile interest and a cozy forest-inspired look.
Materials
- Assorted wood slices, 2–4" diameter, total surface area 36" round
- Round tabletop base, 36" diameter
- Epoxy or wood glue and filler
- Sandpaper 120–220
- Clear epoxy or varnish for sealing
- Pneumatic nail gun or clamps
Instructions
- Arrange wood slices on the base in a pleasing pattern before gluing.
- Glue each slice with wood glue and clamp where needed. Let set 24 hours.
- Sand surface flush starting with 120 grit to smooth transitions.
- Fill gaps with epoxy or wood filler; sand when dry.
- Seal with clear epoxy or varnish. Epoxy: allow 72 hours full cure.
How to Display or Gift It
This table pairs beautifully with jute rugs and ceramic planters. Keep a small bottle of wood oil for future touch-ups. A jar of clear epoxy resin works well to make the surface wipeable.
- Upholstered Ottoman Coffee Table (Tufted)
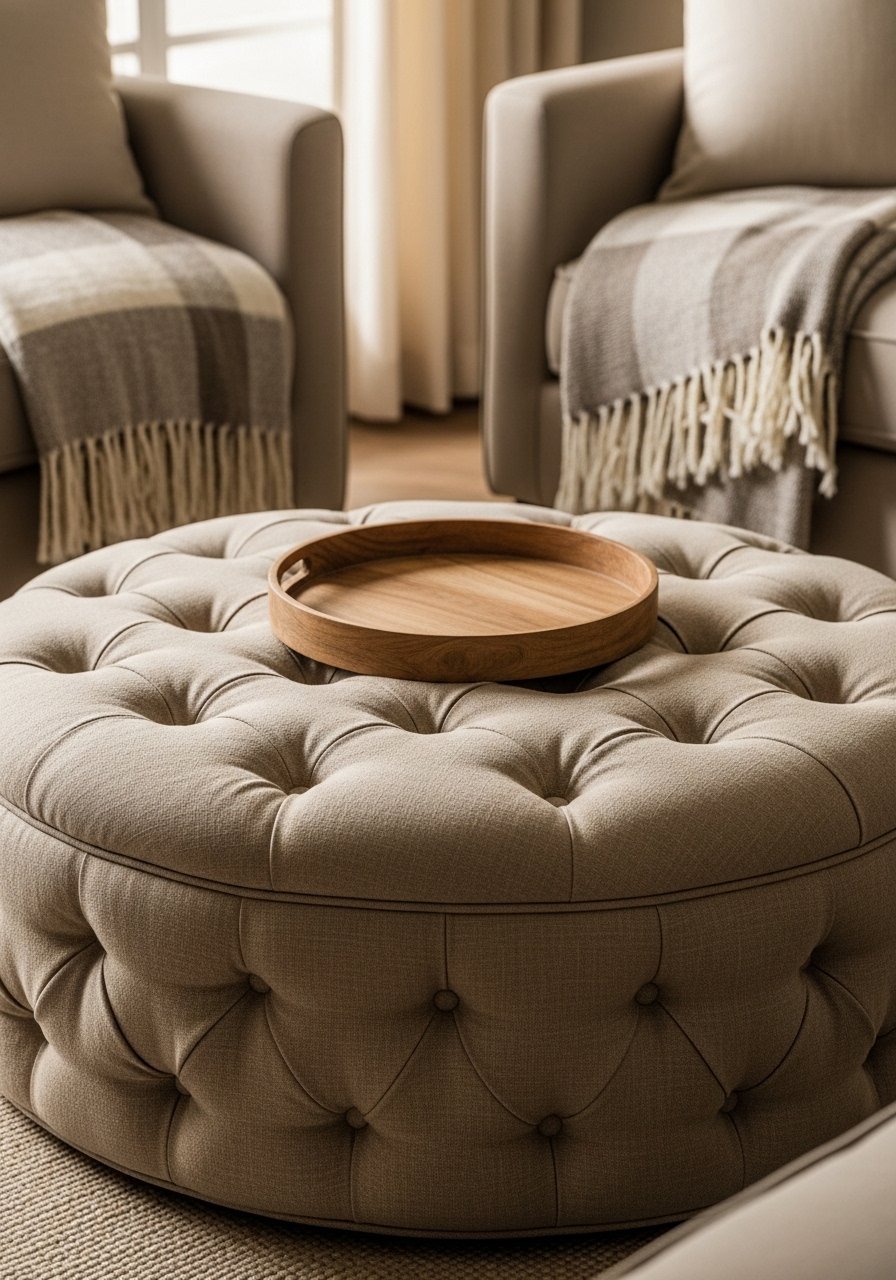
Soft surfaces turn your coffee table into comfortable extra seating. Tufting adds a vintage, handmade feel that meshes with cottagecore and boho styles.
Materials
- Plywood round top, 36" diameter, 3/4"
- High-density foam, 3" thick
- Batting, 1 yard
- Linen fabric, 2 yards
- Tufting buttons and strong twine
- Staple gun and heavy-duty staples
- Glue spray
Instructions
- Cut plywood to size and glue foam to top with spray adhesive.
- Wrap foam with batting and fabric, pulling taut and stapling underside.
- Mark tuft positions and drill pilot holes. Push twine through, secure buttons on top and knot underneath.
- Add a non-slip pad beneath and top with a wooden tray for drinks.
How to Display or Gift It
Use as a coffee table or extra seat for movie nights. Store extra cushions in a nearby basket. A round wooden serving tray helps anchor drinks.
- Distressed Chalk-Paint Coffee Table (Shabby Chic)
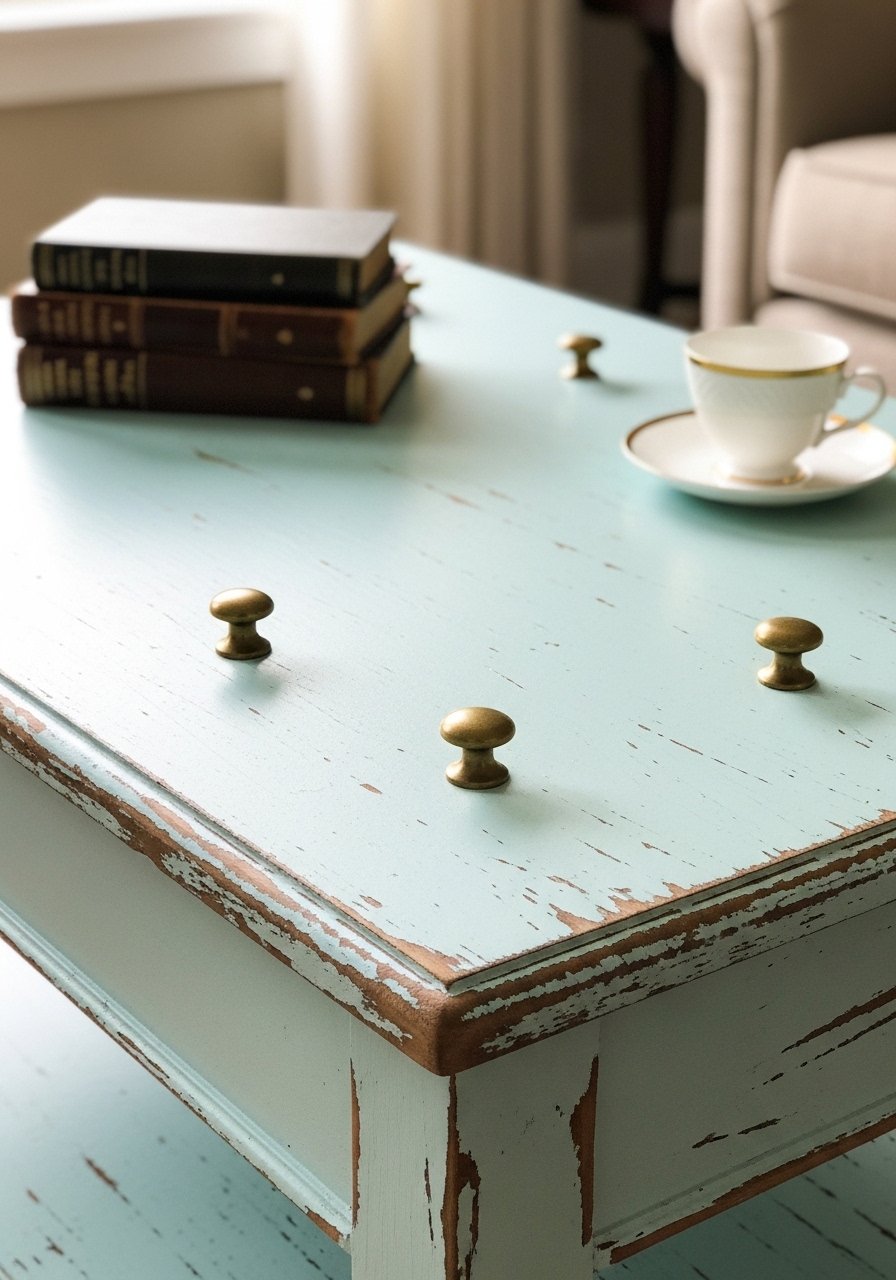
Chalk paint gives that soft, vintage look without much prep. Distressing the edges reveals underlying wood and adds warmth.
Materials
- 1 table (thrifted or new), 40" x 20"
- Chalk paint, pint
- Sanding block 220 grit
- Clear wax for sealing
- Wax brush or lint-free rag
- Painter's tape
Instructions
- Clean the table; you don’t need to sand heavily for chalk paint.
- Apply 2 coats of chalk paint; dry 1 hour between coats.
- Sand edges and corners with 220 grit for a worn look.
- Seal with clear wax; buff to soft sheen. Cure 24 hours.
How to Display or Gift It
This piece shines in a cottagecore setting with dried florals. For storage, keep wax and a small rag in a craft box for touch-ups. A set of natural beeswax polishes nicely.
- Crate-Nested Coffee Table (Stackable Storage)
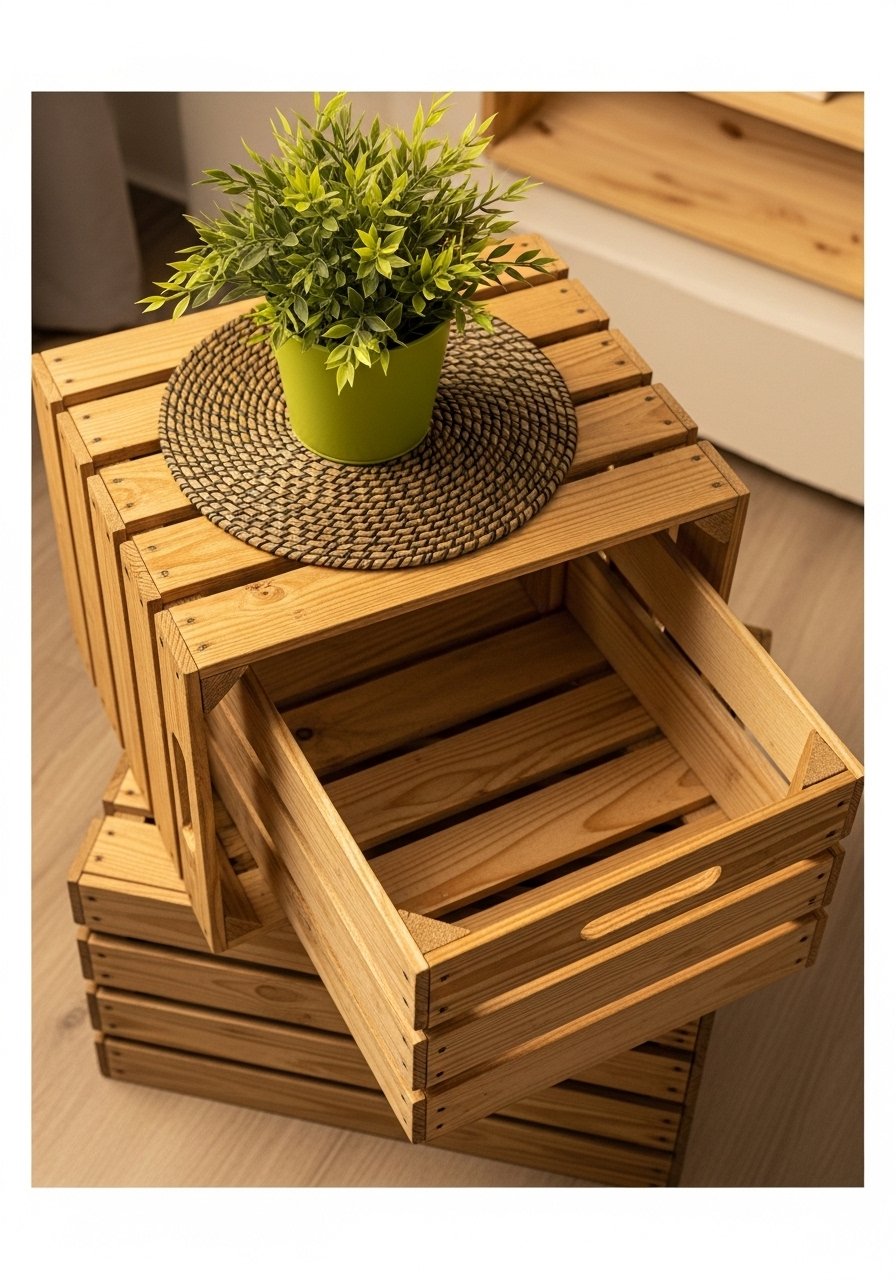
Crates make a flexible table that’s easy to resize. Keep one crate sideways for accessible storage—perfect in small living rooms.
Materials
- 3 wooden crates, 18" x 12" x 10"
- Wood stain and topcoat
- Screws and corner braces
- Sandpaper 120, 220
- Felt pads
Instructions
- Sand crates lightly and stain as desired.
- Stack crates and secure with corner braces or screws. Pre-drill pilot holes.
- Seal with a topcoat and attach felt pads under bottom edges.
How to Display or Gift It
Use crates for board games and throws. For gifting, add a set of woven organizers to tuck inside.
- Tile Inlay Rustic Coffee Table
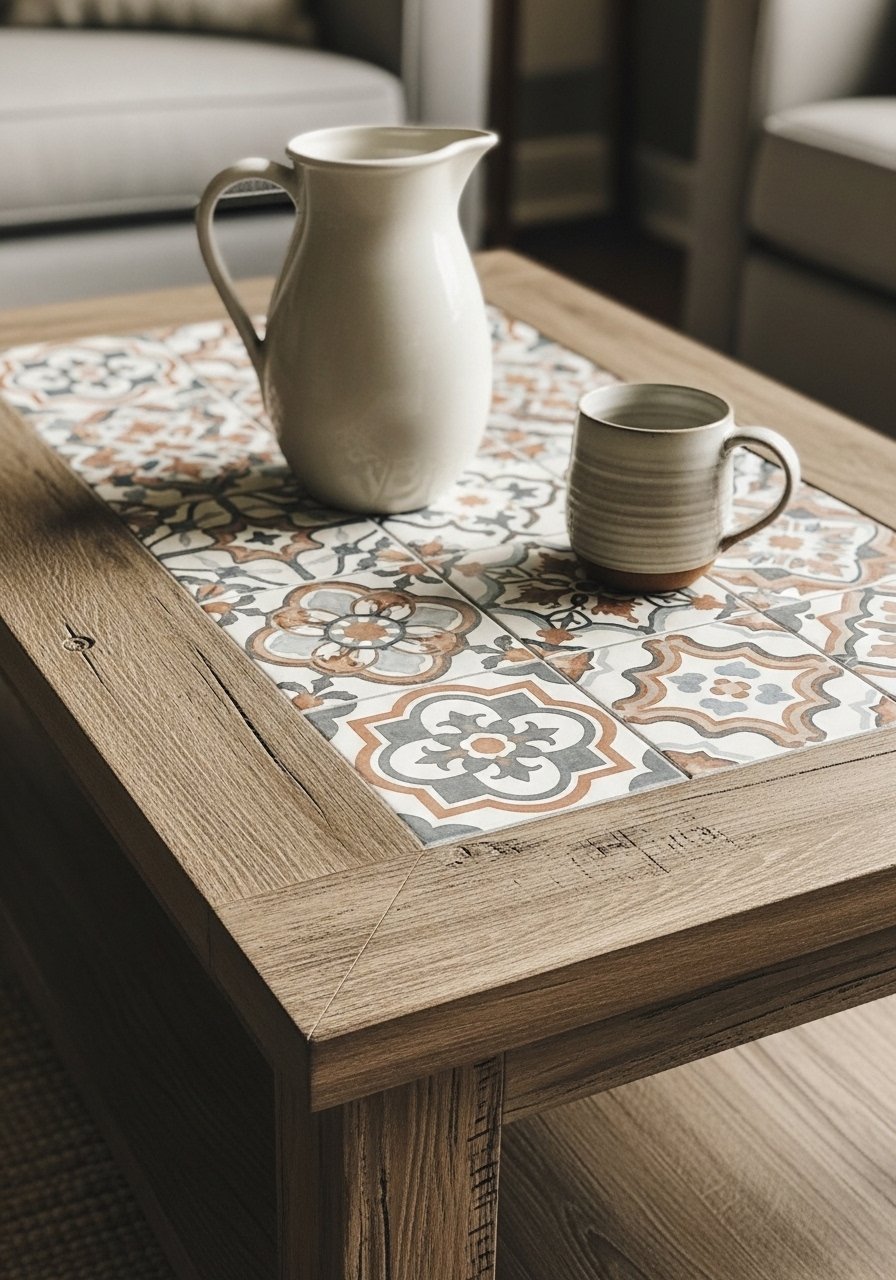
Tile inlay adds pattern and personality. Choose muted encaustic-look tiles for a vintage feel that pairs well with warm wood.
Materials
- 1 wood frame/tabletop, 42" x 22"
- Tiles to fit central inset (e.g., 12” x 12” area)
- Thinset mortar or tile adhesive
- Grout and grout sealer
- Tile spacers and float
- Wet saw or tile cutter
Instructions
- Create a recessed area in the tabletop to seat tiles 1/4" below wood surface.
- Lay tile adhesive and set tiles with spacers. Allow 24 hours for thinset to cure.
- Grout tiles and wipe clean; let grout cure 24 hours, then seal grout.
- Seal wood frame with oil or poly for contrast.
How to Display or Gift It
Tiles make cleaning spills easy. Pair with textiles in tile colors for cohesion. A tile sealer preserves grout from stains.
- Rope-Wrapped Leg Rustic Coffee Table
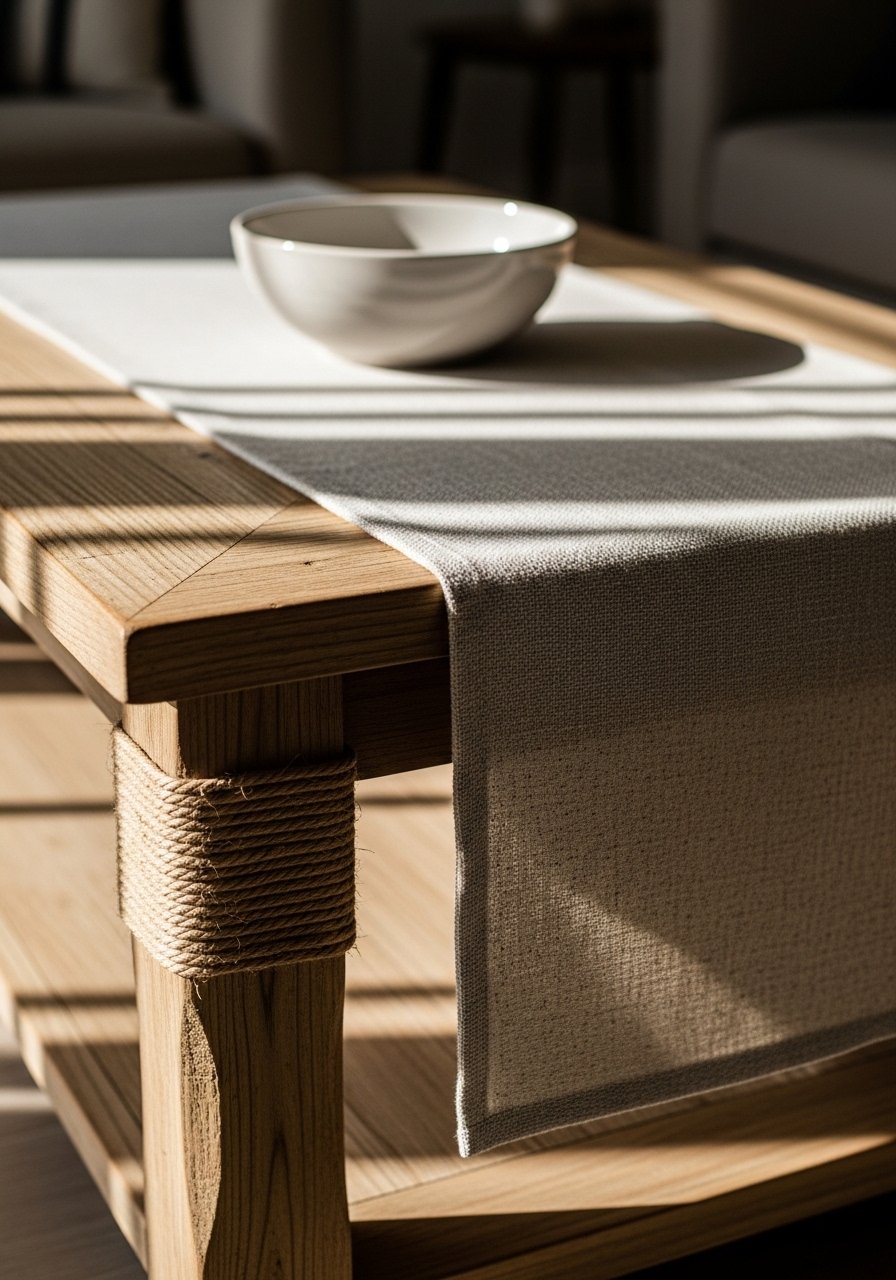
Wrapping legs in rope brings a tactile nautical or boho element. The natural fibers warm up any room and hide blemishes.
Materials
- 1 tabletop, 36" x 22"
- 4 wooden legs
- Natural jute rope, 50 ft
- E6000 or hot glue, 1 tube
- Scissors and lighter (to seal rope ends)
- Felt pads
Instructions
- Clean legs and plan rope starting point.
- Apply a small bead of glue and start wrapping tightly, pressing rope edge to edge. Glue every 6 inches.
- Finish ends by tucking and securing with glue; seal frayed ends with a quick flame on a lighter if synthetic blended.
- Attach legs to tabletop and add felt pads.
How to Display or Gift It
This table reads cottagecore or boho depending on accessories. For gifting, include care instructions and a small bottle of fabric-safe glue for future repairs.
- Reclaimed Shutter Pane Coffee Table (Glass Top)
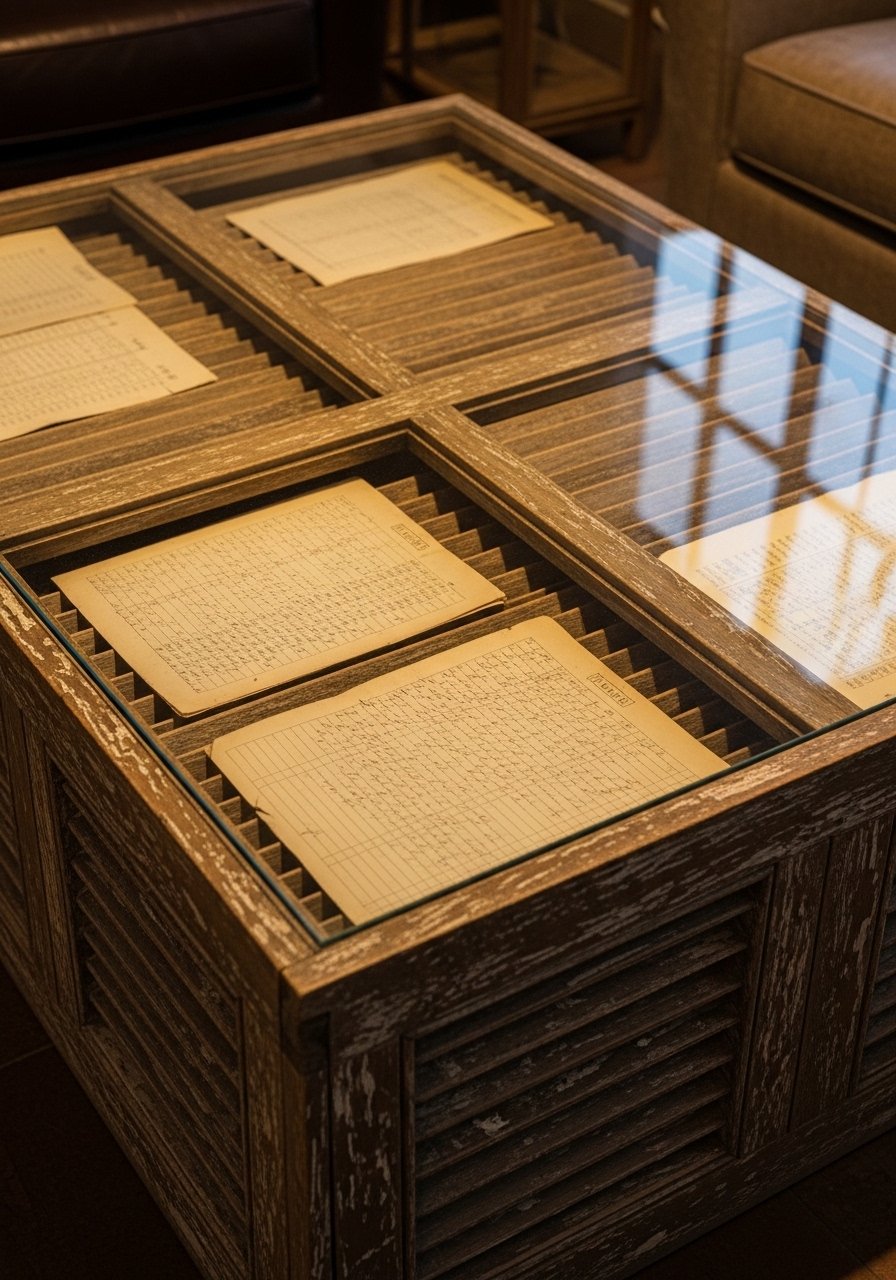
Use old shutter panels as a decorative top beneath a glass sheet. The shutters create framed compartments—perfect for keepsakes.
Materials
- 1 set shutters trimmed to 40" x 20"
- Tempered glass top, 40" x 20"
- Felt pads and silicone bumpers
- Paint or stain for shutters
- Wood glue and small finishing nails
Instructions
- Clean shutter slats, repair loose parts, and paint/stain as desired. Dry 4–6 hours.
- Attach shutters to a plywood base to stabilize.
- Place glass top on silicone bumpers to prevent slipping and mark positions.
- Add felt pads under base to protect floor.
How to Display or Gift It
Place ephemera (postcards, photos) under glass for a personal touch. Package the glass separately if gifting and include a glass suction lifter for safe handling.
- Industrial Pipe Frame Coffee Table
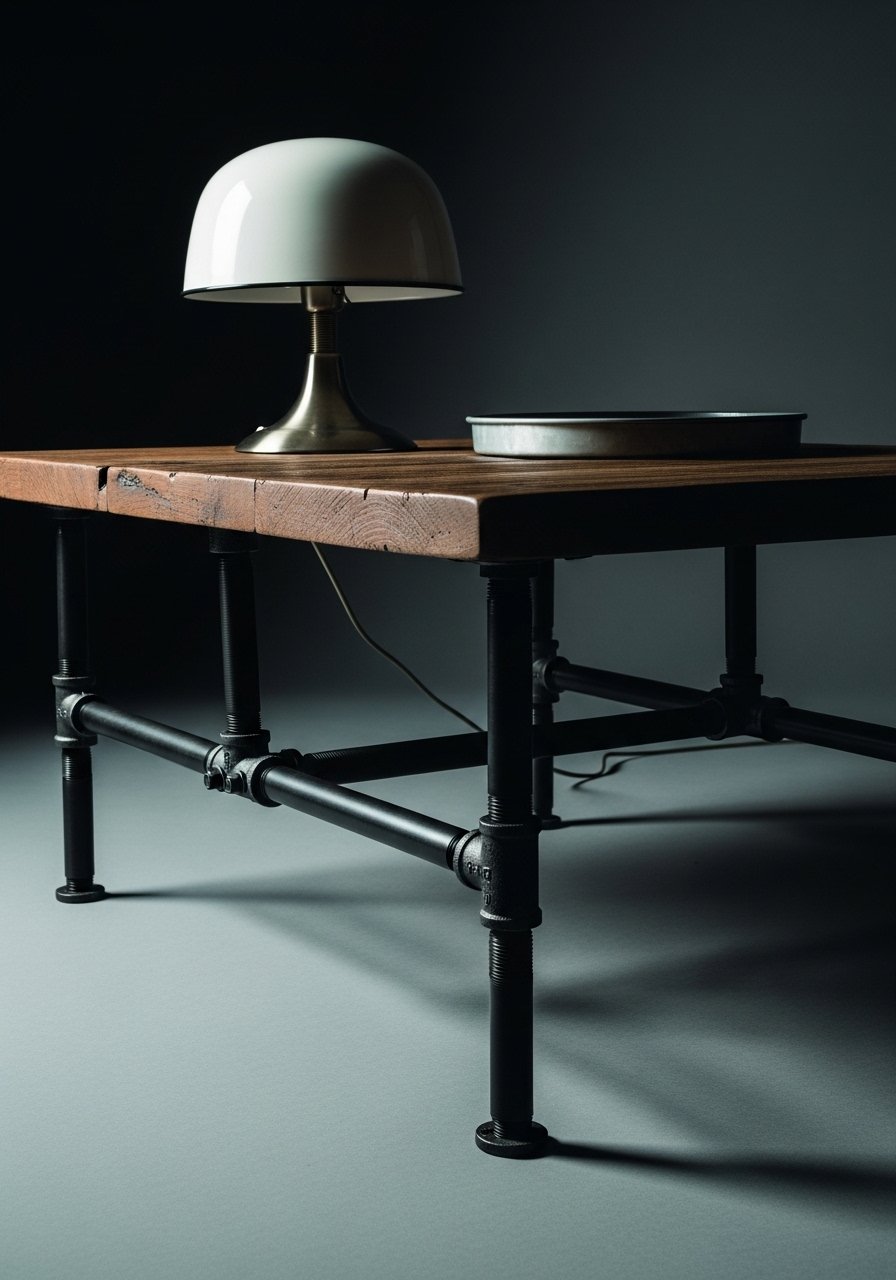
Industrial pipe frames are strong and create a sturdy visual contrast with warm wood tops. Easy to customize in height and length.
Materials
- 1 wood top, 48" x 18"
- Galvanized pipe fittings for base (pre-cut to desired height)
- Pipe wrench
- Sanding supplies and stain
- Metal primer (if painting pipes)
Instructions
- Assemble pipe frame to size and tighten with pipe wrench.
- Sand and finish the wood top; stain and seal with poly 24 hours cure.
- Attach wood top to frame with brackets or screws from underside.
How to Display or Gift It
This table suits urban farmhouse or loft spaces. Add coasters and a metal tray for styling. A set of pipe fittings makes assembly straightforward.
- Sliding Top Storage Coffee Table (Lift-Top)

A lift-top adds practical storage while keeping that cozy rustic look. Great for small spaces—store blankets and board games inside.
Materials
- 1 tabletop, 42" x 24"
- Lift-top mechanism (single or double)
- Hinges and screws
- Plywood for internal box, 42" x 24" x 8"
- Wood finish and sandpaper 120
- Safety stay or soft-close hardware
Instructions
- Build an internal storage box sized to fit under the tabletop.
- Install lift-top mechanism per instructions and test action.
- Finish wood surfaces and ensure smooth operation. Allow 24 hours for finish cure before heavy use.
How to Display or Gift It
Perfect for TV remotes and snacks. For gifting, include a small organizer to keep items tidy. A lift-top hardware kit simplifies install.
- Rustic Folding Picnic-Style Coffee Table
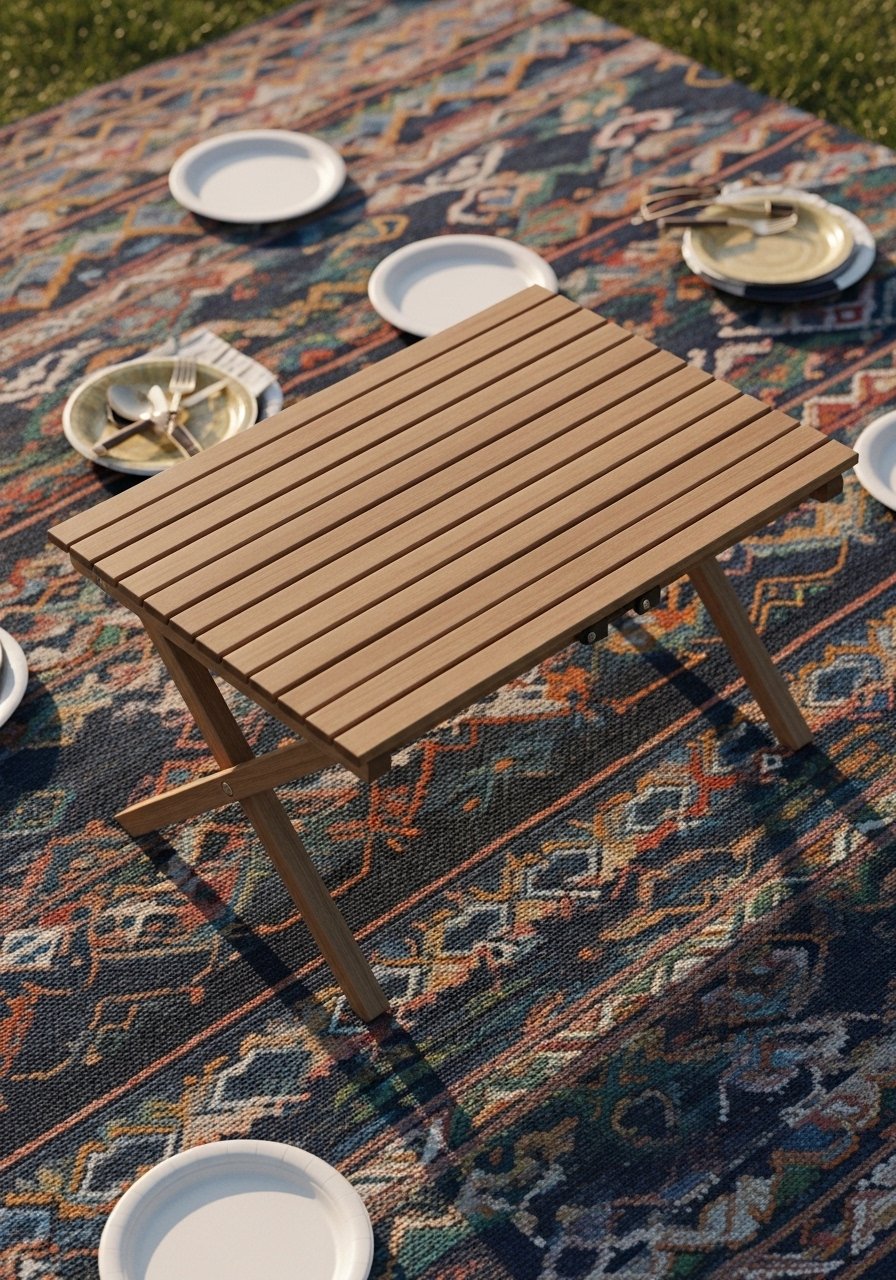
This folding style is portable for indoor/outdoor use and stores flat. Slatted tops dry quickly if used on patios.
Materials
- 1 slatted top, 36" x 24"
- Folding leg hardware (brackets)
- Weather-resistant stain or outdoor poly
- Screws and a bit driver
- Sandpaper 120
Instructions
- Build or buy a slatted top; sand and treat with outdoor-grade finish.
- Attach folding leg brackets and test stability.
- Let finish cure for 48 hours before outdoor use.
How to Display or Gift It
Use on a covered porch or for picnic-style in living room. Fold and store in a closet with a fabric storage bag.
- Reclaimed Door Coffee Table with Drawer
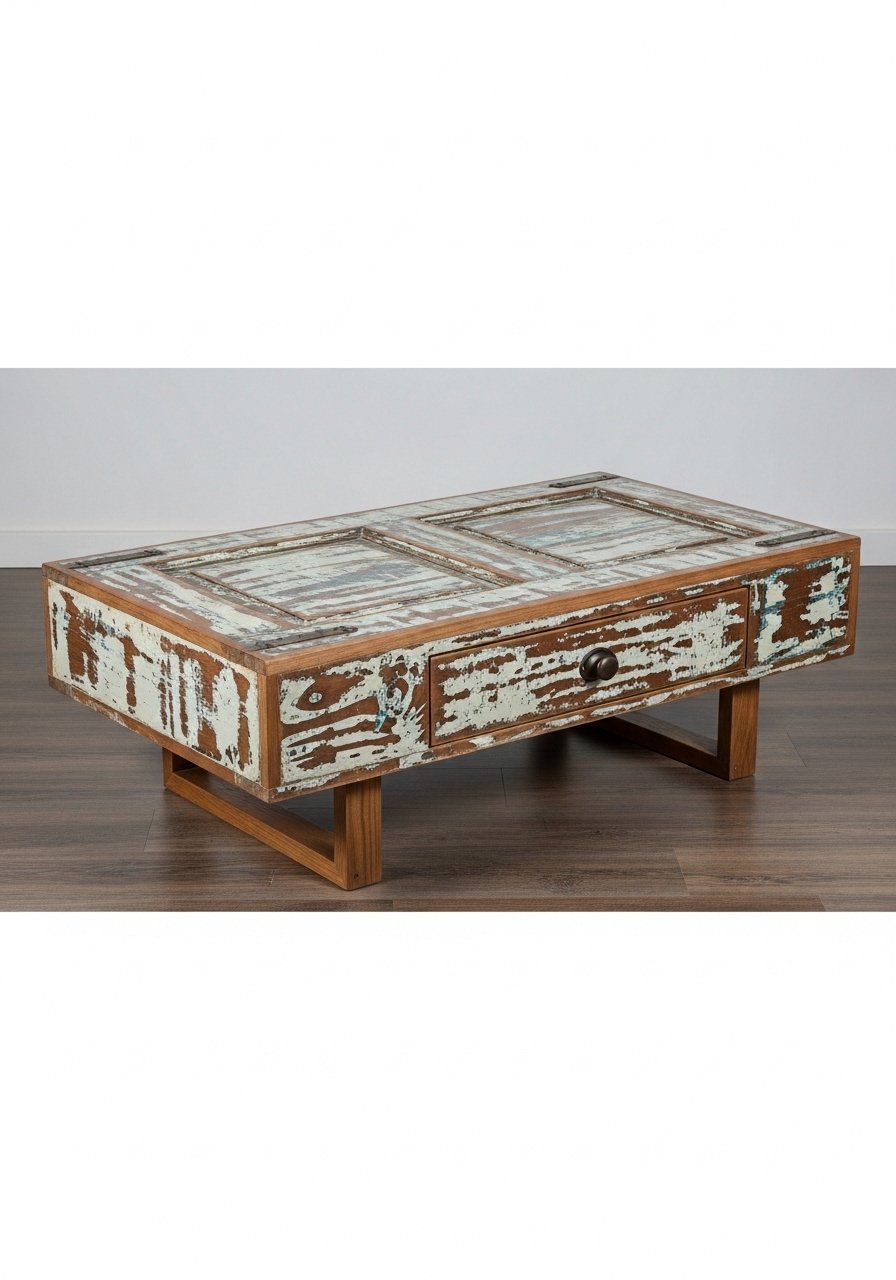
An old door provides a large, dramatic top and often has built-in hardware that adds charm. Adding a drawer boosts hidden storage.
Materials
- 1 reclaimed door cut to 48" x 20"
- Drawer kit sized to fit under top
- Legs or base, 12–14" height
- Sanding supplies and paint stripper if needed
- Wood screws and brackets
Instructions
- Cut door to length and sand edges. Strip paint if necessary.
- Build or install drawer beneath the door top per kit instructions.
- Attach base and secure top. Paint or stain as desired and allow 24 hours curing.
How to Display or Gift It
Works well in an eclectic living room. Add a decorative knob as a finishing touch. A compact drawer kit keeps things simple.
- Patchwork Reclaimed Wood Coffee Table
Patchwork uses small scraps for a colorful, rustic surface. The piece reads thoughtfully collected and handmade.
Materials
- Assorted reclaimed wood strips totaling 36" x 24"
- Plywood backing, 3/4"
- Wood glue and clamps
- Belt sander or orbital sander
- Polyurethane satin finish, 16 oz
Instructions
- Arrange strips in a layout, glue to plywood backing in sections, clamping for 60 minutes.
- Sand flush and fill gaps with wood filler.
- Apply 2 coats satin polyurethane; dry 24 hours between coats.
How to Display or Gift It
This table is a great statement piece—pair with neutral textiles. For gifting, wrap in kraft paper and include a small sample of the finish in a mini paint sample kit.
- Japandi Minimal Rustic Coffee Table (Low and Wide)
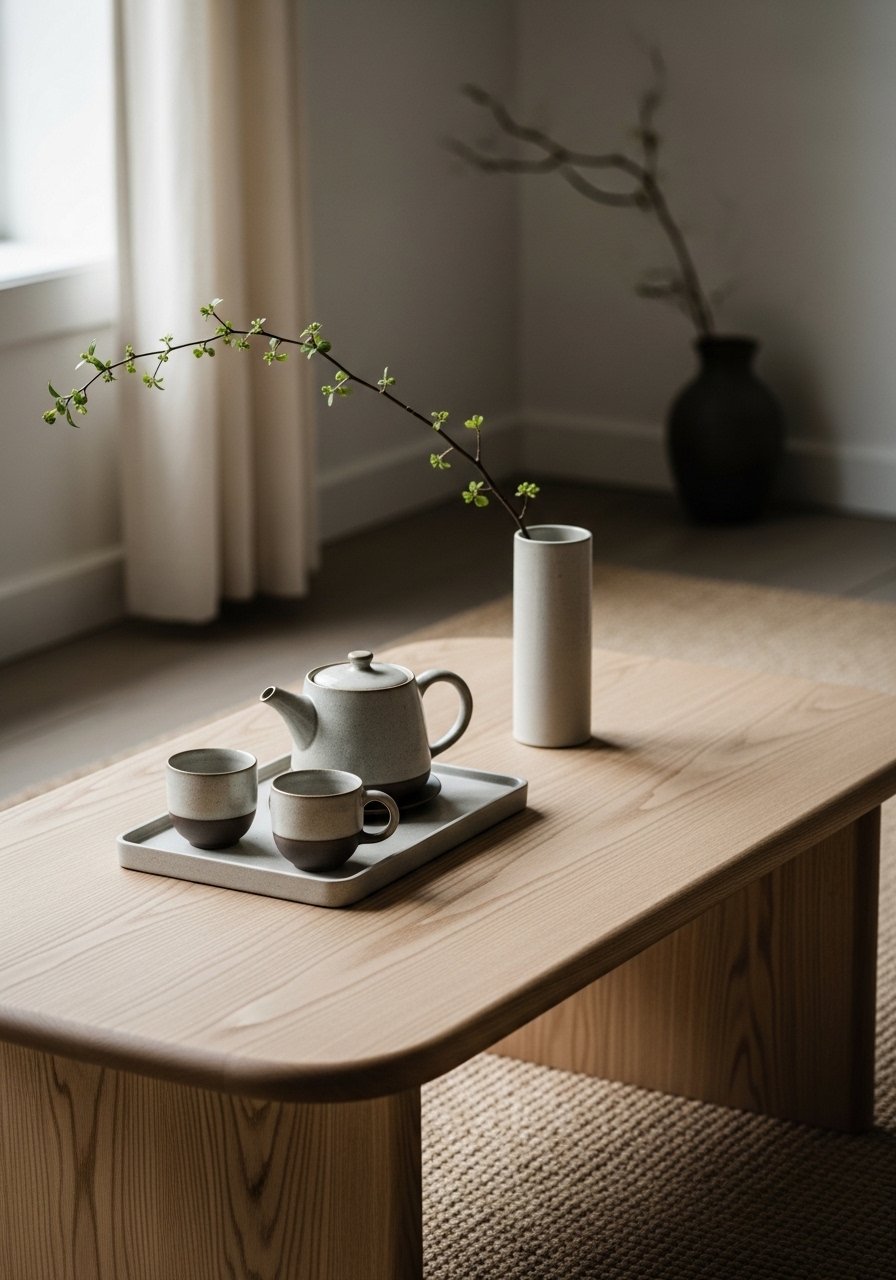
Japandi fuses Japanese minimalism and Scandinavian warmth—clean lines, warm wood, and understated styling. This low table keeps spaces calm and grounded.
Materials
- 1 low tabletop, 48" x 18" x 1"
- Smooth tapered legs, 8–10"
- Clear oil finish (e.g., Danish oil)
- Sandpaper 240 grit
- Glue and screws
Instructions
- Sand thoroughly with 240 grit for a silky finish.
- Apply Danish oil in thin coats with lint-free cloth; dry 8 hours between coats.
- Attach low legs and check height balance. Cure 48 hours before use.
How to Display or Gift It
Style with minimal ceramics and a single linen runner. For gifting, include a small bottle of oil and a lint-free cloth pack.
- Mosaic Pebble and Resin Coffee Table
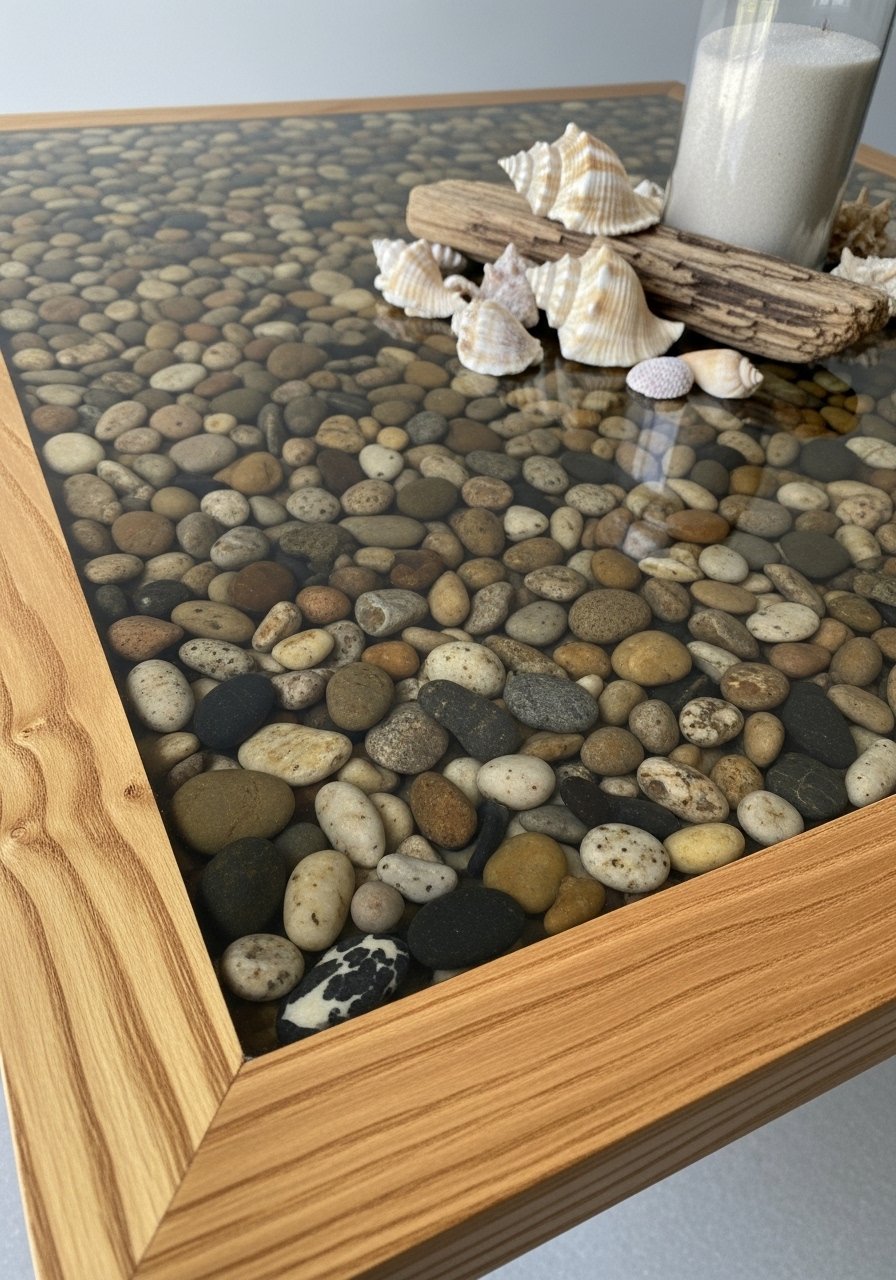
Pebble inlay gives a tactile, natural surface reminiscent of a shoreline. Pair with warm wood for a cozy coastal-rustic feel.
Materials
- 1 tabletop frame, 40" x 20"
- River pebbles, assorted sizes, 5–10 lb
- Clear epoxy resin kit (1–2 gallons depending on thickness)
- Sandpaper up to 800 grit
- Heat gun for bubble removal
- Mixing cups and nitrile gloves
Instructions
- Lay pebbles in tabletop area and experiment with pattern.
- Mix epoxy per kit instructions and pour in thin layers to avoid overheating. Thin layers cure in 12–24 hours; total build may be 48–72 hours.
- Use a heat gun to remove bubbles in each pour.
- Sand flush and polish once fully cured.
How to Display or Gift It
This table adds a coastal vibe—pair with blue linens and driftwood accents. A small epoxy resin kit sized for tabletops makes the process simpler.
These 25 rustic DIY coffee table ideas should give you options for every style—farmhouse, cottagecore, boho, Japandi, and industrial. Try a simpler pallet design if you want a fast win, or plan a weekend for a resin river or live-edge slab.
Which project will you pin first? Save this list for your next weekend build and share a photo with a friend who loves cozy home projects. Trust me, picking up a quality hot glue gun with temperature control changed how every single one of these projects turned out — fewer strings, cleaner joins, and safer handling.
Happy building—and don’t forget to pin your favorites for later.


