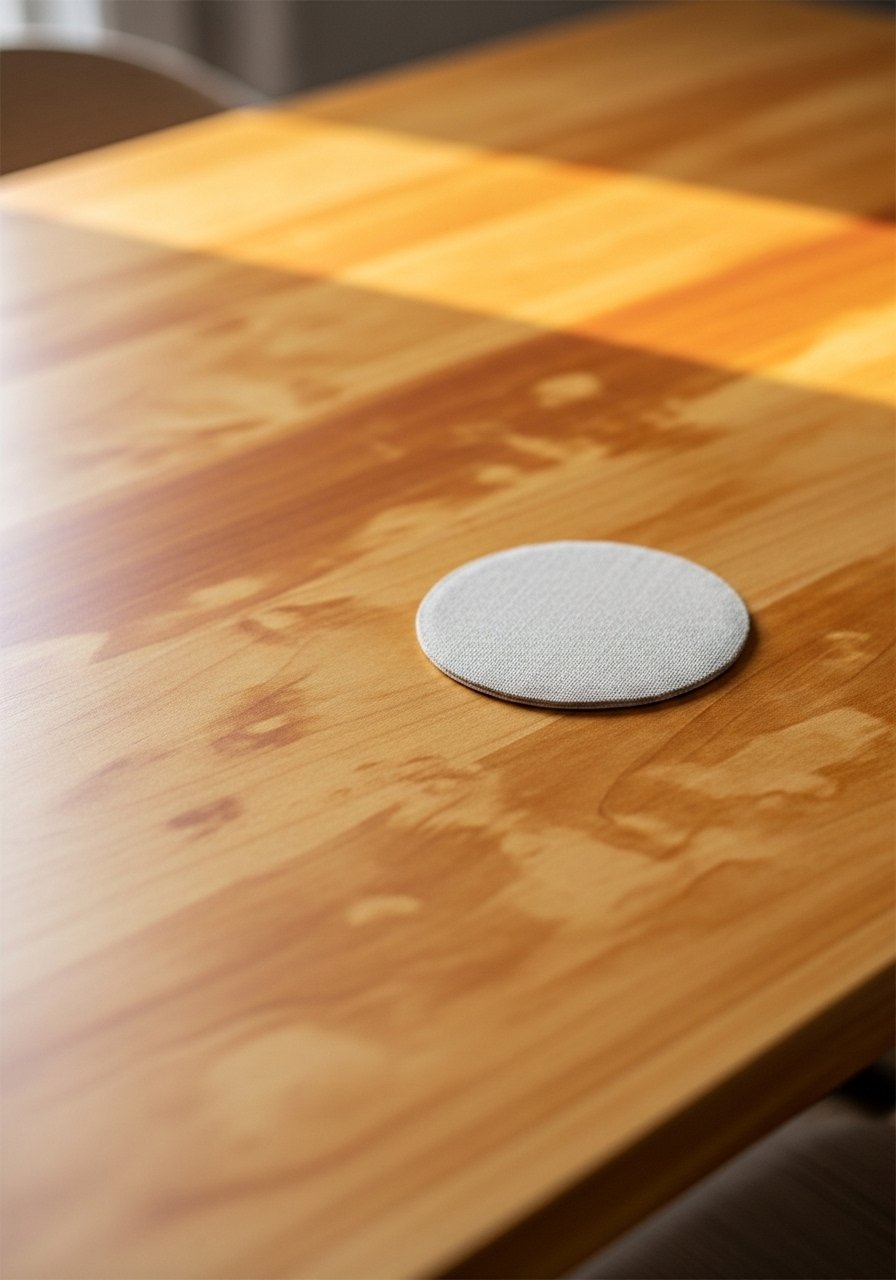
You’re staring at that blank corner thinking a coffee table should be bold, textural, and practical. A DIY concrete coffee table is the perfect answer — it reads industrial chic but feels warm when paired with wood and linen. Whether you want a hairpin-legged slab, a terrazzo-topped rectangle, or a marbleized round, these projects show you how to get there step by step.
I kept each build real: exact bag sizes, curing times, and simple tooling so you won’t overbuy. If you’re mixing more than a quick patch, grab a drill with mixing paddle to speed up batching and a foam brush for thin sealant coats. I use a 50 lb bag of Quikrete fast-setting concrete mix for most tops and a variable-temperature hot glue gun for quick mold fixes. Pin your favorites, then keep scrolling — each project has a materials list, exact steps, drying times, troubleshooting tips, and styling ideas.
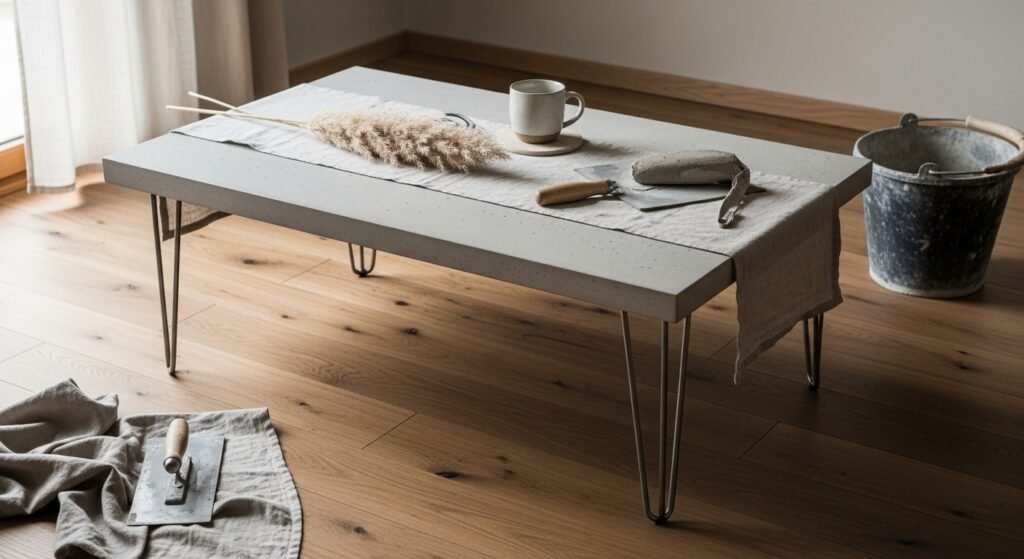
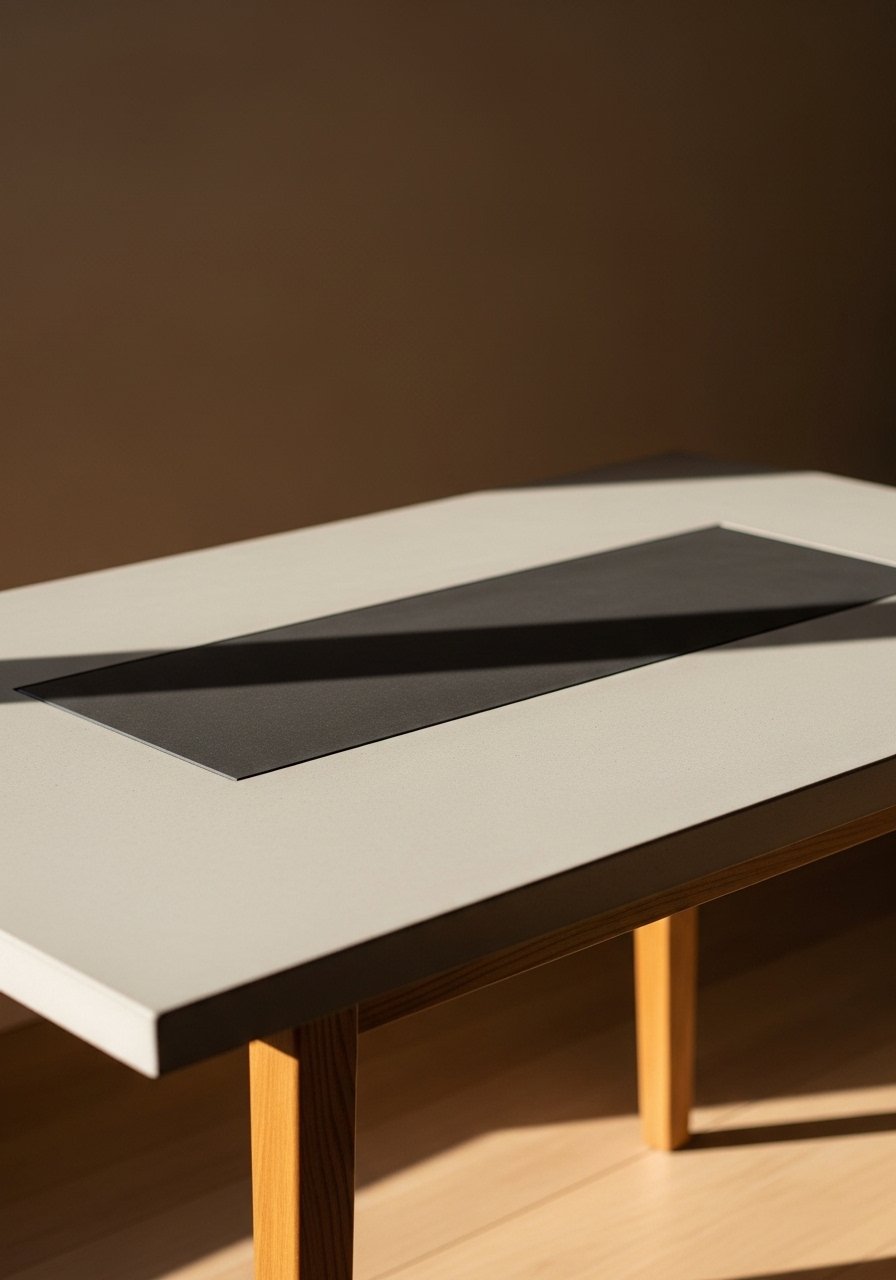
- Minimalist Rectangular Slab — DIY concrete coffee table
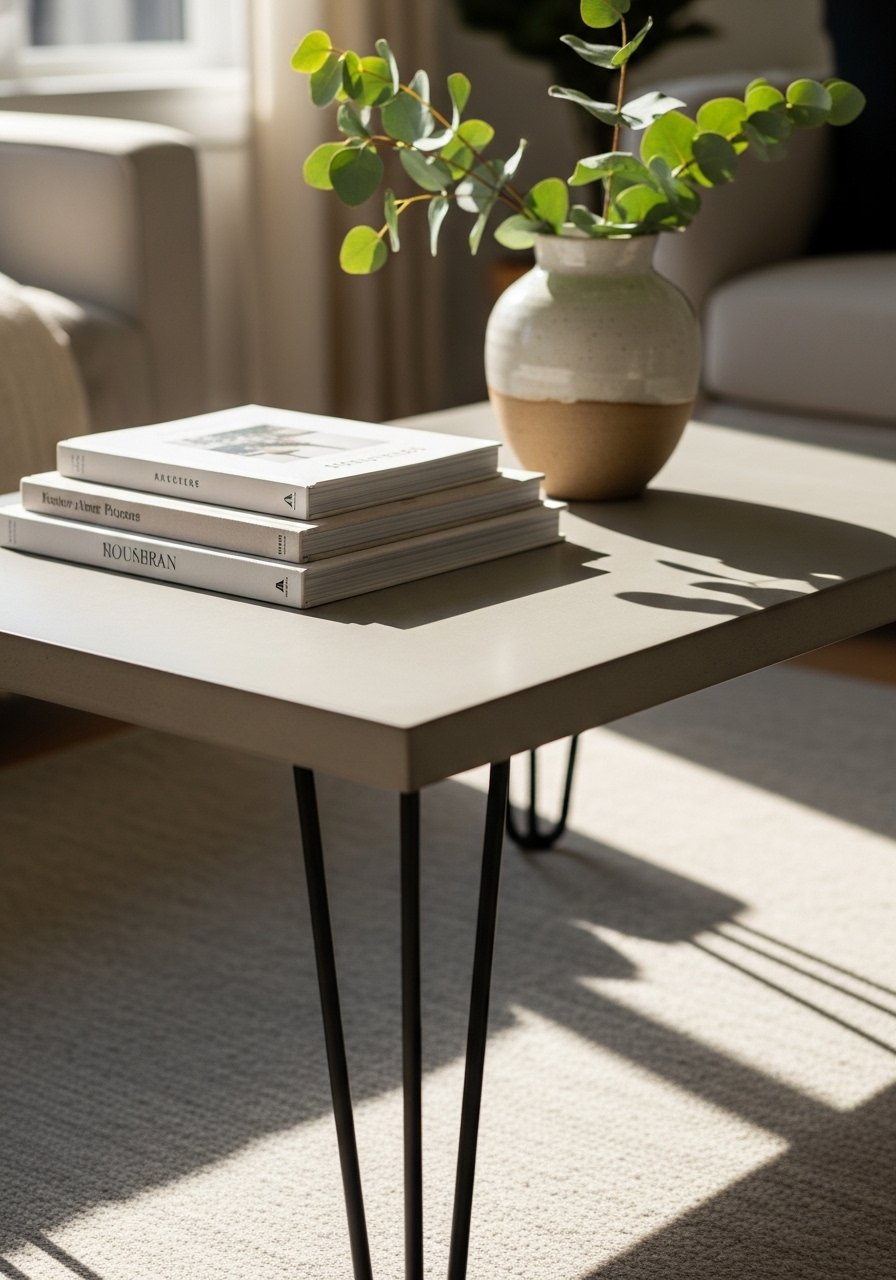
This simple rectangular slab nails that industrial-meets-Scandi look. The top is low-profile, 24" x 36" x 1.25", finished matte and paired with hairpin legs for contrast. It’s a great first full-cast project for beginners who want a clean, modern focal point.
Materials
- 1 x 50 lb bag Quikrete fast-setting concrete mix
- 1 sheet 1/2" melamine, 24" x 36" (for mold)
- 4 steel hairpin legs, 16" height
- 1 small bottle mold release spray (6 oz)
- Mixing bucket, 5 gallon
- Drill with 1" mixing paddle
- Rubber trowel and 80–220 grit sanding pads
- Concrete sealer, satin (8 oz)
- Painter’s tape, 1 roll
Instructions
- Build a melamine box with 1/2" sides and reinforce corners with hot glue or screws. Seal seams with tape. Spray inside with mold release.
- Measure volume: for 24" x 36" x 1.25" you need about 1.1 ft³ — one 50 lb bag is sufficient.
- Mix per bag directions in a 5-gal bucket using a drill and mixing paddle. Aim for pancake-batter consistency.
- Pour into mold slowly. Tap the sides and use a rubber mallet under the mold to reduce air pockets. Use a small foam brush to level if needed.
- Strike off excess with a straightedge. Let set 24–36 hours until firm to the touch.
- Remove from mold, wet-sand starting 80 grit, progress to 220 for a smooth finish. Let cure 7 days for light use; full strength at 28 days.
- Apply two coats of satin concrete sealer with a foam brush; dry 2 hours between coats.
How to Display or Gift It
- Center on a low-profile rug for a lofty industrial vibe.
- Add felt pads under hairpin legs to protect floors.
- Wrap in kraft paper and tie with twine if gifting; include care notes about cure time.
- Store unused concrete pads flat on a pallet in a dry area during cure. Consider a small set of felt furniture pads for protection.
- Round Poured Top with Live-Edge Wood Trim
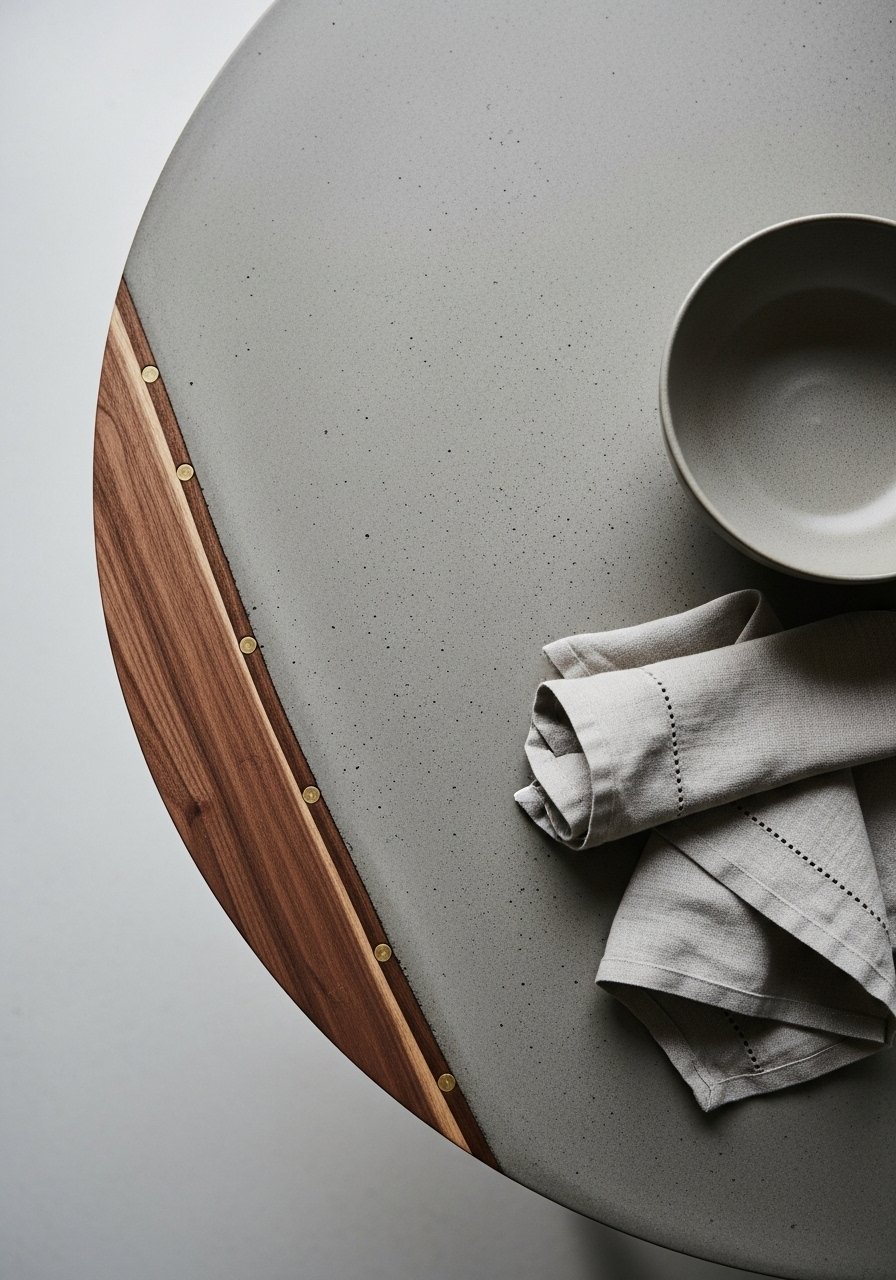
This round piece blends warm walnut with cool concrete for a rustic-industrial vibe. Wood trim softens the edges and hides mold seams. Great for those who like tactile contrast and natural grain.
Materials
- 1 x 40 lb bag Quikrete countertop mix
- Plywood circular mold, 30" diameter, 1.5" deep (melamine-lined)
- 1 live-edge walnut strip, 30" length, 1.5" wide, 3/4" thick
- Exterior wood glue & 4 brass screws
- Mixing bucket with paddle
- Fine 120–320 grit sanding pads
- Outdoor-safe polyurethane (8 oz)
Instructions
- Line circular plywood mold with melamine or tape seams and spray mold release.
- Mix countertop-grade concrete per bag in a 5-gal bucket to a thick, pourable consistency.
- Pour halfway, vibrate or tap to release bubbles, then add remainder. Screed smooth.
- Let set 18–24 hours, then demold carefully.
- Attach live-edge walnut trim with exterior wood glue and brass screws from underside.
- Sand wood trim smooth and finish with two coats of exterior polyurethane, 2 hours between coats.
- Allow concrete to cure 7 days before placing on legs.
How to Display or Gift It
- Pair with a metal pedestal base for a café-style setup.
- Add a natural fiber runner and potted fern for a cozy corner.
- Wrap with kraft paper and a strip of burlap for a gift.
- Terrazzo Inlay Coffee Table (Small Chips)
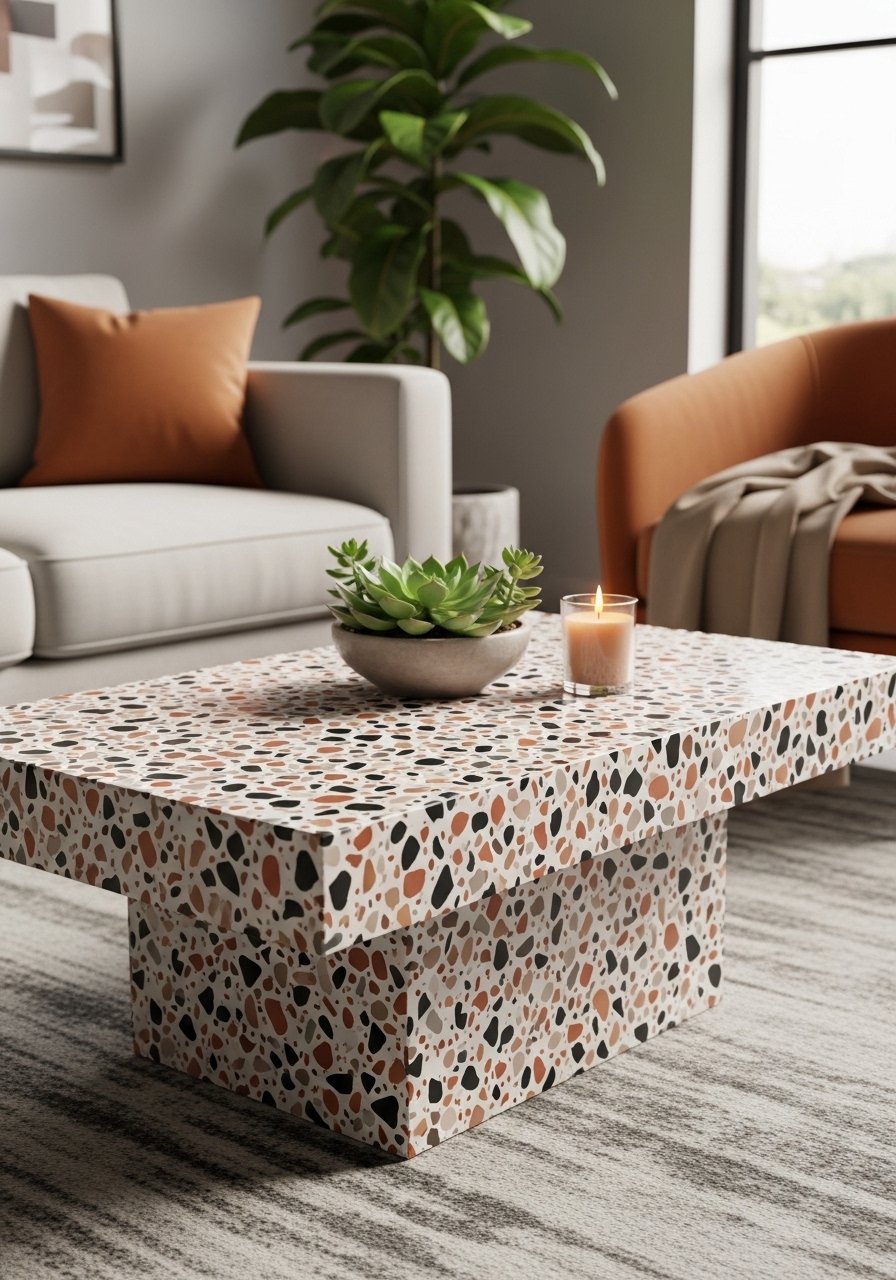
Terrazzo gives concrete a lively, handcrafted look. You’ll embed chips in the surface for that retro-meets-modern feel. Beginner-friendly if you premix chips and pour in layers.
Materials
- 1 x 40 lb bag concrete mix
- 1 lb terrazzo aggregate chips (mixed colors)
- Melamine mold, 22" x 30" x 1.5"
- Epoxy grout or fine cement grout (1 lb)
- Grout float and sponge
- Orbital sander with 120–400 grit pads
- Concrete sealer, glossy (8 oz)
Instructions
- Tape and spray the melamine mold with mold release.
- Mix concrete to a slightly stiff consistency.
- Pour a 1/4" base layer and let stiffen for 30–45 minutes.
- Sprinkle terrazzo chips evenly across surface, press lightly.
- Pour remaining concrete to cover chips. Tap to remove air.
- Demold after 24–36 hours. Once surface is slightly firm, apply grout to fill voids and lock chips.
- After 48–72 hours, sand progressively to level chips, finishing with 400 grit for a polished look. Seal with glossy sealer.
How to Display or Gift It
- Add brass legs to echo chip highlights.
- Place a tray with candles and a small stack of coasters.
- Wrap in tissue and tuck a care card about sealer maintenance.
- Industrial Steel-Frame with Concrete Slab
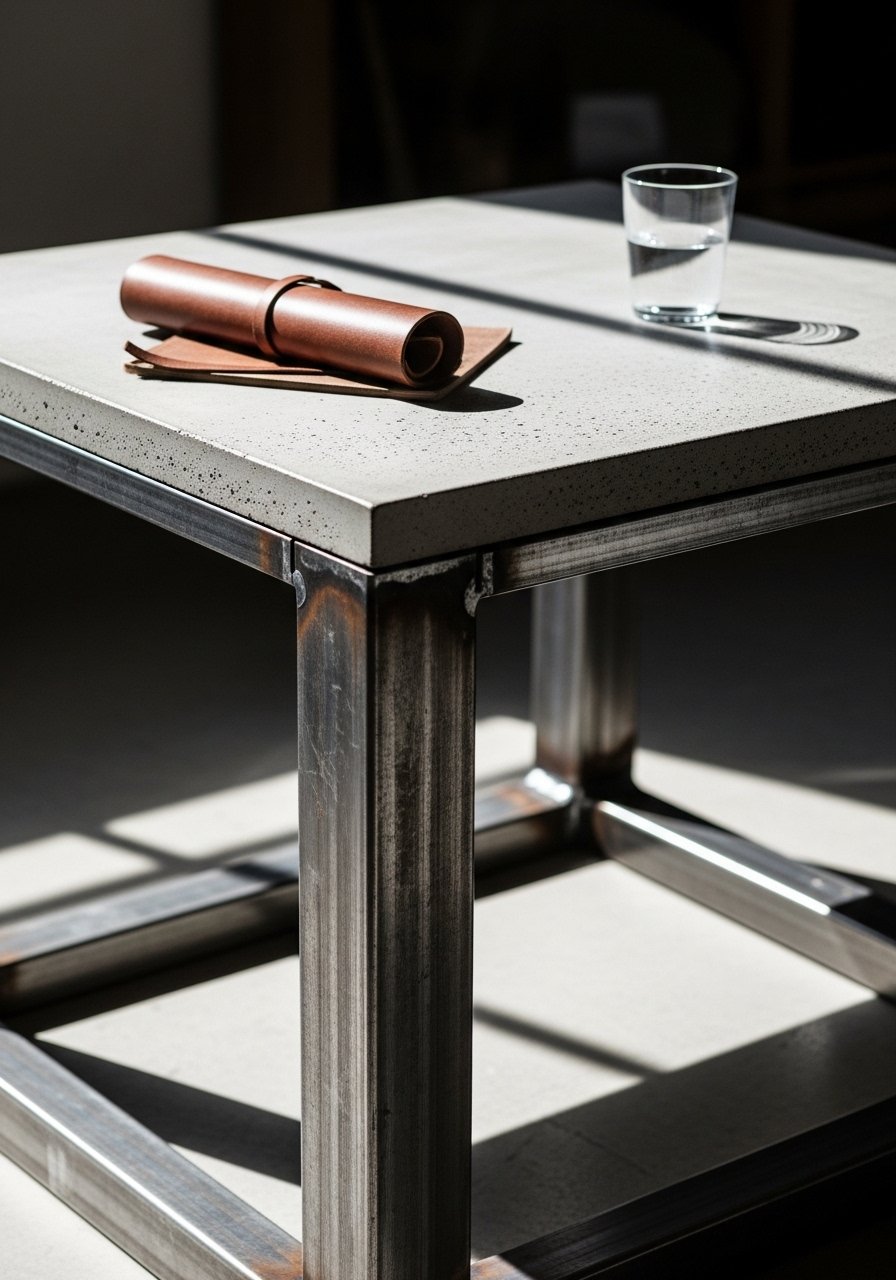
This hybrid pairs a thin concrete top with a welded steel frame. The frame supports a thinner slab, saving weight while keeping the rugged look.
Materials
- 1 x 30 lb fast-setting cement mix
- Steel frame, pre-welded C-channel inner size 22" x 36"
- Melamine board, cut to fit inside steel frame, 1" deep
- Epoxy adhesive for bonding
- Mixing bucket and paddle
- Diamond sanding pads 80–300 grit
- Clear concrete sealer (8 oz)
Instructions
- Measure steel frame inner dimensions. Build a melamine mold to fit snugly inside.
- Spray mold release and place inside frame.
- Mix concrete to a pourable consistency. Pour slowly into mold.
- Use a chisel or screwdriver to remove trapped air near edges.
- Cure 24–48 hours, remove mold, and sand edges to fit frame if needed.
- Set concrete slab into steel frame with epoxy adhesive and clamp for 24 hours.
- Seal top with two coats of sealer. Allow 2 hours between coats.
How to Display or Gift It
- Show it on a leather sofa to emphasize industrial textures.
- Add felt pads beneath frame to protect floors.
- Offer as a housewarming gift for friends who love loft-style decor.
- Geode-Style Resin & Concrete — DIY concrete coffee table
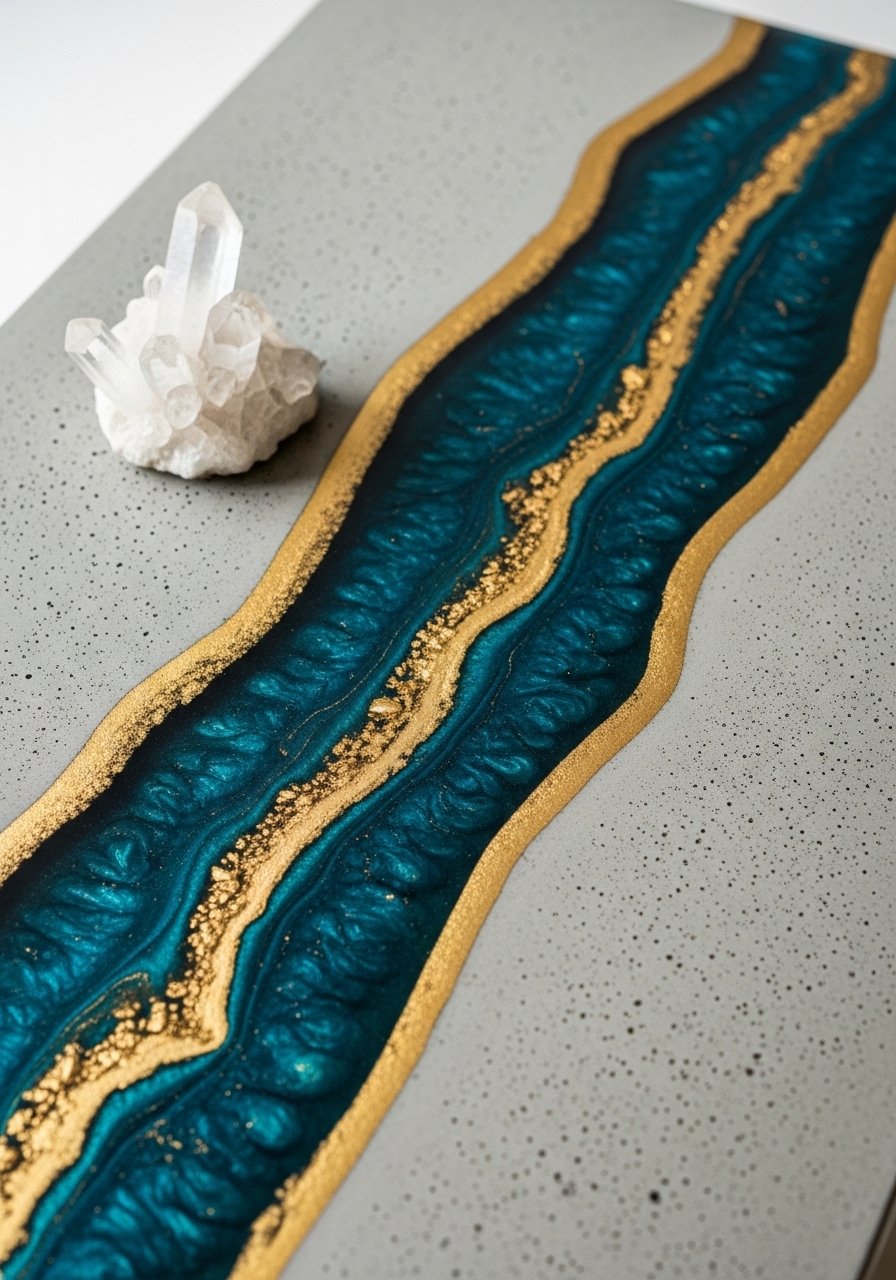
Combine epoxy geode inlays with concrete for a dramatic centerpiece. This project blends mineral sparkle with a dense concrete field. You'll pour the concrete, then rout a channel for epoxy or cast in two stages.
Materials
- 1 x 40 lb bag countertop concrete mix
- Epoxy resin kit, 32 oz (clear)
- Pearlescent epoxy pigment set (teal, white, gold)
- Melamine mold, 20" x 36" x 1.5"
- Silicone mixing cups, wooden stir sticks
- Heat gun for bubble removal
- Diamond sanding pads and sealer
Instructions
- Decide geode placement and tape off area or build a silicone channel in the mold.
- Pour concrete base and let reach a putty-like state (about 4–6 hours depending on mix).
- Press channel form into partially set concrete or rout after demold.
- Mix epoxy per instructions. Tint separate batches with pigments.
- Pour epoxy into channel in layers, using heat gun to pop bubbles. Cure per epoxy instructions (typically 24–72 hours).
- Sand epoxy flush and polish. Seal concrete surface with sealer.
How to Display or Gift It
- Pair with simple metal legs to keep the focus on the geode.
- Add a small brass label describing epoxy pigments as a gift tag.
- Clean with a soft microfiber cloth to keep shine.
- Hollow-Core Lightweight Concrete Table
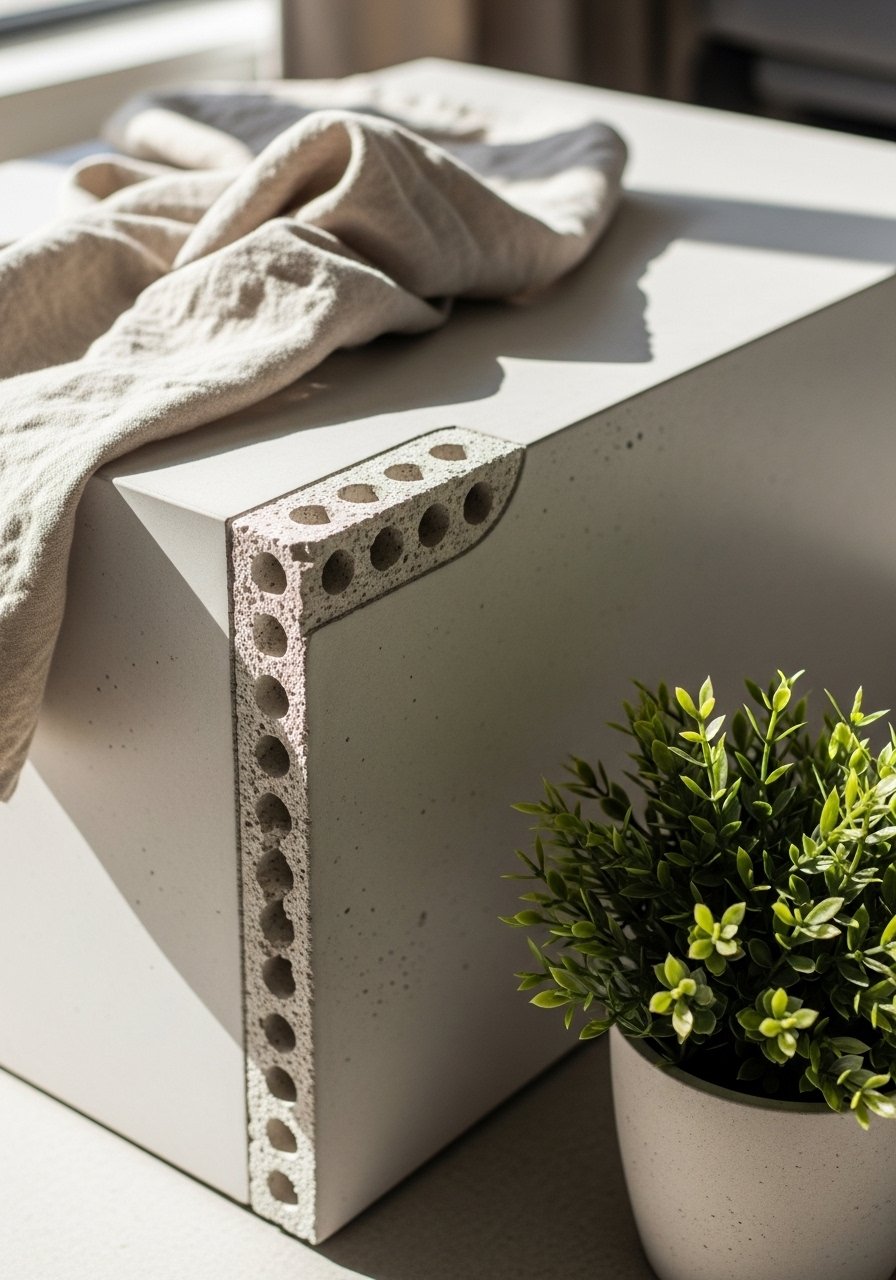
A hollow core keeps the heft down while maintaining the concrete look. Use foam inserts in the mold to leave voids that reduce weight and material.
Materials
- 1 x 50 lb bag fast-setting concrete
- High-density foam blocks (2), cut to shape for voids
- Melamine mold, 22" x 42" x 1.5"
- Fine mesh to support foam
- Drill with paddle, mixing bucket
- 80–220 grit sanding pads
- Concrete sealer
Instructions
- Arrange foam blocks in mold, supported by mesh so they don't float.
- Spray mold release and foam with barrier coat so concrete doesn't bond.
- Mix concrete slightly stiff and pour around foam, tamping down to remove air.
- Let cure 24–36 hours, then demold and remove foam (cut out if necessary).
- Patch any imperfections with a slurry of leftover concrete; sand when firm.
- Seal with two coats, waiting 2 hours between coats. Wait 7 days before light use.
How to Display or Gift It
- Use on rug with light sofas to keep room airy.
- Add removable felt pads to corners for stacking storage.
- Polished Marbleized Concrete Top
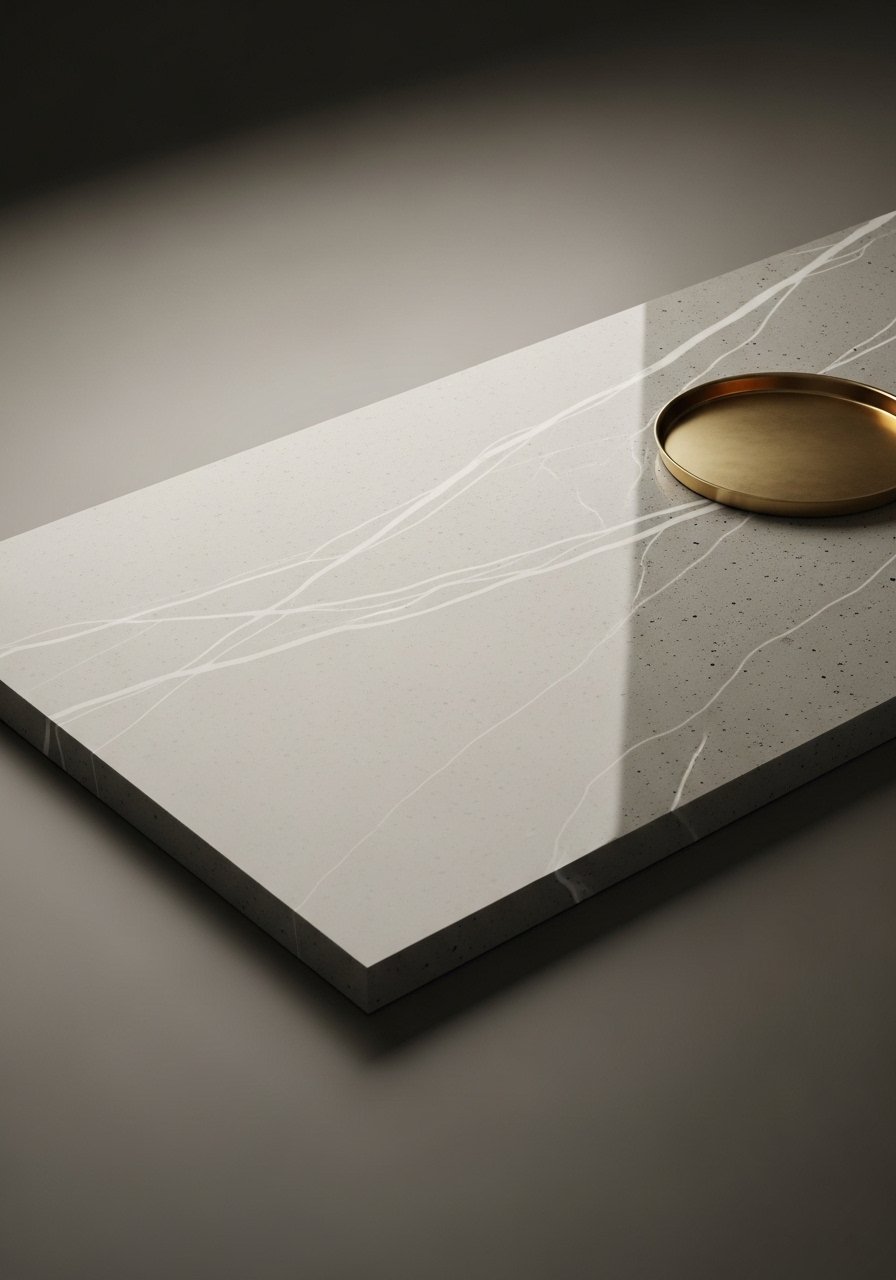
Mimic marble by swirling pigment into concrete while pouring. After sanding and polishing, the surface gleams with natural veining.
Materials
- 1 x 50 lb bag countertop mix
- Liquid concrete pigment (black & white), 2 oz each
- Melamine mold, 24" x 36" x 1.5"
- Orbital sander, sanding pads 80–600 grit
- Polishing compound and pad
- Gloss sealer or concrete polish (8 oz)
Instructions
- Mix a base batch of concrete. Pour into mold to desired depth.
- Mix small amounts tinted with white and black pigments.
- Pour tinted batches in thin streams and swirl with a trowel to form veins.
- Let cure 24–48 hours, demold, and wet-sand progressively up to 600 grit.
- Use polishing compound to bring out shine. Seal with glossy sealer.
- Allow full cure 7 days before heavy use.
How to Display or Gift It
- Pair with brass or gold-toned legs to highlight veins.
- Wrap in bubble and kraft paper for gifting; include polishing instructions.
- Pebble-Inset Coastal Coffee Table
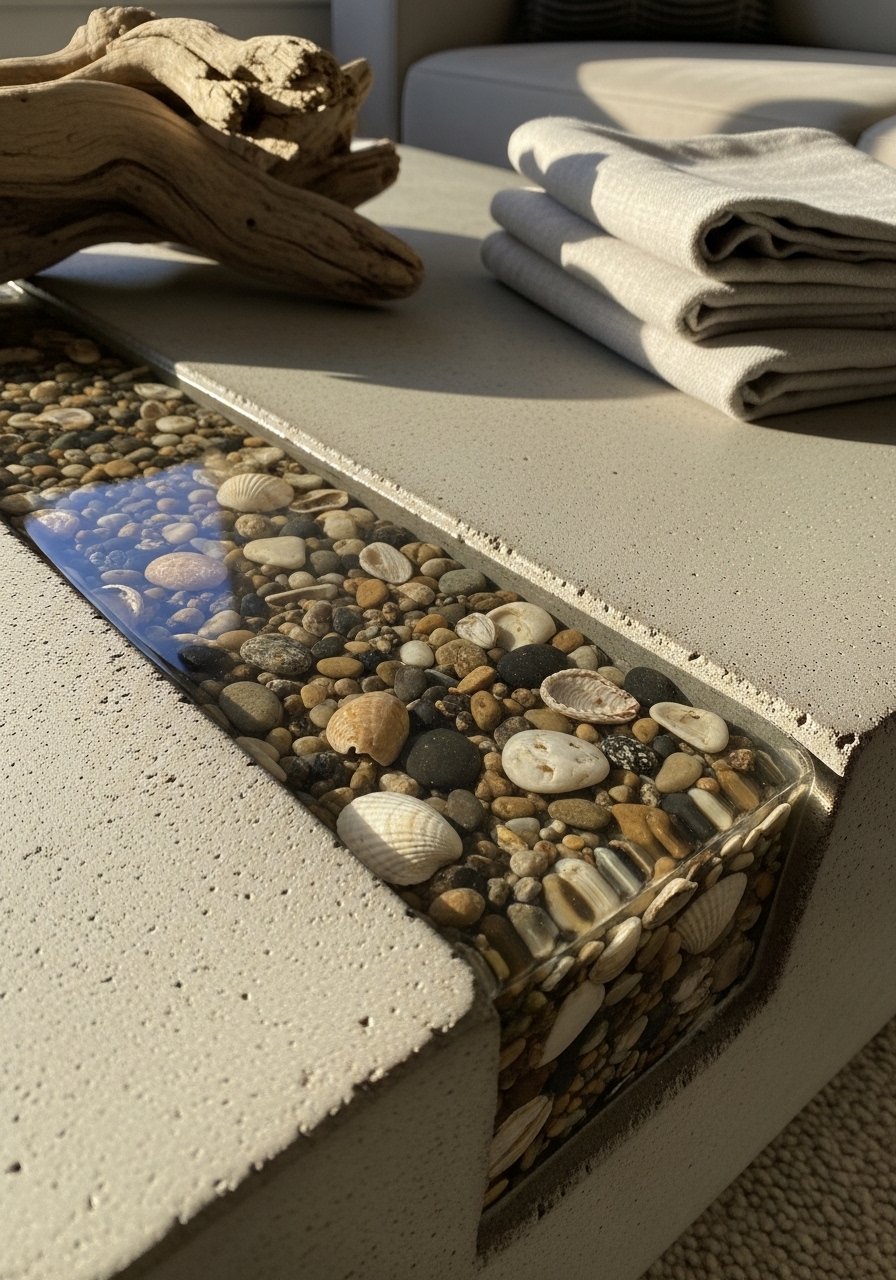
Bring beach texture indoors by embedding flattened pebbles and shells in a shallow concrete surface and sealing them flush.
Materials
- 1 x 30 lb quick-set concrete mix
- 1 lb polished river pebbles and small shells
- Melamine mold, 20" x 36" x 1"
- Fine grout or paste for filling
- Epoxy sealer (for glossy fill)
- Sponge and soft brush for cleaning
Instructions
- Lay pebbles in mold bed. Spray with mold release.
- Pour thin concrete layer to cover pebble backs (about 1/2").
- Press pebbles into concrete while it's still tacky.
- After 24 hours, apply grout or epoxy to fill gaps and lock pebbles.
- Sand edges smooth and seal the whole surface.
- Cure 7 days before placing heavy items.
How to Display or Gift It
- Place near plants for a natural vignette.
- Gift to coastal-loving friends wrapped with a small jar of extra pebbles.
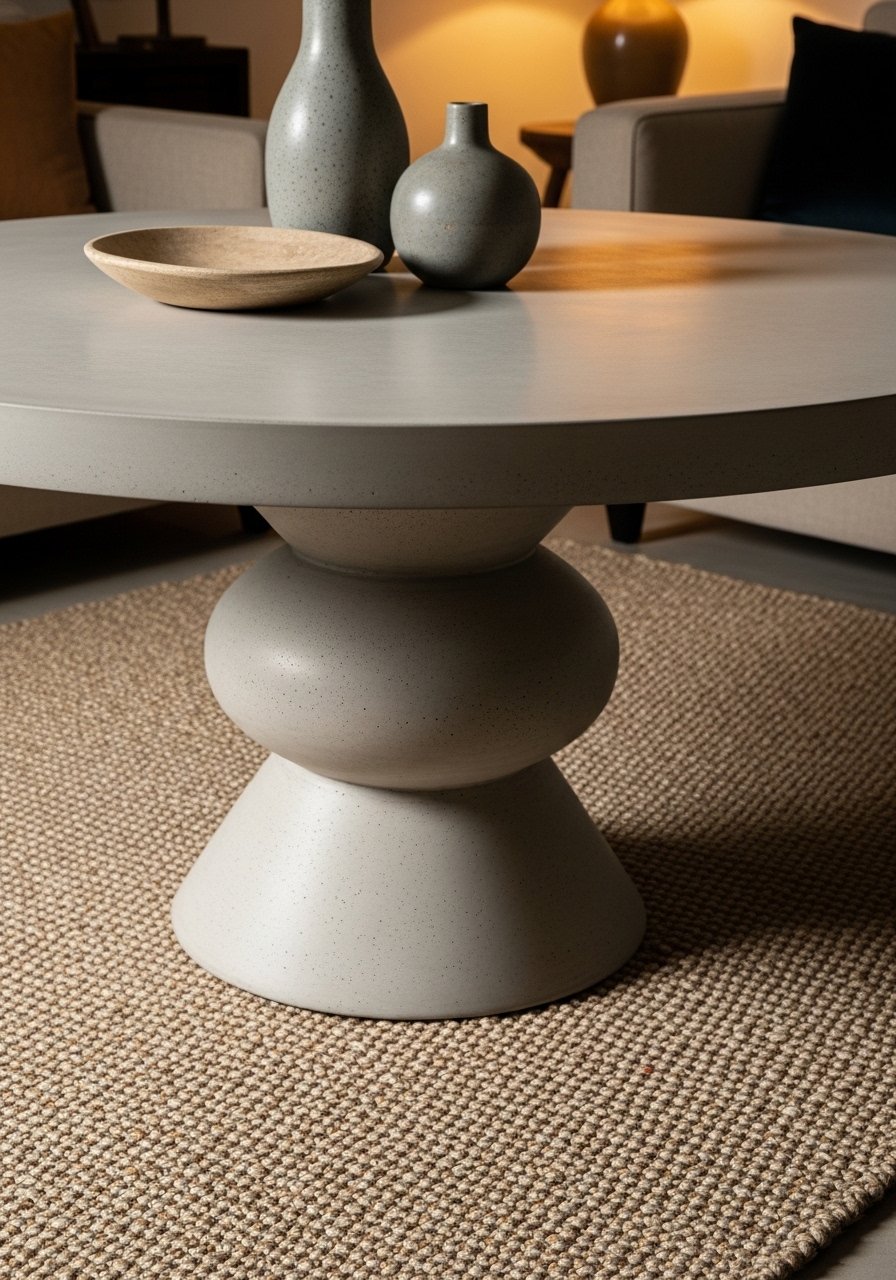
- Mid-Century Round DIY concrete coffee table
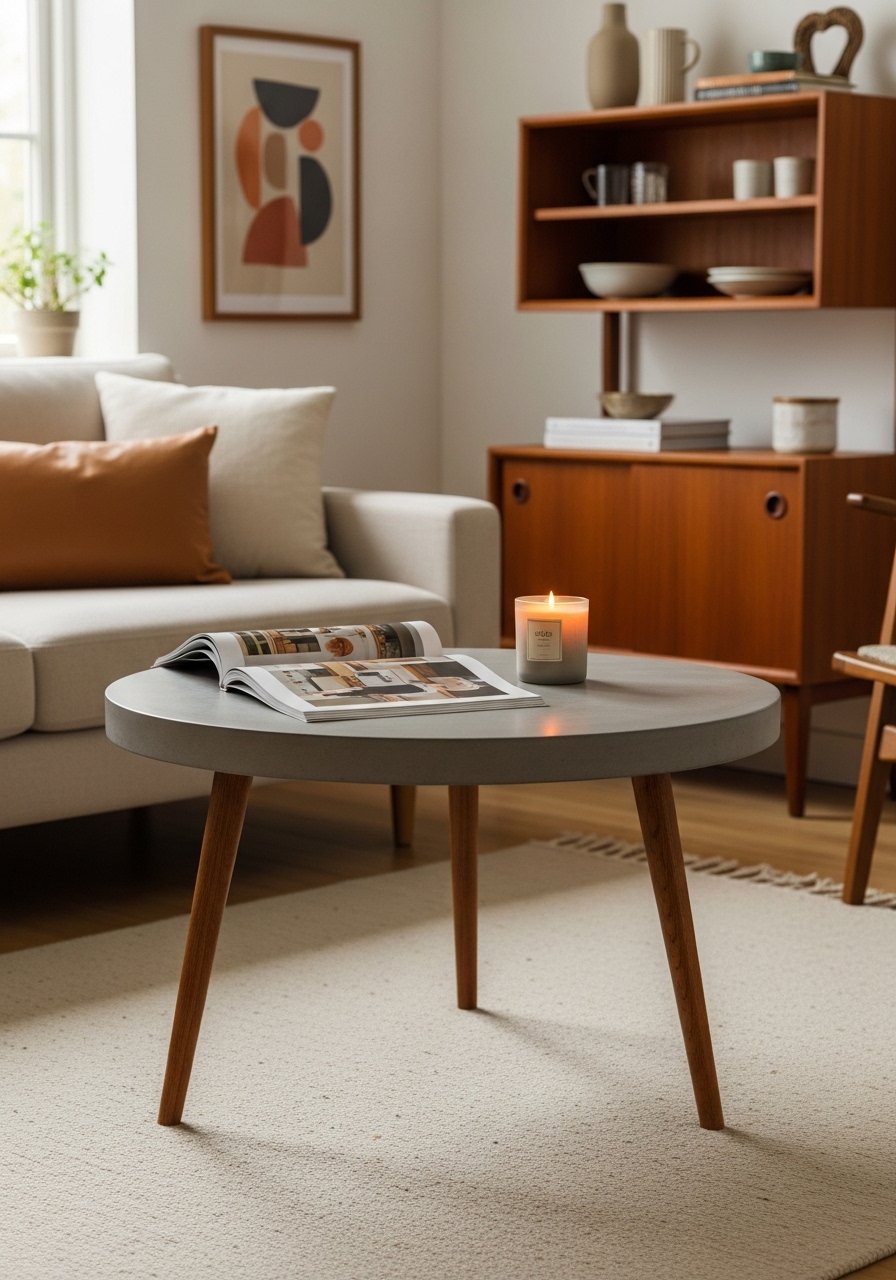
This mid-century inspired round table pairs a concrete top with tapered wood legs. Balanced proportions feel vintage yet modern.
Materials
- 1 x 40 lb bag countertop concrete mix
- Circular melamine mold, 30" diameter, 1.25" deep
- 4 tapered wooden legs (7" length)
- Wood mounting plates and screws
- Mixing paddle and bucket
- 120–220 grit sanding pads
- Satin concrete sealer
Instructions
- Prepare a circular mold lined with melamine. Spray mold release.
- Mix concrete and pour to 1.25" thickness, level with a straightedge.
- Let set 18–24 hours. Demold and sand surface smooth.
- Mount wood leg plates to underside, ensuring centered alignment.
- Attach legs with screws and wood glue. Let glue set 24 hours.
- Seal top with two coats of satin sealer. Cure 7 days for light use.
How to Display or Gift It
- Use a jute rug and leather armchair for mid-century styling.
- Pack in a box with ample padding and include assembly screws.
- Industrial Pipe Legs with Embedded Metal
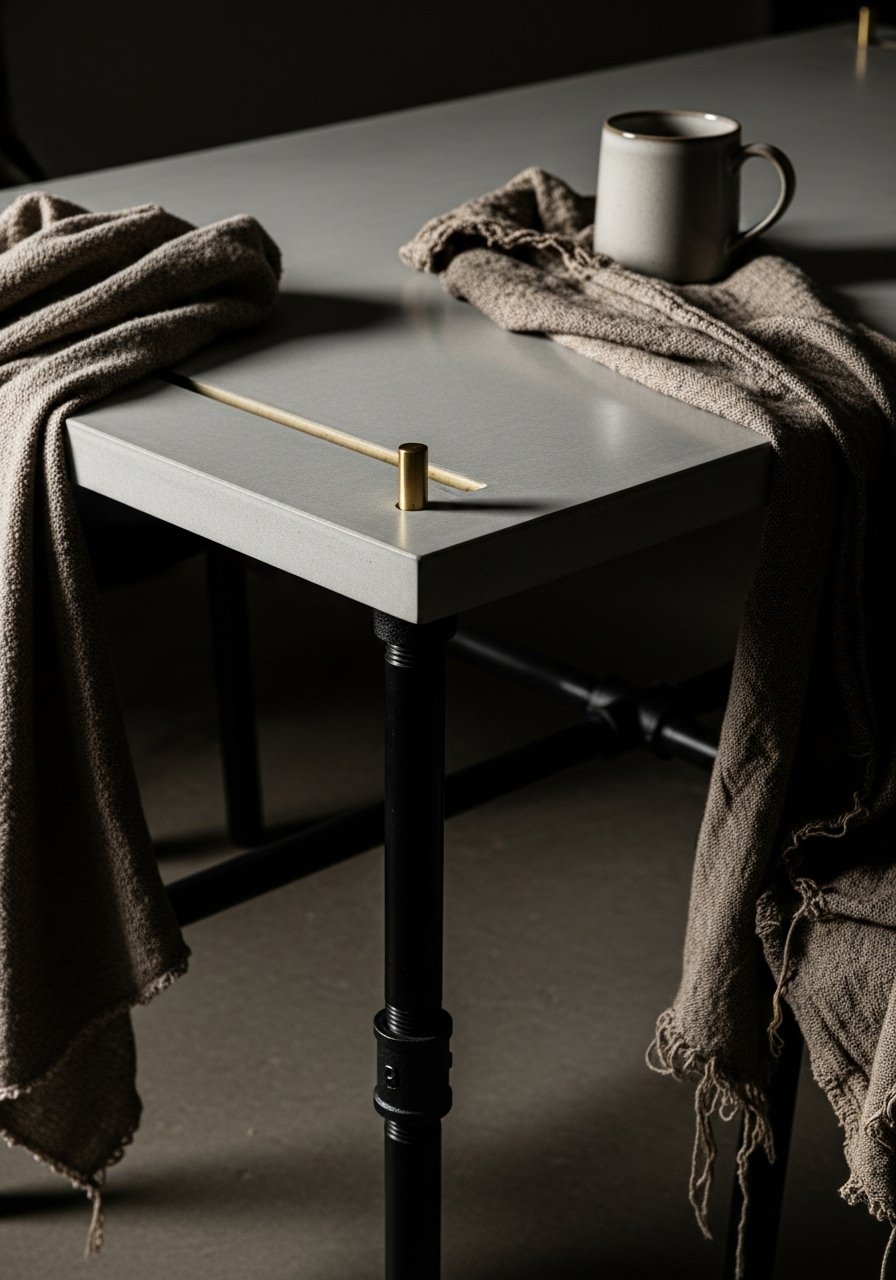
Embedding metal rods or brass accents creates an urban edge. This build uses pipe legs for that warehouse vibe.
Materials
- 1 x 40 lb bag concrete mix
- Melamine mold, 22" x 42" x 1.5"
- 2 brass rods, 18" long
- 4 black iron pipe legs (16" height)
- Epoxy resin for sealing rod edges
- Mixing tools and sanding pads
Instructions
- Mark rod placement and insert into mold, securing ends so they stay centered.
- Pour concrete and vibrate to remove air pockets around rods.
- Cure 24–36 hours, demold and sand.
- Cut rods flush and seal ends with epoxy to prevent corrosion.
- Attach pipe legs using anchor plates and epoxy.
- Seal top with matte sealer. Cure 7 days before use.
How to Display or Gift It
- Use with leather-bound books and metal accents.
- Add a small brass care tag for gifting.
- Nested Side Tables from One Pour
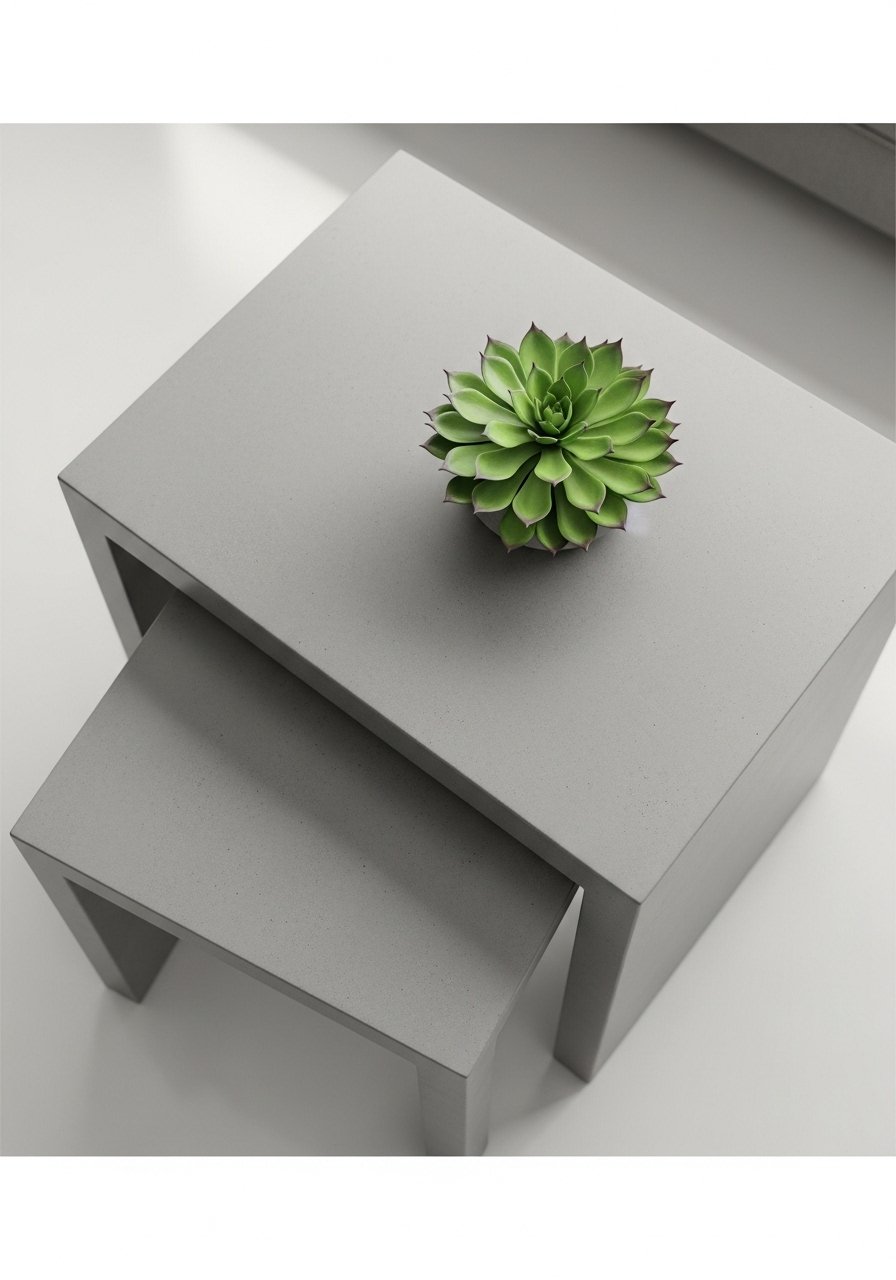
Create two sizes in one mold using a nesting form. It’s efficient and gives a cohesive set.
Materials
- 1 x 60 lb total concrete mix (2 x 30 lb bags)
- Melamine nesting mold (large and small within)
- High-density foam insert for inner void
- Mixing bucket and paddle
- Sanding pads 80–220 grit
- Clear sealer
Instructions
- Build or purchase a nesting melamine mold that houses the smaller mold inside the larger.
- Spray both molds with mold release.
- Pour concrete into outer area first, then pour into inner box for smaller table.
- Let cure 24–36 hours. Demold both pieces carefully.
- Sand both pieces and seal with two coats; dry 2 hours between coats.
- Allow 7 days for light use, 28 days for full cure.
How to Display or Gift It
- Nest beside a sofa as a dynamic duo.
- Package together for a matching set gift in kraft boxes.
- Split-Level Two-Tone Concrete Table
A split-level two-tone top adds depth. Use pigmented layers to create a raised darker inset.
Materials
- 1 x 50 lb countertop mix
- Liquid pigment (charcoal, 2 oz)
- Melamine mold with inset form
- Mixing bucket and paddle
- Small spatula and brayer
- Sanding pads and sealer
Instructions
- Build an inset form inside the main mold where the darker pour will sit.
- Pour base layer and let firm for 30–60 minutes.
- Mix pigmented batch and pour into inset. Level and vibrate.
- Demold after 24–36 hours, sand seams smooth.
- Seal both sections with compatible sealer. Allow full cure 7 days.
How to Display or Gift It
- Pair with contrasting pillows to echo the two tones.
- Wrap with brown paper and twine for gifting.
- Reclaimed Wood Base with Floating Concrete Top
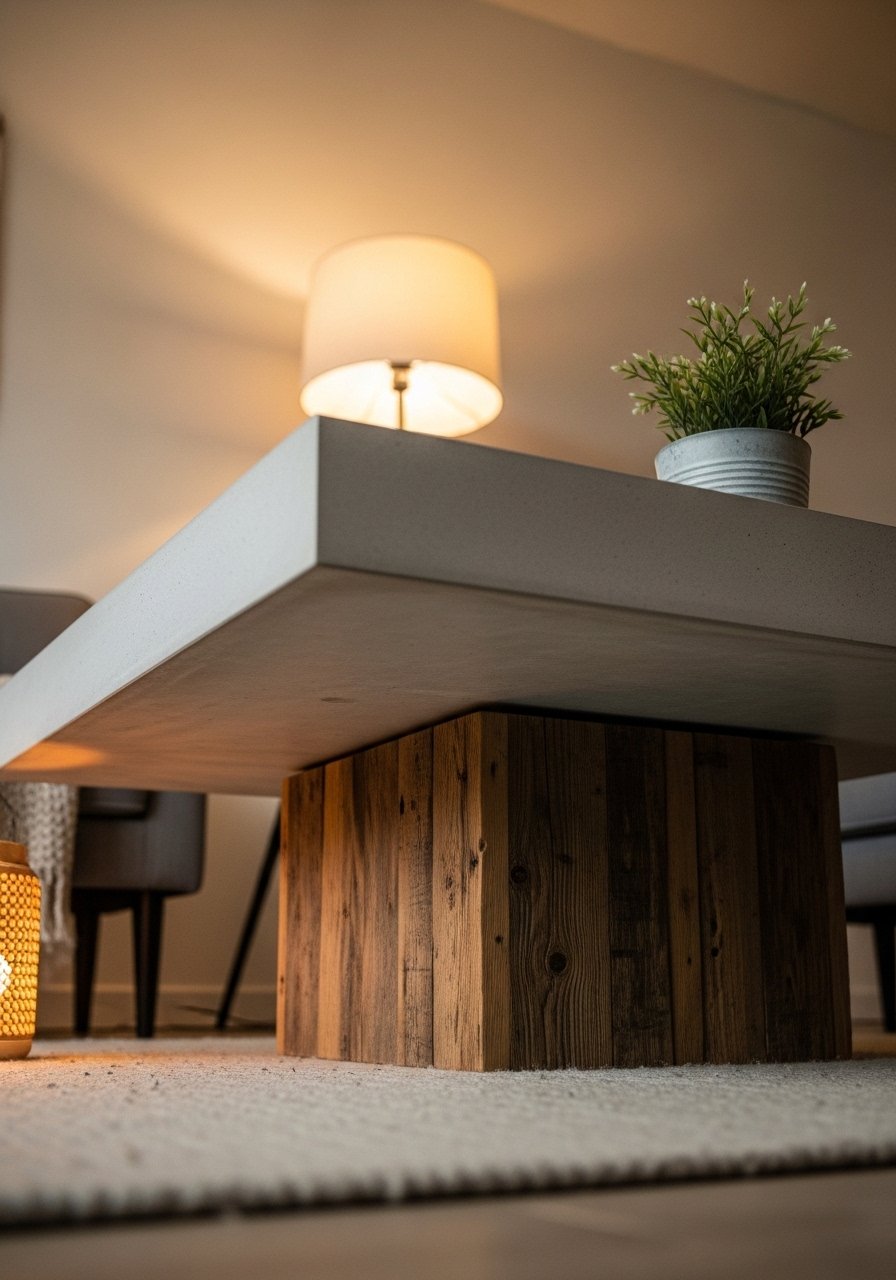
A reclaimed wood base warms the cold concrete. Build a recessed lip in the wood to accept the concrete slab.
Materials
- 1 x 50 lb bag concrete mix
- Reclaimed wood base, inner recess dimensions 20" x 40"
- Melamine slab mold, 20" x 40" x 1.25"
- Construction adhesive and clamps
- Sanding pads and sealer
Instructions
- Construct a recessed pocket in the wood base to receive a 1.25" slab.
- Cast concrete slab separately and sand smooth after 24–36 hours.
- Fit slab into wood pocket with construction adhesive and clamp until set 24 hours.
- Seal both wood and concrete surfaces as needed.
- Cure slabs 7 days before regular use.
How to Display or Gift It
- Place in rustic living rooms and accessorize with woven coasters.
- Use a small gift tag with care instructions when gifting.
- Mosaic Tile Embedded Concrete Table
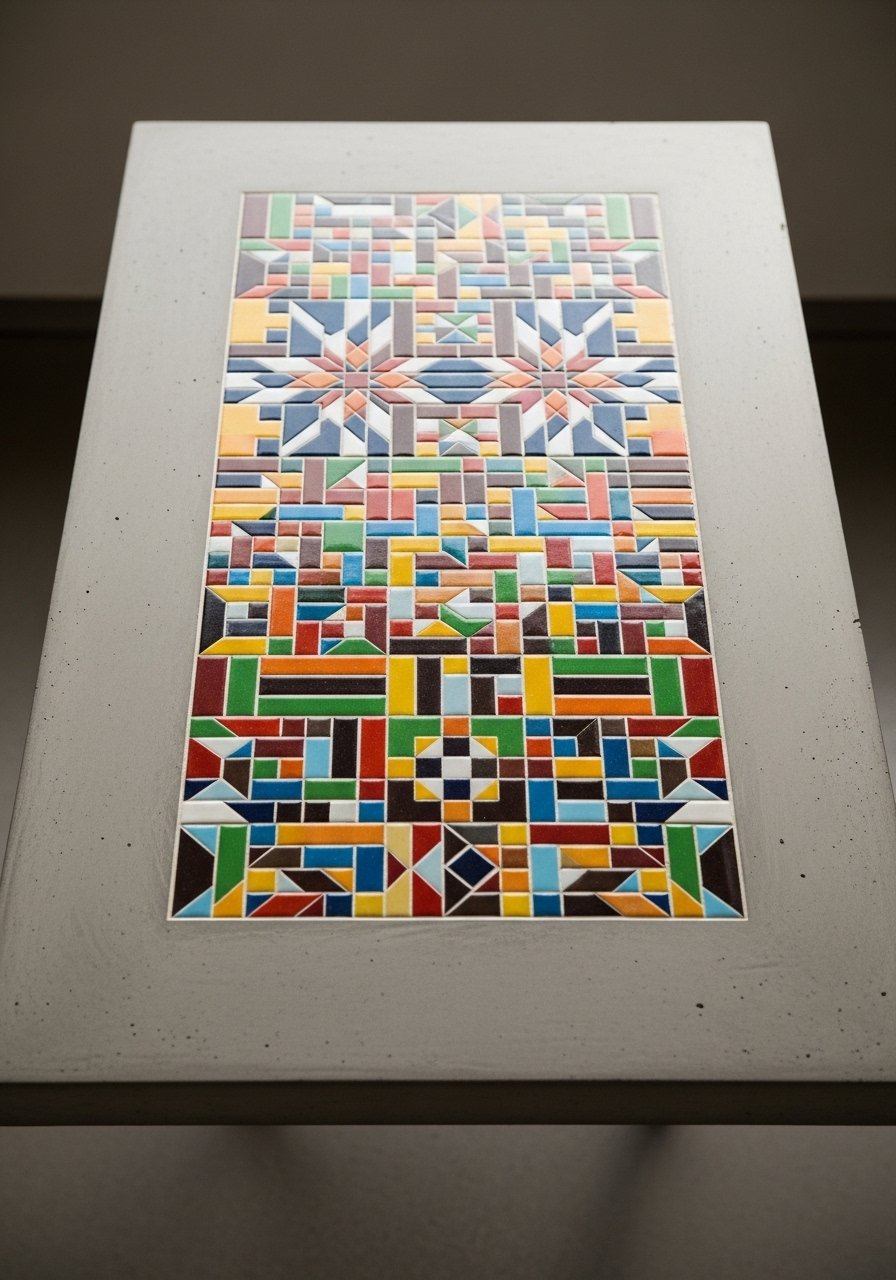
Embed ceramic tiles into the tabletop to introduce pattern and color. This feels craft-forward and playful.
Materials
- 1 x 40 lb bag mix
- 100 small ceramic tile pieces (assorted), total ~1 lb
- Melamine mold, 22" x 36"
- Thinset or epoxy to set tiles
- Grout and float
- Sponge and sealer
Instructions
- Lay tiles in desired pattern into mold before pouring.
- Pour concrete to cover tile backs, leaving tile faces exposed.
- After 24–36 hours, clean and grout gaps between tiles.
- Sand edges and seal surface.
- Allow grout and sealer to cure 48–72 hours before light use.
How to Display or Gift It
- Place near a bright window to highlight tile colors.
- Wrap tiles with extra grout as a mini repair kit for the recipient.
- Concrete Top with Brass Inlay Strips
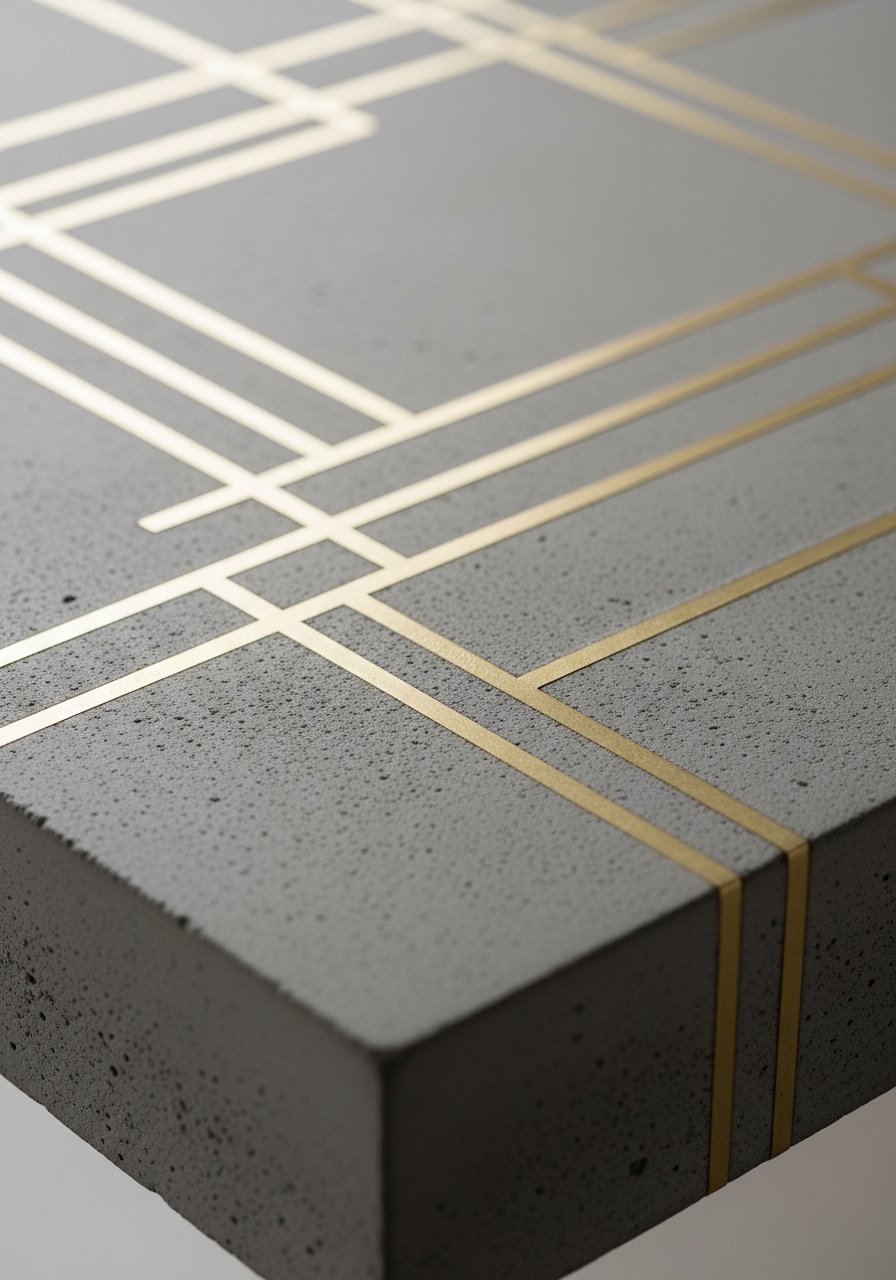
Brass inlays add subtle luxury. Install brass strips into grooves routed into the mold or cut post-pour and glue.
Materials
- 1 x 40 lb bag concrete
- Brass flat strips (4), 18" long
- Melamine mold, 20" x 36"
- Epoxy adhesive for strips
- Router (if grooving) or Dremel
- Sanding pads and sealer
Instructions
- Plan inlay pattern and cut shallow grooves in mold or table top.
- Pour concrete and let cure 24–36 hours.
- Route grooves in cured slab if not pre-formed. Insert brass strips with epoxy.
- Sand flush where necessary and seal to prevent tarnish.
- Wait 48 hours after epoxy before handling.
How to Display or Gift It
- Match with brass accessories like coasters or trays.
- Pack with a polishing cloth if gifting to maintain shine.
- Concrete Top with Built-In Planter
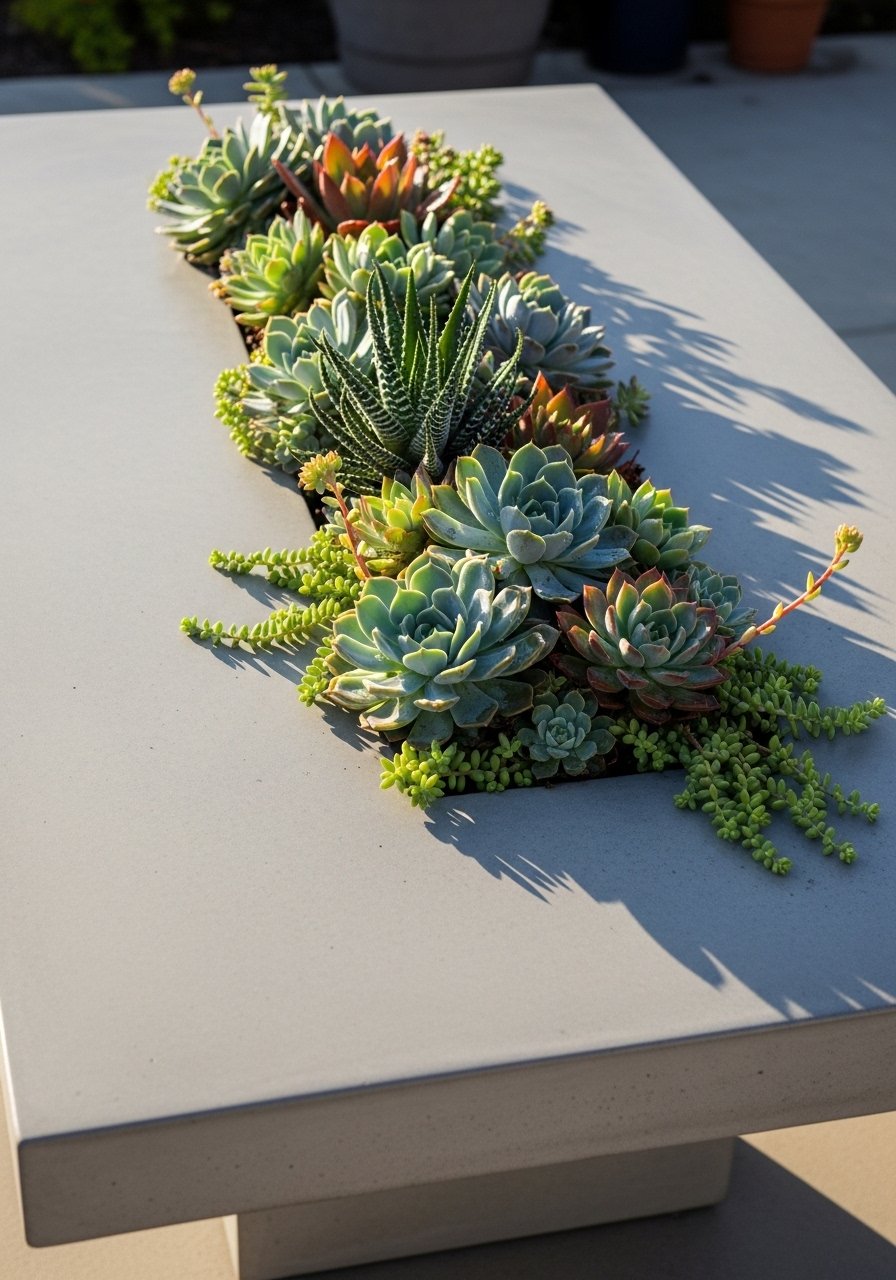
A small built-in planter brings life to a heavy material. Use a removable liner for watering ease.
Materials
- 1 x 50 lb bag concrete
- Melamine mold with planter cavity (8" x 10" x 3")
- Plastic planter liner to fit cavity
- Drain layer of pebbles
- Sanding pads and sealer
- Succulents and potting mix
Instructions
- Place a plastic liner in the mold before pouring to form the planter cavity.
- Pour concrete around liner and level. Let set 24–36 hours.
- Demold and remove liner if you used disposable. Insert a fitted plastic liner for planting.
- Add drainage pebbles, soil, and succulents. Avoid overwatering to protect concrete.
- Seal edges inside planter with waterproof epoxy if necessary.
How to Display or Gift It
- Use drought-tolerant plants and include a small watering instruction card.
- Wrap table in craft paper and tuck in a small bag of succulent mix for gifting.
- Two-Piece Split Slab with Hidden Storage
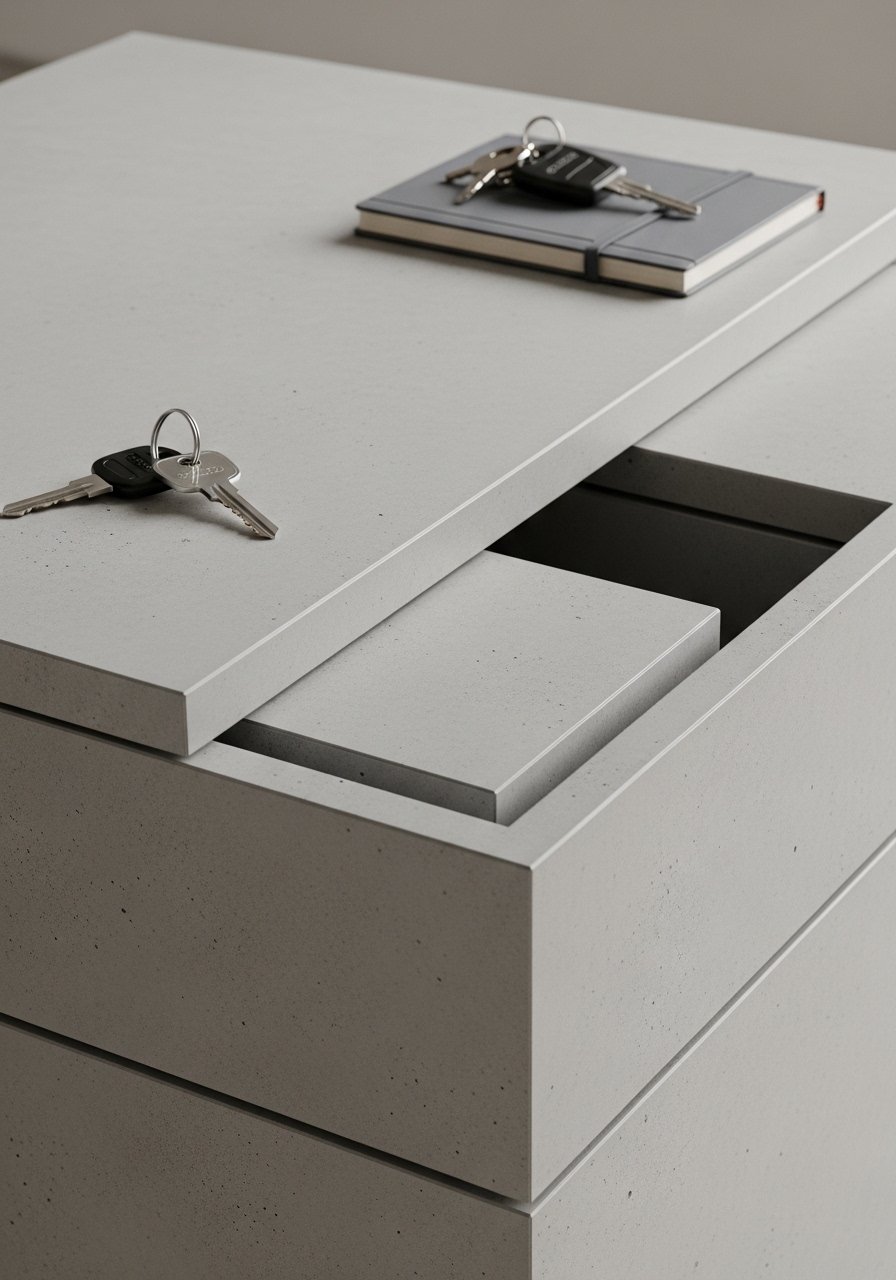
Split the table into top and base to create hidden storage. Use magnets or recessed handles for lift.
Materials
- 1 x 60 lb concrete mix (split between top and base)
- Melamine mold for two-piece casting
- Small recessed lift handles (2)
- Neodymium magnets (4) for alignment
- Sanding pads and sealer
Instructions
- Cast base and lid separately using aligned molds and registration pegs.
- Install recessed handles into the lid underside before final curing.
- Embed magnets in matching positions in both parts to keep alignment.
- Sand surfaces and seal both pieces.
- Allow 7 days before light use and 28 days for full cure.
How to Display or Gift It
- Use as a storage spot for remotes or magazines.
- Gift with a small decorative box of matches or a candle.
- Stained & Washed Concrete Finish
Create a warm, variegated surface with concrete stain. The acid-wash look gives a lived-in character.
Materials
- 1 x 40 lb bag concrete
- Concrete stain (amber, 4 oz)
- Spray bottle, soft cloths
- Neutralizing cleaner (per stain kit)
- Sanding pads and sealer
Instructions
- Cast slab and let cure 7 days; stains work best after initial cure.
- Test stain on scrap first. Apply with spray bottle or cloth in a random pattern.
- Let react per product instructions (usually 24 hours), then neutralize.
- Sand lightly for texture if desired. Seal with matte sealer.
How to Display or Gift It
- Pair with warm wood tones and woven textiles.
- Include a small stain test card if gifting, so the recipient can refresh tones later.
- Mosaic Pebble Steps — Layered Surface
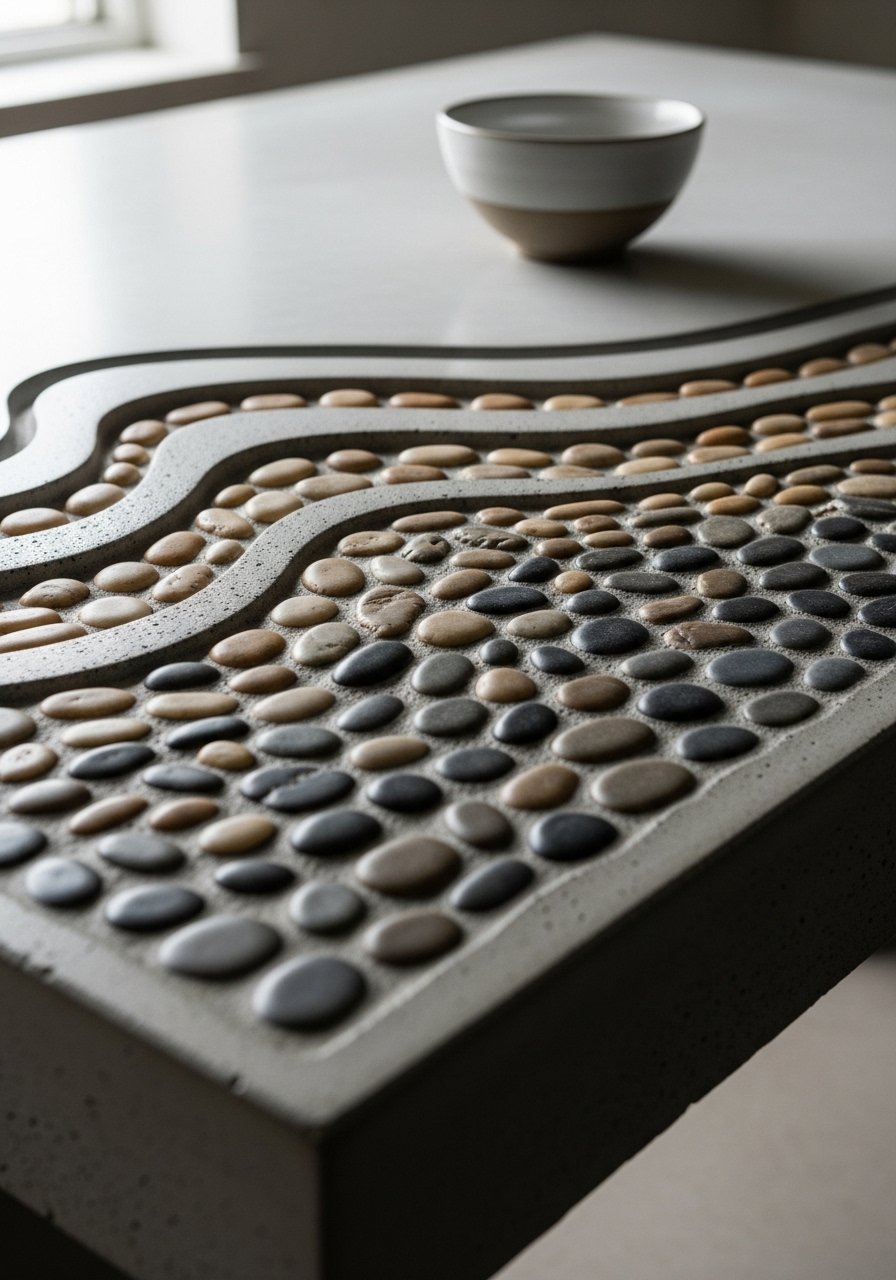
Layer pebbles in steps to create a low-relief topography. It reads sculptural and tactile.
Materials
- 1 x 40 lb concrete mix
- 400 small mosaic pebbles
- Melamine mold with stepped inserts
- Grout or epoxy filler
- Sanding pads and sealer
Instructions
- Arrange pebbles on steps in the mold before pouring final layer.
- Pour concrete around pebble backs and press to set.
- After demold, apply grout to lock pebbles and sand flush.
- Seal surface after grout cures 48 hours.
How to Display or Gift It
- Display with small succulents in recessed steps.
- Gift with a small polishing cloth and grout touch-up kit.
- Industrial Concrete Pedestal Base Table
Casting a pedestal gives sculpture-like presence. Cast base and top separately and glue together.
Materials
- 1 x 80 lb concrete mix (split for base and top)
- Molds: circular top 28" dia, pedestal form 12" tall
- PVC pipe for support sleeve
- Epoxy adhesive
- Sanding pads and sealer
Instructions
- Cast pedestal form using a round mold and PVC sleeve for a hollow core.
- Cast top in separate mold. Demold after 24–48 hours.
- Sand both pieces and dry fit.
- Use epoxy adhesive to bond pedestal and top; clamp until set 24 hours.
- Seal and allow 7 days for light use.
How to Display or Gift It
- Center on a round rug for symmetry.
- Gift wrapped with a small care booklet.
- Concrete Tray Top (Removable) Coffee Table

A removable tray top doubles as a centerpiece for serving. Cast a shallow lip and pair with a wooden base.
Materials
- 1 x 30 lb bag concrete mix
- Melamine tray mold 20" x 30" x 1.5"
- Wooden base with ledge for tray
- Rubber grip pads for underside
- Sanding pads and sealer
Instructions
- Cast tray with 1.5" depth and a built-in lip for easy lifting.
- Demold after 24 hours, sand edges.
- Add rubber pads to underside so the tray sits snugly in the base.
- Seal and cure 7 days before use.
How to Display or Gift It
- Use for serving coffee or as a display tray on the couch.
- Gift in a box with coasters and a small candle.
- Japandi Minimal Concrete Table with Soft Edges
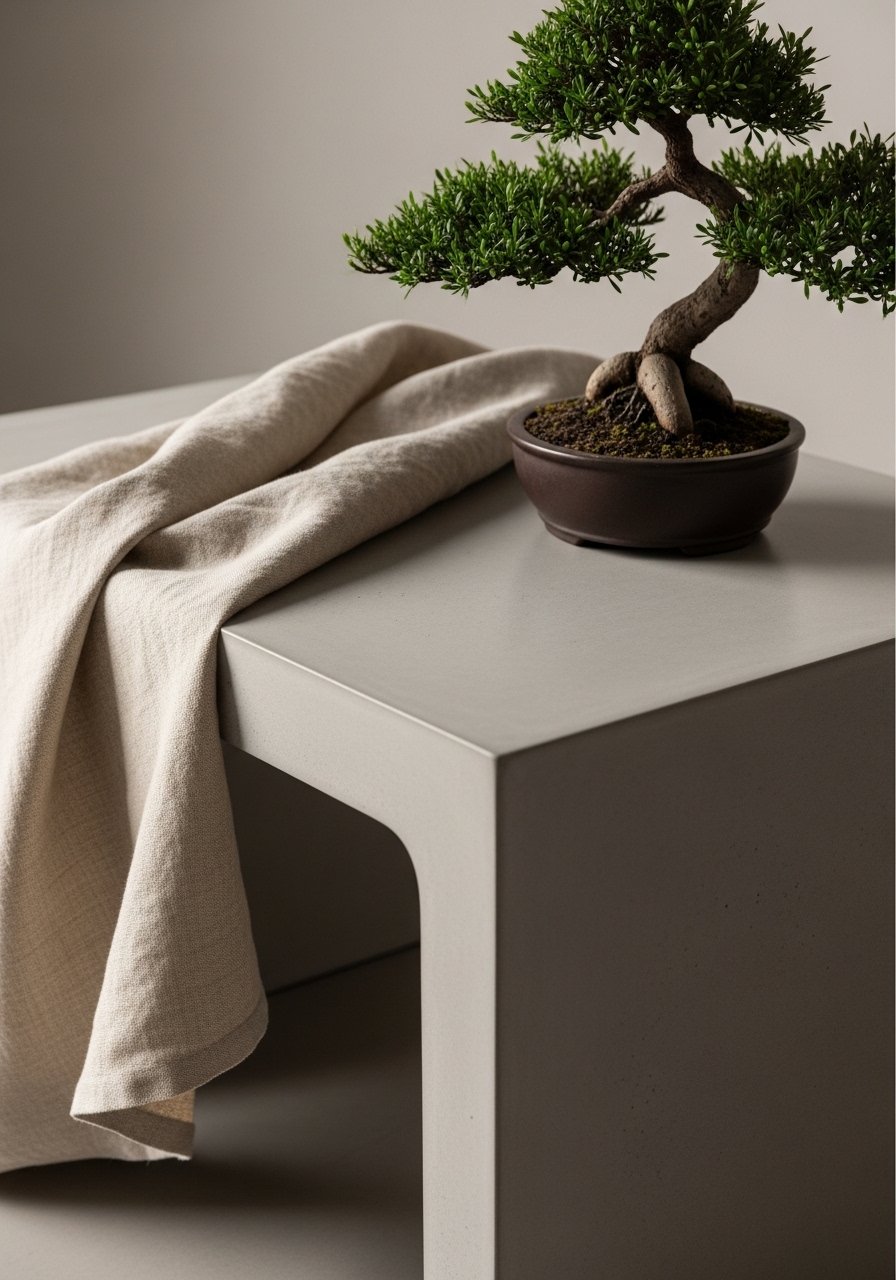
This Japandi-inspired table softens concrete with rounded corners and a warm satin finish. The result is calm, restrained, and cozy.
Materials
- 1 x 50 lb countertop concrete mix
- Melamine mold with rounded corners, 20" x 40" x 1.25"
- Sanding pads 120–400 grit
- Satin concrete sealer
- Fine file or sanding block for edges
Instructions
- Use a rounded-corner mold or sand corners into a radius after demold.
- Pour concrete and level. Cure 24–36 hours, then demold.
- Sand edges carefully with a block to soften corners.
- Finish with two coats of satin sealer, waiting 2 hours between coats.
- Allow 7 days before light use; 28 days for full strength.
How to Display or Gift It
- Pair with neutral cushions and a small bonsai for Japandi styling.
- Gift wrapped in linen and tied with jute for an understated present.
These 22 projects show how flexible a DIY concrete coffee table can be — from minimalist slabs to geode insets and planter combos. Try one that suits your comfort level: the rectangular slab is a great starter, while the geode or terrazzo versions let you play with color and texture. Save and pin the ideas you love, then pick a project and a day to mix your first batch.
If you want one tool to improve every build, grab a quality drill with a mixing paddle — it saves time, gives a consistent mix, and reduces strain. I use a variable-speed drill with mixing paddle and it’s sped up batches for all my pours. Which style are you tempted to try first — the terrazzo inlay or the geode resin? Share this list with friends who'd love a hands-on weekend project.


