Welcome — you’re about to pick through 30 creative, doable DIY coffee table decor ideas that make every living room surface feel curated and comfortable. Whether your style leans boho, farmhouse, japandi, or modern cottagecore, this roundup mixes quick crafts and weekend builds that add texture, color, and personality to your coffee table.
You’ll find projects that use simple craft supplies, plus a few small tools that speed things along. I often cut accents with my Cricut Explore cutting machine for precision and reach for a temperature-controlled hot glue gun when pieces must hold fast. Each project includes exact measurements, drying times, and tips to avoid common slip-ups, so you’ll finish with a decor piece you actually love to touch and use.
Flip through these DIY coffee table decor ideas and pick a few to make this weekend. Save the pin, gather a couple of tools, and let’s get crafting.
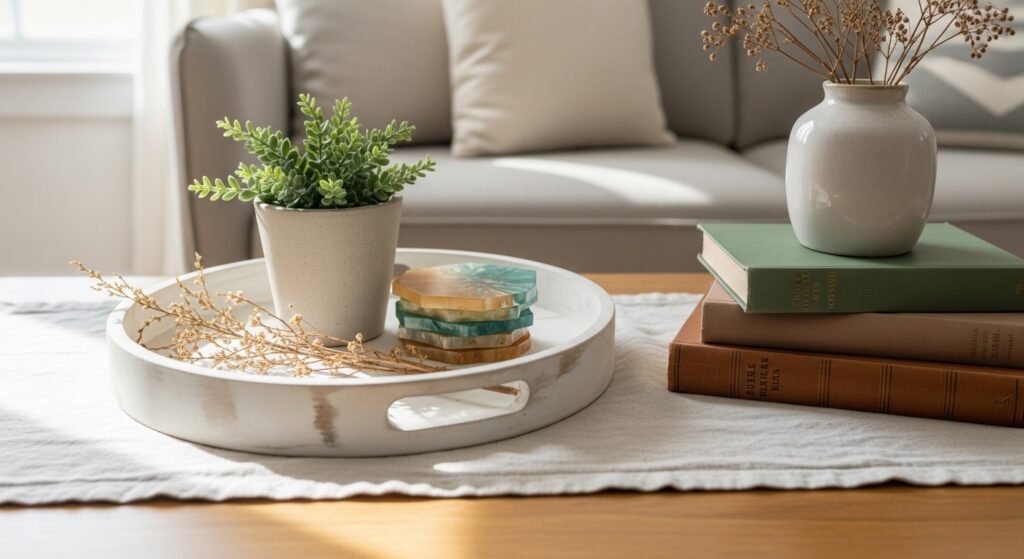
- Painted Wood Tray with Leather Handles
This classic tray is useful and pretty. The chalk paint finish gives a soft matte look that feels modern-farmhouse. Beginners love the straightforward sanding and painting steps. The leather straps add a tactile contrast that’s satisfying to hold.
Materials
- 1 unfinished wood tray blank, 12" x 8" x 1"
- 2 leather straps, 1/2" x 6"
- 4 small brass screws, 3/8"
- 1 8 oz jar of chalk paint (color: sage)
- 1 2" foam brush
- 1 120-grit sandpaper sheet
- 1 coat of paste wax or matte sealer, 2 oz
Instructions
- Lightly sand the tray with 120-grit until smooth. Wipe dust with a damp cloth.
- Apply one thin coat of chalk paint with a 2" foam brush. Let dry 30 minutes.
- Lightly sand edges for a distressed look if desired. Wipe clean.
- Apply a second coat of paint. Dry 45 minutes.
- Drill pilot holes for leather straps 1" from each end. Screw straps in place.
- Finish with one coat of paste wax or matte sealer. Cure 24 hours until firm to the touch.
How to Display or Gift It
Place the tray on your coffee table to corral candles, coasters, and remotes. Tie a twine bow around the leather strap for gift-giving. Store trays flat in a craft organizer drawer to avoid dings. A small wooden easel also works if gifting as a tabletop photo prop.
- Stacked Vintage Book Centerpiece (with Faux Florals)
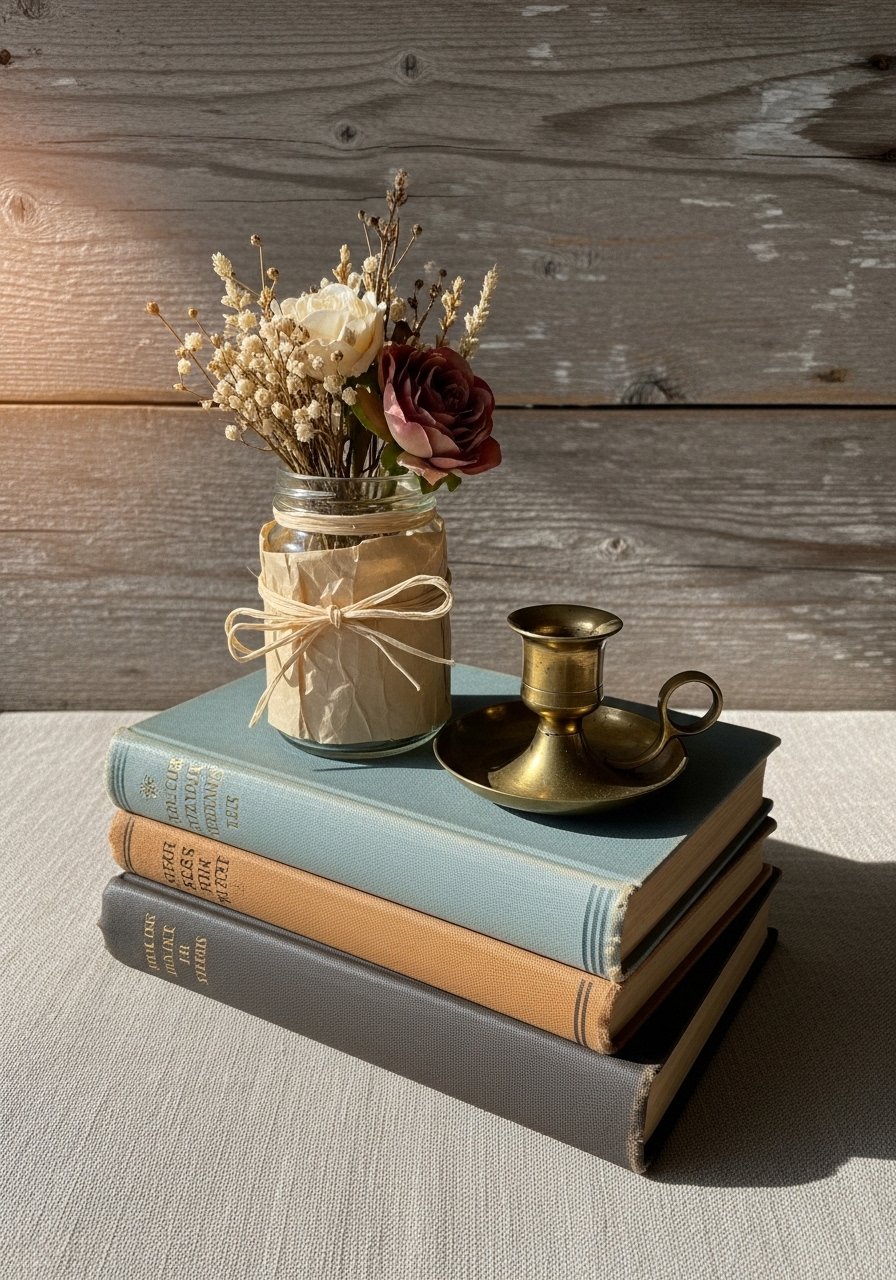
Stacking books creates height and story on a coffee table. This version uses covered book boxes for durability and a faux floral arrangement that never wilts. It's lightweight and perfect for renters.
Materials
- 3 book box covers (or repurposed hardcover books), largest 9" L
- 1 8 oz glass jar (used as vase)
- 1 bunch faux dried stems (6–8 stems)
- 1 roll decorative kraft paper or book cover paper, 2 sq ft
- Double-sided tape, 1 roll
- 1 pair precision scissors
Instructions
- Wrap each book or box with kraft paper and secure with double-sided tape.
- Stack books largest to smallest to create a stable base.
- Arrange faux stems in the jar and place on top.
- Anchor the jar with a dab of hot glue if the table is high-traffic (use a hot glue gun).
- Adjust stems until balanced and pleasing.
How to Display or Gift It
Tuck a small candle or ceramic trinket beside the stack. To gift, nest smaller items in the top book and wrap all three with tissue and twine. Store faux stems upright to avoid crushing in a tall craft storage box.
- Concrete Tea-Light Riser — DIY coffee table decor ideas for minimalists
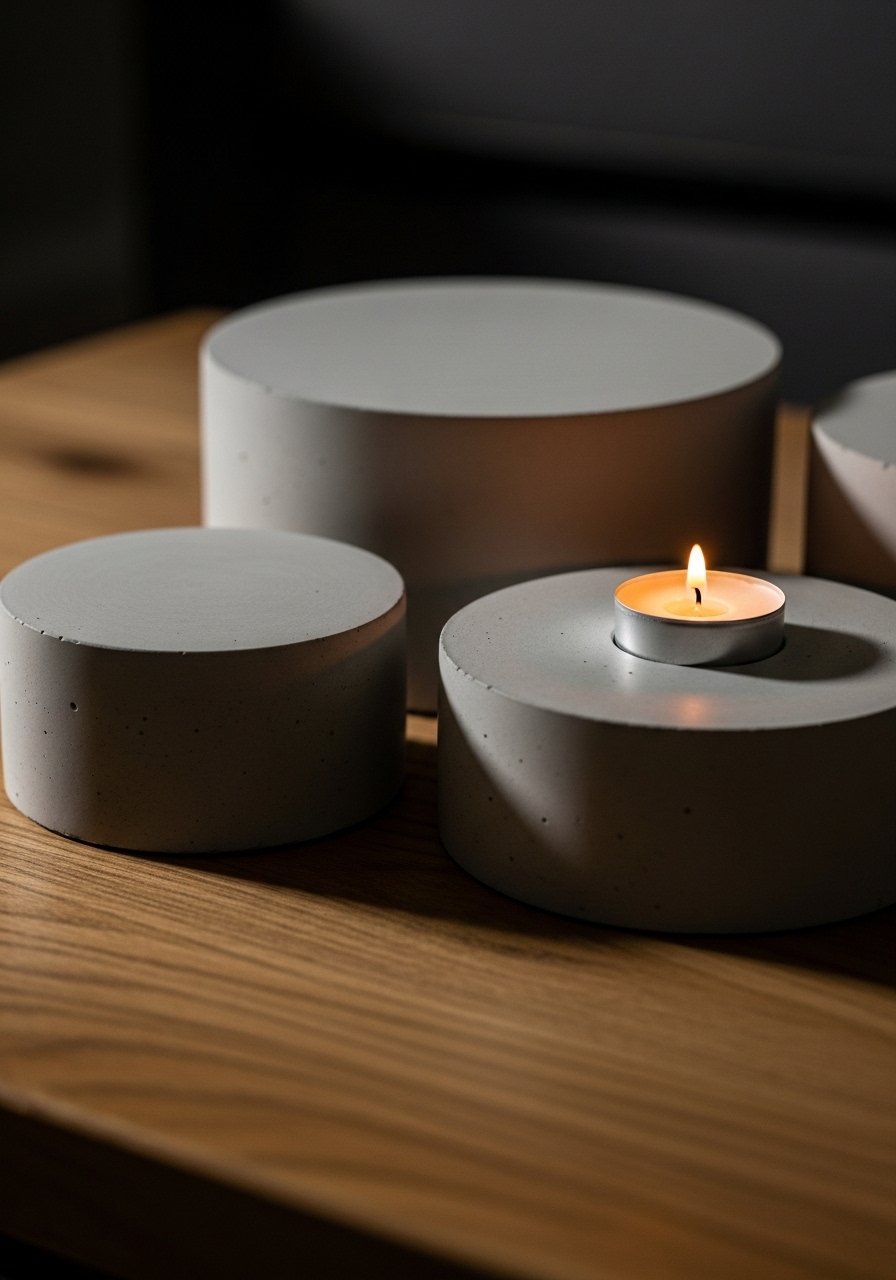
Concrete adds a sculptural, textural element to coffee tables. These risers feel heavy and grounded and play well with japandi and modern looks. Working with small concrete casts is beginner-friendly.
Materials
- 3 silicone round molds, diameters 3", 4", 5", depths 1"–2"
- 16 oz small-batch fast-setting concrete mix
- Water, approx 6–8 oz
- Disposable mixing cup and stir stick
- Fine sandpaper, 220-grit
- Clear spray sealer, 1 can
- 3 tea-light candles
Instructions
- Mix concrete: 16 oz mix to 6–8 oz water per mold per package instructions. Stir to pancake-batter consistency.
- Pour into silicone molds and tap to release bubbles. Let set 1–2 hours until firm.
- After 4 hours, demold carefully. Let cure 24 hours for full strength.
- Sand edges smooth with 220-grit.
- Spray a thin coat of clear sealer and let dry 1 hour.
How to Display or Gift It
Cluster the three risers with candles or small succulents. For gifting, wrap in kraft paper and add a dried sprig. Store cast pieces flat and avoid stacking heavy items on them.
- Resin Geode Coasters
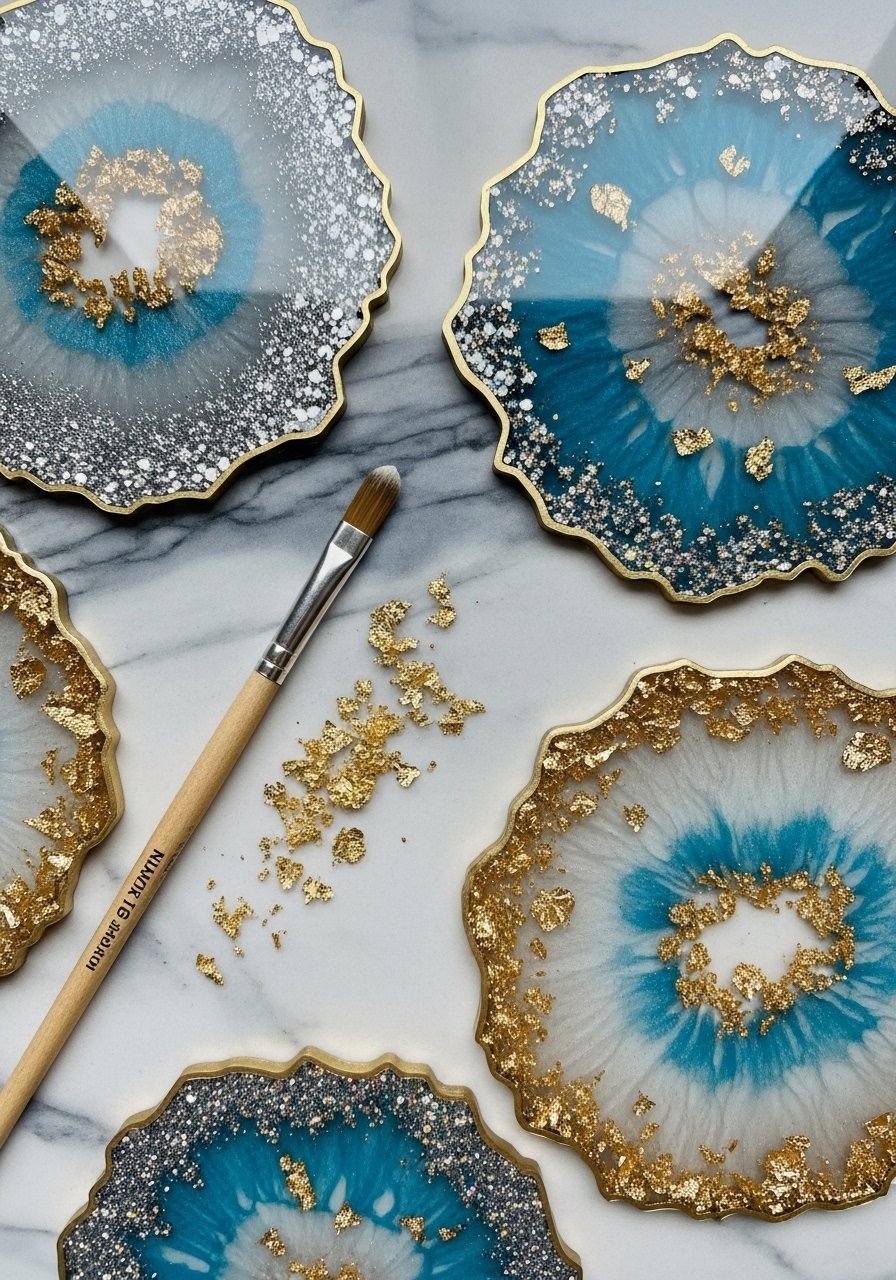
Resin coasters add shine and a luxe look. This geode style mixes mica powders and gold leaf for a jewel-like finish. Use an epoxy kit designed for table-top projects to ensure durability.
Materials
- 4 silicone coaster molds, round 4"
- 16 oz epoxy resin kit (1:1 mix), clear
- Mica powder pigments (3 colors), 1–2 g each
- Gold leaf flakes, 1 g
- Mixing cups & stir sticks
- Disposable gloves, nitrile
- Heat gun or torch for bubbles
- Sandpaper, 320-grit
Instructions
- Prepare workspace and wear gloves. Mix epoxy resin 1:1 per kit instructions. Typical pot life 20–30 minutes.
- Pour base layer into molds to cover bottom. Let sit 5 minutes.
- Mix small resin portions with mica powders and layer toward edges to mimic geode shapes. Add gold leaf.
- Use a heat gun for 3–5 seconds to pop bubbles.
- Cure 24–48 hours (check kit for full cure).
- Demold and sand rough edges if needed. Polish with a microfiber cloth.
How to Display or Gift It
Stack coasters with a twine tie and tuck a small note inside. Pair with matching cups or a tea tin. Keep coasters flat in a small craft organizer to avoid warping.
- Hand-Painted Terracotta Planter Trio
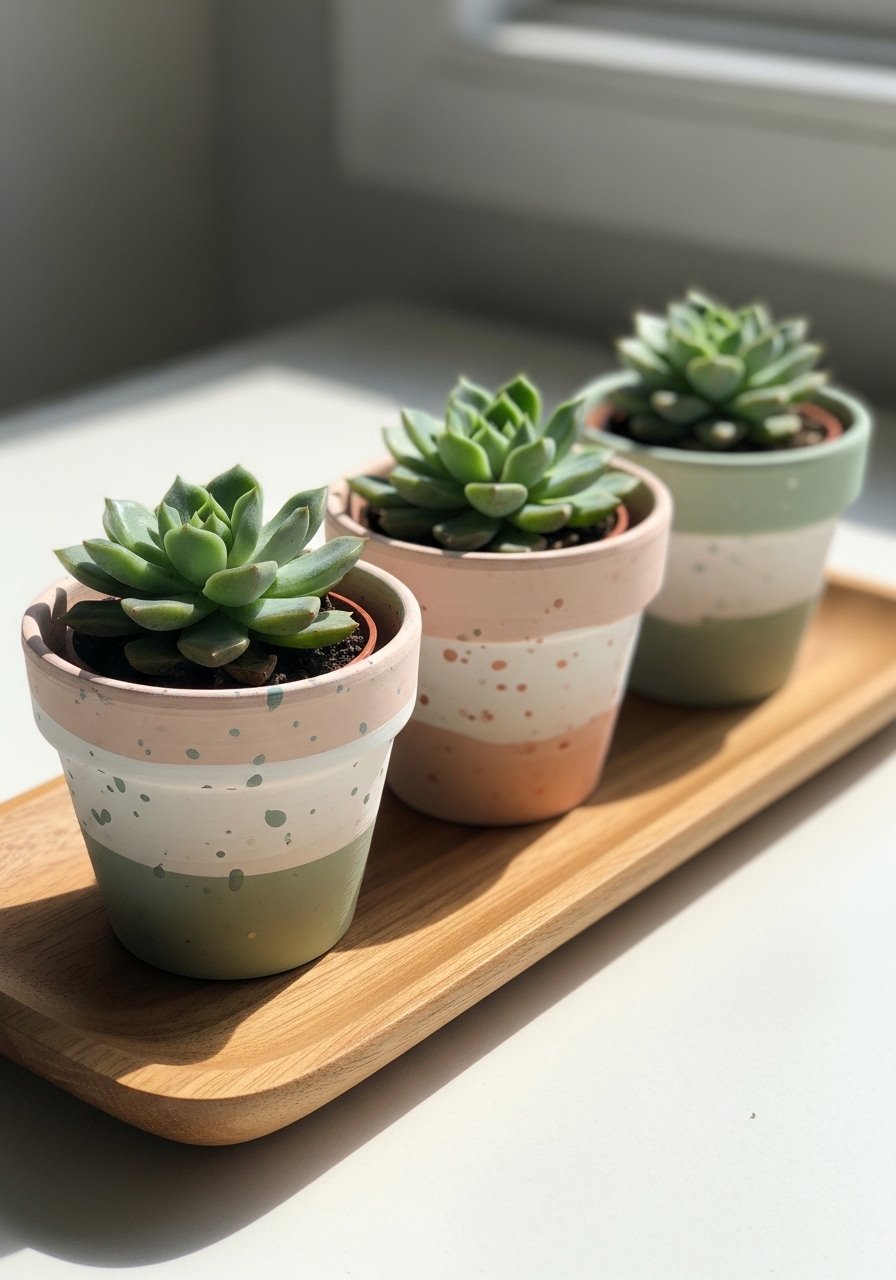
A set of painted terracotta planters brings nature and color to the coffee table. Sealing keeps paint intact when watering.
Materials
- 3 terracotta pots (2.5", 3.5", 4.5")
- Acrylic craft paints (matte), small tubes
- 1 small paintbrush set (detail & 1/2" flat)
- Mod Podge outdoor, 2 oz
- Potting mix for succulents, 1 qt
- 3 small succulents (pre-potted)
- Foam brush
Instructions
- Clean pots and let dry. Prime with a thin base coat of paint; dry 20 minutes.
- Add pattern layers using a small detail brush. Allow each layer to dry 15–20 minutes.
- Seal outside with one coat of Mod Podge outdoor. Dry 1 hour.
- Add small drainage rock in pot, fill with potting mix and transplant succulents.
- Water lightly and place on table.
How to Display or Gift It
Group the trio at different heights on a tray. For gifting, nest in tissue and box the set. Store extra paint in an airtight container to touch up later.
- Marble Contact Paper Top for a Thrifted Tray
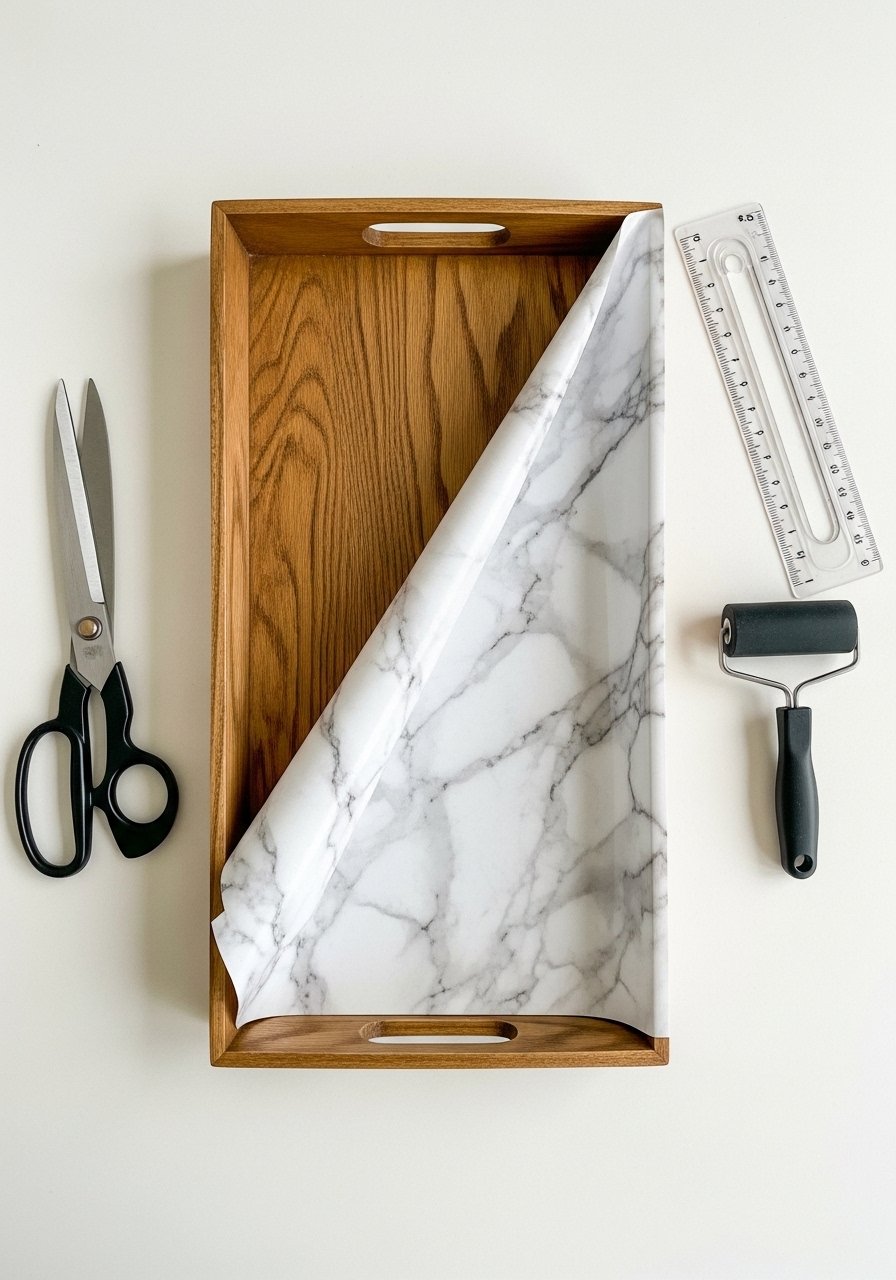
Contact paper is an affordable way to mimic marble. A brayer keeps air bubbles out for a smooth finish.
Materials
- 1 thrifted wooden tray, approx 14" x 10"
- Roll marble contact paper, 1 ft x 2 ft
- Utility knife and spare blade
- Metal ruler, 12"
- Brayer roller
- Painter's tape, 1/2"
Instructions
- Clean tray surface. Measure and cut contact paper leaving 1/2" overhang.
- Peel backing and apply from one edge, smoothing with a brayer as you go.
- Trim excess with a utility knife using a metal ruler.
- Press edges with painter's tape for 1 hour for added adhesion.
- Allow to rest 24 hours before heavy use.
How to Display or Gift It
Use this marble-trimmed tray to anchor decor. Wrap in tissue and secure with baker’s twine for gifting. Store unused contact paper flat.
- Macramé Mini Wall Hanging on a Mini Dowel — tabletop accent
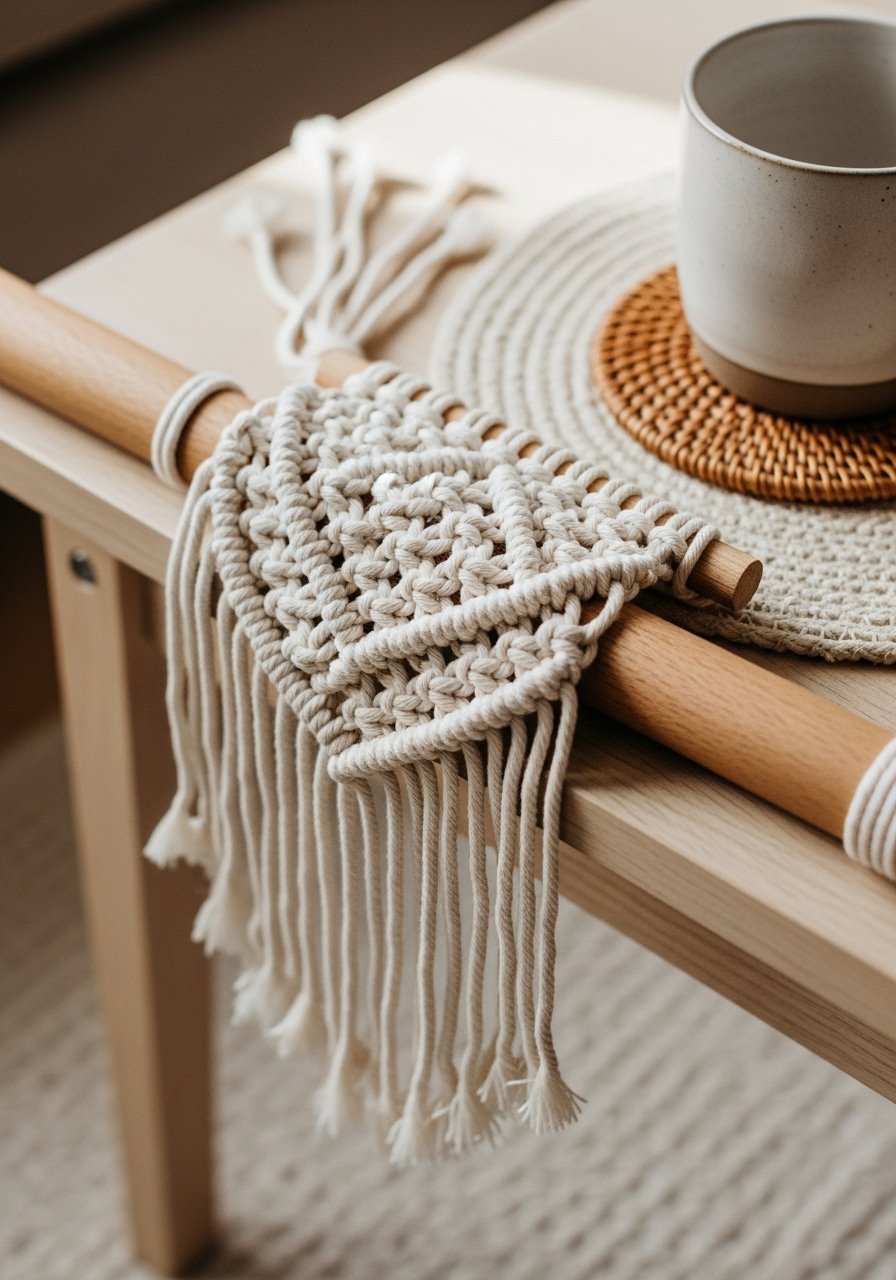
A tiny macramé piece leans against a stack of books as a tactile accent. Knots add texture and a boho vibe to the table.
Materials
- 3 mm single-strand macramé cord, 10 yds
- 1 wooden dowel, 6"
- Scissors
- Comb for fringe
- Measuring tape
Instructions
- Cut 6 cords at 36" each.
- Fold cords in half and attach to dowel with lark’s head knots.
- Tie square knots in rows: 2 rows of 3 knots each.
- Finish with a half hitch around the dowel on each side.
- Trim fringe evenly and comb for fullness.
How to Display or Gift It
Prop the dowel on a small easel or lean it against a framed photo. For gifting, wrap in kraft paper and include a mini comb. Store macramé cord on a spool.
- Terrarium Cloche with Mini Fairy Lights
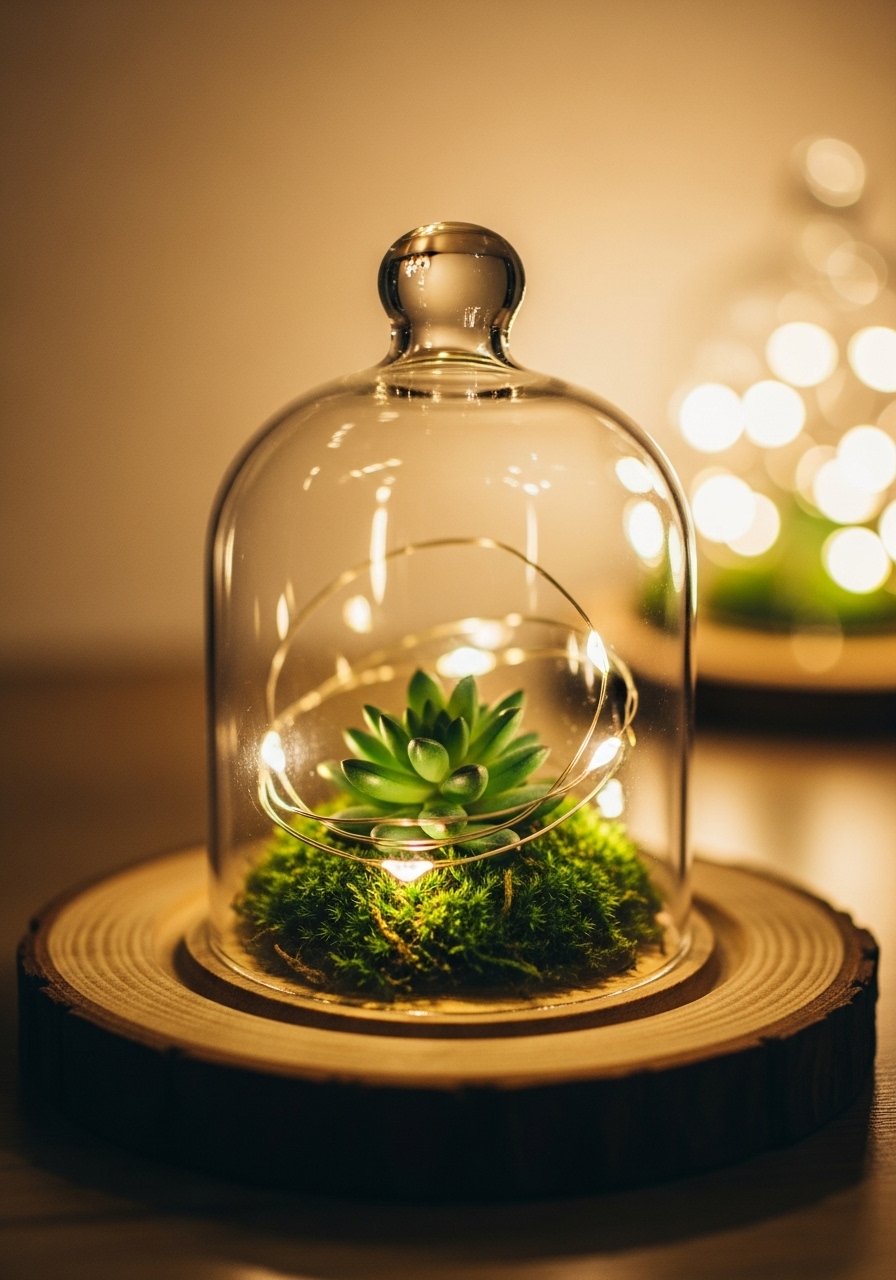
A glass cloche makes a mini ecosystem and the fairy lights add warm glow at night.
Materials
- 1 glass cloche, 6" tall
- 1 wooden base, 6" diameter
- Sheet moss, 1 cup
- 1 small faux succulent or air plant
- Battery-operated micro fairy lights
- Hot glue gun for securing base (optional)
Instructions
- Arrange moss on the wooden base to create a soft bed.
- Place succulent or air plant centered.
- Wrap fairy lights gently and tuck battery pack behind base.
- Set cloche over arrangement.
- Switch lights on as needed. Replace batteries every 2–3 months with frequent use.
How to Display or Gift It
Set cloche on a coaster or tray. For gifting, include spare batteries and wrap in tissue in a box. Store glass cloche in bubble wrap between uses.
- Driftwood Candle Centerpiece
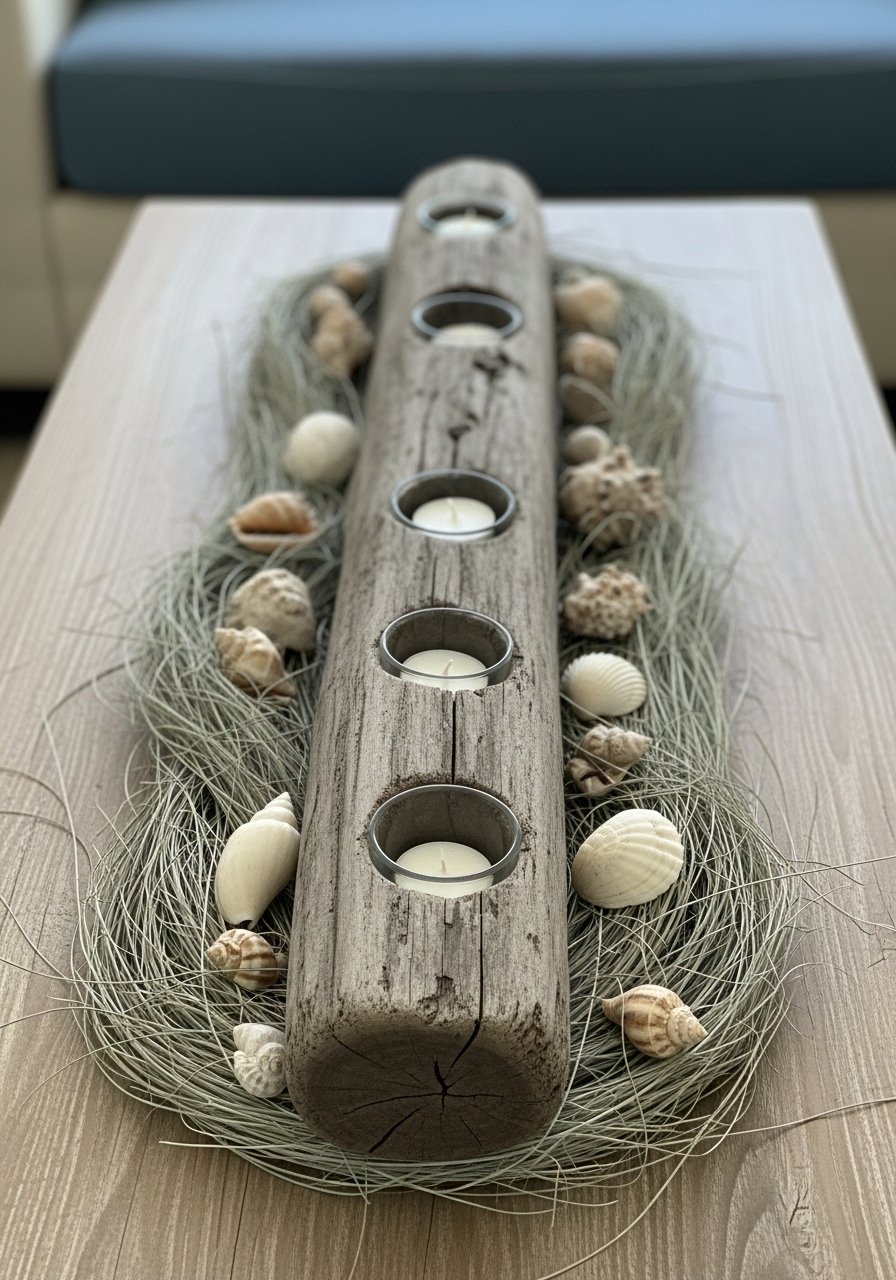
Natural driftwood adds coastal texture and pairs beautifully with candles. Secure votives for safe use.
Materials
- 1 driftwood piece, 20" long
- 3 glass votive holders (small)
- Epoxy putty for fixings, 2 oz
- Sandpaper, 120-grit
- 3 unscented votive candles
Instructions
- Clean and sand any sharp driftwood spots.
- Position the three votive holders and mark spots.
- Use epoxy putty to recess votives slightly into the wood. Let cure 1–2 hours.
- Place candles in holders and light safely.
How to Display or Gift It
Center the driftwood on a runner and add shells for beachy styling. For gifting, pack with padding. Store in a dry place to avoid mold.
- Mosaic Tile Tray (Broken China Look)
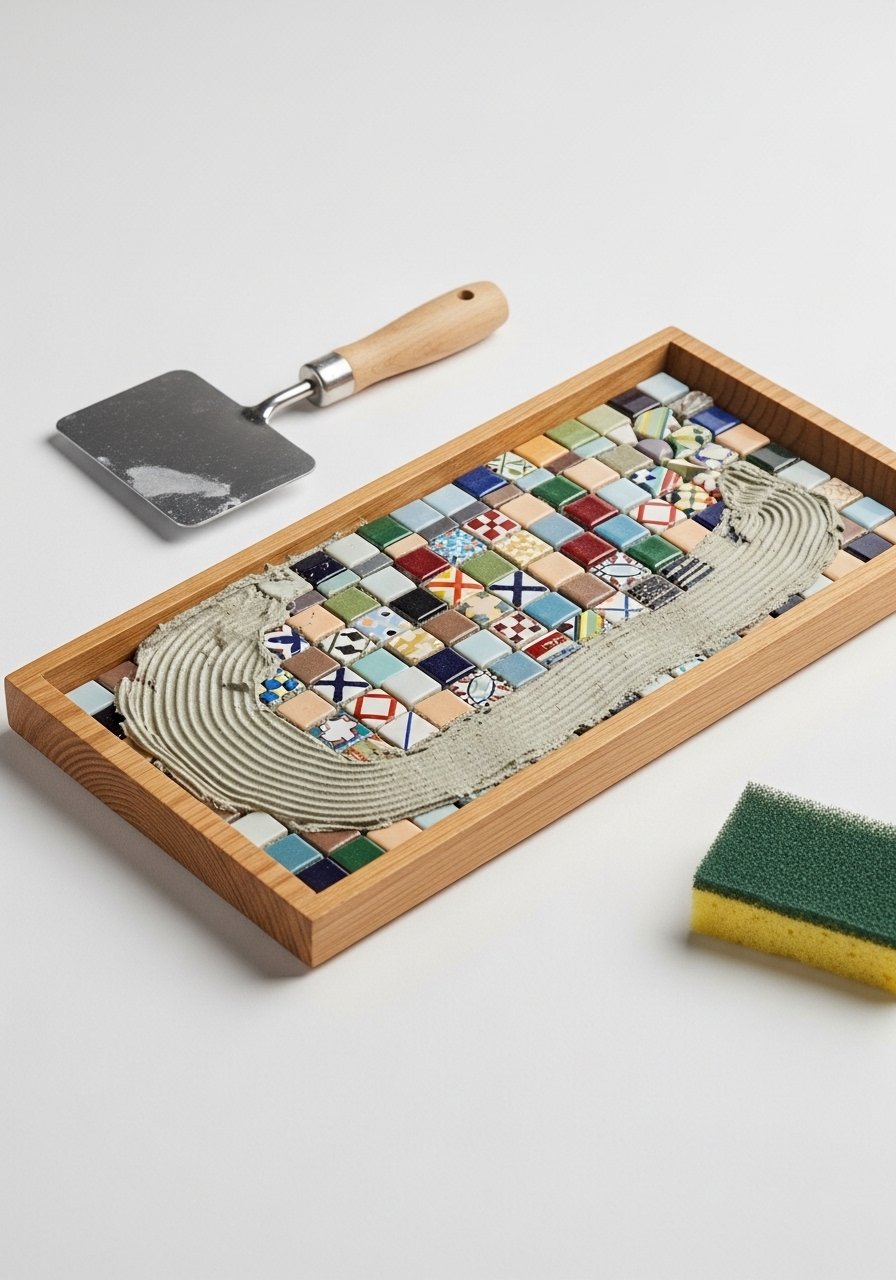
Mosaic brings pattern and color. Use small tile pieces to create vintage-broken-china charm.
Materials
- 1 unfinished wood tray, 12" x 8"
- Assorted ceramic tiles, broken or cut, total ~1 lb
- Thin-set adhesive, 4 oz
- Sanded grout, 4 oz
- Grout float and sponge
- Safety glasses and gloves
- Tile nippers if cutting tiles
Instructions
- Arrange tile pieces on tray to plan design.
- Spread thin-set with a notched trowel and press tiles in. Cure 24 hours.
- Mix grout and spread to fill gaps. Wipe excess with damp sponge.
- Allow grout to cure 24–48 hours.
- Seal grout if desired with grout sealer. Dry 1–2 hours.
How to Display or Gift It
Use as a centerpiece tray or under a glass cloche for protection. Wrap with bubble wrap and label “fragile” for gifting. Store in vertical racks to avoid chipping.
- Painted River Rock Bookends
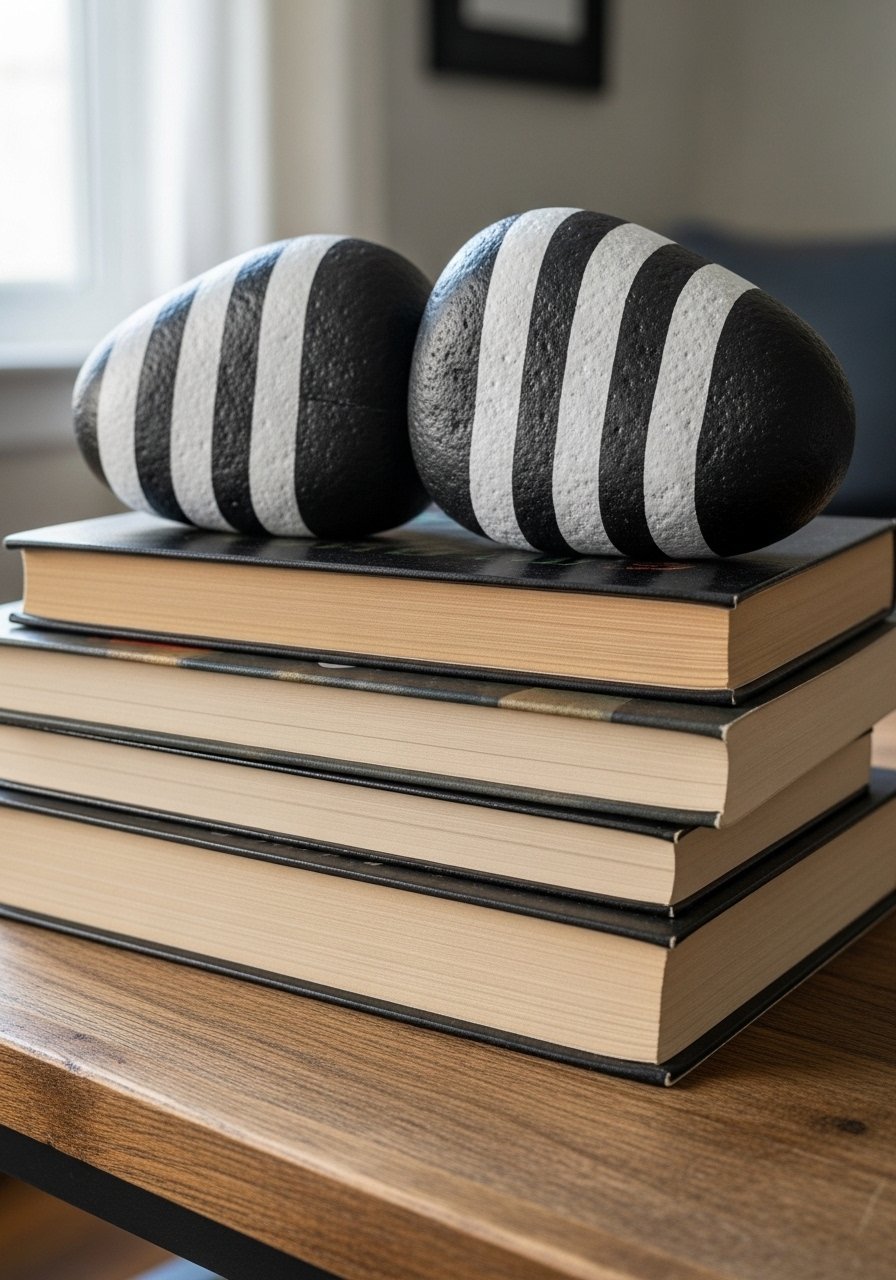
Painted rocks act as functional art and are virtually free if you forage safely. Use acrylic paint pens for control.
Materials
- 2 large river rocks (each ~3–4 lb / 4–5")
- Acrylic paint pens, fine tip
- Matte sealer spray, 1 can
- Rubbing alcohol and cloth for cleaning
Instructions
- Clean rocks with rubbing alcohol and let dry.
- Sketch designs lightly with pencil.
- Fill in with paint pens; let dry 15 minutes between layers.
- Spray with matte sealer and let dry 1 hour.
How to Display or Gift It
Use as bookends on a coffee table stack. Wrap in kraft with a ribbon for gifting. Store extra paint pens in an organizer.
- Faux Stone Tray with Chalk Paint Finish
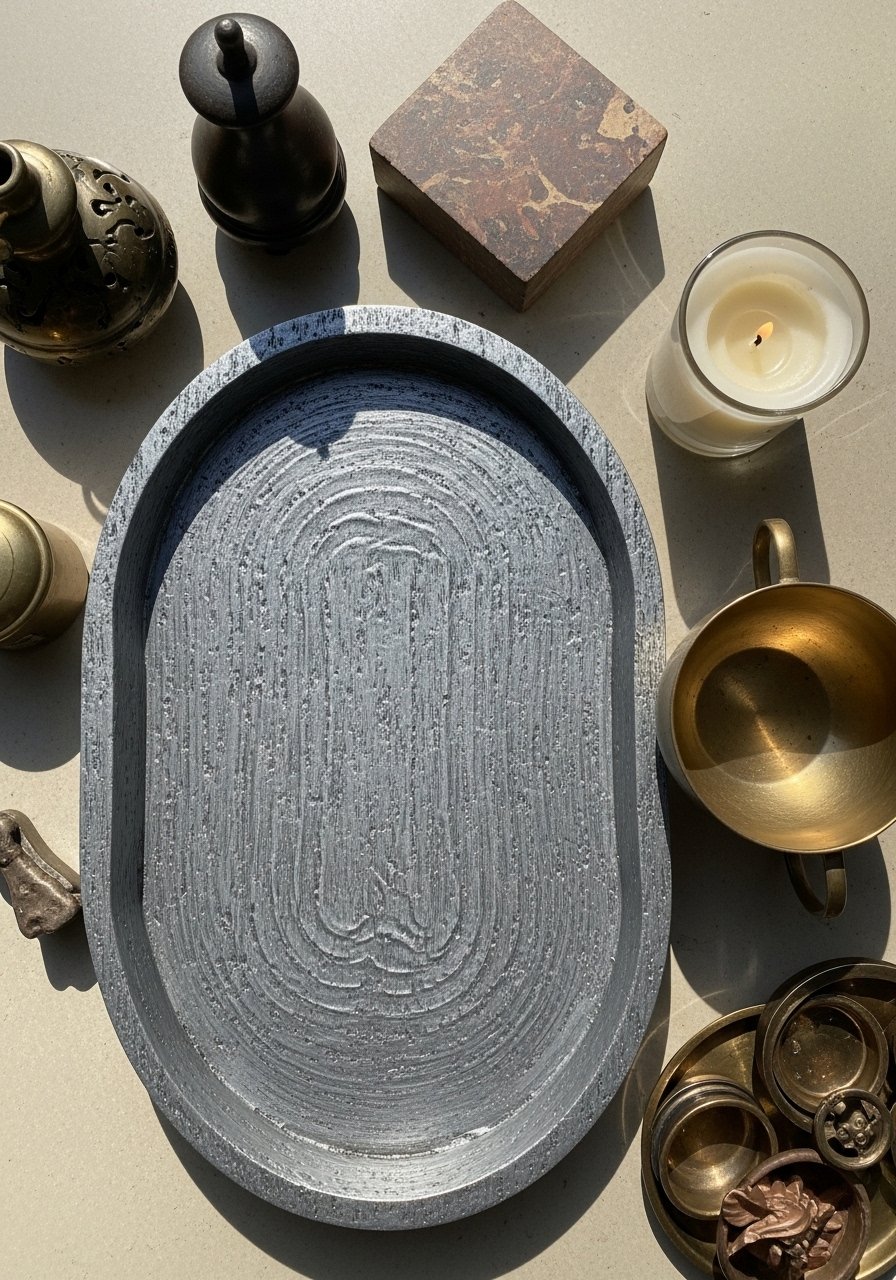
A layered dry-brush technique gives wood a faux-stone look without weight. Great for cottagecore or industrial tables.
Materials
- 1 wooden tray blank, 14" x 10"
- Chalk paint (dark gray, light gray, off-white)
- 2 foam brushes (1/2" and 1")
- Sponge for stippling
- Matte varnish, 2 oz
Instructions
- Base coat tray in dark gray. Dry 30 minutes.
- Dry-brush lighter gray across high points with a sponge for texture.
- Add off-white accents with a stipple sponge for veining.
- Seal with matte varnish and let cure 24 hours.
How to Display or Gift It
Pair with brass or copper accents for contrast. Wrap in tissue and place in a tray-shaped gift box for sending. Store in a climate-stable area.
- Upcycled Teacup Planter Trio
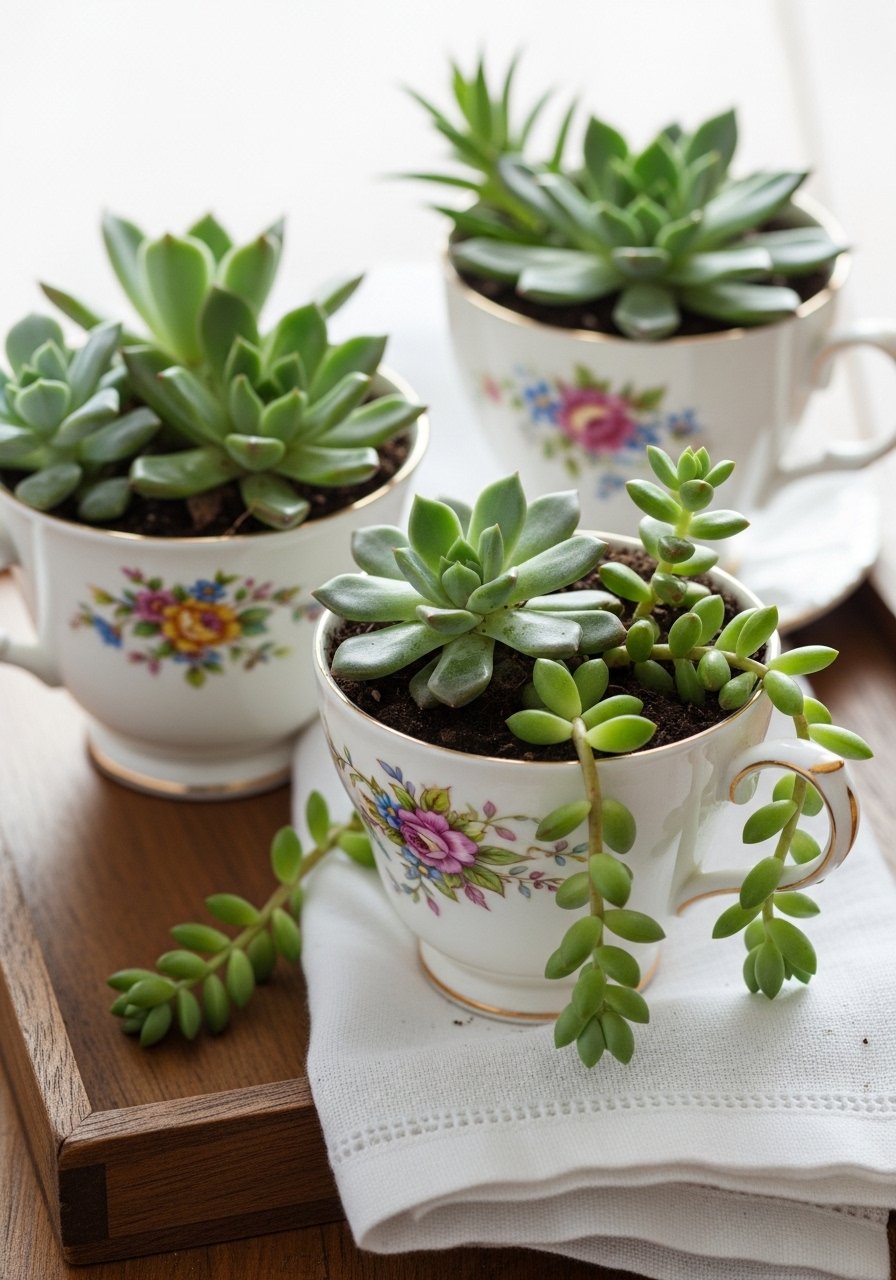
Vintage teacups make charming mini planters — they bring pattern and a delicate scale to the coffee table.
Materials
- 3 vintage teacups with saucers (various sizes)
- Small drill bit (1/8") or aquarium gravel for drainage
- Potting mix for succulents, 1 pint
- 3 small succulents
- Mini spoon for planting
Instructions
- If possible, drill a small drainage hole or add a layer of gravel.
- Fill cups with potting mix and plant succulents.
- Water lightly and allow to drain on a saucer.
How to Display or Gift It
Group on a small tray and rotate to avoid sunburning plants. Wrap individual cups with tissue for gifting. Store extra saucers in a padded craft box.
- Pressed Flower Coaster Set in Resin
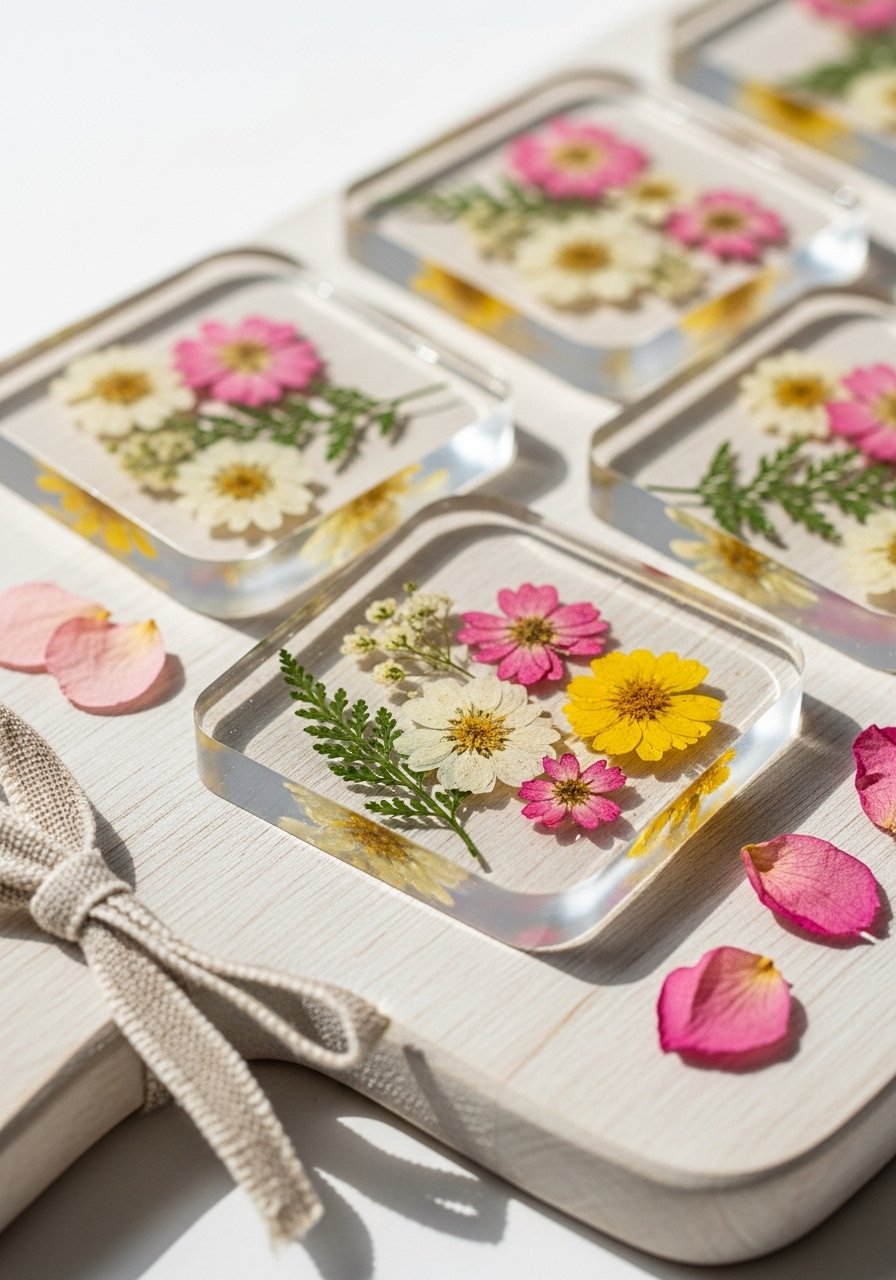
Pressing flowers preserves a seasonal look. Encasing in resin creates a usable, wipeable coaster set.
Materials
- 4 resin coaster molds (4" square)
- 16 oz epoxy resin kit
- Pressed flowers, 8–12 small blooms
- Mixing supplies, gloves, stir sticks
- Fine sandpaper, 320-grit
Instructions
- Place pressed flowers in molds in desired layout.
- Mix resin 1:1 and pour a thin base layer. Let sit 10 minutes.
- Pour remaining resin to embed flowers. Use heat gun for bubbles.
- Cure 24–48 hours.
- Demold and sand edges if needed.
How to Display or Gift It
Stack coasters and tie with ribbon for a pretty gift. Keep coasters flat in storage to avoid warping.
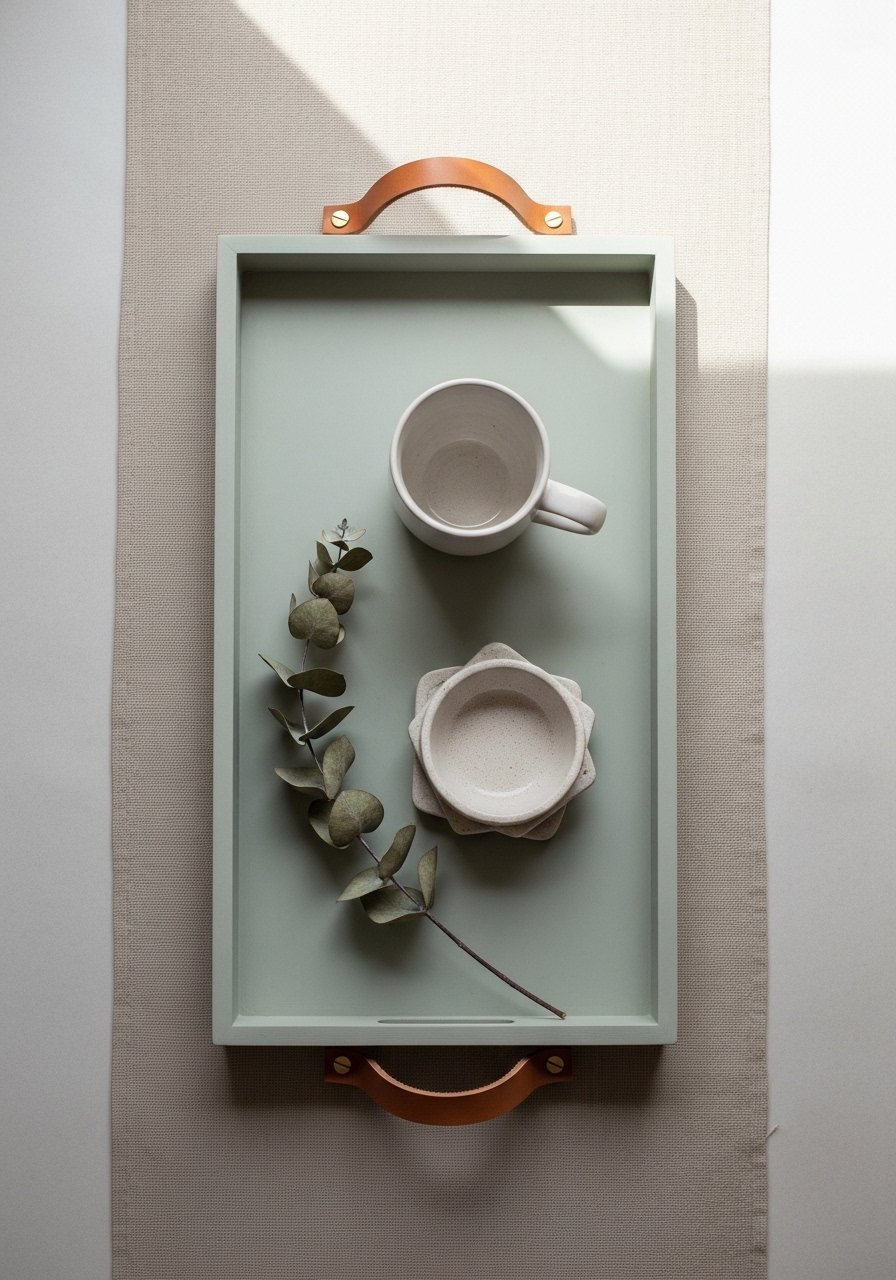
- Layered Tray Styling — DIY coffee table decor ideas you can swap seasonally
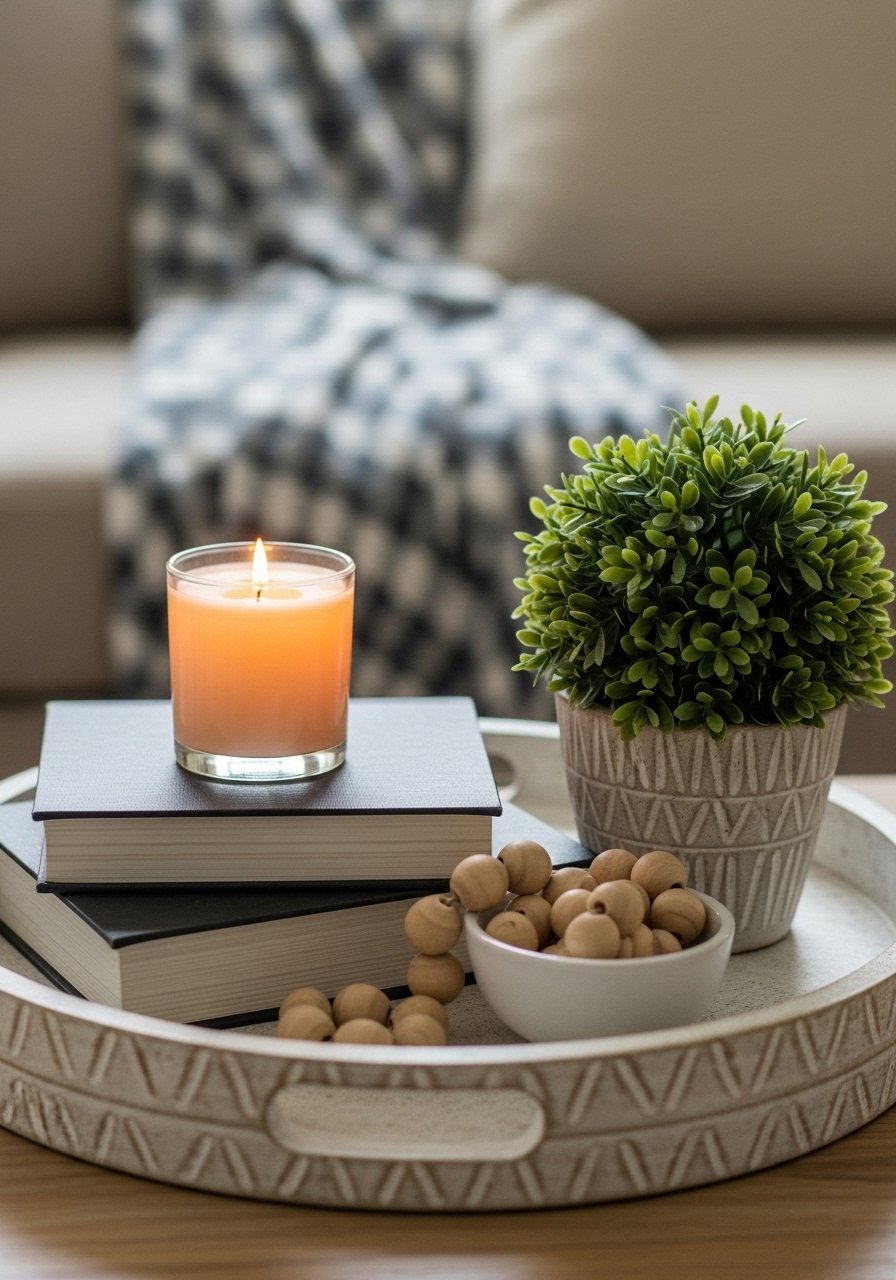
This styling approach is a modular idea you can swap with the seasons. Layer textures, heights, and a focal object for constant visual interest.
Materials
- 1 wooden tray, 12" x 8"
- Stack of 2–3 books (varied sizes)
- 1 pillar candle (3" x 4")
- 1 small ceramic bowl
- Decorative beads or potpourri, 1/2 cup
- Small plant or faux sprig
Instructions
- Place the largest object (books) off-center.
- Add a tray-safe candle and bowl next to the books.
- Fill bowl with beads or potpourri as filler.
- Tuck in a sprig or mini plant to finish.
- Rotate seasonal accents every 4–6 weeks to keep the table feeling fresh.
How to Display or Gift It
This layered tray makes a ready-to-give hostess set. For storage, nest similar trays vertically in a shallow organizer.
- Painted Ceramic Bowl with Metallic Rim
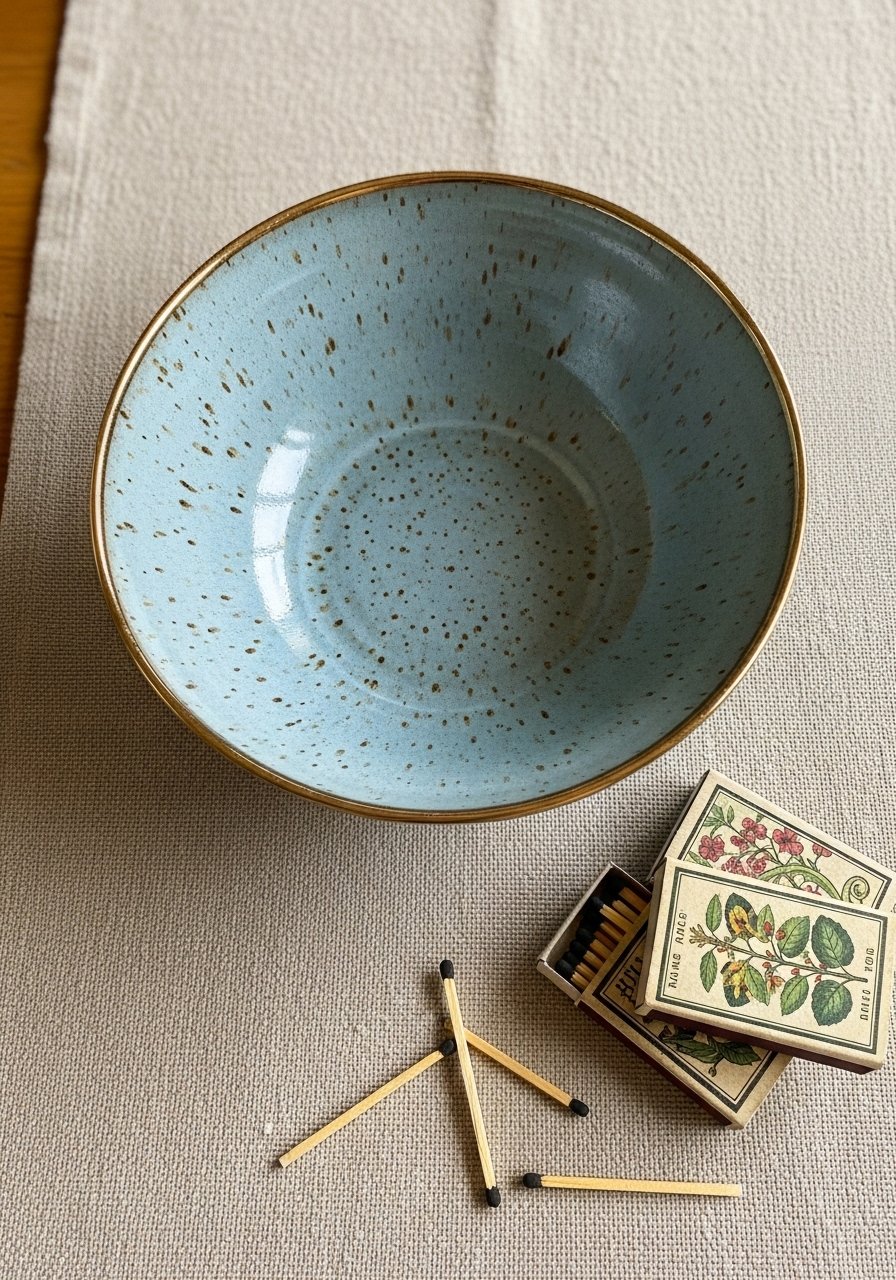
A painted ceramic bowl is tactile and useful for holding keys, matches, or small remotes. The metallic rim catches the eye.
Materials
- 1 plain ceramic bowl (6" diameter)
- Acrylic ceramic paint or paint pens
- Gold leaf pen or metallic paint, 1
- Sealant for ceramics, 1 can
- Foam brush
Instructions
- Clean bowl. Paint base patterns and let dry 20 minutes between coats.
- Add metallic rim with a gold pen. Dry 15 minutes.
- Seal with a ceramic-safe sealant and let cure 24 hours.
How to Display or Gift It
Fill with potpourri or matches. Wrap in tissue and box for gifting. Store sealed bowls stacked with soft interleaving.
- Minimalist Wire Tray for Magazines and Mugs
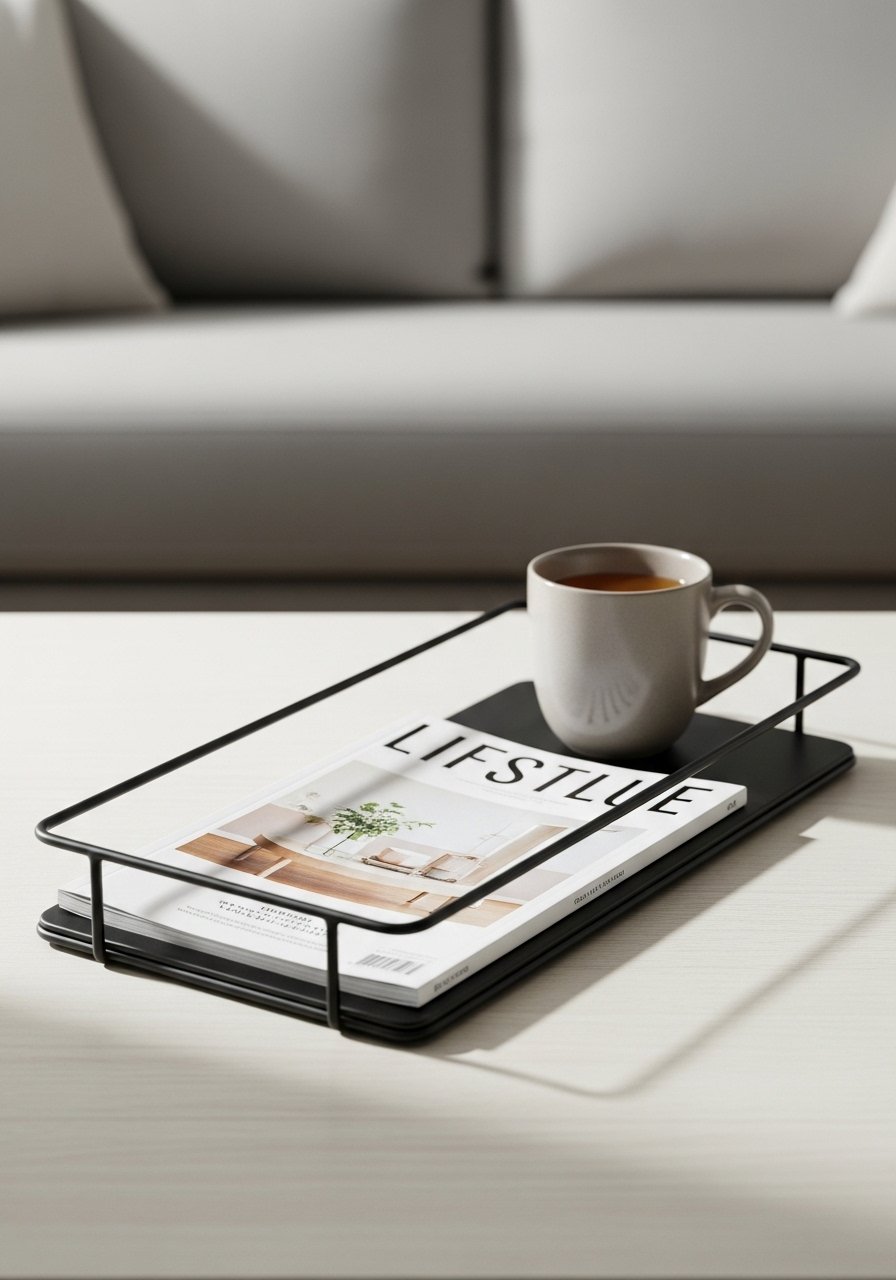
A wire tray keeps the look light and airy. Spray-painting a thrifted tray gives a sleek finish.
Materials
- 1 metal wire tray (or thrift find)
- Matte spray paint (black or brass), 1 can
- Painter’s tape
- Drop cloth
Instructions
- Clean and tape any areas you want protected.
- Spray in light coats, maintaining 12" distance. Dry 15 minutes between coats.
- Cure 24 hours.
How to Display or Gift It
Use for magazines or remotes. Wrap in kraft and tie with ribbon for gifting. Store disassembled if stackable in a metal rack.
- Felt Ball Coasters (Colorblocked)
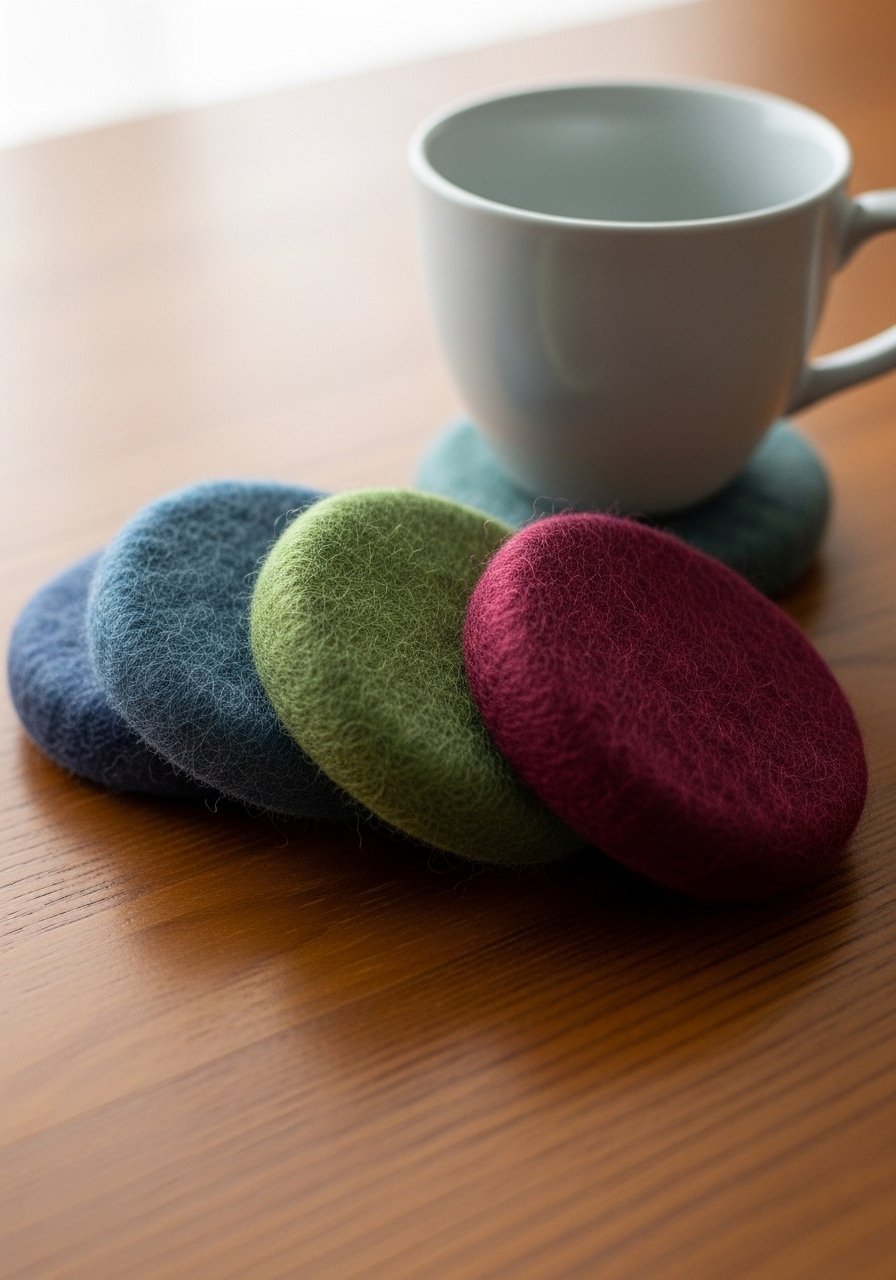
Felt ball coasters are soft, absorbent, and handmade-feeling. Colorblocking gives a modern twist.
Materials
- Wool felt balls, approx 50 balls (size 12 mm)
- Hot glue gun and glue sticks
- Cardboard circle template, 4"
- Scissors
Instructions
- Arrange felt balls around a cardboard circle, gluing as you go.
- Continue second row to create thickness.
- Trim any stray fibers.
How to Display or Gift It
Stack coasters with a ribbon and tuck a mini tea bag for gifting. Store in a fabric pouch.
- Miniature Framed Botanical Prints (Triptych)
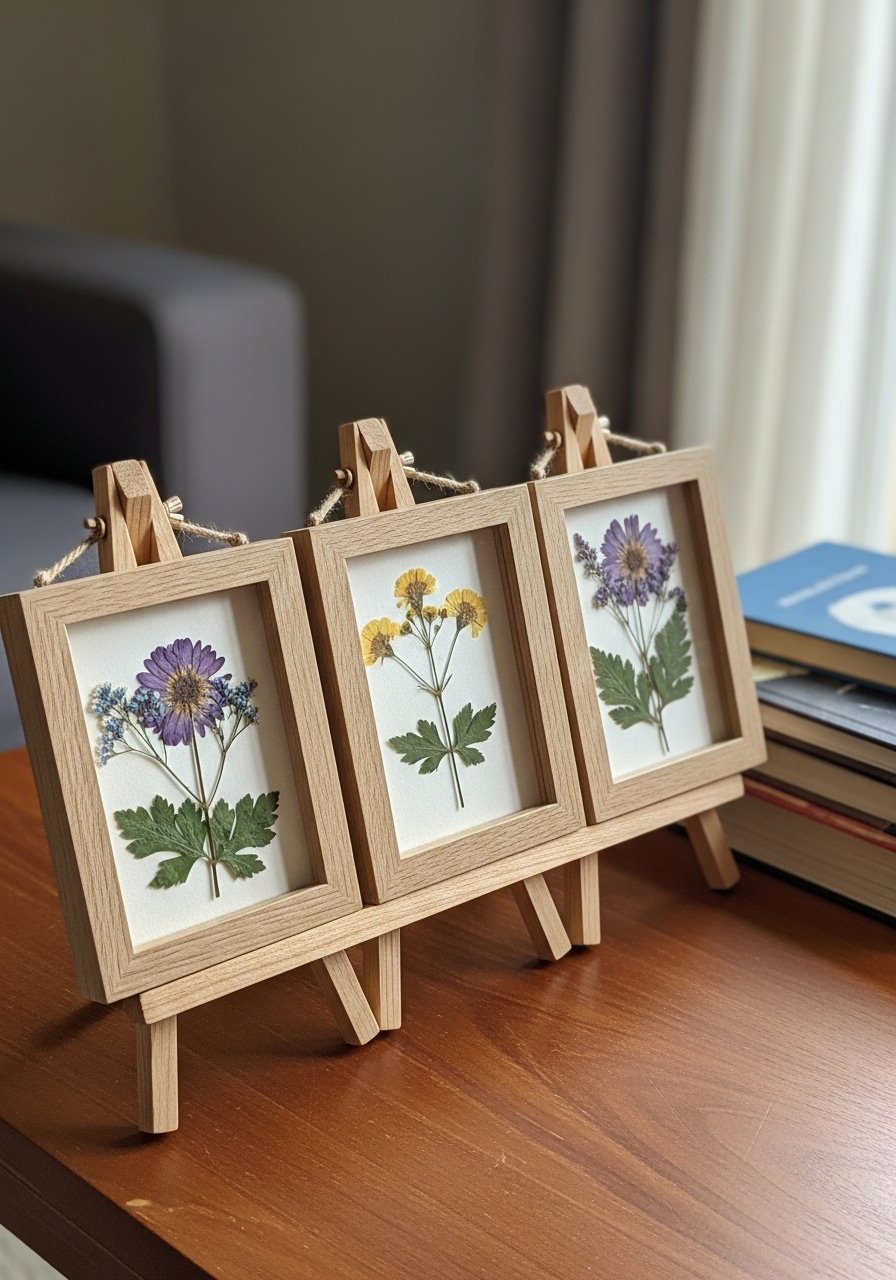
A small triptych adds a refined gallery feel to a table vignette.
Materials
- 3 small frames, 3" x 3"
- Pressed leaves or flowers
- Acid-free paper for background
- Glue dots
- Small tabletop easel
Instructions
- Mount pressed botanicals on acid-free paper using glue dots.
- Insert into frames and close securely.
- Display on a mini easel or lean against a stack of books.
How to Display or Gift It
Use a small wooden easel for tabletop display. Wrap frames in bubble wrap and place in a gift box.
- Cork and Leather Coaster Set
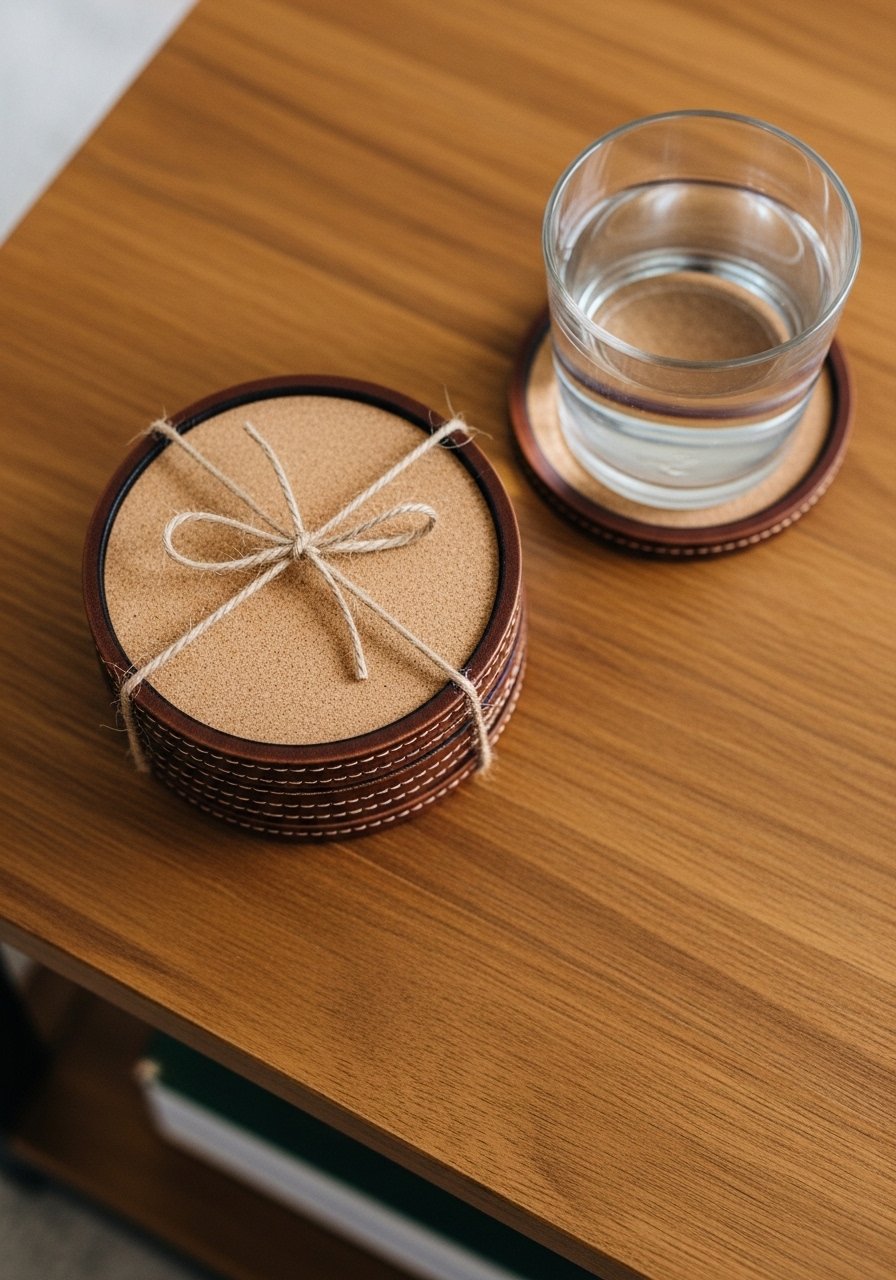
Cork coasters with stitched leather edges feel luxe and protect your table surface.
Materials
- 4 cork coaster blanks, 4" diameter
- Leather strips, 4" x 1/2" each
- Leather glue or contact cement
- Hole punch for leather (if stitching)
- Waxed thread for stitching (optional)
Instructions
- Glue leather strips to the cork edge and let dry 1 hour.
- Optional: punch holes and stitch leather to cork for a finished look.
- Allow adhesive to fully cure 24 hours.
How to Display or Gift It
Stack coasters and tie with twine. Store in a coaster box or on a coaster holder.
- DIY Pebble Inlay Tray
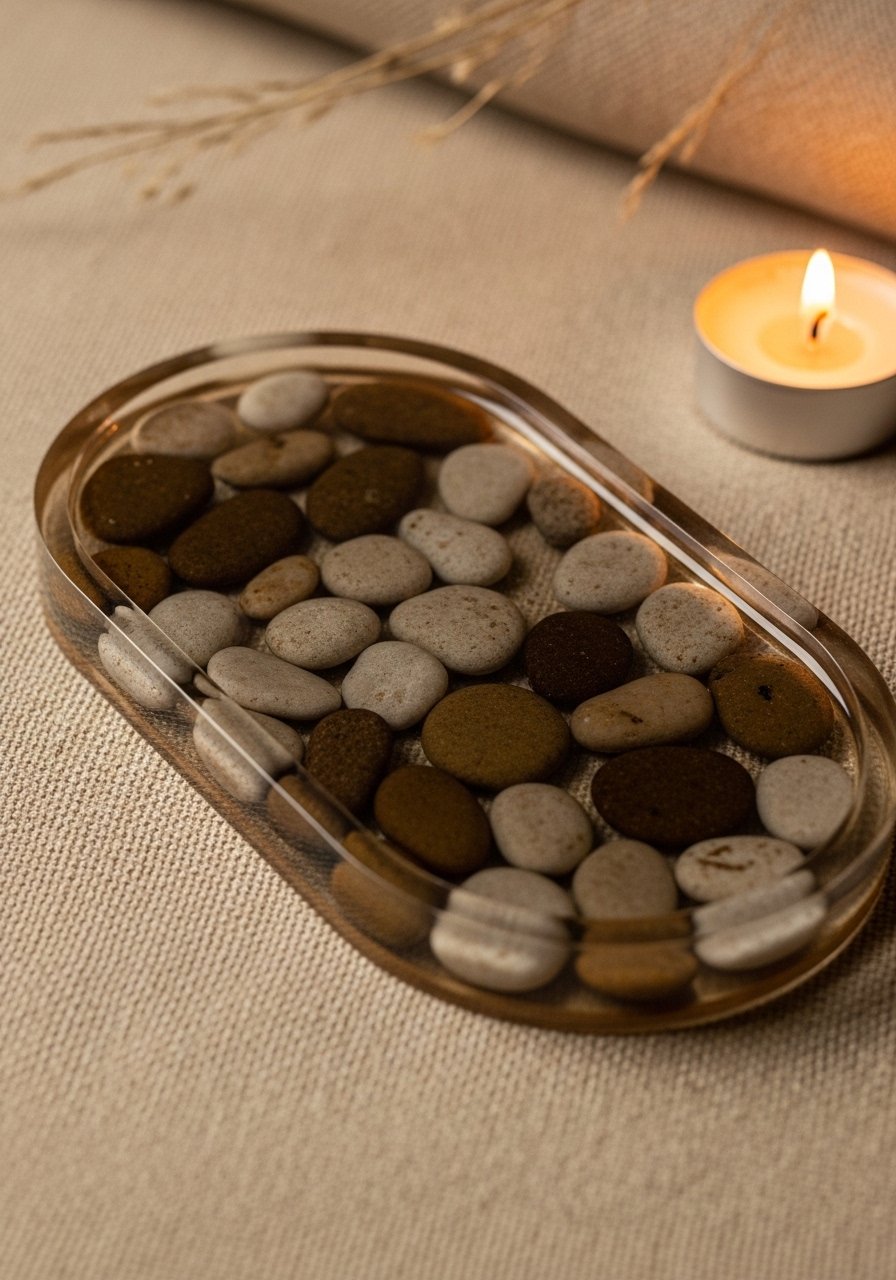
Pebble inlay creates tactile interest and a beachy look. Resin secures and gives a glossy finish.
Materials
- 1 small tray, 12" x 6"
- Small flat pebbles, ~1 lb
- 8 oz epoxy resin kit
- Mixing supplies, gloves
- Sandpaper, 320-grit
Instructions
- Arrange pebbles in tray pattern.
- Mix epoxy and pour to embed pebbles. Pop bubbles with a heat gun.
- Cure 24–48 hours.
- Sand rough edges if necessary.
How to Display or Gift It
Use as a catchall or serving tray for dry items. Store on its side in a protected space.
- Hand-Lettered Quote Tile (Ceramic)
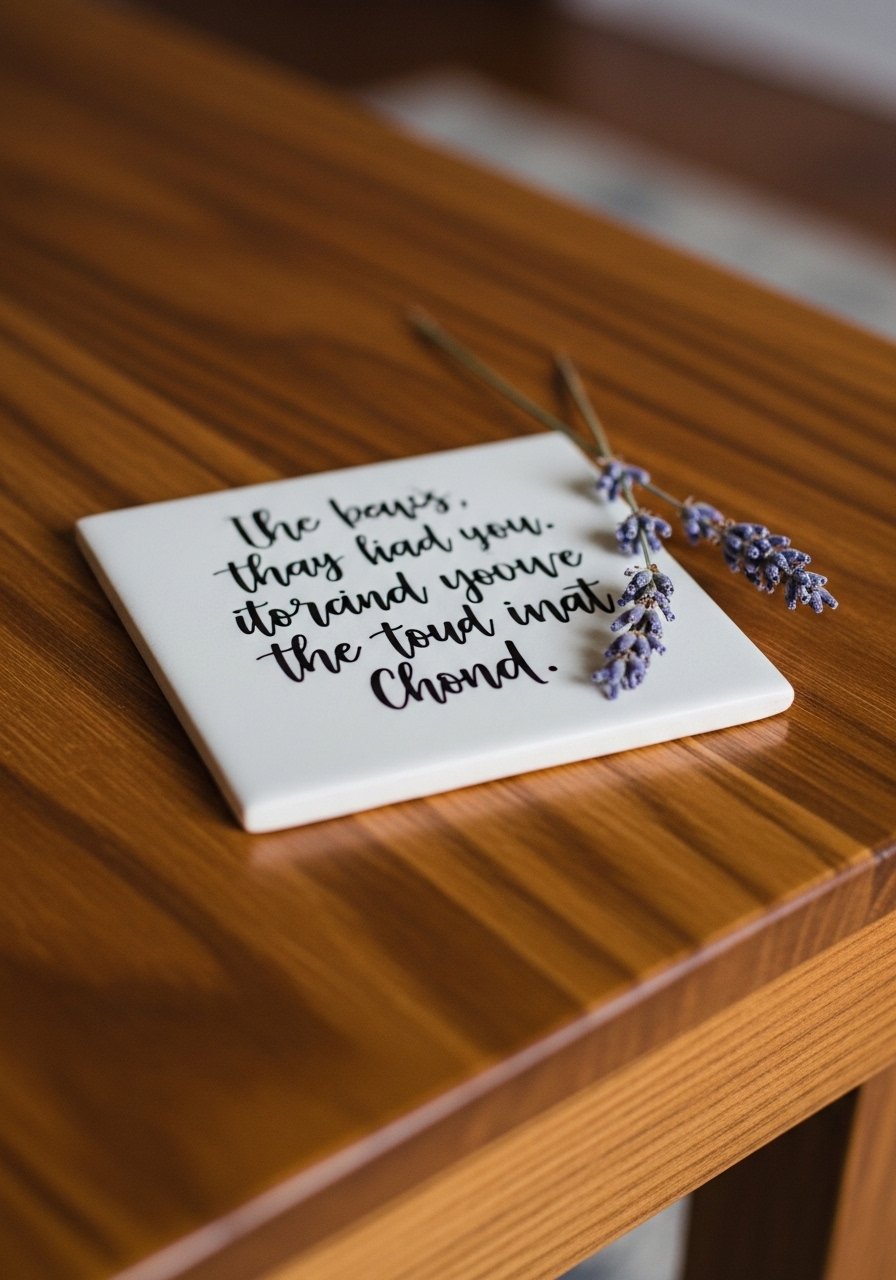
A simple hand-lettered tile acts like a tiny art piece with personality.
Materials
- 1 ceramic tile (6" x 6")
- Oil-based paint pen (fine tip)
- Ruler and pencil for faint guides
- Clear spray sealer
Instructions
- Sketch quote lightly in pencil.
- Trace with an oil-based paint pen; allow ink to dry 15–20 minutes.
- Spray with clear sealer and cure 1 hour.
How to Display or Gift It
Prop tile with a mini easel or place under a glass cloche. Wrap in tissue and place in a shallow box for gifting.
- Geometric Concrete Candle Tray
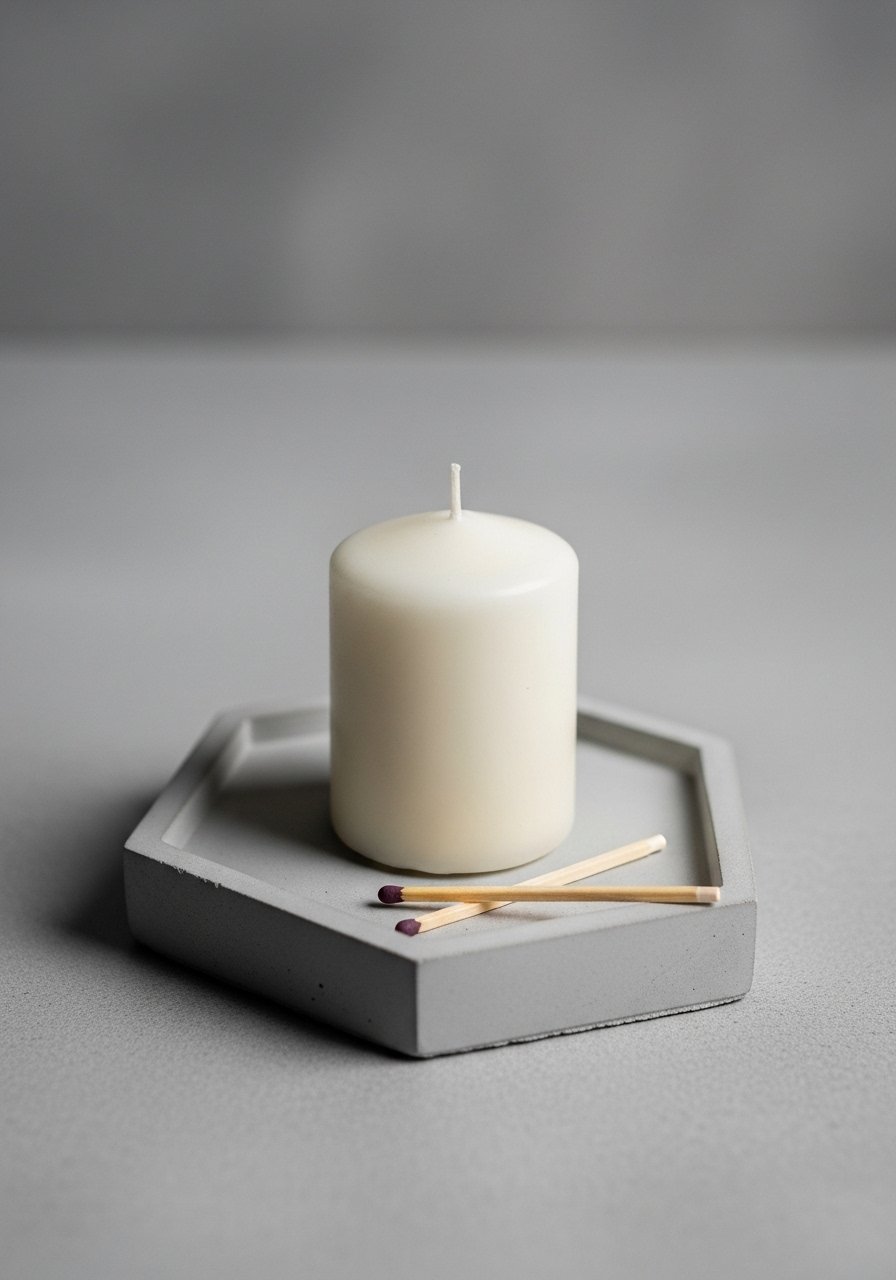
A geometric concrete tray is modern and tactile. Mold in a silicone tray for crisp edges.
Materials
- 1 silicone mold (geo shape), 6"
- 8 oz concrete mix
- Water, ~3 oz
- Mixing cup and stir stick
- Fine sandpaper, 220-grit
Instructions
- Mix concrete to pourable consistency per package.
- Pour into mold and tap out bubbles.
- Cure 24 hours then demold.
- Sand edges and seal if desired.
How to Display or Gift It
Pair with a pillar candle and matches. For gifting, wrap in kraft and include care notes.
- Painted Wood Bead Tray Edge (Boho Bead Trim)
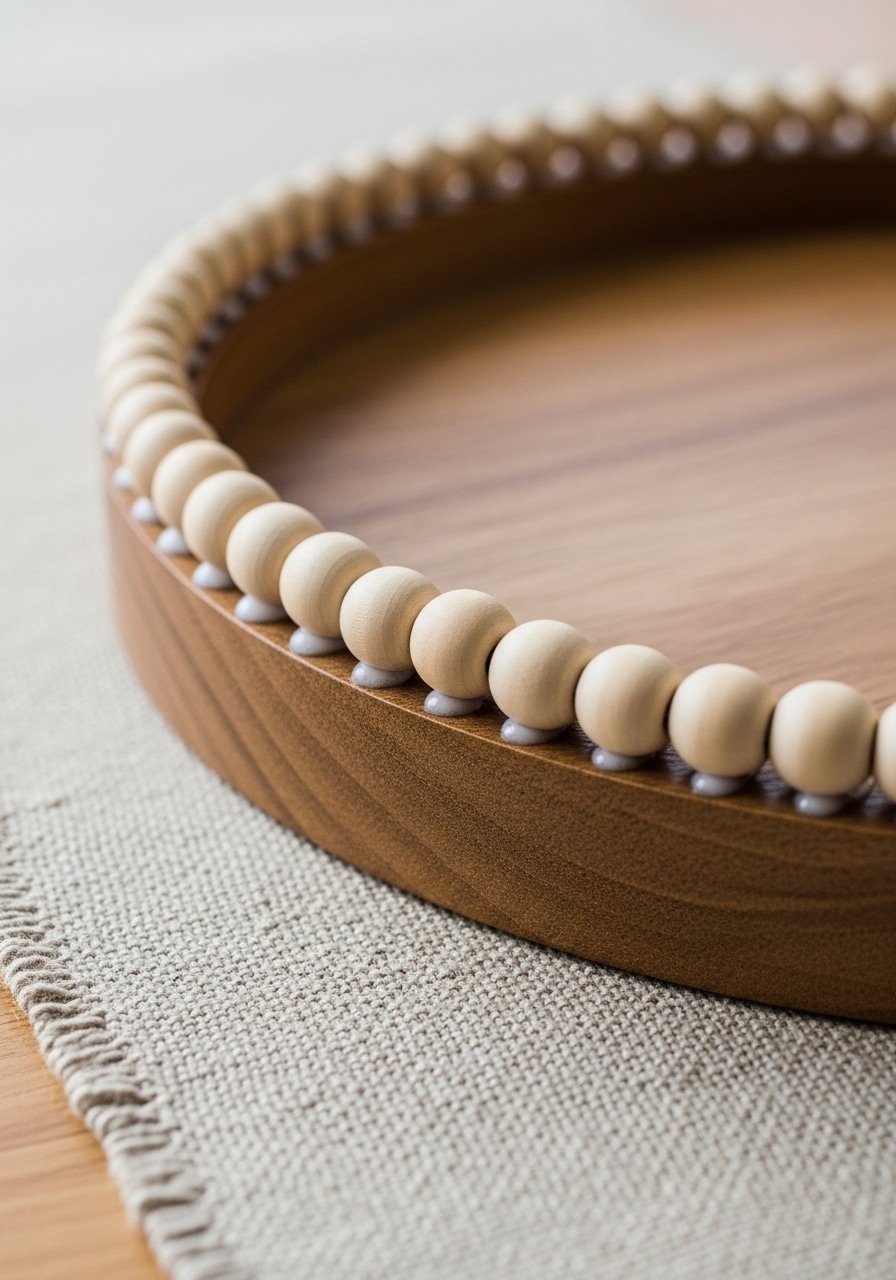
Wood beads are affordable and add handcrafted warmth. Painting them allows a custom palette.
Materials
- Wood beads, approx 40 beads (12 mm)
- Thin cotton cord, 36"
- Acrylic paint in 2 colors
- Hot glue gun
- 1 tray, 12" x 8"
Instructions
- Paint beads in desired colors; dry 30 minutes.
- String beads and knot ends.
- Hot-glue bead strand along the outer rim of tray.
- Let glue set 15 minutes before handling.
How to Display or Gift It
Use as a decorative tray. For gifting, nest tray and bead piece with tissue. Store beads and cord in a small kit for repairs.
- DIY Match Striker Box (Ceramic Tile + Wood)
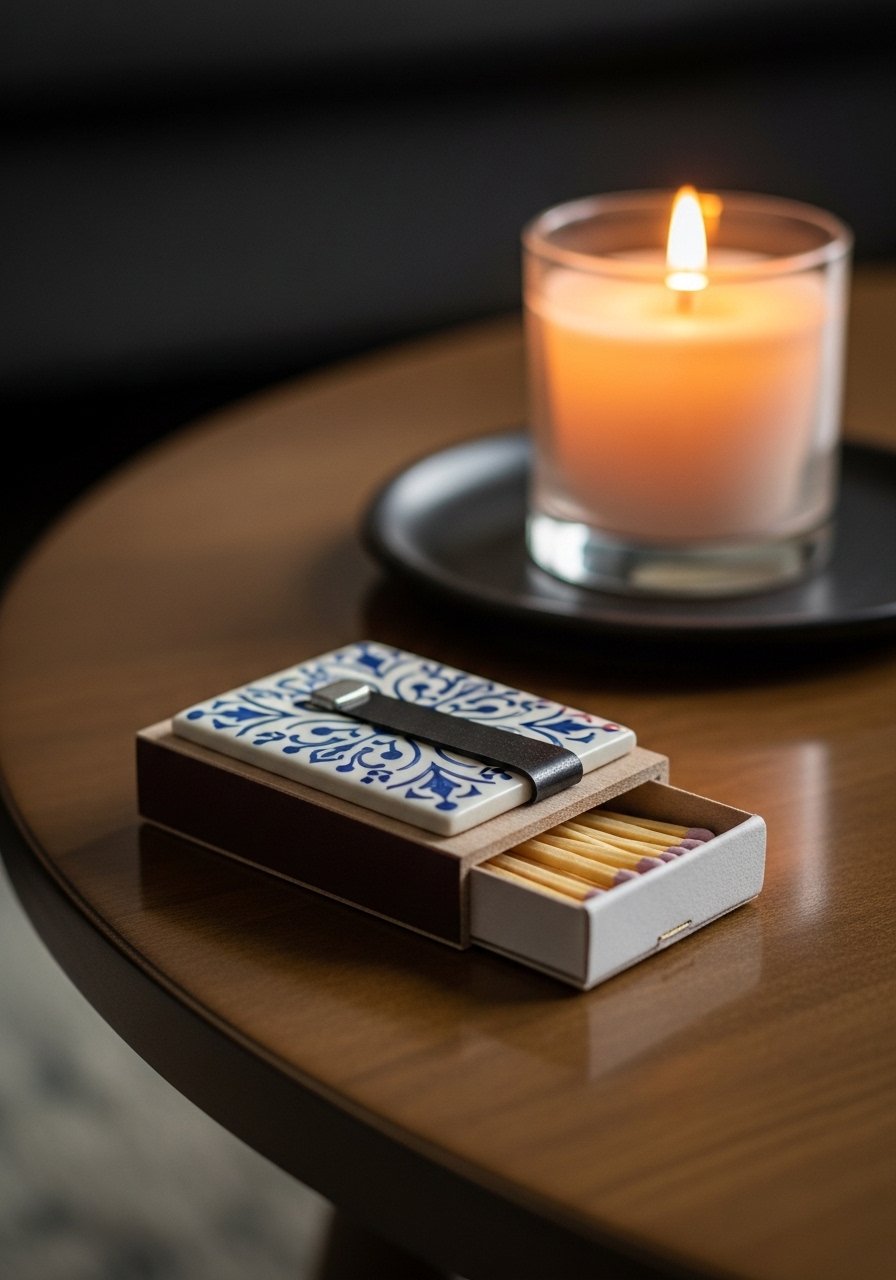
A handcrafted match striker box is practical and pretty by candlelight.
Materials
- Small wooden box, 3" x 2"
- Small ceramic tile (1" x 2") for striker
- Strong craft glue (E6000)
- Box of long safety matches
Instructions
- Glue tile to top of wooden box and let cure 24 hours.
- Fill box with matches and close lid. Keep out of reach of children.
How to Display or Gift It
Place with candles on a tray. Wrap in kraft with matches tucked in for gifting. Store in a dry drawer.
- Faux Marble Serving Slab with Epoxy Finish
Swirling paint gives the look of marble; epoxy adds a glossy,food-safe surface when fully cured.
Materials
- Wood slab, 12" x 8"
- Acrylic paints (white, gray, gold)
- 8 oz epoxy resin kit (food-safe)
- Mixing supplies
- Fine-grit sandpaper
Instructions
- Paint marble veins with acrylics; allow dry 30 minutes.
- Mix epoxy per kit and pour evenly. Remove bubbles with a heat gun briefly.
- Cure 24–48 hours before food contact.
How to Display or Gift It
Use for serving dry food only unless epoxy kit indicates food safety. Wrap in tissue with a label of care instructions.
- Layered Mini Vignettes — DIY coffee table decor ideas for renters
Quick swap vignettes let you refresh the table without big projects. Keep small, styled groups that can be moved.
Materials
- 3 small items (frame, candle, plant)
- 1 small tray or wooden plank
- Decorative filler (beads, moss)
- Tweezers for placement
Instructions
- Choose a tray or plank and select three objects of varying heights.
- Arrange with negative space — leave at least 1–2" between objects.
- Change one element seasonally for refresh.
How to Display or Gift It
Create a small curated gift box with the three items. Store extras in a stacking craft box.
- Copper Pipe Bookends with Leather Pads
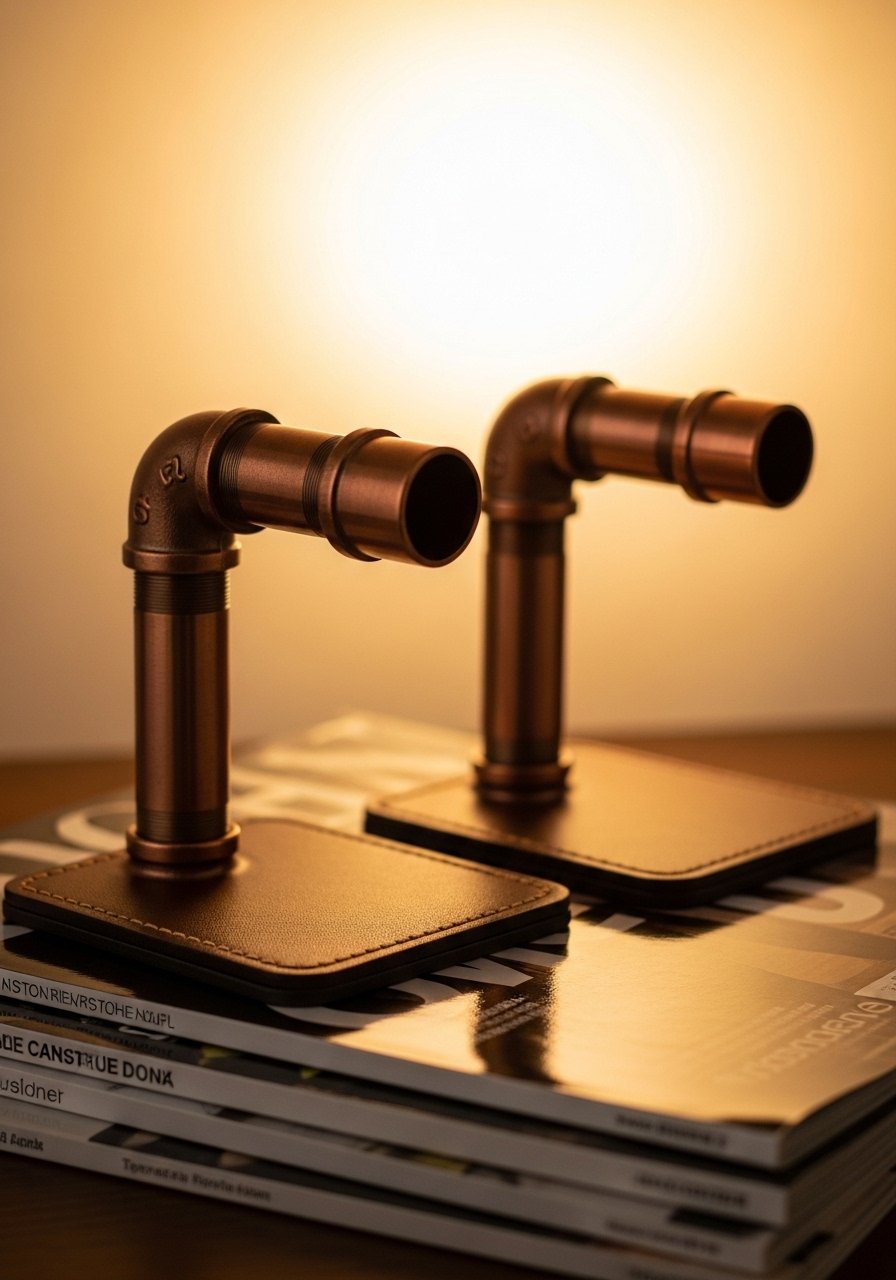
Copper pipe bookends bring industrial warmth. Leather pads protect surfaces.
Materials
- 2 copper pipe L-shape pieces, 4" x 4"
- Leather pads, 2
- Strong adhesive
- Fine sandpaper for edges
Instructions
- Clean pipes and sand raw edges.
- Glue leather pads to bottoms and let cure 24 hours.
- Place on coffee table to hold books or magazines.
How to Display or Gift It
Pair with a book and wrap as a gift set. Store pipes in a tool box when not in use.
- Glass Bead Scatter (loose fillers for decorative bowls)
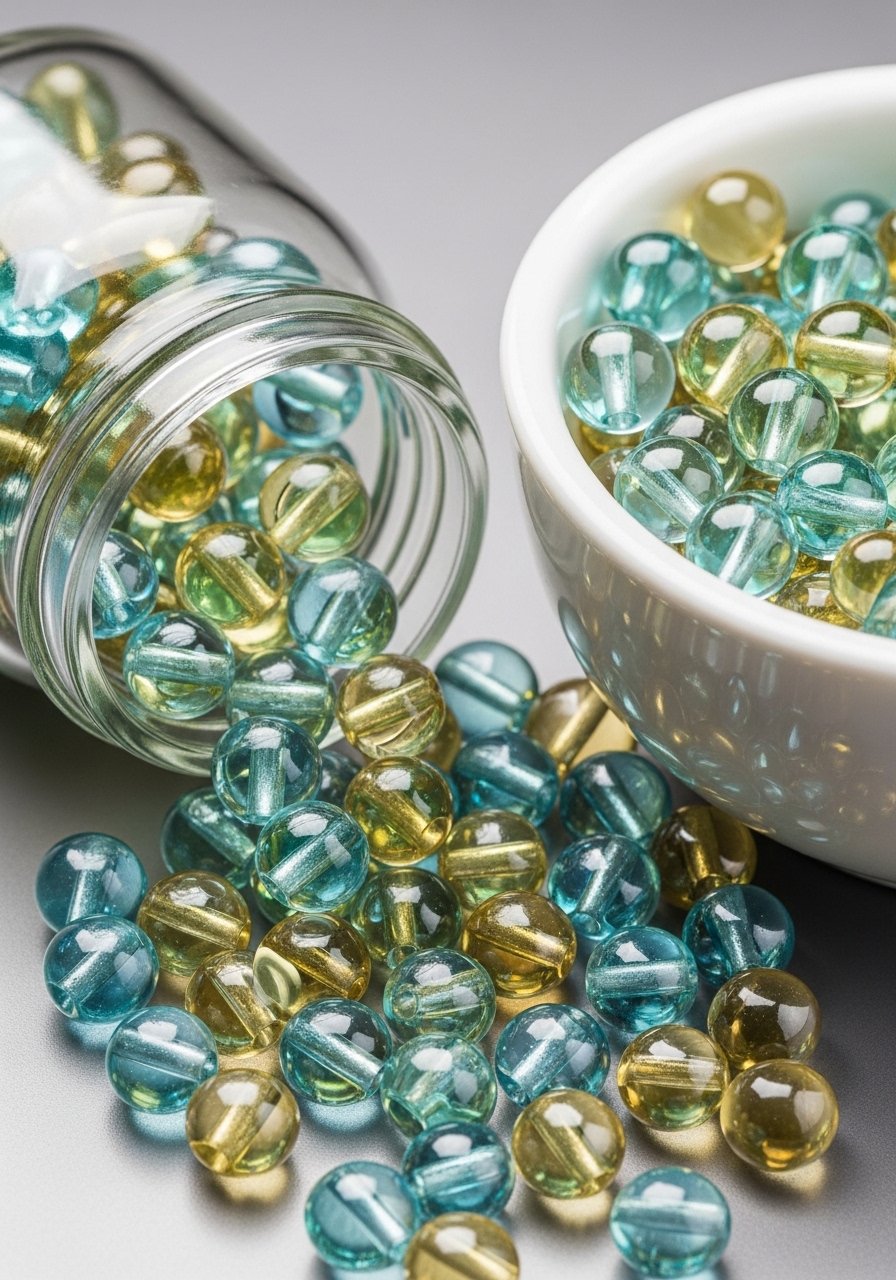
Glass beads add sparkle and catch light beautifully. Use in bowls or vases as a base for candles.
Materials
- Glass beads, approx 1 cup
- Small ceramic bowl
- Tweezers for precise placement (optional)
Instructions
- Pour beads into bowl to desired depth.
- Place a candle or object on top. Avoid placing open flames directly on beads; use a glass candle holder on top.
How to Display or Gift It
Tie beads in a small organza bag for a hostess gift. Store beads in airtight jars.
- Woven Jute Table Mat as a Centerpiece Base
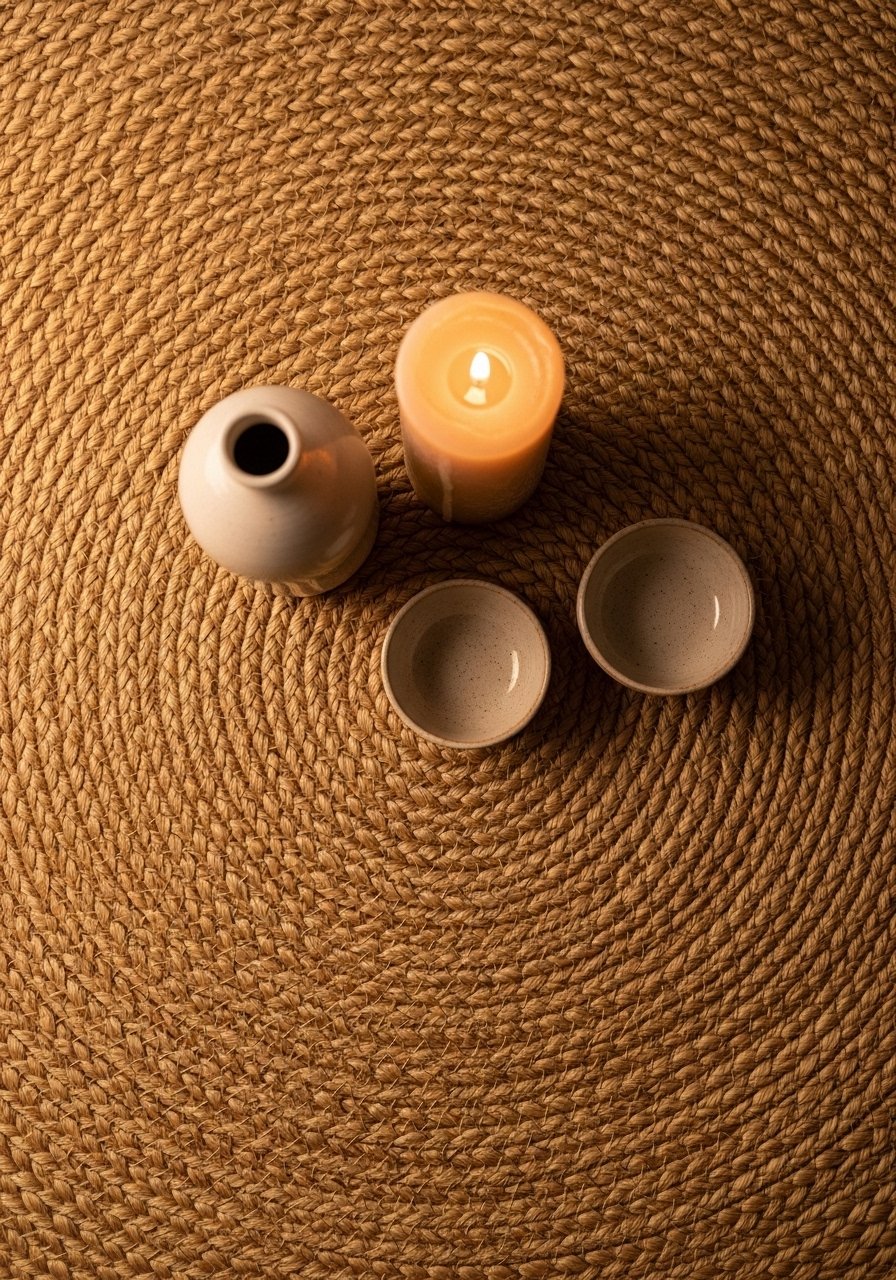
A woven jute mat adds organic texture and anchors the styling on larger coffee tables.
Materials
- Round jute mat, 14" diameter
- Fabric glue (if adding embellishments)
- Small decorative items for the centerpiece
Instructions
- Lay mat in center of table.
- Place taller object slightly off-center and arrange supporting items.
- Shake out outdoors occasionally to remove dust.
How to Display or Gift It
Pair with matching coasters or a candle and present in a kraft box. Store flat to preserve shape.
You made it this far — nice work. This set of 30 DIY coffee table decor ideas covers quick crafts, weekend builds, and renter-friendly swaps so you can craft looks that suit your living room style. Try a few that match your skill level, then mix them up into layered vignettes for maximum impact. Save or pin this article so you can come back when you’re ready to make more. Which project will you try first — the resin geode coasters or the macramé mini hanging? Share this list with a friend and make a crafting date.
Trust me, picking up a quality hot glue gun with temperature control changed how every single one of these projects turned out — less string, better adhesion, and faster finish times.


