
You’ve scrolled past one too many cookie-cutter tables and want something that actually fits your living room personality. These 25 DIY coffee table ideas cover every vibe—farmhouse to japandi, resin river to tufted ottoman—so you can make a showpiece that feels like yours.
Each project below includes exact materials, measurements, realistic drying and cure times, and simple step-by-step instructions. I’ll point out the tools that actually save time—like an orbital sander for smooth edges or a quality epoxy kit for glasslike rivers—and link to them so you can grab what I use. For cutting vinyl accents or patterns, I often reach for my Cricut Explore for fast, precise shapes.
Pin the projects you love and try one this weekend. Ready? Grab a foam brush, a hot glue gun, and let’s make your next centerpiece.
- Hairpin-Leg Minimalist DIY Coffee Table
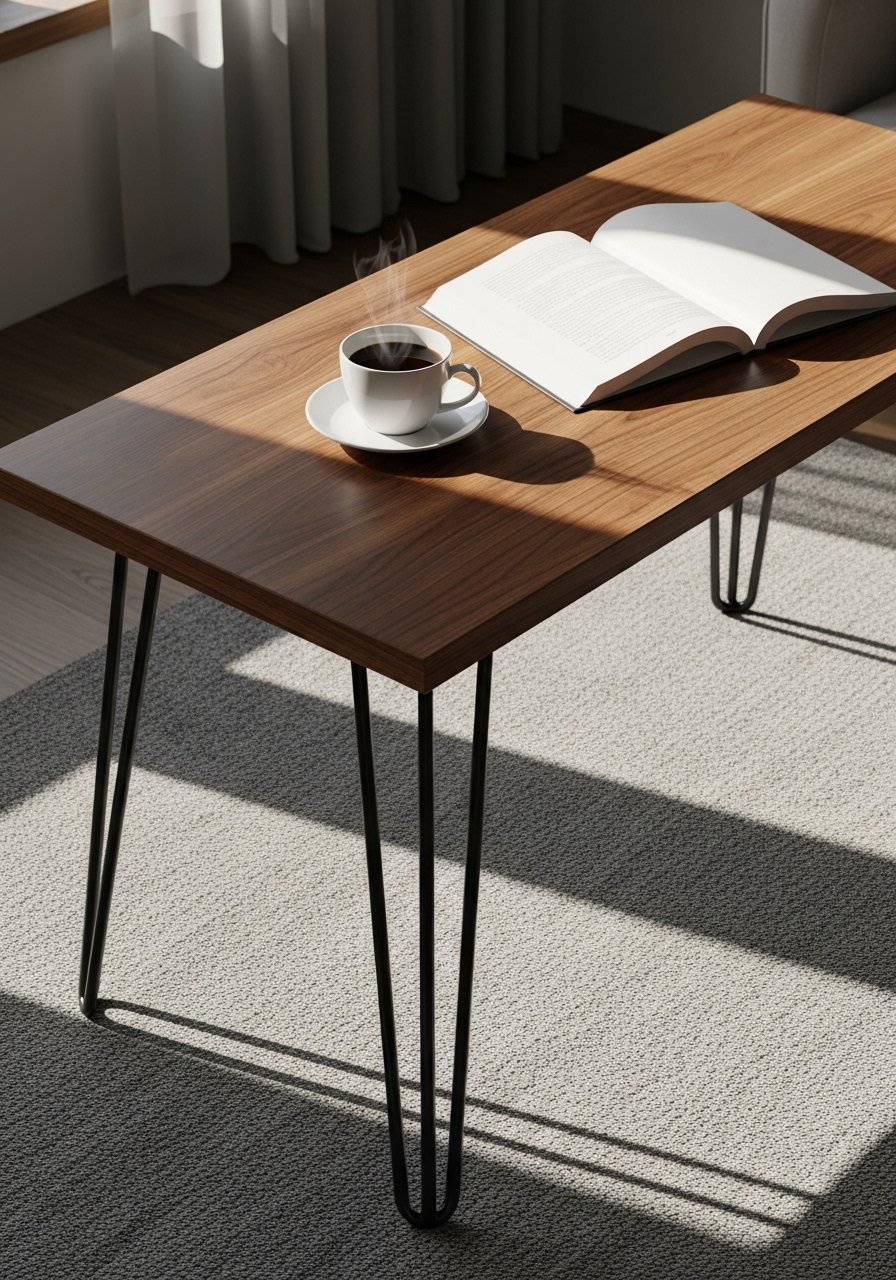
This simple hairpin-leg table is fast, affordable, and looks high-end. It’s perfect if you like clean lines and a low profile. The smooth sanded top shows off wood grain and pairs well with a sculptural vase. Beginners will love how quick it is; you’ll feel the solid weight under your hands once it’s assembled.
Materials
- 1 solid pine board, 36" x 18" x 1"
- 2 black steel hairpin legs, 16" height
- 1 120- and 1 220-grit sandpaper
- 1/2 cup wood stain (walnut)
- 1 can matte polycrylic sealer, 8 oz (2 coats)
- 6 1-1/4" wood screws
- Wood glue (Titebond original)
- Lint-free cloth
- Protective gloves
Instructions
- Sand the board with 120-grit, then finish with 220-grit until smooth to touch.
- Wipe dust with a lint-free cloth.
- Apply one coat of stain with a foam brush; wipe off after 3 minutes for light tone. Let dry 4–6 hours.
- Sand lightly with 220-grit between coats.
- Apply two thin coats of polycrylic with a foam brush. Wait 2 hours between coats; fully firm to the touch in 6 hours.
- Mark leg placement: 6" in from each short edge, centered on width.
- Pre-drill holes for screws; attach legs with screws and a screwdriver.
- Tighten and wipe off any glue squeeze-out. Let the table sit upright for 24 hours before use.
How to Display or Gift It
- Style with a linen runner and a small stack of coffee-table books.
- Add soft felt pads under legs to protect floors.
- Wrap in kraft paper and tie with twine for gifting; include assembly screws in a small labeled bag.
- Store extra stain in a sealed container in a cool spot.
Product mentions: hairpin legs, foam brushes
- Live-Edge Slab Resin River DIY Coffee Table
This live-edge resin river table is a weekend project if you plan and prep. The glossy epoxy river gives depth and color, while the natural edge keeps it organic. It’s a splurge look that’s surprisingly achievable—plan for epoxy mixing and at least 72 hours of curing.
Materials
- 1 live-edge walnut slab, 48" x 18" x 1.5"
- 2-part epoxy resin kit, pint (clear casting resin; follow brand ratio)
- Blue dye or alcohol inks for resin
- Painter’s tape and silicone caulk (for sealing gaps)
- Orbital sander with 80/120/220 grits
- 4 steel table legs or a metal base
- Mixing cups, stir sticks
- Disposable gloves, respirator mask
- Heat gun or torch
Instructions
- Flatten and level both slab halves so edges meet with a gap for the river. Sand to 120 grit.
- Seal the underside with one thin coat of resin to lock in air.
- Build a resin mold beneath the gap using melamine board and silicone to seal; tape all seams.
- Mix epoxy per manufacturer instructions (commonly 1:1 or 2:1 by volume—follow your kit). Stir 3–5 minutes, scraping sides.
- Tint 60% of resin with blue dye; pour a first thin layer to fill voids. Use a heat gun to pop bubbles. Let sit 12–24 hours until tack-free.
- Pour additional layers until river is flush with tabletop; total pour depth per layer no more than 1/4". Expect 2–3 pours.
- After final cure (24–48 hours tack-free, 72 hours full cure), sand resin smooth from 220 to 600 grit, then polish.
- Attach base/legs with bolts and let rest 48 hours before heavy use.
How to Display or Gift It
- Keep away from direct sun while curing; epoxy can yellow if exposed to UV without UV-stabilized resin.
- Pair with low-profile seating to show the slab edge.
- For gift-giving, include care instructions: use coasters and mild soap cleaning.
- Recommended tool: epoxy resin kit
- Reclaimed Pallet DIY Coffee Table with Casters
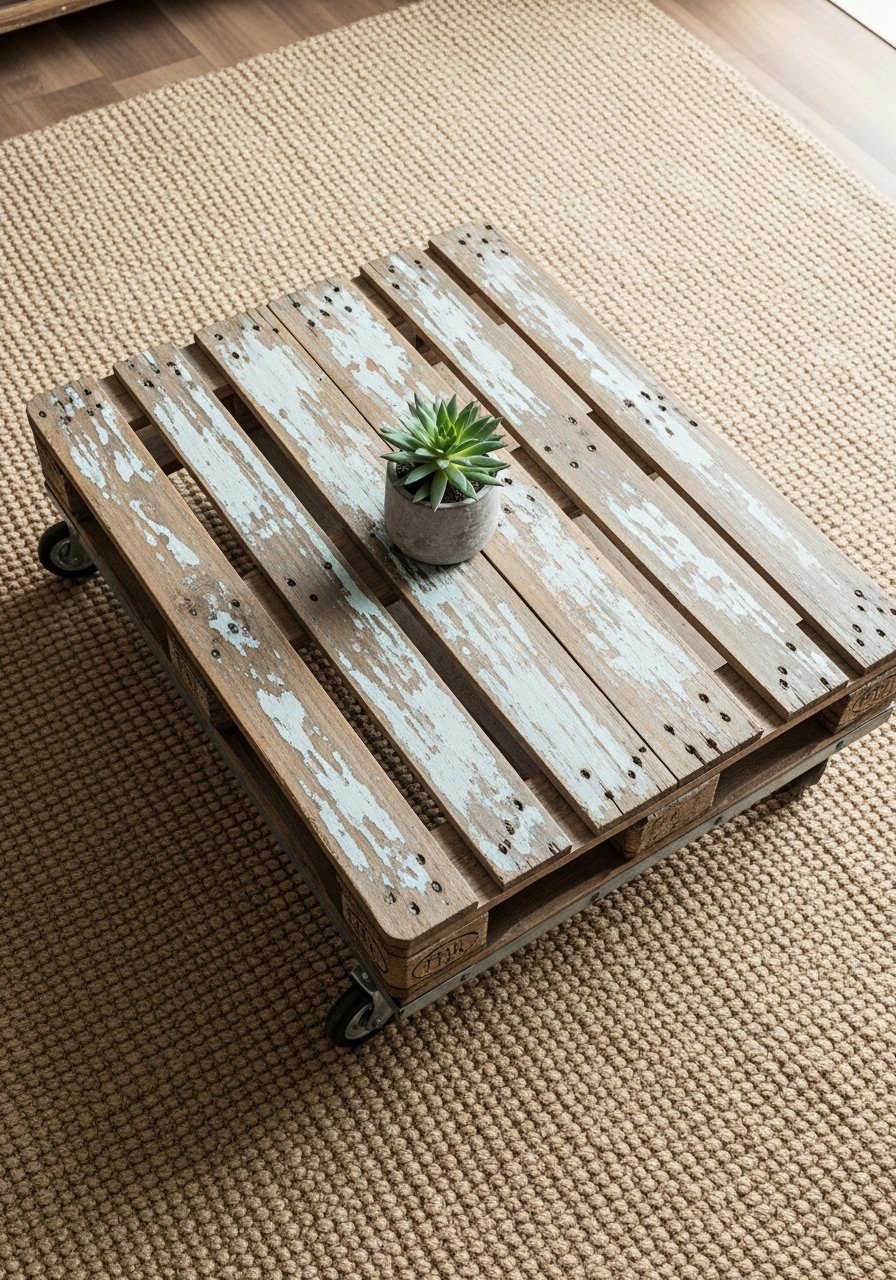
Pallet tables are budget-friendly and customizable. This one uses reclaimed slats for a rustic, cottagecore vibe. Casters make it movable for small rooms. Watch for nails and uneven planks—taking time to prep saves splinters later.
Materials
- 3–4 reclaimed pallet boards (cleaned and kiln-dried), total top size 40" x 24"
- 2 2"x4" boards for framing (cut to fit)
- 4 heavy-duty casters (locking)
- Wood screws 1-1/4" and 2-1/2"
- Wood glue and wood filler
- Orbital sander with 80/120/220 grits
- Chalk paint or stain (your choice) 8 oz
- Clear coat spray or polycrylic 8 oz
Instructions
- Disassemble pallets carefully with pry bar; remove nails.
- Cut top boards to 40" length; arrange for tight fit.
- Build a frame from 2"x4" supports sized 36" x 20" inside the top boards and screw into place with 2-1/2" screws.
- Glue and screw top slats to frame with 1-1/4" screws.
- Fill gaps with wood filler; sand smooth up to 220-grit.
- Paint or stain. For chalk paint: two coats, sanding between for a worn look. Wait 1–2 hours between coats; cure 24 hours.
- Attach casters, one at each corner; test and tighten.
- Apply a clear protective coat; let dry 2–4 hours between coats, 24 hours to cure.
How to Display or Gift It
- Add baskets underneath for storage and a tray on top for easy serving.
- Use a craft organizer box to store spare screws and small hardware.
- Casters allow rolling outside for summer porch use—lock them in place when stationary.
- Product suggestion: locking casters
- Mid-Century Turned-Leg DIY Coffee Table
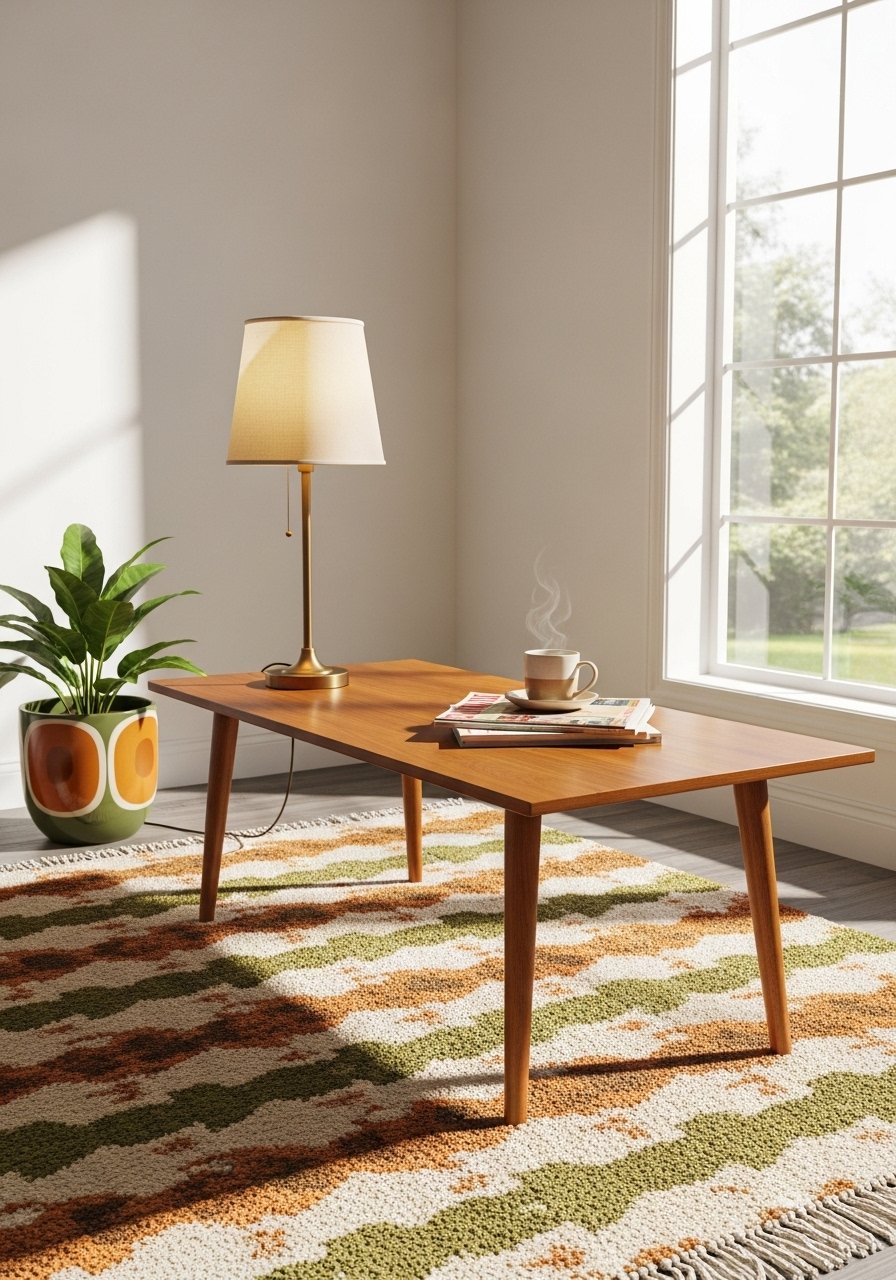
Channel mid-century charm with turned legs and a simple walnut-stained top. Turning legs or buying pre-turned legs gives that classic silhouette. This table sits proudly in a Japandi or vintage-modern room.
Materials
- 1 poplar or maple top, 36" x 18" x 1"
- 4 pre-turned wooden legs (mid-century tapered), 15"
- Wood stain (walnut), 1/2 cup
- Polyurethane satin, 8 oz (2 coats)
- Wood glue and pocket-hole screws
- Pocket hole jig (Kreg-style)
- Sandpaper: 120/220 grit
Instructions
- Drill pocket holes in tabletop underside using pocket-hole jig.
- Stain legs and tabletop with walnut. Wipe after 3–4 minutes for medium tone. Dry 6 hours.
- Apply two coats satin polyurethane with a foam brush. Wait 2 hours between coats; fully cure 24 hours.
- Attach legs using wood glue and pocket-hole screws through the underside.
- Sand any rough spots and check leg alignment.
- Let sit upright 24 hours before placing heavy objects.
How to Display or Gift It
- Pair with a low-profile sofa and a woven tray.
- Wrap legs with protective felt pads to protect floors.
- For gifting, include small jars of touch-up stain.
- Helpful tool: Kreg pocket hole jig
- Terrazzo-Style Painted DIY Coffee Table
Get a terrazzo look without messy tile work. This painted approach mimics chips in a glossy finish and suits boho, cottagecore, or playful modern rooms. It’s tactile and fun to make with small detail brushes.
Materials
- 1 MDF tabletop, 36" x 20" x 3/4"
- Acrylic craft paint set (white base + 3 chip colors)
- Fine and medium foam brushes
- Painter’s tape
- Water-based epoxy or clear coat (2-part) 8 oz
- Sandpaper 220/400 grit
- Small flat brush for chips
Instructions
- Sand MDF lightly, wipe dust away.
- Paint two coats of white base with a foam roller. Dry 30 minutes between coats.
- Cut tiny irregular “chips” from colored paint using a small brush; dab onto base in random clusters.
- Let paint dry 2 hours, then seal with water-based epoxy or clear gloss coat. Apply two thin coats; 2 hours between coats. Full cure 24–72 hours depending on product.
- Sand edges lightly with 400 grit to remove drips, buff to shine.
How to Display or Gift It
- Place a cork coaster under pots to avoid scratching the finish.
- Display with pastel ceramics and brass accents.
- Package in kraft paper and tissue for gifting; include care note to avoid harsh cleaners.
- Product tip: water-based epoxy clear coat
- Concrete-Look DIY Coffee Table with Faux Finish
Concrete is heavy. This faux-concrete finish gives industrial style without the weight. Microcement or concrete-effect paint layered over MDF delivers the look—lightweight and trendy for industrial or minimal rooms.
Materials
- 1 MDF or plywood top, 38" x 20" x 3/4"
- Microcement kit or concrete-effect paint 16 oz
- Primer and bonding agent per product
- Trowel and sanding block
- Clear matte sealer (2 coats)
- Sandpaper 120/220/400 grit
Instructions
- Prime the top with a bonding primer; let dry 2 hours.
- Mix microcement per manufacturer instructions. Apply first thin layer with a trowel. Let dry 4–6 hours.
- Apply a second thin layer, texture lightly with trowel and let cure 24 hours.
- Sand gently with 220 grit for smoothness; finish with 400 grit for soft polish.
- Seal with two coats matte sealer, 2 hours between coats; full cure 24–48 hours.
How to Display or Gift It
- Pair with leather or low-sheen fabrics to contrast texture.
- Keep on felt pads to protect floors.
- Include a care card noting mild soap only.
- Tool suggestion: microcement kit
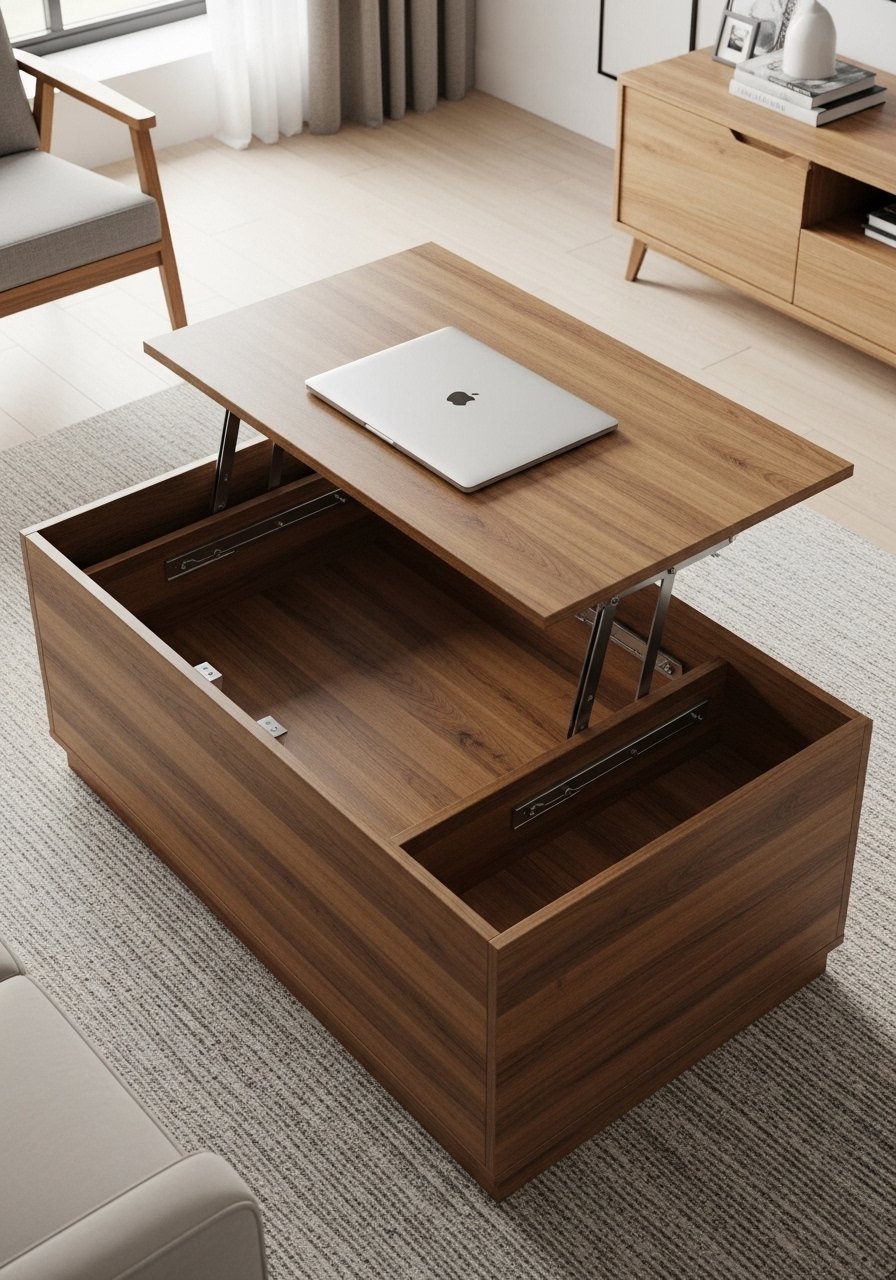
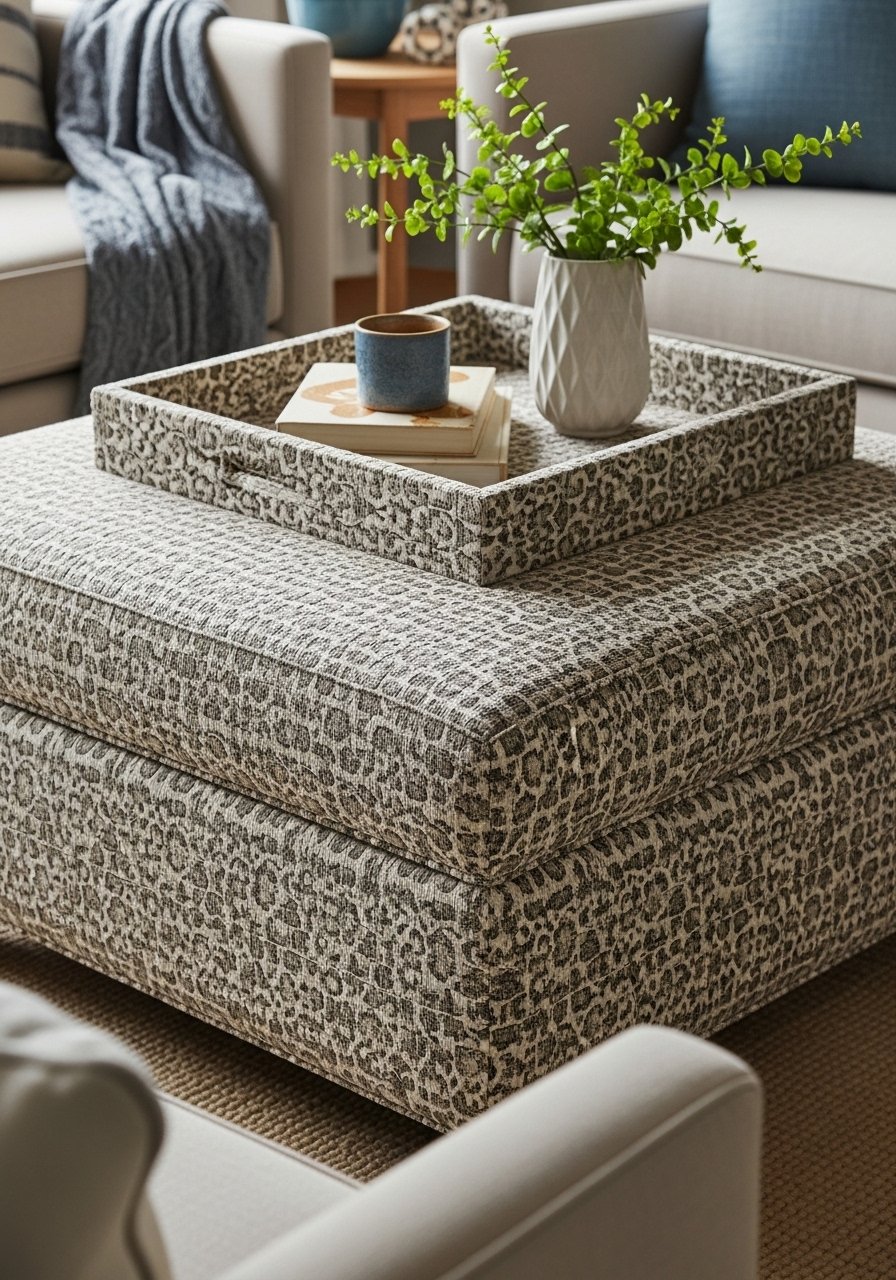
- Tufted Ottoman DIY Coffee Table (Storage Top)
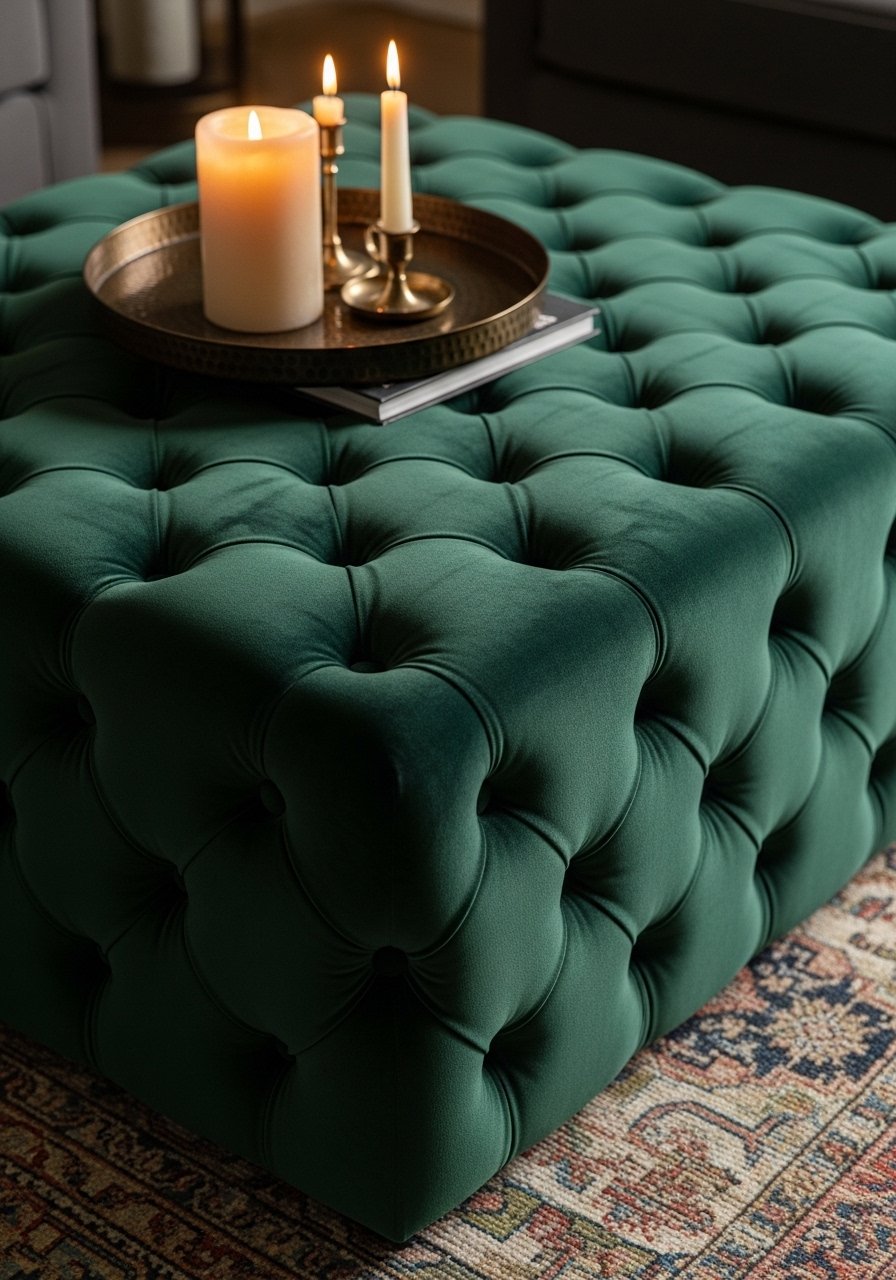
A tufted ottoman doubles as seating, storage, and a coffee table. This build is upholstery-forward: foam, batting, and tufting give that luxe feel. Ideal for cozy, boho, or cottagecore living rooms.
Materials
- 1 wooden box base, 36" x 24" x 12"
- High-density upholstery foam 4" thick, cut to size
- Batting (1 yard)
- Velvet or linen upholstery fabric (2 yards)
- Upholstery tufting kit (buttons, long needles)
- Spray adhesive, staples and staple gun
- Hinges (if making storage lid)
- Felt pads
Instructions
- Cut foam to top size; glue to wooden lid with spray adhesive.
- Add batting layer and wrap fabric over edges; staple underside.
- Mark tuft points in a grid (e.g., 5 x 3). Pre-drill holes through lid for tuft needles.
- Thread button with long needle and pass through foam and batting, secure on underside with tufting twine and button back.
- Attach lid to base with hinges if making storage. Test lid alignment.
- Add a tray for drinks to protect fabric. Let adhesive set 24 hours before heavy use.
How to Display or Gift It
- Use a removable tray on top for drinks; swap with seasonal decor.
- Store throws in the storage cavity.
- Wrap as a luxe housewarming gift in heavy kraft and ribbon.
- Product hint: upholstery tufting kit
- Farmhouse Crate Stack DIY Coffee Table
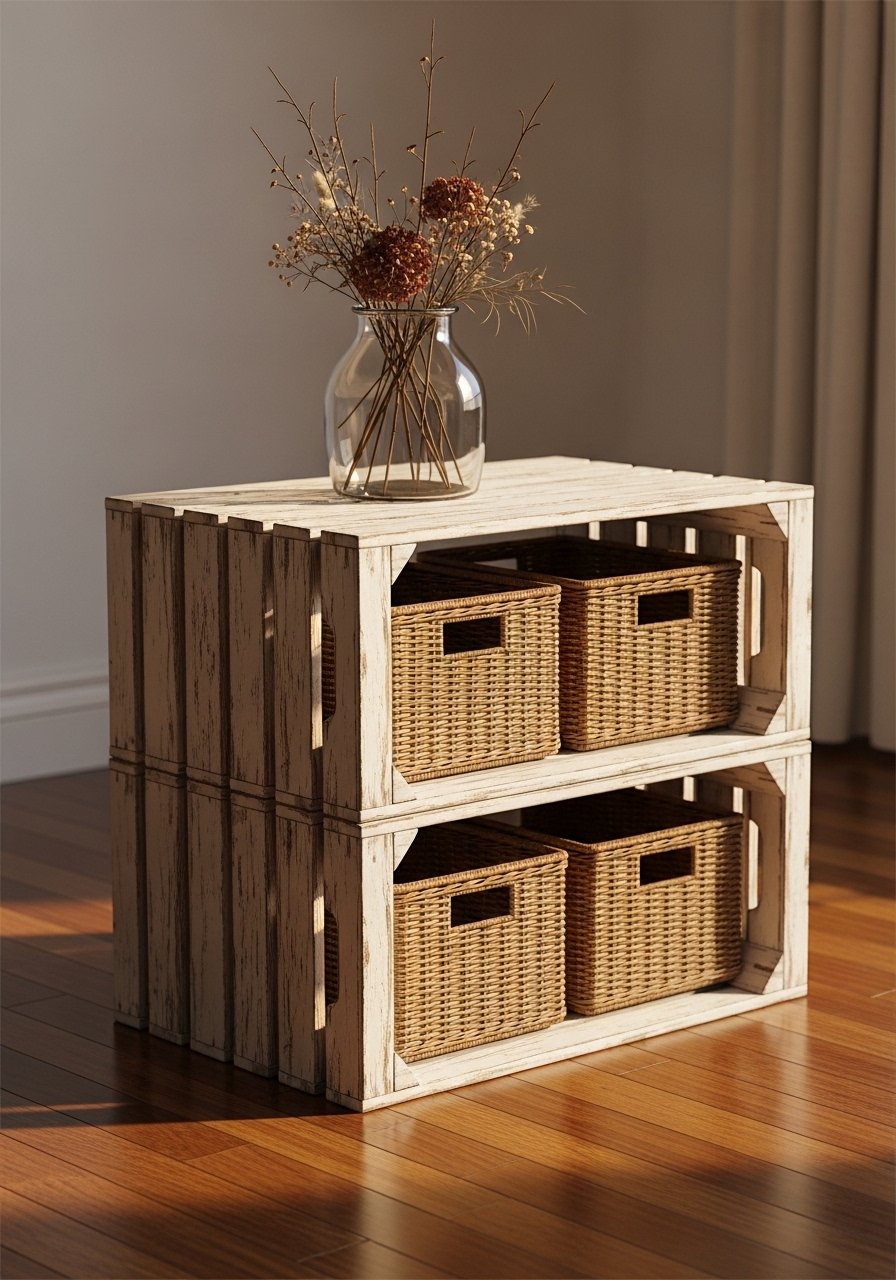
Crates stacked in a grid make a modular, farmhouse-friendly table with built-in storage. It’s a beginner project that’s customizable by paint or stain color.
Materials
- 4 wooden crates, 18" x 12" x 9" each
- Wood screws and L-brackets
- Chalk paint (white) or stain
- Sandpaper 120/220 grit
- Clear wax or polycrylic
- Wicker baskets (fit crate openings)
- Felt pads
Instructions
- Sand crates lightly. Paint two coats of chalk paint; dry 1–2 hours between coats.
- Distress edges with sandpaper after paint dries.
- Arrange crates in desired configuration (2×2 recommended) and screw together with L-brackets underneath for stability.
- Seal with wax or polycrylic; let cure 24 hours.
- Insert baskets for concealed storage.
How to Display or Gift It
- Use as toy storage in family rooms; baskets keep things tidy.
- Top with a wooden tray and potted plant.
- For gifting, include a set of baskets and a swatch of paint.
- Helpful product: wicker baskets
- Industrial Pipe and Wood DIY Coffee Table
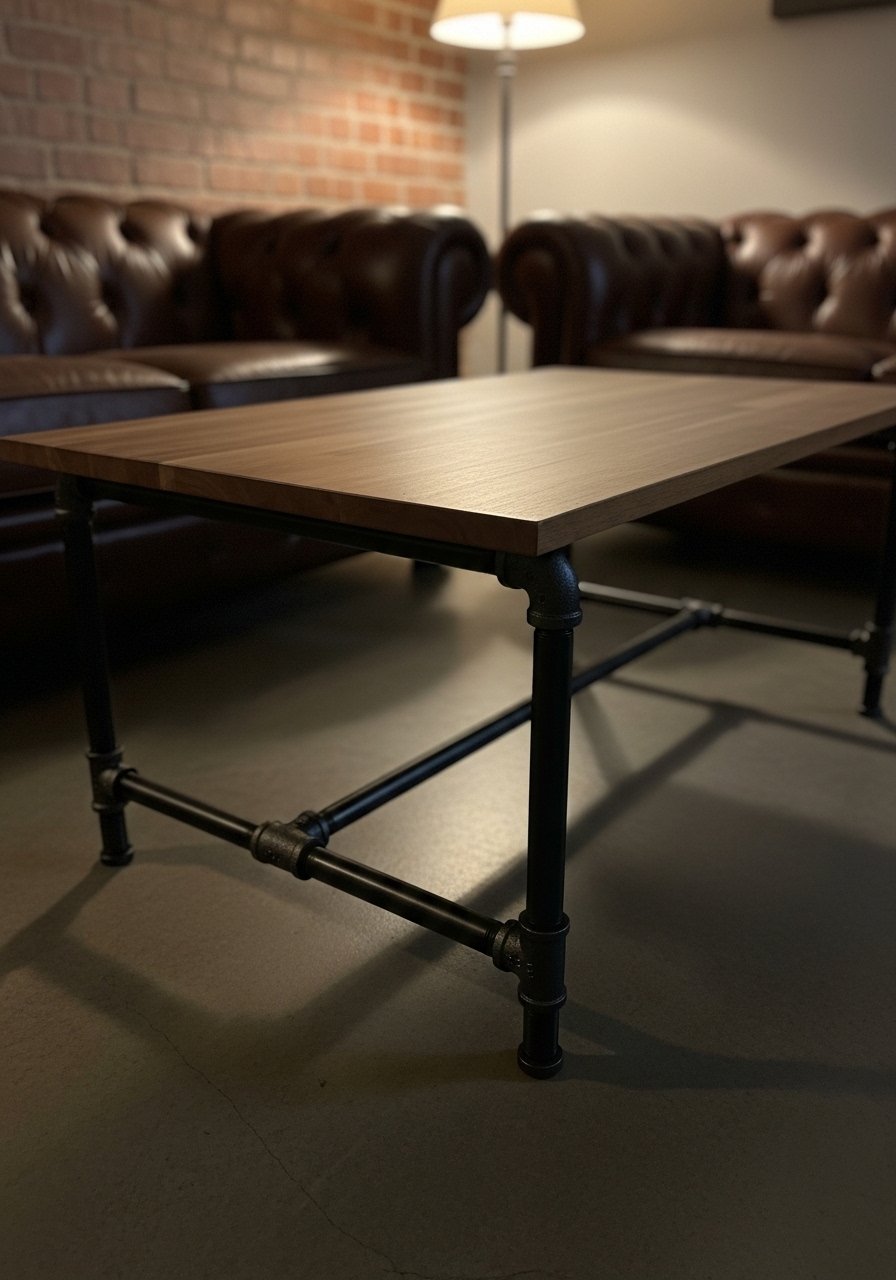
Industrial pipe bases bring edge to any tabletop. Pipes are sturdy and lend a loft-like feel. This build is perfect for pairing reclaimed wood with metal for a mixed-material look.
Materials
- 1 wood top, 40" x 20" x 1"
- Black steel pipe kit for table legs (flanges, pipes, elbows)
- Wood stain and sealer
- Drill and metal screws
- Thread seal tape (for tight pipe joints)
- Sandpaper 120/220 grit
Instructions
- Finish the wood top (stain + two coats sealer). Dry 2 hours between coats.
- Assemble pipe legs on the floor to check height and layout.
- Pre-drill screw holes and attach pipe flanges to underside of tabletop.
- Fasten legs to flanges and tighten pipe joints with thread seal tape if wobble occurs.
- Flip and test for stability; adjust for level.
How to Display or Gift It
- Pair with Edison-bulb lighting and leather textures.
- Use a protective felt pad between pipe flanges and tabletop if needed.
- For gifting, include assembly hardware in a labeled bag.
- Product mention: industrial pipe fittings
- Round Mosaic Tile DIY Coffee Table
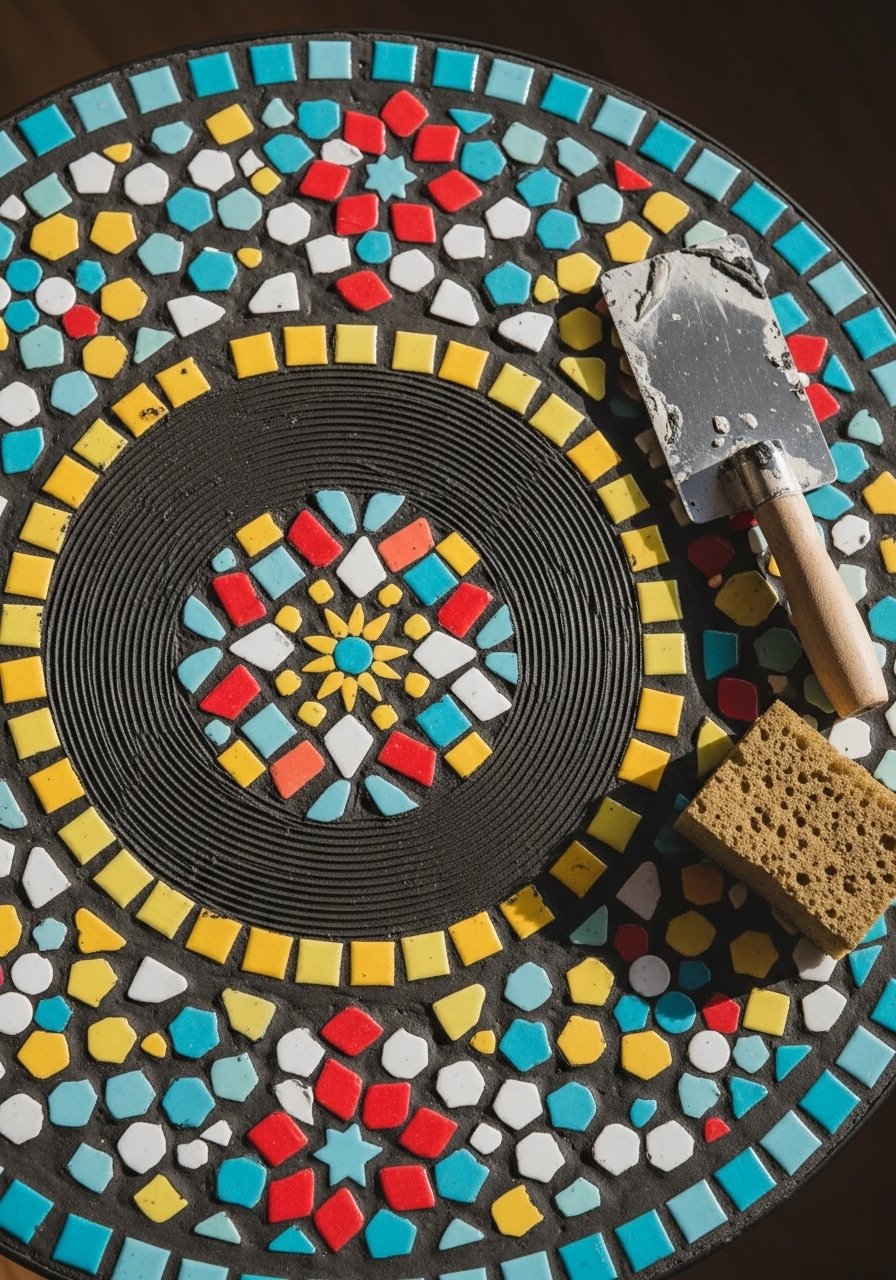
Create a Mediterranean feel with mosaic tile insets. This project is tactile and forgiving; grout hides small imperfections and adds texture.
Materials
- 1 round MDF or plywood top, 36" diameter
- Ceramic mosaic tiles (assorted), ~2 sq ft
- Tile adhesive (thin-set) 1 lb
- Grout 1 lb (sandless for fine tiles)
- Tile nippers and small tile cutter
- Rubber grout float and sponge
- Sealer for grout and tiles
Instructions
- Trace and plan tile layout on tabletop.
- Spread thin-set with a notched trowel and press tiles in place. Let set 24 hours.
- Mix grout and apply with float, forcing into joints. Wipe excess with a damp sponge.
- Let grout dry 24 hours, then seal grout per product (two coats).
- Attach finished top to base or pedestal.
How to Display or Gift It
- Style with woven coasters and terracotta planters.
- Use a small wooden easel to display if gifting as wall art.
- Store extra tiles in a container for future repairs.
- Tool link: tile nippers
- Vintage Suitcase DIY Coffee Table
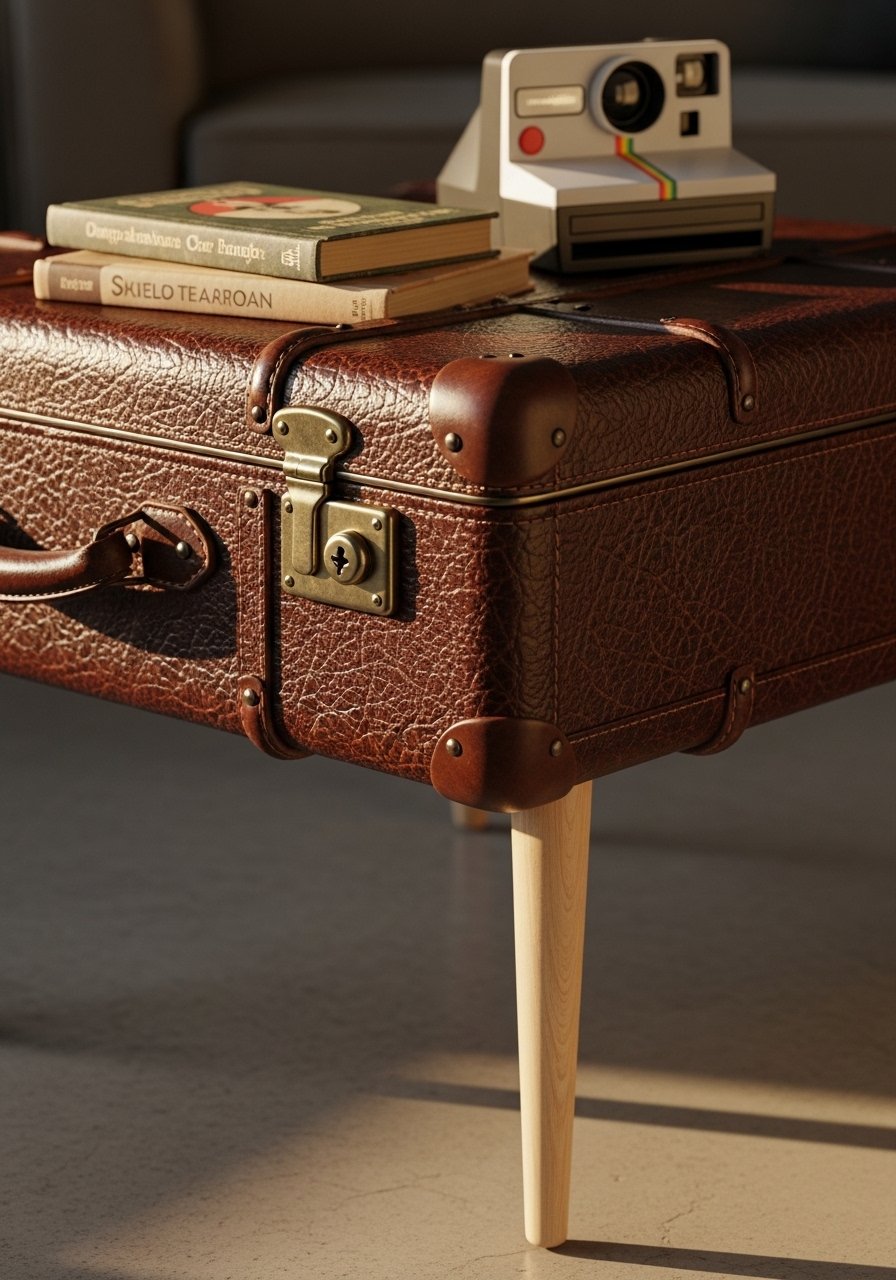
Turn a vintage suitcase into a conversation piece. It’s lightweight and full of character—great for eclectic or cottagecore rooms. The inside is perfect for lightweight storage.
Materials
- 1 vintage suitcase (sturdy)
- 4 short wooden turned legs, 6–8"
- Screws and corner braces
- Felt pads
- Optional: small caster set (if you want mobility)
- Drill and screwdriver
Instructions
- Clean suitcase inside and out. Reinforce bottom with a thin plywood panel cut to suitcase dimensions.
- Attach legs to plywood using screws through braces. Counter-sink screws to avoid hitting interior.
- Test stability and add felt pads to legs.
- Optionally mount casters to the plywood for mobility; use locking casters for safety.
How to Display or Gift It
- Use as a travel-themed coffee table with maps, globes, and retro accents.
- Wrap in decorative paper and ribbon for unique gifting.
- Store small throws or remotes inside.
- Product mention: short wooden turned legs
- Decoupage Map DIY Coffee Table (Mod Podge)
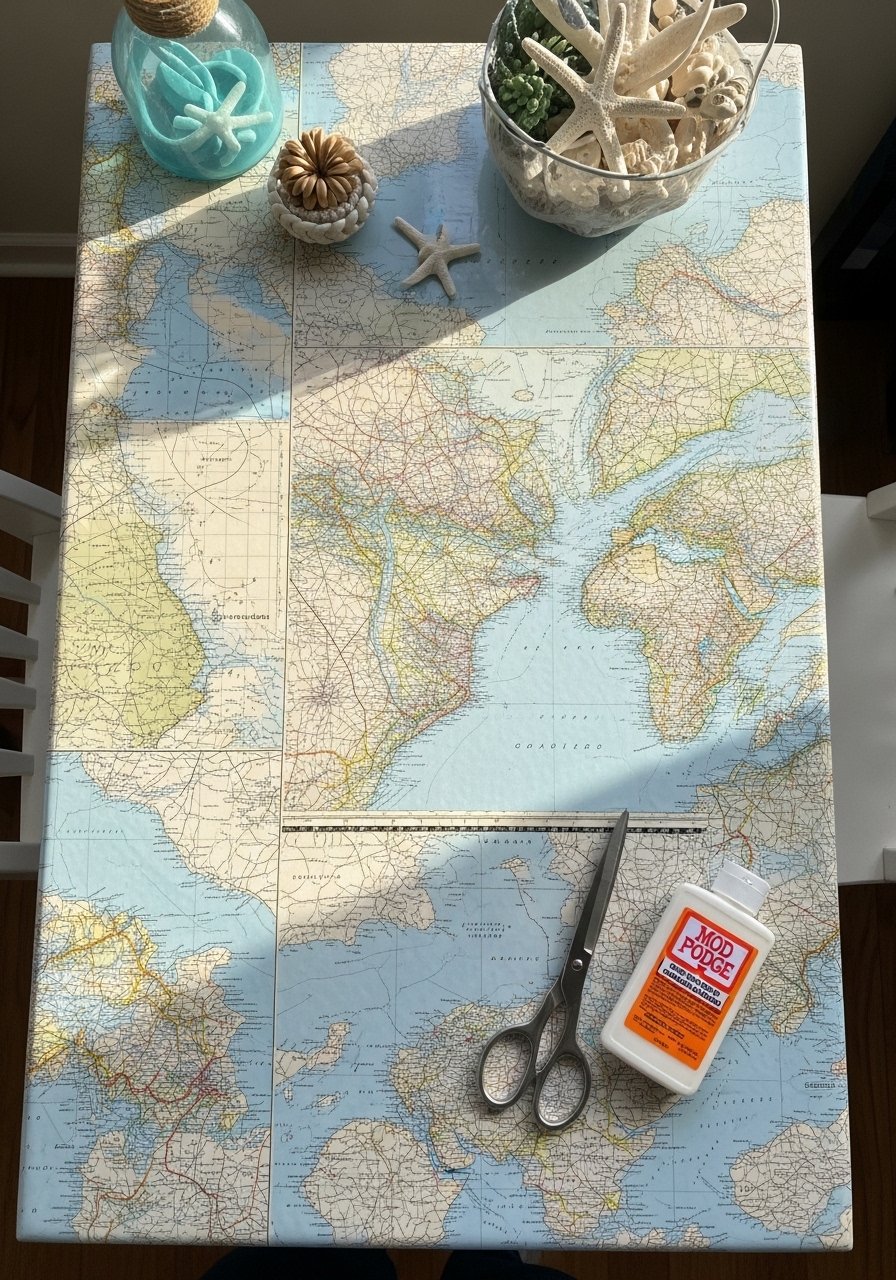
Decoupage lets you personalize with maps, sheet music, or fabric. Mod Podge seals and protects the surface. This project adds an heirloom vibe to any space.
Materials
- 1 tabletop, 36" x 20"
- Vintage map printouts or real maps (cut to fit)
- Mod Podge (matte or gloss) 8 oz
- Foam brush and brayer roller
- Sandpaper 220 grit
- Acrylic sealer (spray) for extra protection
Instructions
- Sand and prime tabletop lightly. Lay out map pieces and trim.
- Brush Mod Podge on top surface and smooth map pieces from center outward. Use a brayer for bubbles.
- Once dry (15–20 minutes), apply two more thin coats of Mod Podge, 15–20 minutes drying between coats.
- Finish with an acrylic spray sealer (2 coats) for durability; dry 1 hour between coats and 24 hours to cure.
How to Display or Gift It
- Frame edges with thin wood trim for a shop-made look.
- Wrap in kraft and include a note about the map’s origin when gifting.
- Store extra maps flat in a craft portfolio.
- Tool link: Mod Podge
- Pallet Coffee Table with Glass Top
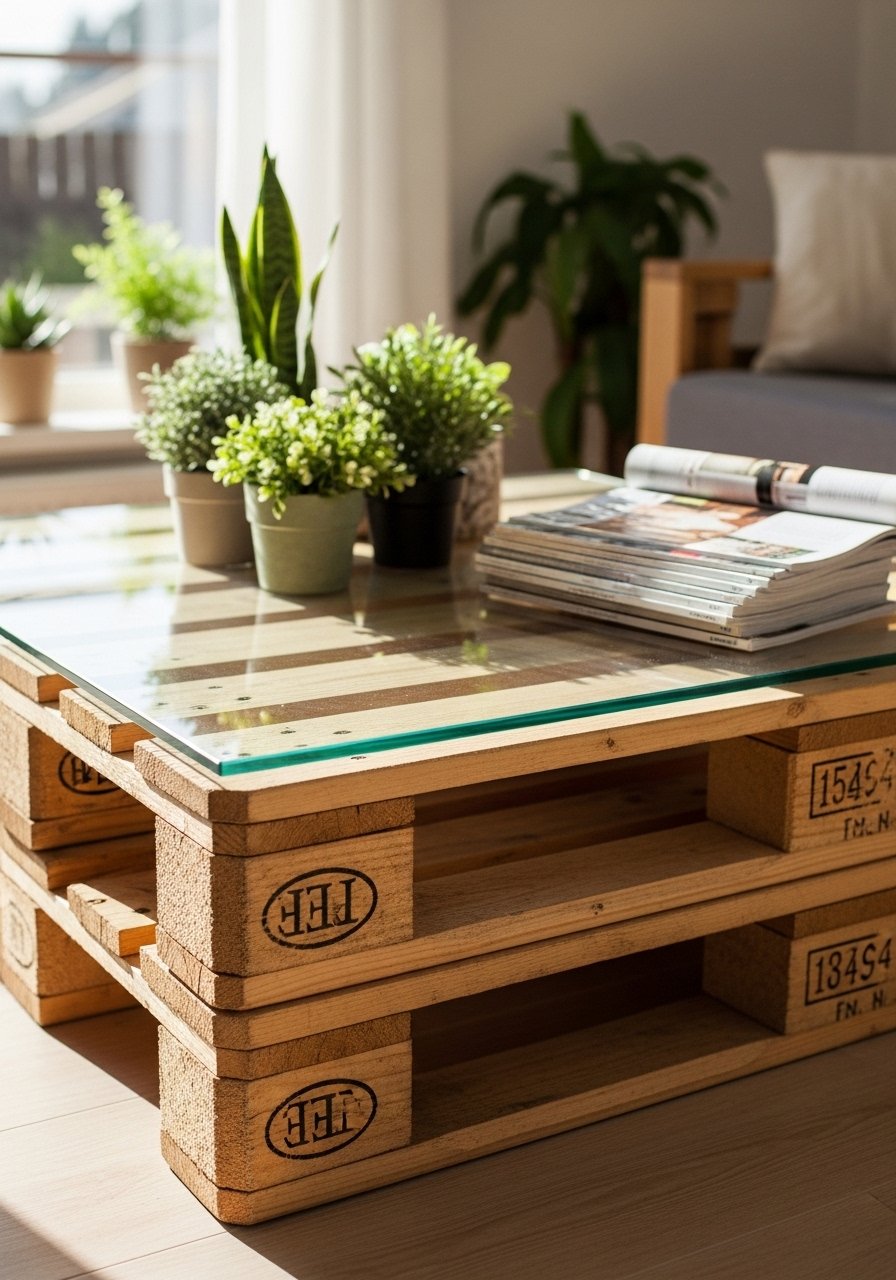
Combine pallet charm with a glass top for easy cleaning and a refined finish. The glass protects the wood and reveals the rustic texture below.
Materials
- 1 pallet base cut to 40" x 24"
- Tempered glass top cut to 40" x 24" (3/8" thickness)
- Rubber bumpers for glass
- Sanding and sealing supplies
- Paint or stain and clear coat
Instructions
- Prep pallet base: sand, paint or stain, and seal with two coats polycrylic. Dry 2 hours between coats.
- Clean glass and attach rubber bumpers where glass will sit.
- Place glass carefully on bumpers; check for stability and level.
- Keep in place; no permanent attachment necessary for easy cleaning.
How to Display or Gift It
- Pair with low seating to show off the pallet slats.
- Wrap glass in bubble wrap and pillows for safe gifting.
- Add felt pads on underside to protect floors.
- Product suggestion: tempered glass top
- Geometric Inlay DIY Coffee Table
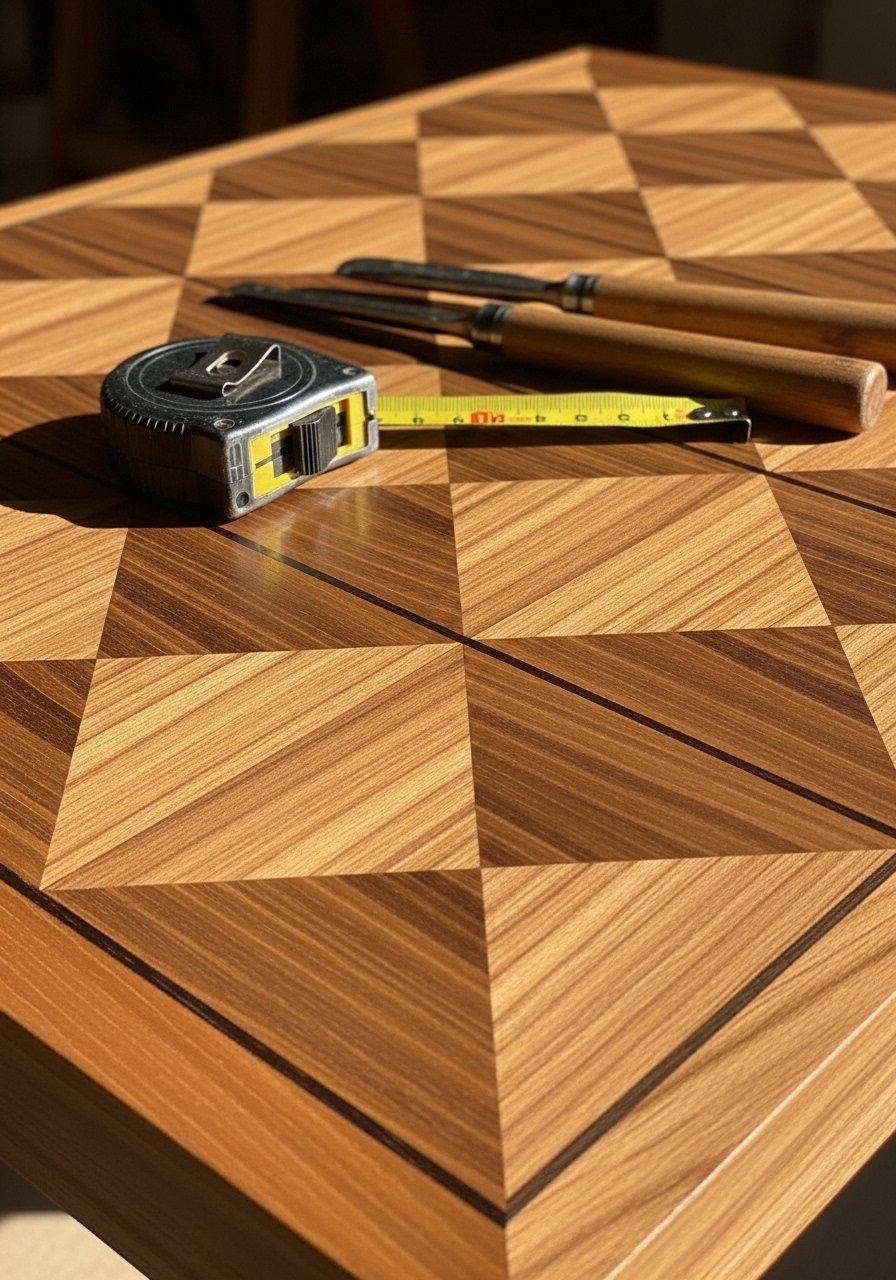
Inlay gives a custom, designer look. Using contrasting woods or painted inserts yields a luxe geometric tabletop. Precision matters—use a straightedge and a steady hand.
Materials
- 1 oak tabletop, 36" x 18" x 1"
- Veneer or hardwood strips for inlay (maple/walnut), assorted widths
- Wood glue, clamps
- Router with straight bit (or chisel set)
- Sandpaper 120/220 grit
- Clear satin polyurethane
Instructions
- Plan your geometric pattern and mark the top with a pencil and straightedge.
- Rout shallow channels (1/8" depth) for inlay or cut precisely with a chisel.
- Press veneer or wood strips with wood glue into channels and clamp.
- Once dry (6 hours), sand flush to the surface; use 220-grit for finish.
- Apply two coats of satin polyurethane with 2-hour dry time between coats; cure 24 hours.
How to Display or Gift It
- Place a low-profile centerpiece to show the pattern.
- For gifting, include a small bottle of wood cleaner and care tips.
- Store samples of inlay wood in a flat organizer.
- Tool mention: router with straight bit
- Floating Tray Top DIY Coffee Table
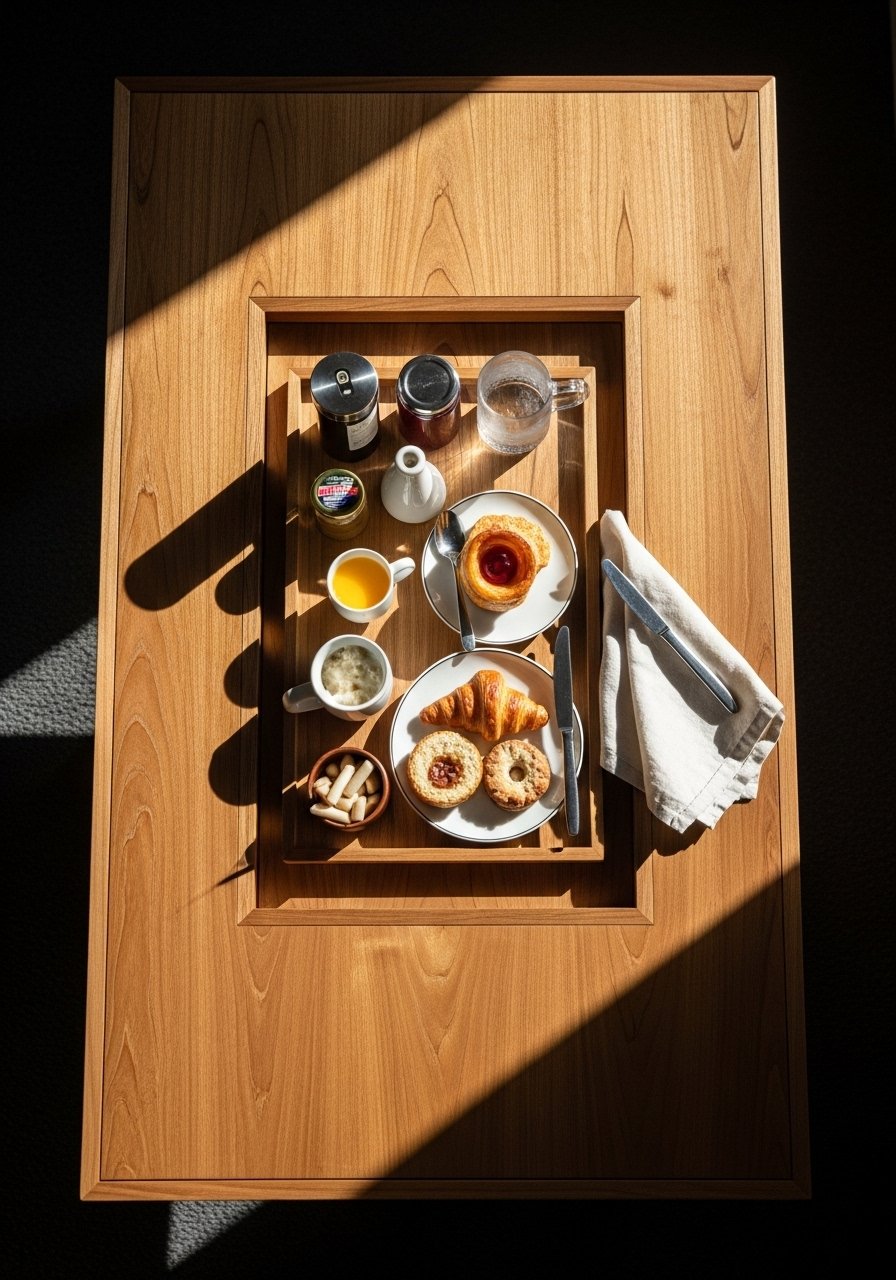
A floating tray top keeps tabletop clutter organized and makes serving easy. The recessed tray lifts out for cleaning or serving, making this a great small-space solution.
Materials
- 1 outer frame table top, 36" x 20"
- 1 removable tray sized 20" x 12"
- Router or jigsaw to create recess
- Foam pads for tray bottom
- Wood stain and sealer
- Handles for tray edges (optional)
Instructions
- Cut tray recess into table top using a jigsaw or router; leave 3/4" lip around edge.
- Fit tray and sand edges; test for easy removal.
- Stain tray and table top; two coats of sealer. Dry 2 hours between coats.
- Add foam pads to tray bottom so it sits snugly but removable.
How to Display or Gift It
- Use the tray as a serving surface for coffee and pastries.
- Store extra napkins in the recess when the tray is removed.
- Wrap tray with linen and twine for gifting.
- Product tip: removable serving tray handles
- Folding Drop-Leaf DIY Coffee Table for Small Spaces
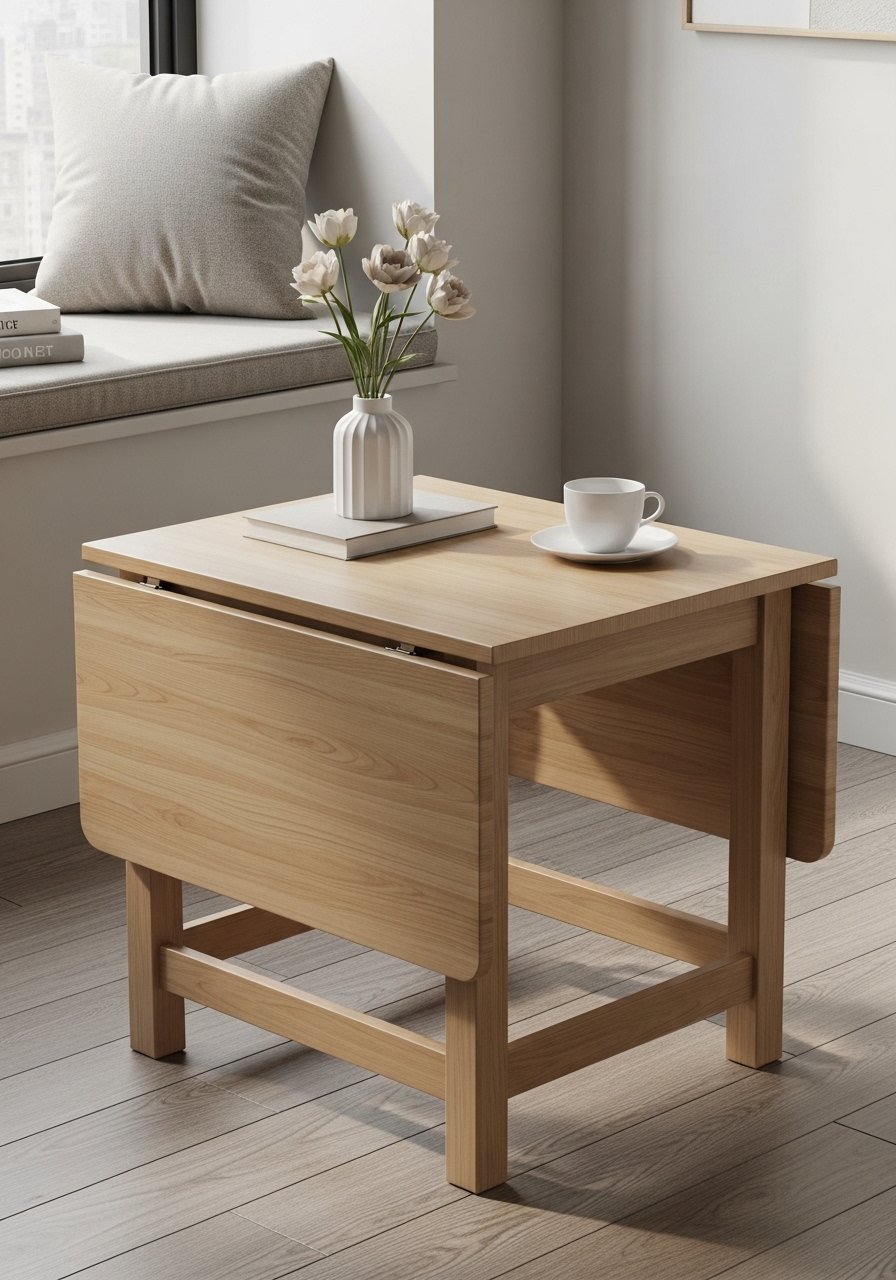
Drop-leaf tables are brilliant for tiny spaces—you can expand for guests and fold flat for everyday life. This simple hinge system is both practical and stylish.
Materials
- 1 tabletop base, 30" x 20"
- 2 drop leaves, 15" x 20" each
- Heavy-duty hinges and drop-leaf support brackets
- Screws, wood glue
- Sandpaper 120/220 grit, stain/sealer
Instructions
- Cut base and leaves to size.
- Attach hinges to align leaves flush when down and level when up.
- Install support brackets under leaves that swing out for support.
- Stain and seal all parts; dry 2 hours between coats.
How to Display or Gift It
- Perfect for apartment dwellers; fold up when guests come.
- Pack in a flat box with instructions for DIY gifting.
- Tool mention: drop-leaf brackets
- Nesting Crate Coffee Tables (Set of 2)
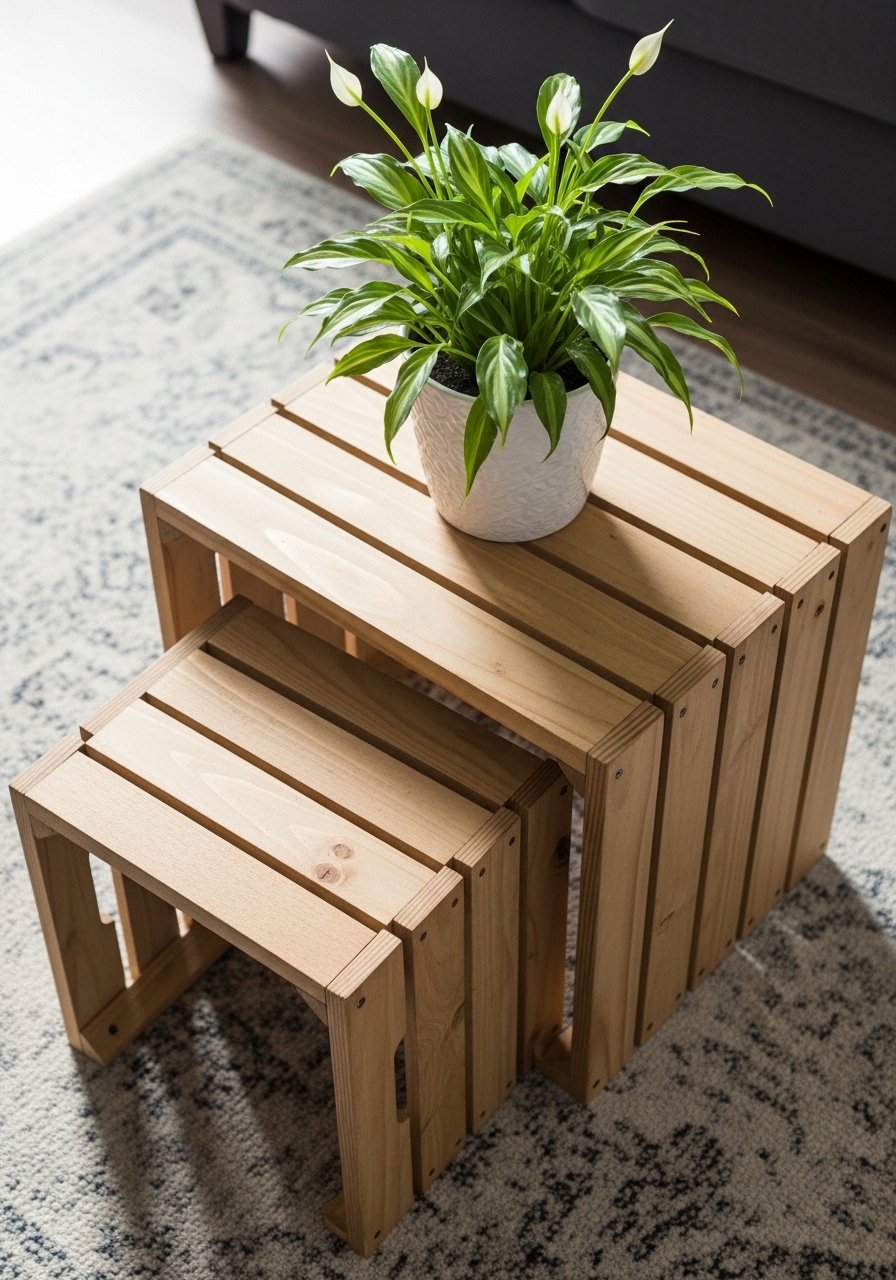
Nesting tables are flexible for gatherings and styling. Using crates keeps the feel casual and storage-friendly. Build two sizes for a layered look.
Materials
- 2 crate tops: 36" x 18" and 28" x 16"
- 4 corner brackets to secure each
- Sanding supplies, paint or stain
- Casters (optional)
- Wood screws, glue
Instructions
- Assemble each crate box and sand smooth.
- Paint or stain crates; dry 1–2 hours between coats.
- Stack and fit smaller crate partially under the larger one to nest.
- Add casters if you want mobility. Test balance.
How to Display or Gift It
- Use as side tables separately or together as a set.
- Give as a matching set with a handwritten styling guide.
- Storage tip: tuck baskets inside crates for hidden storage.
- Product link: stackable storage crates
- Vinyl Record Resin Top DIY Coffee Table
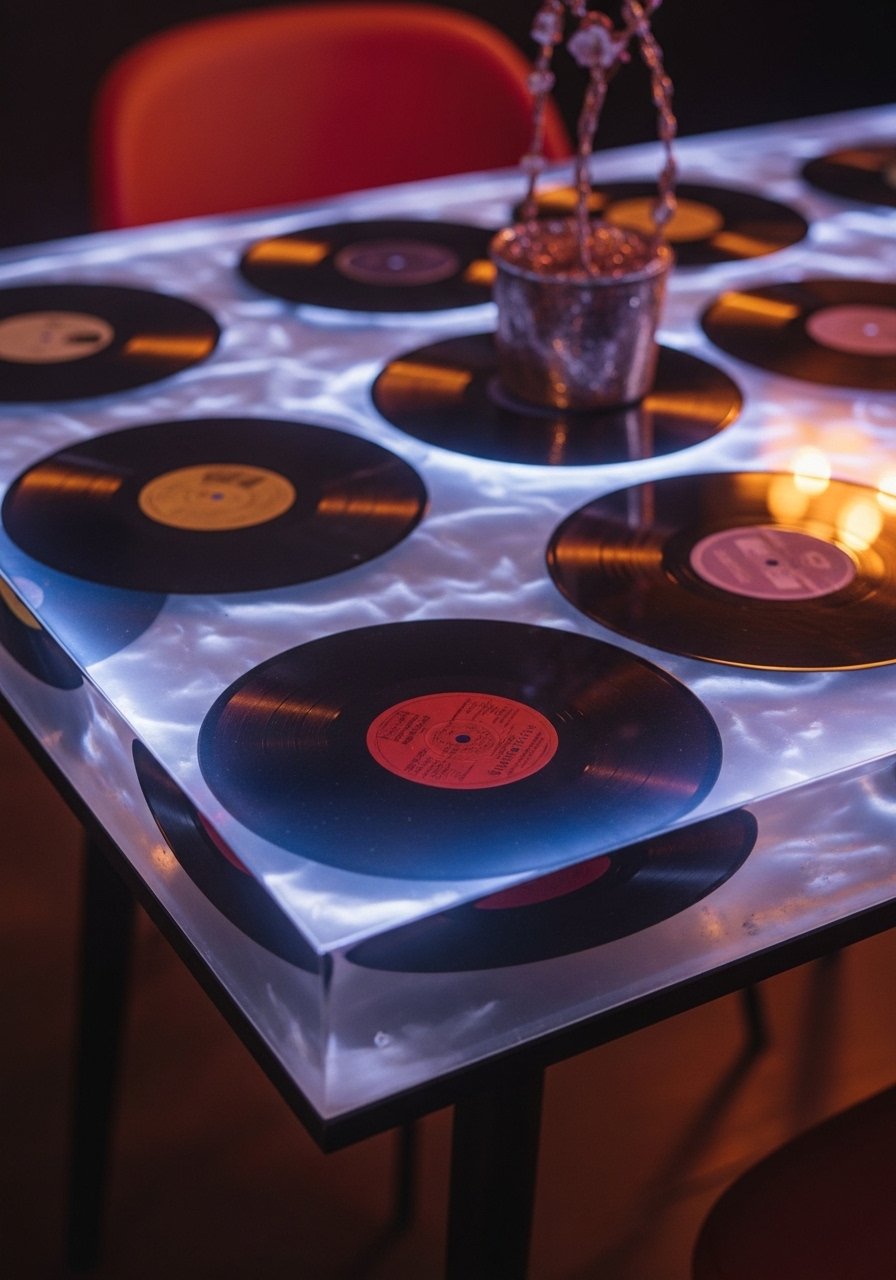
Encapsulate vinyl or paper memorabilia under resin for a bold statement piece. This tabletop preserves memories under a glossy, durable surface.
Materials
- 1 tabletop, 36" x 18"
- Old vinyl records or paper ephemera
- 2-part epoxy resin kit (casting resin)
- Mixing cups, stir sticks, gloves, respirator
- Heat gun for bubble removal
Instructions
- Affix records to tabletop with spray adhesive so they stay flat.
- Build a resin dam around edges with melamine and silicone.
- Mix resin per instructions; pour in thin layers (1/8" per pour). Wait 12–24 hours between layers.
- Use heat gun to pop bubbles after pouring.
- After final cure (72 hours full cure recommended), sand edges flush and polish.
How to Display or Gift It
- Display in a music room or retro-styled living room.
- Pack carefully for gifting with bubble wrap and a care note.
- Product suggestion: casting epoxy resin
- Center Planter DIY Coffee Table (Green Table)
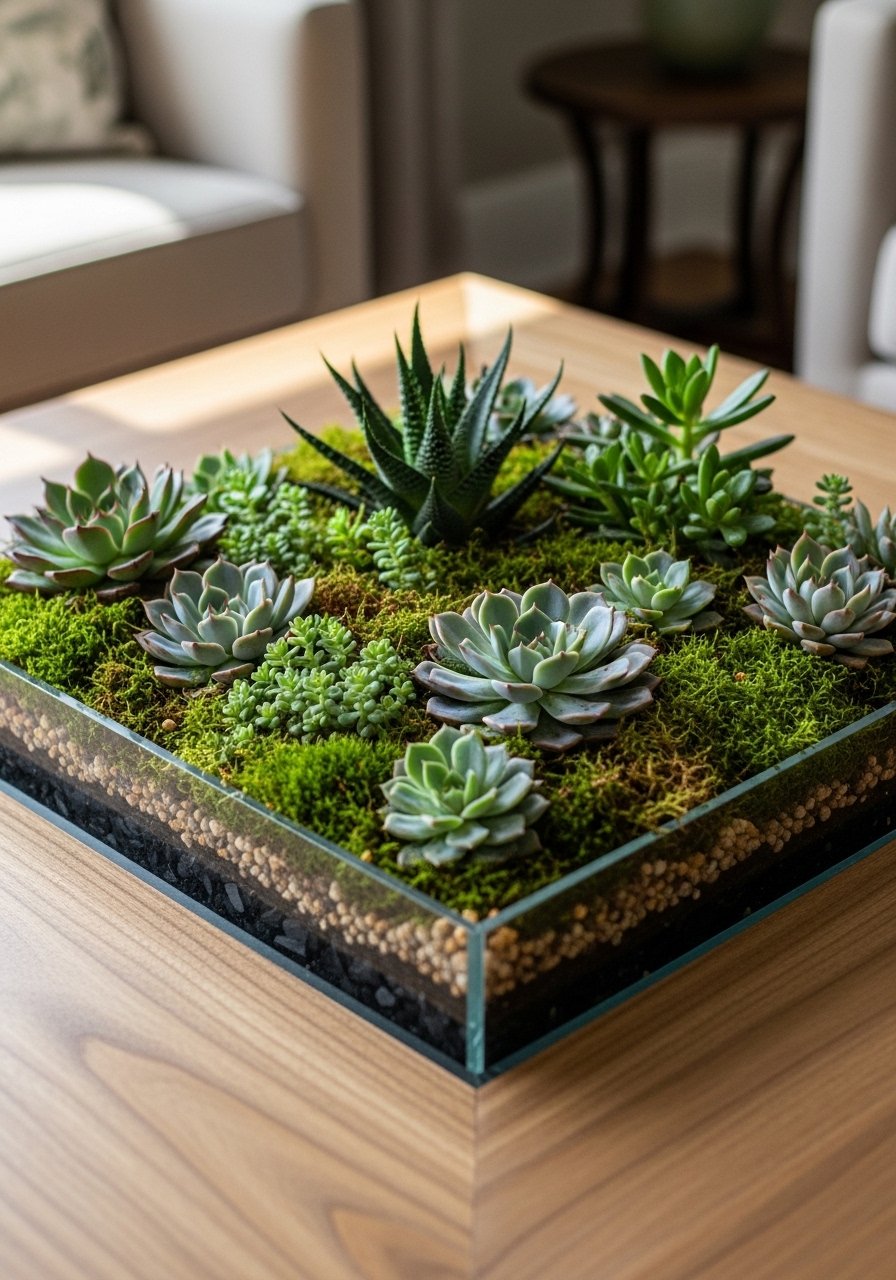
Bring life into your living room with a planter built into the tabletop. Succulents and air plants are low-maintenance and add texture.
Materials
- 1 table top with central cutout 18" x 10"
- Plastic planter liner sized to fit, with drainage holes
- Gravel and potting mix for succulents
- Succulents and moss (arranged)
- Waterproof seal for inner cavity
- Silicone caulk
Instructions
- Cut central cavity and line with plastic liner; seal seams with silicone.
- Add gravel drainage layer, then potting mix.
- Plant succulents firmly; water sparingly.
- Seal outer tabletop with sealer to protect wood from moisture splashes.
How to Display or Gift It
- Let plants settle for 1–2 weeks before heavy handling.
- Use as a centerpiece on a sunlit spot.
- Gift with a small watering syringe and care instructions.
- Product link: succulent starter pack
- Glass-Top Pressed Flowers DIY Coffee Table
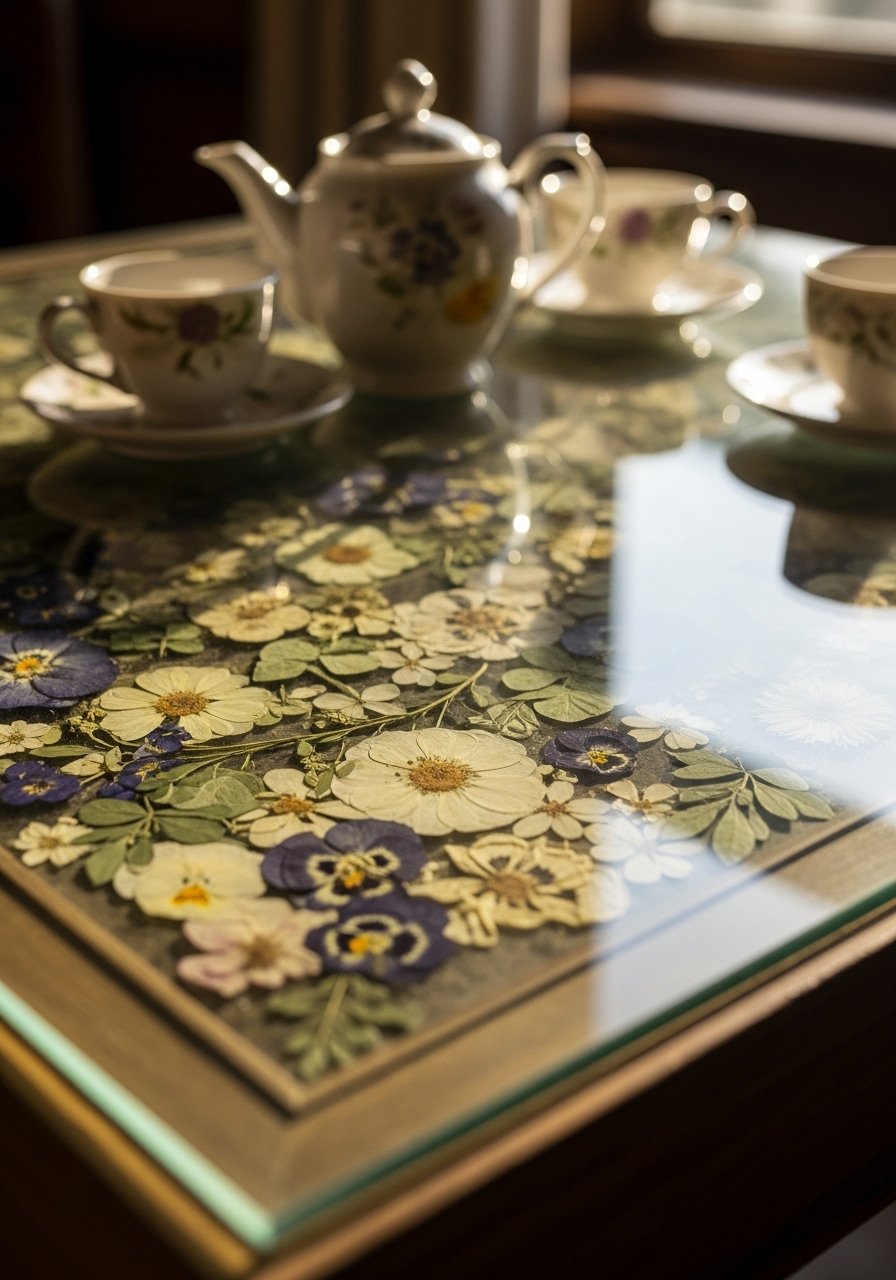
Pressed flowers give a botanical, cottagecore feel. Seal them under glass or clear resin for protection; they look delicate and timeless.
Materials
- Pressed flowers (assorted) dried for 2–4 weeks
- Glass or clear resin top
- Tweezers, archival glue (acid-free)
- Plywood or MDF base
- Frame or trim for edges
Instructions
- Arrange pressed flowers on base and secure with archival glue.
- Cover with a clear glass top sized to fit; or pour a thin layer of casting resin to encapsulate (follow resin cure times).
- If using resin, pour in thin layers and allow 24–72 hours to cure fully.
- Finish edges with trim or a thin frame.
How to Display or Gift It
- Keep out of direct sunlight to prevent fading.
- Pair with botanical books for styling.
- Gift wrapped with a care note about avoiding moisture.
- Tool mention: flower press
- Lift-Top Storage DIY Coffee Table
A lift-top table is ergonomic for working from the couch and sneaky storage. Buy a lift-top hardware kit to ensure smooth operation.
Materials
- Table base and top sized 36" x 20"
- Lift-top hardware kit (gas spring or hinge system)
- Plywood base for storage cavity
- Screws, drill
- Paint or stain and protective sealer
Instructions
- Build base with storage cavity sized to fit the lift hardware.
- Install lift-top kit per manufacturer instructions. Test movement and clearances.
- Stain or paint and seal. Check for pinch points and add felt bumpers.
How to Display or Gift It
- Perfect for remote work or breakfast in bed.
- Include a small assembly manual if gifting.
- Product suggestion: lift-top hardware kit
- Japandi Painted Scandinavian DIY Coffee Table
Japandi blends Japanese minimalism and Scandinavian warmth. Keep forms simple, finishes matte, and colors soft. Chalk paint gives a soft, velvety finish perfect for this look.
Materials
- 1 light wood top, 36" x 18"
- Chalk paint (soft gray or warm white) 8 oz
- Natural wood oil or light stain for top
- Sandpaper 220 grit
- Wax or matte sealer
Instructions
- Oil or lightly stain the tabletop; wipe excess and dry 6 hours.
- Paint legs or shelf with chalk paint; two coats, 1 hour drying between.
- Sand lightly for a soft finish. Protect painted surfaces with clear matte wax.
How to Display or Gift It
- Pair with low-seating and natural fiber rugs.
- Wrap with recycled paper and a dried sprig for a minimalist gift.
- Product link: chalk paint
- Tile-Inset Farmhouse DIY Coffee Table
Inset tiles add durability and character. Tiles can be swapped seasonally, or grout left natural for rustic charm.
Materials
- Tabletop with center recess 18" x 12"
- Ceramic tiles (patterned), enough to fill inset
- Thin-set adhesive and grout
- Tile sealer and clear protective topcoat
- Wet saw or tile cutter
Instructions
- Cut and dry-fit tiles in recess.
- Apply thin-set and press tiles into place. Let set 24 hours.
- Grout and wipe excess. Seal grout after 24 hours.
How to Display or Gift It
- Style with mason jars and simple linens.
- For gifting, include tiles and grout in a small kit for future repairs.
- Tool mention: wet tile saw
- Cracked-Ice Resin DIY Coffee Table
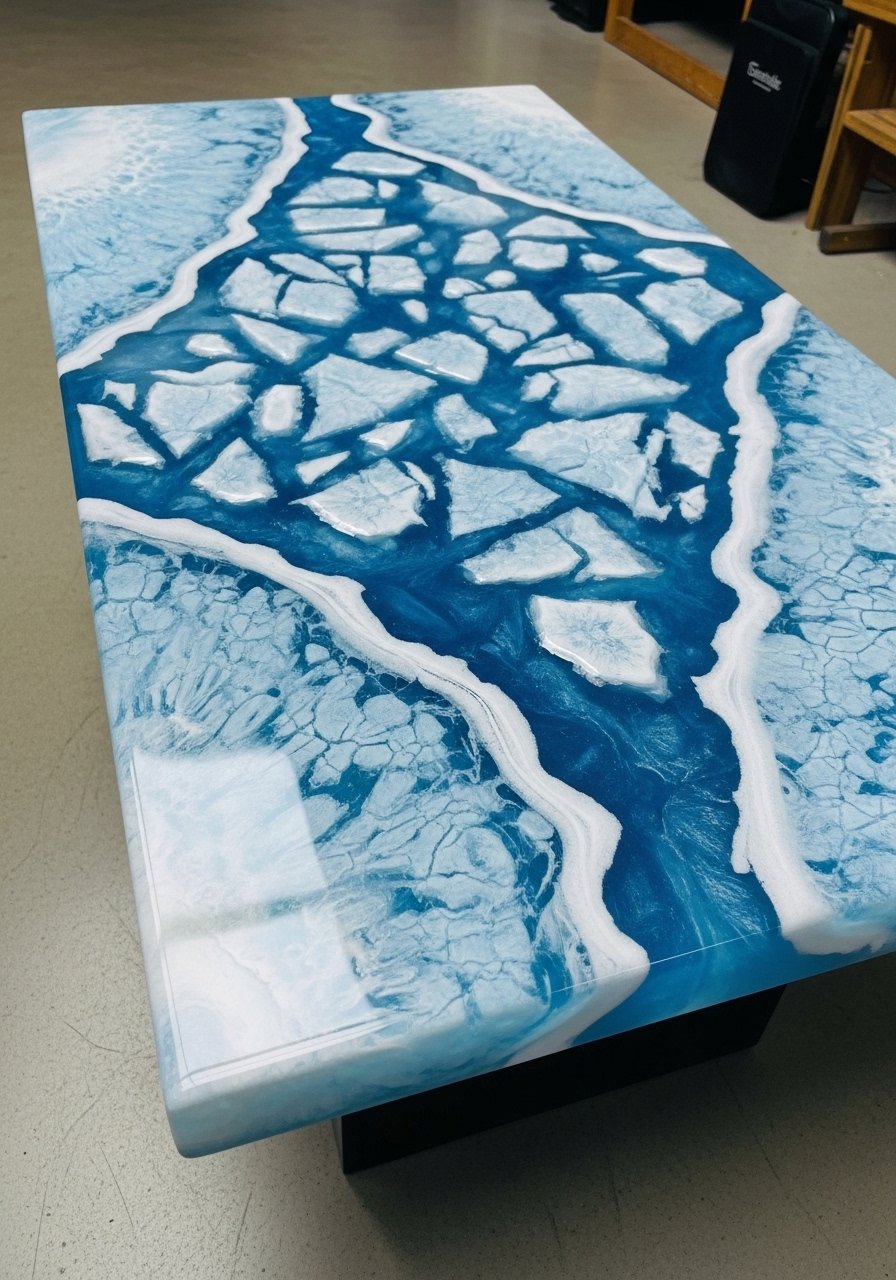
The cracked-ice technique layers resin and pigments to create depth and sparkle. It’s dramatic but manageable if you work in thin layers and control bubbles.
Materials
- Wood or MDF table top sized 36" x 18"
- Clear casting epoxy resin kit (2-part)
- White pigment, metallic pigments, alcohol inks
- Mixing cups, gloves, heat gun
- Sandpaper 220–600 grit, polishing compound
Instructions
- Seal tabletop underside with thin resin coat.
- Mix resin per instructions and pour tinted layers, using heat gun to manipulate pigments.
- Create crack effects by layering whites and using a blowtorch briefly to move pigments.
- Let cure 24–48 hours between major pours; final cure 72 hours.
- Sand and polish to a high gloss.
How to Display or Gift It
- Keep away from high heat while curing; full cure is important for durability.
- Package with bubble wrap and a care card for gifting.
- Product link: metallic epoxy pigments
- No-Sew Upholstered Ottoman Coffee Table
A no-sew approach uses adhesive and stapling for upholstery—great for non-sewers. The finished piece is cozy, kid-friendly, and perfect for a soft centerpiece.
Materials
- Wooden box base 36" x 24" x 12"
- High-density foam 4"
- Fabric (2–3 yards) heavy-weight
- Spray adhesive and staple gun with staples
- Batting 1 yard
- Optional: tufting buttons and long needles
Instructions
- Cut foam to size and adhere to wooden lid with spray adhesive.
- Wrap batting and fabric and staple to underside, pulling taut.
- If tufting, mark points, pre-drill, and tuft as in project 7.
- Attach lid to base; add a tray for setting drinks.
How to Display or Gift It
- Use as extra seating in a family room.
- Gift with a small pillow or throw on top.
- Store in a roomy craft box to avoid creasing fabric.
- Product suggestion: heavy-weight upholstery fabric
Thanks for spending time browsing these DIY coffee table ideas. From lightweight pallet builds to glossy resin rivers, there’s a project for every skill level and style—farmhouse, boho, japandi, mid-century, and industrial all made doable at home. Pin the ones you love, try one this weekend, and tag a friend who’d enjoy a build date. Which look are you most tempted to try first?
Quick tool tip: a quality temperature-controlled hot glue gun really speeds small assemblies and reduces stringing across most builds—it’s made finishing so much less fussy for me.


