You’ve got a cozy apartment and not much floor space, but that doesn’t mean your living room can’t have a standout centerpiece. These 21 renter-friendly, compact DIY coffee table ideas for apartments are designed to be lightweight, non-permanent, and oh-so-stylish. Whether you crave boho textures, japandi minimalism, or a farmhouse vibe, there’s a project here you can finish in an afternoon or over a weekend.
I’ll show exact measurements, realistic material quantities, drying times, and simple troubleshooting so your build won’t fall apart on week two. Keep a heat gun or hair dryer handy to speed drying. I reach for my small heat gun when I’m curing glue or smoothing resin spills. Ready to pin your favorite looks and get crafting? Let’s make a coffee table that fits your space and your style.
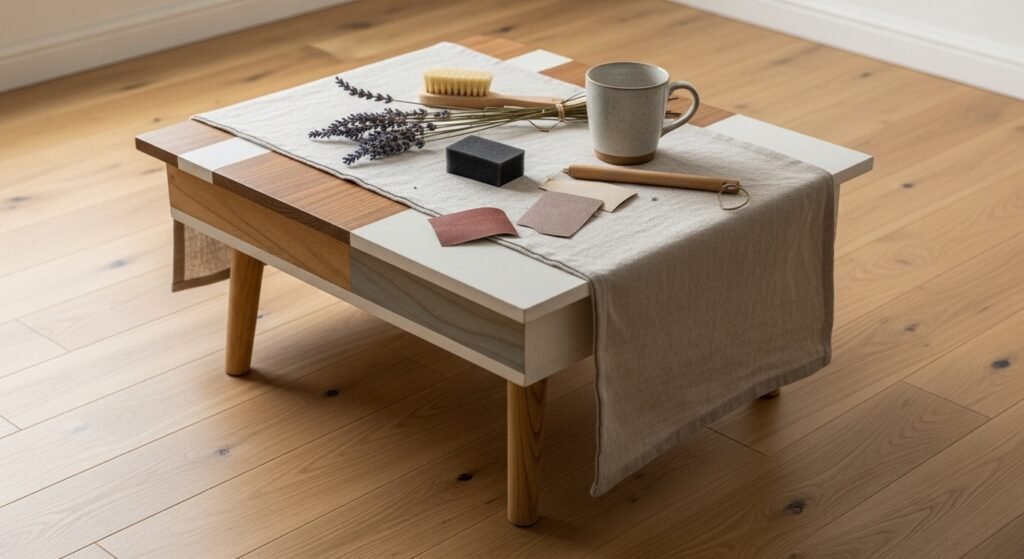
- DIY coffee table ideas for apartments: Foldable Tray Coffee Table
This foldable tray table looks built-in but packs away easily—perfect for micro-living. The detachable top lets you use it as a serving tray or a tabletop. Expect a light, tactile surface with rounded corners that feel pleasant in your hands. Beginners will love the simple joinery.
Materials
- 1 solid birch plywood panel, 18" x 14" x 1/2"
- 4 pre-made folding table legs, 13" height, black powder coat
- 1 can chalk paint, 8 oz (matte), color of choice
- 1 jar satin polyurethane, 8 oz
- 1 roll painter’s tape, 1 in
- Sandpaper: 120 and 220 grit
- 3 brass corner protectors with screws
- Wood glue, 4 oz
Instructions
- Sand the plywood top with 120 grit, then clean dust. Wipe with a tack cloth.
- Tape the edges with painter’s tape for a clean paint line.
- Apply two thin coats of chalk paint with a foam brush. Let dry 30 minutes between coats.
- Remove tape once paint is tack-free. Sand lightly with 220 grit for very smooth finish.
- Apply one coat of satin polyurethane with a foam brush. Dry 2–3 hours; recoat after 4 hours.
- Attach folding legs to underside using included screws and a power screwdriver.
- Screw in brass corner protectors to finish edges.
How to Display or Gift It
Use the tray table next to a loveseat or as a bedside table. Add non-slip pads under legs for apartment floors. Pack nested (top stacked with legs folded) in kraft tissue and tie with twine for gifting. Store flat in a closet or under a bed. For neat storage, tuck it into a slim fabric storage bag.
- Mid-Century Hairpin Leg Compact Top
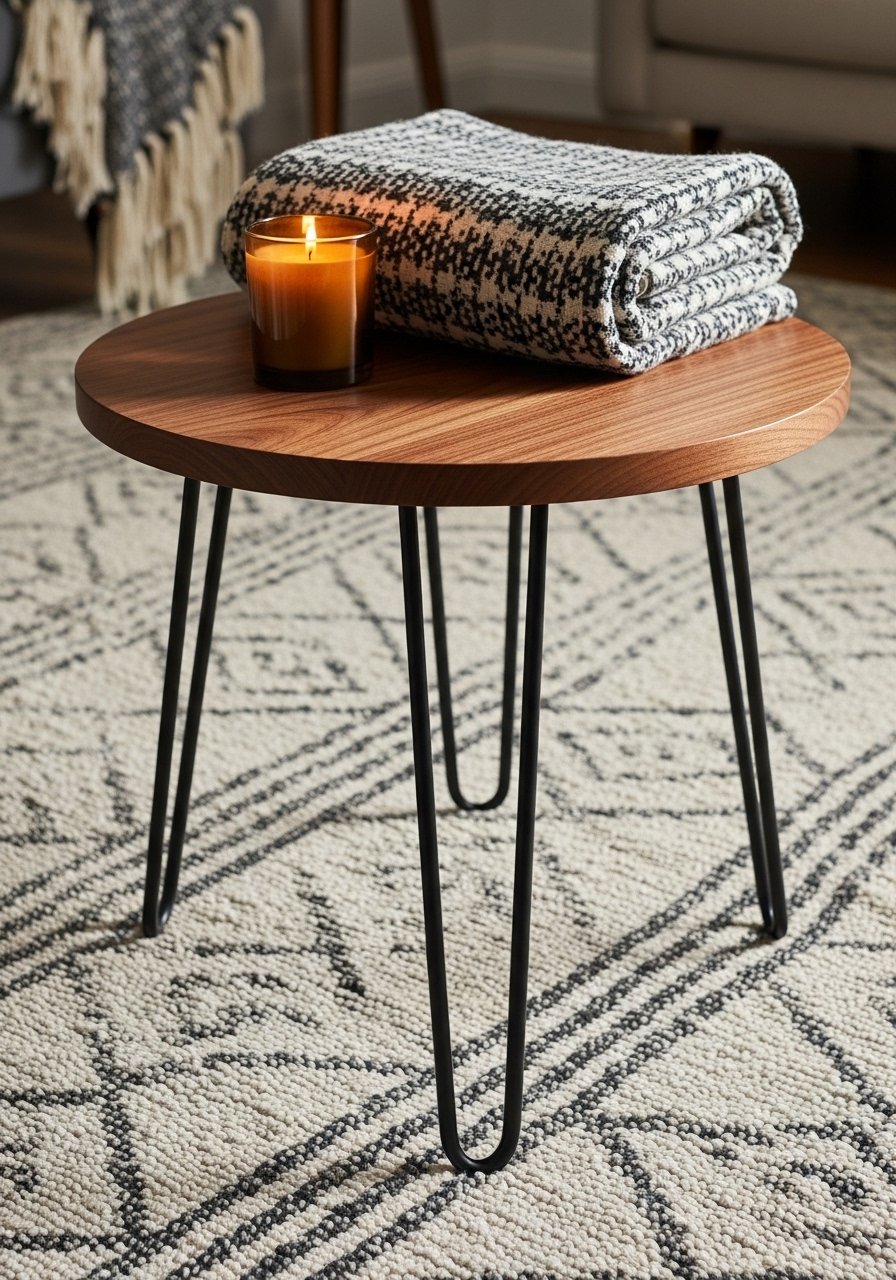
This mid-century inspired table gives you sturdy style in a small footprint. The walnut stain brings depth and warmth. You’ll get clean, smooth edges and a pleasing heft without fighting heavy furniture.
Materials
- 1 softwood round top, 20" diameter x 3/4"
- 1 walnut wood stain, 8 oz
- 1 can clear satin finish, 8 oz
- 3 hairpin legs, 12" high, black
- 1 sanding sponge, medium
- 1 lint-free cloth
- Wood glue (small tube)
- 4 felt pads
Instructions
- Sand the round top with sanding sponge until smooth.
- Apply walnut stain with a lint-free cloth. Wipe off excess. Dry 6 hours.
- Add two coats of satin finish; wait 2–4 hours between coats.
- Center and mark leg placement on underside with pencil.
- Pre-drill pilot holes and attach hairpin legs with screws.
- Stick felt pads to protect floors.
How to Display or Gift It
Pairs perfectly with a low sofa in a japandi-inspired living room. Add a small ceramic vase and a stack of zine-sized books. Wrap in kraft paper and include care instructions for staining and cleaning. Use a small wooden easel to display tabletop art when giving as a gift.
- Pallet Slat Boho Ottoman-Top Coffee Table
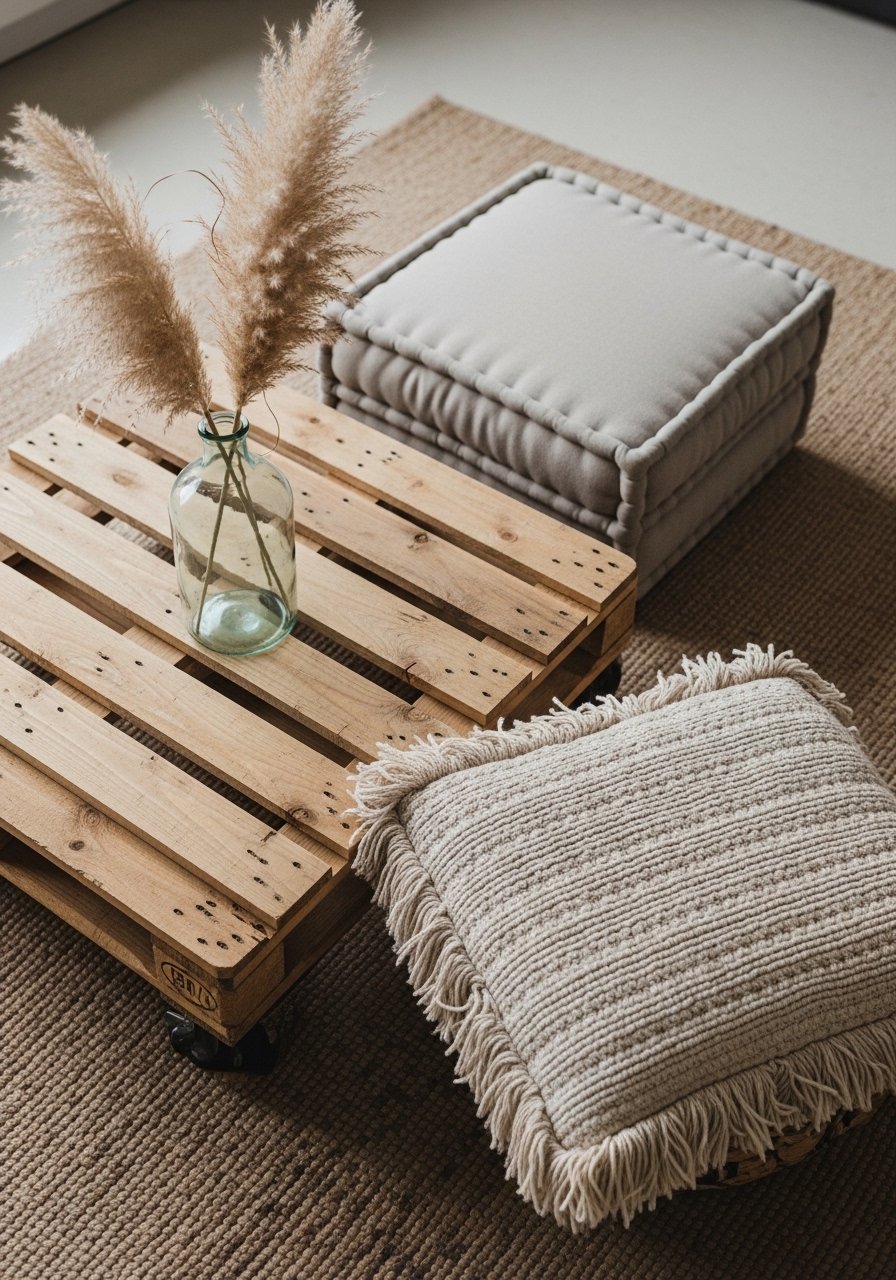
This design uses reclaimed pallet slats for a breezy boho look. The cushioned top adds comfort and doubles as seating. Lightweight, movable, and renter-safe—no wall fixtures required.
Materials
- 6–8 pallet slats, cut to 36" x 6" (arranged to 24" x 36" table)
- 1 2" foam cushion, 24" x 36"
- 1 upholstery fabric, 1 yard
- 1 box 1-1/4" wood screws
- 1 can wood stain (weathered gray), 8 oz
- Staple gun and 1/4" staples
- Sandpaper 120 grit
- Corner brackets (optional)
Instructions
- Sand pallet slats and arrange into 24" x 36" panel. Glue edges and screw through slats into hidden cleats.
- Stain slatted panel; dry 6 hours.
- Wrap foam in upholstery fabric and staple underneath to create the cushion top.
- Attach cushion to top with removable Velcro strips for easy cleaning.
- Add corner brackets for extra rigidity if needed.
- Check for splinters; sand any rough spots.
How to Display or Gift It
Layer with a round tray to create a stable surface for drinks. Works well in boho or cottagecore rooms. For gifting, pack cushion separately to prevent crushing. Keep extra fabric in a fabric storage box.
- Japandi Minimalist Cubed Coffee Table with Hidden Storage
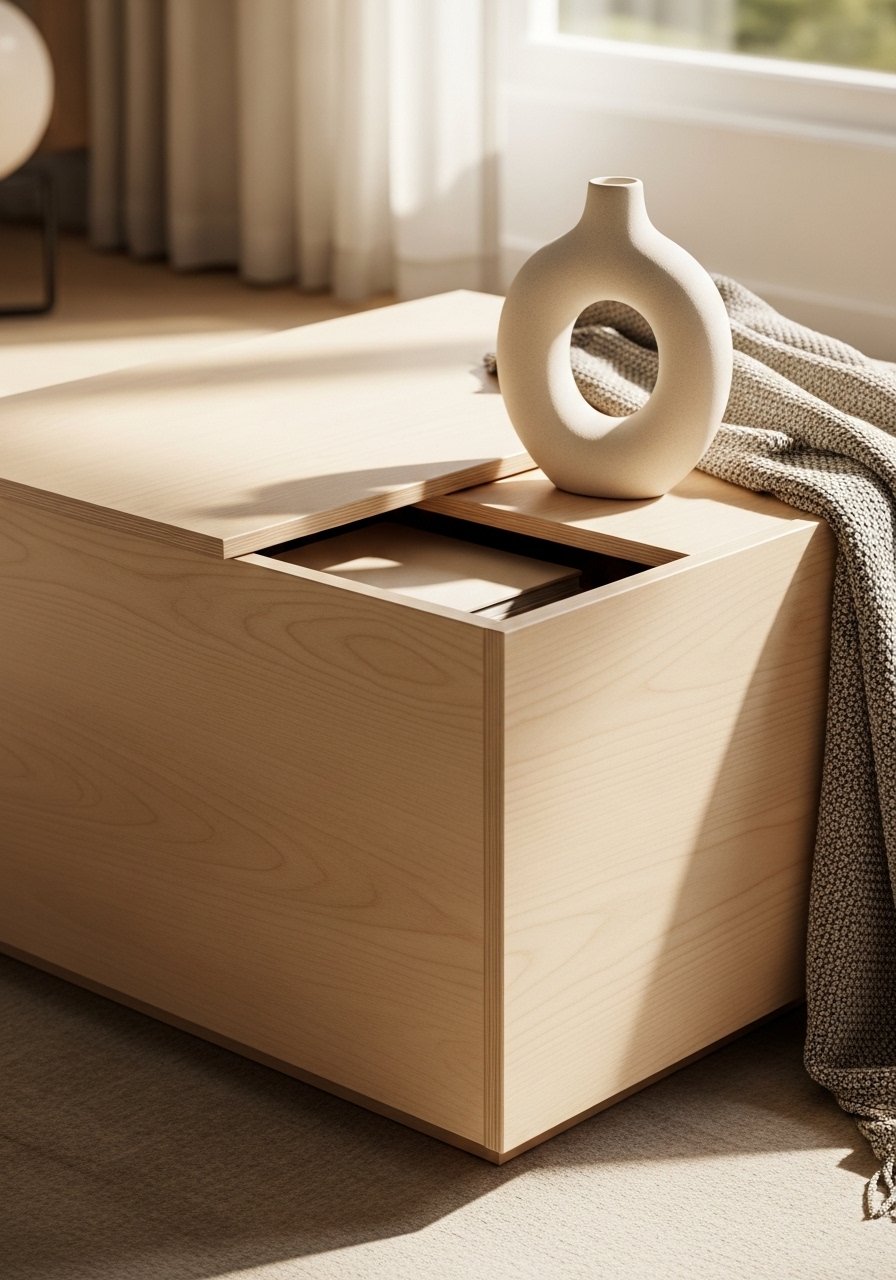
This compact cube blends Scandinavian warmth with Japanese restraint. The slotted sliding lid gives you storage without visible hardware—perfect for renters who want clutter-free surfaces.
Materials
- 2 birch plywood panels, 18" x 18" x 3/4"
- 1 sheet 1/4" plywood for bottom
- Wood glue, 4 oz
- 1 can clear water-based finish, 8 oz
- 1 pack wooden sliders (small)
- Sandpaper 120, 220
- Drill and countersink bit
Instructions
- Cut panels and assemble a box with wood glue and clamps.
- Insert 1/4" bottom and glue. Let cure 24 hours.
- Sand joints and apply two coats of clear finish. Dry 2–4 hours between coats.
- Fit sliding lid to sit snug but move freely on sliders.
- Lightly round top edges with sandpaper for a soft touch.
- Wipe clean and allow final cure 24 hours before heavy use.
How to Display or Gift It
Tuck throws and magazines inside. Top with a low tray and a tea set for a calm, minimal look. For storage before gifting, use a stackable craft organizer box.
- DIY coffee table ideas for apartments: Resin Geode Accent Top (Small)
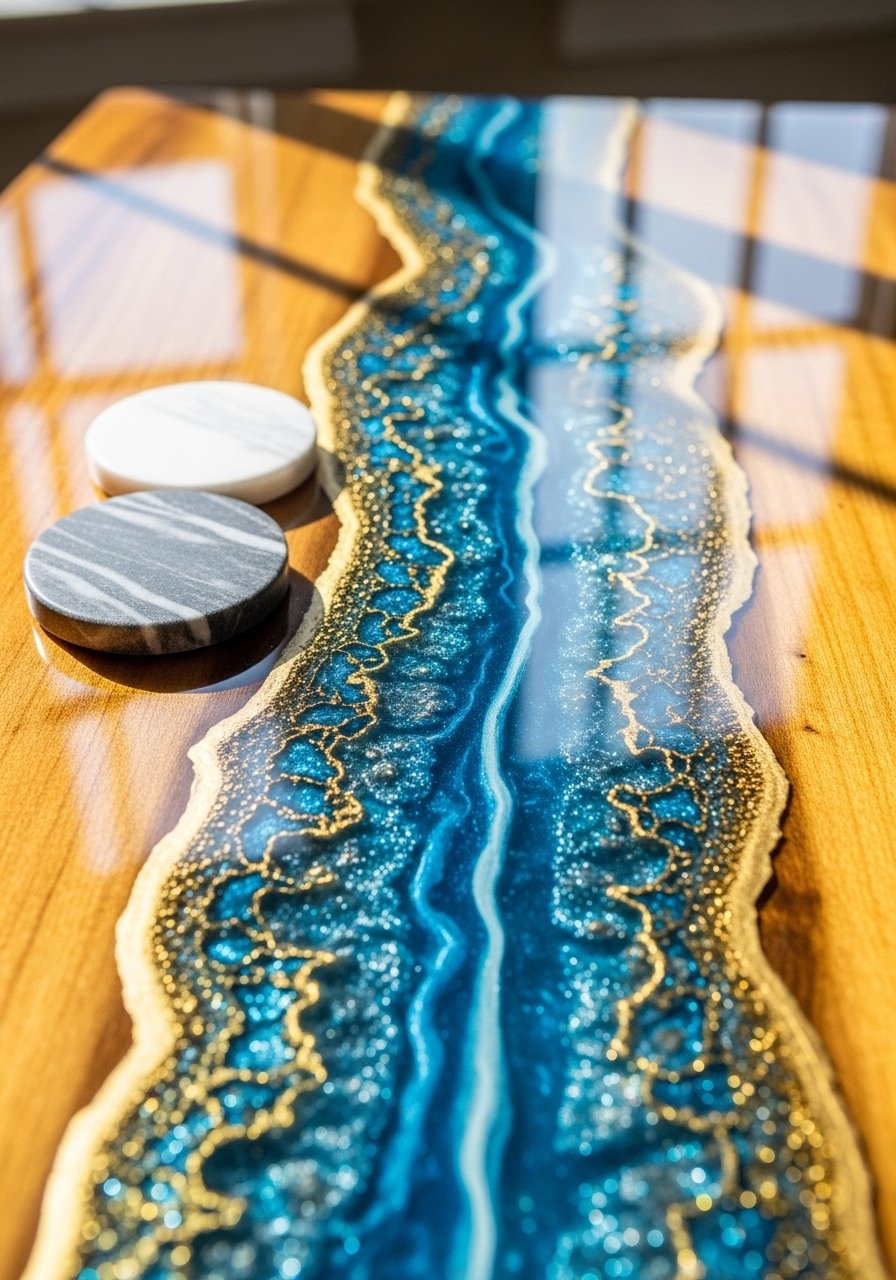
Create jewel-like shine with a small resin-accent tabletop—resin adds luxury without a heavy build. This compact size fits narrow sofas and adds a pop of color. Use a disposable mixing cup and slow-cure resin for fewer bubbles.
Materials
- 1 hardwood panel, 16" x 12" x 3/4"
- 1 ArtResin epoxy kit (clear), 16 oz total
- Pigment powders: blue and gold mica, 2 small jars
- Disposable mixing cups and wooden stir sticks
- Small blowtorch or heat gun
- Painter’s tape
- Sandpaper 220 grit
Instructions
- Seal the wood with one thin coat of resin and let cure 12 hours.
- Tape areas you want to remain natural. Pour mixed resin into a channel for the geode.
- Add mica pigments in layers. Use stir sticks to create flow.
- Use a heat gun for 5–10 seconds to pop bubbles and help resin self-level.
- Let cure 24–48 hours depending on kit instructions.
- Sand edges lightly and add a thin final pour if necessary. Fully cure 72 hours before use.
How to Display or Gift It
Keep coasters handy. For gifting, include care tips—no direct heat or cutting on the surface. Wrap in bubble wrap and place in a sturdy shipping box if mailing.
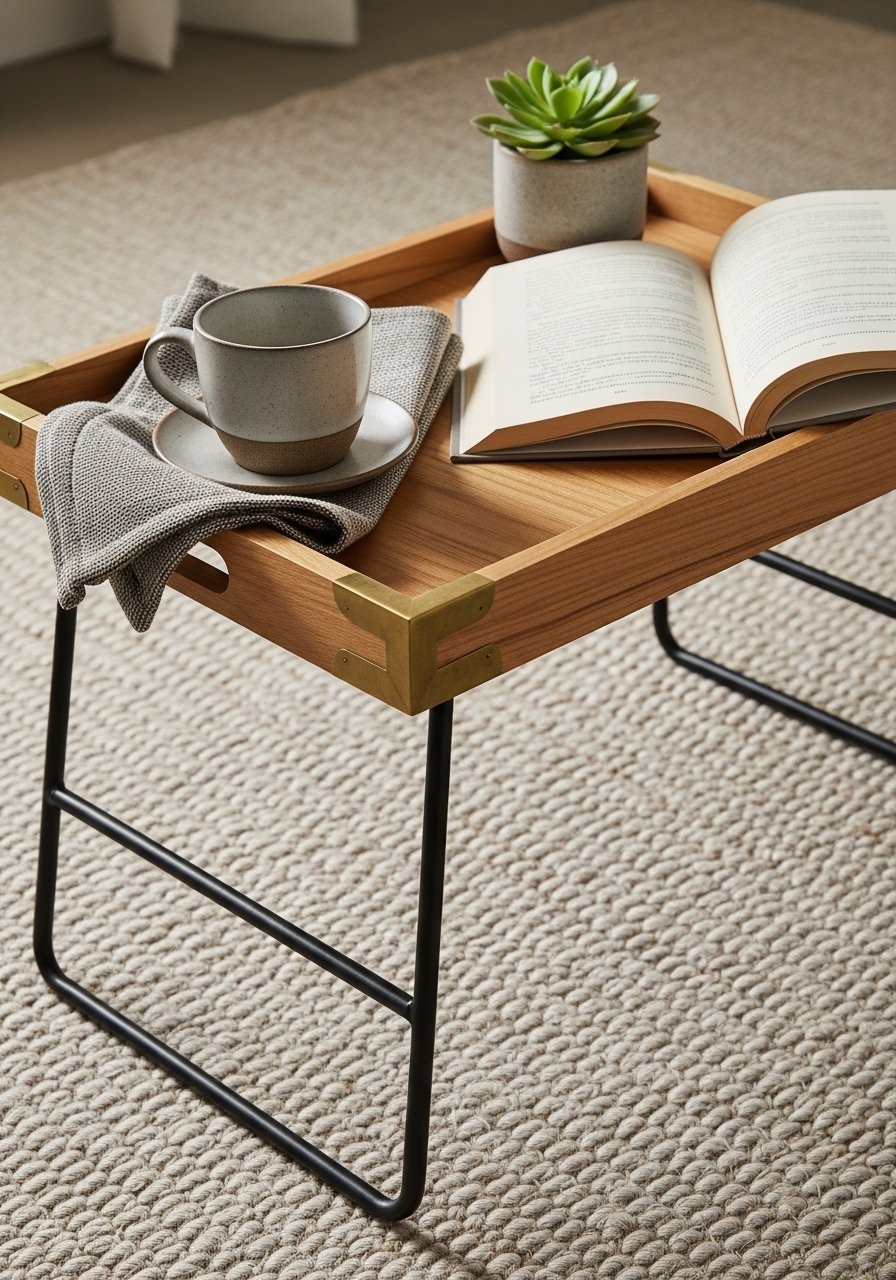
- Fold-Down Wall-Mounted Drop-Leaf Table (Renter-Friendly)
This wall-mounted drop-leaf acts as a coffee table that folds away, perfect for micro-studios. Use removable drywall anchors rated for the weight—no studs required for light use.
Materials
- 1 narrow top board, 36" x 10" x 3/4"
- 2 folding shelf brackets, brass tone
- 4 heavy-duty removable drywall anchors rated 50 lbs
- 1 can clear finish
- Sandpaper 120
- Painter’s tape
- Small level
Instructions
- Sand and finish board. Let finish dry 2–4 hours.
- Locate desired height and mark bracket positions. Use level.
- Install removable drywall anchors per instructions.
- Attach brackets to wall and then to the underside of the board.
- Test fold-down mechanism. Tighten screws if wobble.
- Allow finish to cure fully 24 hours before setting drinks on it.
How to Display or Gift It
Great as a space-saving coffee and snack station. Top with non-slip pads and a decorative tray. For gifting, include a pair of folding brackets and installation instructions in a small hardware kit.
- Vintage Suitcase Side Coffee Table
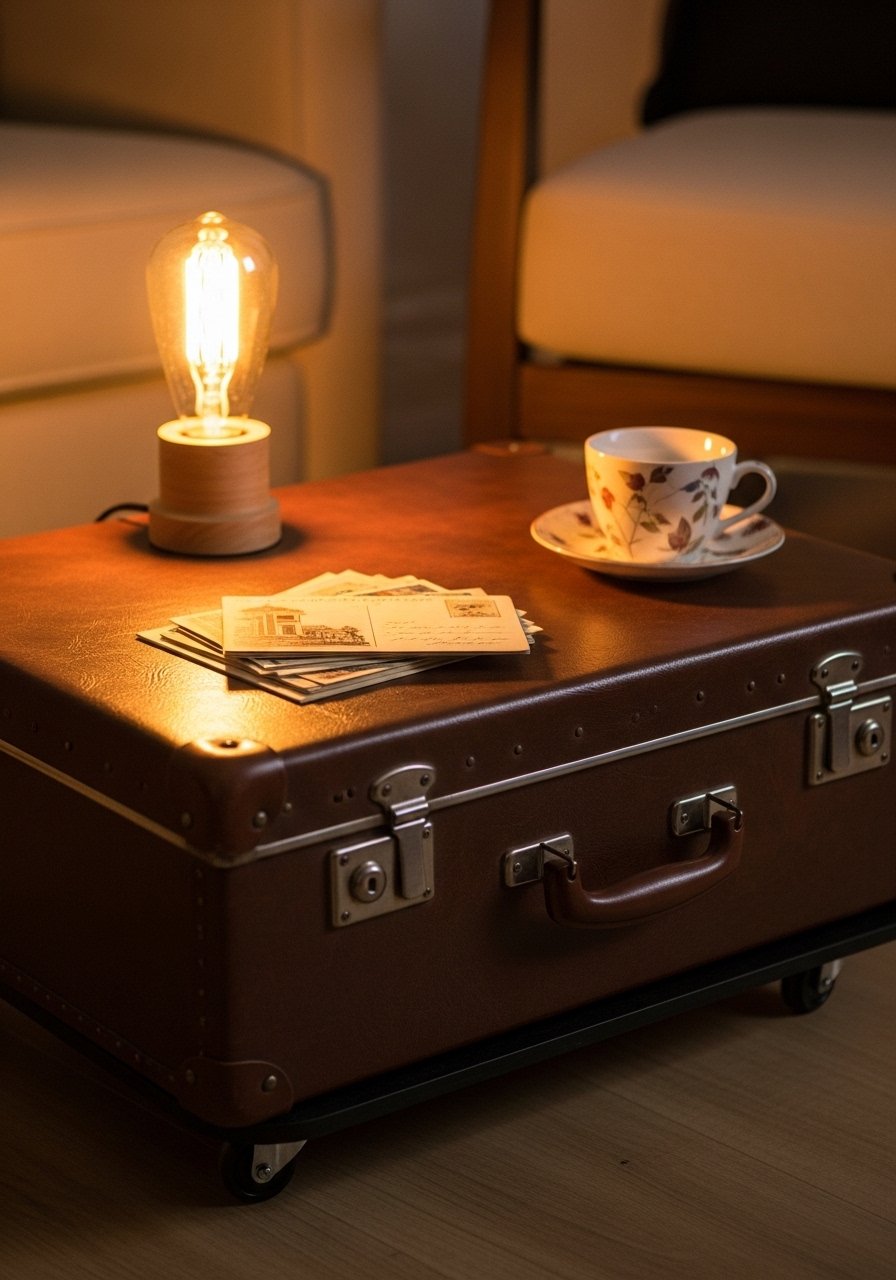
A retro suitcase adds instant personality and hidden storage. Casters make it easy to roll away for dance parties. The surface can be reinforced for drinks with a removable tray.
Materials
- 1 vintage hard-sided suitcase (sturdy)
- 4 swivel casters with screws
- 1 sheet 1/4" plywood cut to suitcase interior
- 1 pack felt pads
- 1 small foam brush
- E6000 adhesive 2 oz
Instructions
- Clean interior and measure for plywood insert.
- Cut plywood, sand edges, and insert to create flat top.
- Attach casters to underside of suitcase base using screws (pre-drill).
- Add felt pads to top edges where glassware may sit.
- Use E6000 to reinforce any loose corners; allow curing 24 hours.
- Test mobility and stability before use.
How to Display or Gift It
Place a removable tray on top to protect the surface. This works wonderfully in boho or vintage-themed rooms. For shipping as a gift, tuck it into a moving blanket set.
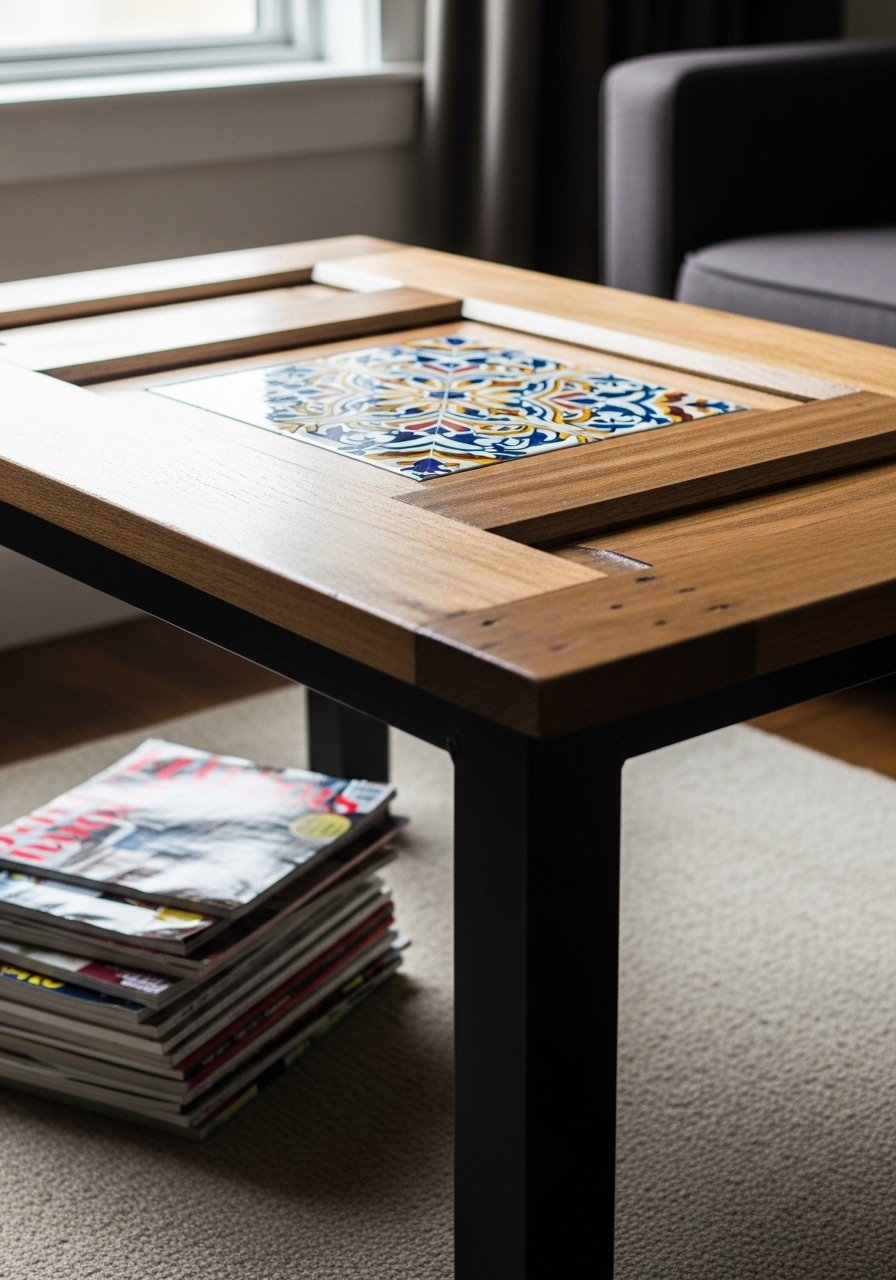
- Stenciled Tile Tray Coffee Table
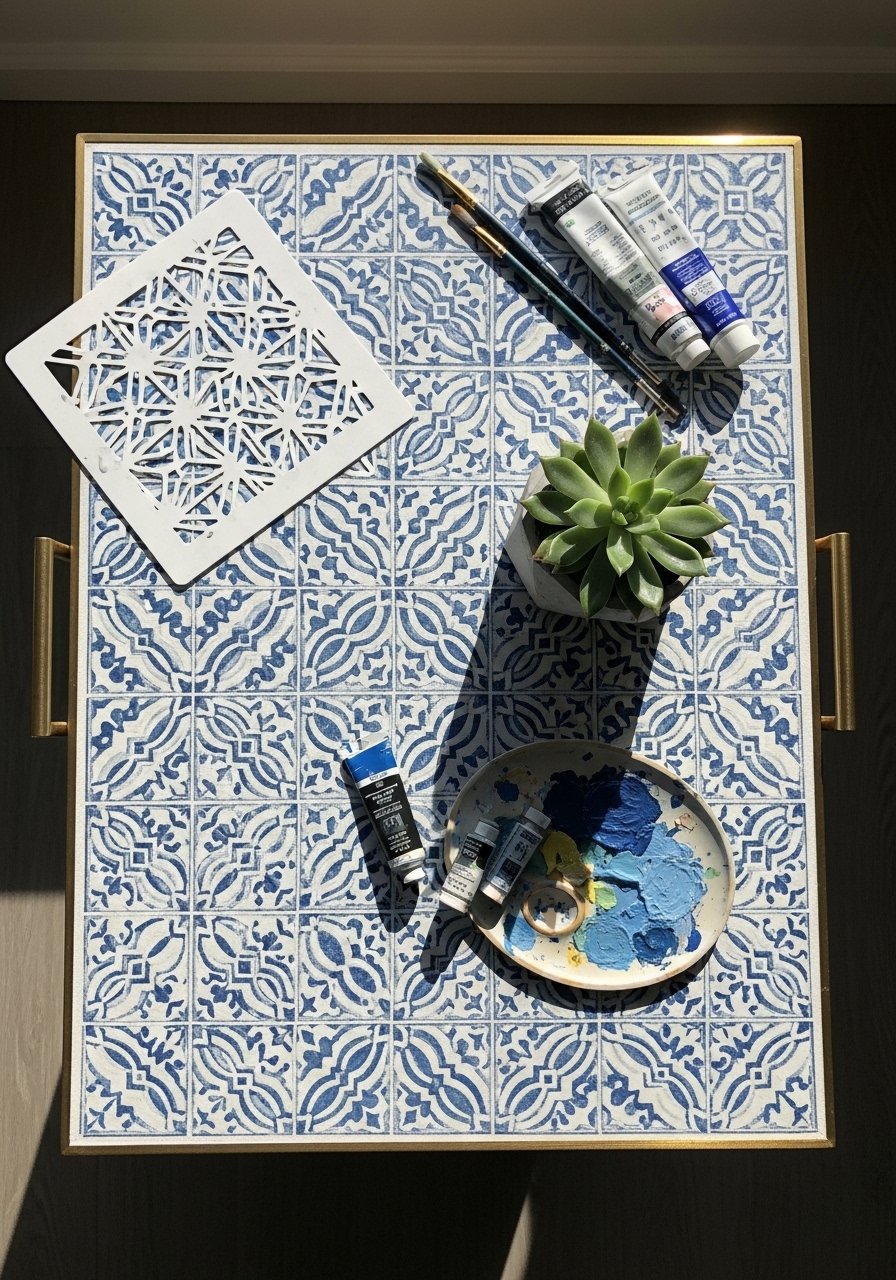
Stenciled faux-encaustic tiles give a patterned look without heavy tiles. The tray top stays removable so you can use it for serving. Texture feels slightly raised and hand-painted.
Materials
- 1 wooden tray top, 24" x 14" x 3/4"
- 1 pack reusable stencils (8" square)
- Acrylic craft paints, 3 colors
- 1 small foam roller
- Painter’s tape
- 2 brass handles with screws
- Clear matte Mod Podge, 8 oz
Instructions
- Tape stencil in place and roll paint lightly with foam roller.
- Let first color dry 20–30 minutes, then layer additional colors.
- After paint is dry, seal with two coats of Mod Podge. Dry 30 minutes between coats.
- Attach handles to sides.
- Fit tray to low base or set directly on hairpin legs.
- Clean stencils with water after use.
How to Display or Gift It
Use as a centerpiece with candles and seasonal decor. For gifting, include stencil and paint set in a craft supply kit.
- DIY coffee table ideas for apartments: Stackable Crate Coffee Table
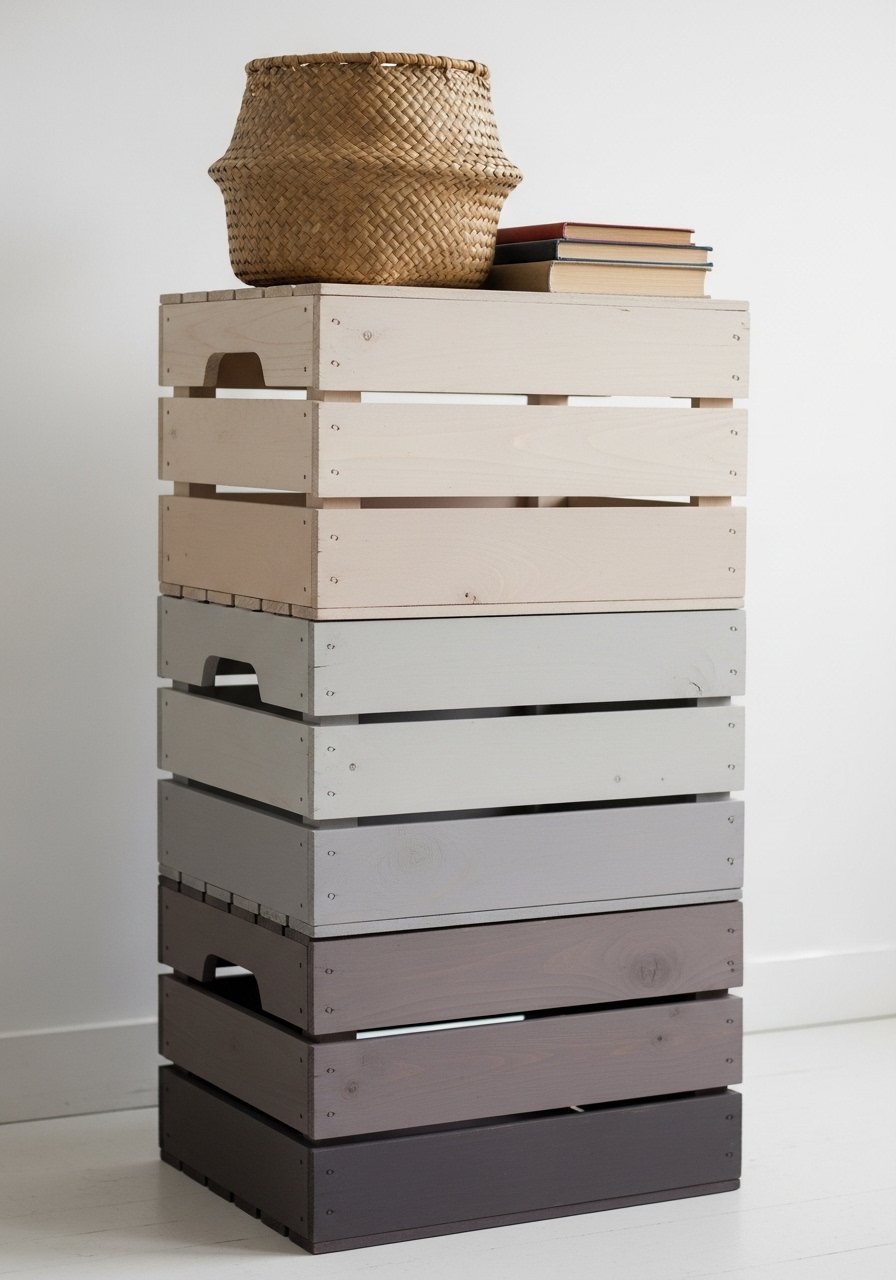
Stackable crates create flexible storage and surface area. They’re modular—rearrange them into shelving or a console when you move. The painted finish is slightly textured and matte.
Materials
- 3 wooden milk crates, 12" x 12" x 9"
- 1 can latex craft paint, 8 oz (choose 3 shades)
- 1 jar clear wax or matte sealer, 8 oz
- Sandpaper 120
- 1 can spray primer, 8 oz
- 1 roll painter’s tape
- Screws (optional) for stacking
Instructions
- Sand crates lightly and apply spray primer. Dry 30 minutes.
- Paint crates in chosen ombre shades; allow 1 hour between coats.
- Seal with wax or matte sealer.
- Stack crates and optionally screw through bottom into top for a secure fit.
- Add felt feet to bottom crate to protect floor.
- Let paint cure 24 hours before heavy use.
How to Display or Gift It
Use one crate as a magazine rack. For gifting, pack crates nested in a folding storage bin and include stacking instructions.
- Minimalist Concrete Top with Portable Base
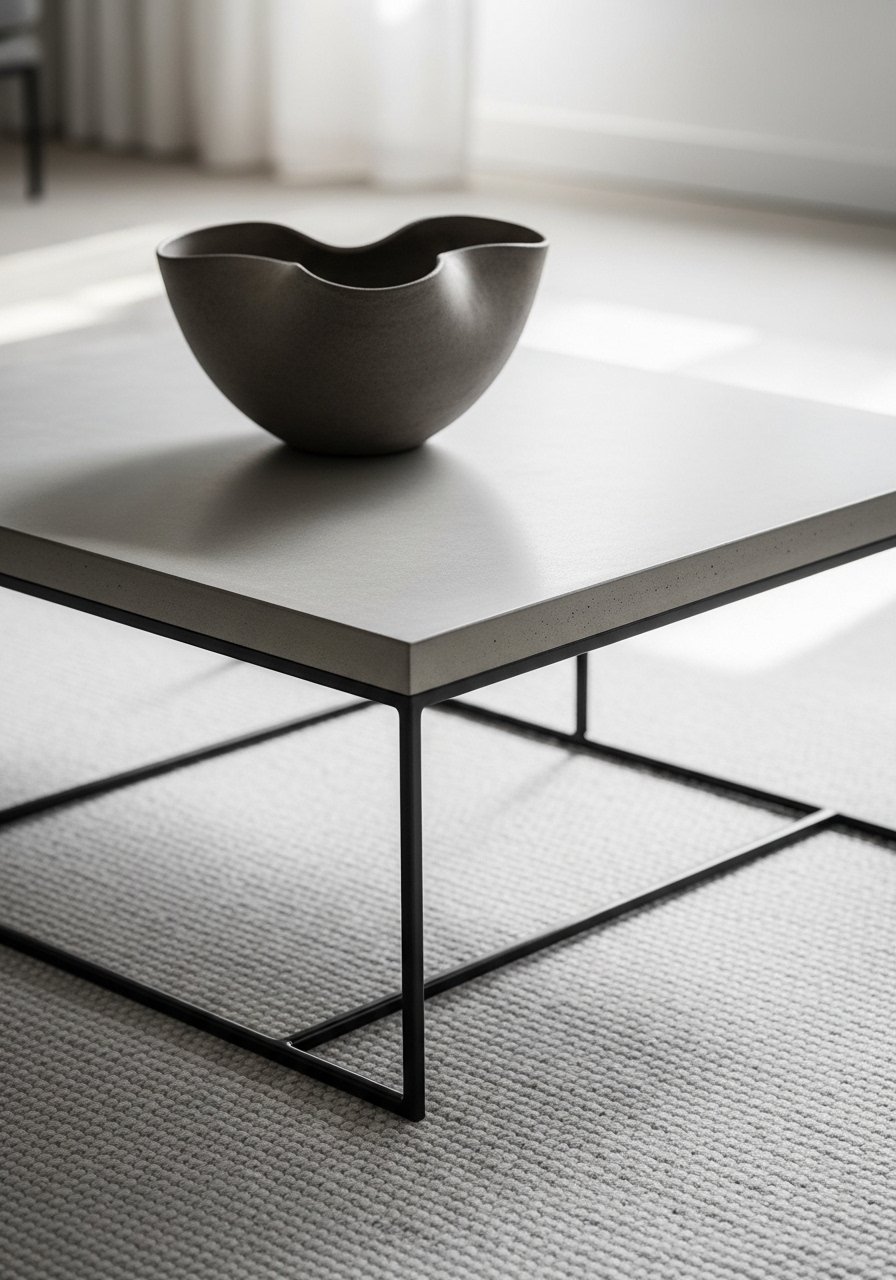
A thin concrete top gives an industrial edge without crushing your floor. Use a lightweight fiber-reinforced concrete mix for strength and less weight—ideal for renters.
Materials
- 1 silicone mold for 22" x 12" slab
- 1 small bag fiber-reinforced concrete mix, single batch (approx 10 lbs)
- 1 sealant for concrete, 8 oz
- 1 lightweight metal base, 14" height
- 1 disposable mixing bucket
- Gloves and safety mask
- Sanding block 220 grit
Instructions
- Mix concrete per package; pour into mold and vibrate to remove air bubbles.
- Let set 24–48 hours; demold after 48 hours.
- Sand edges lightly and seal both sides with concrete sealer. Dry 6 hours.
- Attach metal base with bolts per base instructions.
- Allow full cure 7 days for best hardness before heavy use.
- Check underside for any rough casting and sand if needed.
How to Display or Gift It
Pair with a soft rug to warm the industrial feel. If gifting, include care instructions about sealing and avoiding spills. Use a small dolly to move safely.
- Slim Ladder Leg Coffee Table with Thrifted Top
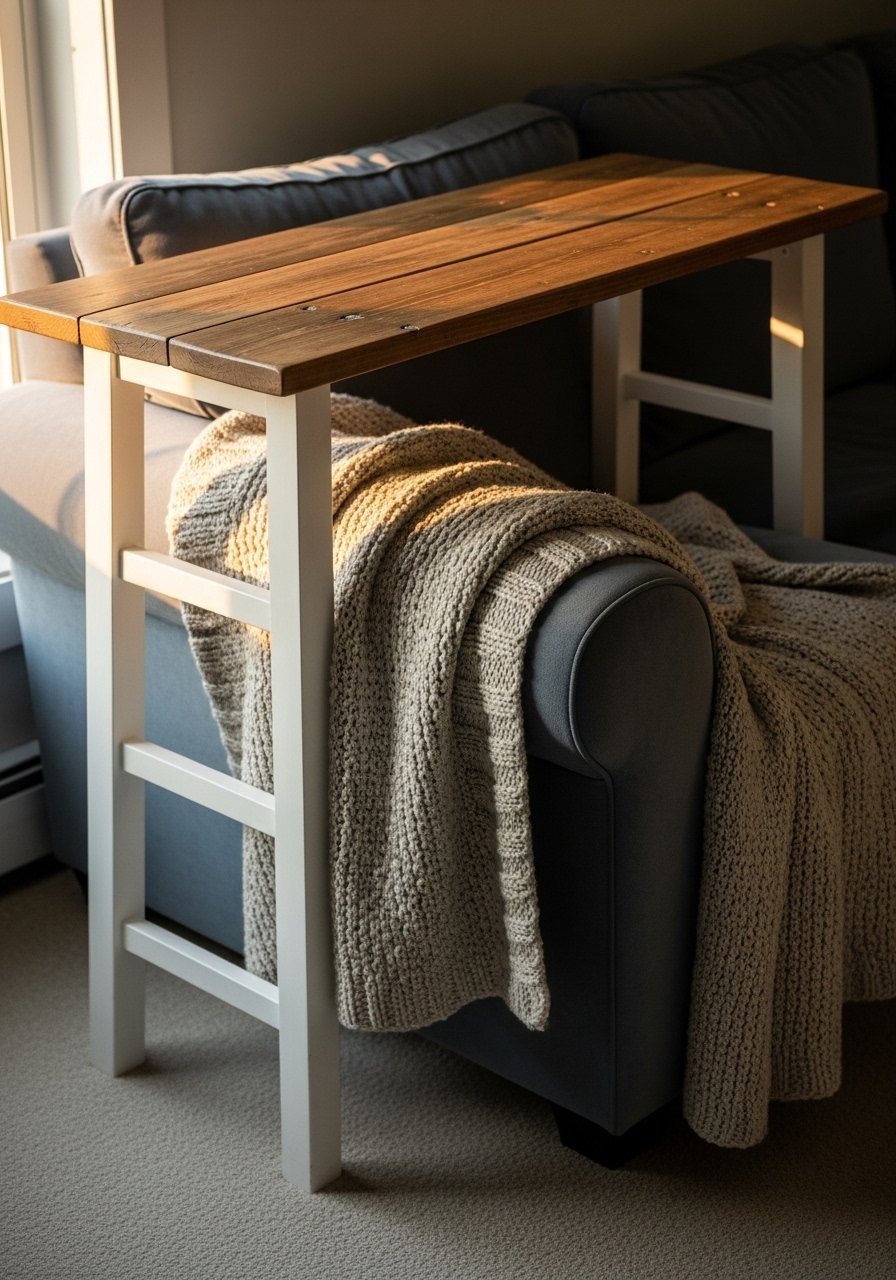
Use a thrift-store tabletop and give it new life with painted ladder legs. The slender profile keeps the room airy. This project focuses on budget-friendly salvage with clean finishes.
Materials
- 1 salvaged wood board, 36" x 10" x 3/4"
- 2 painted ladder legs (cut to 16")
- 1 can chalk paint, 8 oz
- 1 jar clear wax
- Sandpaper 120, 220
- Wood screws and drill
- Furniture pads
Instructions
- Clean and sand the thrifted board. Remove nails or staples.
- Paint ladder legs with chalk paint; dry 1 hour between coats.
- Wax legs and board for a soft sheen.
- Attach legs to board using screws from underside.
- Add furniture pads to protect floors.
- Let wax cure 24 hours.
How to Display or Gift It
Works as a narrow coffee table or sofa-side console. For gifting, include a small jar of finish in a gift box.
- Mosaic Tile Tray Table (No-Glue Tile Option)
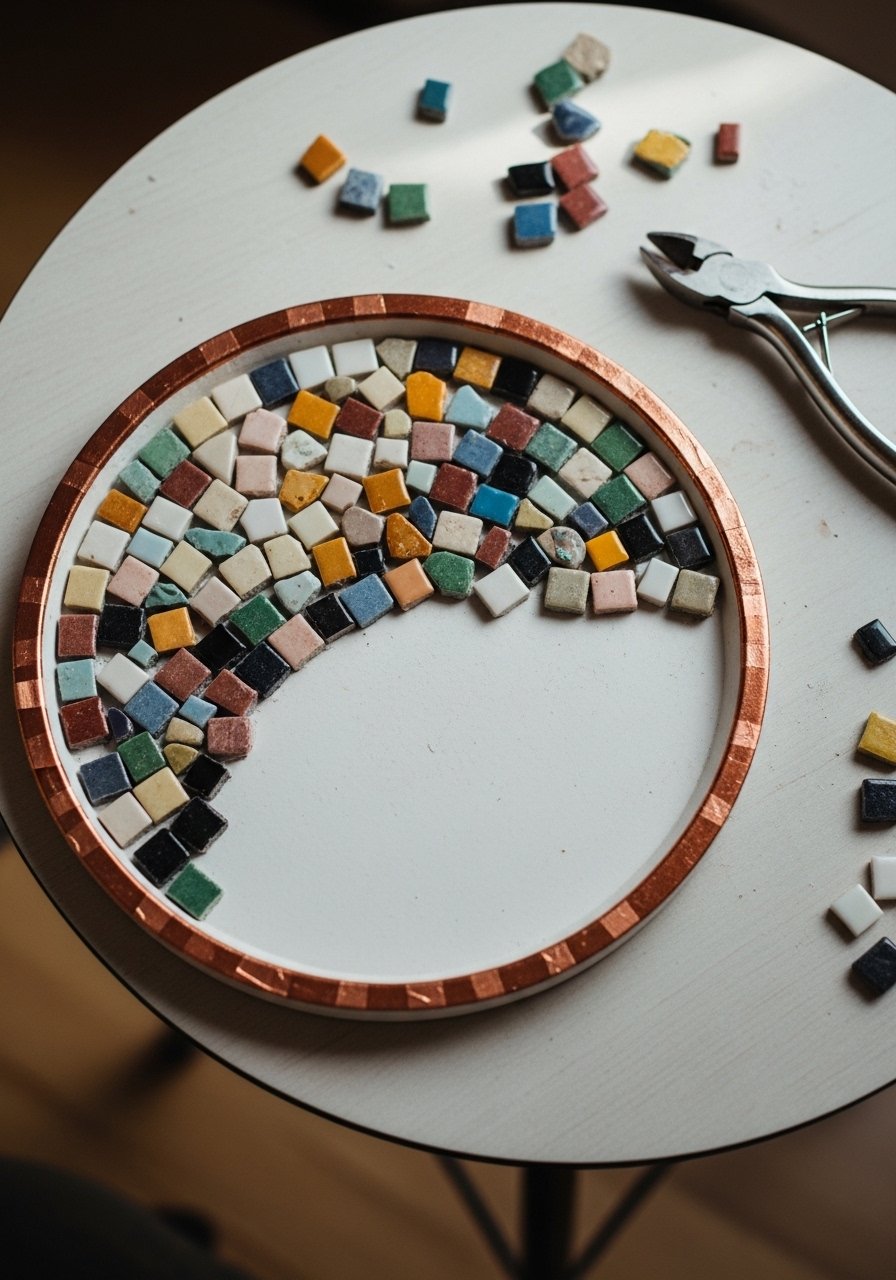
Create a mosaic surface without gluing tiles to allow tile swaps. Use copper tape to secure tiles to a removable tray insert. Texture is tactile and slightly uneven—charming for boho rooms.
Materials
- 1 wooden tray, 20" x 12"
- 1 pack loose mosaic tiles (approx 200 small pieces)
- 1 roll copper foil tape, 1/4"
- Tile nippers
- Grout (optional, small packet)
- Rubber mallet
- Soft cloth
Instructions
- Arrange tiles on tray in desired pattern.
- Use copper foil tape beneath tiles’ edges to hold them in place.
- Optionally grout and wipe clean; dry 24 hours.
- Add felt pads to tray bottom.
- For swapping tiles later, remove copper foil and reseal.
- Polish with a soft cloth.
How to Display or Gift It
Use as a decorative serving tray or tabletop. Pack with extra tiles in a small craft organizer for gift-giving.
- Foldable Crate + Hairpin Leg Hybrid

A foldable crate on hairpin legs gives instant tabletop and storage. This ultra-light option is great for renters who rearrange often and need quick assembly.
Materials
- 1 foldable plastic crate, 24" x 16"
- 4 12" hairpin legs
- 4 corner brackets
- Screws for plastic
- 1 round rattan tray, 16"
- Drill with plastic bit
Instructions
- Unfold crate and position hairpin legs inside edges.
- Secure legs with corner brackets and screws rated for plastic.
- Add rattan tray to create flat, stylish top.
- Test stability before placing heavy items.
- For outdoor use, rinse crate and dry thoroughly.
- Store folded if you need the floor space.
How to Display or Gift It
Top with a plant and candle cluster. For gifting, pack flat with assembly instructions and a small screwdriver set.
- Painted Chevron Stacking Table Set (Nested)
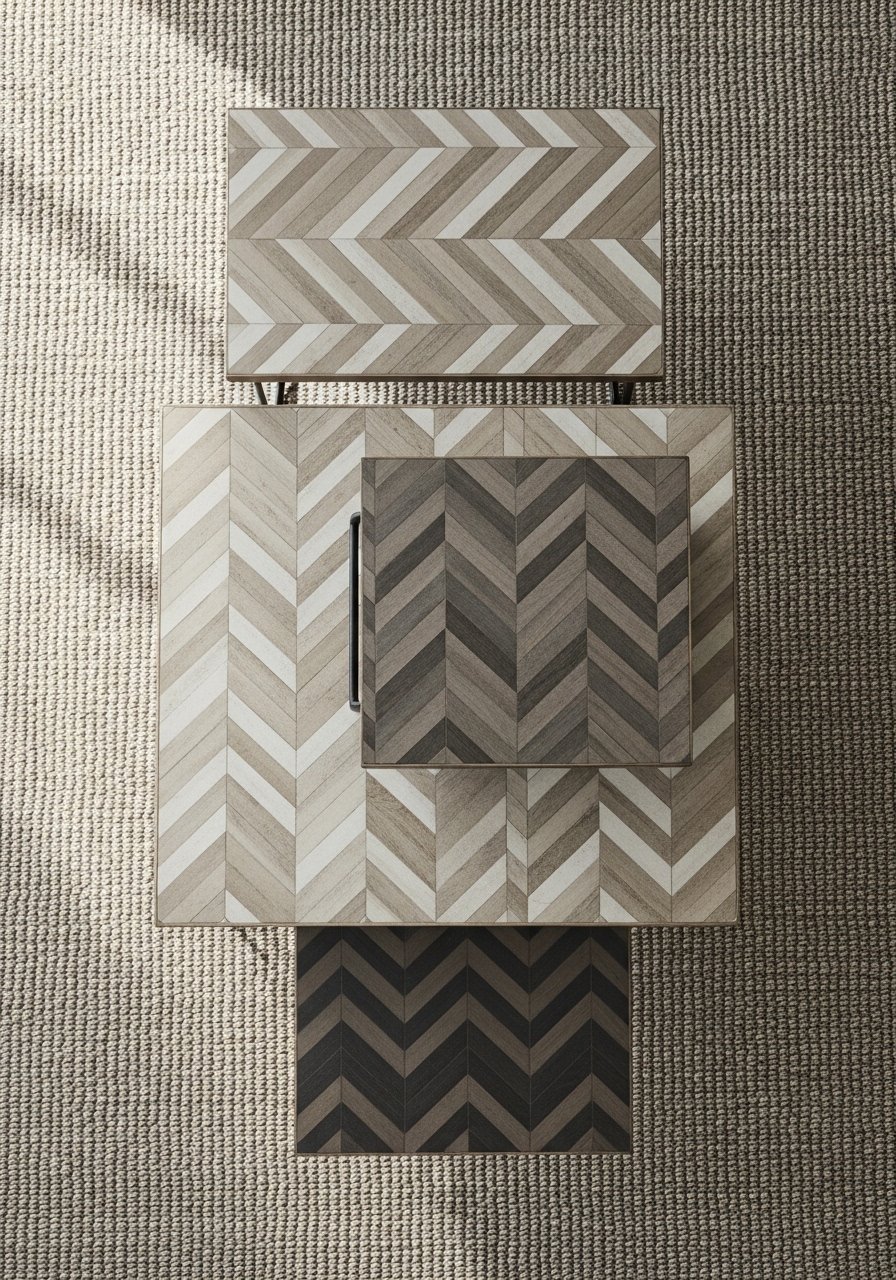
Nested tables are the ultimate flexible solution—spread them for guests, stack them for simplicity. Chevron paint adds a modern, textural feel.
Materials
- 3 wooden nesting table tops, sizes 20", 16", 12" diameter
- 1 chevron stencil roll
- Acrylic paints (2 colors)
- Foam brushes
- Clear matte sealer
- Sandpaper 220
- Painter’s tape
Instructions
- Sand and prime table tops.
- Apply chevron stencil and paint in alternating colors; dry 20–30 minutes between coats.
- Remove stencil while paint is tacky for crisp edges.
- Seal with two coats matte sealer; dry 2 hours between.
- Reattach bases and test nesting fit.
- Let final cure 24 hours.
How to Display or Gift It
Keeps a compact footprint and suits modern or farmhouse themes. Wrap in kraft paper and include touch-up paint in a small mason jar for gifting.
- Upcycled Drum Coffee Table with Fabric Wrap
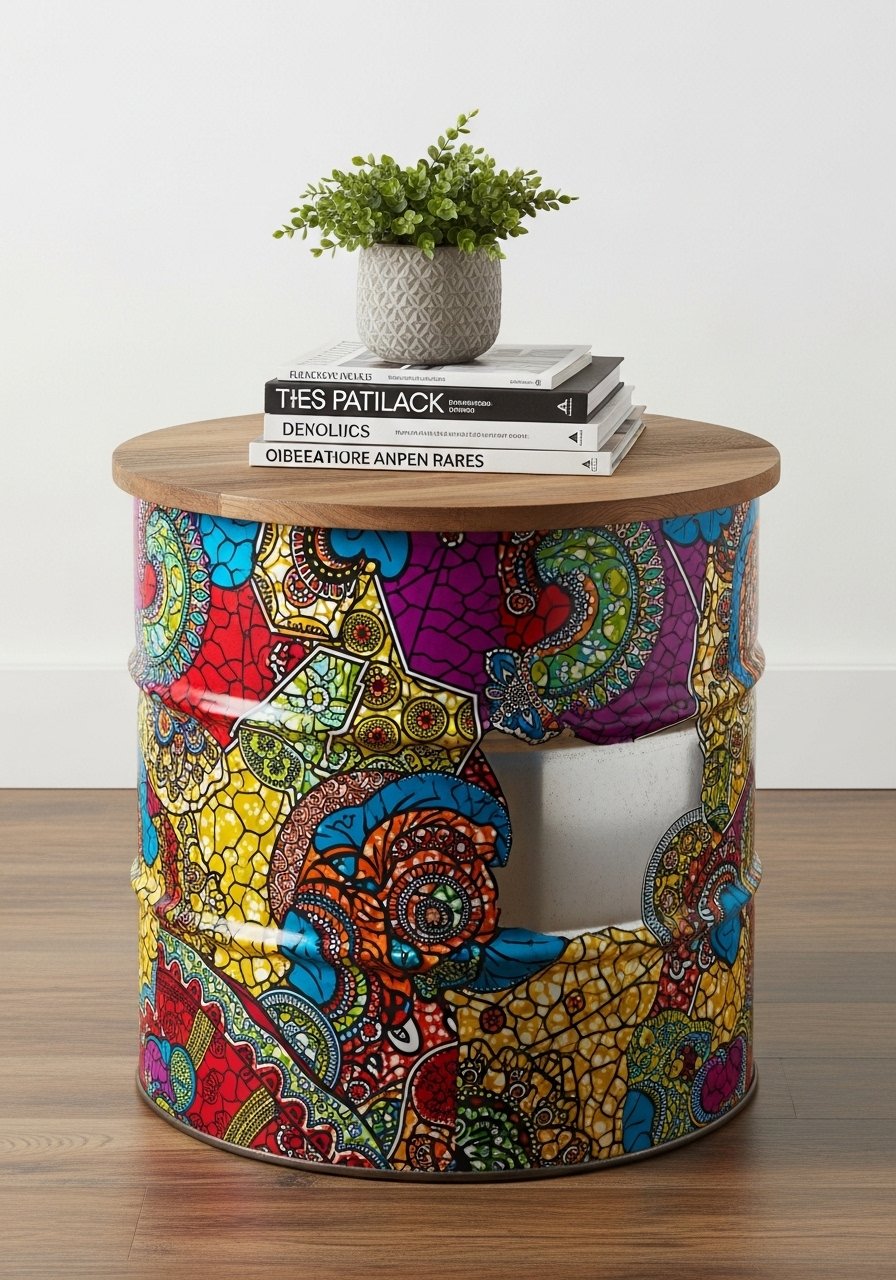
Turn an empty drum into a statement table with fabric wrapped around it and a wooden top. The fabric offers endless style options—from boho prints to cottage florals.
Materials
- 1 clean metal drum (recycled)
- 1 plywood round top, 20" diameter
- 1 yard upholstery fabric
- Staple gun with 1/4" staples
- Sandpaper 120
- Clear topcoat for wooden top
- Adhesive (spray or fabric glue)
Instructions
- Clean and sand drum exterior to remove rust.
- Stretch fabric around drum and staple seam inside.
- Attach plywood round with screws into top lip (pre-drill).
- Seal wooden top with two coats of clear topcoat; dry 2–4 hours between coats.
- Add felt pads under drum to protect floors.
- Check fabric tension after 24 hours and retighten staples if needed.
How to Display or Gift It
This piece works well in eclectic or boho rooms. For gifting, fold fabric and include leftover scraps in a fabric storage pouch.
- Painted Rope-Wrapped Coffee Table (Round)
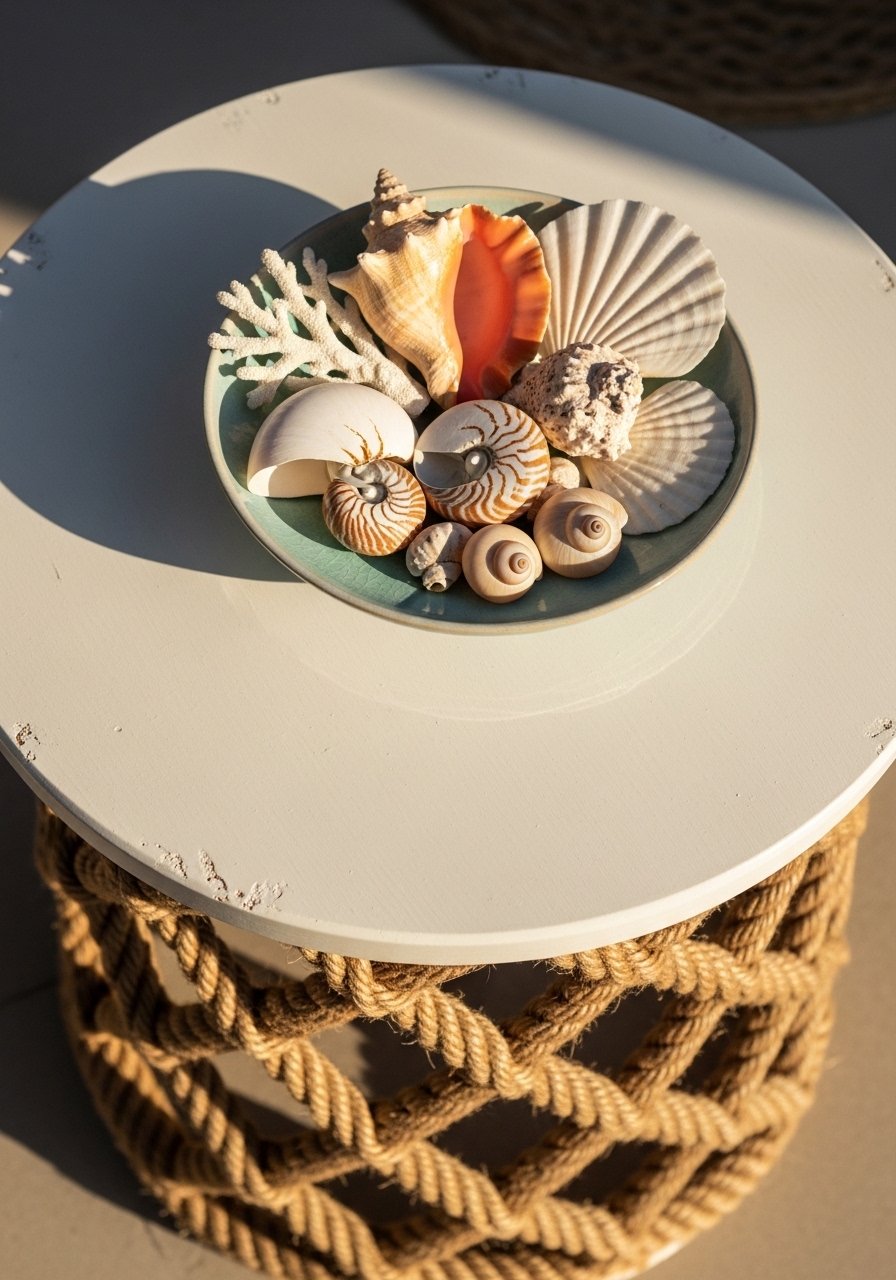
Jute rope gives a coastal, tactile look and hides imperfections on thrifted bases. The painted top keeps it fresh and bright.
Materials
- 1 small round tabletop, 18"
- 1 spool 3mm jute rope, 25 yards
- Hot glue sticks, 20 count
- Hot glue gun
- White chalk paint, 8 oz
- Clear matte finish, 8 oz
- Scissors
Instructions
- Paint tabletop with two coats chalk paint. Dry 30 minutes between coats.
- Starting at base, wrap jute rope and secure every 6 inches with hot glue.
- Continue wrapping until desired height is reached.
- Trim and tuck end under last wrap; glue securely.
- Attach tabletop to base. Let hot glue set 10 minutes.
- Seal painted top with matte finish; dry 2–4 hours.
How to Display or Gift It
Pairs with coastal or cottage decor; add a small woven tray on top. Gift with a spool of jute and a mini hot glue gun.
- Tile Inlay Vintage Door Coffee Table
Repurpose an old door as a tabletop and add a tile inlay for pattern and durability. The surface feels solid and lived-in.
Materials
- 1 reclaimed vintage door cut to length, 36" x 18"
- Tile pack for inlay (approx 1 sq ft)
- Thin-set mortar, small bag
- Grout, small packet
- 4 adjustable steel legs, 14" height
- Tile cutter
- Sponge and bucket
Instructions
- Cut and sand door to desired length, remove hardware.
- Create a recess for tile with router or chisel.
- Mix thin-set and bed tiles into recess; set and level.
- After 24 hours, grout tiles and wipe clean. Let grout cure 48 hours.
- Attach legs and add felt pads.
- Seal wooden areas with clear finish; dry 2–4 hours between coats.
How to Display or Gift It
A rustic focal point that fits farmhouse style. For gifting, include a tiny grout tool and a tile care kit.
- Convertible Cranked Coffee Table (Height Adjustable)
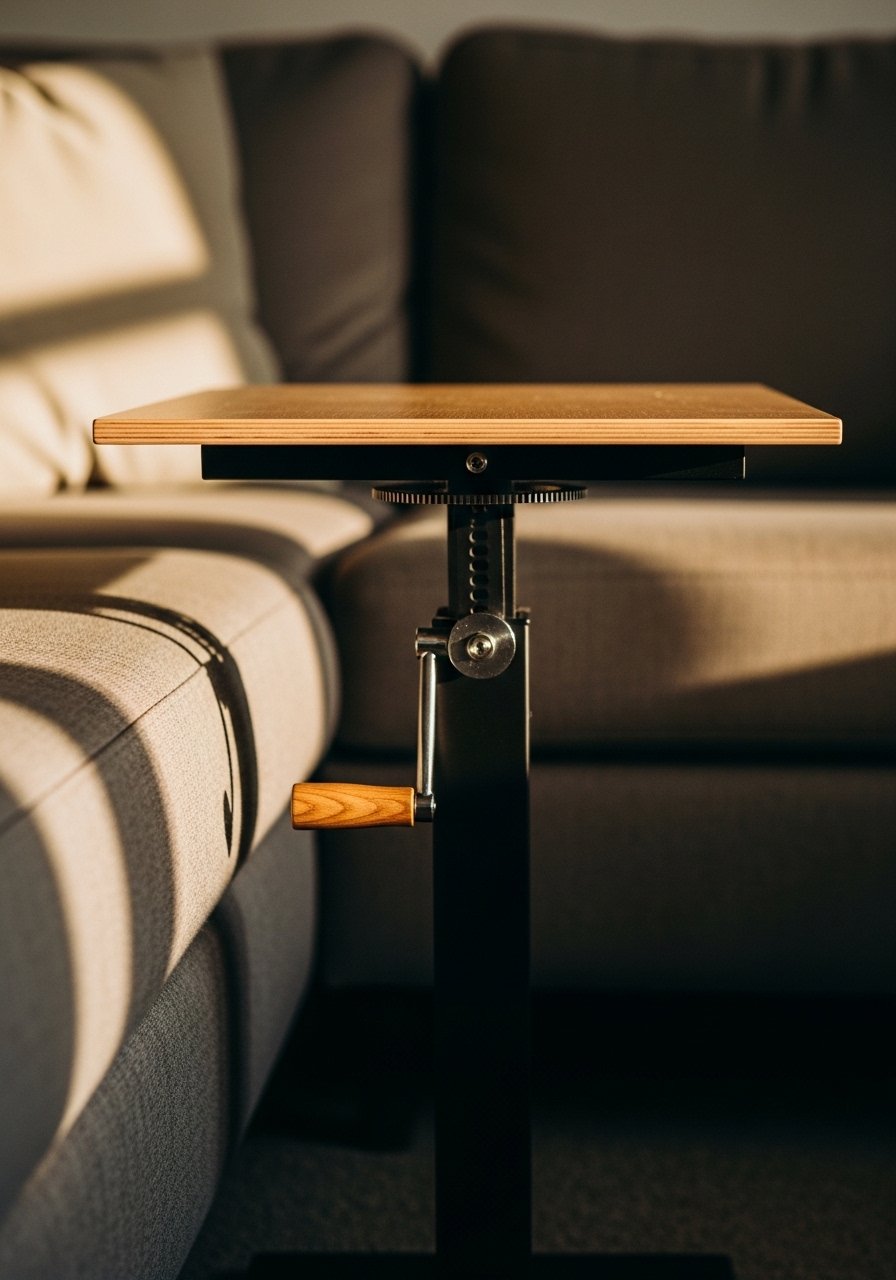
This height-adjustable table gives versatility—low for lounging, higher for working. The crank mechanism is simple to install and renter-friendly when anchored to the table top only.
Materials
- 1 tabletop, 30" x 16"
- 1 tabletop crank lift mechanism (small)
- 2 metal support rails
- Screws and bolts
- Drill
- Clear finish
- Small wrench
Instructions
- Attach lift mechanism to underside of tabletop per manufacturer instructions.
- Secure metal rails and test crank motion.
- Seal tabletop surface with one coat of finish; dry 2 hours.
- Test full range of motion several times and tighten bolts.
- Add non-slip pads to protect the floor.
- Allow mechanism to settle for 12 hours before heavy loads.
How to Display or Gift It
Works great as a laptop surface turned coffee table. For gifting, include an instruction card and a compact tool kit.
- Macramé-Topped Low Coffee Table
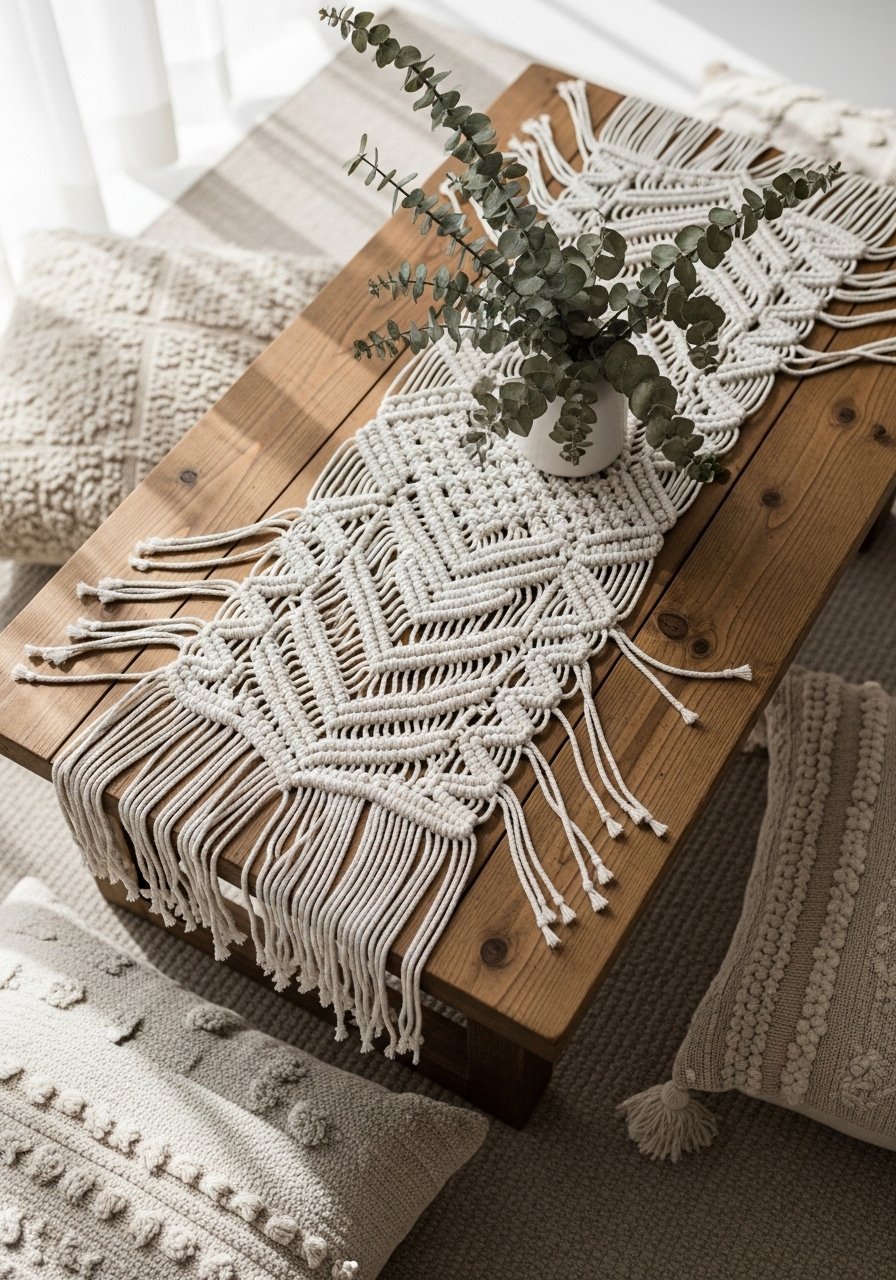
Add a boho macramé topper that lifts a plain tabletop and is removable for washing. The macramé adds soft texture and a handmade feel.
Materials
- 3mm single-strand macramé cord, 50 feet
- Wooden dowel, 24" (for weaving if desired)
- Wooden tabletop, 24" x 16"
- Scissors
- Measuring tape
- Comb for fringe
- Fabric glue (optional for ends)
Instructions
- Cut cords to desired lengths (usually 8 ft each for fringe).
- Use square knots and alternating knots to create pattern until topper fits table width.
- Trim fringe and comb for tidy ends.
- If desired, attach topper to dowel for easy hanging or removable cover.
- Place topper on tabletop; remove for washing with gentle hand-wash.
- For stubborn fray, use fabric glue sparingly on knots.
How to Display or Gift It
Use as a layer over a painted or stained top. Pack folded topper in a gift tissue bundle for gifting.
- Bamboo Folding Coffee Tray with Leather Handles
This lightweight bamboo tray is a chic, renter-friendly coffee table option. Leather handles add a touch of craft-market polish and feel lovely in the hand.
Materials
- 1 bamboo tray kit, 24" x 14"
- 2 leather strap handles, 8" each
- Leather screws or rivets
- Leather punch
- Wood finish oil, 2 oz
- Screwdriver or rivet setter
Instructions
- Assemble tray per kit instructions.
- Oil bamboo with finish oil; wipe excess. Dry 1–2 hours.
- Mark and punch holes for leather handles.
- Attach handles with rivets or screws.
- Let hardware set 24 hours before heavy carrying.
- Maintain by re-oiling once every 6 months.
How to Display or Gift It
Use as a portable coffee surface or serving tray. For gifting, pair with a tea sampler in a kraft gift box.
- Foldaway Lap Desk Coffee Table (Multifunction)
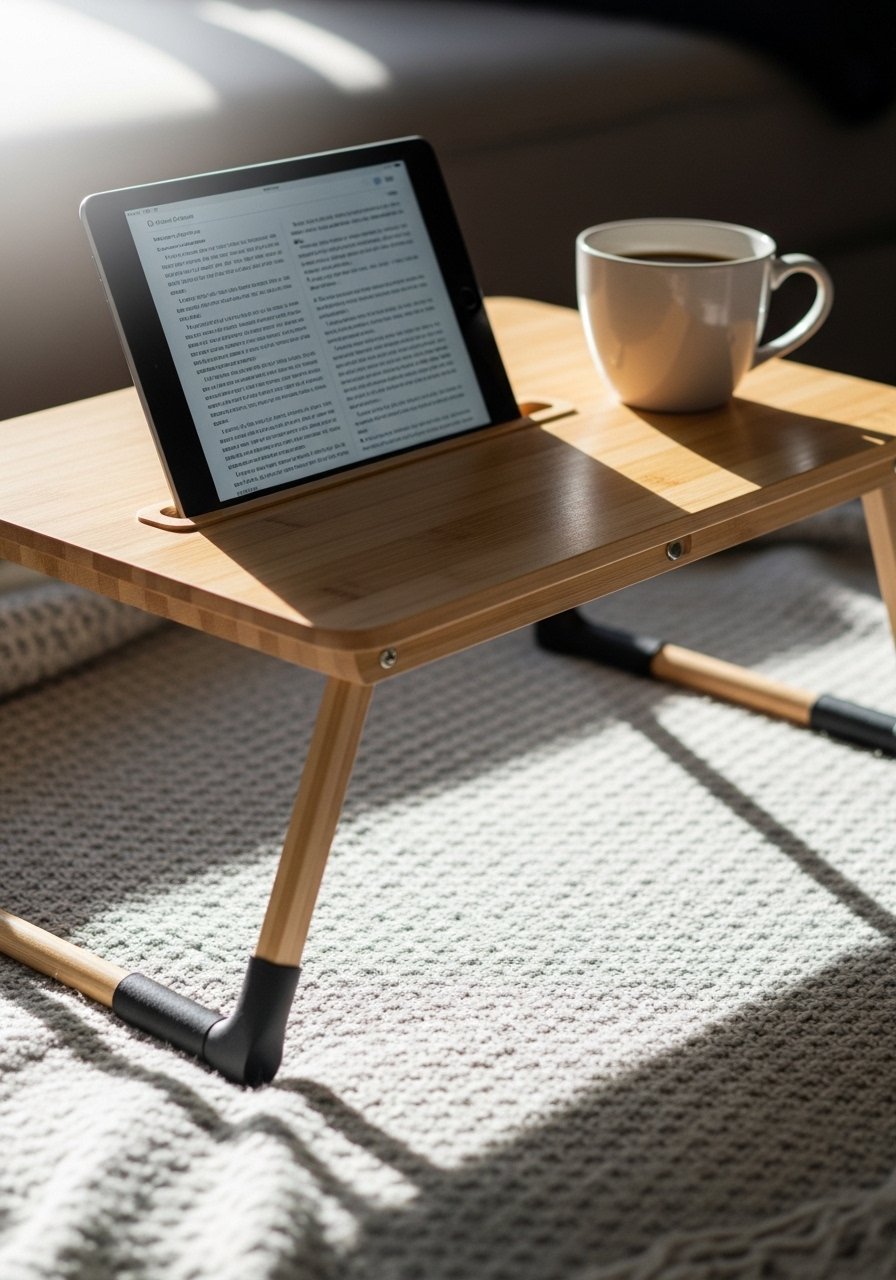
This compact lap-desk/coffee table hybrid works on the floor or on a couch. The angled legs fold flat for storage, making it ideal for renters and students.
Materials
- 1 poplar board top, 18" x 12"
- 2 hinged folding legs (pre-made)
- 1 small tablet slot cutout (1" x 6")
- Wood stain (light oak)
- Clear matte topcoat
- Screws and hinge hardware
- Sandpaper 220
Instructions
- Cut slot for tablet and sand edges smooth.
- Stain top; dry 4–6 hours.
- Attach folding legs with hinges; test folding.
- Apply two coats of topcoat; dry 2 hours between.
- Check for wobble and tighten screws as needed.
- Store flat under a bed or couch when not in use.
How to Display or Gift It
Works great for breakfast in bed or movie nights. Pack in a canvas storage sleeve for gifting.
You made it to the end—21 renter-friendly, compact DIY coffee table ideas for apartments that cover every style from cottagecore to japandi. Try a quick project this weekend or pin three to save for later. Which design will you make first—a foldable tray, a resin geode accent, or a stacked crate table? Share a photo with a friend or gift one of these pieces to someone moving into a new apartment. Trust me, picking up a temperature-controlled hot glue gun changed how smoothly many of these projects go — fewer strings, better bonds, and fewer burns.


