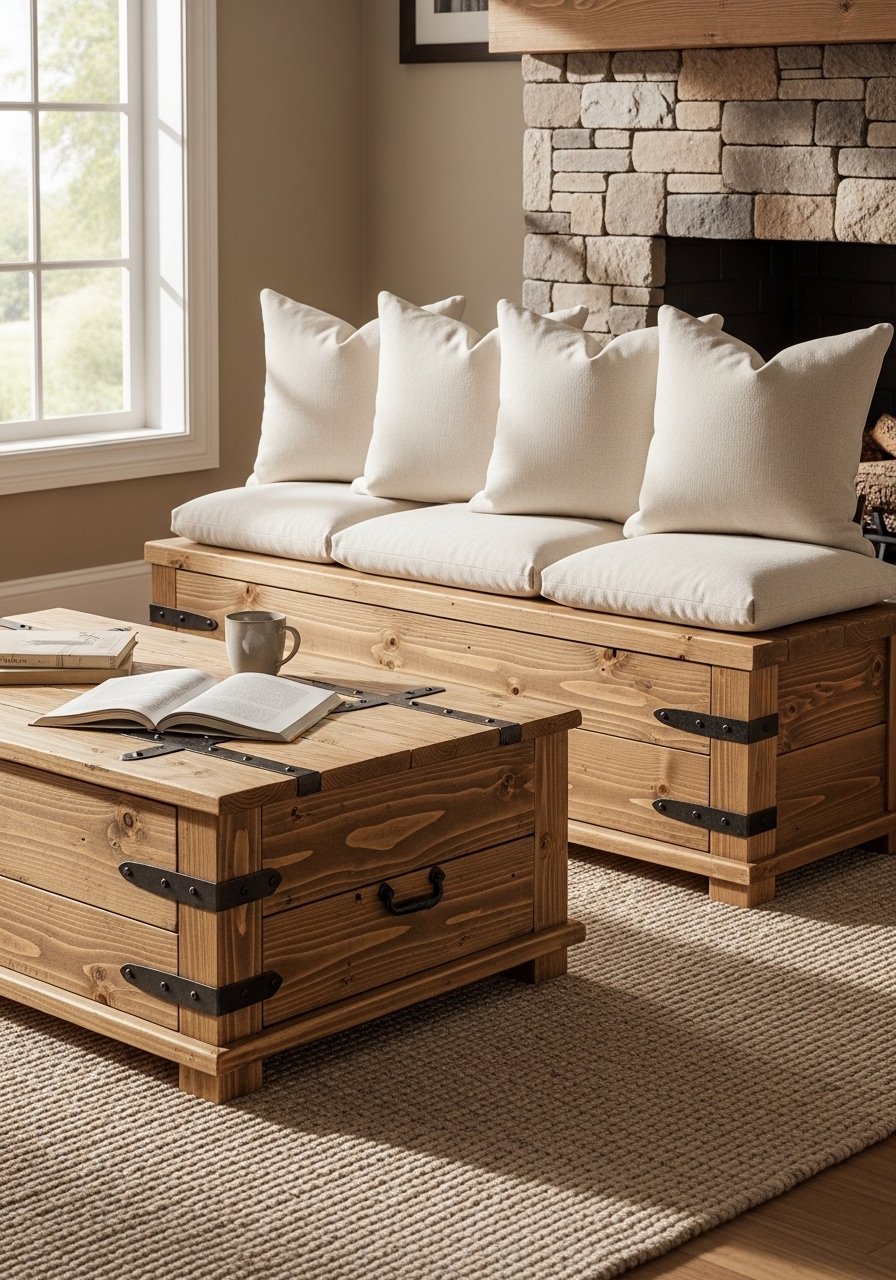
You love a room that feels lived-in and calm. These 29 DIY coffee table ideas with wood are for exactly that: warm, natural pieces you can build at home. Whether you like cottagecore charm, Japandi minimalism, boho texture, or farmhouse comfort, there’s a wood project here that fits your style and skill level.
You’ll find step-by-step builds that use common lumber, basic power tools, and approachable finishes. I often reach for my Cricut Explore cutting machine for stenciling accents, and a good hot glue gun speeds many small assembly steps. Each project lists exact materials, drying times, and troubleshooting tips so your table comes out looking finished and refined.
Save this post on Pinterest and pin the projects you love. Ready to build something warm, wooden, and uniquely yours? Let’s get into 29 gorgeous DIY coffee table ideas with wood you’ll actually want in your living room.
- Live-Edge Slab Coffee Table
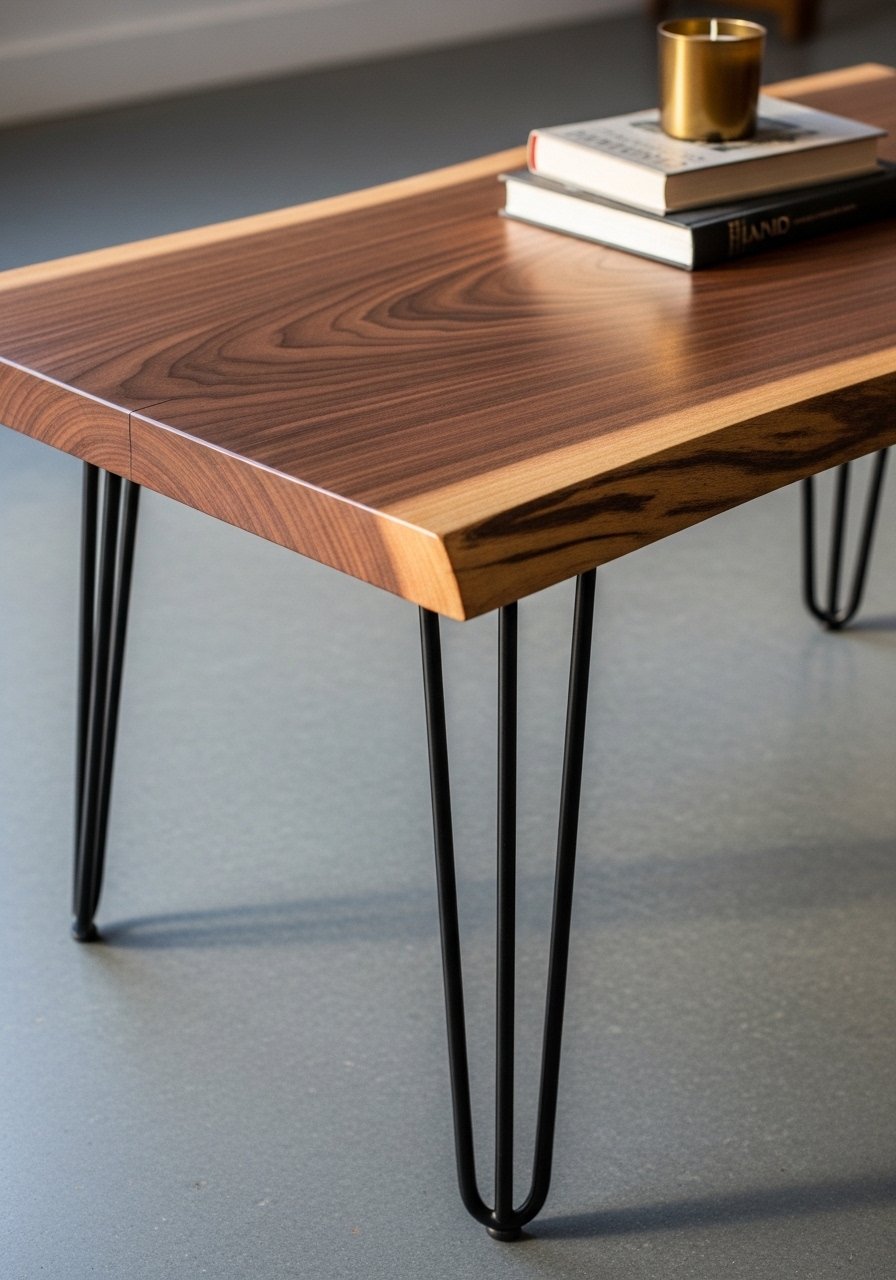
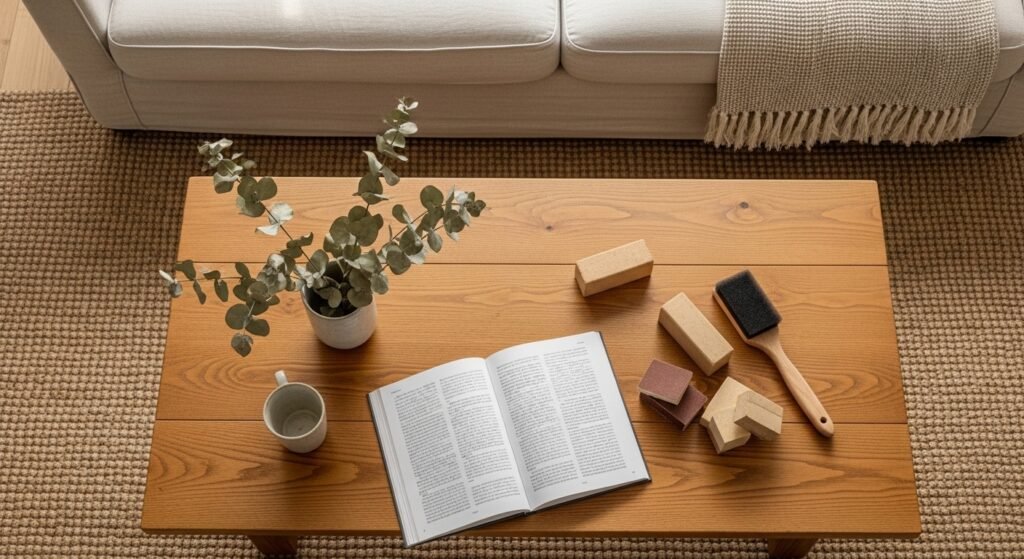
This design celebrates natural wood edges and grain. The slab feels organic and luxe—perfect for a Japandi or rustic living room. It’s a one-board hero piece, heavy in texture and smooth to the touch after finishing. Beginners can do this with basic sanding and a clear finish.
Materials
- 1 walnut live-edge slab, 36–48" long x 16–22" wide x 1.5–2" thick
- 2 steel hairpin legs, 8"–12" height
- 1 120–220 grit sanding block set
- 1 quart satin polyurethane (water-based)
- 1 foam brush
- 4 stainless steel wood screws, 1"
- Masking tape, small quantity
Instructions
- Inspect slab for cracks; fill any gaps with epoxy if needed (see troubleshooting).
- Clamp slab flat on sawhorses; sand from 120 → 180 → 220 grit for a smooth surface.
- Wipe dust with tack cloth; let sit 10 minutes.
- Apply one thin coat of satin polyurethane with a foam brush. Wait 2 hours.
- Lightly sand with 220 grit between coats. Apply 2 more coats, total 3 coats, 2 hours dry between.
- Mark leg positions near each end; pre-drill holes and attach hairpin legs with 1" screws.
- Check stability and sit the table upright. Cure fully 48 hours before heavy use.
How to Display or Gift It
- Put the slab on a natural fiber rug and add a ceramic tray for drinks.
- A small plant or dried grasses emphasize the organic edge.
- If you gift, wrap in kraft paper and add twine. For storage, keep flat in a climate-controlled space.
- A small set of furniture pads protects floors when moving.
- Reclaimed Pallet Plank Coffee Table (Farmhouse)
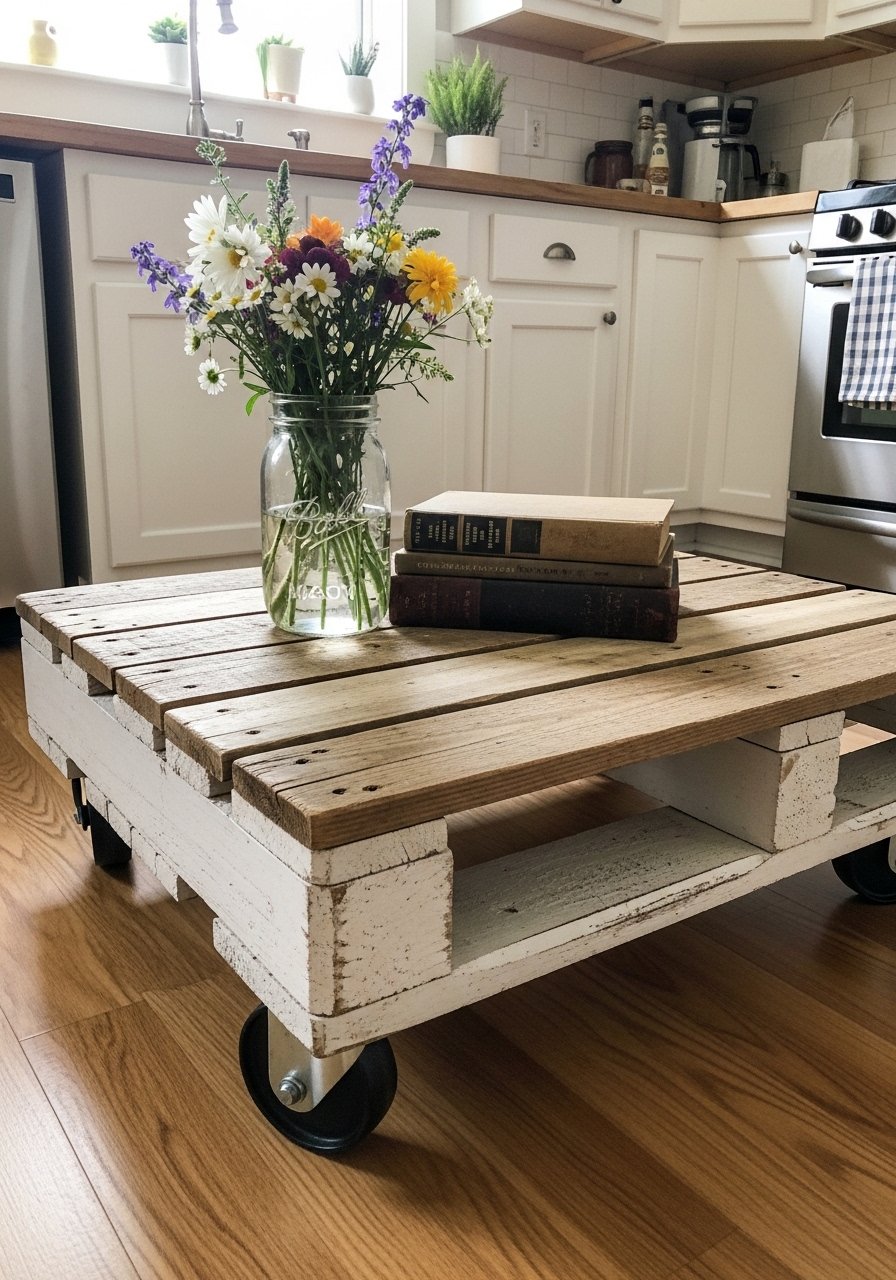
Pallet wood gives that cozy farmhouse vibe and a slightly rough texture. This is budget-friendly and huge on character. Wheels make it practical for small spaces. You’ll need a couple of simple power tools and patience for cleaning and prep.
Materials
- 6–8 pallet planks, 36" x 4" nominal each (or cut to fit 36" x 18" top)
- 2 2x4s, 36" (frame supports)
- 4 caster wheels (2 locking)
- 1 12 oz wood filler tube
- 1 can chalk-style paint (sample size, 8 oz)
- 1 jar of clear wax or sealant, 8 oz
- 1 palm sander, sandpaper 80–120 grit
- Wood screws: 1¼" and 2½"
- Safety gloves and mask
Instructions
- Take apart pallets carefully and remove nails. Treat wood with a wire brush and soapy water; let dry 24 hours.
- Cut planks to top size 36" x 18". Lay them tight and clamp.
- Screw 2×4 supports across the bottom, flush with edges.
- Fill holes with wood filler; sand 120 grit once dry.
- Paint the frame lightly with chalk-style paint for that farmhouse finish; wipe off excess.
- Apply clear wax or sealer over the planks to protect from spills. Let cure 24 hours.
- Attach caster wheels to underside corners with 2½" screws. Test locking casters.
How to Display or Gift It
- Style with a woven tray and enamelware mugs.
- Use mason jars with fresh garden herbs as a casual centerpiece.
- If gifting, include a small bottle of furniture wax in a kraft bag.
- Store disassembled until the recipient is ready; keep in a dry shed.
- Mid-Century Plywood Hairpin Coffee Table (keyword in title)
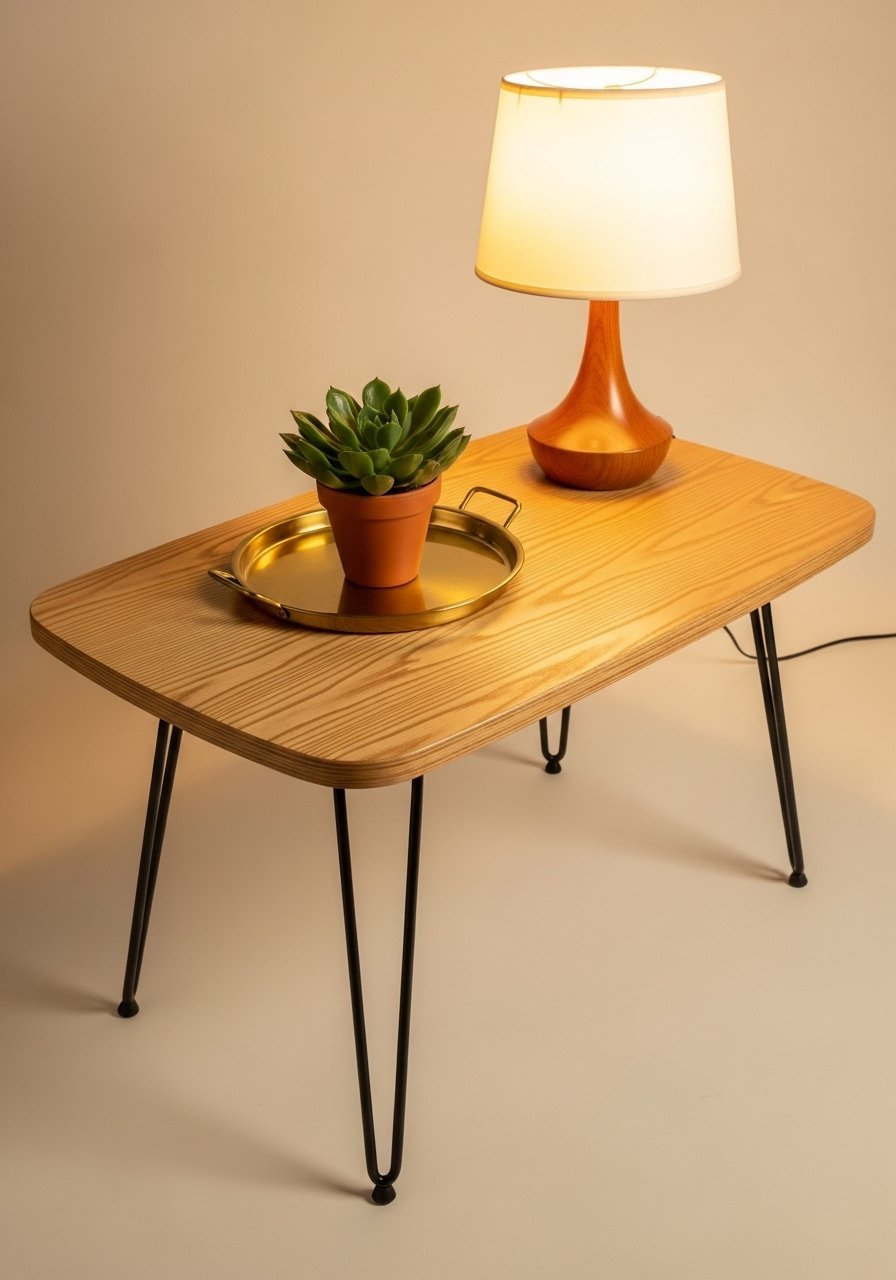
This sleek, lightweight table nods to mid-century style with warm veneer and narrow legs. The plywood edges and rounded corners feel smooth under your hands. Good for small apartments and quick builds.
Materials
- 1 sheet birch plywood, ¾" x 24" x 48"
- 4 12" hairpin legs
- 1 router with round-over bit
- 1 orbital sander, sandpaper 120–220 grit
- 1 can of clear matte lacquer, 16 oz
- 1 foam brush and lint-free cloths
- Wood glue and clamps
- Drill and screws (1" wood screws)
Instructions
- Draw top shape on plywood (e.g., 36" x 20" with rounded corners) and cut on jigsaw.
- Route edges with 1/8" round-over bit for smooth touch.
- Sand progressively 120 → 220 until silky.
- Apply 2 thin coats of matte lacquer; dry 2 hours between. Total cure 24 hours.
- Attach hairpin legs using pre-drilled holes and 1" screws.
- Let hardware set 1 hour before moving.
How to Display or Gift It
- Pair with a wool throw and a textured ceramic vase.
- For gifting, pack tabletop in a flat box with corner protectors.
- Store flat to avoid warping; use a humidity-controlled room.
- A small tray keeps keys and remotes organized.
- Parquet Inlay Coffee Table (keyword in title)
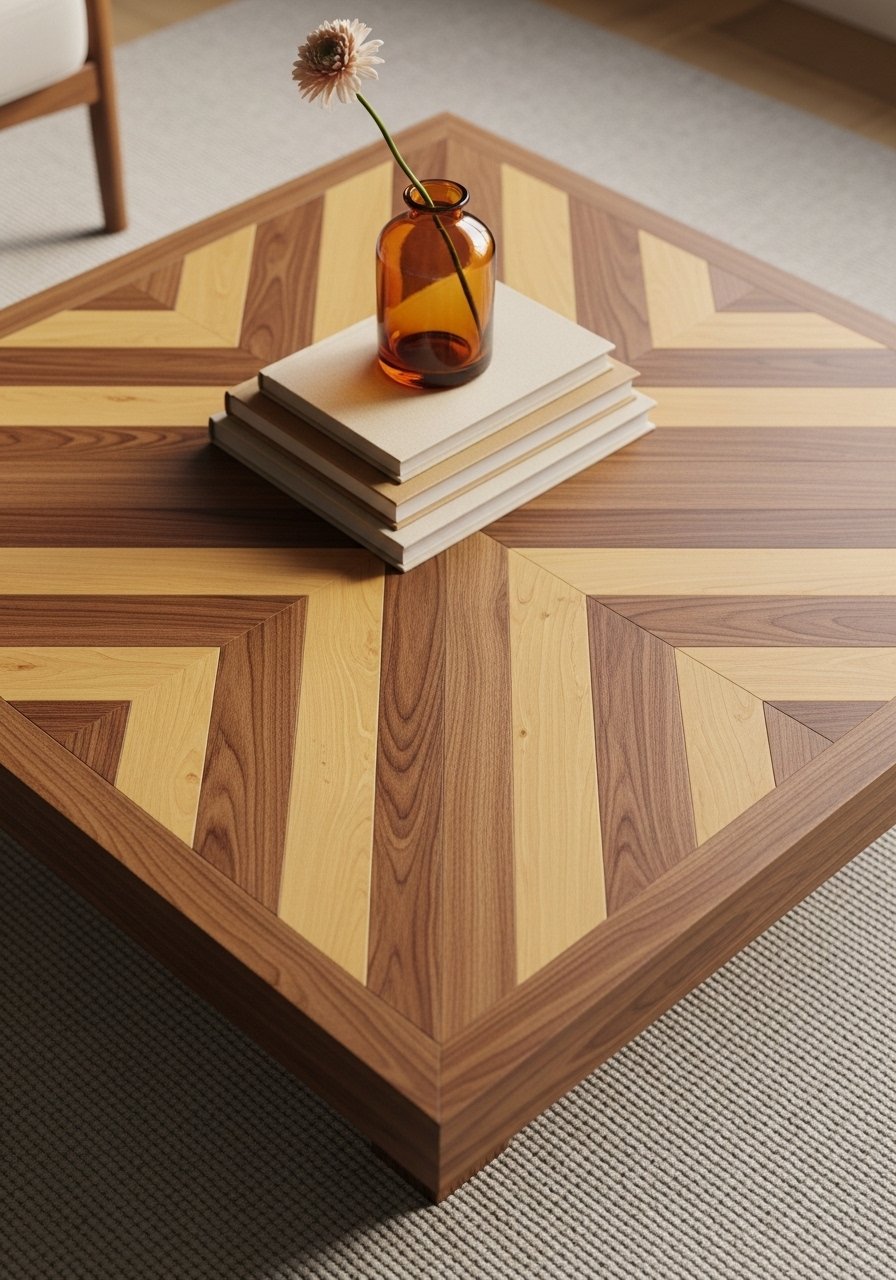
Parquet inlay gives a handcrafted, furniture-shop look with tidy geometric grain. This project is satisfying if you like precise measuring and small pieces. The table looks rich, with a tactile, patterned surface.
Materials
- 1 pine plywood base, ¾" x 24" x 24"
- Parquet veneer strips (assorted wood tones) or cut solid wood strips ½" x 24"
- 1 bottle wood glue, 8 oz
- 1 trim router or precision saw
- 1 sanding block (120–220 grit)
- 1 clear epoxy wood finish, 16 oz
- Painter’s tape
- 4 metal leg brackets (if attaching pre-made legs)
Instructions
- Cut veneer or strips into 1" width pieces; lay out pattern on plywood before gluing.
- Start in the center and glue strips, pressing firmly; use painter’s tape to hold seams while drying.
- Let glue set 12 hours. Sand flush with 220 grit.
- Apply clear epoxy finish in 2 coats, allow 24 hours cure between coats. Use a heat gun for bubbles over each coat.
- Attach legs via brackets and pre-drill holes.
- Full epoxy cure 72 hours before heavy use.
How to Display or Gift It
- Use brass or tapered wooden legs for a mid-century look.
- Keep a felt pad set for the bottom to protect floors.
- Gift in a shallow box with silk tissue and a printed care card.
- Make-ahead: create multiple small veneer panels and assemble later.
- Crate Box Storage Coffee Table (boho)

Crates create lots of storage and a casual boho vibe. The rough texture is charming—sanded but not perfectly smooth. This is great for renters and craft rooms.
Materials
- 4 wooden fruit crates, 12" x 16" each
- Wood stain, 8 oz (warm oak)
- 1 small paintbrush and rag
- Wood screws, 1¼"
- Sandpaper 120 grit
- 4 caster wheels (optional)
- Felt pads for feet
Instructions
- Sand crates lightly and wipe dust.
- Stain crates with rag; let penetrate 5–10 minutes, wipe off, dry 6 hours.
- Stack two crates per side facing in or out depending on desired look; secure with screws through ends.
- Attach casters on underside if you want mobility.
- Let finish cure 24 hours before loading with decor.
- Add felt pads if leaving static to protect flooring.
How to Display or Gift It
- Fill cubbies with baskets, vintage books, or woven blankets.
- Wrap as a gift with ribbon and tuck a small plant inside.
- For storage, stack unassembled crates flat and keep in a dry room.
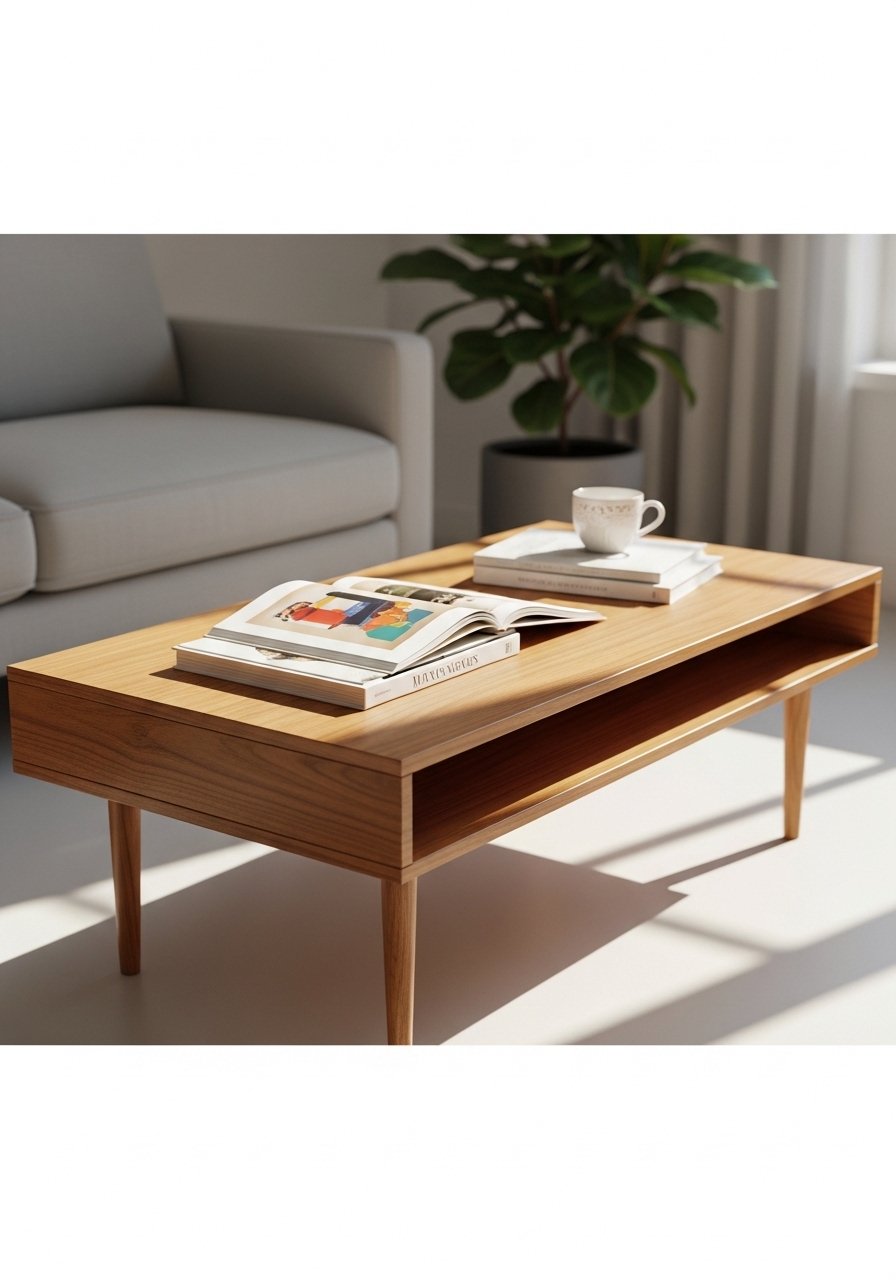
- Mid-Century Box Frame Coffee Table with Shelf
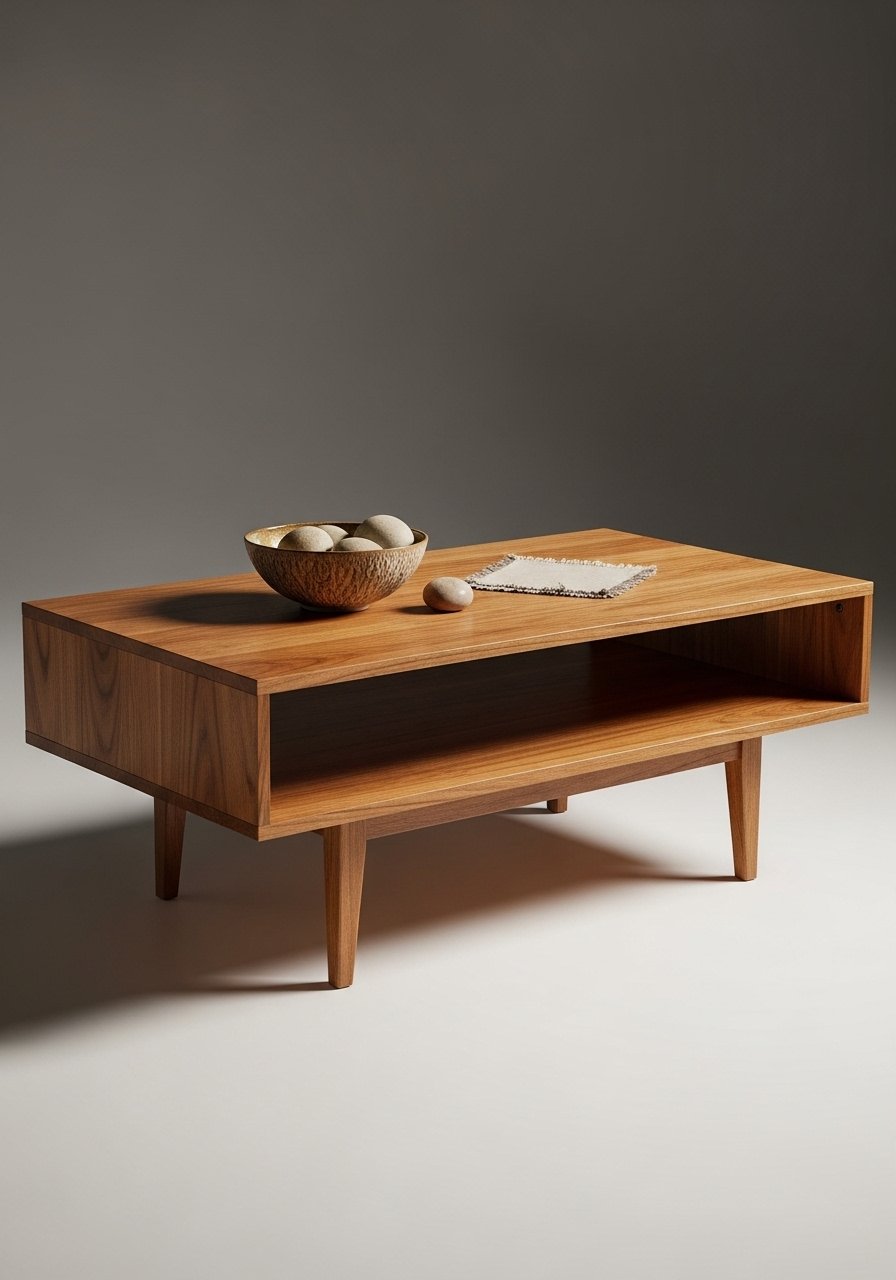
A box-frame table adds subtle architecture and a hidden shelf for magazines. The visible joinery and walnut finish read handcrafted and warm. Great for intermediate woodworkers comfortable with pocket holes.
Materials
- 2 walnut boards, 1" x 6" x 48" (for top edges)
- 1 plywood sheet, ¾" x 18" x 36" (for top and shelf)
- 1 Kreg pocket hole jig
- 1 stain (walnut), 8 oz
- 1 wipe-on polyurethane, 8 oz
- 4 tapered wooden legs, 16"
- Wood glue, clamps, 120–220 grit sandpaper
Instructions
- Cut plywood to 36" x 18" top and shelf sizes.
- Build the box frame using Kreg pocket holes to join edges. Glue and clamp until set.
- Sand the entire assembly 120 → 220.
- Apply walnut stain; wipe off after 2–3 minutes. Dry 6 hours.
- Seal with two coats of wipe-on polyurethane, 2 hours between.
- Attach legs and let table sit for 24 hours before heavy use.
How to Display or Gift It
- Store board games on the lower shelf.
- Pair with a woven tray and a stack of coffee table books.
- For gifting, disassemble legs and pack hardware in a labeled bag with assembly instructions.
- Use a small craft organizer box to keep extra screws.
- Hairpin Leg Round Top (keyword in a project intro)
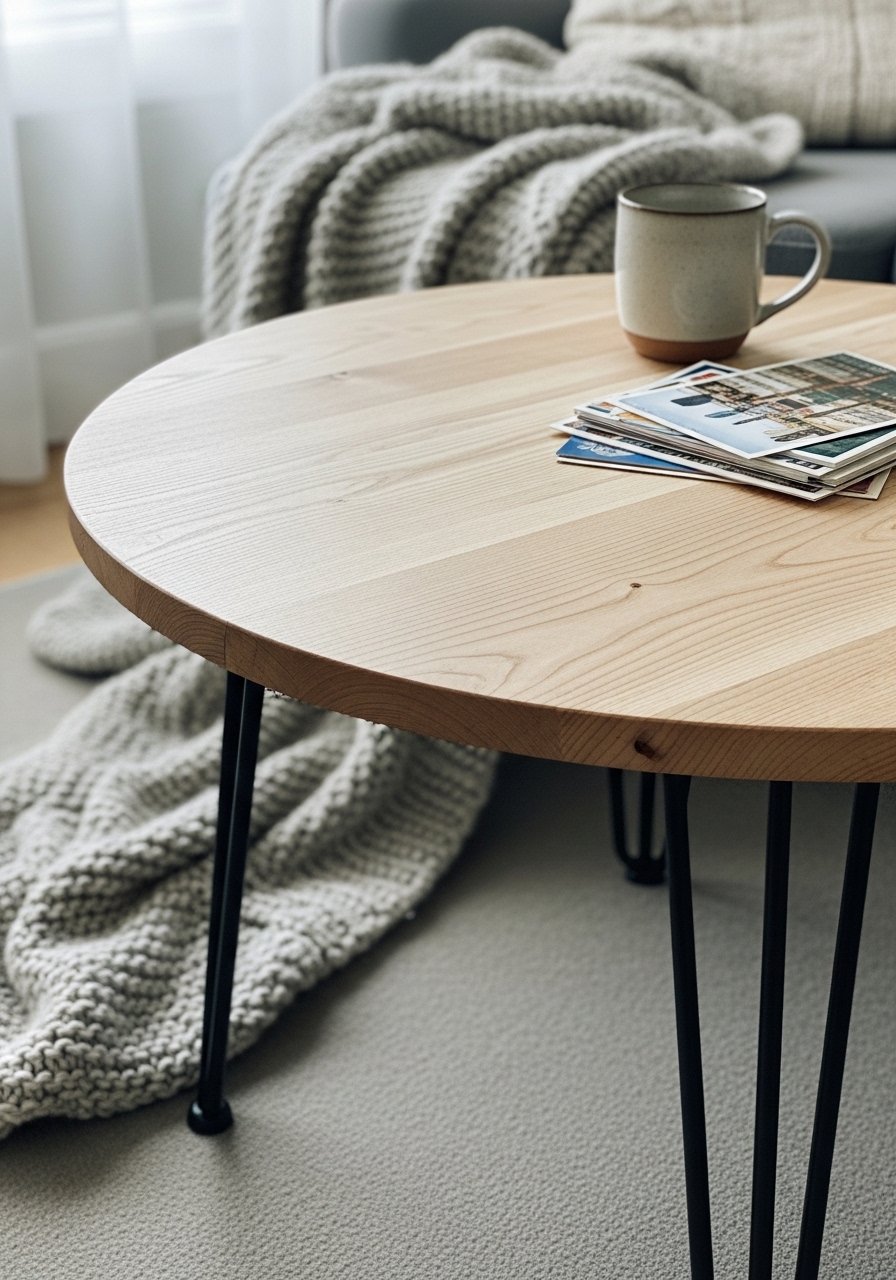
A round top with hairpin legs is airy and modern. The circular shape softens corners in a cozy room. It’s quick: cut a round top, finish, and attach legs.
Materials
- 1 round birch plywood top, 30" diameter, ¾"
- 3 12" hairpin legs
- 1 jigsaw or circle cutting jig
- Sandpaper 120–220 grit
- 1 can matte polyurethane, 16 oz
- Wood glue, clamps
- Tack cloth
Instructions
- Trace a 30" circle using a string jig and pencil.
- Cut slowly with a jigsaw; sand edges smooth.
- Sand surface to 220 grit for silky feel.
- Apply 3 thin coats of matte poly, sanding lightly between coats. Dry 2 hours between.
- Mount hairpin legs evenly spaced on underside.
- Cure 48 hours before placing heavy items.
How to Display or Gift It
- A round table pairs well with curved sofas and soft textiles.
- Gift with a small care kit: polish cloth and felt pad set.
- Store flat and wrapped in moving blankets if transporting.
- Use a small wooden easel to show assembly instructions if gifting.
- Rustic Trunk Coffee Table with Lift Top
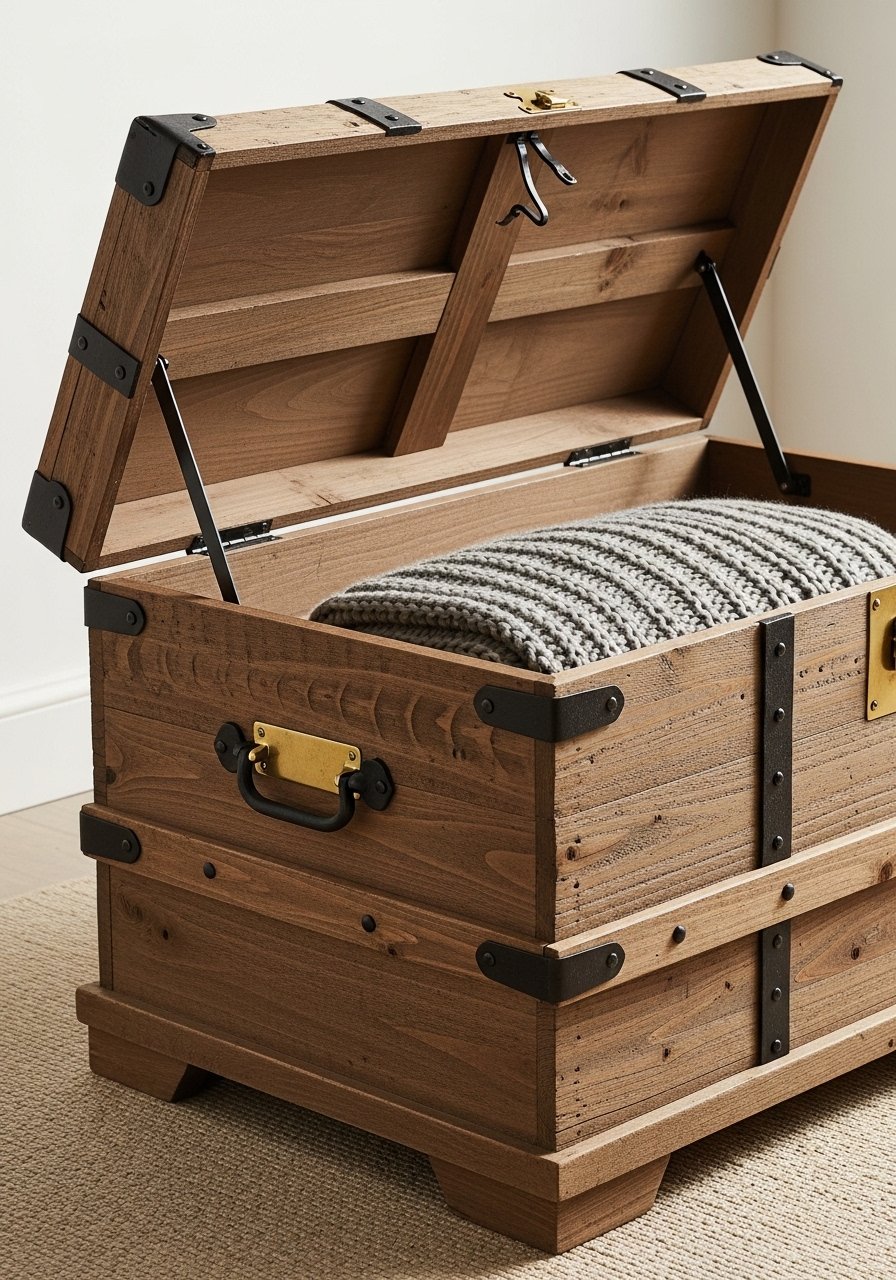
This trunk table doubles as storage and a tray-like surface. The textured wood and iron hardware create a cozy, vintage feel. Hinges and a prop stay make the lift-top easy and safe.
Materials
- 1 pine panel assembly, 36" x 20" x 12" box shape
- 1 pair lift-top hinges with lid supports
- 2 iron corner brackets
- Wood stain (antique finish), 8 oz
- 1 can clear satin poly, 16 oz
- 1 foam brush, rag
- Screws and wood glue
Instructions
- Build a rectangular box base and screw panels together with glue.
- Sand and stain the outside; wipe excess after 5 minutes. Dry 6 hours.
- Attach hinges and lid supports per hardware instructions.
- Apply two coats of satin poly; dry 2 hours between.
- Mount iron corner brackets for an aged look.
- Allow full cure 24–48 hours before loading.
How to Display or Gift It
- Use as a cocktail table and hidden blanket storage.
- Add a decorative latch and label for gifting.
- Store small throw pillows inside when not in use.
- A craft organizer tray works well inside to keep little items tidy.
- Turned-Leg Farmhouse Coffee Table

Turned legs bring traditional charm and tactile detail. You can buy pre-turned legs or use a lathe if you have one. The combination of painted apron and natural top is cozy and familiar.
Materials
- 1 solid pine top, 42" x 20" x 1"
- 4 turned legs, 18"
- 1 can chalk paint (apron), 8 oz
- 1 quart satin polyurethane (top)
- Wood screws, corner brackets
- Sandpaper 120–220 grit
- Paint brush and foam brush
Instructions
- Cut and sand top to size; sand to 220 grit.
- Paint apron with chalk paint; dry 2 hours and lightly sand for a worn look.
- Attach legs with corner brackets and screws. Pre-drill holes.
- Finish top with 3 coats of satin poly; 2 hours dry between coats.
- Assemble and let cure 24 hours before use.
How to Display or Gift It
- Top with a woven runner and vintage books.
- Gift fully assembled or as a kit with pre-drilled pieces and hardware bag.
- Store in a dry area to prevent paint from chipping.
- Epoxy River Coffee Table (keyword in title)

The epoxy river look is dramatic and modern, combining live-edge wood and colored resin. This project requires careful sealing and bubble control, but the finished gloss feels glassy and cool to the touch.
Materials
- 2 live-edge slabs, matching width to create a gap of 2–4"
- 2 lbs epoxy resin kit (clear epoxy, part A/B)—quantity depends on gap depth
- Epoxy pigment, blue (alcohol or paste)
- Plastic mixing buckets, stir sticks
- Heat gun or propane torch to pop bubbles
- Painter’s tape and caulking for mold
- 120–220 grit sandpaper
- Protective gloves and respirator
Instructions
- Build a mold under the slabs using melamine and caulk seams.
- Seal the wood edges with a thin epoxy "seal coat" to prevent air bubbles from escaping.
- Mix epoxy per instructions; add pigment to achieve the river color.
- Pour epoxy into the gap slowly. Use a heat gun to pop surface bubbles.
- Let epoxy cure 24–48 hours per manufacturer. Demold carefully.
- Sand epoxy edges starting at 120 grit then to 400 for clarity. Polish if desired.
- Attach legs and let table sit 72 hours before use.
How to Display or Gift It
- Show it with LED underlighting for drama.
- If gifting, include a care card on how to avoid scratches.
- Store horizontally during cure; keep pets away.
- Use a resin polishing kit if you see hazing later.
- Stenciled Pattern Coffee Table (crafty accent)
Stenciling adds pattern without complex joinery. Use a pre-cut stencil or your Cricut for precision. The painted pattern is slightly raised and adds tactile interest.
Materials
- 1 pine top, 36" x 18"
- 1 large reusable stencil (geometric pattern)
- Acrylic craft paints (2 colors), 2 oz each
- 1 stencil brush and foam roller
- Painter’s tape
- 1 can clear matte poly, 16 oz
- Sandpaper 120–220 grit
Instructions
- Sand the top to 220 for paint adhesion.
- Prime with a thin coat of acrylic primer if using bare wood; dry 1 hour.
- Center stencil and tape edges. Dab paint with stencil brush or use a light roller.
- Remove stencil carefully while paint is wet for crisp lines.
- Touch up with a fine brush if needed. Let paint dry 2 hours.
- Seal with 2 coats of clear matte poly, 2 hours between.
- Attach legs after final coat cures 24 hours.
How to Display or Gift It
- Style with coordinating colored textiles.
- For gifting, include a small set of paintable coasters.
- Store stencil flat in a craft envelope.
- Make multiple small stenciled trays as matching gifts.
- Parson’s Table with Upholstered Top
Upholstered tops add softness and double as a footrest. Tufting gives a tailored look, and the wooden base keeps it sturdy. This is great if you like mixed textures.
Materials
- 1 plywood top, 36" x 24" x ¾"
- High-density foam, 1" thickness, cut to top size
- Linen upholstery fabric, 1 yard
- Button tuft kit (if tufting)
- Staple gun and staples
- 4 square legs, 16"
- Spray adhesive, scissors
Instructions
- Cut foam to fit plywood top. Spray-adhere foam to plywood.
- Wrap fabric around foam and staple underneath, pulling tight.
- For tufting, mark button placement; drill holes and secure buttons per kit.
- Attach legs with screws and wood glue into pre-drilled holes.
- Let glue set 2 hours before flipping upright.
How to Display or Gift It
- Pair with a tray for drinks.
- For gifting, pack fabric swatches and extra tufting buttons.
- Store in a dry room to avoid mildew.
- Make-ahead options: sew matching cushions later.
- Geo-Tiled Wood Top Coffee Table

Small wood tiles create a mosaic with depth and texture. It’s a puzzle-like build that looks boutique when finished.
Materials
- Hexagon wood tiles, ~60 pieces, 1" thick
- Plywood base, ¾" x 24" x 24"
- Wood glue
- Clamps and painter’s tape
- Sanding block 220 grit
- Clear satin sealer, 16 oz
- Small tile spacers (optional)
Instructions
- Lay out pattern dry on plywood until satisfied.
- Glue each tile down, working from center outward; clamp lightly.
- Let glue cure 12 hours.
- Sand any uneven edges and fill gaps with thin wood filler if needed.
- Seal with two coats satin sealer, 2 hours between.
- Attach legs after final coat cures 24 hours.
How to Display or Gift It
- A tiled top pairs nicely with minimal decor.
- As a gift, include a care card explaining to avoid prolonged water exposure.
- Store tiles flat; keep adhesives in an organizer box.
- Make a matching set of coasters with leftover tiles.
- Scandinavian Minimal Floating Top Coffee Table
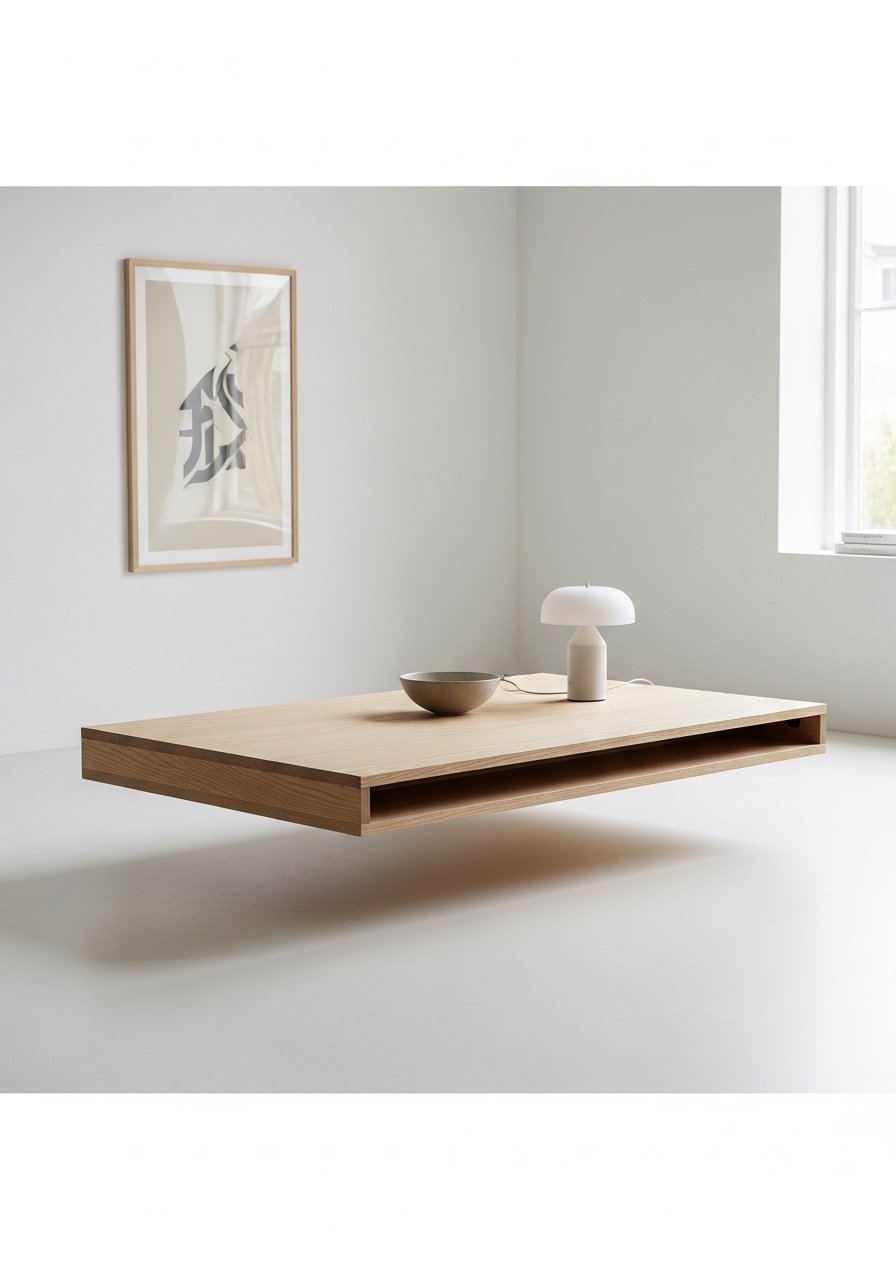
The recessed-leg design gives a floating look and Scandinavian calm. The top feels light and smooth. This table works in minimalist spaces.
Materials
- 1 ash veneer plywood top, 36" x 18" x ¾"
- 2 recessed leg supports (pre-cut) or build from plywood, 8" height
- Wood glue and screws
- Clear matte lacquer, 16 oz
- 120–220 grit sandpaper
- Clamps and drill
Instructions
- Build the top and bottom recess supports; assemble with glue and screws.
- Sand edges and top to 220 grit.
- Apply two coats of matte lacquer. Dry 2 hours between coats.
- Attach recessed leg supports and let sit 24 hours before placing items.
How to Display or Gift It
- Style with a ceramic tray and a low-profile lamp.
- For gifting, include assembly instructions and felt pads.
- Store in a climate-controlled environment.
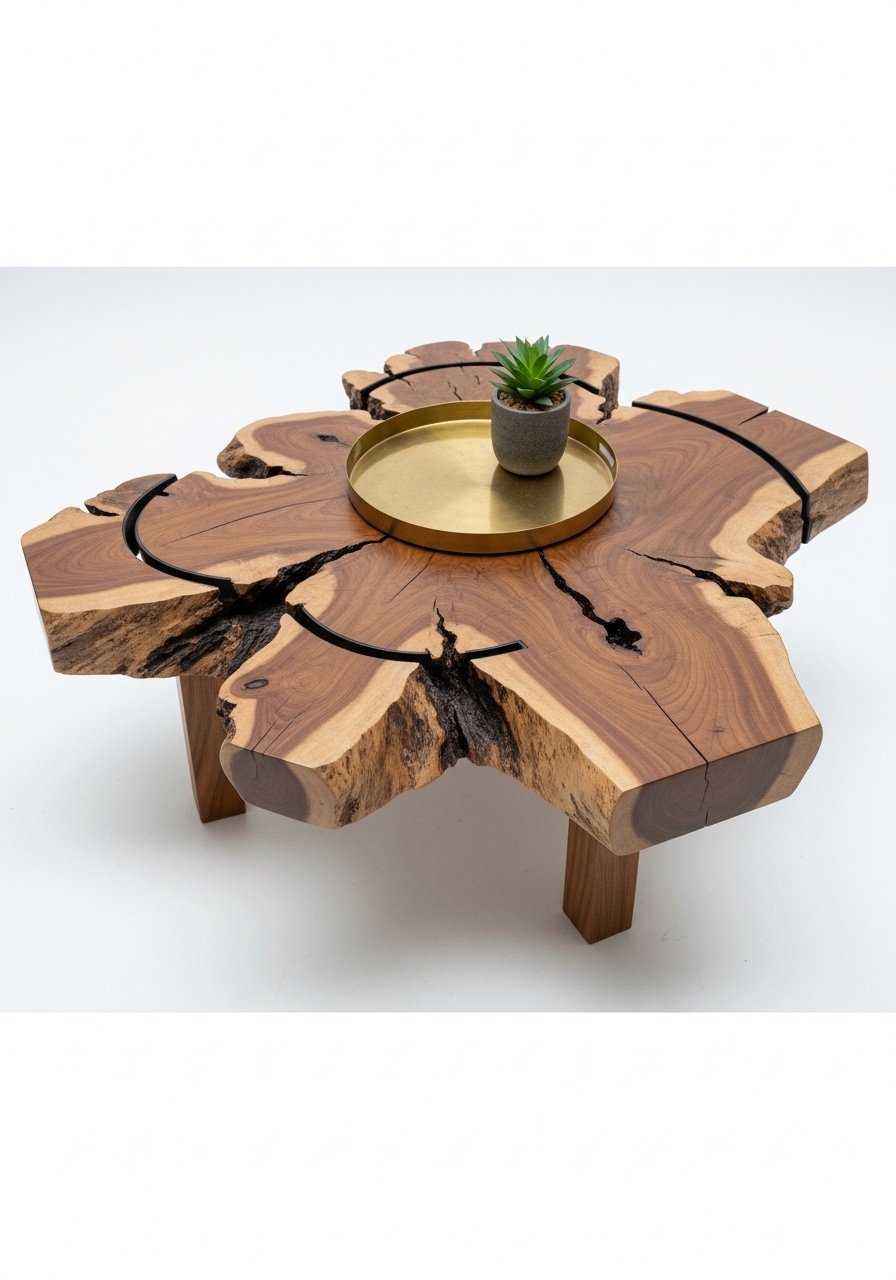
- Log Slice Coffee Table (tree round)
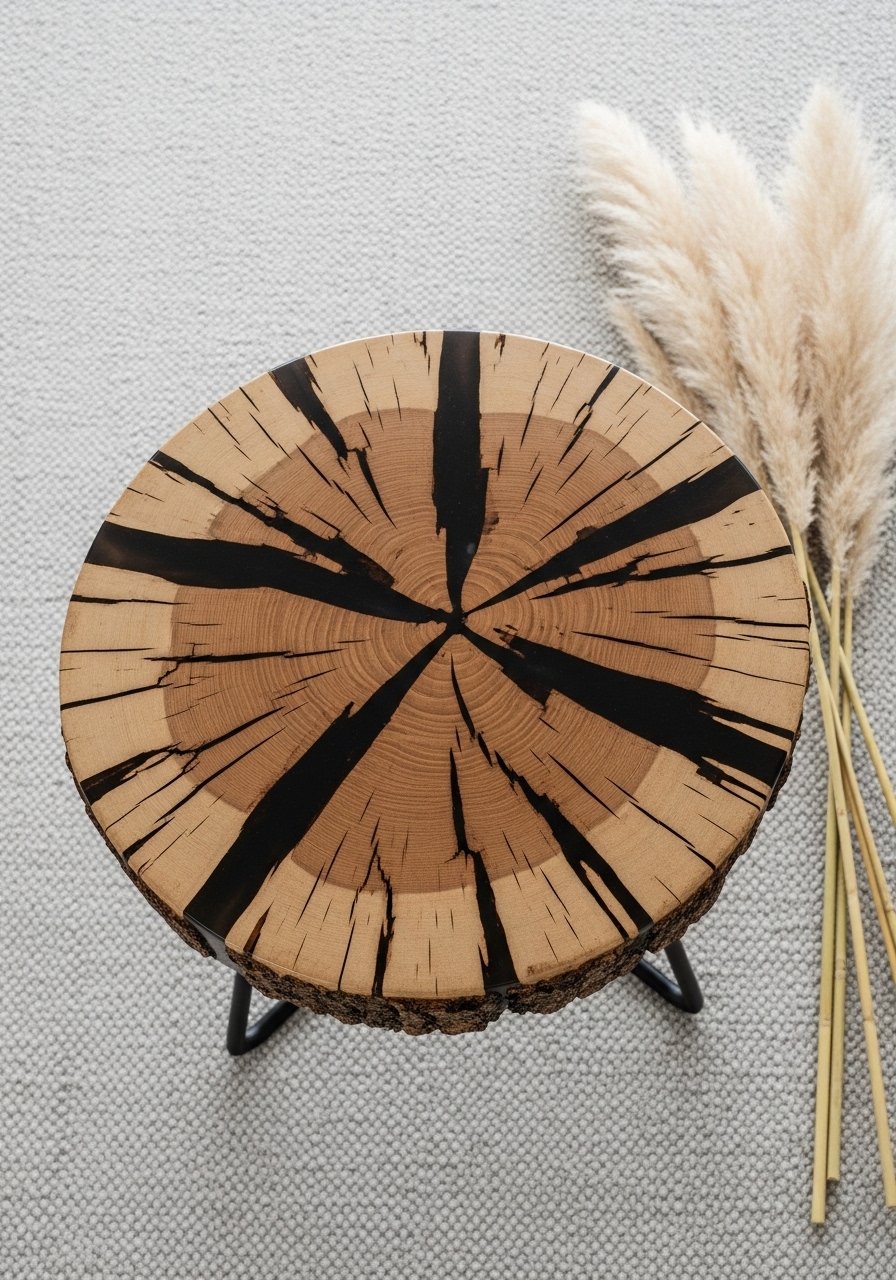
A tree slice table feels rustic and organic. Cracks and rings tell a story. Stabilize with epoxy or pine plugs and a clear finish to show grain.
Materials
- 1 wood round slice, 24–30" diameter, 1.5–2" thick
- Epoxy resin (for crack fill), 1 lb
- 3 metal tripod legs
- Sandpaper 80→220 grit
- Tack cloth and foam brush
- Satin polyurethane, 16 oz
Instructions
- Dry the slab thoroughly for 2–6 months if fresh. For store-bought kiln dried, proceed.
- Fill cracks with epoxy and let cure 24 hours.
- Sand from 80 → 220 to remove unevenness.
- Apply three coats of satin poly; 2 hours between. Final cure 48 hours.
- Attach tripod legs and test stability.
How to Display or Gift It
- Use as an accent table with a small plant.
- Gift with a coaster set and a small polishing cloth.
- Store flat on a pallet to avoid warping during cure.
- Farmhouse X-Base Coffee Table

X-bases are classic farmhouse. The cross-bracing adds visual interest and a sturdy feel. Distressed paint gives vintage character.
Materials
- 1 solid pine top, 48" x 20"
- 2 X-shaped side aprons cut from 1x6s
- Chalk paint (for base), 12 oz
- Satin poly for top, 16 oz
- Wood screws, glue, clamps
- Sandpaper 120–220 grit
- Metal corner accents (optional)
Instructions
- Cut and assemble the top and X aprons; ensure square with clamps.
- Paint the base with chalk paint. For a distressed look, sand edges after paint dries 2 hours.
- Stain or leave the top natural; seal with two coats of satin poly with 2 hours between.
- Attach apron to top with screws and glue.
- Let finish cure 24 hours before use.
How to Display or Gift It
- Pair with woven baskets on the lower shelf.
- For gifting, include a small jar of touch-up stain.
- Store disassembled to save space.
- Extendable Drop-Leaf Coffee Table
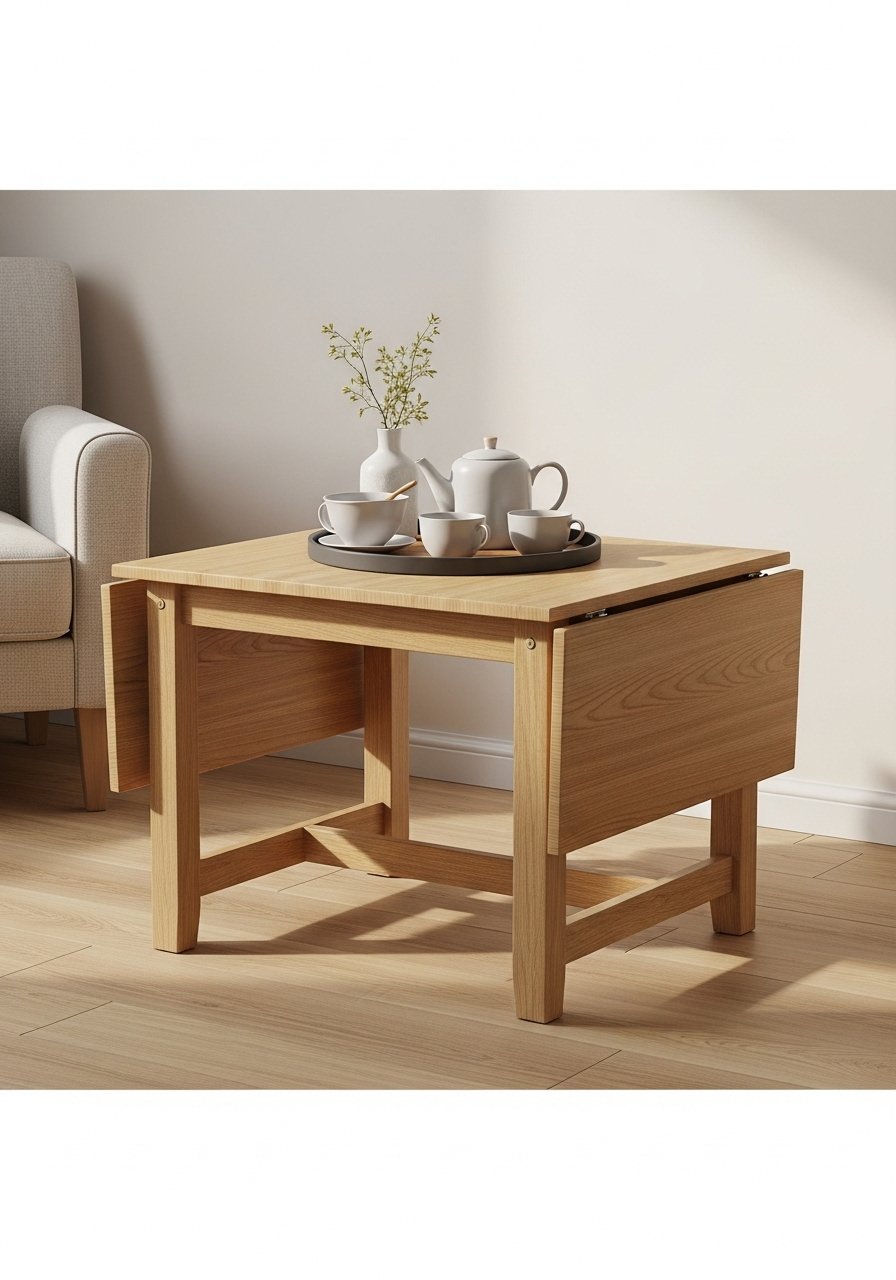
Drop leaves make this table flexible for guests or compact spaces. The hinges are the only slightly fiddly part. When extended, it becomes a large surface for crafts.
Materials
- 1 center plywood panel 24" x 18"
- 2 drop leaves, each 12" x 18" x ¾"
- 2 drop-leaf hinges (supporting)
- 1 can clear varnish, 16 oz
- Screws, wood glue, sandpaper 120–220 grit
- Support brackets (optional)
Instructions
- Cut center panel and leaves; sand edges smooth.
- Attach hinges to leaves and center panel, ensuring flush alignment.
- Seal with two coats of varnish, 2 hours apart.
- Install leaf support brackets if needed.
- Test movement; adjust hinge screws for smooth action.
How to Display or Gift It
- Great for craft nights—extend for projects.
- Pack hardware in a labeled bag if gifting as a kit.
- Store folded in narrow spaces when not in use.
- Nested Coffee Table Set (two-tier)

Nesting tables are practical and stylish. They allow flexible layouts and layered styling. The pieces slide together for compact storage.
Materials
- 1 larger top, 36" x 20"
- 1 smaller top, 26" x 16"
- 4 legs per table (short tapered)
- Wood glue, screws
- Clear matte lacquer, 16 oz
- Sandpaper 120–220 grit
Instructions
- Cut both tops and sand to 220.
- Attach legs with pre-drilled holes and screws.
- Finish both with two coats of matte lacquer, 2 hours between.
- Let cure 24 hours before sliding tables together.
How to Display or Gift It
- Layer with smaller decorative trays on top.
- For gifting, include assembly instructions and felt pads.
- Make-ahead: build tops and deliver legs separately for safer transport.
- Wooden Slat Coffee Table with Under-Shelf
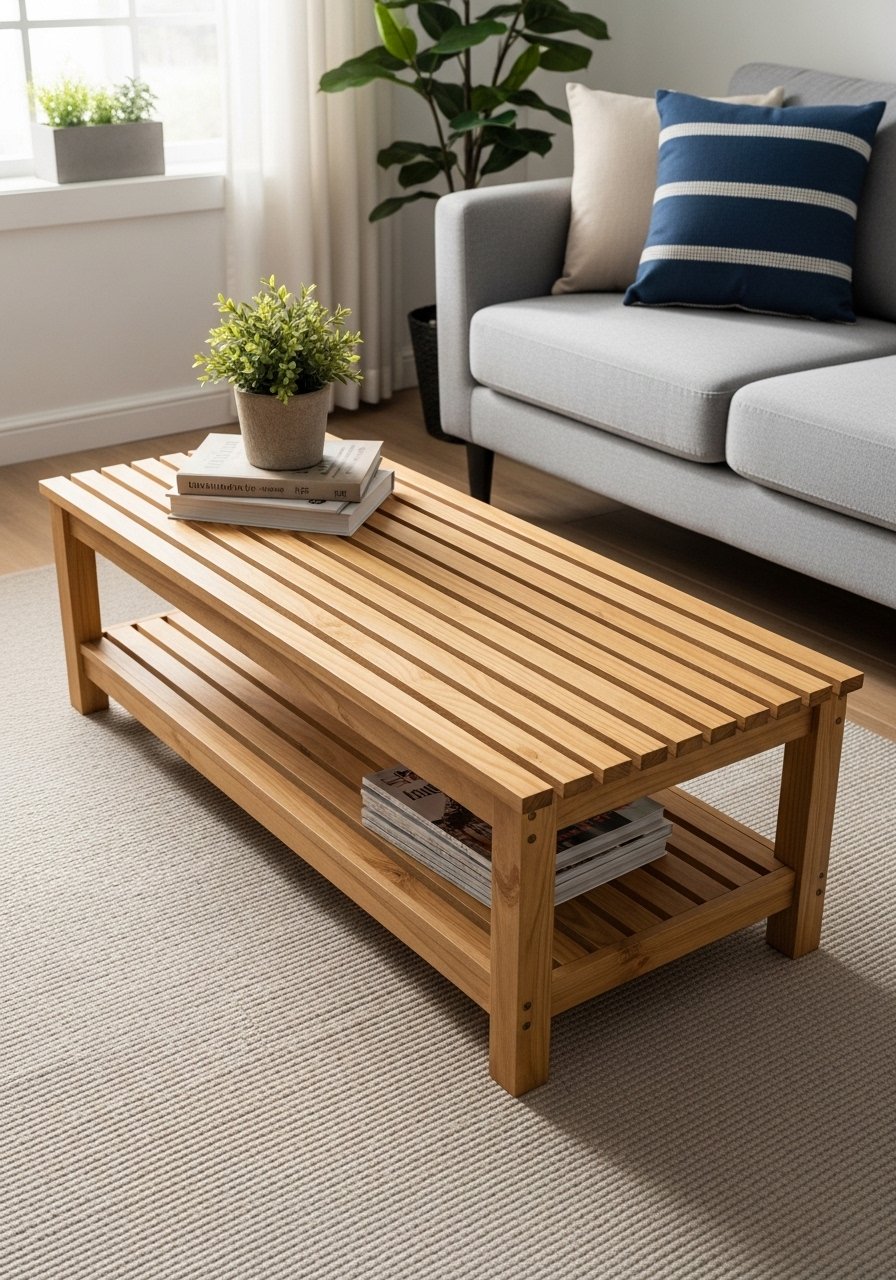
Slats create gentle texture and a lightweight look. The lower shelf keeps clutter out of sight. This fits coastal and cottagecore aesthetics.
Materials
- 8–10 slats, 1" x 3" x 36"
- 1 plywood shelf, 36" x 12"
- 2 1×4 frame rails
- Wood glue, 1¼" screws
- Stain (natural), 8 oz
- Satin polyurethane, 16 oz
Instructions
- Assemble frame and lay slats evenly across the top with ¼" gaps.
- Glue and screw slats into frame. Clamp and dry 1 hour.
- Install lower shelf and secure.
- Stain slats and shelf; wipe off after 2–3 minutes, dry 6 hours.
- Seal with two coats polyurethane, 2 hours apart.
- Cure 24 hours before adding items.
How to Display or Gift It
- Add woven baskets on the lower shelf for organization.
- Gift with a small book and candle for a cozy starter bundle.
- Store slats flat; keep glue in a sealed container.
- Concrete-Top Wood Frame Coffee Table
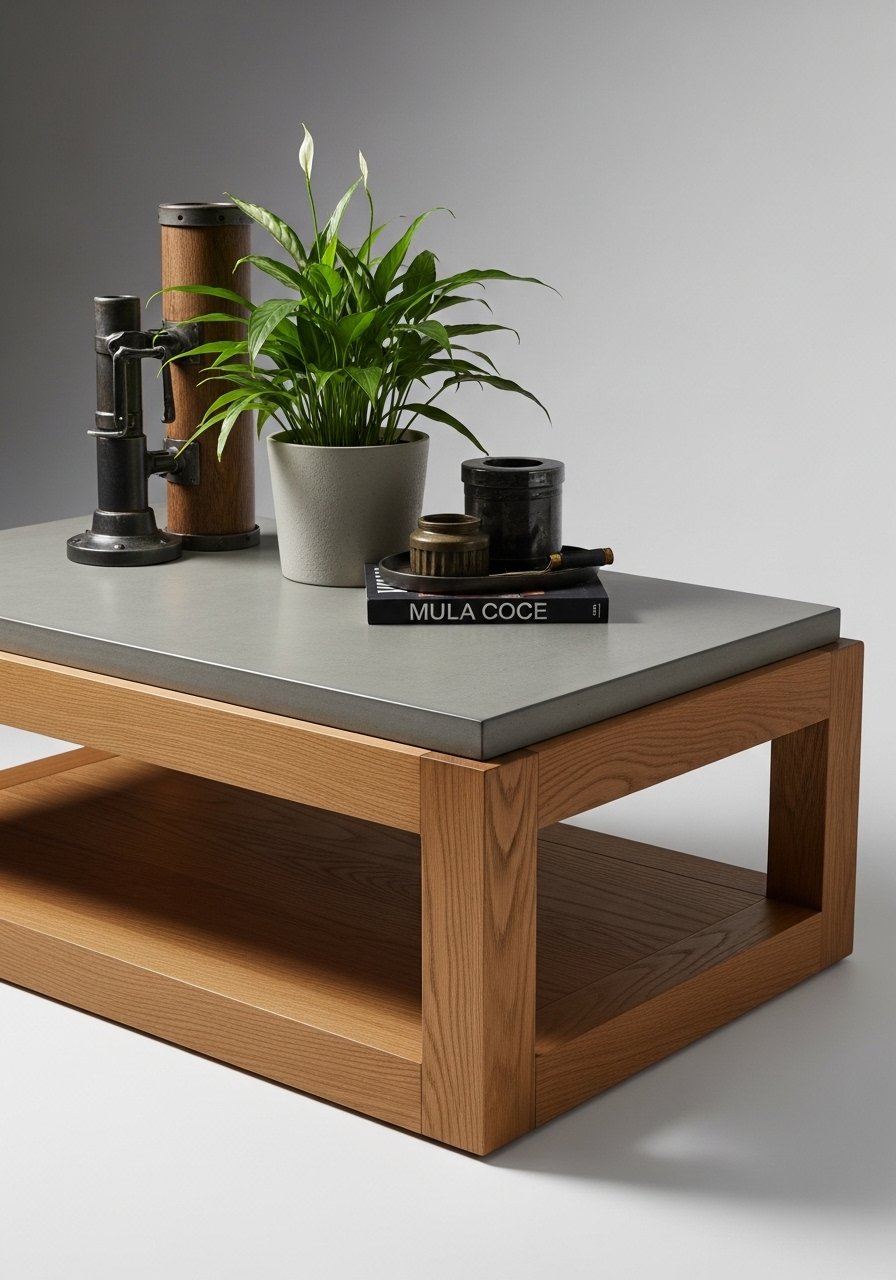
Concrete gives a cool, modern contrast to warm wood. The slab feels smooth and substantial. This project combines woodworking and simple concrete casting.
Materials
- 1 wooden frame built to hold a 36" x 20" concrete slab
- 1 bag fast-setting concrete mix, 10–20 lb (depending on slab thickness)
- Melamine mold sized 36" x 20" x 1"
- Concrete sealer, 8 oz
- Mixing bucket, trowel, respirator
- Screws and wood glue for frame
Instructions
- Build a melamine mold and pour concrete mix to 1" thickness; pour carefully to avoid air pockets.
- Vibrate mold gently to remove bubbles. Let set 24–48 hours.
- Remove slab, sand edges, and seal concrete with sealer; dry 4 hours.
- Build a wooden frame to cradle the slab and screw together.
- Place slab in frame and secure with brackets.
- Full concrete cure 7 days before heavy use.
How to Display or Gift It
- Pair with industrial decor and metal accents.
- For gifting, include notes on avoiding acidic cleaners on concrete.
- Store the slab flat during curing to prevent cracks.
- Hidden Drawer Coffee Table
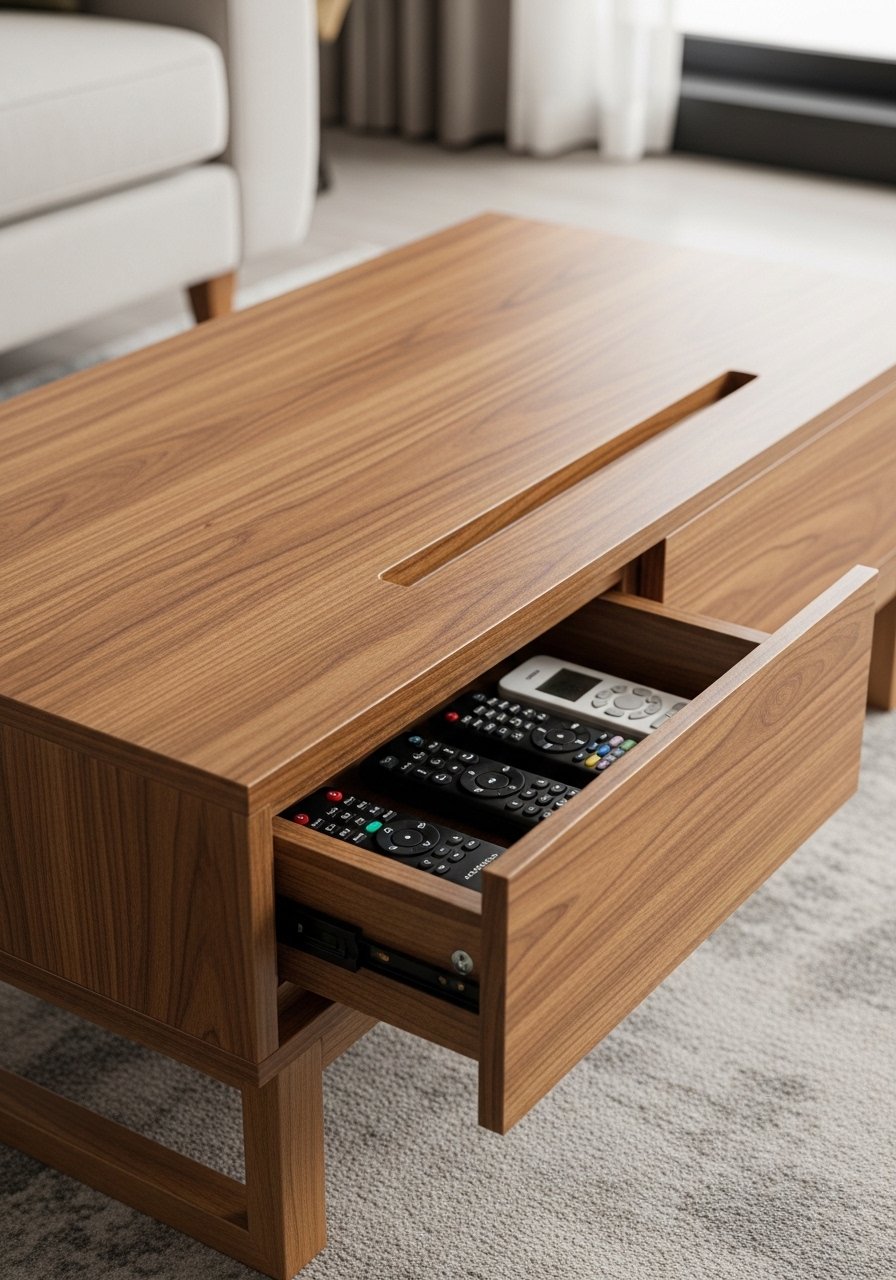
A hidden drawer gives discreet storage for remotes and chargers. The drawer's smooth action makes the table feel smart and custom.
Materials
- 1 top panel 36" x 20"
- 1 drawer box built from ½" plywood, 16" x 10" x 3"
- 1 set of drawer slides (soft-close)
- Wood glue and screws
- Wood stain and clear poly
- Sandpaper 120–220 grit
Instructions
- Build drawer box and sand all surfaces.
- Install drawer slides according to instructions.
- Build table frame with a slot for drawer; ensure drawer alignment.
- Finish with stain and two coats of poly, 2 hours apart.
- Insert drawer and test for smooth operation.
How to Display or Gift It
- Great for hiding remotes or chargers. Use drawer with a small organizer.
- Gift with a small felt-lined organizer tray.
- Store extra hardware in a labeled craft organizer.
- Mosaic Tile and Wood Coffee Table
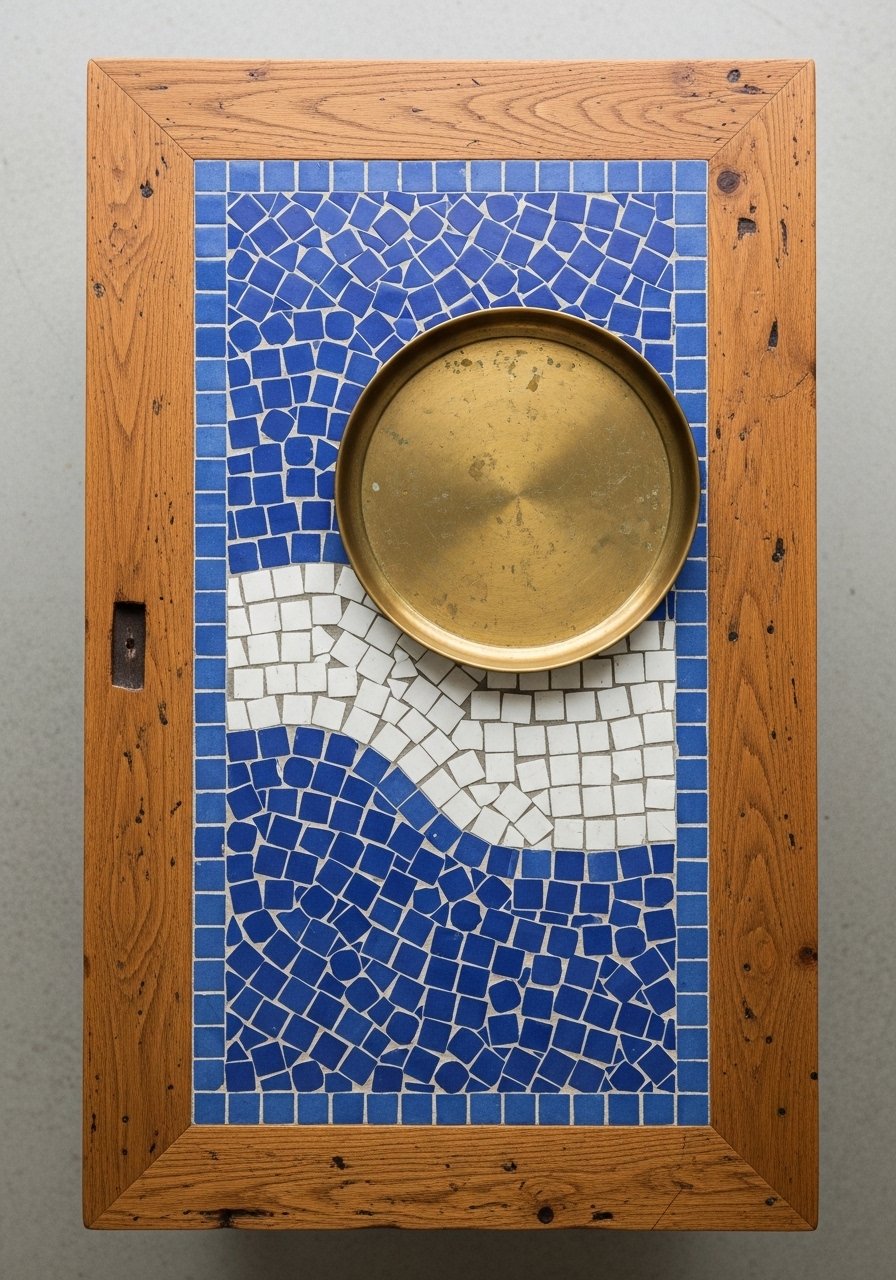
Tiles make a durable, colorful centerpiece and are easy to seal into a wooden frame. This table blends artisan tile work with warm wood.
Materials
- 1 plywood base, 36" x 18"
- Box of mosaic tiles, enough for 12" x 16" inset
- Thin-set mortar and grout (small tub)
- Tile spacers
- Silicone grout sealer
- Wood border strips, 1" x 2"
- Notched trowel, sponge
Instructions
- Build wooden frame and inset space for tiles.
- Apply thin-set and place tiles; use spacers for even grout lines.
- Let mortar set 24 hours, then grout and wipe off.
- Seal grout with silicone sealer; dry 24 hours.
- Attach legs and allow final set 24 hours.
How to Display or Gift It
- Pair with ceramic pitchers and woven coasters.
- Gift with a small tile care kit (sealer and sponge).
- Store tiles flat and keep grout sealed until use.
- Farmhouse Bench-to-Table Convertible Coffee Table
This convertible piece is flexible for seating or lounging. Bolted connections make conversion straightforward and reliable.
Materials
- Top panel for table, 42" x 16"
- Hinge plates and bolts, 4 sets
- 2 bench legs (folding) and table legs
- Stain and poly, 8–16 oz
- Sandpaper 120–220 grit
- Tools: drill, wrench
Instructions
- Build top and attach hinge plates allowing the top to fold into bench seating.
- Mount both sets of legs with bolts for easy removal.
- Stain and seal with two coats poly; dry 2 hours between.
- Test conversion several times; tighten bolts as needed.
- Full hardware settle time 24 hours before heavy use.
How to Display or Gift It
- Great for small gatherings—use as extra seating.
- Gift with assembly tools and instructions in a labeled box.
- Store legs separately to avoid damage during transport.
- Inlay Resin Patterned Accent Table
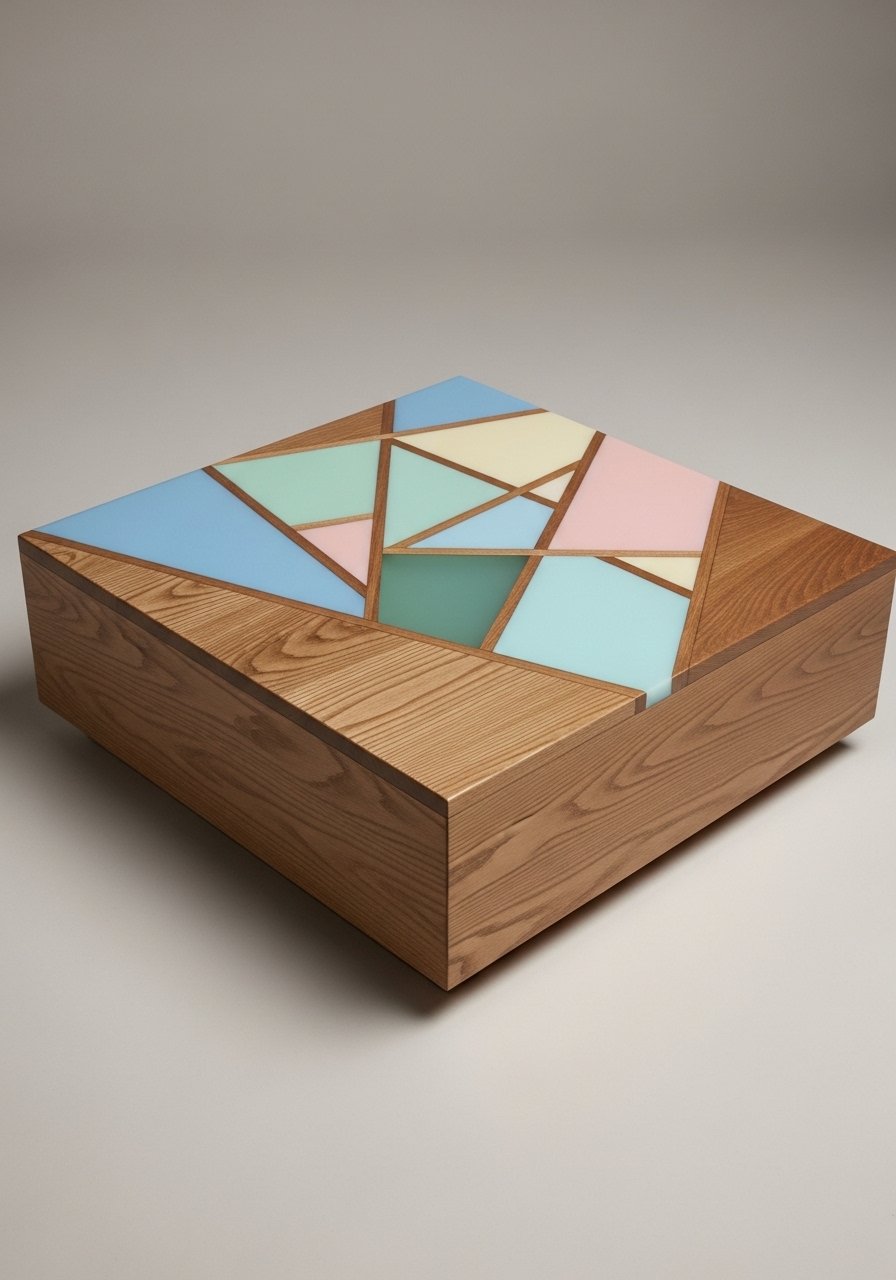
Resin inlays let you add color and pattern without full epoxy pour. They’re simple enough for beginners and give a polished, modern feel.
Materials
- 1 plywood top 24" x 24"
- Epoxy resin kit small size, 1 lb
- Pigment pastes in two colors
- Painter’s tape, small mixing cups
- Sandpaper 120–400 grit
- Clear matte varnish
Instructions
- Rout shallow inlay grooves into a pattern on the top.
- Seal grooves with a thin epoxy coat to prevent air bubbles.
- Mix epoxy with pigment and pour into grooves. Use heat gun for bubbles.
- Let cure 24–48 hours, sand flush 220–400.
- Finish entire top with matte varnish; dry 24 hours.
How to Display or Gift It
- Pair with a soft wool runner to highlight color contrasts.
- Gift with a small resin care note and polish cloth.
- Store flat while curing to avoid warping.
- Cranked Leg Industrial Coffee Table
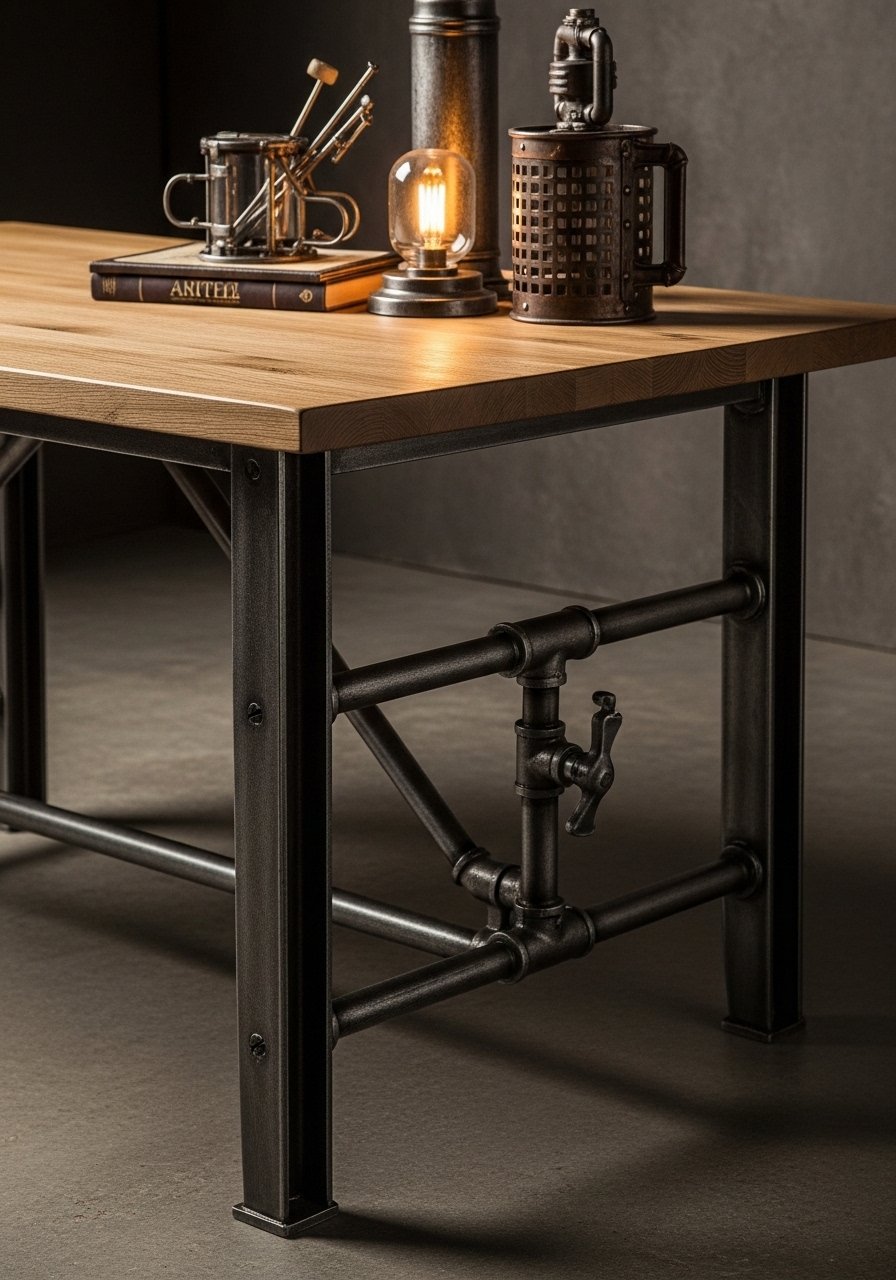
Cranked metal legs give an industrial edge while the wood warms the look. This combination is rugged and refined.
Materials
- 1 solid oak top, 42" x 20"
- 2 cranked steel leg sets
- Wood wax (beeswax or tung), 8 oz
- Screws, drill
- Sandpaper 120–220 grit
Instructions
- Sand the oak top and apply wax with a cloth; buff after 15 minutes.
- Attach cranked legs with screws; pre-drill holes.
- Let wax cure 24 hours before heavy use.
How to Display or Gift It
- Use with leather seating and dark accents for a moody room.
- Gift with a small tin of wood wax and polishing cloth.
- Store off the ground to avoid scratches.
- Mid-Century Floating Shelf Coffee Table
A recessed floating shelf gives the illusion of levitation and adds hidden storage. The teak finish reads mid-century modern and smooth under hand.
Materials
- 1 top and shelf plywood pieces, 36" x 18"
- 4 tapered legs, 16"
- Wood glue, screws
- Teak stain and clear lacquer, 8–16 oz
- Sandpaper 120–220 grit
Instructions
- Build top and recessed shelf assembly; ensure shelf fits snugly.
- Sand and apply teak stain; dry 6 hours.
- Seal with two coats lacquer; dry 2 hours between coats.
- Attach tapered legs and let sit 24 hours before use.
How to Display or Gift It
- Great for hiding remotes. Use small boxes on the shelf to keep it tidy.
- Gift with a small set of teak oil for future maintenance.
- Store assembled or disassembled depending on transport.
- Upholstered Ottoman Coffee Table with Tray Top
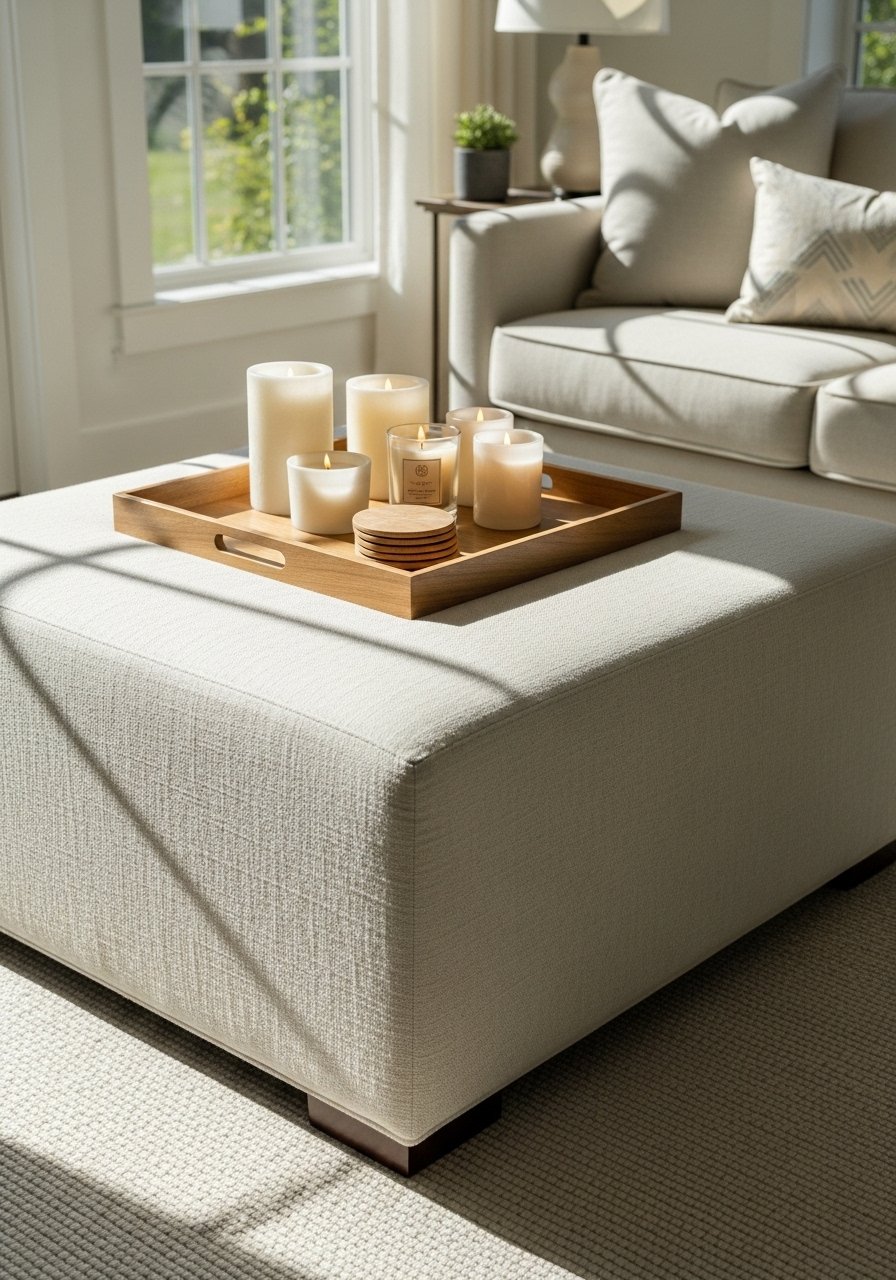
An ottoman-table hybrid adds softness and modularity. The removable tray protects upholstery and creates a stable surface for drinks.
Materials
- Plywood base, 30" x 30"
- High-density foam, 2" thickness
- Upholstery fabric, 1.5 yards
- Removable wooden tray, 30" x 30"
- Staple gun and staples
- Velcro strips to secure tray if desired
Instructions
- Attach foam to plywood with spray adhesive.
- Wrap fabric tightly and staple underside.
- Finish wooden tray with wipe-on poly.
- Place tray on top; secure with Velcro if needed.
- Let adhesive set 2 hours before use.
How to Display or Gift It
- Swap tray for seasonal styling. Great in family rooms with kids.
- Gift with a small throw pillow or coaster set.
- Store fabric and foam wrapped if shipping.
- Rustic Slab with Metal Band Accent
A metal band frames the wood and gives an industrial-refined finish. Tactile grain contrasts nicely with cool metal.
Materials
- 1 thick wood slab, 36" x 18" x 1.5–2"
- Steel flat bar for band, bent to perimeter
- Black paint for metal
- Screws and metal brackets
- Epoxy for cracks, 1 lb
- Satin poly for wood, 16 oz
Instructions
- Fit and bend steel band to band the slab, weld or screw ends together.
- Fill cracks with epoxy and sand flush.
- Paint steel band black; let dry 24 hours.
- Finish slab with three coats satin poly, 2 hours between.
- Secure band to slab with discreet brackets and attach legs.
- Cure 48 hours before heavy use.
How to Display or Gift It
- Pair with matte black lamps and terracotta pots.
- Gift with a small metal care wipe and wood polish.
- Keep metal-coated parts separated during shipping.
- Low Platform Coffee Table with Integrated Planter
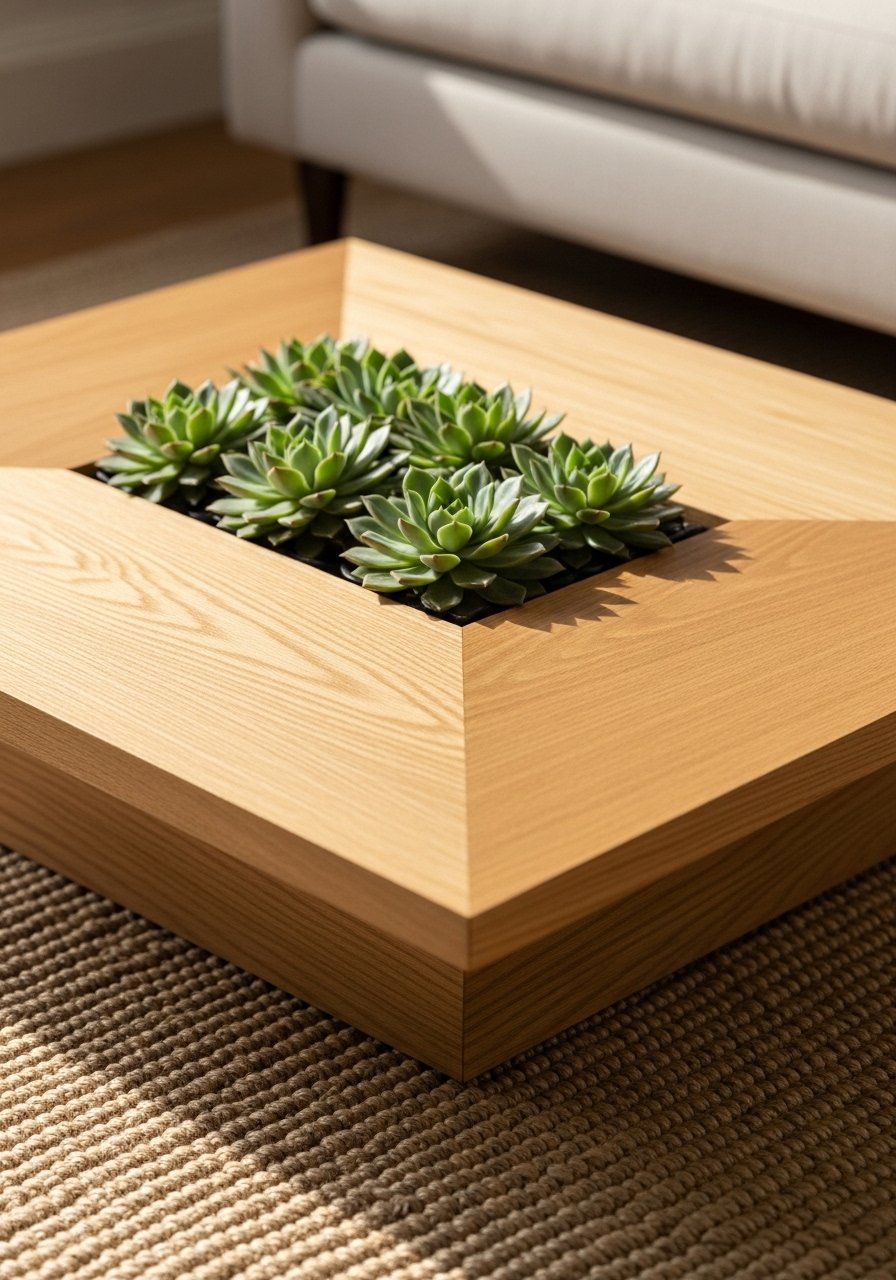
An integrated planter brings greenery into your living space and feels fresh. Succulents are low maintenance and look sculptural against warm wood.
Materials
- 1 platform top, 36" x 20" x 3"
- 1 planter box inset, 12" x 6" x 4"
- Plastic planter liner
- Succulents and potting mix
- Wood stain and poly, 8–16 oz
- Silicone sealant for liner edge
Instructions
- Cut and assemble platform and inset planter cavity.
- Line planter with plastic liner and seal edges with silicone.
- Sand and finish wood with stain; dry 6 hours.
- Plant succulents in liner and place into cavity.
- Let wood finish cure 24 hours before moving table.
How to Display or Gift It
- Use drought-tolerant succulents for low care.
- Gift with a small plant care card.
- For storage, remove planter liner and keep plants separately.
These 29 DIY coffee table ideas with wood cover so many styles—cottagecore, farmhouse, Japandi, boho, and mid-century—so you can pick a project that fits your room and skill level. Try a simple plywood hairpin table if you want a quick win, or pour an epoxy river for a weekend-long statement piece. Save or pin the designs you like, then gather materials and schedule a relaxed build day.
I find a temperature-controlled hot glue gun and a good set of sanding blocks make almost every build cleaner and faster. Which of these DIY coffee table ideas with wood will you try first? Share your photos with friends or gift a finished piece—they always feel personal and special.


