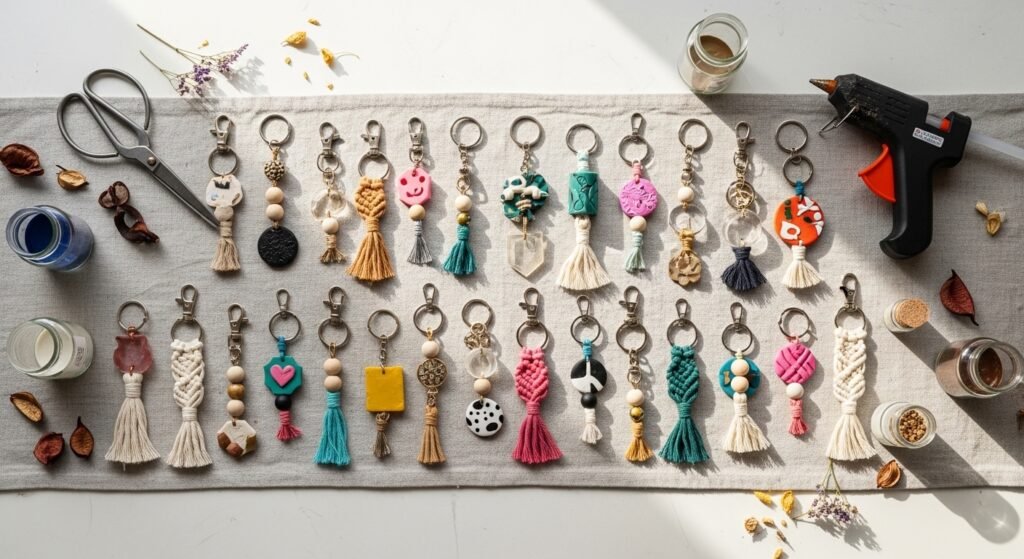
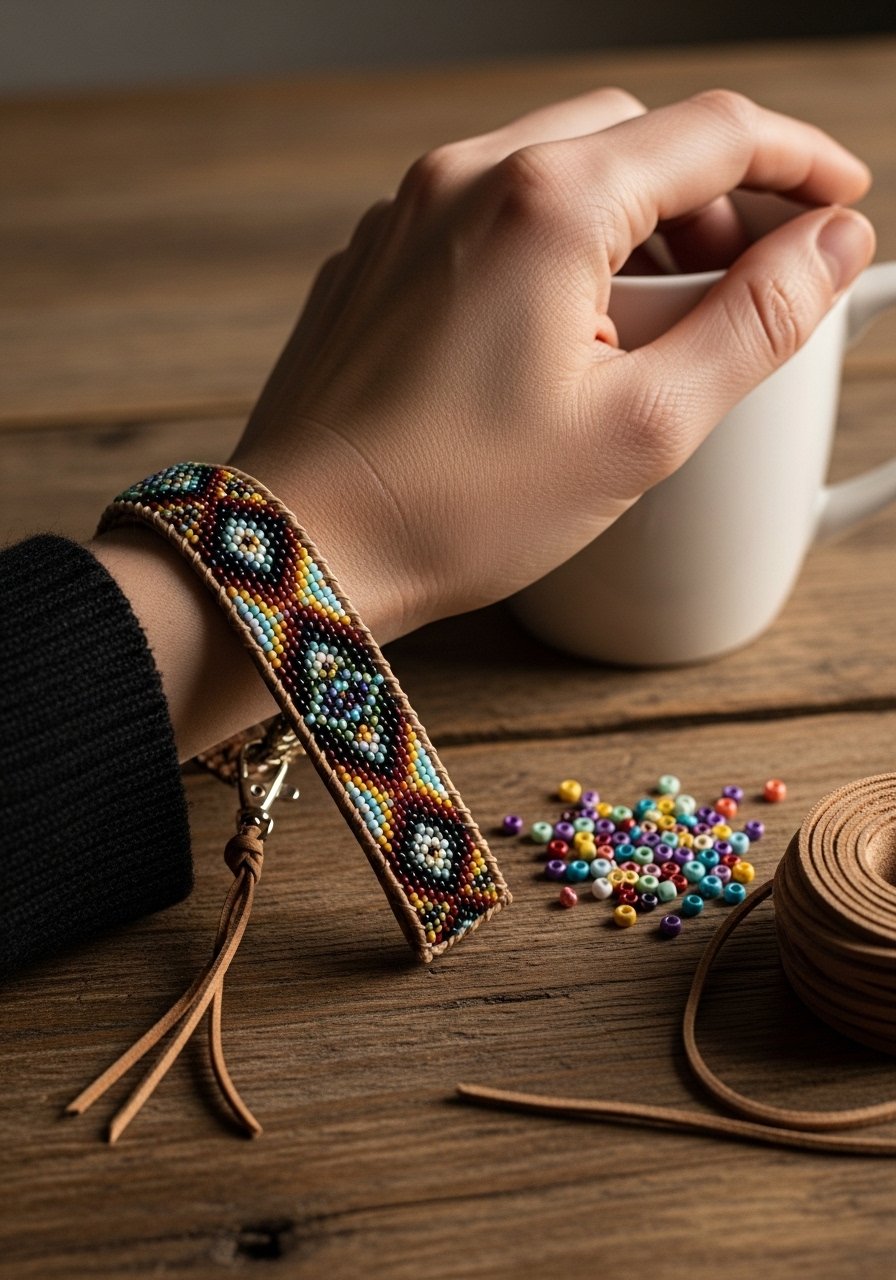
You know that little thrill when you find your keys without digging? These easy DIY keychain ideas are all about that tiny moment of joy—handmade charms, soft tassels, and clever holders that come together with a few simple supplies. Whether you want a gift-ready charm or a tiny thing to keep in your bag, you’ll find projects here that use materials you probably already own or can grab in one quick Amazon order.
I often start small with a precision craft knife for clean edges or a heat gun when working with resin. If you prefer cutting pre-drawn shapes, run them through my Cricut Joy cutting machine and you’ll have repeatable pieces in minutes. Grab a basic hot glue gun for quick assembly and you’re set.
Below are 27 sweet, simple projects—complete materials, step-by-step instructions, dry times, and styling tips—so you can pick one, pin it, and make it today. Each idea is designed with beginner-friendly techniques and approachable aesthetics like cottagecore, boho, and modern minimalist.
1. Mini Polymer Clay Charm — Soft Pastel Heart
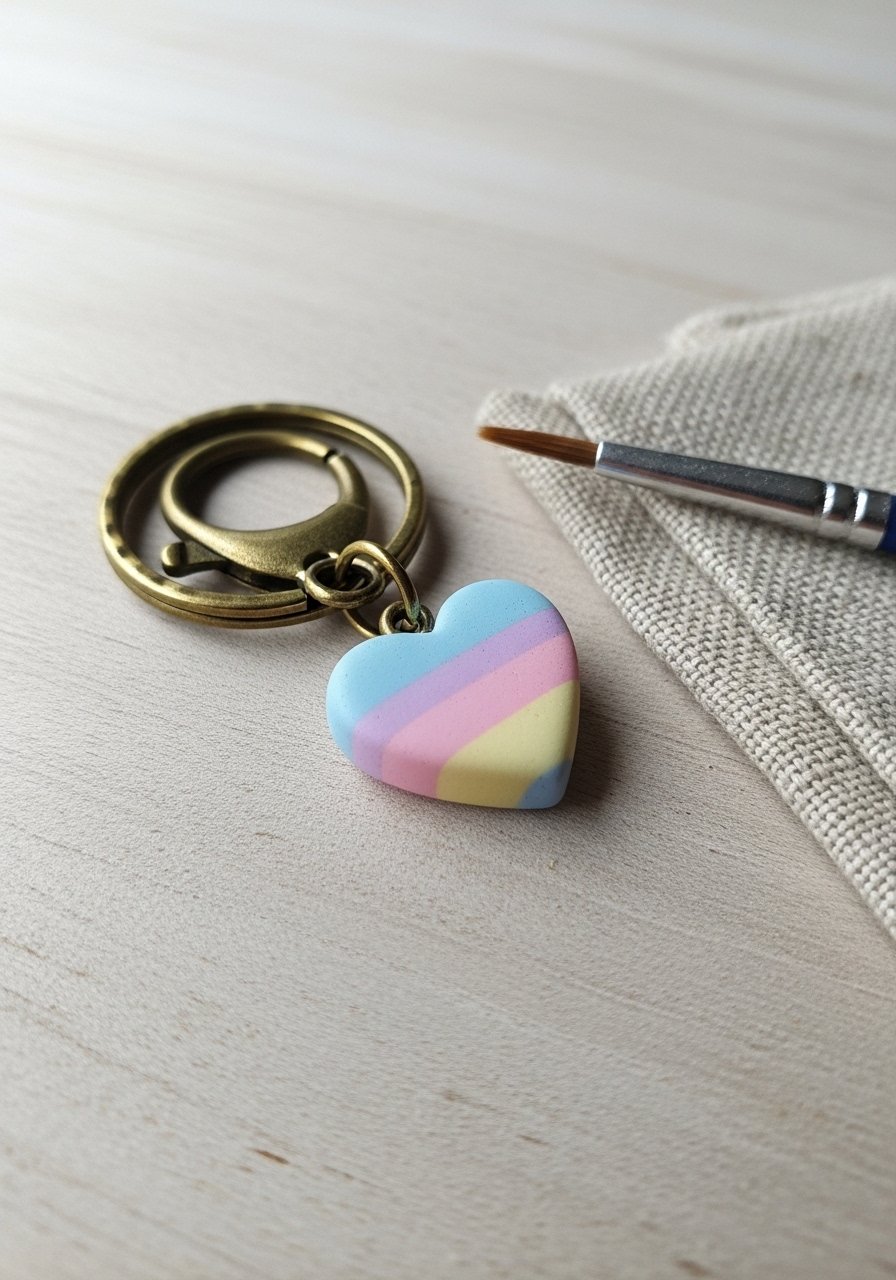
This tiny heart feels weightless in your hand and has a soft matte finish that’s perfect for cottagecore or gift tags. Polymer clay bakes in minutes and lets you mix colors to match a palette. Beginners will love molding simple shapes with a rolling pin and a craft blade.
Materials
- Sculpey® III polymer clay, assorted pastels – about 1 oz total
- Small heart cutter or craft blade
- Brass split key rings, 1 per charm
- Small eye pins, 1 per charm
- Fine-grit sandpaper, 400–600 grit
- Parchment paper or a ceramic tile for baking
- Optional: matte varnish, 1 small bottle
Instructions
- Condition about 5–10 g of clay by warming it in your hands until soft.
- Roll to 2–3 mm thickness on parchment paper.
- Cut hearts with cutter or freehand with a craft knife. Smooth edges with fingers.
- Insert a tiny eye pin into the top, leaving a loop above the clay.
- Bake on a ceramic tile at 275°F (135°C) for 15 minutes per 1/4" thickness—about 15–20 minutes for these thin charms. Let cool 10 minutes.
- Sand any rough edges with 400-grit for a velvety feel.
- Attach the charm to a split ring using pliers.
How to Display or Gift It
Tie a single heart to kraft-wrapped gifts with twine and a sprig of dried lavender. Store extra baked charms flat in a small stackable craft organizer until ready to assemble. These make great party favors—package three in a tiny muslin bag for a polished look.
2. Leather Tassel Keychain — Boho Fringe
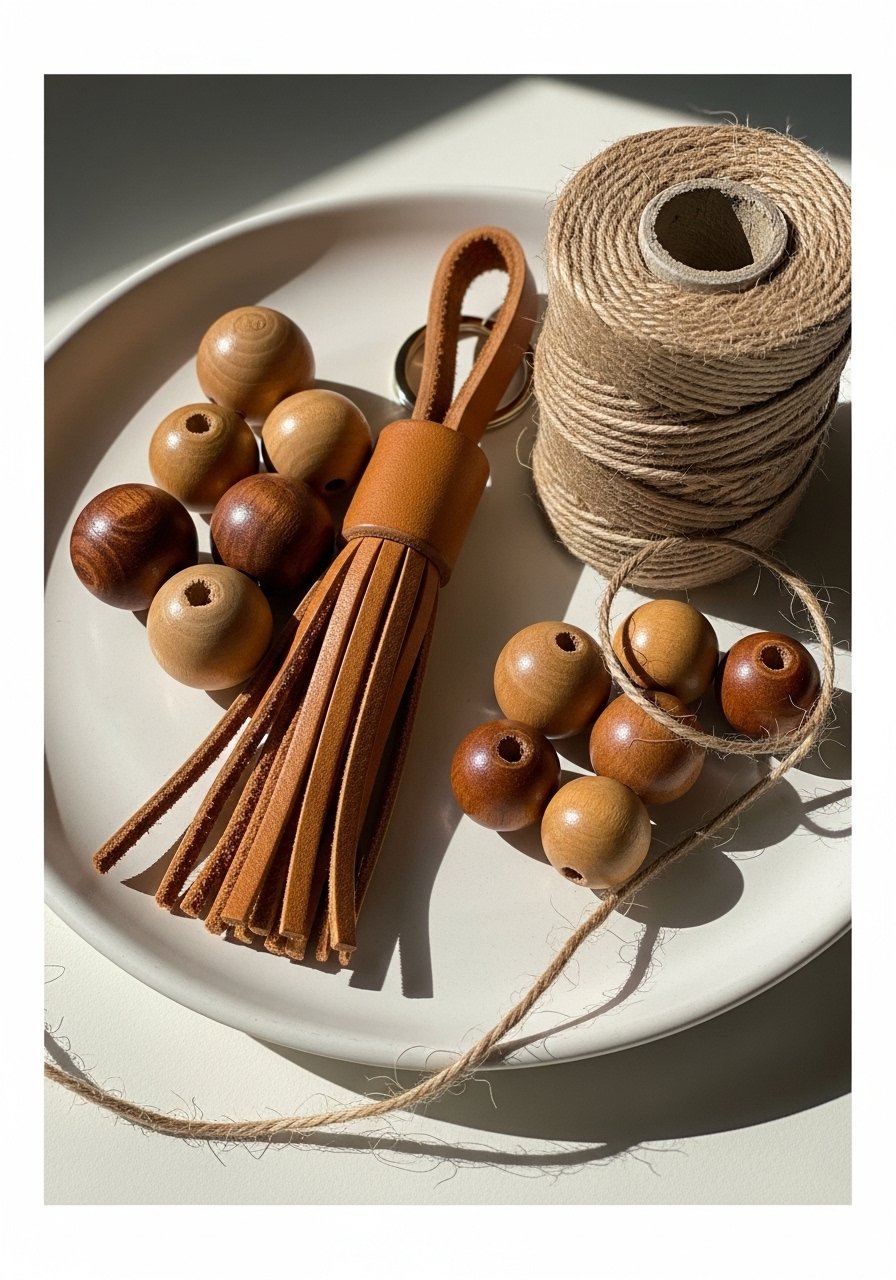
Tassels feel luxe but are easy to make from faux or real leather. They swing nicely and pair well with wooden beads for a boho look. Use a rotary punch or scissors—either works for a relaxed, handmade edge.
Materials
- Faux leather strip (3" x 6"), 1 per tassel
- Small brass lobster clasp and split ring, 1 each
- Wooden bead, 12 mm, 1–2
- Super-fine scissors or rotary cutter
- Hole punch (rotary or handheld)
- Craft glue or E6000, small tube
Instructions
- Cut leather to 3" x 6". Trim one long edge into 1/8" strips, stopping 1/2" from top.
- Roll the uncut top edge tightly to form the tassel head.
- Dab a small amount of E6000 inside the roll and press to secure. Let set 1–2 hours, check tack-free.
- Slide a wooden bead onto the split ring before attaching tassel.
- Punch a small hole through the head and insert split ring, then add lobster clasp.
- Trim fringe ends if needed for evenness.
How to Display or Gift It
Hang on a peg by the front door, or clip to a tote for instant texture. Bundle 3–5 tassels on one ring for key holders or zipper pulls. Keep extra leather strips flat in a craft organizer drawer.
Hot glue guns are great for quick holds, but use E6000 for a more durable finish.
3. Shrinky Dink Photo Charm — Tiny Keepsake

Turn tiny photos or doodles into durable charms with shrink plastic (Shrinky Dinks). The colors deepen during baking and the piece shrinks to a glossy, thick charm. Kids love this one—it's a great rainy-day craft.
Materials
- Shrinky Dink shrink plastic sheets, white or clear – 1 sheet
- Printed mini photos or permanent marker pens
- Hole punch — 1/8" before baking
- Small brass split rings, 6 mm
- Oven or toaster oven
- Gloss sealer like Mod Podge Gloss, optional
Instructions
- Draw or glue a tiny 1.5" image onto the shrink sheet. Cut around it, leaving 1/8" margin.
- Punch a hole near the top before shrinking—do not punch after.
- Preheat oven to 325°F (163°C) for most shrink plastics; follow package if different.
- Place piece on parchment, bake 2–3 minutes—it shrinks and curls; when flat again, remove and cool 1–2 minutes.
- Seal with a thin coat of Mod Podge Gloss, letting dry 15–20 minutes between coats; one coat usually suffices.
- Attach to split ring and key ring.
How to Display or Gift It
Thread a few small charms on one ring for a mini-gallery keychain. Slip finished charms into a small kraft box with tissue paper for keepsake gifts. Store unshrunken sheets flat in a craft storage drawer.
If you prefer clean cuts, a precision craft knife helps with tiny shapes.
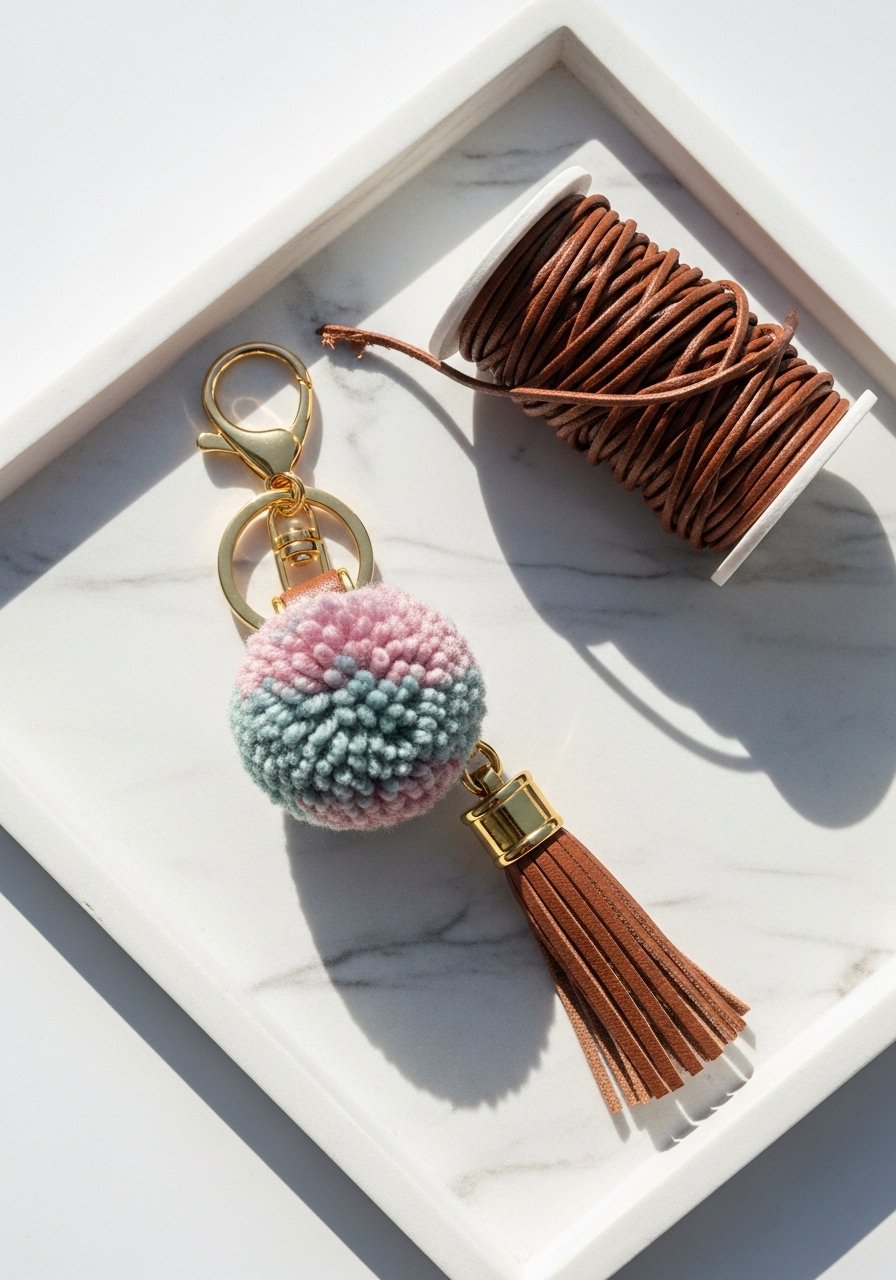
4. Beaded Pom-Pom Keychain — Soft and Squishy
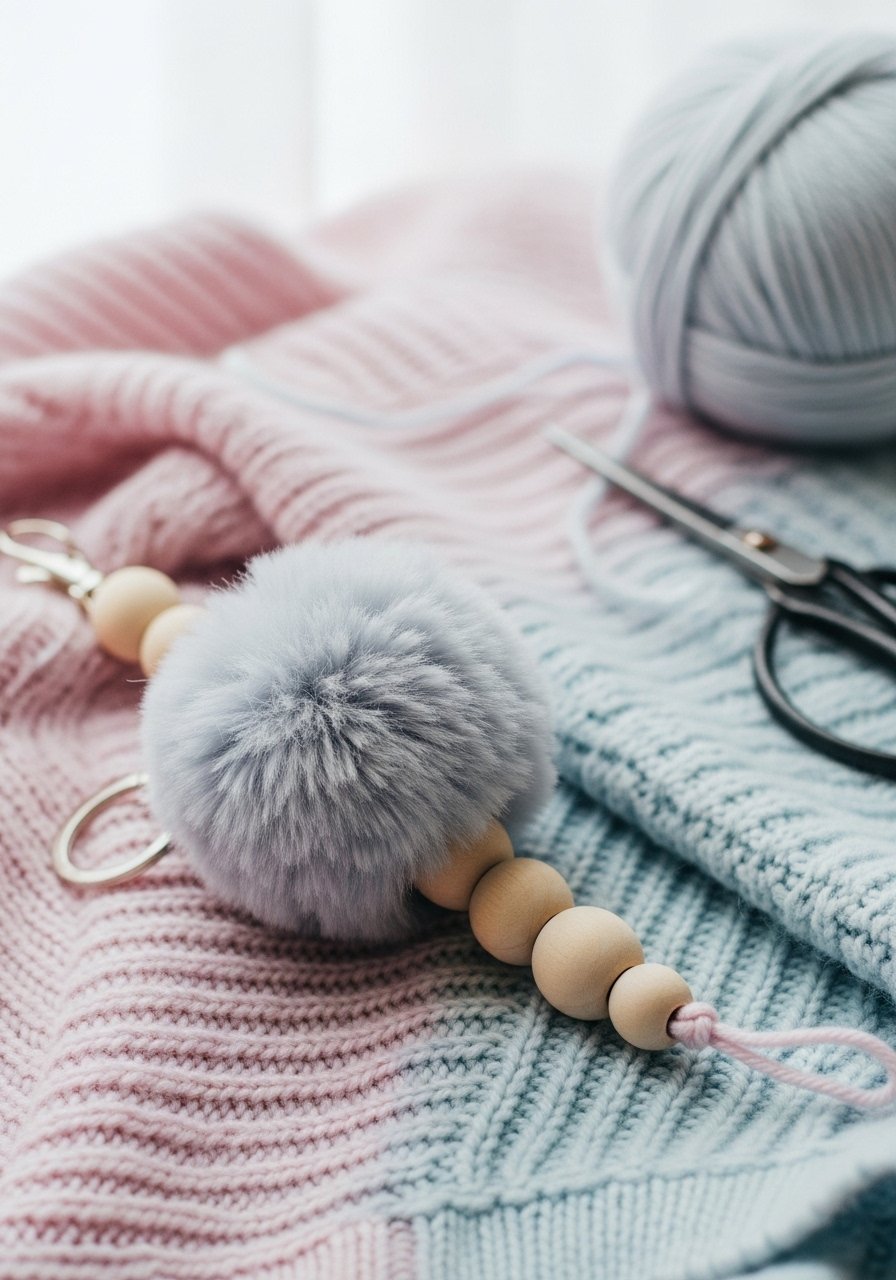
Yarn pom-poms are cozy and tactile—perfect for winter or cottagecore aesthetics. Combine them with wooden beads for a playful contrast. Use a pom-pom maker or a fork if you don’t have one.
Materials
- Acrylic yarn, worsted weight – 10–20 yards
- Pom-pom maker or large fork
- Wooden beads, assorted sizes
- 2 small jump rings and split ring
- Scissors
- Yarn needle
Instructions
- Wrap yarn around the pom-pom maker or fork 60–100 times depending on fluffiness.
- Tie center tightly with a 6" piece of yarn, slide off and trim edges to form a round pom.
- Thread a yarn tail through a wooden bead and knot to secure.
- Tie the bead to a split ring or use small jump ring if preferred.
- Trim stray fibers for a neat round shape.
How to Display or Gift It
Clip to backpacks or zipper pulls for instant personality. Store extra pom-poms in sealed mason jars for a fun craft-room display. Make sets in seasonal colors and tie together with twine for gifting.
A yarn needle set makes threading beads painless.
5. Mini Macramé Tassel — Japandi Minimal
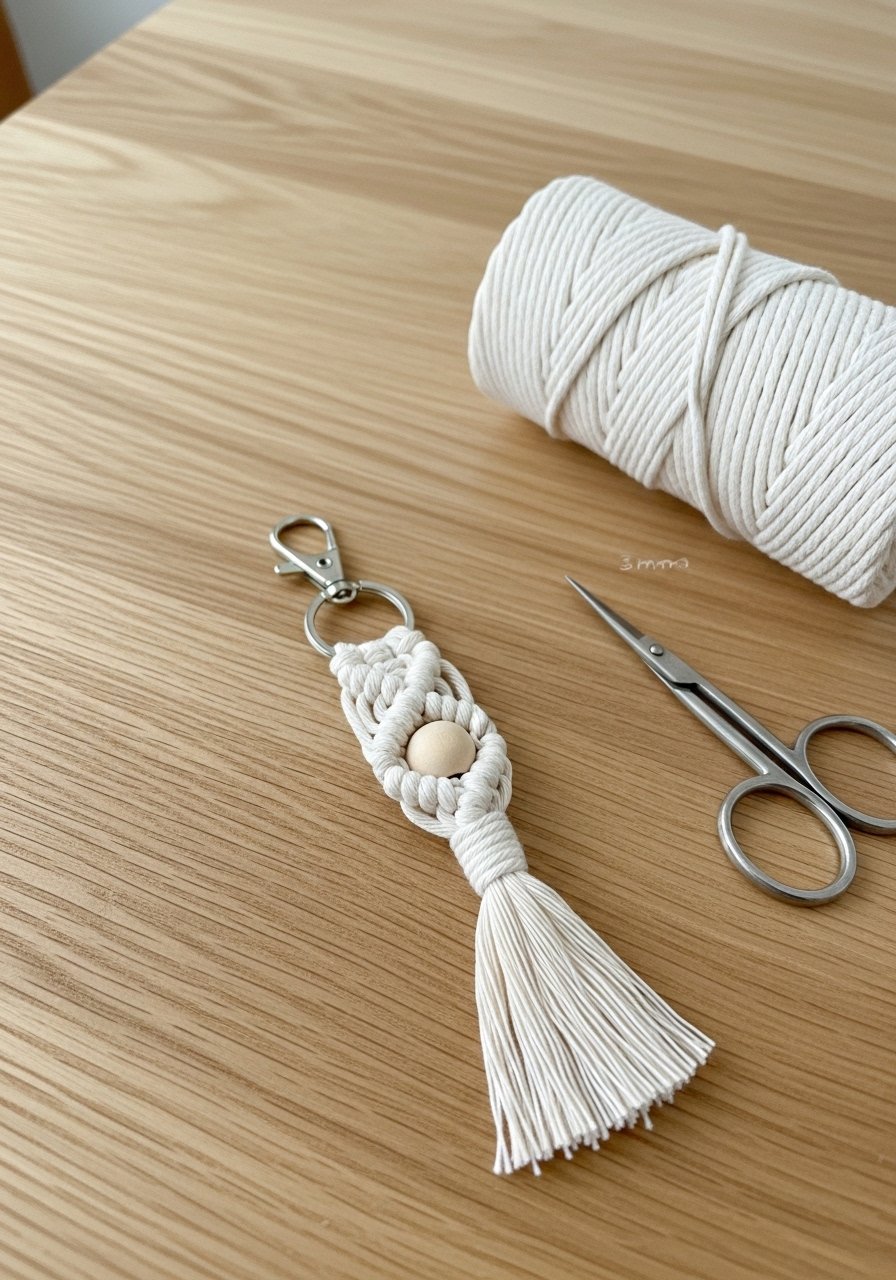
Mini macramé offers a clean, Japandi look that’s simple to learn. Basic knots create a decorative fringe that feels organic and sophisticated. This is a great project for relaxing evening crafting.
Materials
- 3mm cotton macramé cord, 1 yard
- Wooden bead, 10 mm
- Split ring and lobster clasp
- Scissors
- Comb for fluffing
Instructions
- Cut three lengths of cord: 2 x 12", 1 x 6" (for wrapping).
- Fold the two 12" cords in half over the split ring. Add the wooden bead on the looped section if using.
- Use the 6" cord to wrap tightly around the top, secure with a drop of glue.
- Trim fringe evenly and comb to fluff.
- Attach lobster clasp to split ring if desired.
How to Display or Gift It
Pair with linen tote bags for a neutral look. Bundle several tassels on a ring to make a statement keychain. Keep extra cord and finished tassels in stackable craft drawers to avoid dust.
For neat wraps, a tacky glue gives an invisible hold while drying.
6. Wooden Bead + Leather Loop — Minimalist Key Loop
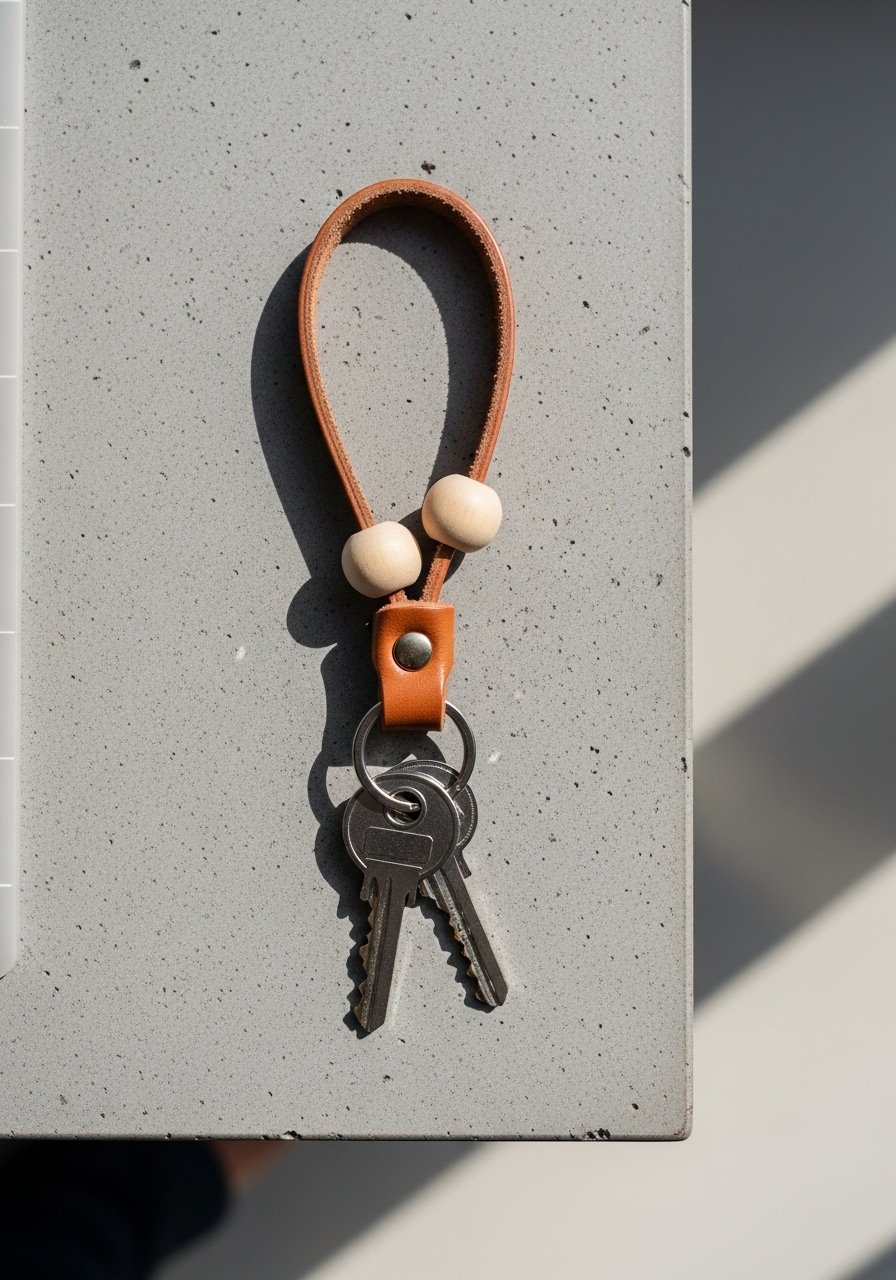
This key loop is sleek and practical—great for those who prefer minimal designs. Use waxed leather for durability and wooden beads for warmth. It's a satisfying small project that comes together in ten minutes.
Materials
- Waxed leather strip, 1/2" x 8"
- Wooden beads, 10 mm, 2
- Brass rivet or small screw post
- Metal split ring
- Leather punch
- Scissors or leather shears
Instructions
- Fold leather strip to create a loop about 3" long when folded.
- Thread wooden beads onto the loop, position near the fold.
- Punch a hole through both layers about 1/2" from the fold.
- Insert rivet or screw post and set according to hardware instructions.
- Attach split ring and add keys.
How to Display or Gift It
Slip the loop over a hook by the entryway for an instant grab-and-go spot. Wrap in kraft paper and slide into a small gift box for a polished present. Store extra leather strips flat to avoid curling.
A leather hole punch keeps holes clean and centered.
7. Tiny Embroidered Felt Charm — Cottagecore Stitch

Sew sweet little embroidered scenes on felt for a soft, tactile keychain. This project is perfect for practicing basic stitches and adding personalized details like initials.
Materials
- Wool blend felt squares, 2" x 2"
- Embroidery floss, assorted colors
- Needle, size 7 or 8
- Small hoop for stability (optional)
- Small piece of fusible interfacing, 2" x 2"
- Split rings and small lobster clasp
- Scissors
Instructions
- Back felt with fusible interfacing for stability and press per instructions.
- Draw or transfer a tiny motif with a disappearing fabric pen.
- Use backstitch, French knots, and lazy daisy to stitch design—each charm should take 15–30 minutes.
- Cut a second felt square for backing and whipstitch around edges, leaving a small opening to lightly stuff with scrap fiber if you like.
- Close opening, stitch a tiny loop at top and attach split ring.
How to Display or Gift It
Group a set of embroidered charms on one ring for a sentimental gift. Present in a small wooden box lined with tissue. Keep stitched pieces in a shallow craft drawer to prevent crushing.
A needle threader is a small tool that speeds up embroidery.
8. Painted Wood Disc — Farmhouse Painted Charm
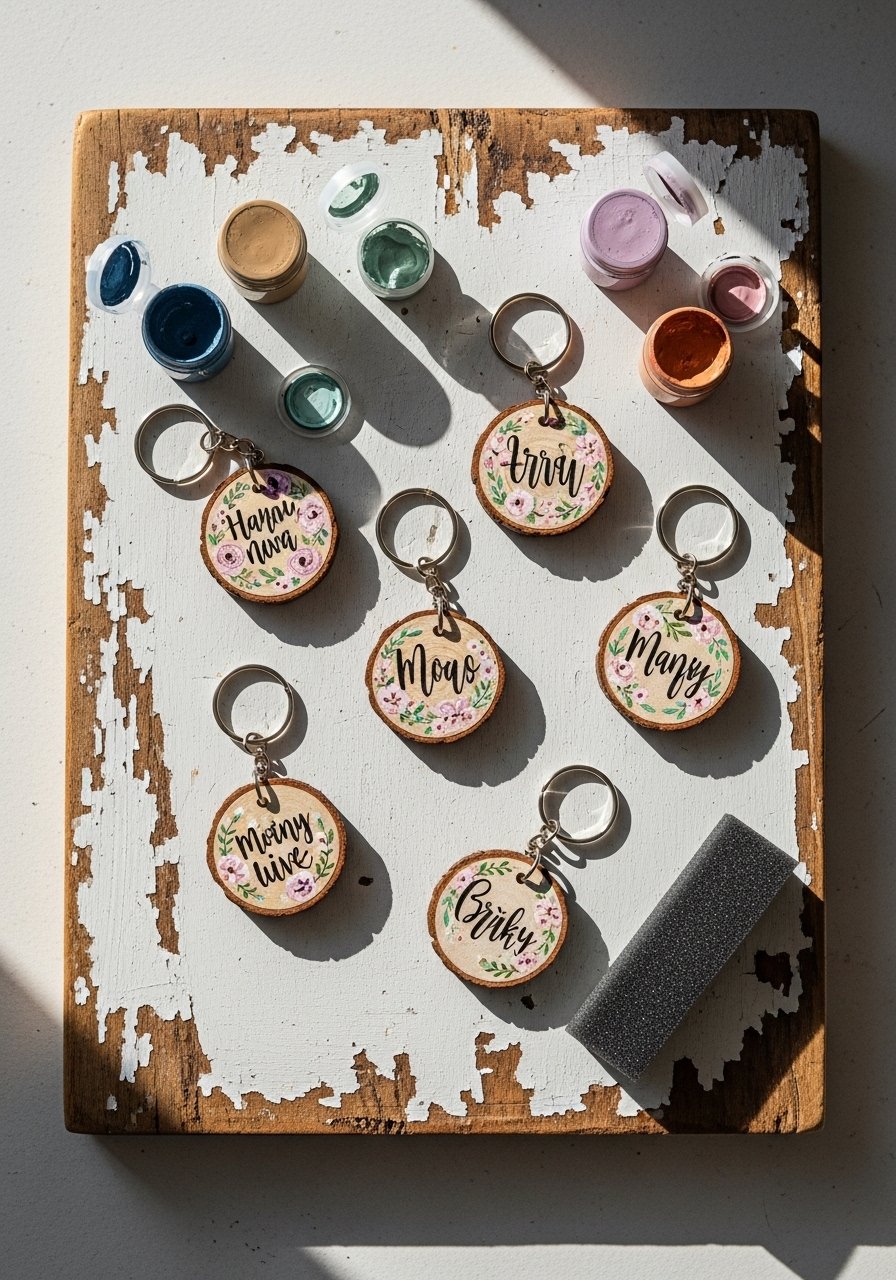
Wood discs take paint beautifully and lend a farmhouse or rustic vibe. Use chalk paint for matte coverage and seal with matte Mod Podge for scratch resistance.
Materials
- Wooden discs, 1"–1.5" diameter
- Chalk paint set, assorted colors
- Fine foam brush
- Lettering stencil or micro-tip paint pen
- Small hole punch or pre-drilled discs
- Matte sealer like Mod Podge Matte
Instructions
- Sand discs lightly if rough. Wipe dust away.
- Apply one thin coat of chalk paint, dry 15–20 minutes. Apply second coat if needed.
- Use a stencil or paint pen for lettering; let dry 30 minutes.
- Seal with one thin coat of Mod Podge Matte; dry 20–30 minutes.
- Attach split ring through hole.
How to Display or Gift It
Tie to a jar as a custom label, or clip to aprons and market totes. Stack extras in a small craft organizer when painting in batches. Chalk-painted discs pair well with twine and kraft paper for gifting.
A set of foam brushes helps lay down smooth, even coats.
9. Resin Pressed Flower Charm — Glossy Nature
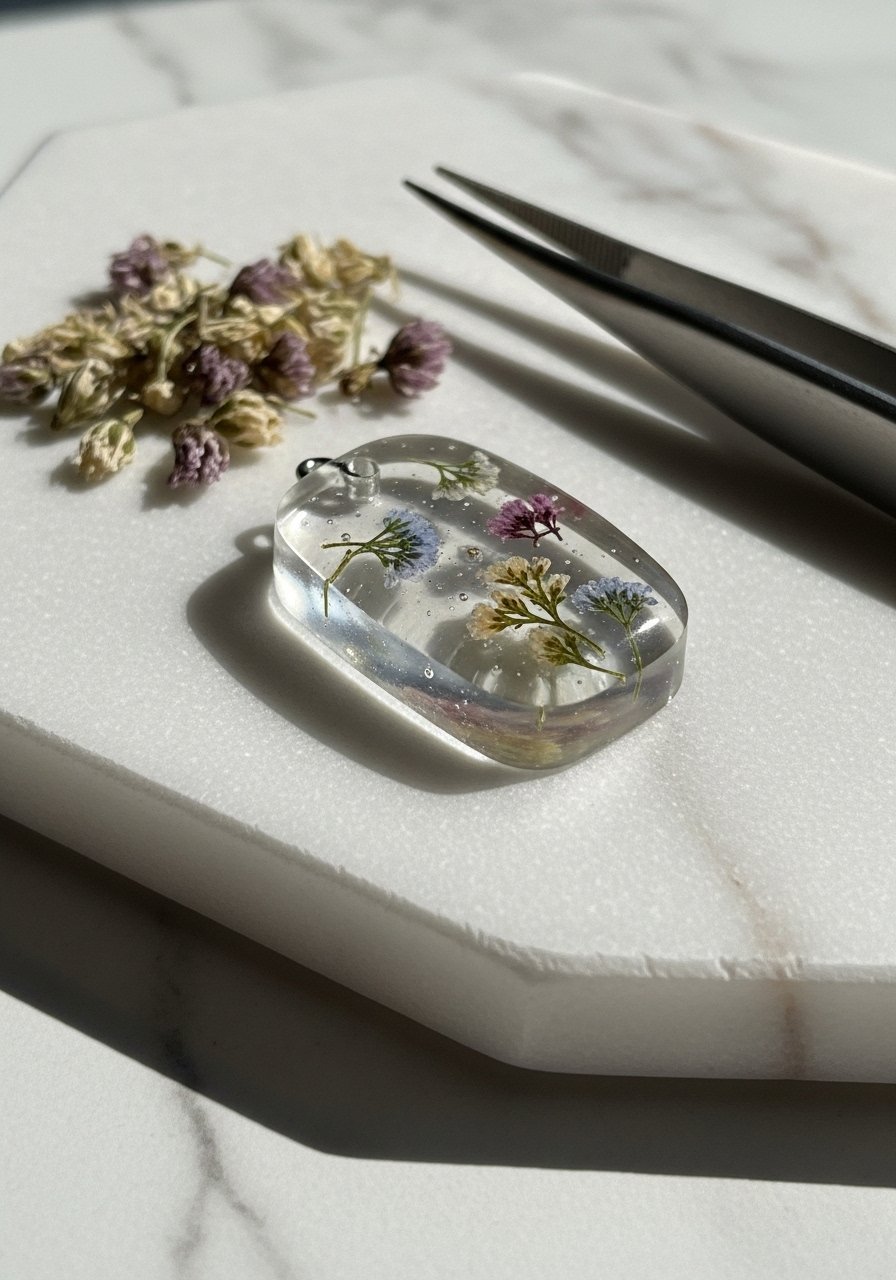
Encapsulate tiny pressed blooms in clear resin for a tiny window to nature. This project feels luxe but is beginner-friendly when you work in thin layers and use a silicon mold.
Materials
- Clear epoxy resin kit, small 2-part, 30–60 ml
- Silicone charm molds (small rectangle/circle)
- Pressed flowers, tiny (dried flat)
- Mixing cups and stir sticks
- Disposable gloves and respirator mask recommended
- Sandpaper and small hole drill if molds aren’t pre-drilled
- Split rings
Instructions
- Prepare mold and pressed flowers. Work in a ventilated area.
- Mix resin parts per kit instructions—usually 1:1 by volume—stir 2–3 minutes slowly to minimize bubbles.
- Pour a thin base layer (1–2 mm), wait 5–10 minutes for bubbles to rise.
- Place flowers with tweezers. Pour remaining resin to fill mold.
- Cover and let cure 24–48 hours (full hardness 72 hours).
- Demold, sand edges if needed, and drill a small hole if mold didn’t include one. Attach split ring.
How to Display or Gift It
Attach to a small wooden tag for an earthy presentation. Keep cured charms in a flat box separated by tissue to avoid scratches. Make sets in coordinating palettes for bridesmaid gifts.
For mixing, a clear set of epoxy resin mixing cups keeps measurements exact.
10. Perler Bead Mini — Retro Pixel Charm
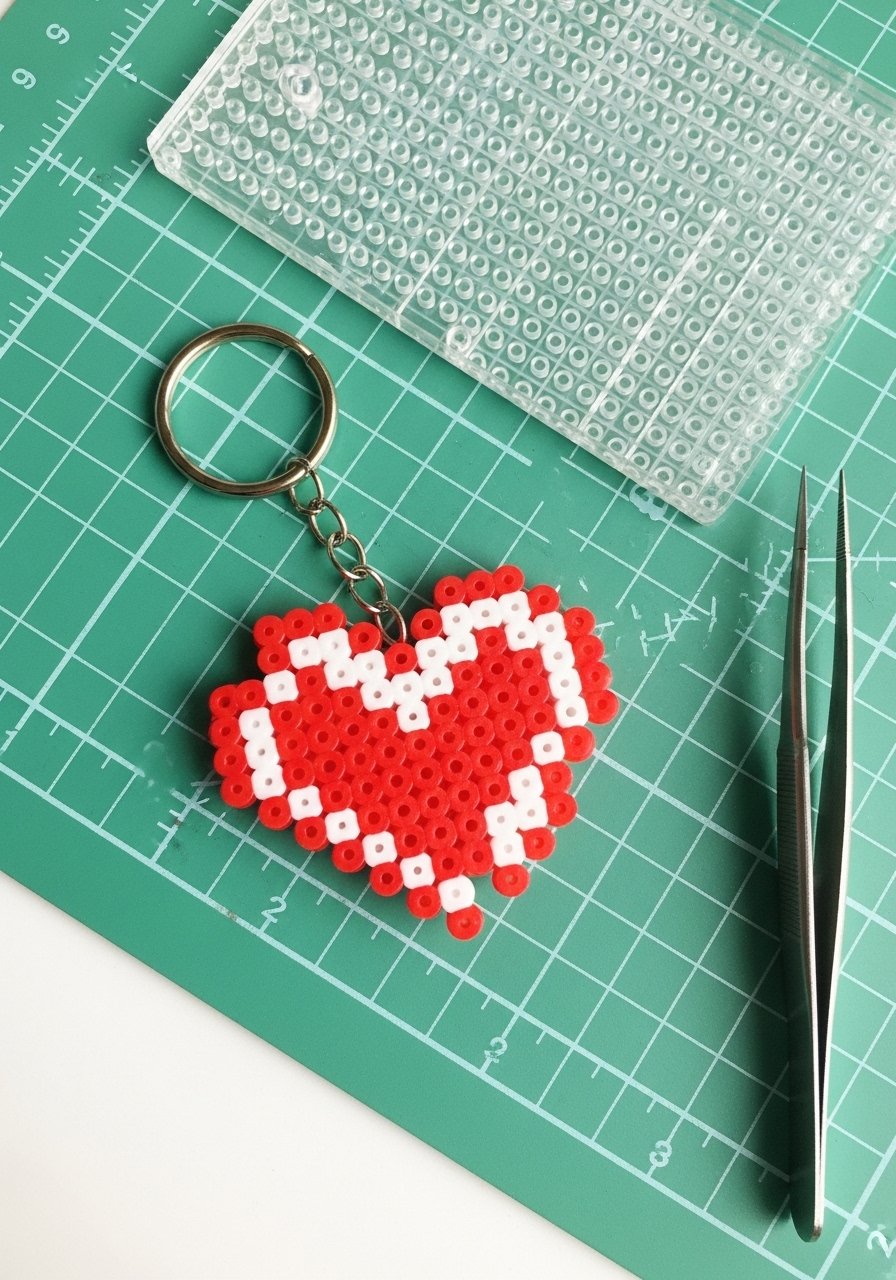
Perler beads shrink into hard plastic charms after ironing, making pixel art tiny and durable. Great for kids and nostalgic makers, and you can make dozens in an evening.
Materials
- Perler beads, assorted colors
- Small square pegboard or mini board
- Ironing paper (parchment)
- Tweezers
- Small hole punch tool if needed
- Split rings and jump rings
Instructions
- Lay bead design on pegboard; keep a small gap near top for a hole or plan to punch after.
- Cover with ironing paper and press iron on medium for 10–20 seconds, move iron in circular motions until beads fuse.
- Let cool 30 seconds, then remove and flip to fuse the other side if desired—repeat ironing 5–10 seconds.
- Punch a hole if not created; attach a jump ring and split ring.
How to Display or Gift It
Create themed sets—gaming, floral, or initials—and present on a small card backed with washi tape. Store leftover beads in small jars by color.
Tweezers make tiny bead placement so much easier—try a precision tweezer set.
11. Shrink Plastic Name Tag — Personalized ID
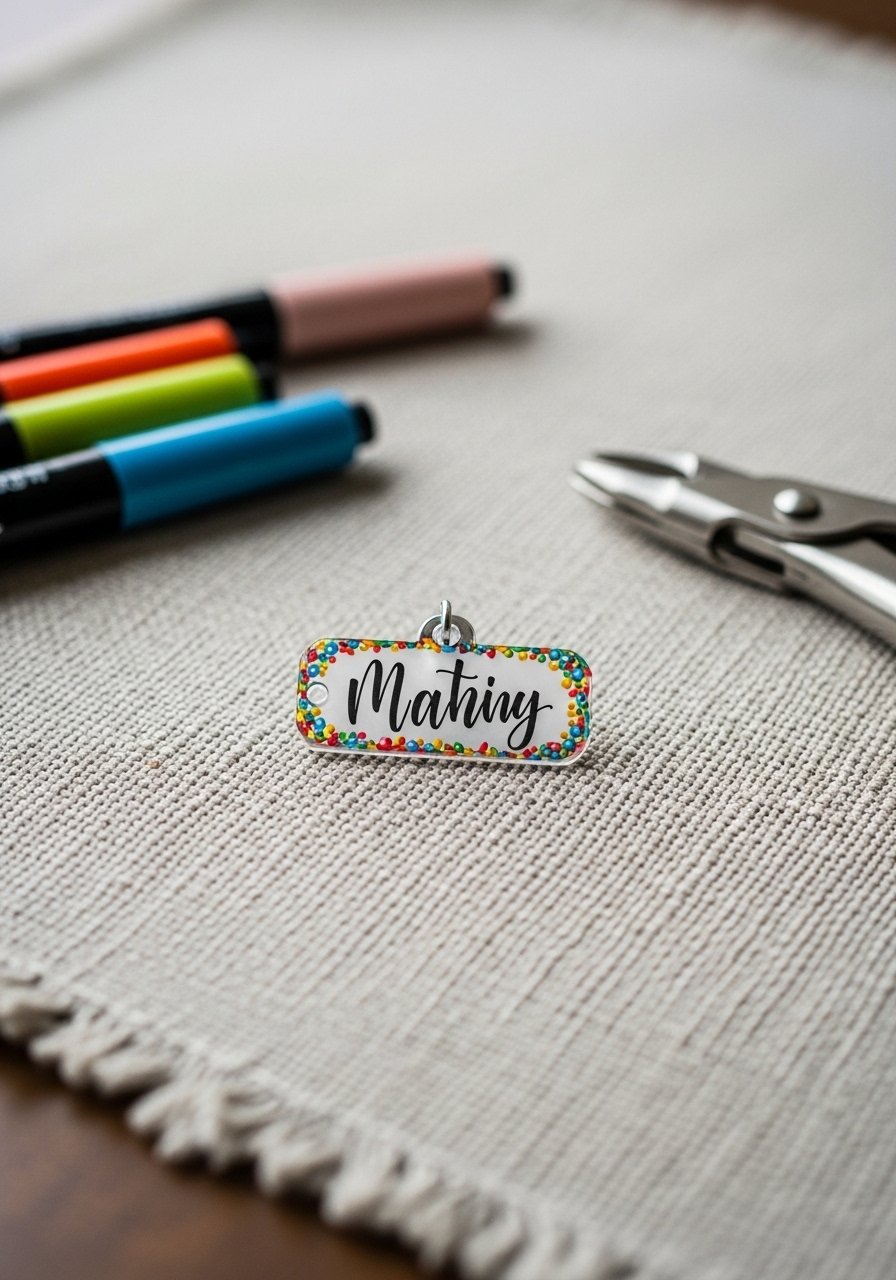
Make personalized name tags on shrink plastic with paint pens or printed fonts. This is a fast way to create custom party favors or teacher gifts.
Materials
- Shrink plastic sheets (white or clear)
- Fine-tipped paint pens or printed designs
- Hole punch
- Oven set to 325°F
- Clear sealer (optional)
Instructions
- Draw or print name at about 1.5". Cut out leaving small margins.
- Punch hole near top.
- Bake at 325°F for 2–3 minutes until flat; cool.
- Seal with one thin coat of sealer if desired, dry 20 minutes.
- Add split ring.
How to Display or Gift It
Slide onto a planner zipper or attach to a pencil pouch. Make batches with class lists and package in small clear bags.
A pack of fine paint pens helps with crisp lettering.
12. Paracord Mini Fob — Rugged Utility
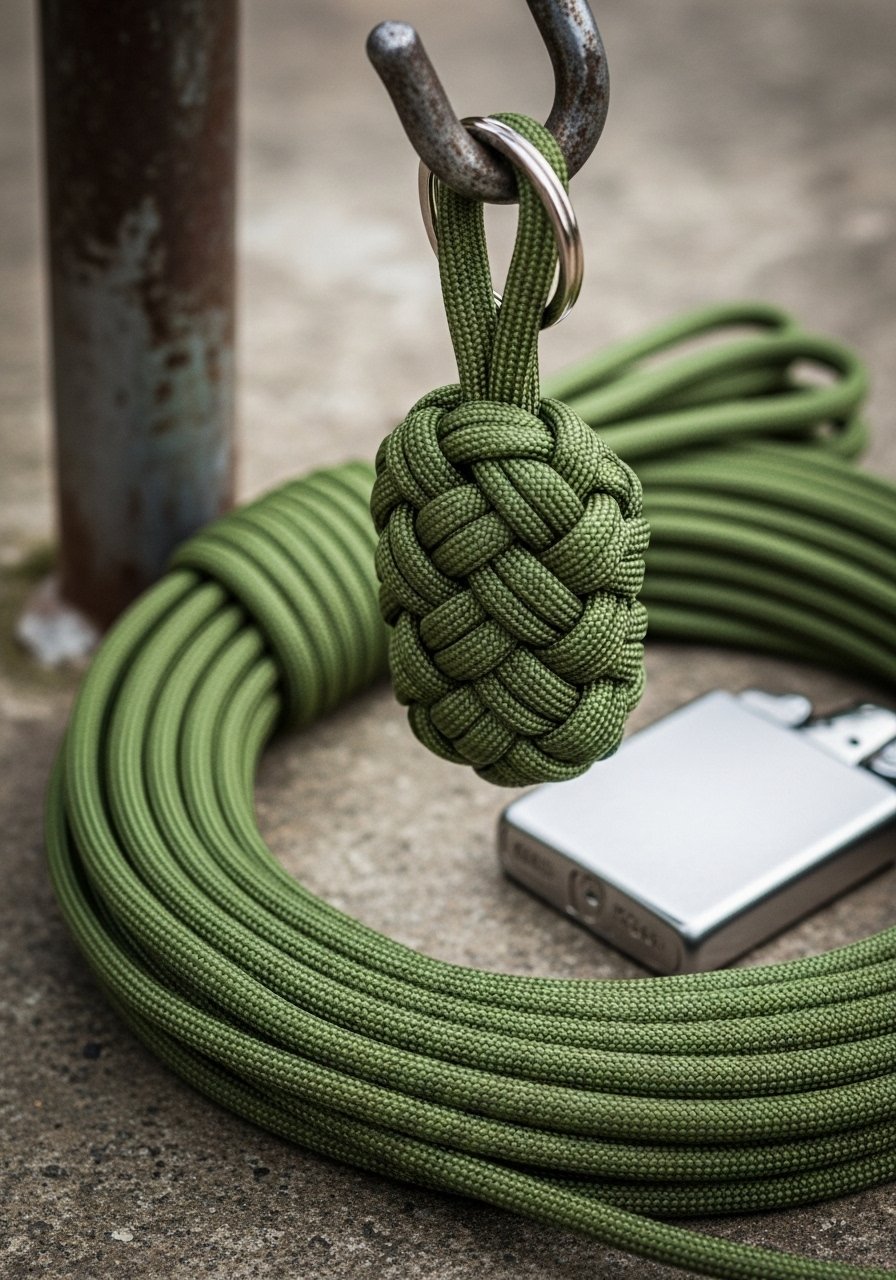
Paracord fobs are practical and feel outdoorsy. They’re great for campers or anyone who likes a durable, tactile accessory. Learn a few knots and you’ll be whipping these up fast.
Materials
- 550 paracord, 3–4 ft per fob
- Split ring
- Lighter to seal ends
- Scissors
- Paracord jig (optional)
Instructions
- Measure 3–4 ft of cord. Seal ends with lighter.
- Fold cord and attach folded end to split ring.
- Use cobra or Solomon bar knot for 2–3 inches of length.
- Trim excess and melt ends, pressing to secure.
How to Display or Gift It
Attach to outdoor gear or carabiners for a camping-ready look. Store extra cord in small labeled jars in a craft closet.
A paracord jig keeps tension even for uniform knots.
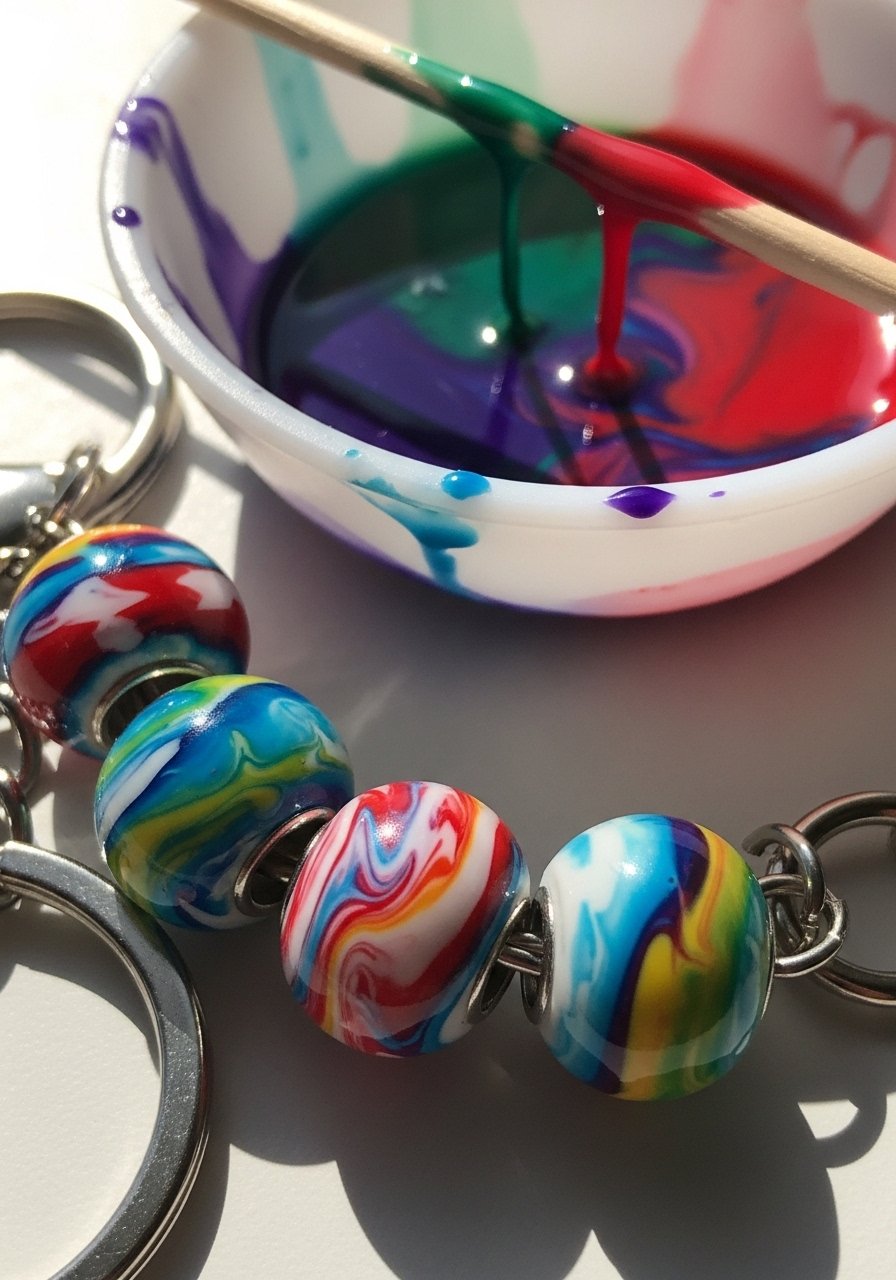
13. Alcohol Ink Marbled Drop — Bright Abstract
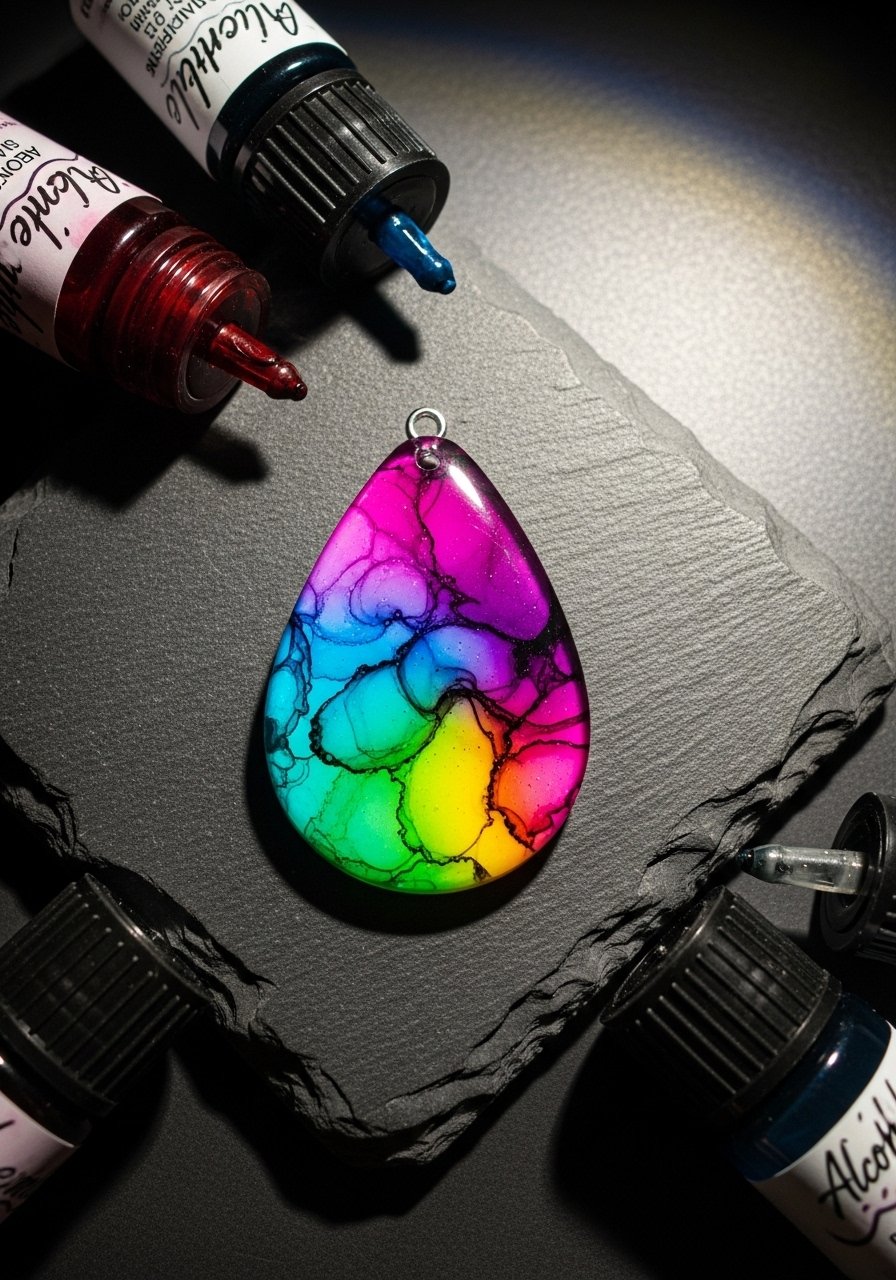
Alcohol inks make bold, flowing patterns that are luminous under resin. This project uses tiny bezels or molds to keep things tidy and bright.
Materials
- Mini bezel trays or silicone drop molds
- Alcohol ink set (assorted colors)
- Isopropyl alcohol, eyedropper
- Clear resin kit, small amount
- Micro brushes or toothpicks
- Split rings
Instructions
- Drop alcohol inks on small ceramic tile and add isopropyl to thin strokes.
- Move ink into molds or onto blank resin bases with a toothpick for desired pattern.
- Pour thin resin layer to encapsulate (mix per kit instructions).
- Cure 24–48 hours; full cure 72 hours.
- Attach split ring.
How to Display or Gift It
Group color-coordinated charms on a ring for a modern statement. Place in a small glass jar with ribbon for boutique-style gifting.
Alcohol ink flows best on non-porous surfaces; test on a scrap beforehand. For mixing resin, a small resin kit sized for jewelry is perfect.
14. Wire-Wrapped Crystal — Boho Gem
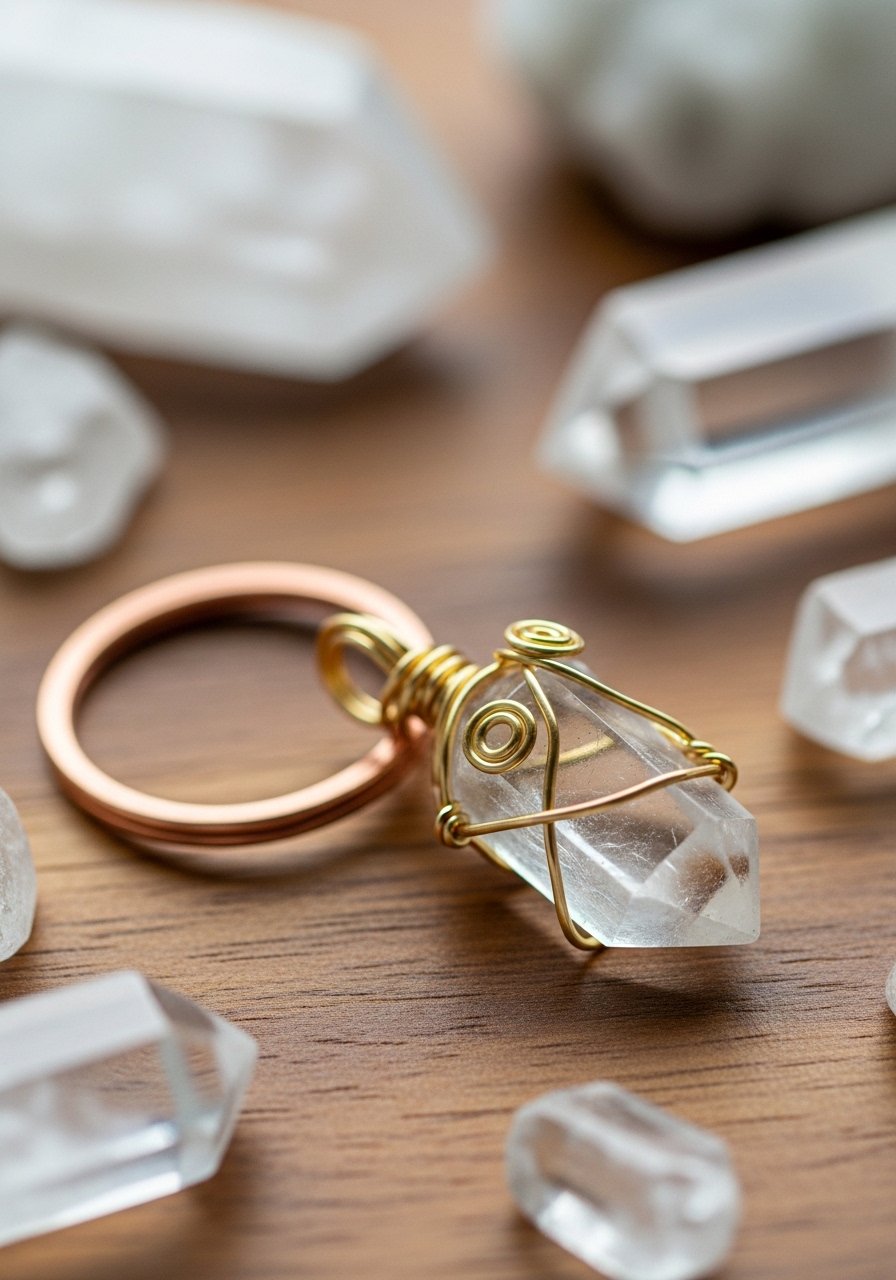
Wire-wrapping stones gives a boho, metaphysical vibe. Small crystal points or tumbled stones are affordable and instantly elevated with simple wire work.
Materials
- Small crystal points or tumbled stones, 1"–1.5"
- 20–22 gauge jewelry wire, 6–12" per charm
- Round-nose pliers, chain-nose pliers, wire cutters
- Jump rings and split rings
Instructions
- Center wire under stone and pull ends up around the stone.
- Twist and wrap to secure stone in place, creating decorative loops.
- Trim excess and tuck wire ends for safety.
- Attach a jump ring and split ring.
How to Display or Gift It
Pair with a tiny card that lists the stone’s meaning. Store stones in small velvet pouches until ready to wrap.
A set of jewelry pliers makes wrapping neat and safe.
15. Mini Pom-Pom Leather Tassel — Mixed Textures
Combine soft pom-poms and leather for a modern textural contrast. This mixed-media approach looks boutique but is quick to assemble.
Materials
- Yarn leftover (10 yards) for pom-pom
- Faux leather strip 3" x 5"
- Small wooden bead, 12 mm
- Split ring and lobster clasp
- Hot glue gun and glue sticks
Instructions
- Make a small pom-pom (see Project 4).
- Create a mini leather tassel with 3" x 5" strip, fringe 1/8" cuts.
- Secure leather roll with hot glue; add wooden bead on top.
- Glue pom-pom to leather head and attach to split ring.
- Let glue cool 5–10 minutes before use.
How to Display or Gift It
This one looks luxe clipped to a handbag. Wrap in tissue and tuck a dried sprig on top for gifting. Store glued pieces in a box until glue fully cures.
A compact hot glue gun is perfect for small assembly.
16. Polymer Clay Animal Face — Cute Mini Mascot
Create adorable tiny animal faces with layered polymer clay. This is perfect for gifting to kids or adding personality to pencil pouches.
Materials
- Polymer clay assorted colors, small amounts
- Needle tool and sculpting blade
- Eye pins and split rings
- Ceramic tile for baking
- Fine sandpaper
Instructions
- Condition clay; form base disc ~15 mm diameter.
- Add small colored pieces for ears, nose, and eyes; blend seams.
- Insert eye pin and bake at 275°F (135°C) for 15–20 minutes.
- Cool, sand gently, and attach split ring.
How to Display or Gift It
Make a set of four animal faces and present them in a small box. Keep baked pieces flat in a drawer to protect painted surfaces.
A small polymer clay tool kit speeds shaping and detailing.
17. Tiny Cross-Stitch Charm — Petite Needlework
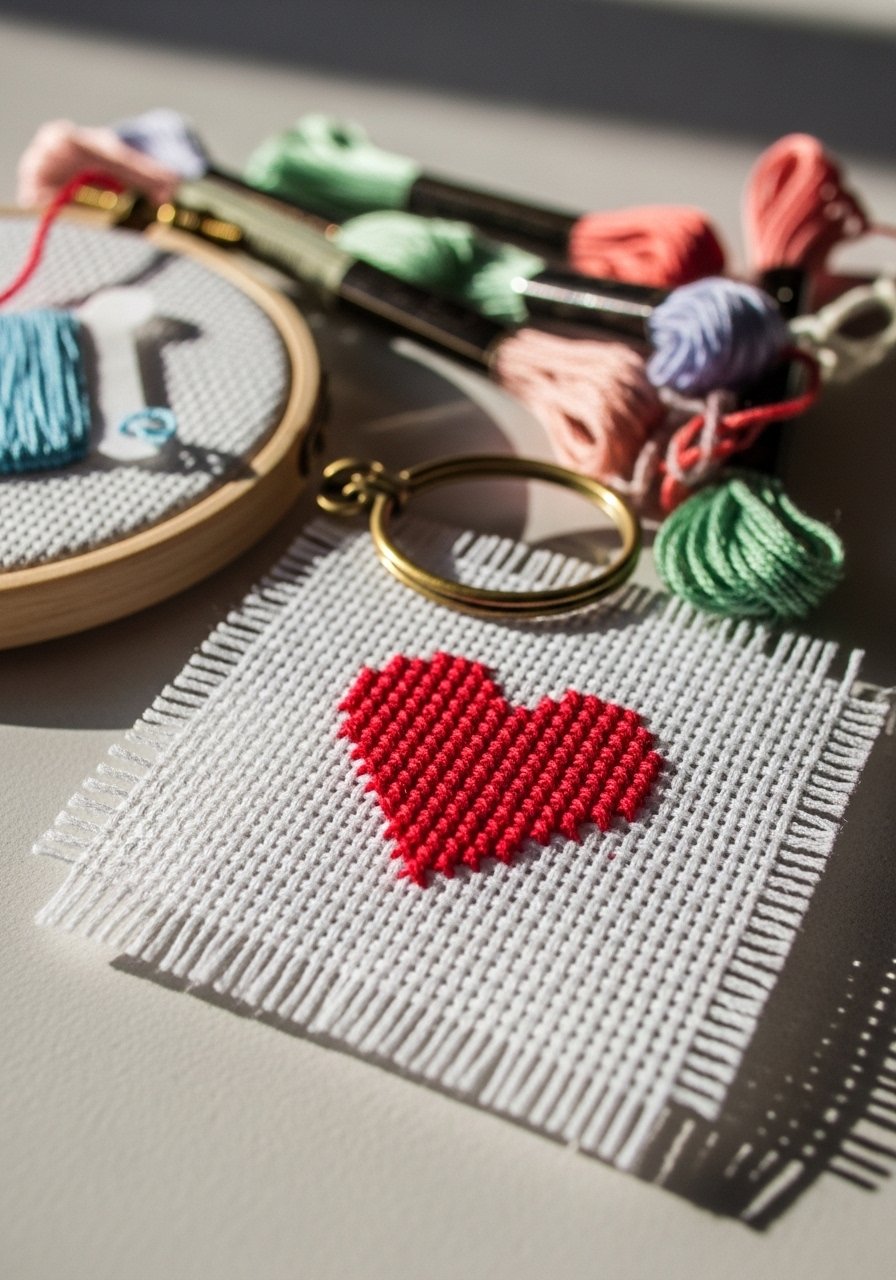
Cross-stitch is scalable—tiny motifs become charming key fobs. Use aida cloth and small hoops or stitch and finish on felt backing.
Materials
- Aida cloth scraps, 14-count
- Embroidery floss
- Size 26 needle
- Small felt backing
- Split ring and tiny hoop or ribbon
- Scissors
Instructions
- Chart a tiny motif (5×5 stitches) and stitch on aida cloth.
- Cut around design, leaving 1/4" seam allowance.
- Attach to felt backing with whipstitch.
- Add a small loop and attach to split ring.
How to Display or Gift It
Group alphabet initials on a ring for personalized teacher gifts. Store stitched pieces flat in a zip pouch.
A tiny embroidery hoop set is handy for small stitching.
18. Beaded Leather Wrap — Chic Wristlet
Turn beads and leather into a wristlet that doubles as a keychain. It’s functional and makes keys easy to carry hands-free.
Materials
- Leather cord 18"
- Beads (wood, glass) – ~10–15 small beads
- Lobster clasp and split ring
- Bead needle (optional)
- Scissors and lighter
Instructions
- Thread beads onto leather cord in desired pattern, leaving 2" at each end.
- Fold to form a wristlet and secure ends with knot; seal ends with lighter.
- Attach lobster clasp and split ring.
How to Display or Gift It
Slip on a wrist for quick errands or clip to diaper bags. Pack several colorways in a small drawer organizer.
A slim beading needle helps threading tiny bead holes.
19. Upcycled Button Stack — Vintage Charm
Buttons make charming retro keychains when stacked and wired. Use vintage buttons for character and varied textures.
Materials
- 3–4 buttons per charm (varied sizes)
- 20-gauge wire, 6"
- Round-nose pliers and cutters
- Split rings
Instructions
- Stack buttons in pleasing order.
- Thread wire through center holes, leaving 1" at top to form a loop.
- Twist wire ends securely and trim.
- Attach to split ring.
How to Display or Gift It
Tie vintage tags on a kraft string and bundle button keychains for a retro party favor. Keep spare buttons organized in small jars.
A small button storage jar keeps supplies neat.
20. Cork Disc Keychain — Wine Cork Upcycle

Recycle wine corks into lightweight, tactile discs. They’re rustic and perfect for natural or farmhouse aesthetics.
Materials
- Wine corks, 1 per disc (slice into discs)
- Sharp knife or small saw
- Sandpaper, 220 grit
- Paint pens or wood-burning tool (optional)
- Small eye screw
- Split ring
Instructions
- Slice cork into 1/4" thick discs using a sharp blade.
- Sand edges smooth.
- Decorate with paint pen or wood-burn a small design.
- Screw in a tiny eye screw and attach split ring.
How to Display or Gift It
Group in sets of three with coordinating colors for housewarming gifts. Store cork slices flat in a small container.
A small wood-burning tool adds rustic engraved detail.
21. Bottle Cap Photo Charm — Retro Lid
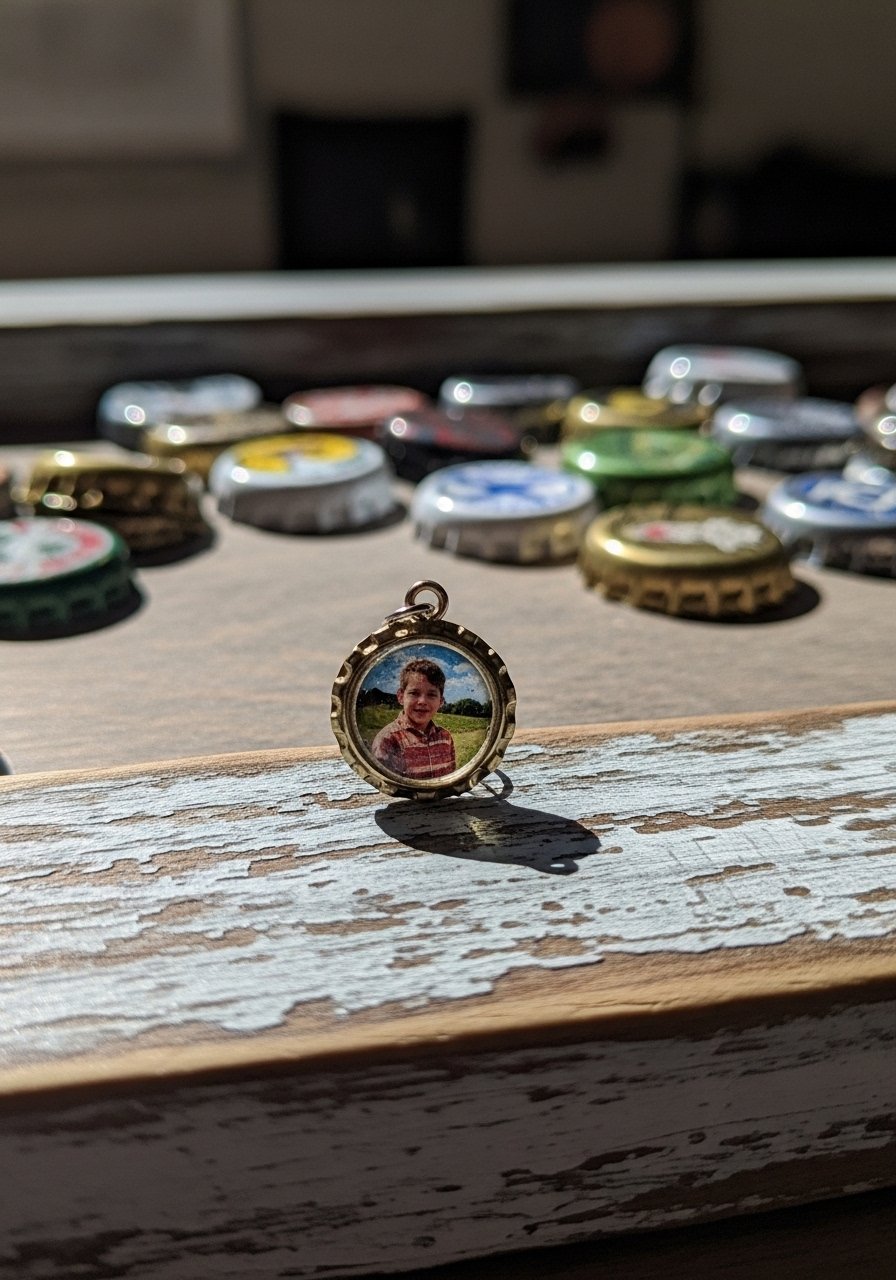
Bottle caps are quirky and fun for photo or logo charms. Add a resin top for durability and shine.
Materials
- Bottle caps, flattened slightly
- Small printed photos, ~20 mm
- Clear resin or strong clear-drying glue
- Sandpaper and small drill
- Split rings
Instructions
- Flatten cap gently if needed. Sand edges.
- Glue photo into cap and pour a tiny layer of resin or apply a clear epoxy dome.
- Let cure 24–48 hours.
- Drill or punch small hole in edge and attach split ring.
How to Display or Gift It
Group themed bottle caps (travel, band logos) on one ring for a personalized set. Store extras flat until cured.
An epoxy dome kit gives a professional glossy finish.
22. Mini Felt Animal — Soft Stuffed Charm
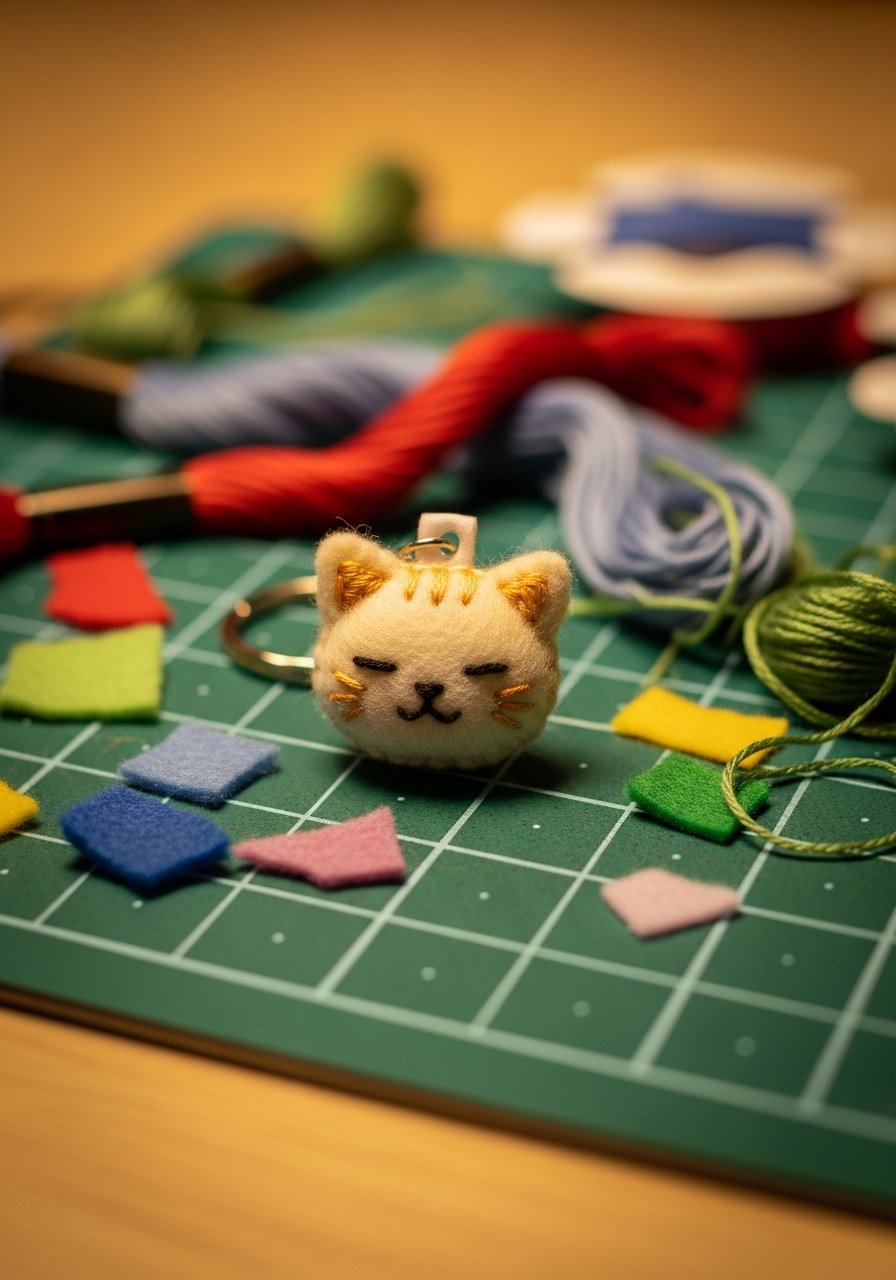
Sew tiny stuffed felt animals—simple shapes, little stuffing, and hand-stitched details make adorable charms kids adore.
Materials
- Wool felt sheets, 2"x3" per charm
- Embroidery floss
- Needle and thread
- Fiberfill stuffing, pinch
- Small key ring and loop
- Scissors
Instructions
- Trace and cut two identical shapes.
- Embroider the face on one piece before sewing.
- Whipstitch around edges, leaving a small opening to add stuffing.
- Stuff lightly, close, and attach ring.
How to Display or Gift It
Attach to diaper bags or backpack zippers. Keep extra felt pieces in a divided sewing box.
A small sewing kit is great for on-the-go repairs.
23. Nail Polish Marbled Bead — Poured Color
Marbling with nail polish is an affordable way to make colorful beads. It’s a playful method that gives glossy, varied results.
Materials
- Plain wooden or plastic beads, 10 mm
- Variety of nail polish colors
- Small bowl of water
- Toothpicks or skewers
- Sandpaper and sealer
Instructions
- Drip different nail polishes onto water surface to create a pattern.
- Dip bead into pattern, rotating to coat.
- Let dry 30–60 minutes.
- Seal with clear gloss if desired; dry 1–2 hours.
- Attach to split ring.
How to Display or Gift It
Make color-coordinated bead sets and present on a small card. Store dried beads in a box to prevent dust.
A clear topcoat seals brilliance.
24. Crochet Mini Amigurumi Charm — Tiny Plush
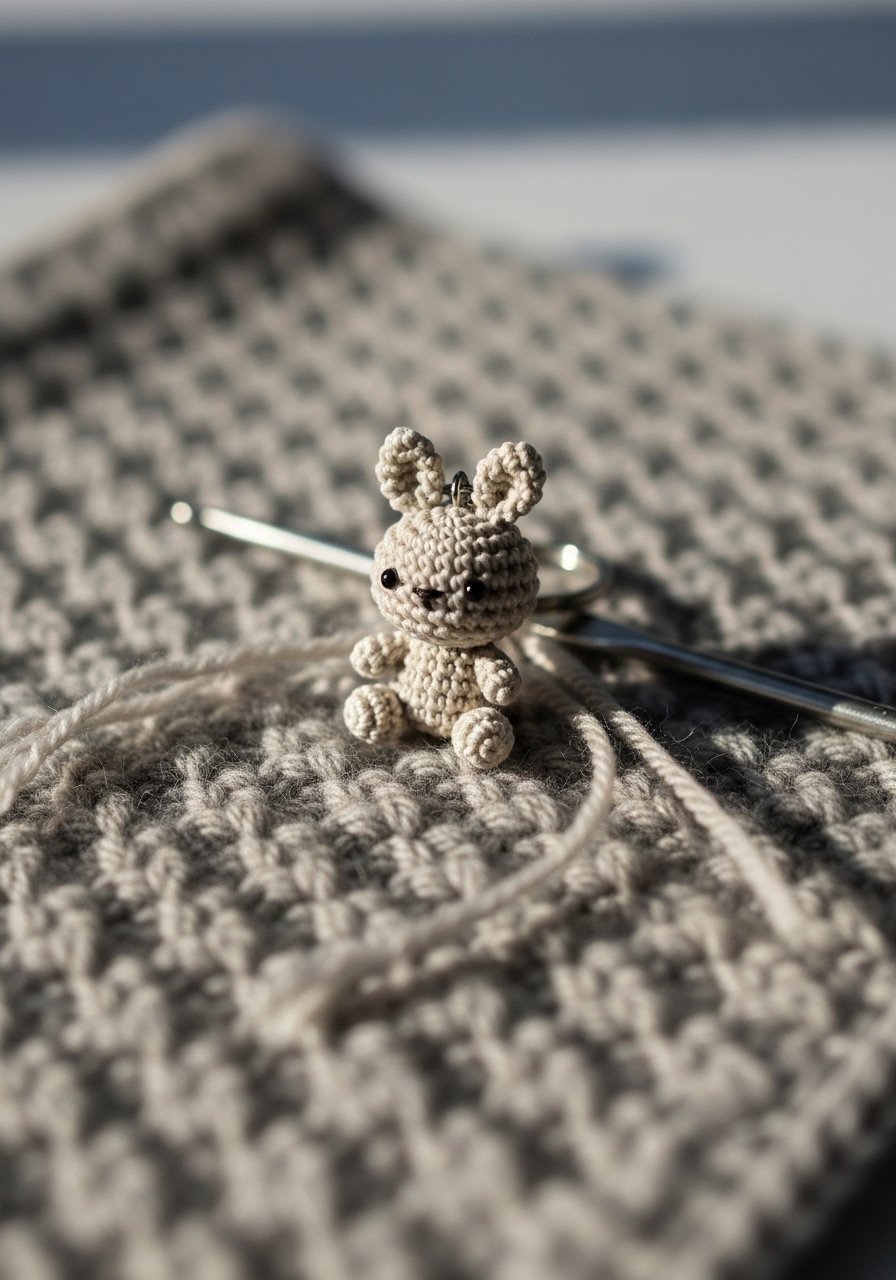
If you crochet, tiny amigurumi translate beautifully to keychains. Use cotton yarn for a tidy finish and embroider simple faces.
Materials
- Fingering weight cotton yarn, small scraps
- Crochet hook 2.5–3.5 mm
- Fiberfill, small amount
- Yarn needle
- Split ring and a small chain
Instructions
- Crochet in continuous rounds: make a magic ring and single crochet 6 sts, increase, and shape head to about 1" diameter.
- Stuff lightly and close with decrease rounds.
- Embroider face and attach to split ring via small chain.
How to Display or Gift It
Clip to baby shower gifts or stitch names on mini scarves for each charm. Keep extra crochet hooks and yarn in a portable project bag.
A crochet hook set lets you work at the perfect gauge.
25. Minimal Acrylic Tag — Modern Gloss
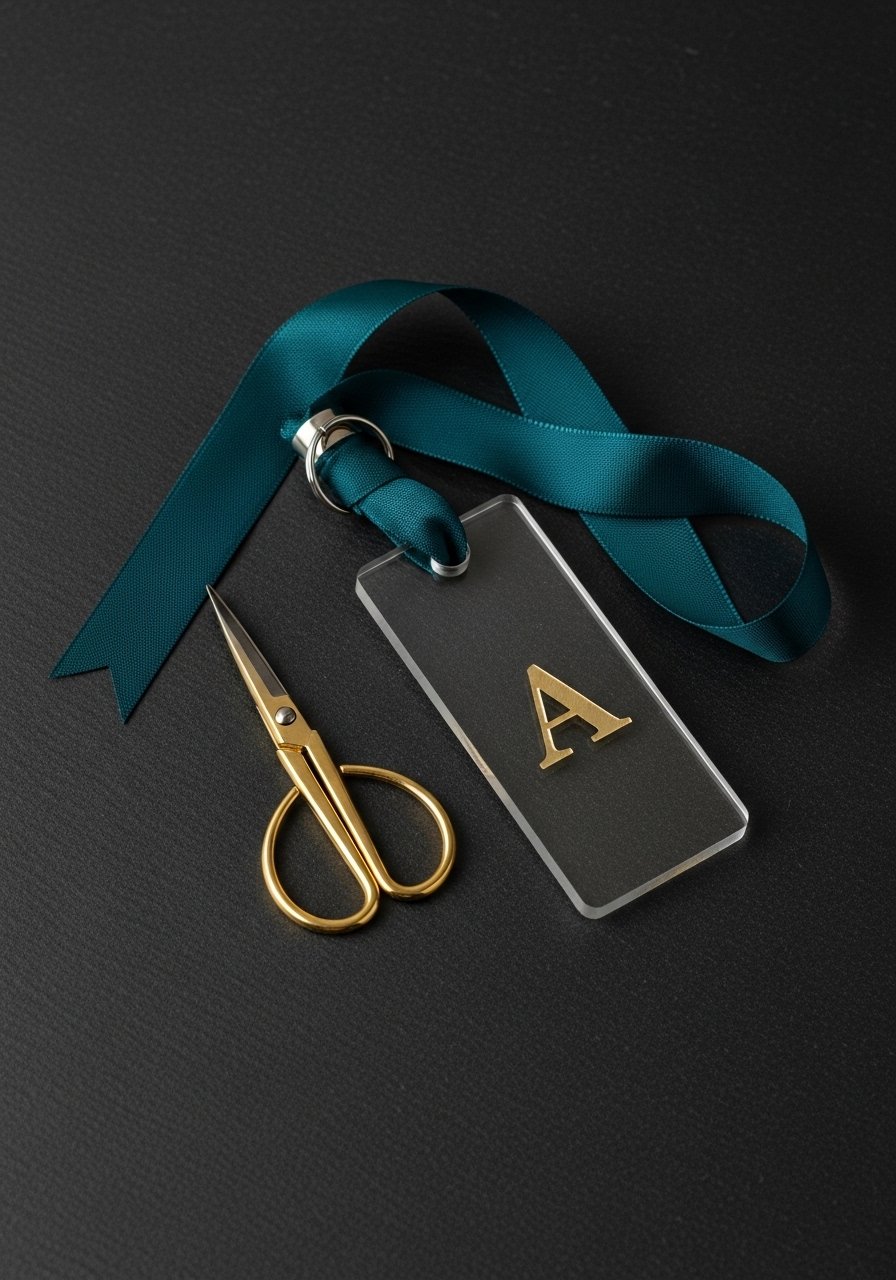
Acrylic tags are glossy, modern, and perfect for crisp initials or small shapes. Use acrylic blanks or cut with a craft cutter.
Materials
- Acrylic blanks, small shapes
- Gold foil or metallic paint pen
- Drill with small bit if not pre-drilled
- Split rings
- Microfiber cloth for polishing
Instructions
- Decorate with a metallic paint pen or apply foil.
- Let paint dry 30 minutes.
- Drill small hole if needed and attach split ring.
How to Display or Gift It
Pair with a leather tassel for contrast or place on a small card with a minimalist logo. Store acrylic blanks flat to avoid scratches.
A set of metallic paint pens gives crisp results on acrylic.
26. Embossed Copper Disc — Tiny Metalwork
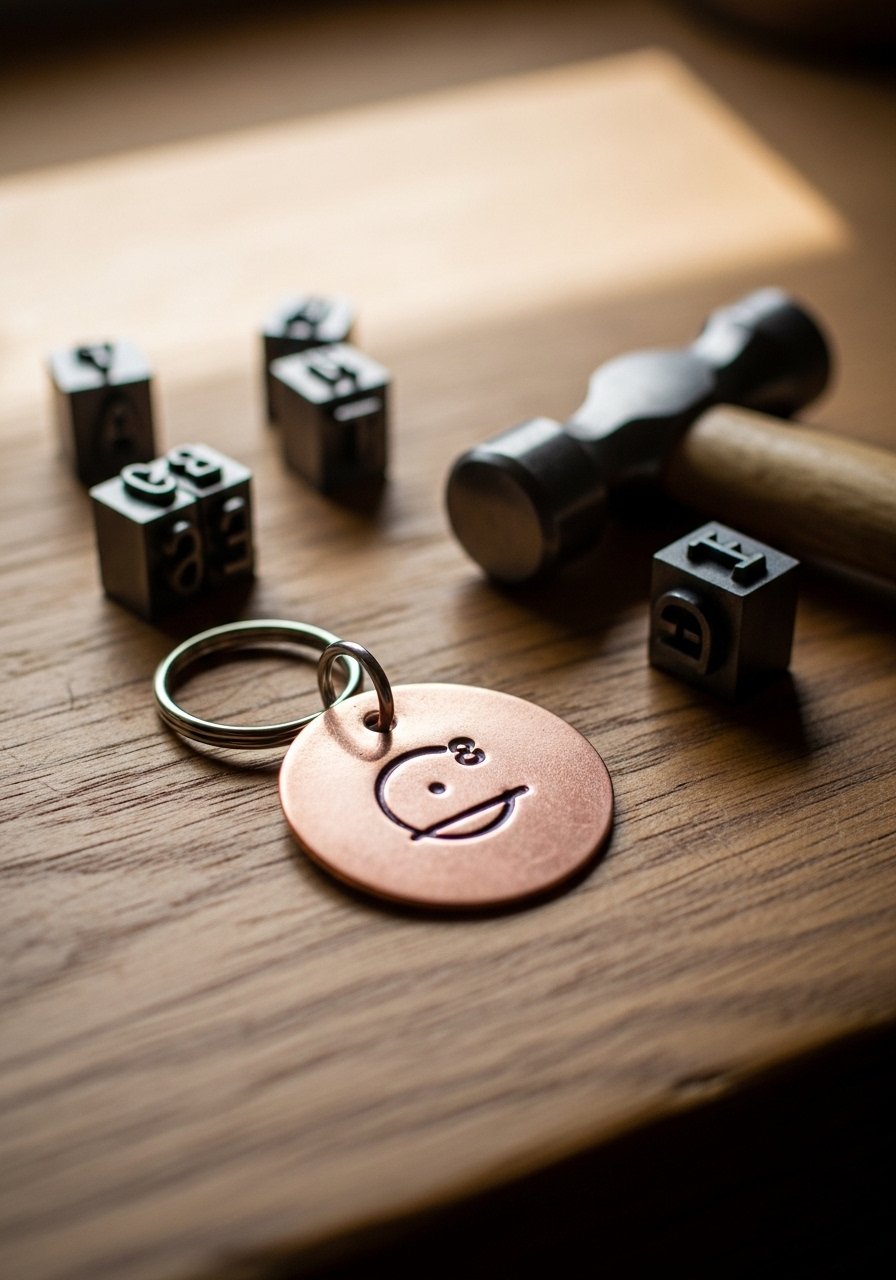
Stamp metal discs with letters or symbols for an heirloom-yet-modern keychain. Copper is forgiving and polishes to a warm glow.
Materials
- Copper discs, 3/4"
- Metal stamps and steel block
- Ball-peen hammer
- Split rings
- Fine sandpaper and polishing cloth
Instructions
- Place disc on steel block, position stamp.
- Strike firmly with hammer once or twice to create impression.
- Polish edges and darken letters with ink if desired (wipe surface clean).
- Attach split ring.
How to Display or Gift It
Stamp initials for couples or families and present on a small kraft card. Keep extra discs in a divided hardware tray.
A beginner metal stamping kit includes necessary stamps and blocks.
27. Painted Pebble Charm — Nature's Tiny Art
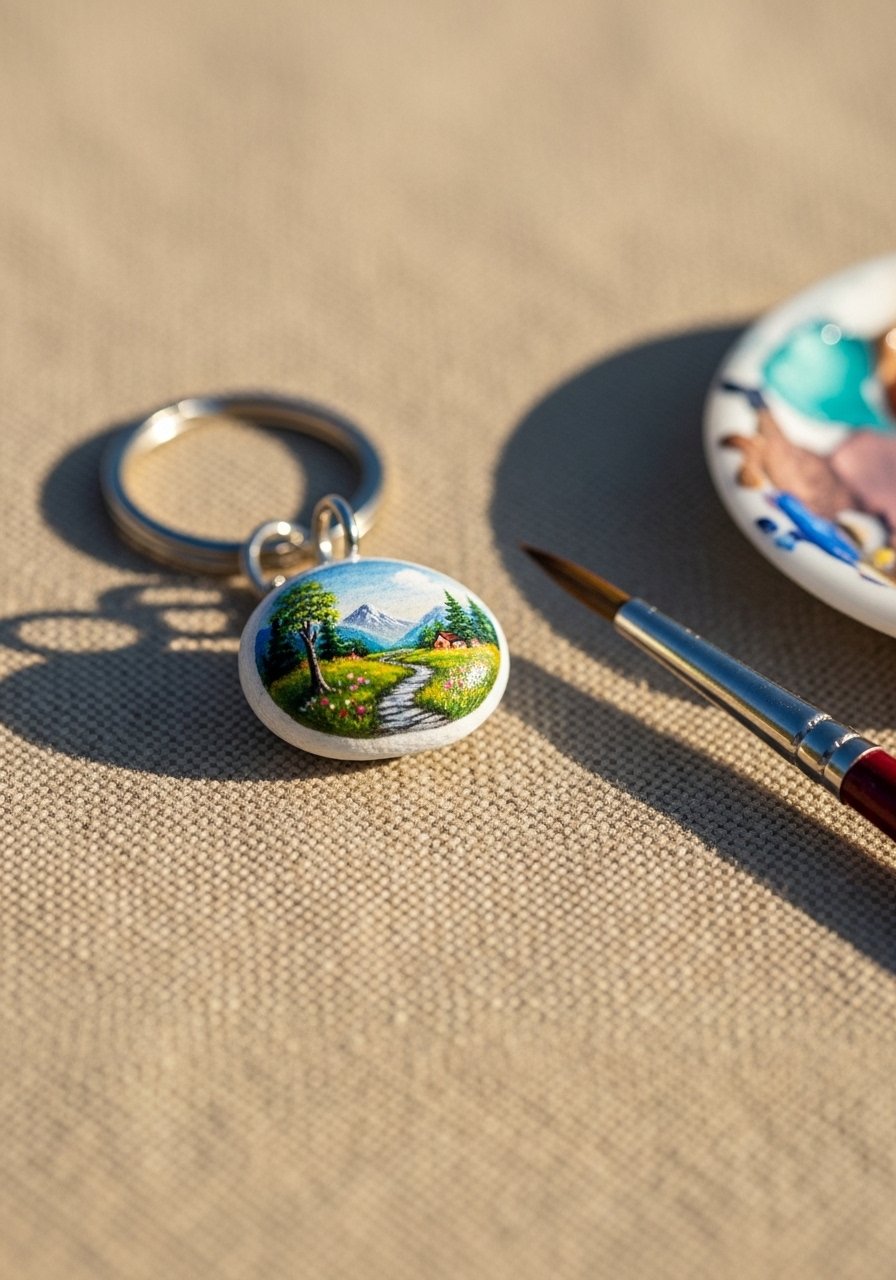
Smooth pebbles make satisfying mini canvases. Paint tiny scenes or abstract marks and seal with matte varnish for a pocket-friendly charm.
Materials
- Smooth pebble, about 20–25 mm
- Acrylic paint set
- Fine detail brushes
- Matte sealer like Mod Podge Matte, 1 small bottle
- Hot glue or E6000
- Split ring and small wire loop (or glue to a drilled hole)
Instructions
- Clean pebble and prime with one thin coat of white acrylic; dry 15 minutes.
- Paint desired design in thin layers; allow 10–15 minutes between coats.
- Seal with one coat of matte sealer; dry 20–30 minutes.
- Attach loop or glue split ring to back and allow adhesive to cure 24 hours.
How to Display or Gift It
Set as a little paperweight on a desk or tie to a small bundle of handwritten notes. Store painted pebbles separated by tissue while sealant cures.
A set of fine detail brushes makes tiny scenes effortless.
I loved putting together this mix of quick crafts and tiny keepsakes—from polymer clay hearts to resin-encased flowers, there’s an easy DIY keychain idea here for every mood and skill level. Try one tonight, or pin a few to save for a crafting weekend. Which look are you most likely to make—soft tassels, glossy resin charms, or tiny stitched pieces? Share this with a friend and trade favorites.
Trust me, picking up a quality hot glue gun with temperature control changed how many of these small assemblies held up—less stringing, cleaner joins, and faster finishing. Happy crafting!


